1
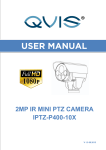
Preface Thanks for purchasing our rear view mirror GPS navigator! As integrated high-performance reception chip and high-sensitivity antenna, this product is turned out to be a formidable GPS navigator! No matter you are in a business trip or traveling around, no matter you are climbing mountains or undergoing an adventure in the wild, this product is definitely your best companion, providing information for you to know where you are at any time and facilitating your outing. Besides what is mentioned above, the product is also capable of playing back music and video, browsing images and bluetooth hand-free as well as other functions etc. to meet your various entertainment requirements. So that to guide you through the operation of rear view mirror GPS navigator, a well-prepared user’s manual containing details about usage and product introduction etc. is provided together. Before getting started, please read through the user’s manual carefully. Although the extra discretion and prudence is always given along the process of user’s manual preparation, with a view of providing all necessary educational information concerning this product, mistakes and omission seem to be unavoidable. Therefore, your understanding is appreciated and your comments and correction always welcome. It is suggested to back up data on the SD/MMC Storage Card into your computer. We shall not be held responsible for any direct or indirect data loss or damages due to incorrect operation of software and hardware, product reparation, battery replacement or other unexpected situations. As the contingent misunderstanding of this product manual by the users is out of our control, we shall not take any responsibility for any accidental damage or loss or claim by the third party. Information contained in this manual is only for reference. Any information concerning this product is subject to updating due to our continuous product research and development from time to time without prior notification. -1- Cautions 1. Please assure that locate the position before startup the car, you have to know that there will be 4 satellites reception and the monitor status will change to blue from grey. Never get current satellite position and check the receiving situation on the GPS monitor when the vehicle is running as the longitude and latitude vary and it’s hard to get the position. Besides, please keep away from mountain, high building etc. which will block off the positing, while receiving satellites. 2. As for the operation of this product in the aircraft, please consult the aviation company first of all. Special care should be taken when an electronics device is engaged during a flight. 3. Never get closer to a place emitting intensive radio waves or radiation which could affect the operation of this product. 4. Never make the navigator fall down or clash with stiff objects to protect it against any damage in appearance, battery loose, data lose or other hardware mutilation. 5. Never let this product expose to the humid environment or rain as the water leaked into could disable it to the extent beyond reparation. 6. Never switch on this product in the dusty environment. 7. Over-voltage, power cable strain, bending or squeezing by heavy objects is not allowed to avoid overheating or fire disaster. 8. Never deploy any chemical or detergent to clean up the navigator to prevent erosion of the surface or paintwork. 9. In order to eliminate the risk of electric shock, do not touch the cable power plug with wet hands and do plunge it into the socket completely. 10. Never charge the battery in a neither extreme cold nor hot place, which could damage the battery. 11. Keep this product which is working out of the reach of children. 12. Never put it under the high temperature to avoid the problem of over-heat to this product, which could trigger fault or danger. 13. Put this product on an even workbench instead of blanket, pillow or carpet which could build up the heat to a level so high to bring forth damage. -2- 14. When any sort of fault comes into being, please contract with qualified maintenance personnel for service rather than disassemble it at your own discretion. 15. Keep all the wires in neat order to prevent damage-fostering tangling. 16. Never suppress the LCD screen violently. Please wipe the screen surface clean with soft cloth. 17. Never cut off the power directly in the mode of navigation, music, video and image browse, which could lose data. 18. When the system is reading data from or writing date into the memory card, never take out the card directly which could make the information stored in the memory card corrupted or lost or even crash the system. 19. In the process of formatting, upload or download, never disconnect the power supply abruptly. Otherwise, it could lead to a problem of application error. 20. Pay attention to the compatibility of multimedia files and the product can only play back the files in the stipulated formats. 21. All the TV programs, music, movies and images are under the protection of copyright. Unauthorized usage is deemed as an infringement to the laws of copyright. 22. For the sake of data safety, please back up the data on the SD/MMC card into the computer on a regular basis. 23. Do not adjust the volume of speaker to maximum for a long time. Otherwise, it will cause audio distortion. 24. The pictures presented in this manual are only for reference 25. This product is now fully supported TMC! TMC (Traffic Message Channel, traffic information channel)is a digital coding system. TMC traffic can provide to report the accident site and time results, information including some within the scope of the traffic conditions. TMC will map navigation on the road in front of the accuracy of the forecasts. Provide GPS radio stations around the differential correction data, greatly improving the accuracy of GPS route. The provision of transport problems and the severity of detailed information of the affected location, regional, or section of the affected locations; -3- direction and scope that affected sections or similar position, as well as the direction of traffic; duration, the issue is expected duration; diversion proposal, the driver has to find the proposed route for the election. 26. TMC selection function whether there is a need to understand the local DGPS data load wave FM broadcasting services, if not so can not use the function in normally. 27. Acknowledge if the map has including TMC function while you select to TMC, if not so can not use the function in normally. 28. Power supply cautions: when you install the rearview mirror gps, never contact the car battery +12V to the GND line, it will damage this product. Some time maybe the product is not be damage, just change the fuse is ok. BUS and truck, some of the latest car the battery is +24V, never contact the +24V to this product. It will damage it. You must find a 24V to 12V DC-DC converter, change the +24V to +12V for the rearview mirror gps. The automobile power supply system is complicated, never install the rearview mirror gps by yourself, you must find a professional engineer install the product. 29. Certain country prohibit the installation of product on a vehicle’s windshield. Those that are known as of the release date of this product are listed below; however, please make sure that you are in compliance with your state’s most recent law before installing this product. We are not responsible for any damages, penalties, or fines that may occur as a result of illegal installation. GPS Packing List Components Quantity GPS Navigator 1 Cable with a filter 1 Power Cable 1 User’s Manual 1 Car Charger (Option) 1 Bracket(Option) 1 -4- Product Description 3.5-Inch 16K color TFT High Brightness Display Screen at 320*240 1.5W Built-in Hi-Fi Speaker Button + Touch Panel Operation Built-in High Sensitive GPS Reception Module Built-in GPS Receiving Antenna Support TMC Function(OPTION) Software and Data Storage SD/MMC Card or Built-in FLASH. Music Playback in the Format of MP3, WAV and MIDI etc. Video in the Compatible Format such as ASF, AVI, MP4 WMV, Image Browse in the Format of BMP, JPG, PNG and GIF etc. Bluetooth Hand-free Function Video Signal Input to Realize the Function of Reversing Rear Mirror Support FM transmit function, Frequency Range of 88MHZ~92MHZ. Power supply from 9V to 16V. Support Two Styles Interface Options Product Specifications Environment Parameters Size 30*8.5*3cm Working Temperature -10℃ ~ +55℃ Storage Temperature -20℃ ~ +85℃ Working Humidity 45% ~ 80%RH Storage Humidity 30% ~ 90%RH Main Frequency Main Chip Type Memory Expansion Card Navigation Software Storage Medium Operating System Software Compilation Method Navigation Software System Parameters 400MHZ/533MHZ(optional) SAMSUNG S3C2443 64MB-4G(option) 128MB~8GB SD card or FLASH(optional) WINCE 5.0 NET ARMV4I Supply by third part -5- GPS Hardware Parameters Frequency 1.575GHZ C/A CODE 1.023 MHZ chip rate Channel Number 20 Channels Tracking Sensitivity -150dBm Positioning Sensitivity 10m, 2D RMS 5m, 3D RMS, WAAS enable Speed Rate 0.1m/s Data Update Rate 1HZ Recapture Time 0.1s on Average Hot Startup Time Less than 3s Warm Startup Time 40s on Average Cold Startup Time Less than 100 s Maximum Positioning 18,000m Height Maximum Speed Rate 515m/s Acceleration < 4g Build-in Antenna Type Built-in Active Ceramic Antenna Build-in Antenna Gain 24dB Build-in Antenna Voltage 3.3V±5% Build-in Antenna Current 15mA Basic Parameters Video Input Type Video Input Power Screen Dimensions Resolution Audio Output(option) Audio Power Standby Power Power supply Transmit frequency Transmit distance CVBS No 4.3 320*240 Double Channel CD Sound Quality 4Ω/1.5W <20mW DC 9V to 16V FM Transmit 88MHZ~92MHZ 3~5 M -6- MP4 Parameter Formats Resolution asf,avi,mp4,wmv 320*240 BluetoothHandfree Parameters( optional) Maximum Distance 10m Communication Type V1.2 Handfree Type Full Duplex Transmission Chip Set CSR BLUECORE3 TMC parameter( optional) Signal frequency 87.5-108.mhz Signal received mode RDS Interface Built-in -7- Rearview mirror GPS Appearance and Function Description -8- NO. MARK DETAILED 1 Mirror A Complanate Mirror 2 V2 Swish to V2 mode 3 M From V1 or V2 mode Swich to GPS or MP4 mode 4 P POWER 5 S Sleep (Some model disable) 6 V1 Swish to V1 mode 7 MIC Microphone of Bluetooth 8 TOUCHSCREEN 3.5 inch touch screen of the GPS 9 SD CARD PORT Can support 8GB sd card 10 CABLE Contact with power and video input 11 BRACKET CHASSIS Different car need different bracket 12 GPS ANTENNA Gps antenna is built-in 13 SPEAKER 1.5W Speaker built-in 14 BACK OF CM035A CM035A need special bracket 15 BACK OF CM035B CM035B can clip on car original mirror 16 V3 (CAR CAMERA) The car carmear signal input port 17 V2 Press Panel V2 button Change To V2 way 18 V1 Press Panel V1 button Change To V1 way 19 BATTERY(YELLOW) +12V Contact With Car Battrey 20 ACC (RED) +12V Contact With Car ACC 21 GND(BLACK) Contact 22 PARKING(GREEN) Contact With Back Light Power 23 FUSE For Protect The GPS 24 CAR CHARGER Contact with Car Cigar Lighter 25 MANUAL POWER CABLE Contact With Car Battery, ACC, GND, PARKING 26 FEMALE CONNECTOR Can Contact With Upon 24 or 25 With Negative Of the Car warn: 1: Based on safe care, The press switch “V1” “V2” “S” are only available without navigate click or MP4/MP3 work. 2: Normal nar monitor switch to camear mode need contact with brake line, our product no need contact with brake line, it can feel video signal automatice, the GPS can switch to back camera video display mode automatice. -9- Operation Instructions 7.1 Turn-on/Turn-off Press the power button for about 1 second, the LOGO as well as the startup schematic progress bar appear on the LCD screen as shown in the following picture: After 10 seconds, the system logs into the programs as shown in the following picture: Hold the button “S” for more than 2 seconds when the power is on, the system shuts down and log into the hibernation mode automatically, hold the button “S” for at least 2s, the system wake up automatically. The system will log into the “Power Off” state when the driver pull out the key from the car lockhole, next time when the driver start the car, the gps will start automatically. 7.2 Running Navigation Map 7.2.1 Setting of Map in SD Card Insert the SD Card which contains the navigation software and log in the setup interface, Click the icon to log into the relevant interface as shown below: Click the icon to enter the SD folder and select the path of map software. Note: there is a option of “Navigation auto run at power on”. Select it and the Navigation can auto-run at power on, otherwise, it won’t auto-run. Click the icon to log into - 10 - “StorageCard”to select the path of storage. Double click of StorageCard to log into the file of “NaviOne”to select the storage path as shown as the following: Double click the blue part of NaviOne to log in and double click the “NaviOne.exe”as the storage path of navigation as shown as below: Locate the navigation software according to the storage directory and click the icon to quit and return to the interface of Programs as shown below. Click the icon . on the main interface and the system will show automatically the map navigation. The operation of navigation software provided by third parties is different, please refer to the corresponding software manuals. 7.2.2 Setting of Map in Built-in FLASH Insert the SD Card which contains the navigation software and log in the setup interface, Click the icon to log into the relevant interface as shown below: Log into the select interface of map storage path, click the icon to log into “NANDFlash”to select the storage path as belows: - 11 - Double click blue part of “NANDFlash”to log in and select the “FileTransmittor.exe” to set the navigate path, as shown as below: Quit the programs menu and click the icon to log into the interface of files copy: Click the map folder “NaviOne” on the left, and click “MOVE” button to the space of “FLASH”, there will appear the schematic progress bar and time as below: After finishing the copy, quit and reset the map storage path, click the icon on the setting interface, as below: Click on the interface of path selection to log into the path of “NANDFlash” folder: Double click the folder of NaviOne to log into the selection of path as shown as the following: - 12 - Double click “NaviOne.exe” as the navigated path, as below: Click to quit the main interface when selected the path of navigation software, as shown as below: Click the icon . on the main interface and the system will show automatically the map navigation. The operation of navigation software provided by third parties is different, please refer to the corresponding software manuals. 7.2.3 Navigate Satellite Signal Reception Cautions Notes: 1. Please be assure that should locate the position normally before startup the car, otherwise it will take long time to position, even unable to position. 2. The test of GPS monitor must be carried out in an open space. please keep away from mountain, high tree, high building etc. which will block off the positing, while receiving satellites. Otherwise, the satellite signal can not be received, leading to a bad signal reception status. 3. When the GPS position in the car, please be sure that there isn’t metal composition to block, such as metal insulation paper, metal explosion-proof membrane etc., these materials will make a bad effect to the satellites reception even unable to receipt any signal. 4. The standard of static position: the GPS navigator will receipt 4 satellites signal and position normally in the open place in 60s, according to the actual location of the different there will be some differences in other environmental conditions. The GPS reception not support position and satellites reception indoor. There are two modes to view the satellites reception: the first is to view via the built-in GPS Monitor, the second mode is to view via the GPS Information built-in Map(please refer the practice of Map operation) - 13 - 7.2.4 GPS Monitor Viewer In the setup interface, as below: Click the icon to log into the function of GPS Monitor, click the icon on the right to log into the interface of Satellite Number & Signal Reception Status as shown below: Grey means the GPS is receiving the satellites and not position yet, as shown as below: Blank means the GPS unable to position and recept the satellites signal. Click the icon Click the icon Click the icon to interface shown below: to reset the GPS satellite test. on the right to log into the interface of Satellite Data-stream as shown below: Click the icon on the right to log into the interface of Altitude, Longitude & Time as shown below. - 14 - 7.3 Music Player Interface Operation: In the programs interface, click the icon to log into the main interface of Music Player as shown in the following picture: Click the icon first,and click the icon to to select the storage directory of audio files as shown in the following picture: Select audio files in “NAND Flash” or “Storage Card”, click to confirm and return to the interface of Music Player as shown in the following picture: Click the icon to add all audio files of the folder. Click the icon to add more audio files Click the icon to select the interface of adding audio files. Click the icon to return to the interface of Music Player. - 15 - Click the icon or double-click the file to start playback. Function Description for other Icons: Click the icon to pause; Click the icon to select next track; Click the icon to select previous track; Click the icon to repeat.; Click the icon to play at random; Click the icon to enable the speaker operate normally; Click the icon to silence the speaker; Click the icon to delete selected files.; Click the icon to delete all files; Click the icon to quit the interface of Music Player. Click the icon to adjust volume and the icon or the “Playback Progress Bar” to set up the speed of playback. Note: When insert earphone in GPS navigator to listen music, the speaker output will be closed automatically. 7.4 Video Player Interface Operation As for the interface of Programs, please refer to the following picture: Click the icon to log into the main interface of Video Player as shown in the following picture: - 16 - Click the icon interface.: to select the storage directory of video files and log into the following Select the desired video file and click the icon or double-click the file to play back the selected video files as shown in the following picture: Or click the icon Click the icon Click the icon to select all the files as shown below: to return to the interface of Video Player: to add more video files and then the icon to return to the interface of Video Player. Click the icon Click the icon or double-click the file to start playback as shown below. to enlarge the screen to the full size as shown below: Click the screen to quit the full size screen mode. - 17 - Function Description for other Icons: Click the icon to silence the speaker; Click the icon to enable the speaker operate normally. Click the icon to select next video file. Click the icon to select previous video file. Click the icon to delete selected files. Click the icon to delete all files. Click the icon to quit the interface of Video Player. Click the icon playback. 7.5 to adjust volume and the “Playback Progress Bar” to set up the speed of Image Browser Interface Description As for the interface of Programs, please refer to the following picture: Click the icon Click to log into the main interface of Image Browser as shown below: to select the location of file to be saved, then enter into interface show as follows: Select the desired image file, and click or double click the file name to return to the “Image Viewer” interface as shown as the following picture: - 18 - Function Description for other Icons: Click the icon Click the icon to move to the previous image. Click the icon to move to the next image. Click the icon 7.6 to enlarge the screen to the full size. to enter the Image Slide mode. Click the icon to zoom out. Click the icon to zoom in. Click the icon the rotate the image 900 clockwise. Click the icon to quit the interface of Image Browser. Bluetooth Hand-free Operation Description As for the interface of Programs, please refer to the following picture: The device will enter into the Bluetooth mode after clicking the icon following picture: Click , as shown as the to enter the setting menu of Bluetooth: Configure whether to remain the Bluetooth pair established last time in - 19 - the non-Bluetooth interface; To configure whether to answer all the coming calls automatically Click the icon to log into the Code Input status as shown below: Input PIN code and then press In the Bluetooth main menu, click icon to confirm the code, press to exit to looking for a pair of devices: To make a partnership, user need use a cell phone with blue tooth function to search the GPS navigator. Please refer to the cell-phone manual for more details of Bluetooth function on cell. When the cell searched a GPS Bluetooth device, it demands input the latter’s password. The default password is 1234 and device name is GPS. Once the pair match is successfully completed, if the Bluetooth function on both GPS and cell-phone is turned-on, the navigator’s Bluetooth will connect automatically. At the same time, there will be a time searching menu shown as below: After successful connection, the color of the telephone no. keyboard will be changed from grey to deep-grey: - 20 - Bluetooth Device Management Click the icon in the Bluetooth mode to check out the history of match-up as shown in the following picture: Connect with all selected devices Disconnect with all selected devices. Delete all Bluetooth devices. Click the icon in the Bluetooth mode to log into the Dial & Communication Setup. Please refer to the following Dial interface Back Button Answer Button Redail Button Call Recording Button; Process of Getting-through Hang up Volume Adjustment Communication Status Telephone Number of Call-out Communication Duration Hang-up and Increase & Decrease Volume - 21 - As for the status of Communication (the mobile phone is connected with this product), please refer to the following picture. Telephone Number of Incoming Call Hang-up Button and Receiving Button NOTE: The Bluetooth device is only for the hands-free Bluetooth telephone, and does not support the Bluetooth data transmitting and other functions. 7.7 Setting Operation As for the interface of Programs, please refer to the following picture: click the icon Click the icon Click the icon to log into the interface,there are 10 icons to select as shown as belows: on the side to log in the following icons on the left to return the last icon. - 22 - 7.7.1 FM Setting Operation Click Press to log into the FM interface, as shown below and the following tips pop up: to turn on the FM transmitter, Press to turn off the FM transmitter to decrease frequency, Press to increase frequency, please adjust the Press frequency to the blank to avoid the local radio station. 7.7.2 Touch Panel Calibration In the setup interface, click the icon to log into the interface of Touch Panel Calibration as shown as the following picture: Continue to press the Central Cursor as shown on the screen till the Calibration Cursor moves to the upper left corner automatically and then the lower left corner, lower right corner and upper right corner in sequence. If the callibration is achieved, the screen displays OK and the user can use the Touch Pen to click any spot on the screen to quit. And all the information concering screen caliabration is memorized even the power is off. Therefore, it is unneccessary to carry out screen calibration each time at startup. And the screen of this product must be calibrated before delivery from factory. - 23 - 7.7.3 Language Setup Interface Operation In the setup interface, Click the icon to log into the interface of Language Setup as shown below: The GPS support multiple languages(English ,German,French,Spanish,Dutch,Hungarian,Czech, Danish,Norwegian,Swedish,Portuguese,Italian,Japanese,Finnish,Romanian,Hellenic,Russian,Poland etc.)Select the desired language and then return to the setup interface. Click to page up the language options. Click to page down the language options. Click to return back the system setup interface. 7.7.4 Brightness Setup Interface Operation In the setup interface, click the icon to log into the interface of Brightness Setup as shown below: Through this option, the brightness and duration of backlight can be configured. When completing setup, click the icon to return to the interface of Setup. - 24 - 7.7.5 Volume Adjustment Operation In the setup interface, click the icon to log into the interface of Volume Adjustment as shown below: Under this interface, users are allowed to adjust the volume, enable or disable the speaker and the tone while pressing any button or the touch panel. Click the icon to return to the interface of Setup. 7.7.6 Time Setup Operation In the setup interface as shown below: Click the icon to log into the interface of Time Setup as shown below: Date format: Year-Month-Date=2022-11-04,click and Time format:24-hour system, Hour: Minute=18:14,click to adjust the current date. and to adjust the current time. Click the relevant area to activate the modification status for corresponding option directly on the touch panel and then press the button icon to adjust. When completed, click the to return to the interface of Setup. - 25 - 7.7.8 System Information As for the interface of Setup, please refer to the following picture Click the icon to log in the following interface ID: GPS body number VER: Software version number RAM: Built-in memory capacity/total capacity=32.89MB/64.00MB FLASH: Built-in Flash memory=1010.14MB/2048.00MB Initial Setup: Restore the system into the initial status; 7.7.9 Interface Style Setup In the setup interface and find out the icon Click the icon as shown below: to log into the interface, two style of “Light green” and “black” to select, as shown as the following pictures: Select your desired style and then click the icon to return to the interface of Setup. AV-IN Function 8.1 V1 Video input Press V1 button, the video will change to V1 mode. The video will back to GPS or Bluetooth mode when they have something happen that meet a crossing or some one calling you. 8.2 V2 Video input Press V2 button short time, the video will change to V2 mode, if you press V2 for long time, the video will between V2 and GPS circularly per 10 second. - 26 - 8.3 V3(back camera) Video input V3 is design for contact a back camera, Can be connected with camera for safe parking, When reverse the car, the rearview image appears onto the screen automatically. 8.4 Video angle adjust In the interface of Programs, and find out the icon Click the icon as shown below: to log into the interface of AV Setting: The function is applied most in the play-back of some audio & video such as DVD, digital TV, AD machine, rearview mirror etc, and there are 4 options for user to select: 8.4.1 Mode: it means that the display is as same as the input video without any rotate or mirror process, as shown in the following. 8.4.2 Mode: it means that the display is a vertical mirror of the input video, as shown in the following. - 27 - 8.4.3 Mode: it means that the display is a horizontal mirror of the input video, as shown in the following. 8.4.4 Mode: it means that the display is a horizontal rotate-mirror of the input video and the mode is applied to the rearview mirror of a vehicle, as shown in the following. NOTE: This function should be setup before connecting the video into the GPS. When the video is connected to GPS, the setting can not be changed before unplugging the video cable. Software Update 9.1 Copy Update Files Down load the latest software from website, copy all the files in to SD Card, and then insert the SD into the GPS navigator. 9.2 Setting path of update tool In the Programs,as shown below: Click to log into the Settings interface as shown as the following picture: - 28 - Click“ Click ”,enter to Navigation setup, show as below: to enter to Double click Storage card,,show the update tool“SysUpdater” as below: to select the path of software,click to return back the Main Program as shown below: Click again to enter the update interface: This is part of document of OS software upgrade, tick it means upgrade otherwise indicated that he did not check the upgrade This is upgrate startup logo interface, tick it means upgrade otherwise indicated that he did not check the upgrade. This is part of documents of BOOT upgrade software, tick it means upgrade otherwise indicated that he did not check the upgrade. This is part of documents of APP update software, tick it means upgrade otherwise indicated that he did not check the upgrade. This is reset option to update, tick it means need to reset, otherwise no need to reset, please note that it need to reset only when update the BOOT, other items not to select gernerally. - 29 - This is option to the path of storage of all items. Finish setup and show as below: Click to clear all the previous setting items and path. Click to start to update. Click to format the built-in FLASH. 9.3 Update and Format Operation Click to update, system will pop-up the waiting icon, after finishing update, there will shown as the following picture: After finishing update, click again to format the FLASH, click Format will pop-up the following picture: Select will pop-up as shown below: - 30 - Press OK and then turn off the power, turn on the power button again to restart the GPS, system will appear the LOGO and the startup schematic progress bar, after shown the red writing System Initializing, there will appear Update 1—100% of the software update progress, this interface will stay 1 minute, please be patient to wait…After finishing update the software, it will run the process of touch panel calibration, please do the calibration (please refer to the manual of 7.7.2) and then log into the main interface. - 31 - 10.FAQ 1. What role does the electrical map play in the navigator? A. The electrical map is an application that integrates map data and navigation software, and the navigation function is implemented with the help of the software and the navigator. 2. How long would be the positioning completed after turning-on? A: The navigator should meet the requirement of getting position parameters with 60s at the same point under clear sky. But the time to position is affected sometimes by factors such as satellite signal shelter, SA interfere (block-off of mountain or building), climate, environment etc. 3. What can I do as the map is lost during formatting? A: There are map data backup in the CD-ROM. You should unzip the data of the folder “GPS map” in the CD-ROM into the SD card. After inserting the card into the GPS navigator and turning it on, the system demands activation code. Then input the right one (call your dealer for it) according to the hints to reactivate the navigation system. 4. Why does the positioning take longer time sometime? A: The time to position may be longer in the following situations: (1) GPS satellites distribute uneven over the local zone. (2) GPS signal can not pass through most opaque solid matters, and the signal receiving is interfered shelters above such as building, tunnel, trestle, tree, vehicle’s blast-ban membrane etc., as well as weather conditions such as overcast and rainy day. (3) The receiving of GPS signal would also be affected and reduced down by thick film or tearing foil that contains some mental element. 5. Is it free to receiving GPS satellite signal with the navigator? A: Yes, the receiving of GPS signal is free of any charge. 6. Can I obey completely the GPS’s navigation during my trip? A:The result of the position and the route calculated by the navigator are only for your reference, and you shall pay attention to the local code and the traffic symbols in driving. 7. How about the precision of the navigator? A: The precision of the GPS, which comes from the satellite position technique of the USA army, is completely in the influence of the precision of USA’s GPS satellite signal. According to the official data, the precision is within 10 meters; and commonly, it may be more precise in 6 meters at more than 90% time. 8. How to do in the case of abnormal shutdown of the navigator? A: (1) Press the POWER Key on the panel of the device and observe if the restarting is normal or not. (2) Check your power supply cable fuse, change it if it is broken. 9.Why the gps can not work when I get in my car? A: Some time your car is under the sunshine for a long time, it is high temperature in the rearview mirror gps, the mirror gps will stop work for protect itself, wait about 3 minites, the temperature lower, the gps will start working. 10.Why is that some movie files can be played, while others of same format can not be played? A: Incompatibility may occur, because there are different compilation-modes and resolutions for the files of same format at current websites. All you have to do is convert their format using recommended conversion tool attached to the disk before playing them. - 32 -