1
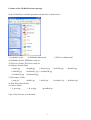
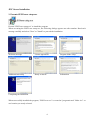
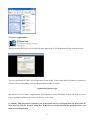
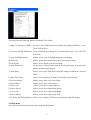
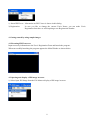
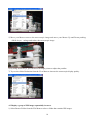
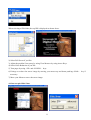
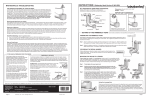
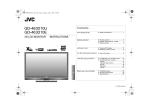
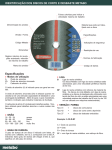
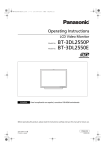
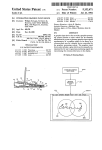
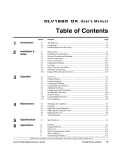
Texnai Stereo 3D Tool Box
JPS Viewer
Version 1.0.2.1
Operation Manual
2003.12.16
Texnai, Inc.
Texnai Stereo 3D Tool Box JPS Viewer Ver.1.0.2.1 User's Manual
What is JPS Viewer
?
JPS Viewer included in the Texnai's Stereo 3D Tool Box is, as well as JPS Builder, an essential utility
program developed for 2-view Interleave Type Stereo 3D LCD users to browse their own stereoscopic
JPS images by using the 3D LCD. Where, the JPS image consists of two pictures connected left and right
that have parallax each other.
JPS Viewer allows you to display JPS images in stereo and to play a stereoscopic slide show as well.
You can create your own JPS images by using above mentioned Texnai's JPS Builder.
The JPS Builder allows you to adjust the parallax of left and right pictures you shot yourself and to create
an excellent stereoscopic JPS images by monitoring the stereoscopic effect with your 3D LCD.
JPS Builder and Viewer are resolution independent, so they are available for any size of H and V
Interleaved 2-view 3D LCD such as microPol type 3D LCD and Sharp's V-Interleave G-Shift Parallax
Barrier naked eyed 3D LCD. By using any of these LCD, users can increase the stereoscopic display
quality by using "Noise Reduction" function.
Available Computer and 3D LCD for running this JPS Viewer
Computer
:
IBM PC compatible Windows2000 or XP Home Edition/Professional systems
Stereo Display : * Sharp naked eye Parallax Barrier type Stereo3D LCD (V, G-Shift Interleave)
* Vrex microPol type Stereo LCD (H-Interleave) such as Arisawa, Avonine, I/O data
* Naked eye Parallax Barrier type Stereo3D LCD(H & V Interleave) such as DTI, 3D COM, Avonine
Equipments to shoot stereoscopic pictures
Digital Camera : Any kind of digital camera.
Slide Mount
: Novoflex Castel L etc.
Tripod : Any kind of tripod.
2
Contents of the CD-ROM software package
In the CD-ROM are contained programs and data files as shown below.
1) ReadMeFirst.pdf
2) JPSBuilderManual.pdf
3) JPSViewerManual.pdf
4) JPSBuilder Folder/ JPSBuilder setup.exe
5) JPSViewer Folder/ JPSViewer setup.exe
6) LRImage Sample Folder
* doguL.jpg
* doguR.jpg
* doki01L.jpg
* doki02R.jpg
* keifuku01L.jpg * keifuku01R.jpg
* keifuku02L.jpg
* keifuku02R.jpg
* doki01R.jpg
* doki02L.jpg
* keifuku01.jps
* keifuku02.jps
7) JPS Sample" Folder
* dogu.jps
* doki01.jps
* doki02.jps
8) Slide Show Demo Folder
9) Checker Folder
* L_green.jpg
* R_red.jpg
*greenRed.jps
Copy all the files into your hard disk.
3
JPS Viewer Installation
1. Execute JPSViewer setup.exe
Execute "JPSViewer setup.exe" to install the program.
When executing the JPSViewer setup.exe, the following dialogs appears one after another. Read each
message carefully and select "Next" or "Install" to proceed the installation.
Welcome message
License agreement
Program folder setup
Additional task setup
Ready to install
Information
Completing the installation
When successfully installed the program, "JPSViewer.exe" is created at "program/texnai" folder in C: or
at a location you newly selected.
4
2. User's registration
When executing JPSViewer.exe for the first time appears the User's Registration Form as shown below.
You are requested to fill the User's Registration Form within 30 days from the first launch to continue to
use this software. Regarding your own Registration Number, e-mail to
[email protected]
and inform us User's Name, Organization, Serial Number of the CD-ROM. Texnai will send you your
User's registration Number as soon as we receive your e-mail.
[ Caution ] This program is expired if you do not make the User's Registration for more than 30
days after the first use. Even by using the CD-ROM, you can not reinstall the program unless you
make User's Registration.
5
3. Main functions of this program
When executing JPSViewer appears the main windows that contains File Menu, View Menu., etc. as
shown below.
3.1 File Menu Functions
Select "File" from the menu bar to open the File Menu.
You can select the following functions from this File Menu.
1) Open JPS Image: Allows you to select a single JPS image to display the stereoscopic image on your
display.
2) Browse Folder:
Allows you to select a folder that contains JPS images to display one by one or to
display the stereoscopic slide show
on your display.
3.2 View Menu Functions
Select "View" from the menu bar or push Right Button of your mouse to open the View Menu.
6
You can select the following functions from this View Menu.
1) Sharp (V-interleave G-Shift ) : Creates V and G-Shift Interleaved Image for Sharp grid barrier 2-view
3D LCD (Left first)
2) Vrex microPol(H- Interleave): Creates H Interleaved Image for Vrex microPol type 2-view 3D LCD
(Left first)
3) Swap Left/Right Image:
Allows you to swap Left/Right Image on your display.
4) Auto trim :
Allows you to trim unnecessary part of stereoscopic image.
5) Full Screen:
Allows you to display Full Screen image.
6) Noise Reduction :
Allows you to reduce Noise from an interleaved image to increase the
quality of stereoscopic display.
7) Slide Show:
Allows you to play Slide Show using JPS images included in a selected
folder.
8) Show File Name:
Allows you to display File Name of currently selected image.
9) Previous Image:
Allows you to show a previous image
10) Next Image:
Allows you to show a next image
11) Move Up:
Allows you to move right image Up
12) Move Down:
Allows you to move right image Down
13) Close Up:
Allows you to move right image Right
14) Close Down:
Allows you to move right image Left
15) VPI On (for Sharp Display) : Allows you to display VPI bar on your Sharp G-shift 3D display.
3.4 Help Menu
You can select Help from the menu bar to open the Help Menu.
7
1) About JPSViewer: Information on JPS Viewer is shown in this dialog.
2) Registration:
In case you like to change the current User's Name, you can make User's
Registration from here as well inquiring a new Registration Number.
4. Getting started by using sample images
4.1 Executing JPSViewer.exe
Input necessary information to the User's Registration Form and launch the program.
When successfully launching the program appears the Main Window as shown below.
4.2 Opening and display a JPS image in stereo.
1) Select Open JPS Image from the File Menu to display a JPS image in stereo.
8
2) Select your 3D display from the View Menu, Sharp (V-interleave G-Shift ) or
Vrex microPol(H-
Interleave)
3) Select Full Screen from the View Menu to display the JPS image with Full Screen in stereo.
4) In case the Left and Right looks reverse, switch the Left and Right by selecting Swap Left/Right Image
from the View Menu.
9
5) Move your Mouse to move the stereoscopic image and move your Mouse Up and Down pushing
<Shift> key to enlarge and reduce the stereoscopic image.
6) By using Arrows Keys, you can move the Right picture to adjust the parallax.
7) Try to select Noise Reduction from the View Menu to increase the stereoscopic display quality.
4.3 Display a group of JPS image sequentially in stereo.
1) Select Browse Folder from the File Menu to select a folder that contains JPS images.
10
When selecting a JPS folder, the top JPS is displayed as shown above.
2) Select Full Screen if you like.
3) Adjust the parallax if necessary by using View Menu or by using Arrow Keys.
4) Select Noise Reduction if you like.
5) Turn pages by using <UP> and <DOWN> keys.
6) Enlarge or reduce the stereo image by moving your mouse up and down pushing <Shift>
necessary.
7) Move your Mouse to move the stereo image.
4.4 Stereoscopic Slide Show
11
key if
1) Create a folder that contains JPS files that you like to show as a slide show and rename the JPS files
with sequential numbers. Add a sound file (wav) to have a BGM with the Slide Show.
2) Select Browse Folder from the File Menu to select the folder that contains the sequential JPS images.
3) Select Slide Show from the View Menu to play the stereoscopic Slide Show
When selecting Slide Show from the View Menu appears a dialog box to setup the time interval
(millisecond) between each displaying image.
4) Select Full Screen from the View Menu and play Slide Show.
4.5 VPI Bar for Sharp G-Shift 3D LCD
In case you use Sharp's G-Shift 3D LCD, select VPI On from the View Menu to display the VPI bar at the
bottom of the display. Move your eye's position and when the VPI bar becomes completely black, your
eyes are right position for the 3D LCD to see the stereoscopic display.
12
[Note]
* The specifications and the instructions shown in this manual are subject to change without notice.
* The company and product names are trade marks of those companies and products.
Copyright all reserved by Texnai, Inc.
Texnai, Inc./ #1008 2-1 Udagawa-cho, Shibuya-ku, Tokyo, Japan.
Tel: 81-3-3464-6927
e-mail: [email protected]
13
Fax: 81-3-3476-2372
http://www.texnai.co.jp