1
NTI BRANDNAME AND DESCRIPTON
CPU Connection
1.
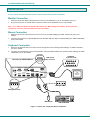
Connect the male USB type A connector end of the USB-AB-1M-ST cable into the device port on the CPU.
2.
Connect the male USB type B connector of the same cable to the "CPU" port on the VOPEX.
3.
Connect the male 15HD connector end of the VEXT-3 into the CPU’s video port. (See Fig. 2)
4.
Connect the female 15HD connector end of the VEXT-3 into the "VIDEO" port on the VOPEX.
Rear View of VOPEX-USBV-2
VIDEO
MONITOR 2
MONITOR 1
-
5VDC
2A
USER 2
DEVICES
HUB PORTS
+
DEVICE 3
NTI
VIDEO
15HD Male
Video Connector
USER 1
DEVICES
1275 Danner Dr
Aurora, OH 44202
www.nti1.com
Tel:330-562-7070
Fax:330-562-1999
CPU
DEVICE 2
DEVICE 1
USB Type B
Male
Rear View of Windows USB CPU USB Type A Male
USB Type B
Female Connector
Input Device Port
USB-AB-1M
USB Type A Female
Video Port
VEXT-3
15HD Female
Video Connector
15HD Female
Video Connector
15HD Male
Video Connector
Figure 2- Connect the VOPEX to the CPU
Rear View of VOPEX-USBV-2
Hub Ports
MONITOR 2
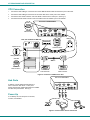
If desired, connect additional USB devices to
each of the three "Hub Ports". These ports
will be powered and operational anytime the VOPEX
and CPU are powered ON. See Fig. 3.
-
5VDC
2A
MONITOR 1
USER 2
DEVICES
HUB PORTS
+
DEVICE 3
DEVICE 2
NTI
VIDEO
USER 1
DEVICES
1275 Danner Dr
Aurora, OH 44202
www.nti1.com
Tel:330-562-7070
Fax:330-562-1999
CPU
DEVICE 1
Power-Up
If not already ON, turn ON power to the CPU,
monitors, and VOPEX.
AC
Adapter
ADAPTER
USB Camera
Printer
Scanner
Figure 3- Connect other
devices to Ports 2-4
4