1
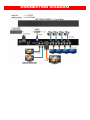
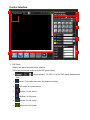
SPLITMUX-3GSDI-4
3G/HD/SD-SDI Quad-view Video
Processor
User Manual Safety and Notice
The SPLITMUX-3GSDI-4 (SPLITMUX) 3G/HD/SD-SDI Quad-view Video Processor has been
tested for conformance to safety regulations and requirements, and has been certified for
international use. However, like all electronic equipments, the SPLITMUX should be used with care.
Please read and follow the safety instructions to protect yourself from possible injury and to minimize
the risk of damage to the unit.
● Follow all instructions and warnings marked on this unit.
● Do not attempt to service this unit yourself, except where explained in this manual.
● Provide proper ventilation and air circulation and do not use near water.
● Keep objects that might damage the device and assure that the placement of this unit is on a stable
surface.
● Use only the power adapter and power cords and connection cables designed for this unit.
● Do not use liquid or aerosol cleaners to clean this unit. Always unplug the power to the device
before cleaning.
TABLE OF CONTENTS
INTRODUCTION...................................................................................................................1 FEATURES ...........................................................................................................................1 PACKAGE CONTENTS ........................................................................................................1 SPECIFICATIONS ................................................................................................................2 PANEL DESCRIPTIONS.......................................................................................................3 HARDWARE INSTALLATION ...............................................................................................4 CONNECTION DIAGRAM ....................................................................................................5 Operation Software ...............................................................................................................6 WARRANTY........................................................................................................................13 INTRODUCTION
The SPLITMUX 3G/HD/SD-SDI Quad-view Video Processor is an advanced video processor for
multimedia presentations. It is an ideal solution for some application such as surveillance, where up to four
SDI video signals must be displayed on a single display. It supports up to 4 SDI video inputs, of which all
can be output simultaneously with the desired display layout through software control. The advanced video
processor allows you to manipulate the output images into any position or size you want for viewing 4
computers or four video signals or a combination.
The embedded processor converts signals from input sources to match the native resolution of
monitors, flat panel displays, projectors as well as user-selectable output settings up to WUXGA
(1920x1200). Dual outputs are provided in both digital (SDI and DVI) formats with one connected to a
remote display and the other is connected to on-site display for real time monitoring.
FEATURES
● Supports 3G/HD/SD SDI video formats
● Input resolutions support interlaced or progressive video under SMPTE
● Dual outputs DVI (640x480 to 1920x1200) / SDI (720P, 1080P)
● Each SDI channel has 1 re-clocked SDI loop-out
● Adjustable size & position through software
● Image parameters and layouts are automatically saved in flash memory and can be recalled for later
use
● User-selectable output settings, up to 1920x1200 (Only for DVI)
● Perfect as a video screen splitter, a video converter and a video switcher
● Software control through RS-232 and Ethernet
● 1U size
PACKAGE CONTENTS
● 1x SPLITMUX
● 1x USB to RS-232 cable
● 2x 1U rack mounting-ear
● 1x Installation software CD
● 1x UL 12V power adapter
● 1x UL AC power cord
● 1x User Manual
1
SPECIFICATIONS
Technical
Role of usage
Dual output support
Multiplexer / video processor
Yes (DVI & SDI)
Video bandwidth
2.25Gbps
DVI connector
DVI-I Female
BNC connector
75 ohm interlocked socket
RS-232 Connector
DB9 Female
Ethernet connector
WE/SS 8P8C (RJ45 Female)
Input
4x SDI; 1RJ45
Output
4 x SDI loop-out ; 2 x SDI; 1 x DVI
Supported
Resolutions
Up to 1920x1080p (1920x1200)
Audio support
Surround sound (up to 7.1ch) or stereo digital audio
Mechanical
Housing
Metal enclosure
Dimensions
[L x W x H]
Weight
236 x 440 x 45mm (9.3" x 17.3" x 1.8")
Model
2100g (4.6lbs)
Package
5000g (11 lbs)
Mounting method
Power supply
Power consumption
Operation temperature
Storage temperature
Relative humidity
2
1RU rack-mounting case with ears
5V 4A DC (CE/FCC/UL Certified)
30W Maximum
0~40°C (32~104°F)
-20~60°C (-4~140°F)
20~90% RH (non condensing)
PANEL DESCRIPTIONS
Front Panel
1. Power LED: Power indicator
Rear Panel
2. Power Switch: Power On/Off
3. RS-232: RS-232 control port
4. +12V DC: Connect to the +12VDC power supply unit.
5. Dip Switch: NOT SUPPORTED
6. Device ID
7. USB
8. Ethernet: Ethernet control port.
9. SDI output
10. DVI output
11. Input 1-4: SDI inputs
12. SDI local loop out (provides local output connection for this input)
3
HARDWARE INSTALLATION
Safety Precautions
1. To prevent fire or shock hazards, do not expose this device to rain or moisture.
2. The product should be placed more than one foot away from heat sources such as radiators, heat
registers, stoves, and other products (including amplifiers) that produce heat. In addition, do not place
any material or device on the top of the SPLITMUX.
3. Do not use immediately after moving from a low temperature to high temperature, as this causes
condensation.
4. Do not place this product on an unstable cart, stand, or table. The product may fall, causing serious
injury to a child or adult and serious damage to the product.
5. Unplug this product from the wall outlet before cleaning. Do not use liquid cleaners or aerosol cleaners.
Use only a damp cloth for cleaning.
6. Do not allow the same still picture to be projected for a long time or an abnormally bright video picture
to be projected. The video image could be burned into the display device.
Installation Procedures
Unpacking
Remove the SPLITMUX from the shipping container and examine it for any signs of shipping
damage or missing items (check with package contents above). All shipping items should be saved if the
product is to be moved or returned for service. Shipping unit back to dealers for service not in the original
box may result in voiding warranty or incurring additional costs.
Placement
The unit will maintain a proper operating temperature provided it is installed without having anything
blocking the sides and top of the unit.
Connections
We recommend the highest quality cables for both input and output connections.
1. Switch OFF the SPLITMUX and all devices that you want to connect.
2. Connect a monitor, a projector or other displays that comes with DVI / SDI inputs
3. Connect a device equipped with SDI output including SD/HD/3G to the BNC input connector of the
SPLITMUX.
4. Connect a device equipped with composite video output to the BNC input connector of the
SPLITMUX.
5. Connect your computer to the SPLITMUX with a 9-pin RS-232 cable and then install the software.
6. Plug in AC Adapter power cord into AC power socket.
7. Execute the control software and establish the connection between PC/Laptop and SPLITMUX.
8. For detailed software control operation, please refer to the software instruction section.
4
CONNECTION DIAGRAM
5
Operation Software
System Requirement and Precautions
1. The device provides a software control program, “SDIMultiviewer” (provided on the CD), which runs
under Microsoft Windows 98, 2000, XP, Vista, 7 through the interface of RS-232 serial control.
2. Before you click the icon of the software, make sure you have made an RS232 connection between
your computer COM port and the device and switched on the device (indicated by the illuminated LED
on the front panel).
Support Software: Ver. 2.1
Support Firmware: Ver. 2.1
Start the Operation Software
When you click-on to open the Setup_SDI Multiviewer.exe file, the below dialog will pop-up. You
can use two ways to control the SPLITMUX , RS-232 or Ethernet TCP/IP (under Microsoft
Windows 7, see your network administrator to setup this program).
RS-232 mode: Select the correct serial COM port (Port Number) and click the “Connect” button.
--OR-Ethernet (TCP/IP) mode: Enter the device IP address and click the “Connect” button.
With a successful connection the control interface will open.
6
Control Interface
1
3
Control Percent:
4
5
6
7
8
2
1. PAP Panel
Display and adjust the window size, position.
In this part find several control tools for PAP panel setting:
¾
Control percent: 10~100% to set the PAP panel display/control
size.
¾
Stretch: Fix the size ratio when the window is resizing.
¾
PAP mode (for customization)
¾
Window 1 in full screen
¾
Window 2 in full screen
¾
Window 3 in full screen
¾
Window 4 in full screen
7
2. Tool Bar list:
(1)
Status: Get all information of the device and update this software state.
(2)
Port Setting: For setting up network connection.
(3)
8
Advance Setting: In this function, user can set the no signal color, fade in/out effect,
background picture, window text, input text, OSD border, Clock, audio and factory reset.
¾ Clock and Audio:
User can set up the position of clock and other audio control.
¾ Factory Reset:
Click the
button to perform a factory default reset. This default reset
process will take about 10~15 seconds and will initialize all settings to original system
state.
9
3. Output Resolution:
Set the output resolution. When setting the different resolution, the parameters of PAP and
custom layout (position and size) will change accordingly.
10
4. Audio, analog clock and digital clock
5. Background picture:
6. Default layout and Custom layout:
¾
Default layout: Use factory preloaded video
layouts.
¾
Custom layout: Use custom pre-saved video layouts.
Here you can adjust the size and position of the output screen. If you want to save the
layout, click the right mouse button to save this layout to the SPLITMUX.
7. Window selection and input mapping
For each display window, user can assign arbitrary video input here. Besides, user also can
adjust the order of windows.
11
8. Window setting
Here you can adjust the size, position or other settings of the specified window.
12
WARRANTY
The warranty period on this product (parts and labor) is two (2) years from the date of purchase. Please
contact Network Technologies Inc at (800) 742-8324 (800-RGB-TECH) or (330) 562-7070 or visit our
website at http://www.networktechinc.com for information regarding repairs and/or returns. A return
authorization number is required for all repairs/returns.
13