1
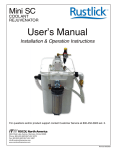
SC3000
COALESCER
User’s Manual
Installation & Operation Instructions
For questions and/or product support contact Customer Service at 800-452-5823 ext. 2.
3624 West Lake Avenue, Glenview, Illinois 60026
Phone: 800-452-5823 /847-657-5278
Fax: 800-952-5823/847-657-4897
[email protected]
www.rocolnorthamerica.com
Revised 06/2009
SC3000 User’s Manual
Set-Up
1. Preparation
The following items are included with the SC3000 Coalescer: Float Assemby (qty. 2), replacement filter
cartridge (qty. 1). If one of these items is missing do not continue with set-up. Contact Customer Service
at 800-452-5823 ext. 2 regarding missing/damaged items.
2. Air supply
Locate a source of compressed air near where the unit will be installed. Make sure the air hose has the
correct fittings to attach to the filter regulator (#6). DO NOT connect the air supply at this time.
3. Fill
Fill the tank (#1) with approximately 15 gallons of fresh cutting fluid so that the fluid level is 2" below the
top of the return tube (#11).
4. Position
Position the unit near the opening of the sump so there is clear access for the Float Assembly and return
hose (#7). Avoid high traffic areas to minimize damage to the unit.
NOTE: Make sure that a waste container is close by; an empty 5 gallon pail works well.
5. Return Hose
Arrange the return hose (#7) in the sump away from the area where the Float Assembly will be installed.
Use the magnet to secure it in place.
6. Float Assembly
Put the Float Assembly in a still area of the sump with the petals (#15) facing upward so that the intake
tube (#16) in the middle of the float head is visible. Adjust the Float Assembly until it is floating unobstructed and level. Use the magnet (#17) to secure it in place.
NOTE: For sumps with baffling and/or screens it may be necessary to reposition the Float Assembly in different areas of the sump during operation for maximum oil removal.
NOTE: If using a Stabilizer refer to Stabilizer instructions for additional Float Assemby set-up information.
7. Intake Hose
Connect the Float Assembly to the intake hose (#4) with the yellow quick-connect fitting.
8. Filter Regulator
Turn the regulator valve all the way to the left to close the filter regulator (#6). Connect the air supply.
Operation
1. Intake
Turn the regulator valve to the right to turn the unit on. The diaphragm pump (#9) automatically starts to
prime. When the pump is primed use the regulator valve to slowly adjust the rate of fluid intake until a
gentle whirlpool forms inside the intake tube (#16).
IMPORTANT: For maximum effectiveness set the filter regulator (#6) to the lowest possible setting that
forms a whirlpool since the coalescing media removes more oil at a low intake rate.
Note: The intake rate can also be adjusted by moving the float head up or down the intake tube (#16).
2. Remove
A layer of oil will form on the top of the fluid level inside the tank. Remove this layer when it is more than
1/2" thick by tilting the discharge tube (#12) until the lower edge of the tube is just above the bottom of the
oil layer. The oil will drain through the discharge hose (#3) into the waste container.
NOTE: Dispose of waste according to local, state, and federal regulations.
Warranty
The SC3000 has a One-Year Limited Warranty from the date of purchase against defects in workmanship
and materials. Warranty is void if the unit is subject to improper installation/application, misuse, neglect, or
accident. For additional information contact Customer Service at 800-452-5823 ext. 2. Returned units will
not be accepted with out prior approval.
Revised 06/2009
2
SC3000 User’s Manual
Component Identification
Side View
Top View
10. Feed Tube
1. Tank
11. Return Tube
12. Discharge Tube
2. Tank Feed
13. Tank Drain
3. Discharge Hose
14. U-Retainer
4. Intake Hose
6. Filter Regulator
Float Assembly
7. Return Hose
8. Tank Feed Hose
15. Petal
16. Intake Tube
17. Magnet
5. Pre-Filter
9. Diaphragm Pump
Drain
Drain the unit before transport, storage, and cleaning, or if the unit will be out of use for more than a week.
1.Turn the unit off by turning the regulator valve all the way to the left. Disconnect the air supply.
2.Detach the intake hose (#4) from the Float Assembly and connect it to to the tank drain (#13).
3.Disconnect the tank feed hose (#8) from the tank feed (#2) using the yellow quick-connect fitting.
4.Put the free end of the tank feed hose (#8) securely into a nearby waste container to collect the used fluid.
NOTE: The unit holds up to 20 gallons so be prepared for this much used fluid to drain out (i.e. a 5 gallon
pail will not suffice as a waste container unless there are several).
5.Reconnect the air supply and turn the unit on.
6.When the tank is empty turn the unit off and disconnect the air supply.
7.Reconnect the tank feed hose (#8) to the tank feed (#2).
8.Disconnect the intake hose (#4) from the tank drain (#13).
To resume use:
a.Refill the tank with cutting fluid according to Step 3 of SET-UP.
b.Reconnect the intake hose (#4) to the Float Assemby (the Assembly may need to be repositioned).
c.Reconnect the air supply and continue with Step 1 of OPERATION.
3
Revised 06/2009
SC3000 User’s Manual
Clean
The SC3000 should be cleaned periodically for optimal performance. It is recommended that the unit is
cleaned each time the sump is changed out to prevent contaminating the new cutting fluid.
1.Drain the tank according to Steps 1–7 of DRAIN.
2.Fill the tank with 5 to 10 gallons of cleaning solution (1 part Rustlick Kleenzol DY to 10 parts water).
NOTE: DO NOT use solvent-based cleaners.
3.Reconnect the air supply and turn the unit on; the unit will now self-circulate the cleaning solution. Run in
self-circulation cleaning mode for two hours, longer if the unit is especially dirty.
4.Once the cleaning cycle is complete, drain the tank as in Step 1.
5.Fill the tank with 5 gallons of fresh water. Reconnect the air supply and turn the unit on. Circulate the water through for 15 minutes to rinse the unit.
6.Drain the tank according to Steps 1–8 of DRAIN. Remove as much of the rinse water as possible.
To resume use:
a.Refill the tank with cutting fluid according to Step 3 of SET-UP.
b.Reconnect the intake hose (#4) to the Float Assemby (the Assembly may need to be repositioned).
c.Reconnect the air supply and continue with Step 1 of OPERATION.
NOTE: The SC3000 can also be disassembled for cleaning by removing the u-retainer (#14) from the inside
of the tank and lifting out the perforated plate that covers the coalescing media. The coalescing media can
be cleaned separately in a part washer as long as the temperature does not exceed 120°F (49°C).
Troubleshoot
With proper installation and operation the SC3000 should perform with minimal maintenance. However if a
problem does arise the following troubleshooting recommendations should resolve the problem. If further
product support is needed contact Customer Service at 800-452-5823 ext. 2.
Problem
Description
Solution
Pump not pumping No air pressure/fluid circulation
Tank overflowing
Float not working
Check Filter Regulator and adjust air pressure
Intake hose clogged or twisted
Unclog or untwist the hose
Pump clogged
Remove the top of the pump and clean internally
Return hose is not feeding
Reconfigure hose with a downward slope
Return hose/return tube is obstructed
Remove debris from the hose/tube
Pump is cycling too fast
Adjust the regulator valve to reduce pump speed
Excessive foam
Add a defoaming agent and/or reduce pump speed
Filter is clogged
Unclog or replace filter cartridge
Air pressure is too high
Adjust the regulator valve to decrease pressure
The information in this manual is accurate as of the date of issue.
ITW ROCOL North America reserves the right to change any information without notice.
Revised 06/2009
3624 West Lake Avenue, Glenview, Illinois 60026 • Phone: 800-452-5823/847-657-5278 • Fax: 800-952-5823 /847-657-4897
E-mail: [email protected] • URL: www.rocolnorthamerica.com