1
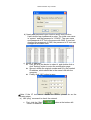
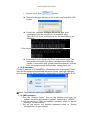
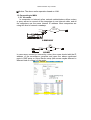
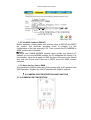
Quick Instruction of Ip-camera
1 Usage for IP-CAMERA............................................................................................1
1.1 Assign IP address in LAN.................................................................................1
1.1.1 Default IP address.....................................................................................1
1.1.2 IE operation...............................................................................................3
1.1.3 CMS operation...........................................................................................3
1.2 Connecting to WAN..........................................................................................4
1.2.1 Via router...................................................................................................4
1.2.2 Via ADSL modem (PPPoE)........................................................................5
1.2.3 Have the live view in WAN.........................................................................5
2 IP-CAMERA PORT DESCRIPTION AND FUNCTION.............................................5
2.1 IP-CAMERA PORT DECRIPTION....................................................................5
2.1 IP-CAMERA FUNCTION TABLE......................................................................6
Usage for IP-CAMERA
1.1 Assign IP address in LAN
1.1.1 Default IP address
The default IP address is 192.168.11.201, subnet mask is
255.255.255.0, and gateway is 192.168.11.1.
1. If user wants to use the default IP address, please modify the
computer IP address to be in the same network section. For
example, set the computer IP address as 192.168.11.200,
subnet mask and gateway are same as IP-CAMERA,
255.255.255.0, 192.168.11.1.
2. User could use IP tool to search the device in the same LAN, also
could modify the IP address. IP tool is in the CMS installation
folder. If user chooses default installation destination folder, the
IP tool is in the “C:\Program Files\ControlCenter”.
a) Double click the icon of “IP tool”, the menu will pop up. After
one minute, the device in the same LAN will display in the IP
tool page.
Quick Instruction of Ip-camera
b) Newly add password logon function and E-mail function.
Users should input password to enter. The initial user name
is “system” and the password is “123456”. The user name
and password of IP Tool is the same with CMS. If user had
changed the password of CMS, the password of IP tool was
changed at the same time.
c) Modify IP address
First, left-click the device to select it, and double click or
click “Setting” button to enter the modification page.
Second, delete the original number and fill in the needed
IP address, which should be in the same LAN with the
computer.
Finally, click “OK” button to save.
Note: If the IP tool cannot search the device, please do as the
following steps:
a) Use “ping” command to check the network
First, click the “Start”
corner of windows ;
button at the bottom-left
Quick Instruction of Ip-camera
Second, click “Run”
button;
Third, the dialogue will pop up, fill in with “cmd” and click “OK”
button;
Fourth, the “cmd.exe” dialogue will pop up, use “ping”
command to test the connection, for example: ping
192.168.11.33, if the connection is ok, the information is as
following:
If the connection fails, the information is as following:
If connection is ok, restart the IP tool and search again. The
tool remain not search the device, please contact with the
vendor. If connection fails, please check the network, such as
hub, computer network configuration, netting twine, etc…
1.1.2 IE operation
Fill the IP address of IP-CAMERA in IE address column and press “Enter”
key, and the system will download the active control, and login dialogue
box will pop up. For detail operation, please refer to Setup Chapter of 5.4
Note: The initial user name and password is “admin”.
1.1.3 CMS operation
1. Run the “Control Center” icon on the desktop and login the
system, the initial user name is “system”, password is “123456”.
2. Add the device to CMS, the detailed operation refers to “device
manager” of user manual;
3. Set up the device, the detailed operation refers to “Server
configuration” of user manual;
Quick Instruction of Ip-camera
Notice: The above entire operation based on LAN.
1.2 Connecting to WAN
1.2.1 Via router
In companies or Internet cafes, network administrators utilize routers
or proxy server to connect all the computers to one Internet cable, and all
the computers use the same Internet IP address. Most companies are
using this kind of network nowadays.
ISP
Inte rnet
ADSL Modem
Ro uter
Swic the r
LAN
COMPANY
ISP
ADSL Modem
Inte rnet
HOME
In case users connect to Internet by router, then users should add the IP
address of the surveillance computer and open the above mentioned
ports in DMZ setup or Virtual Server setup (the names maybe different in
different kind of routers) of the router.
LAN DVS
192.168.11.201
9008
9008
LAN DVS
192.168.11.201
TCP 9008/9008
Quick Instruction of Ip-camera
LAN DVS
1.2.2 Via ADSL modem (PPPoE)
Before operation, please make sure that the setup of PPPoE and SMTP
are correct. The particular operation refers to Chapter 5.4 Net
configuration of the user manual in CD. Then, connect the IP-CAMERA to
ADSL modem with LAN cable.
Note
As ADSL and CABLE MODEM network users usually use dynamic IP
address, so once the MODEM restarts, the IP addresses will change. For
this situation, users could apply for DNS services. Otherwise, user should
look over the E-mail which was set in SMTP when the ADSL modem
restarted
1.2.3 Have the live view in WAN
The operation in WAM is same as in LAN, please refer to IE operation and
CMS operation. Replace the LAN IP address with WAN IP address..
IP-CAMERA PORT DESCRIPTION AND FUNCTION
2.1 IP-CAMERA PORT DECRIPTION
Quick Instruction of Ip-camera
NO
①
Name
AUDIO IN/OUT
Description
Connect to MIC and HP
②
③
④
RS485
ALARM IN/OUT
LAN
DC 12V
Connect to speed dome
Connect to External alarm box
Connect to network
Power input
2.1 IP-CAMERA FUNCTION TABLE
Please refer to the following table for the parameters and instructions of
IP-CAMERA
Parameters
Meaning
SD card
SD card
Motion detection
snap
Sensor alarm snap
WIFI(Wireless Fidelity)
UPnP(Universal Plug and Play)
IP address filer
After triggered motion alarm, the snap picture
can be stored in SD card
After triggered sensor alarm, the snap picture
can be stored in SD card
Connect IE client and device through wireless
router
Access website through gateway / router, and
gateway/router support NAT and UPnP
Deny or allow certain IP address to access
device