1
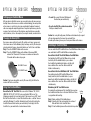
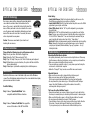
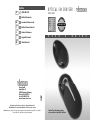
Hotline:
D
✆
0180-5 40 49 10
OPTICAL FM CRUISER
MSFOC / 14050
[email protected]
GB
[email protected]
F
[email protected]
E
[email protected]
I
[email protected]
NL
U
S
E
R
’
S
[email protected]
Vivanco GmbH
Ewige Weide 15
D-22926 Ahrensburg/Germany
Phone +49 (0) 4102/231-0
Fax +49 (0) 4102/231-160
Internet: www.vivanco.com
Design and specifications are subject to change without notice!
All brandnames are registered trademarks of their respective owners.
Caution: Changes or modifications not expressly approved by the manufacturer responsible for compliance
could void the user's authority to operate the equipment.
Caution: To use this mouse properly,
please read the user's guide before installation.
G
U
I
D
E
OPTICAL FM CRUISER
Introduction
OPTICAL FM CRUISER
Page 3
Introduction
Getting Ready
Page 4
Welcome, you have made an excellent choice ...
by deciding in favour of an innovative technology which provides you with
unique benefits. Take a few minutes to read this instruction manual carefully.
It will help you to understand and master the different functions.
Installing the Batteries
Page 4
Low Battery Indicator
Page 4-5
Connecting the Receiver
Page 5
Setting up your Cordless Mouse
Page 6
Changing the Security IDs
Page 6
Using Your Cordless Mouse
Page 6-7
Switching to Track Ball Mode
Page 7
Touch-On Technology
Page 8
Software Installation
Page 8
Mouse Utility
Page 8-9
Troubleshooting
Page 9
N.B.: This Vivanco RF product conforms with the European R&TTE directive
for RF systems in nonharmonised frequency ranges. These systems can be
sold and operated in the following countries:
A, B, CH, D, DK, E, F, FIN, GB, I, N, NL, P
In non-EU member states the approval regulations valid in those countries
must be observed.
Your mouse uses a newly developed optical sensor that replaces the traditional
mouse ball and uses radio technology to communicate with your computer.
The optical sensor accurately scans the surface of your desktop many times
per second for smooth and fast cursor tracking on your computer screen.
And the digital radio technology does not require line-of-sight placement and
usage. Your mouse also comes with a worldwide patented 360° Scroll Ball,
which functions both as a Dual Direction Scroll Bar Controller and as a
button. You can control the Windows ® Scroll Bar Horizontally and Vertically
by rolling the Scroll Ball.
Can also switch the function to Track Ball Mode by simply pressing 2 buttons.
Caution: If your tabletop surface is red in color, transparent like glass or
highly reflective like a mirror, it may be interfering with the optical sensor of
the mouse. Try using a mouse pad, or use the mouse on a different tabletop
surface.
3
OPTICAL FM CRUISER
Getting Ready
Please check the following contents of your Optical FM Cruiser:
1 x Cordless Mouse
1 x User’s Manual
1 x Driver Disk
1 x Receiver,
2 x AAA alkaline batteries
Installing the Batteries
Step 1: Remove the battery compartment cover on the
bottom of the mouse by squeezing the cover in
from the tab to release it.
Step 2: Insert the batteries as shown inside the battery
compartment.
Step 3: Replace the cover.
Low Battery Indicator
Low Battery The Low Battery Indicator on bottom of the mouse will flash/
Indicator glow if the battery is low. Replace the battery if the Low Battery
OPTICAL FM CRUISER
concerned are sold. We at Vivanco also take back batteries/battery packs
free of charge. If you wish to use this service, send your old batteries
marked "Used!" to the following address:
Vivanco GmbH, Ewige Weide 17, D-22926 Ahrensburg
These abbreviations are to be found on batteries/battery packs containing
harmful substances:
• Pb Battery contains lead
• Cd Battery contains cadmium
• Hg Battery contains mercury
Connecting the Receiver
The Cordless Mouse uses digital radio technology Communication between
the mouse and your computer is achieved with great reliability using radio
waves. The cordless mouse do not have bulky cables that can get in the way,
the mouse emits radio frequencies as a means of communicating which are
picked up by the receiver and passed on to your computer.
The receiver is connected to your computer via a cable. And it plugs into your
computer's USB port or mouse porten.
Indicator is on. It is recommended that you use alkaline batteries
when you change batteries to optimize performance. You may
use other battery types, but do not mix them with alkaline.
Note that the low battery indicator is calibrated for alkaline
batteries only, and will not give an accurate indication of
battery life for batteries other than alkaline. When you are not using your
cordless mouse for long periods of time, remove the batteries and store them
in a dry place at normal room temperature.
N.B.: Batteries can leak. If you are not going to use the RF Mouse for a longer
period you should therefore remove the batteries from the device beforehand.
Consider the environment: Batteries and battery packs should not be
thrown away with domestic rubbish. As a consumer you are legally obliged
to return used batteries/battery packs. You can hand them in at your
nearest collection point or wherever batteries/battery packs of the kind
4
USB Port
PS2 Mouse Port
Caution:
For PS2 mouse port installation: Before installing the receiver's cable, turn
off your computer. Plugging and unplugging cables to your computer's mouse
port while the computer is running can damage the mouse port or your
computer.
For USB port installation: Windows® 98 or higher is required for USB port
installation. Connect the mouse cable to the USB port of the computer. For
Windows®, you may be prompted to insert the Windows® software CD. Insert
this software CD into the computer's CD-ROM driver when asked to do so.
Then follow the on-screen instructions.
5
OPTICAL FM CRUISER
OPTICAL FM CRUISER
Setting up your Cordless Mouse
After you have installed the receiver, you are ready to place the mouse on your
desktop. Because the mouse uses cordless radio technology, the exact position
of your mouse is not critical, giving you considerable freedom of movement
and a more enjoyable computing experience. For optimal performance, place the
receiver at least eight inches or 20 centimeters away from the mouse or other
electrical devices, such as the computer, the computer monitor, or external drive.
Changing the Security IDs
Your mouse comes with multi security IDs, which can let your receiver only
listen to one mouse. Do the following steps to change security IDs when you
get undesired interference, change the batteries or for first time installation.
Step 1: Press the CONNECT button on the receiver.
Step 2: Press the CONNECT button on the bottom of the mouse ONCE
and wait for 10 seconds. If the mouse cursor does not move after
10 seconds do the above steps again.
ID-CONNECT-Switch
ID-CONNECT-Switch
Caution: If you have changed the security ID successfully, the LED on the
receiver will flash several times.
Using Your Cordless Mouse
How to Use the 360° Scroll Ball: You can scroll in Windows 98 / 98 SE /
2000 / ME / XP (95 / NT 4.0 - PS2) using your Optical FM Cruiser. The
following paragraph tells you how to scroll. Your mouse has an 360° Scroll
Ball that functions both as a Scroll Bar Controller and as a button. You can
control the Windows® Scroll Bar Horizontally and Vertically by rolling the
Scroll Ball toward the direction you want directly. And simply click the
Scroll Ball as you would with a standard mouse button.
®
6
• To scroll: You can roll the Scroll Ball toward
the direction you want directly.
• To use the Scroll Ball like a standard mouse button:
Click (press down) the ball.
Caution: For saving the batty power, the Mouse will automatically suspend
after you stop operating the mouse for a period of time.
To wake up the mouse, please press the any one button on the mouse.
Switching to Track Ball Mode
You can switch the 360° Scroll Ball to be a Track Ball Mouse. And also you
can switch back to 360° Scroll Ball Mouse mode anytime.
How to Switch the 360° Scroll Ball Mode to Track Ball Mode:
For Switching the 360° Scroll Ball Mouse to be a handy
track ball, click the middle button (i.e. press down
the Scroll Ball) and holding the button, click the right
mouse button at the same time. Release both the
buttons simultaneously.
How to Switch the Track Ball Mode to 360° Scroll Ball Mode:
For switching back to 360° Scroll Ball Mouse from
handy track ball, click the middle button (i.e. press
down the Scroll Ball) and holding the button, click the left
mouse button at the same time. Release both the buttons
simultaneously.
Maintaining the 360° Scroll Ball Function:
To maintain the performance of the Scroll Ball, please clean
the Scroll Ball and the rollers in the Scroll Ball Cave if there
is any problem with scrolling.
Step 1: Rotate and then lift the Holding Cover.
Step 2: Clean the dirt, fiber and sweat on the surface of
Ball and Roller in the Scroll Ball Cave.
Step 3: Put on the Holding Cover and then rotate to fix in position.
7
Holding
Cover
OPTICAL FM CRUISER
OPTICAL FM CRUISER
Touch-On Technology
Your mouse comes with an advanced human body detect
sensor which can detect when the hand touches the
mouse. The sensor is on both the left and right side of the
mouse. When your hand is close to or touches the sensor
area, the mouse works immediately. And when your hand
move off the mouse for more than 2 seconds, the mouse
enters sleep mode to save power.
Left Sensor Area
Right Sensor Area
Caution: The mouse cannot work if your hand is not
touching the sensor area.
Software Installation
Please follow the following steps to install your mouse driver:
Step 1: Insert your driver disk into the floppy driver.
Step 2: Go to the “Start” Menu and select “Run”.
Step 3: Type “A:\Setup” then press the “Enter” button on your keyboard.
Step 4: Follow the on-screen instructions, the system will then install the
driver automatically.
Step 5: Reboot your system while completing the installation process.
Mouse Utility
Double-click the mouse icon in the bottom right corner of the Windows®
screen. Then the following window will open. For a more detailed description,
please review each item as below:
Scroll Ball Setting:
Step 1: Choose “System Default Mode“ to be
compatible with Intelli-Mouse functions.
Step 2: Choose “Enhance Scroll Mode“ to support the
new useful functions of the 360° Scroll Ball.
8
Button Setting:
• Launch Default Browser: Mark this function to obtain the path to access the
IE and Netscape application by pressing the scroll button.
• Launch Default E-Mail: Mark this function to obtain the path to access the E-Mail
application by pressing the scroll button.
• Control (Office Zoom): Hold the “Ctrl“ key of the keyboard by pressing down
the scroll button.
• Shift: Hold the “Shift“ key of the keyboard by pressing down the scroll button.
• Zoom: This gives you a certain pan area by inputting the numbers ranging from
2 X 2 to 64 X 48 in “Zoomed Size“. You can also enlarge the content of the pan
area by inputting the factor number from 2 to 8 in ” Zoom Factor “.
• Auto Scroll: Provides a fixed movement speed for horizontal and vertical scrolling.
• Others: Choose this function for easy application changes such as frequently
using Keys on Keyboard, Minimize windows, Page up, Page down ….etc. by
clicking the button.
Troubleshooting (Try one or more of the following!)
Mouse Does Not Work Upon Installation:
• For optimal performance, place the receiver at least eight inches or 20 cm away
from the mouse or other electrical devices, such as computer, or external drive.
• Make sure you have installed the batteries correctly.
• If you are working on a metallic surface, try using a mouse pad and turning the
receiver on its side for better reception.
• Follow the “Change ID” steps to create a new ID for mouse and receiver.
Mouse Not Detected:
• Make sure the receiver cable is plugged into the right mouse port.
• Make sure your mouse port has the proper configuration.
Refer to your computer documentation for the correct port configuration.
• You may have other system devices (e.g. a LAN card) that conflict with your
mouse. Check the IRQ/address settings of these devices for conflicts,
and change the settings as required.
The Screen Cursor Does Not Move Properly:
• Change the position of your receiver or mouse, because it may be too far from
the mouse; or some object may be interfering with the receiver's radio reception.
• Make sure that the battery power is sufficient. Replace batteries if needed.
• You may also need to change the channel / ID for the mouse.
• If your tabletop surface is red in color, transparent like glass or highly reflective
like a mirror, it may be interfering with the optical sensor of the mouse.
Try using a mouse pad, or use the mouse on a different tabletop surface.
9