1
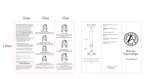
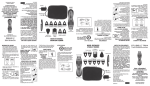
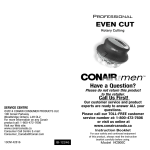
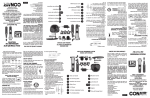
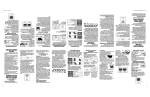
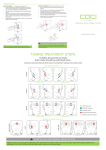
LIMITED TWO YEAR WARRANTY
Conair will repair or replace (at our option) your
unit free of charge for 24 months from the date
of purchase if the appliance is defective in
workmanship or materials.
To obtain service under this warranty, return the
defective product to the service centre listed
below, together with your purchase receipt and
$5.50 for postage and handling. In the absence
of a purchase receipt, the warranty period shall
be 24 months from the date of manufacture.
ANY IMPLIED WARRANTIES, OBLIGATIONS,
OR LIABILITIES, INCLUDING BUT NOT
LIMITED TO THE IMPLIED WARRANTY OF
MERCHANTABILITY AND FITNESS FOR A
PARTICULAR PURPOSE, SHALL BE LIMITED IN
DURATION TO THE 24 MONTH DURATION OF
THIS WRITTEN, LIMITED WARRANTY.
IN NO EVENT SHALL CONAIR BE LIABLE
FOR ANY SPECIAL, INCIDENTAL, OR
CONSEQUENTIAL DAMAGES FOR BREACH OF
THIS OR ANY OTHER WARRANTY, EXPRESS
OR IMPLIED, WHATSOEVER.
This warranty gives you specific legal rights, and
you may also have other rights, which vary from
province to province.
SERVICE CENTRE:
Conair Consumer Products ULC
100 Conair Parkway
Woodbridge Ontario, L4H OL2
©2014 CONAIR CONSUMER PRODUCTS ULC
For more information on any Conair prouct call:
1855-926-6247 (18559 CONAIR)
Visit our Web site: www.conaircanada.ca
Consumer Call Centre E-mail:
[email protected]
IB-11557
14CN146462
STUBBLE TRIM
14 Piece GROOMING SYSTEM
Have a Question?
Please do not return this product
to the retailer.
Call Us First!
Our customer service and product
experts are ready to answer ALL your
questions.
Please call our TOLL-FREE customer
service number at: 1-800-472-7606
or visit us online at
www.conaircanada.ca
Instruction Booklet
Model GMT265XC
be slightly damp (NOT WET) when using your
trimmer. This will prevent the trimmer from
removing more hair than desired.
TYPES OF BEARDS/MUSTACHES
GETTING STARTED:
OUTLINING YOUR BEARD
1. It is always best to begin with a clean, slightly
damp beard.
2. After you have combed through your beard in
the direction it grows naturally, you will want
to outline the desired shape, beginning under
your jawline.
3.Begin defining your
beard’s shape under
your chin and work
upward on each side of
your face toward your
ears. Then define the upper outline of your
beard across your cheeks, past your sideburns,
and toward your hairline.
NOW YOU’RE READY
TO TRIM YOUR BEARD
1. The trimmer includes a five position comb for
use with the hair trimming blade (2-10mm)
which provide lengths of 3/32" (shortest) to
3/8" (longest).
2. To use the 5-position comb, slide the unit over
the trimmer blades and snap it down into
position. At first, until you become familiar
with the adjustments, use the longest trim
setting. (You can always go back and make
your beard a little shorter.)
3. Begin trimming your beard using smooth,
even strokes. Start
with your sideburns
and work downward
toward your chin.
(Never attempt to trim
against the natural
growth of your beard because the hair will
be cut too short.)
4. If you decide you want a closer trim, you
can now adjust the
5-position
comb
attachment to a shorter
setting (such as 3/32" or
5/32") and go over your
beard again until you achieve the desired
length.
HOW TO GET THE STUBBLE LOOK
This trimmer includes 5 stubble combs.
These combs allow you to achieve 15
different looks of stubble or shadow looks
to your already existing growth. Simply use
comb #1-#5 for any look you would like to
achieve. You can also use the taper control,
which has 3 settings. Combined with 5 total
stubble combs you can achieve your 15
different looks. Each comb has a different
length. Comb # 1 is closest to the skin of
the face while comb # 5 is farthest off the
face. Customizing a different look each day!
The stubble combs fit on the blade just like
the jawline combs, note blending the jawline
section for specifics on how combs/jawline
combs go on.
USER MAINTENANCE
INSTRUCTIONS
TAKING CARE OF YOUR TRIMMER
OILING THE BLADES
About once a month you should oil the trimmer
blades with the oil provided in your kit. It is
best to do this over a piece of newspaper. Turn
the trimmer on and hold it so that the blades
are pointed downward. Spread one drop of oil
across the blades, then turn the trimmer off and
wipe away the excess oil with a soft cloth.
Be careful not to use too much oil and don’t oil
your trimmer more than necessary, as this could
damage the motor. (Never attempt to oil the
motor bearing, as it is permanently lubricated.)
After oiling the blades, return the trimmer and
oil packet to the trimmer storage base. Keep oil
away from children.
BLADE CARE
Because the trimmer blades are precisionmade for a very special use, they should always
be handled with care. Each time you finish
using the trimmer, take the cleaning brush
provided and brush away any loose hair that has
collected in the blades.
Be especially careful when changing or adjusting
blades. When you have your trimmer serviced, be
sure that both blades are sharpened or replaced
at the same time.
To promote the long life of the appliance, use
your trimmer only for the purpose intended
by the manufacturer – to trim your beard and
mustache.
THREE POSITION TAPER CONTROL
The Conair trimmer taper
control switch is positioned
at the back of the unit. You
can hold the trimmer in your
hand and adjust the switch
as needed. The taper control
eliminates the need in some
situations for an attachment comb because it lets
you gradually adjust the closeness of the cut. For
closest cut and shortest hair, push switch all the
way to level #3. This is the setting to use for the
2 day shave look. To increase the cutting length,
slowly push control down to level #2 or #1 for
longer cut. Note that too much clipped hair on the
clipper can slow down its operation. To remove
it without removing the blades simply use the
enclosed cleaning brush and gently sweep away
the clipped hair from cutting surfaces. Note:
The taper control only works with the facial hair
trimmer.
GROWING A BEARD AND MUSTACHE
There are three key factors that will determine
which beard or mustache style is best for you:
1. The shape and dimensions of your face.
2. The natural growth of your beard/ mustache.
3. The thickness of your beard/mustache. If
you are unsure about the type of beard or
mustache that would most suit your face,
speak with a professional hair stylist and
ask for an opinion on what style would be
best. Once your beard or mustache has been
styled, it is essential that you maintain its
appearance. To do this, use your trimmer to
trim your beard/mustache weekly.
For the best trimming results, your beard should
MODEL GMT265CSC
STUBBLE TRIMMER
2 Jawline Combs
5-Position
Attachment Comb
Nose/Ear Trimmer
Facial Hair Blade
5 Stubble Combs
Soft Storage Bag
Lubricating Oil
Multi-use Trimmer
Adaptor
SAVE THESE
INSTRUCTIONS
USER MANUAL
Before using the Class 2 Power Supply, read
these instructions carefully.
Model: CA51
Rated input voltage: 100-240Vac, 50/60Hz, 0.2A max
Rated output: 6.0VDC, 70mA
OPERATION
1. For dry location use only. Do not expose to
water.
2. When not in use, unplug unit completely.
3. Never operate this unit if the specification is out
of the rating.
4. When using this unit, a warm temperature will
be reached.
CAUTION
1. Risk of electric shock, dry location use only or do
not expose to liquid, vapor, or rain.
2. Do not short the polarity (output cord). Ensure
jack is plugged into the Trimmer unit before
plugging the adaptor into the outlet.
3. Do not operate any appliance which has a
damaged output cord or housing.
4. Always unplug the unit before cleaning or when
not in use.
5. This power unit is intended to be correctly
oriented in a vertical or floor mount position.
6. Be sure voltage is in correct voltage before
plugging in.
TROUBLESHOOTING
If your rechargeable trimmer does not seem to be
taking a charge, take the following troubleshooting
steps before returning it for repair:
1. Be sure the electrical outlet is working by plugging
in another appliance to test the outlet.
2. Make sure the electrical plug is not connected
to a switch which turns power off when lights
are turned off.
3. Be sure that all connections are secure, and that
the trimmer switch is in the “OFF” position.
OPERATING INSTRUCTIONS
1. Before using your trimmer for the first time,
charge it for 16 hours. Always charge the
trimmer with the ON/OFF switch in the OFF
position.
2. Always check to see if the charging light is on
when you charge the trimmer.
3. Plug the adaptor into any wall outlet (at
the voltage listed on the label affixed to the
adaptor). Unplug adaptor when not in use.
4. The adaptor may become warm while charging.
This is normal.
5. Battery life can be improved by periodically
allowing the trimmer to run until the motor
stops. Immediately shut the switch OFF and
fully recharge.
6. Maximum battery capacity will only be reached
after three complete charging and discharging
cycles.
7. To maintain the optimum capacity of the
rechargeable batteries, the trimmer should be
recharged for 16 hours approximately every
three months.
CARE OF YOUR
TRIMMER
REPLACEMENT
(REMOVAL) OF BLADE SET
To remove blade set from your trimmer, make
sure the trimmer is in the OFF position. Remove
the blade set by placing thumb against the
smaller cutter and pushing forward, releasing
the cutter assembly from the trimmer housing.
Replace with new cutting system and reverse
the removal procedure, only this time place your
thumb on the large cutter and snap into place.
Make sure the taper control is set to the longest
#1 position.
R E CY
E / RE C
CL
LÉE
ON/OFF SWITCH
To operate, simply slide switch toward blade,
to stop push slide away
from blade.
BATTERY REMOVAL
YC
7. Hold the trimmer in the way as shown in
Fig.3 with the thumb pressing the top front
part of the trimmer head and snap it off.
CONTAINS NICKEL-METAL HYDRIDE BATTERY.
MUST BE COLLECTED, RECYCLED OR
DISPOSED OF PROPERLY. DO NOT DISPOSE
OF IN THE MUNICIPAL WASTE.
1. Using a small Phillips head screwdriver,
remove the 3 screws at the back of the
trimmer.
2. Remove the bottom housing and push the
batteries out and disconnect the leadwire
connected with +/– pole. Bring the batteries
to the nearest collection center for proper
disposal. DO NOT throw the battery into the
normal municipal waste system.
IMPORTANT SAFETY
INSTRUCTIONS
When using electrical appliances, especially
when children are present, basic safety precautions should always be taken, including
the following:
READ ALL INSTRUCTIONS
BEFORE USING
KEEP AWAY FROM WATER
DANGER –
Any appliance is electrically
live, even when the switch is off.
To reduce the risk of death or injury by
electric shock:
1. Always unplug appliance from electrical
outlet immediately after using (except
when charging unit).
2. Do not place or store appliance where it could
fall or be pulled into a tub or sink.
3. Do not use appliance while bathing or in
the shower.
4. Do not place appliance in, or drop into, water
or other liquid.
5. If appliance has fallen into water, do not reach
for it. Unplug immediately.
6. Unplug this appliance before cleaning.
DO NOT REACH
INTO THE WATER
WARNING – To reduce the risk of burns,
electric shock, fire, or injury to persons:
1. Never leave a plugged-in appliance
unattended.
2. This appliance should not be used by, on,
or near children or individuals with certain
disabilities.
3. Use appliance only for its intended use as
described in this manual. Only use attachments
recommended by the manufacturer. Do not use
an extension cord to operate the appliance.
4. Never operate the appliance if it has a damaged
cord or plug, is not working properly, has been
dropped or damaged, or dropped into water.
Return the appliance to a Conair service center
for examination and repair.
5. Keep the appliance cord away from heated
surfaces.
6. Do not pull, twist or wrap the cord around
the appliance.
7. Never drop or insert any object into any opening
of the appliance.
8. Do not place the appliance on any surface while
it is operating.
9. Do not use the appliance with a damaged or
broken comb or with teeth missing from the
blades, as injury may result. Before each use,
make certain the blades are aligned properly
and oiled.
10.Do not use the appliance outdoors or where
aerosol (spray) products are being used or
oxygen is being administered.
11.THIS PRODUCT IS FOR HOUSEHOLD USE
ONLY.
BLENDING THE JAWLINE
1. The two jawline attachments (jawline
AC12 provides 7 mm and jawline AC13
provides 5 mm) will help you to achieve
a neat, finished trim under your chin. To
use one of the attachments, press it down
over the trimmer blades until it clicks into
position.
2.Hold the trimmer in an upright position and
begin trimming under your jawline, using
short, even strokes.
3.After your beard is blended, turn off the
the longest trim setting adjustment. (You
can always go back and cut your mustache
more closely with a shorter
setting.)
ALWAYS TRIM YOUR
MUSTACHE FROM
THE TOP DOWN
4. After your mustache has been trimmed to
the desired length, remove the 5-position
comb and, using the blades only, define the
outline of the bottom of your mustache.
5. Use the precision goatee trimmer blade for
fine detailing and hair art.
ROTARY NOSE & EAR TRIMMER
trimmer and remove the attachment by
gently pulling up on tab.
TO TRIM YOUR MUSTACHE
1. For best results, start with a clean, slightly
damp mustache.
2.Comb through your
mustache
in
the
direction it grows.
3.Place the 5-position
comb over the facial hair blade and snap it
into position. It is a good idea to start with
For easy, safe grooming of long nose and ear
hairs, attach the rotary nose/ear trimmer and
hold unit to areas that need trimming.
1. Make sure the trimmer on/off switch is in
the "off" position
Fig.1
2. Detach normal trimming
blade (see "Repl-acement
(Removal) of Blade Set"
instructions)
3. Installing the nose & ear
Fig.2
trimmer
4. Insert the pin of the trimmer
body into the hexagonal hole
of the trimmer head as shown
Fig.3
in Fig.1
5. Press and snap the trimmer
head onto the body as shown
in Fig.2
6. Detaching the nose & ear trimmer