1
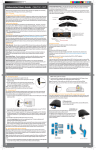
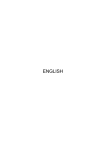
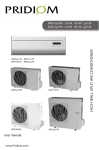
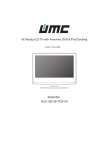
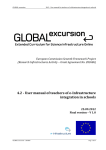
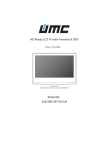
TOSHIBA
Qosmio Series Notebook Computers
User Reference Guides
________________________________________________________________
How to Connect a Sky Digital Set Top Box
(Qosmio F10/F20 Series and Qosmio G10/G20 Series)
________________________________________________________________
©
Toshiba Information Systems (UK( Limited --- Technical Services Department
Page 1
TOSHIBA
Document Name : How to Connect a Sky Digital Set Top Box
Programme Revision : Version 1.0
Released : October, 2005
Last Document Update : October, 2005
________________________________________________________________________________________________
Development Credits
Document Design : Stephen G White
Contributers : Bernard Woolf, Daniel Little, Erika Warzynski
________________________________________________________________________________________________
Microsoft® Windows® XP is a registered trademark or trademark of Microsoft Corporation in the United States of America and other countries. Other product names and companies mentioned
within this document may be the trademarks of their respective owners.
The Technical Services department of Toshiba Information Systems (UK) Limited have made their best endeavours to ensure the material presented here is accurate, however, no
responsibility can be accepted for errors (other than typographical), nor are any guarantees offered. Errors and omissions excepted. All information in this document is subject to change
without notice. No part of this document may be reproduced or transmitted in any form or by any means, electronic or mechanical, for any purpose without the express written permission of
the CSD Technical Services department within Toshiba Information Systems (UK) Limited.
®
Page 2
©
CSD Technical Services Department (June, 2005)
Toshiba Information Systems (UK) Limited
Toshiba Information Systems (UK( Limited --- Technical Services Department
TOSHIBA
Introduction
This document is provided in order to offer guidance and assistance in connecting and setting up either the Qosmio F10/F20 or
Qosmio G10/G20 series of audio/visual personal computers to operate with a Sky Digital set top box.
It is strongly recommended that you read and understand each of the steps detailed herein before you begin carrying them out.
In the event that you do not understand anything described, you are advised to refer to the reseller or place of purchase for
either the Qosmio computer or the Sky Digital set top box for assistance.
Toshiba Information Systems (UK) Limited cannot accept responsibility for any loss or damage that is caused either directly or
indirectly by your failure to properly follow the instructions within this document .
The instructions contained within this document have been provided to assist you with the use of the Qosimo range of products
with the Sky Digital set top box. However, Toshiba Information Systems (UK) Limited shall not be responsible for any updates or
changes that may occur with the third-party hardware which may affect the validity of the information contained herein.
FOR THE AVOIDANCE OF DOUBT, NOTHING IN THE FOREGOING SHALL AFFECT YOUR STATUTORY RIGHTS AS A
CONSUMER IN THE UK. TOSHIBA INFORMATION SYSTEMS (UK) LIMITED DOES NOT EXCLUDE OR LIMIT ANY LIABILITY
FOR PERSONAL INJURY OR DEATH OR FRAUDULENT MISREPRESENTATION OR ANY OTHER LIABILITY WHICH
CANNOT BE LIMITED OR EXCLUDED BY APPLICABLE LAW.
©
Toshiba Information Systems (UK( Limited --- Technical Services Department
Page 3
TOSHIBA
Page 4
©
Toshiba Information Systems (UK( Limited --- Technical Services Department
TOSHIBA
Before You Begin
Before you begin you should ensure that you have all of the required hardware and accessories easily to hand - these are
described and pictured below for your reference. Please note that not all of the items you require will have been provided with
your Qosmio notebook - you may need to purchase additional items from an appropriate retail outlet.
____________________________________________________________________
Items Supplied with the Qosmio Notebook
Antenna cable - Qosmio jack to co-axial aerial connector
Please note that, depending on the model in question, your Qosmio notebook will only have
been supplied with one of these items.
Media Center remote controller - the unit for the Qosmio F10 and G10 series is shown on
the left, while that for the F20 and G20 series is shown on the right
Media Center remote controller infra-red receiver box and infra-red receiver for set top box remote control function
In addition to these items of hardware, you should also ensure that the Windows XP Media Center operating system is updated
in relation to the following two areas:- All updates for the Windows XP Media Center operating system have been downloaded and installed - this can be
acheived by clicking start >>> All Programs >>> Windows Update.
- The latest version of the TV tuner driver is downloaded and installed - this can be found on the Toshiba web site (http://
uk.computers.toshiba-europe.com/) by selecting Support & Downloads followed by Download Files and then
completing all of the drop-down boxes as appropriate for your model of Qosmio, ensuring that TV Tuner is selected within
the Driver Type box.
©
Toshiba Information Systems (UK( Limited --- Technical Services Department
Page 5
TOSHIBA
Methods of Connecting the Qosmio Notebook to Accept a Television Signal
Once you have the correct items of hardware and have upgraded the Windows XP Media Center operating system as
appropriate, you should next decide how you are going to connect the Qosmio to accept a television signal from the Sky Digital
set top box. The notebook itself is capable of accepting one of three different input types, each of which offers differing levels of
sound and image quality, and each of which is described below for reference:Coaxial Cable Connection
Image Quality
Poor
Connection
Antenna-in port (see Appendix A - Connecting a Qosmio through the Antenna-in Port)
Considerations
Not all Sky Digital set top boxes output a digital signal through the RF-out socket but instead initially
convert it to an analogue format. In the event that the set top box to which you are connecting the Qosmio
provides a digital output through the RF-out socket, you will need to know which channel is being used for
this signal in readiness for the software configuration process described later - this information is normally
detailed within the User Manual provided with the set top box.
Composite Cable Connection
Image Quality
Medium
Connection
Monitor-in port (see Appendix B - Connecting a Qosmio through the Monitor-in Port)
Considerations
When using a composite connection it will be necessary to purchase an additional cable - a SCART
Connector to 3-Plug RCA cable - which can then be used in conjunction with the monitor-in cable
provided with the Qosmio.
In addition to the cabling considerations, by default Windows XP Media Center has all audio input
channels enabled which means that, when a connection is made to the monitor-in port, the audio signal
will be duplicated on both the Wave and Line In channels. As the audio signal that goes through the Linein channel is in an uncompressed format it will be presented to the user approximately half a second
ahead of the video resulting in playback that is almost unwatchable. This issue can be resolved by muting
the Line-in channel by following the procedure detailed below:- Click start >>> Control Panel.
- If the Control Panel application is in Category View...
- Click Sounds, Speech and Audio Devices.
- Click Advanced Volume Controls from the left hand pane.
- If the Control Panel application is in Classic View...
- Double-click Sounds and Audio Devices and then click the Advanced... button.
- Within the Volume Control window, check the Mute box within the Line In section.
- Close the Volume Control window by clicking the cross in the top right-hand corner.
S-Video Cable Connection
Image Quality
High
Connection
S-Video input port for video (see Appendix C - Connecting a Qosmio through the S-Video Input Port)
Monitor-in port for audio (see Appendix B - Connecting a Qosmio through the Monitor-in Port)
Considerations
When using an S-Video connection it will be necessary to purchase an additional cable - a SCART
Connector to S-Video cable - which will attach directly to the appropriate port on the Qosmio. However,
you should also note that, although S-Video provides the best picture quality, it does not carry any audio
signal which means that a further cable will be needed to connect the RCA audio output sockets on the
set top box, if they are present, to the composite input port on the Qosmio.
Please note that not all Sky Digital set top boxes support S-Video output through the SCART socket and,
for those that do, this feature must usually be activated via the set top box setup menu.
In addition to the cabling considerations, by default Windows XP Media Center has all audio input
channels enabled which means that, when a connection is made to the monitor-in port, the audio signal
will be duplicated on both the Wave and Line In channels. As the audio signal that goes through the Linein channel is in an uncompressed format it will be presented to the user approximately half a second
ahead of the video resulting in playback that is almost unwatchable. This issue can be resolved by muting
the Line-in channel by following the procedure detailed below:- Click start >>> Control Panel.
- If the Control Panel application is in Category View...
- Click Sounds, Speech and Audio Devices.
- Click Advanced Volume Controls from the left hand pane.
- If the Control Panel application is in Classic View...
- Double-click Sounds and Audio Devices and then click the Advanced... button.
- Within the Volume Control window, check the Mute box within the Line In section.
- Close the Volume Control window by clicking the cross in the top right-hand corner.
Page 6
©
Toshiba Information Systems (UK( Limited --- Technical Services Department
TOSHIBA
©
Toshiba Information Systems (UK( Limited --- Technical Services Department
Page 7
TOSHIBA
Page 8
©
Toshiba Information Systems (UK( Limited --- Technical Services Department
TOSHIBA
Step-by-Step Instructions
Detailed below are the instructions that you should follow in order to connect the Qosmio personal computer to a Sky Digital set
top bax and then configure the Windows XP Media Center operating system to receive satellite television broadcasts.
____________________________________________________________________
Part One - Initial Configuration of the Media Center Application
Please note that this section assumes the presence of an Internet connection in order that the subsequent setup and
configuration processes can be properly completed, and the Electronic Program Guide (EPG) downloaded - you must
therefore ensure that the Qosmio is connected to the Internet before continuing with the following instructions. In
addition, please be aware that all of the instructions that are contained within this section have been developed on the
assumption that (a) an ‘always on’ broadband (DSL) connection to the Internet is available, and (b) the Media Center
infrared remote control receiver box has been connected to one of the Qosmio’s free USB ports.
1)
2)
3)
©
Switch the Qosmio on and allow the Windows XP Media
Center operating system to fully load.
Press the START button on the Media Center remote
controller to start the Media Center application.
At the opening Welcome to the Media Center Setup
Wizard screen, select Next.
4)
At the Media Center Setup screen, select Next.
5)
At the Media Center Privacy Policy screen, select Next.
Toshiba Information Systems (UK( Limited --- Technical Services Department
Page 9
TOSHIBA
Page 10
©
6)
At the Get the Most from Media Center screen, click
either Yes or No as appropriate for your environment and
then select Next.
7)
At the Join a Wireless Network screen, click either Yes or
No as appropriate for your environment and then select
Next.
8)
At the “Always on” Internet Connection screen, click Yes
and then select Next.
9)
At the Test Your Internet Connection screen, click the
Test button in order to check that the notebook is able to
obtain information from the Internet. In the event that no
problems are encountered, and the system displays the
Connection Working message, select Next.
Toshiba Information Systems (UK( Limited --- Technical Services Department
TOSHIBA
10) At the Required Components Have Been Set Up screen,
select Next.
11) At the Optional Setup screen, click the I am finished
option and then select Next.
12) At the You Are Done! screen, select Finish - this will
complete the initial configuration and automatically take
you to the Media Center menu.
©
Toshiba Information Systems (UK( Limited --- Technical Services Department
Page 11
TOSHIBA
Part Two - Configuring the Media Center Application to Receive Sky Digital Transmissions
1)
2)
3)
Page 12
©
Switch the Qosmio on and allow the Windows XP Media
Center operating system to fully load.
Press the START button on the Media Center remote
controller to start the Media Center application.
From the Media Center menu scroll through the options
and select Settings.
4)
From the Settings menu, select General.
5)
From the General menu, select Media Center Setup.
6)
From the Media Center Setup menu, select Set Up TV
Signal.
Toshiba Information Systems (UK( Limited --- Technical Services Department
TOSHIBA
7)
In the event that the screen as shown on the left is
displayed, you should take note of the effect that
continuing will have on areas such as any recordings that
might be scheduled, before selecting Yes.
8)
At the Set Up Your TV Signal screen, select Next.
9)
At the ConfirmYour Region screen, ensure that the
current region is set to United Kingdom before clicking
the Yes, use this region to configure TV services option
and then selecting Next. Once this precedure has been
completed you should proceed to Step (11).
In the event that the current region is not set to United
Kingdom, you should instead click No, I want to select a
different region, select Next and then proceed to Step
(10).
10) At the Select Your Region screen, use the up and down
arrows to highlight United Kingdom from the list
presented and then select Next.
©
Toshiba Information Systems (UK( Limited --- Technical Services Department
Page 13
TOSHIBA
11) At the Automatic TV Signal Setup screen, click the I will
manually configure my TV signal option and then select
Next.
12) At the Select Your TV Signal screen, click Satellite and
then select Next.
13) At the Select Your TV Signal Type screen, click Analog
Terrestrial (PAL/SECAM) option and then select Next.
14) At the Prepare for Set-top Box Setup screen, select Next.
Page 14
©
Toshiba Information Systems (UK( Limited --- Technical Services Department
TOSHIBA
15) At the Select a Working TV Signal screen you will be
provided with four options, of which the first three need to
be considered in order to continue with the configuration
process. If you are connecting you Qosmio to the Sky
Digital set top box via:Co-axial cable, then proceed to Step (16).
Composite video cable, then proceed to Step (18).
S-Video cable, then proceed to Step (19).
16) At the Select a Working TV Signal screen, select the
Enter Channel option and enter the channel your Sky
Digital set top box broadcasts at - this information will
usually be detailed within the User Manual provided with
the set top box and will be between channels 21 and 69.
17) At the next Select a Working TV Signal screen, and once
the correct channel number has been entered, a picture
will be displayed indicating this part of the configuration
has been completed successfully.
If this is the case, select Next and then proceed to Step
(20).
18) At the Select a Working TV Signal screen, select the
Composite Video option - the Media Center application
will automatically detect the signal input and display a
picture indicating this part of the configuration has been
completed successfully.
If this is the case, select Next and then proceed to Step
(20).
©
Toshiba Information Systems (UK( Limited --- Technical Services Department
Page 15
TOSHIBA
19) At the Select a Working TV Signal screen, select the SVideo option - the Media Center application will
automatically detect the signal input and display a picture
indicating this part of the configuration has been
completed successfully.
If this is the case, select Next and then proceed to Step
(20).
20) In the event that the Set-top Box Already Configured
screen is displayed, select the Reconfigure all set-top
box settings option and then select Next.
21) At the Set-top Box Remote screen, click Yes and then
select Next.
In the event that you Sky Digital set top box does not
come with its own remote control you should instead click
No, select Next and then proceed to Step (33).
22) At the Identify Set-top Box Remote screen, select Next.
Page 16
©
Toshiba Information Systems (UK( Limited --- Technical Services Department
TOSHIBA
23) At the next Identify Set-top Box Remote screen, point the
remote controller for the set top box at the external infrared receiver box, press its ‘0’ key, together with any other
keys that may be requested, and follow the on-screen
instructions - you will then need to proceed as follows:- If the Remote Not Recognised screen is displayed,
proceed to step (24).
- If the Set-top Box Remote Identified screen is
displayed, proceed to Step (32).
If necessary, please refer to Appendix D - Using the
Windows Media Centre Infra-red Receiver Box for
considerations on correctly using remote control devices
in conjunction with the Qosmio notebook.
24) At the Remote Not Recognized screen, click Have Media
Center learn my remote from scratch and then select
Next.
25) At the Prepare to Identify Remote screen, select Next.
26) At the Channel Change Buttons screen, ensure that you
read the information presented before clicking either Yes
or No as appropriate for your remote controller, and then
select Next.
©
Toshiba Information Systems (UK( Limited --- Technical Services Department
Page 17
TOSHIBA
27) At the IR Learning screen, press and hold the
corresponding button on your Sky Digital set top box
remote controller until the instruction Release button to
continue is displayed - at this point you may find that you
need to repeat the same button multiple times while the
Media Center application learns its signal format.
You should repeat this step for each of the remaining
numbers on the remote controller before continuing on to
Step (28).
28) At the next IR Learning screen, press and hold the button
on your Sky Digital set top box remote controller that
equates to ‘Enter’ until the instruction Release button to
continue is displayed - at this point release the button in
order to proceed to the next stage of the configuration
process.
29) At the next IR Learning screen, press and hold the button
on your Sky Digital set top box remote controller that
equates to ‘Next Channel’ until the instruction Release
button to continue is displayed - at this point release the
button in order to proceed to the next stage of the
configuration process.
30) At the next IR Learning screen, press and hold the button
on your Sky Digital set top box remote controller that
equates to ‘Previous Channel’ until the instruction
Release button to continue is displayed - at this point
release the button in order to proceed to the next stage of
the configuration process.
Page 18
©
Toshiba Information Systems (UK( Limited --- Technical Services Department
TOSHIBA
31) At the Set-up Box Codes Learned Successfully screen,
select Next and then proceed to Step (33).
32) At the Set-top Box Remote Identified screen, select Next.
33) At the Select Number of Digits screen, click the
appropriate option based around the highest channel
number your set top box supports - generally this will be
Three digits for most Sky Digital installations - and then
select Next.
34) At the How Do You Change Channels? screen, click the
appropriate option based around how your remote
controller changes channels and then select Next.
©
Toshiba Information Systems (UK( Limited --- Technical Services Department
Page 19
TOSHIBA
35) At the Test Channel Changing screen, use the Media
Center remote controller to enter the number of a channel
you know that your set top box is able to receive.
Please note that, in the event your model of Qosmio
notebook has been supplied with the small form factor
remote controller, which does not include a dedicated
numeric keypad, then you should use the numeric keys
on the notebook’s keyboard to enter the channel number,
click the appropriate option based around the results
experienced and then select Next.
36) At the Set IR Signal Speed screen, use the Channel Up
and Channel Down buttons on the Media Center remote
controller to change channel at least six times.
In the event that no problems are encountered, click The
channel changed correctly and then select Next.
37) At the IR Signal Speed Set screen, select Next.
38) At the Set Up Your TV Program Guide screen, select
Next.
Page 20
©
Toshiba Information Systems (UK( Limited --- Technical Services Department
TOSHIBA
39) At the Guide Privacy screen, click Yes and then select
Next.
In the event that you elect not to use the Electronic
Programme Guide (EPG), you should select No and then
proceed to Step (46).
40) At the Guide Terms of Service screen, click I agree and
then select Next.
41) At the Download Method screen, click Download when
connected and then select Next.
42) At the Enter Your Postal Code screen, enter the full
postal code of the location where the computer is being
used and then select Next - the system will then
automatically connect to the Internet in order to download
the current Electronic Programme Guide (EPG) provider
information.
©
Toshiba Information Systems (UK( Limited --- Technical Services Department
Page 21
TOSHIBA
43) In the event that no problems are encountered obtaining
the provider information, and the system displays the
Download Complete message, select Next and then
proceed to Step (43).
44) At the Select TV Signal Provider screen, highlight one of
the Sky Digital providers listed and then select Next Media Center will then automatically connect to the
Internet in order to obtain the current Electronic
Programme Guide (EPG) information.
45) In the event that no problems are encountered obtaining
the programme guide information, and the system
displays the Download Complete message, select Next.
46) At the You Are Done! screen select Finish - this will
complete the configuration of the system to receive
broadcasts through your Sky Digital set top box and
automatically return you to the Settings menu.
From the Settings menu, press Backspace three times in
order to return to the Media Center menu.
Page 22
©
Toshiba Information Systems (UK( Limited --- Technical Services Department
TOSHIBA
53) From the Media Center menu scroll through the options
and select My TV.
54) From the My TV menu, select Live TV - if appropriate,
this will use the information downloaded previously and
display the current channel on the notebook’s display.
You are then able to change channel by either entering
the channel number via the remote controller or
keyboard, using the PgUp or PgDn keys, or using the
Channel Up or Channel Down buttons on the remote
controller.
©
Toshiba Information Systems (UK( Limited --- Technical Services Department
Page 23
TOSHIBA
Part Three - Tuning the Qosmio Player (Automatic Process)
Step 1
- Using the antenna cable, connect the RF-out socket on the rear of your Sky Digital set top box to the antenna port of the
Qosmio. Refer to Appendix A - Connecting a Qosmio through the Antenna-in Port) for further information.
Step 2
- With the Qosmio notebook switched off, press the TV
button - this will switch the system on, invoke the Qosmio
Player application and display the current television signal
(by default at first switch on this should be ‘white noise’).
The above photographs show the format of the TV button for the Qosmio F10/10 series,
Qosmio F20 series and Qosmio G20 series respectively
Step 3
- Press the F1 key - this will display a list of keystrokes along the bottom of the screen.
- Press F2 Setup to display the Qosmio Player setup and configuration screen.
- Using the Up and Down cursor keys ensure that Channel Settings is highlighed on the left hand side of the screen before
pressing the Right cursor key to move to the right hand side of the screen onto the channel configuration options.
- Ensure that Channel Auto-Scan is highlighed and then press Enter.
- On the following menu that is displayed, ensure that Antenna is highlighed and then press Enter.
- At the Channel Auto-Scan confirmation window that is subsequently displayed, ensure that Continue is highlighed and then
press Enter - the Qosmio will then scan through all possible channels and eventually configure the one on which the Sky
Digital set top box signal is found (for the purpose of these instructions we will assume this is channel 68).
Important Note
Using this procedure will configure the Sky Digital channel number according to the configuration of the particlaur set top
box - in our example channel 68) - which may make it difficult/illogical when changing from the teresstrial channels to the
Sky channels. For example, while you may enter 1 on the Qosmio’s keyboard for BBC1 and 3 for ITV1, you would have to
enter 6 followed by 8 in order to view any of the Sky channels. In the event that you find this inconvienient you may wish
to configure the channel settings manually, so that the Sky Digital signal can be displayed by entering 6, by following the
instructions as detailed in Part Two - Tuning the Qosmio Player (Manual Process) later in this document.
Page 24
©
Toshiba Information Systems (UK( Limited --- Technical Services Department
TOSHIBA
Part Four - Tuning the Qosmio Player (Manual Process)
Step 1
- Using the antenna cable, connect the RF-out socket on the rear of your Sky Digital set top box to the antenna port of the
Qosmio. Refer to Appendix A - Connecting a Qosmio through the Antenna-in Port) for further information.
Step 2
- With the Qosmio notebook switched off, press the TV
button - this will switch the system on, invoke the Qosmio
Player application and display the current television signal
(by default at first switch on this should be ‘white noise’).
The above photographs show the format of the TV button for the Qosmio F10/10 series,
Qosmio F20 series and Qosmio G20 series respectively
Step 3
- Press the F1 key - this will display a list of keystrokes along the bottom of the screen.
- Press F2 Setup to display the Qosmio Player setup and configuration screen.
- Using the Up and Down cursor keys ensure that Channel Settings is highlighed on the left hand side of the screen before
pressing the Right cursor key to move to the right hand side of the screen onto the channel configuration options.
- Move down until Manual Channel Programming is highlighed and then press Enter - this will shown the current television
signal together with four boxes along the base of the screen, Input Channel, Display Channel, Actual Channel and Skip.
- With the Input Channel option highlighed, use the Up and Down cursor keys to set it to 6.
- If necessary, move across to the Display Channel option and use the Up and Down cursor keys to set this to 6 also.
- Move across to the Actual Channel and, using the Up and Down cursor keys, move through the channels that are being
received until the Sky Digital signal is displayed - ensure that you note down the channel number, for example 68.
- Move across to the Skip option and, using the Up and Down cursor keys, ensure this is set to Off - this should result in a
configuration similar to the following:Input
Channel
6
Display
Channel
6
Actual
Channel
68
Skip
Off
Equates to...
Sky Digital
- Once this process has been completed correctly, press Enter followed by F1 - you will now be able to select the Sky Digital
channel by simply pressing 6 on the Qosmio’s keyboard.
©
Toshiba Information Systems (UK( Limited --- Technical Services Department
Page 25
TOSHIBA
Appendices
Appendix A ... Making a Connection Using the Antenna-in Port
Page 27
Appendix B ... Making a Connection Using the Monitor-in Port
Page 28
Appendix C ... Making a Connection Using the S-Video Input Port
Page 29
Appendix D ... Using the Windows Media Center Infra-red Receiver Box
Page 30
Appendix E ... Overview of Equipment Connectivity
Page 31
Page 26
©
Toshiba Information Systems (UK( Limited --- Technical Services Department
TOSHIBA
Appendix A - Making a Connection Using the Antenna-in Port
The following illustrations show the location of the antenna-in port on each of the four different models of Qosmio notebook
covered by this document. Please be aware that you will need to attach the co-axial cable from the Sky Digital set top box to the
co-axial aerial connector that was supplied with the notebook before connecting this assembly to the antenna-in port.
Qosmio F10 Series
Qosmio F20 Series
Qosmio G10 Series
Qosmio G20 Series
©
Toshiba Information Systems (UK( Limited --- Technical Services Department
Page 27
TOSHIBA
Appendix B - Making a Connection Using the Monitor-in Port
The following illustrations show the means of establishing a connection between the Sky Digital set top box and the monitor-in
cable supplied with the Qosmio notebook, and also highlight the location of the monitor-in port on each of the four different
models of Qosmio notebook covered by this document.
RCA Plug - Yellow
(Composite Video)
RCA Plug - White
(Left Audio Channel)
Monitor-in cable to Qosmio notebook - ensure red,
white and yellow sockets are connected to the
respective plugs coming from the set top box
SCART Connector
(To Set Top Box)
RCA Plug - Red
(Right Audio Channel)
RCA Plugs from SCART to RCA
Cable connected to Set Top Box
The above illustrations show the format of the optional SCART to RCA cable that should be connected to the Sky Digital set top box (left) and the method of connecting this to the monitor-in cable
supplied with the Qosmio notebook (right)
Page 28
Qosmio F10 Series - Location of Monitor-in Port
Qosmio F20 Series - Location of Monitor-in Port
Qosmio G10 Series - Location of Monitor-in Port
Qosmio G20 Series - Location of Monitor-in Port
©
Toshiba Information Systems (UK( Limited --- Technical Services Department
TOSHIBA
Appendix C - Making a Connection Using the S-Video Input Port
The following illustrations show the means of establishing a connection between the Sky Digital set top box and both the S-Video
input port and the monitor-in port on the Qosmio notebook, and also highlight the location of the S-Video input port on each of
the three different models of Qosmio notebook covered by this document (the Qosmio F20 series does not offer an S-Video
input port).
S-Video Plug (To
Qosmio Notebook)
Monitor-in cable to Qosmio notebook - ensure only
the red and white sockets are connected to the
respective plugs coming from the set top box
SCART Connector
(To Set Top Box)
RCA Plugs from the audio output
sockets on the set top box
The above illustrations show the format of the optional SCART to S-Video cable that should be connected to the Sky Digital set top box to receive a video signal (left) and the method of connecting
an RCA audio cable to the monitor-in cable supplied with the Qosmio notebook to receive sound (right)
Qosmio F10 Series - Location of S-Video Input Port
Qosmio G10 Series - Location of S-Video Input Port
©
Qosmio G20 Series - Location of S-Video Input Port
Toshiba Information Systems (UK( Limited --- Technical Services Department
Page 29
TOSHIBA
Appendix D - Using the Windows Media Center Infra-red Receiver Box
The following illustrations show an overview of the infra-red receiver box and its external connections, and provides guidance as
to its use in conjunction with a remote control device to ensure that no problems are encountered when performing functions
such as controlling the Media Center application and changing channels on a set top box.
Infra-red Receiver Window
USB Port
Infra-red Transmitter Cable (To Infra-red
Receiver for Set Top Box Remote Control)
USB Cable (To USB Port on
the Qosmio Notebook)
Infra-red Transmitter
Cable Connection
The above illustrations shows the general layout of the infra-red receiver box and details the means of connecting it both to the infra-red receiver for use with the set top box remote control, and to
the Qosmio notebook itself
Infra-red Receiver Window
The distance between the remote controller and the infra-red
receiver should be no more than about five metres. However, this
distance may be reduced based around (a) the type of remote
control being used, (b) the remaining charge in the remote
control’s batteries, and (c) the brightness of the environment in
which the remote control is being used.
Media Center or Set Top
Box Remote Controller
The remote controller should be used at approximately a 30°
angle horizontally and a 15° angle vertically in relation to the
position of the infra-red receiver window. If it is used outside
of these angles you may find that the signals produced by the
remote controller do not get recognised by either the Qosmio
notebook or the set top box
The above illustration shows specific considerations that will need to be made to ensure that the signals from the appropriate remote controller are properly received by either the Qosmio notebook
and/or the Sky Digital set top box
Page 30
©
Toshiba Information Systems (UK( Limited --- Technical Services Department
TOSHIBA
Appendix E - Overview of Equipment Connectivity
The following illustration details the required and optional equipment that can be used in order to connect a Sky Digital set top
box to your Qosmio notebook, and provides an overview of how each of these components are connected together.
Connection to the Qosmio notebook
through either the RF-out, composite or
S-video ports on the set top box
4
5
3
6
2
1
7
Connection to one of the USB ports
on the Qosmio notebook
1) Qosmio notebook
2) Media Center Infra-red Receiver Box This device is required in order to use the Media Center remote controller to control the functionality of
the Media Center application and allow channel to be changed on the Sky Digital set top box.
3) Infra-red Transmitter Cable
One end of this cable attaches to one of the ports on the Media Center Infra-red Receiver Box (2),
while the other is placed in front of the infra-red receiver window on the Sky Digital set top box to
allow the Media Center remote controller to be used to change channels.
4) Wall Socket
Provides a connection to external satellite dish.
5) Sky Digital Set Top Box
6) Video Recorder / DVD Recorder
This device is included in order to illustrate the method of connecting a recording device into the
configuration - if no video recorder or DVD recorder is present then the Sky Digital set top box will
connect directly into the appropriate input socket on the display device.
7) Display Device
©
Toshiba Information Systems (UK( Limited --- Technical Services Department
Page 31