1
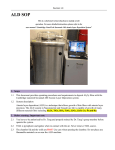
Jetfirst RTP System
User’s Operating Notes
This is not a comprehensive guide for use of the Jetfirst RTP machine and not a User’s
Manual of the Jetfirst RTP. This is short reminder notices and operating tips for references
only made by other users.
Equipment access ..................................................................................................................................1
Important information ...........................................................................................................................2
Annealing ambient and gases................................................................................................................2
Maximum temperatures and durations..................................................................................................2
Process cooling water............................................................................................................................3
Heating uniformity................................................................................................................................3
Starting the machine..............................................................................................................................3
Creating and editing a recipe ................................................................................................................5
Choosing a PID table ............................................................................................................................7
Loading samples ...................................................................................................................................7
Processing .............................................................................................................................................9
After Processing....................................................................................................................................9
Closing down the RTP System .............................................................................................................9
Operation with temperature control by thermocouples.........................................................................9
Changing and creating PID table ........................................................................................................10
Equipment access
You can use the equipment without supervision if you are a Qualified Operator only. No one
is allowed to use the equipment without direct supervision until after final check out.
Training is required before using the Jetfirst RTP machine. To obtain training
1. Read thoroughly through the EECE Cleanroom web pages all the information
concerning the machine.
2. Fill COSHH forms for ALL gases used in the machine and send their electronic copies
to the clean room manager.
3. Read the User's Manual and these User’s Notes.
4. Check in the equipment booking calendar when the machine is going to be used and
attend several sessions carried out by qualified operators to become familiar with
machine layout, location and operation of handles, knobs, switches, valves, etc.
5. Before requesting training from the clean room manager, please make sure that you
are familiar with following terms, tools, devices, processes:
•
sccm - symbols for "standard cubic centimetres per minute". Many similar
abbreviations are in use. These are units of flow rate for gases, and the term
"standard" indicates that the flow rate assumes a standard temperature and a
standard pressure of 1 atmosphere. For natural gas, a standard temperature of
60 °F (15.6 °C) is used.
•
bar / atmosphere (atm) / Torr / Pound-force per square inch (psi)
•
Pirani gauge
•
Penning gauge
•
Pressure regulator (gas)
•
Mass flow controller (thermal)
•
Vacuum pump
•
Turbomolecular pump
•
Rotary vane pump
•
Roughing pump
•
Thermocouple
•
Pyrometer
•
PID controller
Please note, the links above are only for the first reference. Use your notes from the
Semiconductor Device Fabrication Module, books, NU Library, Google, etc. to be able
to answer on simple questions.
6. Request the clean room manager for final training and test session.
Important information
• This machine is designed for rapid thermal processing with temperature controlled by the
pyrometer.
• Thermocouples are used only for the pyrometer and heating uniformity calibration.
• Always keep the central thermocouple pulled down to the level of bottom plate.
• The pyrometer correctly measures temperatures from ~ 350°C.
• Always save the process history file even at the emergency stop. You can find your history
files in C:\Program Files\Jipelec\JetFirst200C\historicals, copy them on your USB drive,
open and analyse them in Excel.
Annealing ambient and gases
NH3 is currently unavailable.
When there is no leak in vacuum chamber, the pump rate is
from
1000 bar
to
9.9E-5
in 0 h 7 min
from
9.9e-5
to
9.9E-6
in 1 h 50 min
If you send a gas in the chamber under turbo-pumping (called "secondary pumping" in the
recipe) and if the pressure is increasing too much, the turbo pump is stopped and the turbo
gate valve is closed at pressures higher than 50 mbar. If you are pumping with turbo-pump
and start heating under turbo-pumping, there is no restriction for the temperature because
you have no heat convection due to the gases.
Maximum temperatures and durations
Do not exceed the following process durations recommended by the manufacturer:
T < 500°C:
180 min
T < 700°C:
60 min
T < 1000°C:
30 min
T < 1100°C:
15 min
T < 1200°C:
5 min
Process cooling water
From now until further notice, the RTP machine has the cooling water running always. Do not
touch the water valves on the wall. In the Maintenance -> Valve Control, you will see the top
green light always on, independently on clicking the "cooling" button. Nevertheless, click this
button to hear that the lamp cooling fans are on and off.
Heating uniformity
For the uniform wafer heating set the correction power coefficients in your recipe:
Central Zone:
1.00
Front-Rear zone:
1.40
Left-Right zone:
1.00
Starting the machine
Emergency
Shutdown
Button
Valves in ‘closed’ position:
Purging N2
Compressed
air
Cooling
water
out
N2/FG
Cooling
water in
O2
Open all gas valves.
Ultrahigh pure (UHP) N2 / forming gas line is
always set for N2. Request CR technician or CR
manager to change setting if you plan to use the
forming gas (FG).
Until further notice, the RTP machine has the
cooling water running always. Do not touch the
water valves on the wall.
All valves are open:
Enable O2, by turning switch clockwise if you are going to anneal in oxygen.
Press the green ‘on’ button.
Start the computer and click on Jetfirst icon to run the
Jetfirst managing software.
After running the Jetfirst managing software you will see
the “Main Menu” which offers 6 operating commands:
Recipes
to create, modify, display or delete a
recipe;
Processing
to load a recipe and run a process;
Maintenance
for manual control of the system;
Historical
to display saved process history;
Configuration
to
enter
calibration
tables,
configuration parameters, etc;
Exit
to return to "Windows" and to
terminal control
‘On’
button
Enable O2, by
turning switch
clockwise
Click on “Parameters” (in the top left corner)
Click “Maintenance”
Enter password: 123456
Under “Maintenance” Menu click on ‘Valves Control’ you will see the ‘Valves Control’ screen
as below.
The valve status indicator is:
• Red -
the valve is closed or fans are OFF
• Green -
the valve is open or fans are ON
Click these three buttons one by one for checking. During checking, the corresponding
component will run and the button is green, when making sure the component is working well
click the button again and the button will change to red. You will see the top green light
always on, independently on clicking the "cooling" button. Nevertheless, click this button to
hear that the lamp cooling fans are on and off.
Click “Purge” to allow chamber to be open: once the pressure is about 1000 mbar, click
“Purge” again to stop it.
Click “Exit”
Creating and editing a recipe
Click “Recipes” in the Main Menu. You will see:
To create a new recipe, press the command button "New".
To open an existing recipe, select a recipe file and click “Open”.
Enter:
• Recipe name;
• Operator's name;
• Comment (optional).
• Select a pyrometer calibration table from the drop-down menu:
“8inch” - for the 8 inch Si carrier wafer;
“6inch” - for the 6 inch Si carrier wafer;
Once the recipe information is entered, click "Edit" and enter or correct you recipe step by
step. Fill the following screen for all recipe steps:
Do not exceed the following process durations recommended by the manufacturer:
T < 500°C:
180 min
T < 700°C:
60 min
T < 1000°C:
30 min
T < 1100°C:
15 min
T < 1200°C:
5 min
For the uniform wafer heating set the correction power coefficients in your recipe:
Central Zone:
1.00
Front-Rear zone:
1.40
Left-Right zone:
1.00
Check the “Pyrometer” radio-button in ALL process steps.
Recipe example
1. Primary vacuum – 60s. To make the chamber becomes a vacuum.
2. N2 – 240s, 500sccm, vacuum - off. To fill the chamber with N2, total volume of the
chamber is 2 L.
3. Primary vacuum – 60 s.
4. O2 – 240s, 500 sccm. Filling the chamber for getting ready for oxidation process.
5. 20 s under pyrometer regulation temperature rises to 800°C with the O 2 flow of
100 sccm to maintain pressure inside the chamber as 1 atm.
6. Ramp up – 10 s, pyrometer temperature regulation; rises from 800°C to 900°C, O
flow 100 sccm.
7. Oxidation process – 180 s, Temp: 900°C, O 2 flow 100sccm
2
8. Ramp down – 10 s, 900°C to 500°C, O
9. Ramp down – 10 s, 500°C to 0°C, O
2
2
flow 100 sccm
flow 100 sccm
Click “Save recipe” to save the recipe.
Click “Display recipe” to display the recipe.
Choosing a PID table
Before progressing to the “Processing” Menu it is imperative that you access the PID
temperature control table.
From the Main Menu click “PID temperature controller”.
Click “Browse” and choose the “Waf8Inch Pyro Reg.pid” file (this is the PID table for 8 or 6
inch Si carrier wafer and temperature control by pyrometer).
Once open, click “Apply all yellow setpoints”. There are 8 temperature zones. The values
must be the same between the two columns in all 8 zones.
If the values are not the same (not uncommon), then change manually the value in the left
column and click “apply all yellow setpoints” again (re-entering more than once if this is
necessary).
Click “Exit”
Loading samples
From the Main Menu go to “Processing”, choose your recipe and click “Download recipe”.
The associated calibration table is also downloaded.
Click “Start processing” The system will ask for sample loading.
Open the chamber
Lift the lid by lifting
this bar upwards
Install in the platen 6 pins (3 short pins and 3
longer metal pins) for 8 inch wafer or
Install in the platen 3 quarts shaped pin if
annealing 6 inch wafer
Place the wafer on top of internal pins, make sure the wafer does not touch the external pins.
Platen prior to and after loading the 8 inch wafer
To anneal small samples, they can be placed atop the silicon carrier wafer. NOTE: do not
place the sample on the centre as it will block the pyrometer and the TC.
Make sure the thermocouple (TC) does not touch the wafer.
Close the chamber carefully and slowly.
Processing
When samples are loaded click on ‘Start Process’ once more.
The screen will display the process form and the process starts immediately.
After each process, there will be a compulsory cooling and venting cycle for 4 minutes.
During the process, the chamber is locked and remains locked until the cooling cycle has
finished.
You have to stay at the machine during the process.
If you have found any process fault or if the power stays at 100% more than 5 sec – click the
“Stop” button on the PC screen to stop the process. Do mot use the Emergency Shutdown
Button on the machine.
After Processing
After the cooling cycle has finished, save the process historical file. Use default name of
history file.
Always save the process history file even at the emergency stop.
You can find your history files in C:\Program Files\Jipelec\JetFirst200C\historicals, copy them
on your USB drive, open and analyse them in Excel.
The historical will be saved on the hard disk in the directory ‘Historical’.
When process has been saved, or if saving not needed, press ‘Exit’ to return to main menu.
Check that the pressure is around 1000 mbar which means that the chamber can be opened.
If not, go to Maintenance -> Vacuum and click “Purge flow on” to fill the chamber.
Open the chamber lid.
Remove your samples from atop the silicon carrier wafer.
Close the lid.
Go to Maintenance -> Vacuum and click “Low vacuum” to pump the chamber. When the
“Primary vacuum” gauge shows the pressure around zero, click “Exit”.
Closing down the RTP System
Click Exit in the Main Menu. Shut down the PC
Turn the RTP off by pressing the red “off” button shown
Finally close all gas 6 valves on the wall.
‘Off’
button
Operation with temperature control by thermocouples
This machine is designed for rapid thermal processing with
temperature controlled by the pyrometer.
Thermocouples are used only for the pyrometer and heating uniformity calibration.
Thermocouples location
•
TC1 is located in the centre of carrier wafer (lamp groups 1-1 and 1-2);
•
TC2 (if installed) is in the right hand side and measures the temperature in the “frontrear zone” (lamp groups 2-1 and 2-2);
•
TC3 (if installed) is in the front and measures the temperature in the “left-right zone”
(lamp groups 3-1 and 3-2).
Check the “Thermocouple” radio-button in ALL process steps.
Getting 3 very good contacts with 3 TCs is not so easy. Manufacturer recommends to bend
them and to install them like springs (or like the S letter).
Changing and creating PID table
PID parameters can be changed manually.
The following figure shows an effect on temperature profile of changing the P and I
parameters (D =0.79 for all profiles)
750
T, C
650
P - I
14 - 7
6.5 - 3.17
6.5 - 2
2
-2
setpoint
550
450
350
10
20
30
40
t, sec
The auto-tune procedure is differ from that one described in the manufacturer User’s Manual.
The temperature controller button is no more in the process window. To create new PID table
follow this procedure:
1. Open the PIMS software, and then click on Maintenance Mode and Manual Heating.
2. Write the coefficient factors to 0.5. Select the TC mode.
3. Write 0°C for thermocouple setpoint and click on Start. You can hear the power contactor
starting on.
4. Then at the bottom left of the window click on Temperature controller
5. With the Browse button select the PID table you want to use. It appears in yellow in the
left column. Click on "Apply all yellow setpoint" button and check that the yellow values
are now in the black column (in the right). If not do it again.
6. On temperature setpoint write 0 (it appears in yellow) and click on enter
7. On the right, click on Local Button and check the green led (Local) is ON
8. Then in temperature setpoint write 50°C and chec k that the furnace starts to heat and
regulate closed to 50°C.
9. Then increase the temperature setpoint (50°C by 50°C) up to the first zone limit (300°C).
When this temperature is reached click once on Auto tune button. The Auto tune led will
be green during the sequence.
10. Wait for the auto tune led going back to black colour. At this moment new PID parameters
appear.
11. With the browse button call again the PID table used (it appears in yellow).
12. In temperature zone 1 write in yellow the new parameters found. Do not click on enter. On
temperature setpoint write 0 in yellow too (no enter). The parameters have to stay in
yellow. Then click on save button and record the new table (you can choose a new
name).
13. Then write again 300°C in the setpoint. By the way the furnace keeps the same
temperature.
14. Then go on to increase the temperature for the second zone (400°C or other). Always
slowly increase the temperature by 50°C steps.
15. Do the same auto tuning sequence for each zone you need.