1
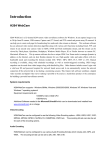
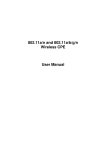
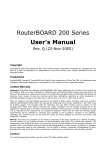
1 Channel MPEG 4 Video Server operation manual PDF 文件使用 "pdfFactory Pro" 试用版本创建 www.fineprint.com.cn Application Note Table of content 1.Introduction············································································································5 2.Overview ·················································································································6 3. Hardware Connection ···························································································8 3.1 Power Connection················································································································8 3.2 Camera Connection·············································································································8 3.3 Network Connection ···········································································································9 3.4 Internet Connection ··········································································································10 3.5 Change IP address of Computer·····················································································12 4.Installation & Settings··························································································16 5.Web View ··············································································································18 6.Web Page Function Interpretation ·······································································20 6.1 Basic Configuration···········································································································20 6.1.1 Administrator ··················································································································· 20 6.1.2 Change Password ············································································································· 22 6.1.3 Networking ······················································································································ 22 6.1.4 PPPoE······························································································································ 25 6.1.5 Dynamic DNS Setting ······································································································ 26 6.1.6 SMTP ······························································································································ 27 6.1.7 Date & Time Settings ······································································································· 28 6.1.8 Video Settings ·················································································································· 29 6.1.9 Audio Settings·················································································································· 34 6.1.10 ALARM EVENT············································································································ 35 6.2 Advanced Configuration ··································································································36 6.2.1 Maintenance····················································································································· 36 6.2.2 Status ······························································································································· 38 6.2.3 Log Settings ····················································································································· 39 6.3 Live view ·····························································································································40 6.4 REC View····························································································································42 Copyright 2006 2 of 2 PDF 文件使用 "pdfFactory Pro" 试用版本创建 www.fineprint.com.cn 25 May 2006 Application Note 6.5 AVI Transform ···················································································································43 7.Trouble Shooting··································································································44 8.Product Specification ···························································································45 Copyright 2006 3 of 3 PDF 文件使用 "pdfFactory Pro" 试用版本创建 www.fineprint.com.cn 25 May 2006 Application Note Before You Use The Video-Server is a surveillance system, so make sure it is legal before installing this unit for surveillance. Also: • Observe good location for the use of the machine during and after maintenance. • Keep your tool case away from walk areas so that other people will not trip over it. • Disconnect all power before performing a mechanical inspection Copyright 2006 4 of 4 PDF 文件使用 "pdfFactory Pro" 试用版本创建 www.fineprint.com.cn 25 May 2006 Application Note 1.Introduction The MPEG 4 Video server is designed to migrate your analog surveillance into high-performance IP surveillance solution, idea for keeping a watchful eye at your business anywhere through Internet. System integration and network utilization are optimized with sophisticated functions such as MPEG-4 streams, audio monitoring and motion detection. To install the Video Server, you need to have the following equipments: × 1 (included) • Video Server • Power Adaptor (12V/1A) × 1 (included) • Network Cable × 1(not included) • Installation CD × 1(included) • Video Cable × 1 (not included) • Analog Camera × 1 (not included) • ADSL (Internet connection) × 1(not included) • One fixed IP or floating IP × 1(not included) • HUB or Router × 1(not included) Video Server Copyright 2006 Power Adaptor 5 of 5 PDF 文件使用 "pdfFactory Pro" 试用版本创建 www.fineprint.com.cn 25 May 2006 Application Note 2.Overview Video Server outlook 1 Front Side View 2 Ethernet 10/100: Network Connection MIC: Audio input DC 12V: 12V/1A Power Jack Copyright 2006 6 of 6 PDF 文件使用 "pdfFactory Pro" 试用版本创建 www.fineprint.com.cn 25 May 2006 Application Note Rear Side view 3 Ping 1-10: GPIO Interface for alarm system Video_IN: BNC connection for Video input 485A/485B: RS485 for PTZ control Copyright 2006 7 of 7 PDF 文件使用 "pdfFactory Pro" 试用版本创建 www.fineprint.com.cn 25 May 2006 Application Note 3. Hardware Connection 3.1 Power Connection • Power on Video server and your analog camera -- connect DC12V/1A power adapter to Video Server and power on. And power on the Camera which you planed to connect to the Video Server. 4 3.2 Camera Connection • Connect your camera and the Video Server. Copyright 2006 8 of 8 PDF 文件使用 "pdfFactory Pro" 试用版本创建 www.fineprint.com.cn 25 May 2006 Application Note 5 3.3 Network Connection Connect the Router and Video Server by network cable, for detail please reference to 3.4. 6 Copyright 2006 9 of 9 PDF 文件使用 "pdfFactory Pro" 试用版本创建 www.fineprint.com.cn 25 May 2006 Application Note 3.4 Internet Connection • Method One: Connect to internal network infrastructure. To have a successful connection, Video server and the subnet of your company’s internal network should be on the same Subnet, The default IP address of the Video Server is 192.168.1.126, The steps are as below: 1. Change the IP address of the Video server to match your network infrastructure, you need to connect the Video server to one computer by the network cable 2. Change the IP of the computer to “192.168.1. x” 3. Click on “Install” file in the included CD and install the OCX on the computer. 4. Type 192.168.1.126 on the IE to enter Video Server IE page. 5. Login in Video Server (ID: admin, no password) 6. Click on the Basic ConfigurationàNetwork 7. Change the IP of the video server to match your network infrastructure. (For example 192.168.200.x) , For detail please refer to 3.5 and 6.1.3 . The network diagram is shown in the picture below. Video Server Intranet 7 • Method Two: Connect the Video Server to a Router Video Server connects to router directly by the network cable. At this moment, Video Server’s setting is Private IP Address. To properly connect to Internet, the client should go through with router’s forward rules. It is shown in the picture below. Ask the Router provider how to use Virtual Server or DMZ application if necessary. Copyright 2006 10 of 10 PDF 文件使用 "pdfFactory Pro" 试用版本创建 www.fineprint.com.cn 25 May 2006 Application Note 8 • Method Three: Connect the Video Server to ADSL modem Video Server connects to Internet directly. If it is a fixed IP, you have to type the IP Address provided by your ISP. If it is a floating IP, you have to type the account and password provided by the ISP to dial-up. The method to change the IP is as below: 1. Change the IP address of the Video server to be as the same as the ISP provided, you need to connect the Video server to one computer by the network cable. For detailed please refer to 3.5 2. Change the IP of the computer to “192.168.1. x” 3. 4. 5. 6. 7. Click Install file in the included CD and install the OCX on the computer. Type 192.168.1.126 on the IE to enter Video Server IE page. Login in Video Server (ID: admin, no password) Click on the Basic ConfigurationàNetwork Change the IP of the video server provided by your ISP (For example 210.111.83.231) , 8. If it is a floating IP, Click on Basic ConfigurationàPPPOE, Enable it and type in the ID/password provide by your ISP. 9. If it is a floating IP, Click on Advance ConfigurationàDDNS, Apply a DDNS and type in your DDNS account/user name/password. For detail please refer to 6.1.6 Copyright 2006 11 of 11 PDF 文件使用 "pdfFactory Pro" 试用版本创建 www.fineprint.com.cn 25 May 2006 Application Note Internet Video Server 9 3.5 Change IP address of Computer Checking Network Configuration of your computer ① Go to Start -> Settings -> Control Panel, then select Network and Internet Connection ② Check the properties in Local Area Connection icon in use Copyright 2006 12 of 12 PDF 文件使用 "pdfFactory Pro" 试用版本创建 www.fineprint.com.cn 25 May 2006 Application Note ③ Check the properties in Internet Protocol [TCP/IP] ④ If IP address is not set automatically, please follow as shown on Copyright 2006 13 of 13 PDF 文件使用 "pdfFactory Pro" 试用版本创建 www.fineprint.com.cn 25 May 2006 Application Note ⑤ IP address of the Video server must have same subnet but different number from the IP address of computer (i.e. Video server :192.168.1.126 , computer : 192.168.1.21) Copyright 2006 14 of 14 PDF 文件使用 "pdfFactory Pro" 试用版本创建 www.fineprint.com.cn 25 May 2006 Application Note Copyright 2006 15 of 15 PDF 文件使用 "pdfFactory Pro" 试用版本创建 www.fineprint.com.cn 25 May 2006 Application Note 4.Installation & Settings Before installing Video Server, be sure to install OCX located in the CD-ROM. The File name is “Install ” • UPnP Service The UPnP functionality is enabled for you to find the location of the Video Server rapidly. To install the UPuP service on your computer, open the Control Panel from the Start Menu and select Add/Remove Programs. Select Add/Remove Windows Components and open the Networking Services section. Click Details and then select UPnP as the service to add. • Search IP Address You can find the Video Server’s IP address rapidly with the tool located on the CD ROM, UPnPGetIP. The operation method is easy. Click the Get IP button to show the IP address of Video Server connected to the computer or router. Step 1: UPnPGetIP Step 2: With the Video Server connected to the router, and by clicking the button, the Video Server’s IP Address and MAC Address will be displayed. Copyright 2006 16 of 16 PDF 文件使用 "pdfFactory Pro" 试用版本创建 www.fineprint.com.cn 25 May 2006 Application Note Note: IP address is the same default setting :192.168.1.126 Copyright 2006 17 of 17 PDF 文件使用 "pdfFactory Pro" 试用版本创建 www.fineprint.com.cn 25 May 2006 Application Note 5.Web View Connect the Video Server the the Computer with same subnet(eg. The computer’s IP is 192.168.1.117, Video server’s IP is 192.168.1.126) , Enter the Video Server’s IP Address in the Location/Address field of you browser(e.g.http://192.168.1.126 ) to connect to the Video Server. The default user name is admin, and you don’t have to enter the password. Click OK. The camera’s Live View page is now displayed in your web browser: Copyright 2006 18 of 18 PDF 文件使用 "pdfFactory Pro" 试用版本创建 www.fineprint.com.cn 25 May 2006 Application Note • Play/Stop/Record button – Play- Left Click on the mouse to display the video. Stop- when you click stop , the live video will be stopped. REC –allows you record the live video & audio. • 2. Snap Shot button – the Snap Shot button saves a snapshot of the image currently being displayed. • 3. View Size button – Digital Room-IN, Room-OUT, adjusts the size of live video image. • 4. Pan/Tilt/Zoom controls-- the Video Server supports P/T/Z camera, Type in the specific number to Pan/Tilt/Zoom your camera remotely. • 5. Optimized By Current Connection –Enable this function to optimize your network bandwidth. • 6. Functions – allows to change parameters in the 4 categories: Basic Configuration, Advance Configuration, Live View and REC View. Note: For detailed information please refer to chapter 6 as below. Copyright 2006 19 of 19 PDF 文件使用 "pdfFactory Pro" 试用版本创建 www.fineprint.com.cn 25 May 2006 Application Note 6.Web Page Function Interpretation 6.1 Basic Configuration Note: any change made to this page will restart the system in order to validate the changes .Make sure every field is entered correctly before clicking save 6.1.1 Administrator • User List User List --adds or removes users (the total user & administrator number is 20) User name—shows user’s name User group--there are two types :user and administrator; only the administrator have the privilege to change all parameters ,especially change user’s password . Note: when user initially access the video server , the default user name is admin ,user group is administrator. User can’t remove the default user name ;If user want to change user name and password , user may add the new user and password which can be used to access the video server on the second. add new user steps as below: • Add new user (only administrator have privilege to add or remove user name ) 1.Click Add , there will be added a text box Copyright 2006 20 of 20 PDF 文件使用 "pdfFactory Pro" 试用版本创建 www.fineprint.com.cn 25 May 2006 Application Note 2.user name-- enter new user name 3.password-- enter password twice 4.user group—choose user group : user or administrator 5. Click save, 6. Click reset : the text box of user name & password is clear • Remove user Administrator can remove the useless ID as below. Copyright 2006 21 of 21 PDF 文件使用 "pdfFactory Pro" 试用版本创建 www.fineprint.com.cn 25 May 2006 Application Note • Maximum number of simultaneous viewers limited to: 20 You can enter simultaneous viewers number from 1 to 20. 6.1.2 Change Password Note: When you initially access the video server ,default user name is admin and don’t need password, you don’t have to enter the password User name—shows user name : admin Password--enter your password twice ,click save 6.1.3 Networking • IP Address Configuration This section enables you to change IP address, Subnet mask, Default router, DNS server address and HTTP port. Copyright 2006 22 of 22 PDF 文件使用 "pdfFactory Pro" 试用版本创建 www.fineprint.com.cn 25 May 2006 Application Note • IP Address Configuration – there are 2 methods to set up IP Address. One is obtaining IP address settings automatically (DHCP), and the other is assigning IP address. DHCP server provides automatic configuration to computers that are connected to it. It assigns an IP address to the computer, and gives it the network netmask, gateway IP, and DNS IPs. If you choose to disable the DHCP server, you can configure your computers manually to use the router. If your network supports DHCP, click the button of View to obtain the IP address automatically from the DHCP server. Click obtain IP address via DHCP, there will be popped a dialog box as below: Copyright 2006 23 of 23 PDF 文件使用 "pdfFactory Pro" 试用版本创建 www.fineprint.com.cn 25 May 2006 Application Note Note :To avoid some abnormal status ,pay attention to the text before you click OK or Cancel The lease time determines how long a specific computer will be assigned a specific IP. This can be as short as a few minutes or as long as months. If you want to make sure that your computers keep the same IPs for a long time, then set a long lease time. • DNS configuration – the Video Server is allowed to set up 2 DNS Servers. Because domain names are alphabetic, they're easier to remember. The Internet however, is really based on IP addresses. Every time you use a domain name, therefore, a DNS service must translate the name into the corresponding IP address. For example, the domain name www.example.com might translate to 198.105.232.4. Note: When using DHCP, you can also choose DNS Server it provides. • HTTP– sets up which Port to be transmitted the data from the Video Server. If the HTTP port is changed, it is only possible to access the video server if the port is known. The port number have to be entered in the URL: http://<video server>:<port> Note: the default HTTP port number is port 80. For example, when you change it to Port 1000 (IP Address: 192.168.1.100), and you browse this page, and the address should be ‘192.168.1.100:1000’ • DHCP Clone Mac DHCP Clone Mac – sets up Mac Address to connect to Cable Modem. Mac Address is the one on the Network Interface Card (NIC) provided by Internet Service Provider (ISP). MAC addresses are used as the source and destination addresses for data packets on a LAN. A MAC address is written as 12 hexadecimal characters (0-9, A-F). The grouping of those 12 characters into pairs separated by colons (00:20:40:70:F4:84) or hyphens (00-20-40-70-F4-84) is purely conventional, and is not related to function. Every network device in the world has a unique MAC address. The first 6 characters of the MAC address are unique to the manufacturer of the device. Allocation of MAC addresses is administered by the IEEE in the USA. Note: When using this function, the DHCP should be enabled. Copyright 2006 24 of 24 PDF 文件使用 "pdfFactory Pro" 试用版本创建 www.fineprint.com.cn 25 May 2006 Application Note 6.1.4 PPPoE • Configuration • • • • Enable PPPoE – enables or disables this function. In addition, PPPoE requires no major changes in the operational model for Internet Service Providers (ISPs) and carriers. The significance of PPP over Ethernet has to do with its far greater ease of use versus competing approaches. By making high speed access easier to use for end consumers, and more seamless to integrate into the existing infrastructure for carriers and ISPs, PPPoE could speed the widespread, also PPP over Ethernet provides a major advantage for service providers by maximizing integration with - and minimizing disruption of - service providers' existing dial network infrastructures. Through tight integration with existing back office automation tools that ISPs have developed for dial customers, PPPoE enables rapid service deployment and cost savings. From authentication, accounting and secure access to configuration management, PPPoE supports a broad range of existing applications and services. User Name – enters the account provided by ISPs. Password – enters the password provided by ISPs. Email Notification when IP is changed: enables Email Notification when IP is changed Copyright 2006 25 of 25 PDF 文件使用 "pdfFactory Pro" 试用版本创建 www.fineprint.com.cn 25 May 2006 Application Note • Status Click Connect, then click Refresh, you can see the IP Address provided by the ISPs in the status text box 6.1.5 Dynamic DNS Setting Unlike DNS that only works with static IP addresses, DDNS works with dynamic IP addresses, such as those assigned by an ISP or other DHCP server. DDNS is popular with home networkers, who typically receive dynamic, frequently-changing IP addresses from their service provider. To use DDNS, one simply signs up with a provider and installs network software on their host to monitor its IP address. You can go to the web site of DynDNS and, and register for a dynamic domain name, which can be used to access it over Internet. Free of charge. Or you can’t use the service. For more information, please go their web sites. DynDNS : http://www.dyndns.com ; PeanutHull : www.oray.net • Choose Server -- There are 3 options including: disable 、 DynDNS 、 PeanutHull ; Choose disable ,the function is invalid ; Choose the desired DDNS Server. DynDNS or PeanutHull where you have got a dynamic domain name . Copyright 2006 26 of 26 PDF 文件使用 "pdfFactory Pro" 试用版本创建 www.fineprint.com.cn 25 May 2006 Application Note • DNS Account – it is an account provided by DDNS Server service. For example, imagiatek.dyndns.org is the Host Name applied by your DNS, and this is your Host Name. • User Name -- enter the applied user name. • Password -- enter the password of the user name. • Manual_Update -- click this button, you are allowed to inform the DDNS Server manually of your new IP address. • Status—You can see the Initializing DDNS progress 6.1.6 SMTP To sep up the simple E-mail transmission function. To set up mail server, please use the mail server provided by your ISPs. SMTP Settings • Mail server 1--The domain name or IP address of the external email server. • From E-mail address1--The email address of sending messages from one server to another • To E-mail address 1 --The email address of the recipients • Authentication1-- if the mail severs require authentication, please click Yes here, and enter User name and Password in the text box provided. • User Name1-- Some SMTP server requires an account name for logging in. Refer to your SMTP Administrator for detailed information. • Password 1-- The password for the SMTP server account. • Mail server 2-- The domain name or IP address of another email server once the previous server is unreachable. • From E-mail address2--The email address of sending messages for the second SMTP server • To E-mail address 2--The email addresses of the recipients for the backup server. • User Name 2-- The account login name for the second SMTP server. • Password 2--The password is for the second SMTP account name. Copyright 2006 27 of 27 PDF 文件使用 "pdfFactory Pro" 试用版本创建 www.fineprint.com.cn 25 May 2006 Application Note 6.1.7 Date & Time Settings • Current Server Time – shows the current date and time displayed by Video Server. • Time Zone – selects your time zone from the pull-down list. • Time Mode – the Video Server will obtain the time from an NTP server. Specify the NTP server’s IP address or host name. • Update Server Time – sets the time from the clock on your computer. It also allows you to manually set the time and date. Copyright 2006 28 of 28 PDF 文件使用 "pdfFactory Pro" 试用版本创建 www.fineprint.com.cn 25 May 2006 Application Note 6.1.8 Video Settings • Network Traffic Control • Auto Mode – enable or disable Auto Mode. The Internet is a global network, basically a vast grouping of computers transferring data to one another. Connection speeds will vary depending on many conditions such as the time of day and the amount of congestion on the Internet in general. When you request a Web page from a server on the Internet, both the request and the resulting page travel over a series of links that help comprise the Internet. Points between links are often referred to as "hops." So depending on the number of people connecting to our servers, the number of "hops" taken to get to our site, the quality of the connections between each hop to Copyright 2006 29 of 29 PDF 文件使用 "pdfFactory Pro" 试用版本创建 www.fineprint.com.cn 25 May 2006 Application Note this site and various other factors, your Internet connection speed will always vary. Enable Auto Mode function ,the video server can automatically get the best statue according to various Internet connection speed. • Tune –when the upload bit stream is limited, we provide two options: Frame rate and Compression which allows you to choose the reduced data is QP value or Frame Rate. Choose Frame rate ,the video view transmission speed is very well ,but the view quality don’t always be very well; Choose Compression ,you can get the best video view quality but can’t get the best transmission speed . • Internet Speed – it is allowed to adjust the settings according to your Internet speed. Three modes, High, Medium, Low. Generally, it is suggested to select High. Select Medium instead if there is a 10-second pause, Select Low if the 10-second pause appears frequently. • Image Appearance • Resolution – you are allowed to change the image resolution. We provide 4 resolutions: D1, Field, CIF, QCIF. The following table is the size of the resolutions: D1 Field CIF QCIF PAL 720*576 720*288 352*288 176*144 NTSC 720*480 720*288 352*240 176*144 PAL is Short for Phase Alternating Line, the dominant television standard in Europe. NTSC is Short for National Television System Committee. The NTSC is responsible for setting television and video standards in the United States .Whereas NTSC delivers 525 lines of resolution at 60 half-frames per second, PAL delivers 625 lines at 50 half-frames per second. • Compression – you are allowed to change the video compression rate. See table below, for the transmission speed under the resolution of CIF, P/I=29. Compression 8 12 14 16 Bit rate 170-850 kbps 150-600 kbps 140-570 kbps 130-520 kbps Note: the default compression setting is 8 There are four options including "Brightness", "Contrast", "Saturation" and ”Hue” You can adjust video view according to yourself favorite Each field has 266 levels ranged from 0 to 255The user may press to fine-tune Copyright 2006 30 of 30 PDF 文件使用 "pdfFactory Pro" 试用版本创建 www.fineprint.com.cn 25 May 2006 Application Note the image. When the image is O.K, click save If parameters are changed without saving, they will be used until the next system startup. Brightness – 0-255 (the default is “128”). • Contrast – 0-255 (the default is “128”). • Saturation – 0-255 (the default is “128”). • Hue – 0-255 (the default is “0”). • Video stream • • Limit frame rate to – adjusts the amount of the frame per second allowable (we provide the amount frame rate from 1~30, the more the frames are transmitted, the smoother the video will be) Frame rate is the amount of frames that go by in video per unit of real (actual) time (usually one second). 30 fps means that 30 frames occur per second, while 24 fps means 24 frames occur per second. Note: The default frame rate is NTSC 30fps ,PAL25fps. • P/I Ratio (P frame;I frame) – changes P and I frame’s ratio. (the lower the ratio of I:P, the clearer the video will be, but the size of the files will increase). • New Prediction – sets the frame to refer the previous I frame. • Client Motion Detection (Windows) • Sensitivity – adjusts the sensitivity of motion detection triggers. Range: high - low, 0 - 999. Enter the sensitivity number in the text box, click save , return live view, then you can find many red dynamic dots in the screen ,When the objects which have been detected by video server are more active ,the red dynamic dots are more in the screen .The smaller sensitivity number you enter ,the more red dynamic dots are in the screen .When you enter 0 sensitivity number, the sensitivity is the highest . Copyright 2006 31 of 31 PDF 文件使用 "pdfFactory Pro" 试用版本创建 www.fineprint.com.cn 25 May 2006 Application Note • • Erosion – deletes the unnecessary dynamic dots detected in the screen. Range: 0 - 8 (0 means no deletion) Dilation – mends the dynamic vacancy detected in the screen. Range: 0 - 8. (0 means a fully mend). Motion Detection enabled – enables/disables motion detection. • Water Mark Enabled – enables/disables water mark. The function can safeguard you privilege ,it make sure your video server • recorded video is dependable ,as below : Copyright 2006 32 of 32 PDF 文件使用 "pdfFactory Pro" 试用版本创建 www.fineprint.com.cn 25 May 2006 Application Note • Snap Shot • Path & File Name – sets up Path and File Name to store the recorded video files. • • Label Color – sets up Lable Color . Enter the number which may display various color .(color range) Time Label – turns on/off Time Lable. Time Lable will display the current date and time in the record video ,as below: Copyright 2006 33 of 33 PDF 文件使用 "pdfFactory Pro" 试用版本创建 www.fineprint.com.cn 25 May 2006 Application Note • OSD • OSD Text – enters the text in the text box to be displayed on the video image (only 32 English bytes). • • • • • Color – sets up the color of the displayed text, 0 - 255. X – enters the displayed text’s coordinates x. Y – enters the displayed text’s coordinates y. OSD Enabled – enables OSD.(picture) OSD FontSize –choose the FontSize ,range from 1 to 20 6.1.9 Audio Settings Audio Settings • Audio Compression – 4 audio compression rates are provided, 16, 24, 32, 40k bit/sec.The higher audio compression rate is ,the better audio quality is. • Audio Volume – audio volume is adjustable, range 0 - 3. Audio Enabled – enables audio. Copyright 2006 34 of 34 PDF 文件使用 "pdfFactory Pro" 试用版本创建 www.fineprint.com.cn 25 May 2006 Application Note 6.1.10 ALARM EVENT Embedded Motion Detection Event • Sensitivity : you can enter the sensitivity number from 0~255,the smaller sensitivity is ,the higher sensitivity is .When you enter the sensitivity number “0”, the sensitivity is the highest. The embedded sensitivity function is different from the client sensitivity function .If you enable the client sensitivity function, you can find many red dynamic dots ;but when you enable the embedded sensitivity function ,you can’t find red dynamic dot . • Motion Detection enabled: enables Motion Detection • Send E-mail with a JPEG: enables send E-mail with a JPEG • Set minimum interval between consequent email send :three potions can be provided including :disable 、10seconds、20seconds、30seconds. • disable --when the alarm event occurs , the video server will send email one time only ; • 10seconds-- when the alarm event occurs, the interval consequent email send is 10 seconds; • 20seconds-- when the alarm event occurs, the interval consequent email send is 20 seconds; • Choose a mail server—two potions can be provided including :Mail server1、Mail server2 Note : you can refer to page26. Copyright 2006 35 of 35 PDF 文件使用 "pdfFactory Pro" 试用版本创建 www.fineprint.com.cn 25 May 2006 Application Note 6.2 Advanced Configuration 6.2.1 Maintenance • Maintain Server • Restart – to reset hardware. • Restore – the unit is restarted and most current settings are reset to the factory default values. The only setting saved is the IP address. • Default – to reset to the factory default settings. • Upgrade server Specify the firmware to upgrade to: click Browse ,specify the latest firmware version which you want to upgrade , then click upgrade Note : please wait a moment because the firmware upgrade need some time, as below Copyright 2006 36 of 36 PDF 文件使用 "pdfFactory Pro" 试用版本创建 www.fineprint.com.cn 25 May 2006 Application Note Copyright 2006 37 of 37 PDF 文件使用 "pdfFactory Pro" 试用版本创建 www.fineprint.com.cn 25 May 2006 Application Note 6.2.2 Status • System Information – shows the firmware version you are using and the version’s date. • Network Status • Ethernet MAC Address shows the Video Server’s current MAC Address. • Lan IP Address – shows the Video Server’s current IP Address. These are the IP settings of the LAN (Local Area Network) interface for the device. These settings may be referred to as "private settings". You may change the LAN IP address if needed. The LAN IP address is private to your internal network and cannot be seen on the Internet. The default IP address is 192.168.0.1 with a network mask of 255.255.255.0 • • Lan Netmask – shows the Video Server’s current Netmask. Lan Gateway Address – shows the Video Server’s current Gateway Address. DHCP Status – shows the Video Server’s DHCP is enabled or disabled. • Camera Information • Camera Type – show the camera’s specification. The default value is NTSC. Here shows your camera’s specification. The factory default value of Camera Type is NTSC. • • Total http live-view users – shows the number of active users, which excludes those who only operate on the screen without played video image. The totle number of active users is 20. Copyright 2006 38 of 38 PDF 文件使用 "pdfFactory Pro" 试用版本创建 www.fineprint.com.cn 25 May 2006 Application Note • OCX Information • OCX Current Version—shows the OCX current version • OCX LastTime---shows date&time of the latest upgrade OCX • OCX Path—shows the upgrade OCX stored path 6.2.3 Log Settings You are allowed to check the user name, IP address, and to select Flash write time. • Log Configuration • Mode – you can choose the methods to store the recorded files: in DRAM or Flash. • Flash write time – when you choose to store in Flash, you are allowed to set up the interval to write to the flash. You can specify a value between 1 – 65535 minutes. • Log Status – displays the information such as the log-in users, time and IP address. Copyright 2006 39 of 39 PDF 文件使用 "pdfFactory Pro" 试用版本创建 www.fineprint.com.cn 25 May 2006 Application Note 6.3 Live view Click Live View to enter the main page of the website. The Live View Page • Play button – plays the live video stream. • Stop button – stops the live video stream. • REC button – records the camera’s live video to the computer. Click the button again to stop recording. The recorded files will be saved to c:/. • Snap Shot button – saves a snapshot of the video image currently being displayed. According to the below steps the recorded files will be saved to c:/. 1. select a resolution to display an image. 2. Click the snap shot button Copyright 2006 40 of 40 PDF 文件使用 "pdfFactory Pro" 试用版本创建 www.fineprint.com.cn 25 May 2006 Application Note Note: The camera image can be saved to c:// specified folder • View Size button – adjusts the video image size. Four options: x1/2, x1, x2, x4. The buttons under the Play button are for PTZ control. to pan the camera up × unit time Up to pan the camera down × unit time Down to pan the camera left × unit time Left to pan the camera right × unit time Right to zoom the camera out × unit time Zoomto zoom the camera out × unit time Zoom+ to focus the camera in × unit time Focusto focus the camera out × unit time Focus+ each unit time is 0.5 sec. each unit time is 0.5 sec. each unit time is 0.5 sec. each unit time is 0.5 sec. each unit time is 0.5 sec. each unit time is 0.5 sec. each unit time is 0.2 sec. each unit time is 0.2 sec. For example, to pan the camera up for 3 seconds, please type 6 in the number column, on the right side of Up. Click Up button. To focus the camera in for 1 second, type 5 in the number field, on the right side of Focus+. Click Focus+ button. Copyright 2006 41 of 41 PDF 文件使用 "pdfFactory Pro" 试用版本创建 www.fineprint.com.cn 25 May 2006 Application Note • Optimized By Current Connect When multi users connect to the server, click Submit. The Auto Mode will optimize according to the current Internet Connection. (Firstly please execute Auto Mode function in the Video Setting, so as to perform the function of Submit) 6.4 REC View REC View --clickBrowse, choose recorded video which you want to play ; click play , the recorded video will play ; click stop ,the recorded video will stop. Copyright 2006 42 of 42 PDF 文件使用 "pdfFactory Pro" 试用版本创建 www.fineprint.com.cn 25 May 2006 Application Note 6.5 AVI Transform AVI transform – click Browse ,choose recorded video ,click transform ,the AVI format of recorded video will be transform into AV format. Copyright 2006 43 of 43 PDF 文件使用 "pdfFactory Pro" 试用版本创建 www.fineprint.com.cn 25 May 2006 Application Note 7.Trouble Shooting 7.1 Why the Video Server speed is lower than 30 fps? A: The video server can process 30 frames per second internally. However the total performance is subject to many coefficients as follows: 1. Network throughput. 2. Bandwidth share. 3. Number of users. 4. The complicated objects in view results in larger image file. 5. The level of your PC or notebook which is responsible for displaying images. In general, the transfer rate in a general environment can achieve 30fps at D1 if the bandwith was not limited. 7.2 What if I forget the password? A: If you are the first time to login, the default account is admin and no password required. If you have changed the password and forget it, ask the administrators for the password. If you are the administrators, the only way to regain access to Video Server is to utilize the default setting button on the rear panel (beside power jack) of the Video server to restore the factory settings. 7.3 Why is the timestamp different from the system time of my PC or notebook? A: The timestamp is based on the system time of Video Server. It is maintained by a real-time clock inside and automatically synchronizes with the time server if Video Server is connected to the Internet and the function is enabled. Differences of several hours may result from the time zone setting. 7.4 Why can I not watch video from Video Server after I login? A: There are many possible scenarios regarding this problem, 1. Check the Video Server’s installing on the user’s manual to confirm all the setting is well done. 2. Check if the Camera is running and connected to video server well. 3. Check if the Internet Explorer’s security level is adjusted and enable ActiveX. 4. If the problem still exists, the current users may be over the system allows. Copyright 2006 44 of 44 PDF 文件使用 "pdfFactory Pro" 试用版本创建 www.fineprint.com.cn 25 May 2006 Application Note 8.Product Specification Video Frame Rate: 30fps @D1 or CIF (NTSC)/ 25 fps @D1 or CIF (PAL)/ 30 fps @ VGA/QVGA(Computer System) Standard MPEG-4 Compression Resolution: D1/FIELD/CIF/QCIF Audio Audio Input : 3.5mm jack for Mic in Audio Compression (16/24/32/40 kbps) Communication LAN: 10/100Mbps Ethernet, auto-sensed Protocol:ARP,TCP,UDP,IP,HTTP,SMTP,FTP,DHCPclient,NTP,DDNS,uPnP,PPPoE, TFTP System CPU Imagia MCP-4010 Video Decoder: ADI 7180 SDRAM: 8M bytes DDRAM: 32M bytes Flash ROM: 2M bytes Software Browser: Internet Explorer 5.0 or above Support Web Base management OS support: Microsoft Windows NT4.0, 2000, XP Interface One BNC Connector One RJ45 Port I/O and Control 3 GPIO input 4 GPIO output Features 1. Video Connection Detection 2. Two level user login (Admin/User) 3. 2 sets DNS server setting 4. 2 sets SMTP server setting 5. Time Zone setting Copyright 2006 45 of 45 PDF 文件使用 "pdfFactory Pro" 试用版本创建 www.fineprint.com.cn 25 May 2006 Application Note 6. Automatically Network Traffic Control 7. Resolution setting (D1/CIF) 8. Brightness/Contrast/Saturation/Hue setting 9. Frame rate setting 1~30 for NTSC, 1~25 for PAL 10. Motion Detection (enable/disable/Sensitivity) 11. Water Mark (Enable/Disable) 12. Snapshot –JPG format with Time Label enable/disable 13. OSD (text/color/location/enable/disable: Max 32 characters) 14. Client side Recording 15. Restart/Restore/Default setting Maximum Users 20 users maximum on line monitoring Others Power Adapter: DC 12V 1A power adapter Power LED Green Color Link/Active Ethernet LED Green Color Operating Temperature 0°C—70°C Dimension (HxWxD) 28mm x 70mm x 150mm Weight :143g Copyright 2006 46 of 46 PDF 文件使用 "pdfFactory Pro" 试用版本创建 www.fineprint.com.cn 25 May 2006