1
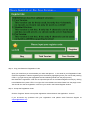
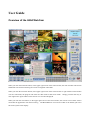
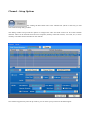
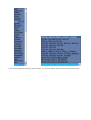
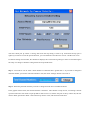
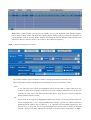
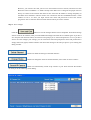
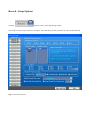
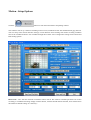
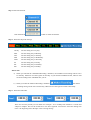
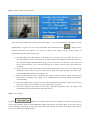
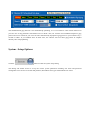
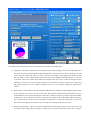
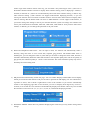
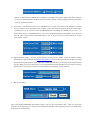
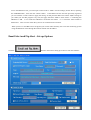
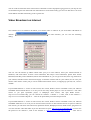
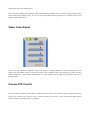
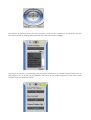
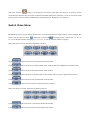
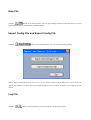
Introduction
H264 WebCam
H264 WebCam is a 32-channel h264 remote video surveillance software for Windows. It can capture images at up
to 30 fps from IP camera, USB camera, Capture card, TV board, and PTZ control and preset many IP cameras! It
can help you to create web page for broadcasting live audio and video stream on Internet. This webcam software
has an advanced video motion detection algorithm along with various alert functions including Email, FTP, and
sound. It can encode your camera video to H264, XVID and Flash multimedia stream, and this stream can be
viewed by Flash player, Quicktime, Realplayer, Windows Media Player, IE or Firefox browser on remote PC,
Macintosh, iPhone etc. This ip camera software also has a unique H264 User Name mode to manage dynamic ip
address on the Internet, and can host Dyndns domain for you. High quality video and audio effects with low
bandwidth needs and recording file formats include ASF, WMV, MP4, MOV, FLV, SWF or AVI. Manual
recording is available, along with scheduled recordings as well as motion-triggered recording. JPEG image
snapshots can be made from video images along with detailed log files. Other features include secure Login with
a valid user ID and password required for network based access and it can automatically restore the network
connection if the network link is lost during a monitoring session. This feature rich software combines a digital
video recorder and digital video server making it possible to be used as a stand-alone product or the centerpiece
for building a powerful surveillance network.
System requirements
H264WebCam supports - Windows 98/Me, Windows 2000/2003/2008, Windows XP, Windows Vista and
Windows 7 operating systems!
Equipment requirements are:
1000MHz Intel or AMD CPU
1GB Memory.
Additional Software needed is the Microsoft DirectX9 which can be downloaded and installed from
www.microsoft.com at no charge.
Video Encoding
H264WebCam can be configured to use the following Video Encoding options - H264, H263, H261, XVID,
MPEG4, MPEG2, MPEG1, MJPEG, FLV, MSMPEG4, WMV3 etc. The encoding bit-rate can also be set
for each of the encoding options.
Audio Encoding
H264WebCam can be configured to use various Audio Encoding formats which include AAC, MP3, and
WMA. The encoding bit-rate can be set to 32K, 24K, 16K or 8K.
Recording Format
H264WebCam can be configured to use various video recording formats as well. Some of the supported
formats are - AVI, MP4, MOV, FLV, SWF, ASF and WMV.
Supported Device
1, USB Cameras which support DirectShow standard.
2, TV boards which support DirectShow standard.
3, Capture cards which support DirectShow standard. You need to install WDM driver.
4, Network IP Camera :
•
01) 4XEM :
WLPTS, WPTS, WFDI, W45, W90, EVS100,
4X-IP7xxx, 4X-PT71xx, 4X-PZ71xx, 4X-FD71xx, 4X-IZ71xx.
•
02) Abs :
311M, 312M, 421M, 422M,
4210, 4220.
•
03) Acti :
TCM-5311, TCM-5312, TCM-4101, TCM-4301, TCD-2500,
ACM-8511, ACM-8201, ACM-8211, ACM-7411, ACM-5711,
ACM-5601, ACM-5611, ACM-5001, ACM-4200, ACM-4201,
ACM-4000, ACM-3511, ACM-3401, ACM-3411, ACM-3311,
ACM-3211, ACM-3001, ACM-3011, ACM-1511, ACM-1431,
ACM-1432, ACM-1311, ACM-1231, ACM-1232, ACM-1011,
ACD-2000Q, ACD-2100, ACD-2200, ACD-2300, ACD-2400,
CAM-7300, CAM-6600, CAM-6500, CAM-5300, CAM-5301,
CAM-5321, CAM-5201, CAM-5221,
SED-2120, SED-2140, SED-2320Q, SED-2610 .
•
04) Airlink101 :
AICN777W, AICN747(W), AICN500(W), AIC250(W),
AICAP650(W), AICP310 .
•
05) Airlive :
OD-600HD, OD-325HD, POE-250HD, POE-200HD, POE-260CAM,
WL-2000CAM, WL-2600CAM, WL-1000CAM, WL-1200CAM,
POE-100CAM, POE-200CAM, OC-600(W), OC-800(W), OD-300CAM
•
06) Allnet :
All2205, All2281, All2282, All2288, All2272, All2298 .
•
07) Apexis :
APM-J010-WS, APM-J011-WS, APM-J012-WS,
APM-J018-WS, APM-J801-WS, APM-J802-WS, APM-J0233-WS-IR,
APM-J0111-WS, APM-J0118-WS, APM-J601-WS-IR, APM-J602-WS-IR.
•
08) Arecont :
AV5155, AV3155, AV2155, AV1355, AV8365, AV8185,
AV5105, AV5100, AV3105, AV3100, AV2105, AV2100, AV1305,
AV1300, AV8360, AV8180, AV3130 .
•
09) Asante :
Voyager I, Voyager II .
•
10) Asoni :
CAM647, CAM638, CAM636, CAM630, CAM629, CAM628, CAM627, CAM624,
CAM620, CAM619, CAM616, CAM614, CAM613, CAM450, CAM436, CAM435, CAM428, CAM422,
CAM419, CAM417, CAM416,CAM415,CAM413 .
•
11) Astak :
Mole ip camera .
•
12) Aviosys :
IP Kamera 9070, IP Kamera 9070-CS, IP Kamera 9070-IR,
IP Kamera 9060 Series .
•
13) Avtech :
AVI322, AVN204, AVN252, AVN263, AVN212, AVN211,
AVI321, AVI212, AVI203, AVI202, AVI201 .
•
14) Axis :
205, 206, 206W, 206M, 207, 207W, 207MW, 209FD, 209MFD,
209FD-R, 209MFD-R, 210, 210A, 211, 211A, 211M, 211W, 212PTZ,
212PTZ-V, 213PTZ, 214PTZ, 215PTZ, 216FD, 216FD-V, 216MFD,
216MFD-V, 221, 223M, 225FD, 231D+, 232D+, 233D, 240Q, 241Q, 241QA,
241S, 243SA, 247S, 2100, 2120, 2130, 2400, 2401,
M1011, M1031, M1031-W, M3011, M3014, Q7401, Q1755, Q6032,
P1311, P1343, P1344, P1346, P3301, P3301-V, P3343, P3344, P5534.
•
15) Basler :
BIP-640c, BIP-750c, BIP-1000c, BIP-1300c, BIP-1600c .
•
16) BlueJay :
BCN-615C, BCN-615D, BCN-615R, BCN-610, BCN-600, BCN-515(G),
BCN-515P, BCN-512(G), BCN-511, BCN-501, BCN-401, BCN-315(G),
BCN-311, BCN-310, BCN-302(G), BCN-201, BVS-115 .
•
17) Bosch :
NWC-0455, NWC-0495, NWD-455, NWD-495,
NWC-0700, NWC-0800, NWC-0900, VG4 AutoDome .
•
18) Bsti :
NC6011(W), PT6011(W), PT100V2W, PD100V2(W), PD100HV2(W) .
•
19) Cannon :
VB-C60, VB-C50i(R), VB-C50Fi, VB-C50FSi, VB-C10(R), VB-C300 .
•
20) CBC-Ganz :
ZN-PT304(L), ZN-D2024, ZN-YH305(L), ZN-YM316P, ZV-S306 .
•
21) Cohu :
3930 serial, 3940 serial, 3960 serial .
•
22) Compro :
IP540, IP540W, IP530, IP530W .
•
23) Digicom :
IP Camera 100W, IP Camera 300W, IP Camera 400W .
•
24) D-Link :
DCS-7110, DCS-6620, DCS-6110, DCS-6111, DCS-5610, DCS-5300,
DCS-5220, DCS-3420, DCS-3415, DCS-3410, DCS-3220, DCS-3110,
DCS-2120, DCS-2121, DCS-2100, DCS-2102, DCS-1110, DCS-1000,
DCS-950, DCS-930L, DCS-920, DCS-910, DCS-900, DVS-301, DCS-104,
DCS-5635, DCS-5605, DCS-N6240, DCS-N5442, DCS-N5440 .
•
25) Dvtel :
DVT-9520, DVT-9523, DVT-9420.
•
26) EasyN :
FS-613A-M136, F1-608A-M002, FS-603A-M401,
MS-633A-A126, MS-638A-A112.
•
27) EdiMax :
IC-1500(Wg), IC-1510(Wg), IC-1520DP(g),
IC-3010(Wg), IC-7000, IC-7000PT(n), IC-7010PTn.
•
28) Encore :
ENENVCWI-G2, ENVCWI-G, ENVCWI-PTG1 .
•
29) Flexwach :
FW-1170-VO, FW-1177-DE, FW-1173-DS, -MM, -VI,
FW-3170, FW-3450, FW-3850, FW-1175-DS, -MM, -VI.
•
30) Foscam :
FI8901, FI8902, FI8903, FI8904, FI8905,
FI8906, FI8907, FI8908, FI8909, FI8918W.
•
31) Fuho :
IP620 .
•
32) Gadspot :
GS9711(G), GS9211(W), GS9603, GS9684, GS1600, GS1200(G),
GS1000, GS800, GSN1000, GSN1250.
•
33) Goscam :
GP-280, GD-2901, GD-2903, GD-2905,
GD-2809, GD-2808, GD-2807, GD-2806, GD-2805.
•
34) Grandtec :
IP Camera Pro, IP Camera Plus,
IP Camera, IP Video Server.
•
35) Hawking :
HNC820G, HNC800PTZ, HNC720G,HNC720W, HNC700PT, HNC320G,
HNC320W, HNC300, HNC290G, HNC230G, HNC210, NC200, NC220W.
•
36) Hikvision :
DS-2CD802P(N)F, DS-2CD812P(N)F, DS-2CD892P(N)F,
DS-2CD832F(-E)(-W), DS-2CD852F(-E)(-W), DS-2CD720F-PT,
DS-2CD862F(-E), DS-2CD852MF-E, DS-2CD752MF-FB(H),
DS-2CD762PF-FB(H) .
•
37) Honeywell :
ACUIX_IP_PTZ_DOME (HDXA,HDXJ,HDXF,HDXG),
HD4DIPX, HCD554IPX, HCS554IPX.
•
38) Hunt :
HLC-1NAD, HLC-81AD, HLV-1WAD, HLV-CAD.
•
39) Imagiatek :
ImagiaTek ip camera.
•
40) Instar :
IN-3010, IN-3001, IN-2905, IN-2901 .
•
41) Intellinet :
NFC31, NFC31-WG, NFC31-IR, NBC31-IR, NFC30, NBC30, NFD30, NVS30, NSC15,
550796, 550734, 550710, 550703, 550482, 550468, 550451, 550444,
550437, 550420, 550413, 550406, 550376, 550345, 550338, 550321,
550314, 550307, 550291, 550277, 550260, 550253, 550178,
524421, 503181 .
•
42) Ipux :
ICS7200, ICS7220, ICS7230, ICS7201, ICS7221, ICS7231, ICS7100,
ICS7120, ICS7130, ICS6600, ICS6000, ICS6010, ICS6020, IYCS8855,
ICS1100, ICS1300, ICS1310, ICS1600, ICS1700, ICS1800, ICS1003, ICS1013,
ICS130A, ICS131A, ICS100A, ICS101A.
•
43) IQinVision :
IQ802, IQ803, IQ805, IQ811, IQ852, IQ853, IQ855, IQ701, IQ702,
IQ703, IQ705, IQ711, IQ752, IQ753, IQ755, IQ601, IQ510, IQ511,
IQ301, IQ302, IQ303, IQ040SI, IQ041SI, IQ042SI, IQA10, IQA11,
HD1080P, IQA12, IQA13, IQA15, IQA20, IQA21, IQA22, IQA23, IQA25.
•
44) Jvc :
VN-V686, VN-V685, VN-C655, VN-C625, VN-V225, VN-C215,
VN-C205, VN-V26, VN-V25, VN-C20, VN-C30, VN-X35, VN-X235 .
•
45) Kingwave :
KW3701, KW3702, KW3715, KW3716, KW3720, KW3730 .
•
46) Kraun :
KW.08, KW.07, KW.06, KW.05, KW.04,
KW.03, KW.02, KW.01, KW.00 .
•
47) Laser :
NT-IPC360, NT-IPC360W .
•
48) LevelOne :
WCS-0030, WCS-2070, WCS-2060, WCS-2040, WCS-2030, WCS-2010,
WCS-1090, WCS-0010, WCS-0020, FCS-1070, FCS-1060, FCS-1040,
FCS-0030, FCS-1030, FCS-1010, FCS-1101, FCS-0010, FCS-0020, FCS-7011,
FCS-5030, FCS-5011, FCS-3021, FCS-3000, FCS-1081(A), FCS-1091 .
•
49) Lichensys :
LS-7300, LS-7320, LS-7200, LS-7220, LS-6600, LS-6610, LS-6620,
LS-6500, LS-6510, LS-6520, LS-6200, LS-6220, LS-5400, LS-5420,
LS-5300, LS-5320, LS-5320D, LS-5300C, LS-5300D, LS-5200,
LS-5220, LS-5220D, LS-5200HP, LS-3211-E, LS-1430-E, LS-1310,
LS-2600, LS-2610, LS-2400, LS-2300 .
•
50) Linksys :
PVC2300, WVC2300, WVC210, WVC200, WVC210,
WVC54G, WVC54GC, WVC54GCA, WVC11B.
•
51) Lorex :
LNE1001, LNE3003, LNZ4001, LNZ9320,
LND7220, LNP5320.
•
52) Lumenera :
Le575, Le375, Le275, Le259, Le175, Le165, Le11059, Le045, Le075,
Li045, Li175, Li165 .
•
53) Megatec :
iCAMView PRO, iCAMView Plus.
•
54) Maygion :
IP603, IP601.
•
55) Micronet :
SP5520.
•
56) Mobi :
IP 70042 .
•
57) Mobotix :
M24, M22, M10, M12, M1, D24, D22, D12, Q22, V12 .
•
58) MultiPix :
MP-HH600, MP-HH500, MP-HH300, MP-HH200,
MP264-500, MP264-400, MP264-308, MP264, HD720-200,
MP2006-200S, MP2006-200C, P2006-600 .
•
59) Mwr :
C1220HW, C1222HW, C1260HW, C1262HW, C1268SL,
C1212H, C1002RW, C1006RW.
•
60) NorthQ :
NQ-9007, NQ-9006 .
•
61) Orite :
IP-200, IC-301, PT-300 .
•
62) Otima-Afreey :
ANC-606V, ANC-606G, ANC-818V, ANC-818G, ANC-800V,
ANC-800G, ANC-808V, ANC-808G .
•
63) Panasonic :
BL-C230, BL-C210, BL-C131, BL-C111, BL-C160, BL-C140,
BB-HCM735, BB-HCM715, BB-HCM705, BB-HCM701,
BB-HCM581, BB-HCM580, BB-HCM531, BB-HCM511, BB-HCM547, BB-HCM527, BB-HCM515,
WV-NP472, WV-NP304, WV-NP244, WV-NP1004, WV-NF302,
WV-NF284, WV-NM100, WV-NW484S, WV-NW964,
WV-NS954, WV-NS324, WV-NS202A .
•
64) Pelco :
IXE20C, IXE20DN, IXS0C, IXS0DN.
•
65) Pixord :
P-600, P-606(W), P-528, P-523(PoE), P-513(PoE), P-505(W), P-500,
P-465, P-463(T), P-463DW, P-428, P-426(PoE), P-423(PoE), P-400(W/PoE),
P-1500, P-1401(W/PoE), P-4514, P-8504, P-4000, P-1000 .
•
66) Planet :
ICA-750, ICA-550W, ICA-700, ICA-651, ICA-601, ICA-530,
ICA-525, ICA-510, ICA-501, ICA-350, ICA-312, ICA-310, ICA-230,
ICA-M230, ICA-M220(W), ICA-210W, ICA-151, ICA-150(W),
ICA-120, ICA-110(W), ICA-108(W), ICA-107, IVS-110 .
•
67) Planex :
CS-WMV02G, CS-W04G.
•
68) Plustek :
IPcam P1000, IPcam P1100, IPcam P2000.
•
69) Repotec :
RP-VP0985, RP-VP0971, RP-VP0962, RP-VP0961, RP-VP0921,
RP-WV0985, RP-WV0971, RP-WV0921 .
•
70) Rimax :
IP Cam 7100, IP Cam 7200.
•
71) Rosewill :
RXS-3211.
•
72) Samsung :
SNB-6001, SNB-6000, SNC-B5368, SNC-B5399, SNC-B2335, SNC-B2331,
SNC-570, SNC-550, SND-560, SNC-1300, SCC-C6475P,
SNP-3750, SNP-3300A, SNP-1000A .
•
73) Sanyo :
VCC-HD2100, VCC-HD2300, VCC-HD2500, VCC-HD4600, VCC-HD5400,
VCC-HD3100, VCC-HD3300, VCC-HD3500, VCC-HD5600, VCC-XZN600P.
•
74) Siemens :
Gigaset WLAN camera.
•
75) Sitecom :
LN-406, LN-403, LN-402, WL-401, WL-400 .
•
76) Sony :
SNC-CH140, SNC-DH140, SNC-RH164, SNC-RH124,
SNC-DF85P, SNC-DF80P, SNC-RS46P, SNC-RS44P, SNC-RS86P, SNC-RS84P,
SNC-RX570, SNC-RX550, SNC-RX530, SNC-RZ50(N), SNC-RZ30, SNC-RZ25, SNC-Z20N,
SNC-CS50, SNC-CS20, SNC-CS11, SNC-CS10, SNC-DS60,
SNC-DS10, SNC-DF80, SNC-DF70, SNC-DF50, SNC-DF40,
SNC-P1, SNC-P5, SNC-M3 .
•
77) Sparklan :
CAS-810, CAS-811, CAS-812, CAS-820, CAS-821, CAS-861(W),
CAS-633(W), VIS-101 .
•
78) Stardot :
NetCam, NetCam SC, NetCam XL, Express 6 .
•
79) StarVedia :
IC202(w), IC212(w), IC502w, IC602, VS316m, VS306 .
•
80) Swann :
SW211-WIP, SW111-WIP, Max-Ip-Cam .
•
81) Sweex :
Sweex ip camera .
•
82) Svat :
CV0204DVR, CV501-16CH DVR .
•
83) Topica :
TOP-868HMP, TOP-788HMP, TOP-757VPC-MIR, TOP-302HMP, TOP-301HMP, TOP-107HMP,
TOP-656PTZ, TOP-23XIP, TIP-264EZ, TOP-100HVS, TIP-868, TIP-777, TIP-303, TIP-136MP .
•
84) Topsee :
TS820, TS808, TS805, TS620, TS50,
IP70 .
•
85) Toshiba :
IK-WD01A, IK-WR01A, IK-WB01A, IK-WB02A, IK-WB02-KIT3-8, IK-WB02-KIT5-50,
IK-WB11A, IK-WB15A, IK-WB21A, IK-WB30A, IK-WB70A .
•
86) Tp-Link :
TL-SC3000, TL-SC3130(G).
•
87) Trendnet :
TV-IP600(W), TV-IP522P, TV-IP512WN, TV-IP512P, TV-IP501W, TV-IP501P, TV-IP252P,
TV-IP422(W), TV-IP410(W), TV-IP400(W), TV-IP312(W), TV-IP301(W),
TV-IP212(W), TV-IP201(W), TV-IP200(W), TV-IP110(W), TV-IP100(W) .
•
88) Truen :
TCAM-570, TCAM-551, TCAM-540,
TCAM-530, TCAM-531, TCAM-6300,
TCAM-370, TCAM-351, TCAM-330 .
•
89) Videoman :
VMD-900 .
•
90) Vikosmo :
VK-100IPCam, VK-200IPCam(g), VK-202IPCam(g),
VK-300IPCam(g) .
•
91) Vivotek :
IP8330, IP8332, IP8161, IP8151, IP7361, IP7330, IP7251,
IP7160, IP7151, IP7152, IP7138, IP7139, IP7142, IP7135, IP7137,
IP7131, IP7132, IP7133, IP7134, IP6112, IP6122, IP6117, IP6127,
IP3112, IP3122, IP3132, IP2112, IP2122, IZ7151,
FD8361, FD8161, FD8133, FD8134, FD7131, FD6112V, FD6122V, FD6111V, FD6121V,
SD7313, SD7323, SD7151, SD6112V, SD6122V,
PT7135, PT7137, PT3112, PT3122, PT3117, PT3127,
PZ7151, PZ7152, PZ6112, PZ6122, PZ6114, PZ6124,
VS8102, VS7100, VS3102, VS3100, VS2403, VS2101 .
•
92) Weichu :
PTW-980G, PT-970, PT-960, PT-930R, PT-930GR, PT-920R,
ANC-606G, IC-900W, IC-800, IC-200 .
•
93) Y-cam :
Y-cam Black, Y-cam White, Y-cam Knight .
•
94) Yoko :
RYK-IP5930, RYK-IP5A30, RYK-IP3900, RYK-IP3800, RYK-IP1800,
RYK-IP2280, RYK-IP1130 .
•
95) Zavio :
F210A, F312A, F610A, F611e, F721A, D610A, D611E, V111T .
•
96) Zonet :
ZVC7640, ZVC7640W, ZVC7630, ZVC7630W,
ZVC7611, ZVC7611W, ZVC7610, ZVC7610W .
Recording File Location
The default directory -- TimHO_Rec is created in root of the every disk partition! And can automatically
switch to the next partition if this partition is full. And you can enable every partition to record or not ! You
can change this record directory name to others! This software can record to hard disk, USB disk and
network disk. And can automatically delete the oldest record files when disk is full.
Help File and Log files
These files are stored in the install directory specified during software installation process. Please refer to
the installation process for specific naming conventions and path information. If you run this program and
press “F1”, you can open this help document!
These files are identified as - H264WebCam.chm, etc.
Email and Ftp of Images
When video motion is detected in channels, H264WebCam can be configured to automatically send
Email alert pictures or FTP uploading alert pictures.
About the trial
H264WebCam have five versions:
1. Free Version Software.
This version can be freely used except commercial purpose, but only have 4 channels, and have
no encode, record functions, and can not be connected from remote functions!
2. Standard Version Software.
This version is not free software, you can try in 21 days for evaluation purposes. It only has 4
channels, and have no web server and stream media server functions!
3. Pro Version Software.
This version is not free software, you can try in 21 days for evaluation purposes. It only have 8
channels can be used, and have no dyndns domain hosting function!
4. Deluxe Version Software.
This version is not free software, you can try in 21 days for evaluation purposes. It have 16
channels can be used, only have no H264 User Name Mode(DDNS) function!
5. Exalted Version Software.
This version is not free software, you can try in 21 days for evaluation purposes. It have 32
channel can be used, and have all function of H264WebCam!
You can view the detailed difference of these five version and buy the optimum version from :
http://www.h264soft.com .
Credit card ordering and quantity discounts are available in our website. When payment is received you will
be sent full version license serial code of H264WebCam, and free to upgrade to new version continually!
Keywords
H264, WebCam, ip camera, network camera, surveillance, motion detection, Domain, Xvid, Mpeg4, DNS,
DDNS, FTP, SMTP, video, encode, decode, communication, conference, multimedia, mp3, record, DVR,
monitor, client, server, H264 encode, H264 video, video encoder, video chat, network, multicast, broadcast,
audio encode, compress, Email.
Contacting
Limitations to Support
We at h264soft.com are happy to help you with any technical problem or questions you may have with
our software. However, we cannot help you with issues such as how to program or other issues not
related directly to the workings of our software.
Contact Information
We can be contacted through the Timhillone Web site: http://www.h264soft.com
Direct Email enquiries can be sent to the Technical Support e-mail address: [email protected]
If you have any questions or comments please feel free to contact us! We look forward to hearing from
you!
Registration
Registration
Are you still a trial user? Order now, it’s simple!
What will happen after I place my order online?
The registration code will be sent to you automatically through your Email after your order is confirmed. You
confirmation Email generally arrives with your registration code within 15 minutes after your order is
completed.
How do I register H264WebCam?
Step 1 - Purchase the software
First and foremost you must purchase the software from our website and have received the confirmation
email.
Step 2 - Open the software
Each time you run H264WebCam, if it is still a trial version, the application will pop-up a “Please
Register “ dialog box, as shown below.
Step 3 - Copy and Paste the Registration Code
Open your email that you received after your order was placed. In this email is your Registration Code.
COPY the registration code the registering from the email by highlighting it with your mouse and pressing
CTRL+C (or right clicking the highlighted coed and selecting Paste from the popup menu).
Now PASTE the registration code into the input field (the box in the Please Register window) by clicking
in that field/box then press CTRL+V or right click in the field/box and select Paste from the popup menu.
You should now see the registration code from your email in the Please Register window.
Step 4 - Accept the Registration Code
Click the “Register” button to accept the registration code and launch the application - that’s it!
If you encounter any problems with your registration code please email Technical Support at
[email protected].
User Guide
Overview of the H264 WebCam
When you click the minimize button, in the upper right corner of the main window, the main window will become
hidden but will remain monitoring the various configured video feeds.
When you click the maximize button, in the upper right corner of the main window or right click the mouse button
over the video feeds, the program will show the video feeds in full screen mode. Simply press the ESC key or
click right mouse again and the main console view will be redisplayed.
When you click the close button, in the upper right corner of the main window, the console view window will be
closed but the application will remain running. The H264WebCam icon will be visible in the taskbar just to the
left of the system clock display.
Setting Up
Overview of Setup/Configuration
The four primary sections for setup/configuration of H264 WebCam are:
Channel
Record
Motion
System
These options can be accessed by clicking on the blue button next to the title of the desired category from the
main display window - shown below.
A detailed description, as well as the various steps used throughout these four setup options, is covered in the
following sections.
Channel - Setup Options
By clicking the blue button next to the Channel title (shown at the left) you will
enter Channel setup dialog window.
This dialog window will provide the options to configure the video and audio sources for all of the available
channels. There can be channels from the local computer (directly connected cameras, TV Cards, etc.) or from
remotely accessible camera elsewhere on the network.
Our software support many network ip cameras, you can select your ip camera in the following list:
If you need to change the default ip camera setting, you can click “Detail” button which near this ip camera list :
You must check your ip camera ‘s setting, and assure the rtsp setting is same as up. And assure the rtsp port is
right! If you need to reverse the pan tilt function, you can enable the “Pan Reverse” item or “Tilt Reverse” item.
In Channel setting main window, the channel list displays the current running settings or those saved following the
last setup. To change a channel’s setting follow the steps listed below.
Step 1 - You must be sure to select a Total Number of Channels that is greater than 1. If you want to change the
channels number, you need to select the number in list, then click “Change” button to activate it!
Step 2 - Select the particular channel you want to change from the list of available channels.
In the graphic shown below, the selected channel is channel 3. This channel is setup for net, connecting a D-Link
ip camera DCS-920. You need to input ip address 203.125.227.73, and the web port of this ip camera 80, fill user
name to dlink, password to dlink . Select D-Link ip camera in list, and select DCS-920 item.
Please Note - In this window you can press the “Delete” key on your keyboard or the “Delete Channel”
button. Either of these actions will delete the selected channel settings. When you press the “Spacebar” on
your keyboard or click the “Change Status” button it will change the selected channel’s status between active
and inactive. When a channel’s status is set to inactive, the software will ignore it.
Step3 - Change the settings of one channel
The “Delete Channel” button will delete a channel’s settings and restore this channel to null.
The “Change Status” button will change this channel between an active and inactive status.
Local
If you select the Local option the highlighted channel will be able to capture video from any
cameras (or other devices) directly connected to the local computer. Within the Local section you
can select the video source, size, frame-rate and audio source. If you have TV card this is where the
desired channel selection is made.
Net
If you select the Net option the highlighted channel will connect to a remote network cameras or
remote computer that is also running H264WebCam software. The network address must be a
dotted decimal IP Address such as 202.96.11.1 , or a domain such as timhillone.dyndns.org. You
also can set a pc name that can be resolved through name services (such as DNS) on the local
network.. Also you can select “H264 User” and enter a user name such as “timhillone” or “Mike.”
However, you must be sure that you have run our Exalted version at remote, and have host this
H264 user name “timhillone” or “Mike” already! This H264 User is designed for people who use
dial up to connect to the internet and which in turn causes the IP Address to change frequently. If
this H264 User should be valid for remote user connections that are fixed/dedicated like a cable
modem or even a T1. Once you input remote user name and password to access the remote
program be sure to select the desired remote channel which you wish to monitor.
Step 4 - Save Changes
Click the
button to save the changes that have been completed. All channel settings
will be saved for all channels, until you make additional changes and click the save button again. If you don’t
save and just click the Exit button, the software will prompt you to return and perform a save. If you don’t
want to save the changes your settings, you can select Exit and when prompted to return and perform Save
simply select Exit (again) and the software will restore the settings to the state just prior to your entering this
dialog window.
button can delete the settings of selected channel !
button can change the status of selected channel, active status or inactive status!
button can automatically search all ip cameras in your local network! This button
can lead you to the following search dialog:
In this dialog, you can select the type of ip cameras, or select “All ip cameras” in list, then click “Search” button,
it will automatically display all ip cameras in your local network! Display ip camera type, MAC address, ip
address or other information. Then you can right click one ip camera in list, and directly add this ip camera to one
channel! Of course you need to set some other information such as user name and password to login this ip
camera.
Record - Setup Options
Click the
button to enter record setup dialog window.
This window will provide an entrance to setup the video and audio encoder parameter for each available channel.
Step 1 - Select the channel.
Click the
button to select one desired channel. If you select “All Channel” in list, your
new settings will be copied to all channels!
Step 2 - Select one record format in list, then change video encode type, audio encode type, bit-rate, and some
OSD information! Such as channel title, date osd and time osd.
a) If you want to record one channel to MP4, MOV files, you can select H264, XVID or Mpeg4 video
encoder type along with AAC audio encoder.
b) If you want to record one channel to FLV, SWF files, you can select H264, FLV1 video encoder
type along with MP3 audio encoder.
c) If you want to record one channel to ASF files, you can select MSMPEG4, WMV3 video encoder
and MP3, WMA audio encoder.
d) If this channel will connect to an ip camera, our software will directly get video stream and audio
stream from it. But if it’s encoder type can not be compatible with the record type of this channel,
our software will re-encode video or audio to an appropriate format, this will cost more cpu
resource! AVI file format can hold many encoder, so you can select an appropriate encoder to avoid
re-encode video.
e) To avoid one record file is too long, you can select every 20 minutes to change new record file, or
every 45 minutes to switch record file! AVI, MP4, MOV file format need to be close exactly,
otherwise all this file can not be played normally!
f) For all channels, you can change the record format, such as AVI, MP4, FLV etc, but you can not
select video encoder and video bitrate for some ip cameras, such as mpeg4 ip camera, H.264 ip
cameras! Because our software will directly save the raw video stream getting from the ip camera to
record files! Or our software will automatically select a right video encoder for your record format.
g) The channel record format will influence the remote viewer, such as “Win Media Viewer” need
ASF or WMV record format! “QuickTime Viewer” and “RealPlayer Viewer” need MP4 or MOV
record format! “Flash Viewer” need FLV or SWF record format! The “ActiveX Viewer” and
“Simple Jpeg Viewer” have no relation with the channel record format, so it can view all channel
video from remote!
Step 3 - Save Changes
Click the
button to save the changes that have been changed, all channel settings
will be saved and take effect at once! If you click “Exit” button directly, software will restore the old settings
and don’t change anything!
Our software can automatically delete the oldest record file when disk is fully! So you can enable this item to
automatically delete, and you can set record file days, then our software will automatically delete all the time-out
record files! This parameter is a global settings for all channels!
Motion - Setup Options
Click the
button to enter the motion detect setup dialog window.
This window will set up 3 function including motion record, scheduled record and scheduled FTP jpeg function.
You can setup video motion detection settings, record durations and recording and motion recording schedules
each of the available channels. Also available through this window is the configuration settings for the Email and
FTP alerting options.
Please Note - The “Set this Channel to Default” button will set this channel to default parameter for motion
recording, or scheduled recording. Simply click this button, with the desired channel selected, and it will becomes
the channel to default settings. It is that easy!
Step 1 -Select the channel.
Click the desired
button to select the channel.
Step 2 - Select the day/week settings
All day
Mon.
Tues
Wed
Thurs
Fri
Sat.
Sun.
use this setting for every day.
use this setting only in Monday.
use this setting only in Tuesday.
use this setting only in Wednesday.
use this setting only in Thursday.
use this setting only in Friday.
use this setting only in Saturday.
use this setting only in Sunday.
Please Note:
a) When you selected the “Scheduled Recording” checkbox, the schedule record setting will be active
for that day. Otherwise it will be ignore for that day. If you selected scheduled record, software will
record according to the scheduled time you set.
b) When you select the “Motion Recording” checkbox
the motion
recording setting will be active for that day. Otherwise it will be ignore for that selected day.
Step 3 - Select the time-table.
There are two time periods you can define. For example - set a workday from 8:00am to 11:59am and
2:00pm to 6:00pm. This set the record file in two time segments. You need to assure the ending time
must > the beginning time! The 8pm->8am is wrong setting!
Step 4 - Set the motion detect parameter
The video can be divided into a 64(8*8) grid style region.
You can select(unselect) each region ‘s status
independently. A region is set (or actively monitored) when the diamond icon
is displayed. The
software will check this region of the video for motion. You simply click the image directly to
activate/deactivate the status of each region.
a) The Recording Time after Motion is the duration of recording will occur when activated. It is
recommended the value be set between 15 and 900 seconds. The Recording Time before Motion is
the record time before checked video moving, you can set 20 or 10 seconds more. If you don’t need
the pre-record function, you can set this parameter to 0, then it will save more cpu resource for
encoding!
b) Motion sensitivity is the video motion grade used during detection. If you set to 0, all video will be
regarded as motion status. If you set to 255, then all video will not be regarded as no motion. The
recommended value should be set between 3 to 6.
c) Motion audio alarm activates or deactivates the systems internal speaker to ‘Beep’ informing you
when motion is detected. This setting can be checked/unchecked (on/off) without impacting the
actual recording.
d) The button “Motion Test” is used to test the video motion detection settings. It allows you to test the
motion sensitivity value’s effectiveness in your particular environment.
e) The “Run a Program” item means you can select a application program in disk, our software will
automatically run this program when video start moving.
Step 5 - Save changes
Click the
button to the changes that have been completed. All channel settings will be
saved for all channels, until you make additional changes and click the save button again. If you don’t want to
save the changes your settings, you can select Exit button, then software will restore the settings to the state just
prior to your entering this dialog window.
The scheduled FTP jpeg function is for scheduled ftp uploading, so it is not related to video motion function! If
you have not set ftp parameter and enabled “Save to Disk” item, our software will scheduled snapshot a jpeg
picture and save it to disk for you! You can select automatically ftp upload a jpeg picture to your website every 5
seconds or others. If you enabled “Save to Disk” item, our software will save these jpeg picture to snapshot
directory after it ftp uploading.
System - Setup Options
Click the
button to enter the system setup dialog.
This dialog will enable access to set up the various system parameters including user name and password
management. You can also set record disk partition, DirectDraw show type and the H264 User Name.
This dialog’s title will show the current record path. (For example: D:\TimHO_Rec).
a) Login User - All users are listed in the User Information list which displays user name and password. You
can input a user name and password and the channel(s) that can opened from a remote connection. To add
a users click the “Add User” button to create a new user and simply set the appropriate settings for that
user. To change a user’s settings click that user from the list and change the desired parameters. Be sure
to click the “Save User” button after making the changes after each user to insure the changes will be
maintained. To remove a user first click the user from list and then click the “Delete User” button and
they will be removed. You can enable or disable one user to view and PTZ control this channel from
remote!
b) Record Drive - This interface will show all hard disk partitions, USB driver and mapped network driver
in the computer. You can set a drive to record or not. The program will automatically select the drive to be
used and able to receive the recording files. If this drive is full (no space) the program will select another
available drive to record. But you need to notice that this software will not delete the oldest record files
from network driver! We know the record speed of USB driver is slow than hard driver, so you must
assure the recording speed is enough for you. Try and test recording on hard driver at first.
c) Program Start Settings - You can set some start parameters when software begin to run every time! (1)If
you need to login when software starting or exiting, you can enable “Start Need Login” item. (2)If you
need to login when software restore from tray, you can enable “Tray Need Login” item. (3)You can set
the default channels numbers window to display when software starting, such as displaying 1 channel, 2
channels, 4 channels etc. (4)You can set automatically full screen when software starting, or hide to tray
when software starting. (5)Our software can support multi-monitor displaying function, so you can
moving our software from on monitor to another monitor! And can select which monitor to display when
software starting. But the default mode “PC have no Multi-Monitor” can not support multi-monitor, so
you need to change this settings at first if you need this function! (6)You can change our software GUI
size to your needs! Such as 1024*600, 1280*768, 1280*1024, 1920*1080 etc. So if you have wide-screen
monitor, or netbook, you can change this parameter to fit your needs!
d) Record and Snapshot Folder Name - You can input a name, our software will automatically create a
directory using this name to save record files, snapshot jpeg pictures! The default folder name is
TimHO_Rec, you can change this name to yours! But you ‘d better to change this name often, because it
will affect automatically delete the oldest files function! The snapshot quality item will set the quality of
jpeg picture, the minimum quality is 1 and 12 is the maximum. The actual maximum quality may also be
limited by the camera being used.
e) PIP position and automatically switch next page - You can enable “Display Channel FPS” item to display
frames per second for each channel. And you can select a position for PIP display, now our software have
4 position to select, such as R-B is right-bottom corner of the window! If you need to automatically
switch to next displaying page after several seconds, you can set “Display Next Page Every” item to 5
seconds, or 10 seconds etc. Our software will automatically display next channel video every few seconds!
This function is also active for 2, 3, 4, 6, 9, 12, 16, 20, 25, 30 channels displaying window.
f)
DirectDraw Method - When there are problems displaying the video feed you may need to change these
settings.
Due to the many kinds of display cards available it is possible your specific display card doesn’t support
overlay or yuy2 DirectDraw methods. Please note that changes to these settings will note take effect
until you restart the software.
g) Server Port - Our software have 3 server embedded in it. (1) One is web server, the default port of web
server is 80, but you can change this port to others, such as 800, and can set this web server need to login.
(2) H264 server is for ActiveX viewer and H264WebCam connecting, the default port is 17518. (3)
Stream media server is for RTSP protocol, so you can use Quicktime player or Realplayer, VLC player to
view the video of our software! The default port is 558, so rtsp://xx.xx.xx.xx:558/live.sdp?ch=1 url can
view channel 1 video.
h) Dyndns Domain setting - You can use this function in Trial version, Deluxe version or Exalted version!
Please apply a dyndns domain from http://www.dyndns.com at first, then you will get a dyndns user name,
password and dyndns domain! Then input these information to below, our software can host this domain
for you! Then you can use IE browser to visit this domain from internet! But you also need to map tcp
port 80, 558, 17518 on your router for your PC which run our Deluxe version software..
i)
H264 User setting
After you purchase H264WebCam Exalted version, you can get a registration code. Once you input this
code into the startup page, your software will automatically update to the full Exalted version, at which point
the H264 User will be active!
To use the H264User first, you must input a name such as “Mike” into the settings (shown above) replacing
the “TIMHILLONE” , then click the “Check” button. If this H264 User has not been previously registered
you can click the “Create” button to apply the setting. At that point the H264 User Name “Mike” belongs to
you. When you start this program every time, this page will show “Mike’s” status with a “√” indicating this
H264User is OK. A “Χ” means this H264User verification has failed. A “?” means the status cannot be
determined. This can occur when the system is not connected to the network.
When you have a valid H264 User configured you can tell others and they can access the monitoring system
using the H264User name through the internet instead of an IP address.
Email Alert and Ftp Alert - Set-up Options
Click the
button in the motion setting up section to enter this interface.
You can send an email alert when video motion is detected as well as ftp upload a jpeg picture to your ftp site. We
recommend using the Test Email and Test FTP buttons to assure all the setting you set is ok! SSL item is for some
email address need SSL transferring, such as gmail.com.
Video Broadcast on Internet
Our software have six method to broadcast your camera video on internet! If you click button “Broadcast on
internet”
on main interface, you can view the following
dialog:
You can view the internet ip address which make your pc to reach internet, select your wanted network to
broadcast, and click button: ActiveX viewer Broadcast, Win Player viewer Broadcast, Quick Time Viewer
Broadcast, Real Play Viewer Broadcast, Flash viewer Broadcast etc, you can get some files, then copy these file to
your website, and add a link to this html web page. If someone click this link on your website, he can view your
camera video online! Assure your pc can be reached from internet at first, so mapping tcp port 80, 558, 17518 is
needed!
If your H264 WebCam ‘s version is Trial version, Pro version, Deluxe version or Exalted version, our software
embedded “Stream Media Server” in it! So you can use many stream player to view our software ‘s real video
stream. If you open Quicktime player, or Realplayer from remote, and open RTSP stream :
rtsp://xx.xx.xx.xx:554/live.sdp, you can viewed our software ‘s channel 1 ‘s video, same as the channel 2 :
rtsp://xx.xx.xx.xx:554/live.sdp?ch=2 … This can be protected by user name and password.
If your H264 WebCam ‘s version is Trial version, Pro version, Deluxe version or Exalted version, our software
embedded “Web Server” in it! So you can use IE browser, Firefox or other internet browser to open our software
from remote, you can select ActiveX Viewer, Quicktime Viewer, Realplayer Viewer, Flash Viewer, Jpeg Viewer to
view our real-time video and audio. If you use IE browser to open : http://xx.xx.xx.xx:80/video.jpg, you can view
the picture of our channel 1, same as the channel 2 : http://xx.xx.xx.xx:80/video.jpg?ch=2 … This can be
protected by user name and password.
If your internet ip address have changed, these old broadcasting webpage will be invalid. So you need to re-create
these broadcasting webpage again. If you use our dyndns domain hosting function, our software can use this
dyndns domain to broadcast.
Video Color Adjust
You can use this interface to adjust the video color settings - including brightness, contrast, saturation, hue, or
simply click the default button to restore the camera color to default values. Any changes you make will take
effect immediately! The software automatically saves your changes so they will be active the next time you use
the application.
Camera PTZ Control
Now our software can PTZ control many ip cameras! You can control your camera to pan, tilt and zoom moving,
and you can control your camera to move to home position! And zoom in, zoom out function! But all these
function need your network cameras to support!
Our software can get the preset list from your ip cameras, so you can save a position to your preset list, and also
can call this position by clicking. But this function also need your cameras to support!
You can set our software to automatically call some camera position every 10 seconds! You can set the cycles of
total numbers, you can set the call gap parameter, and can set the call camera position list, select some camera
positions which you wanted to monitor.
Camera Digital PTZ Function.
You can move the mouse to one channel video at first, then use mouse wheel to zoom in video or zoom out video!
And you can use mouse left button to drag video to left, right, or up, down! This function only act on video
displaying, don’t act on video recording! When you click multi-channel video display button, all channels will
lose digital PTZ effect, and restore video displaying to origin !
Keyboard Shortcuts.
There are 7 keyboard shortcuts in H264WebCam software :
1) PageUp -- Switch to the prior displaying channel video page, same as the button PageUp.
2) PageDown -- Switch to the next displaying channel video page, same as the button PageDown.
3) Tab -- Switch the channel video numbers to display, same as the multi-channel video display buttons!
4) Left -- Control the PTZ camera pan to left.
5) Right -- Control the PTZ camera pan to right.
6) Up -- Control the PTZ camera tilt to up.
7) Down -- Control the PTZ camera tilt to down.
Manual Record
When you click the
button the channel 01’s manual record will start. This button will blink between the
colors
indicating manual recording has taken effect!
and
In this above image, channel 01 is in video motion alarm record mode and channel 02 is in schedule record mode.
The software will first show the motion record and then show the schedule record and lastly show manual record.
If these indicators are not blinking the channel is not recording.
Audio
The software will also listen to the channel which you have selected. When you click video in the video window
the focused channel will switch and the new channel’s window will show a red borderline, see below.
Mute Audio
When you click the
button you can mute the audio out. The button will show
click again to un-mute. Our software will save this status of audio mute !
Play Record Files
when muted. Simply
When you click the
button, you can play the record files! This button will lead you to open the current
record directory. Because our record file is standard AVI, MP4, MOV, FLV, ASF files, so you can use many media
player to play it. Such as Windows Media Player, Quicktime Player, Realplayer, VLC player etc
.
Switch Video Show
H264WebCam allows you to change the interactive viewing modes between single feeds to various multiple feed
displaying or 16:9 mode
displaying at first ! Then select 1, 2, 4, 6, 9,
modes. You can select 4:3 mode
16, 25, 36 channels window to display or 1, 3, 6, 9, 12, 15, 20, 30 channels window to display!
When you select 4:3 mode, the following button will show :
Click
button will show a one channel feed in the window.
Click
button will show two channel feeds in the window with one as PIP(picture in picture) show.
Click
button will show four channel feeds in the window.
Click
button will show six channel feeds in the window with one video is larger than the others.
Click
button will show nine channel feeds in the window.
Click
button will show sixteen channel feeds in the window.
When you select 16:9 mode, the following button will show :
Click
button will show a one channel feed in the window.
Click
button will show three channel feeds in the window.
Click
button will show six channel feeds in the window.
Click
button will show nine channel feeds in the window.
Click
button will show twelve channel feeds in the window.
Click
button will show fifteen channel feeds in the window.
Click
button will show twenty channel feeds in the window.
Click
button will show thirty channel feeds in the window.
Click
button will show the next page of video feeds.
Click
button will show previous page of video feeds.
Snapshot Jpeg file
Click the
button to take a snapshot of the currently selected channel’s video feed as a jpeg file. This file is
saved to the current record directory, and subdirectory: Snapshot.
directory directly !
You can click “Play” button to go to this
Help File
Click the
button on the main interface, you can open the help document of this software! So you can
get the detailed step of each operation of H264 WebCam.
Import Config File and Export Config File
Click the
button on the main interface, you can view the following dialog :
Button “Export Current Settings To File” can save your current settings of H264 WebCam to a file, so you can
upgrade our software to newest, then click “Import Settings From File” button can import your config file to new
version.
Log File
Click the
button on main interface to access the log file, sample shown below.
Adjust TV channel
Click the
button on main interface to access the TV channel adjustment interface.
Exit - Shutting down H264 WebCam
When you click the
recording operations.
button the software will completely shutdown and terminate all monitoring and
Web Browser (B/S)
Web Browser (Such as IE6.0, Firefox, Safari, Chrome etc.)
Because H264 WebCam has an embedded web server it is possible use an internet browser, such as IE, to
remotely view your webcam! If you run this software in your home (and you know the IP address of your home
computer) you can open IE browser from another computer, say in your office, enter the IP address in dotted
decimal format (such as http://56.101.32.68). When the connection is successful you will see an interface
similar to the one shown below:
You can select a viewer to display video from these six viewers.
1. ActiveX Viewer.
This viewer can only be used in IE browser! Because it is the Microsoft standard.
If you click “Setup” button, you can view the following setup dialog! You can select how many channels do you
need to activate, because some pc have low cpu resource, so it can not view 16 channels at the same time! And
you can change port and display mode in this dialog! Our default H264 Server port is 17518, but if you change
this port in H264 WebCam system setup dialog, you need change this port in this setup dialog also!
2. Windows Media Player Viewer :
3. QuickTime Player Viewer :
4. RealPlayer Viewer :
5. Flash Player Viewer :
6. Simple Jpeg Viewer :
Enter a valid user name and password to log into the remote software. The default is “admin”, “123456”. After
you successfully login you will be able to view remote video feeds. While connected remotely you can also click
the “Setup” button and make changes to the monitoring systems display methods or channel setups!
FAQS
1
What standard does H264WebCam take to capture video ?
H264WebCam capture video using DirectShow standard of Microsoft. It can capture H264, Mpeg4, Mjpeg,
Jpeg video stream and audio stream from more than 70 kinds of IP cameras!
2 Why I could not start program ? h264 WebCam always show the following dialog : “Timeout, Please
Register This Software!”
a ) when you install this ip camera software at the first time, you can install it to a new directory, the default
directory is : C:\Timhillone .
b ) If you use this software exceeding 21 days, you must register our software or select “Free Version” to run.
3
Why I could not install this software to default directory : Program Files\Timhillone\H264WebCam ?
If you are XP limited user, or only a standard user, or you using Windows Vista, Win7, you have not right to
write file to system directory, you can change our install directory to : Timhillone\H264WebCam, then OK !
4
Where can I view the differnece of Deluxe version, Pro, Standard, Free version ?
You can view the detailed difference of our four versions from : (http://www.h264soft.com/h264webcam.html)
5
Where can I view the supported IP camera list ?
You can view the supported network camera list from : (http://www.h264soft.com/supportdev.html)
6
How can I view the record files ?
The record files is located at ?:\TimHO_Rec\2011_12_21\CH??, you can enable or disable each driver to
record or not, including hard disk, USB driver, Net driver etc. Our record file is standard AVI, MP4, MOV,
ASF, WMV, FLV, SWF file, so it can be played by many player, such as VLC player, Windows media player,
QuickTime player, Real Player etc.
7
Why I could not display my USB camera or analog camera?
a ) You must install the right WDM driver of your camera before running H264WebCam. You can use this
program (http://www.h264soft.com/downloads/amcap.exe) to test it at first.
b ) if amcap.exe is no problem, you can select one channel ‘s video window, and restore this channel ‘s video
color to default
(click “Default” button in main interface).
c ) Click “System” button to setup, then disable Overlay and Yuy2 item, save and exit, restart H264 WebCam
again, you can display your camera.
8
Why I could not display my IP camera?
a ) You must enable ip camera checkbox, and select the right ip camera model in channel setup dialog!
b ) You must set the right “Net Address”, “User Name” and “Password”, “Web Port” in channel setup dialog.
c ) If your ip camera need more parameter, you can click “...” button in channel setup dialog, and change
“Access Name” or “RTSP Port” or “RTSP Mode” for your network camera.
d ) If you have not found your ip camera model in our camera list, you can select general ip camera, and
change some parameters for your ip camera. And you can mail to us for helping also.
9 How can view my camera with Windows media player, Quicktime player, Real player, Flash player,
VLC player, IE browser ?
You can start Windows media player, and open url : “http://xx.xx.xx.xx:80/video.asf?CH=1” to view the
channel 1 ‘s video.
You can start Flash player, and open url : “http://xx.xx.xx.xx:80/video.flv?CH=1” to view the channel 1 ‘s
video.
You can start Quicktime player or Realplayer, and open url : “rtsp://xx.xx.xx.xx:558/live.sdp?CH=1” to view
the channel 1 ‘s video.
You can start IE browser, and open url : “http://xx.xx.xx.xx:80/video.jpg?CH=1” to view the channel 1 ‘s
video.
10
How can I broadcast my camera to internet ?
You can run our trial version, and click “Broadcast on Internet” button, this button is near the button “About
Author” , then you can select Win player viewer broadcast, Quicktime viewer broadcast, Realplayer viewer
broadcast, Flash viewer broadcast, Simple jpeg broadcast. These button will create some html files, you can
copy these files to your website! then visit these web page can view your cameras!
11
Why I could not connect H264 WebCam from remote?
a ) You must input the correct ip address or domain from remote, and maybe you need to input the right user
name and password to login.
b ) You must assure our Web server is normally start ! The default web server port is 80, if you have other
program to use this port, such as IIS, web server will failed to start! You can change our web server port to
800 or others! use http://xx.xx.xx.xx:800 to visit.
c ) You must assure our RTSP server is normally start ! The default RTSP server port is 558.
d ) You must assure our H264 server is normally start ! The default H264 video port is 17518.
e ) If you connect remote pc from internet, you can assure the remote pc have a internet ip address and can be
reached! or you need to map tcp port 80, 558, 17518 on your router for your PC which run this ip camera
software!
f ) If you have Firewall in PC, you need to open TCP port 80, 558, 17518 in your firewall.
g ) Flash viewer need flv, swf record format. WMP viewer need asf, wmv record format. QuickTime,
Realplayer, VLC player need mp4, mov record format.
12 Why I could not display my capture card ‘s video ? or only one camera can be displayed! (such as
PCIO2000 card, Kodicom8800/4400 card, KGuard card etc.)
a ) You must install WDM driver for these device! because only WDM driver accord with DirectShow
standard! Many WDM driver for capture chipset can be downloaded from internet!
b ) You can download some WDM driver from our website, for example :
PCIO2000 and Kodicom or other capture card which use Conexant BT878A chipset :
(http://www.h264soft.com/downloads/bt878.zip) . You can select “[082] - Generic Bt8xx based with 4
Composite ins” item to install !
KGuard card and some TV card which use Philips 7130-7134 chipset :
(http://www.h264soft.com/downloads/7130.zip)
c ) You can use this program (amcap.exe) to test whether your WDM driver is OK.
d ) You can select the same video source for 4 channels, but select the different video sub-input for 4 channels!
Then you can display all 4 cameras which connected to your capture card.
13
How can I view my camera video on iphone ?
You can open a internet browser such as Safari, then input url : http://xx.xx.xx.xx:80/mobile.html on your
iphone! this method can view each channel video of our software! you must map web port 80 for your pc on
your router at first! If you want to view the video and audio from our software on your iphone, you can start a
VLC player or Quicktime player to open : rtsp://xx.xx.xx.xx:558/live.sdp?ch=1 ! of couse you need map tcp
port 558 for your pc on your router!
14
How can I send text message to my cell phone with H264Webcam ?
SMS text messaging is easy to do. In the Email /FTP Alert setup screen go to the field for the email TO: field.
Most all phone carriers translate SMS to email. You simply format the address to the 10 digit phone number@
the carrier domain address. In the below example we have a pretend phone number of 555-111-2222 that is a
Verizon (vtext.com) phone number. If I wanted to attach a picture with text the address for Verizon would be
the phone number @ vzwpix.com.
Alltel
[10-digit phone number]@message.alltel.com
Example: [email protected]
AT&T (formerly Cingular)
[10-digit phone number]@txt.att.net
[10-digit phone number]@mms.att.net (MMS)
[10-digit phone number]@cingularme.com
Example: [email protected]
Nextel (now Sprint Nextel)
[10-digit telephone number]@messaging.nextel.com
Example: [email protected]
Sprint PCS (now Sprint Nextel)
[10-digit phone number]@messaging.sprintpcs.com
[10-digit phone number]@pm.sprint.com (MMS)
Example: [email protected]
T-Mobile
[10-digit phone number]@tmomail.net
Example: [email protected]
US Cellular
[10-digit phone number]email.uscc.net (SMS)
[10-digit phone number]@mms.uscc.net (MMS)
Example: [email protected]
Verizon
[10-digit phone number]@vtext.com
[10-digit phone number]@vzwpix.com (MMS)
Example: [email protected]
Virgin Mobile USA
[10-digit phone number]@vmobl.com
Example: [email protected]
15
How can I view all remote cameras at the same time in IE browser?
You can open a IE browser, connect to our software web server, then select ActiveX viewer, input the user
name and password and click login button, then you can view all cameras in remote! Click setup button can
config viewing channels!
16
Does H264WebCam support multi-monitor?
Yes! You can enter system setup dialog, then select a monitor to display! Of course you can directly move the
software window to other monitor! The default setting of this parameter is “PC have no Multi-Monitor”, you
need to change this parameter to other selections!
17
Does H264WebCam support DDNS?
Yes! H264WebCam Deluxe version and Exalted version can support DDNS function via two method!
1) One is dyndns supporting! You need to apply a dyndns domain from www.dyndns.com at first, and get a
domain, user name and password! Then input these information to H264WebCam system setup dialog! the
deluxe version software can automatically host this dynamic domain! This domain can be used in IE browser!
2) Another method is H264 user name mode! You can run the Exalted version software on your home pc, and
create a H264 user name at first! Then you can run the free version software on your office PC, click channel
button, and input your H264 user name to netaddress item, enable “H264 user” checkbox! Then you don’t
need any ip address to connect to your home pc to view your cameras! You need to map tcp port 17518 for
your home pc on your home router at first!
18
How to save cpu resource in H264WebCam?
You need to select the appropriate record format in this network camera software! so camera video can avoid
to be re-encoded! this will save many cpu resource! then it can support more cameras recording at the same
time!
1) If your network camera is a mjpeg camera, you can select avi record format in H264WebCam, and select
mjpeg video encoder in record setup dialog! Then this webcam software will directly save raw video stream
to disk or sending to network !
2) If your network camera is a mpeg4 camera, you can select avi, mp4 or mov record format to avoid
re-encoding !
3) If your network camera is a h264 camera, you can select avi, mp4, mov or flv record format to avoid
re-encoding !
19
How to change the GUI size of H264WebCam from 1024*768 to others?
The default GUI size of H264WebCam is 1024*768, you can change this size to 1024*600, 1152*864,
1280*768, 1280*800, 1280*960, 1280*1024, 1360*768, 1440*810, 1440*900, 1440*1080, 1600*900,
1600*1024, 1600*1200, 1920*1080, 1920*1440 etc. Please change this parameter in system setup dialog for
various monitor!
20
How to change the video windows arrangement for 16:9 monitor?
You can click 16:9 button or 4:3 button in the left-bottom corner of H264WebCam, then you can select 3*2,
4*3, 5*4, 6*5 windows arrangement or 2*2, 3*3, 4*4, 5*5, 6*6 windows arrangement! This method can fit
the wide-screen monitor!
21
How to assure the H264WebCam software can be running for ever?
Version 3.84 have add the watchdog function, so it can assure the H264WebCam software can be running for
ever! The watchdog software will always check the status of the H264WebCam software, when it find the
main program have been hung or die, watchdog can restart the H264WebCam software at once ! This function
can assure 24/7 running!
22
How to use the keyboard shortcuts in H264WebCam software?
There are 7 keyboard shortcuts in H264WebCam software.
1) PageUp -- Switch to the prior displaying channel video page, same as the button PageUp.
2) PageDown -- Switch to the next displaying channel video page, same as the button PageDown.
3) Tab -- Switch the channel video numbers to display, same as the multi-channel video display buttons!
4) Left -- Control the PTZ camera pan to left.
5) Right -- Control the PTZ camera pan to right.
6) Up -- Control the PTZ camera tilt to up.
7) Down -- Control the PTZ camera tilt to down.
23
How to use the digital PTZ function in H264WebCam software?
Version 3.87 have add the camera digital PTZ function. You can move the mouse to one channel video at first,
then use mouse wheel to zoom in video or zoom out video! And you can use mouse left button to drag video
to left, right, or up, down! This function only act on video displaying, don’t act on video recording! When you
click multi-channel video display button, all channels will lose digital PTZ effect, and restore video
displaying to origin!


![English Manual AH-160C [Hardware & Software]](http://vs1.manualzilla.com/store/data/005931679_1-0c77ed47c849260a36e03decc8d56d96-150x150.png)