Transcript
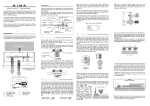
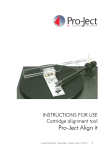
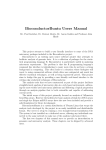
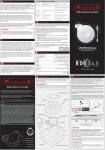
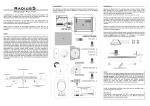
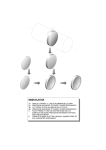
Transit Screw notes Your NIMA is carefully and thoughtfully packed so that the packaging can be re-used whenever you need to transport it. Please store all the packaging material for future use. Locked transit position Carefully unscrew and remove the transit screw. VTA Grub Screw Arm pillar Holder Packaging foam(Carton) Align the two holes NOTE: Please read the contents of this manual thoroughly. It will help you to understand your record playing equipment better and enhance your listening pleasure. PACKAGING NOT INCLUDED WHEN SUPPLIED WITH RADIUS5 RECORD PLAYER INFOMATION PACK QUICK START Arm Pillar shake proof washer Arm Pillar Holder fixing nut Fit the Arm pillar holder through the arm hole, place the shake proof washer and fasten using the fixing nut such that the VTA grub screw is on the right hand side of the tone arm when viewed from the front (this is to allow easy access for VTA adjustment). To keep this orientation while you tighten the fixing nut, use the 1.5mm Allen key as a gentle lever. The fixing nut requires a 27mm A/F spanner; not supplied. [A] Carefully insert the C/W Peg and line up the two holes. 2. Mount the Arm Pillar Holder to the arm board. The arm pillar holder fits into a hole 22-23mm diameter and 222-223mm away from the record centre. (Note: This is identical to the Roksan Tabriz or Artemiz mounting hole and position) To remove the arm from the arm pillar holder, use the 1.5mm A/F Allen key supplied and gently slacken the VTA (Vertical Tracking Angle) adjustment grub screw. Congratulations on your purchase of the Roksan NIMA unipivot tonearm. This tonearm is designed and manufactured to the highest specification and rigorously tested to reward you many years of listening pleasure. 1. Remove Tonearm from the packaging. Mounting the Arm Pillar Holder UNIPIVOT TONEARM Your NIMA unipivot tonearm is an important part of your vinyl replay system. Its correct installation, set-up and operation will have a profound influence on the sonic performance of the entire hi-fi installation. PACKAGING Aligned fixing screw holes [F] 3. Fit the cartridge to the Headshell. 4. Fit Tonearm to the Arm Pillar Holder. 5. Release Tonearm from locked transit position. [B] [G] [C] 6. Fit the Counterweight Peg and Counterweight. Carefully insert the transit screw and screw it into the C/W Peg. Do not over tighten. 7. Set initial Cartridge tracking weight. [E] 8. Fit the Anti-skate Weight. ARM BOARD [D] 9. Set Cartridge alignment. Perspective view of NIMA 10. Set vertical tracking angle (VTA). 11. Set final tracking weight. [ Gently push down to release from locked transit positon ] 12. Fit Arm cable. [H] A : Information pack D : Counterweight G : Allen key B : Anti-skate weight C : Finger lift E : Stylus balance F : Tonearm cable H : Counterweight peg ASSEMBLY Remove tie-wrap Seal of Quality Fixed C/W Peg Fitted (transit) fixing screw NOTE: For transportation/shipping, There are three parts to the assembly of your NIMA tonearm. (Note: With Radius5 the arm pillar holder is already fitted to the record player) Do not remove the protective tie-wrap around the arm tube. Place the arm in a safe place until later. Be extra careful not to damage the anti-skate thread bar. Anti-skate Notched Peg Anti - skate Weight Unipivot Bearing Screw Anti-skate Thread Bar Headshell Counterweight Arm Tube - Remove the transit screw and C/W Peg. - Gently pull the bearing yoke up to lock it in its transit position. - Refit the transit screw from the back. Arm rest Counterweight Peg - Secure the arm tube with the releasable tie-wrap. See above The cartridge body should be aligned to the dotted lines as shown with the stylus tip directly below the front edge of the headshell. When you have aligned the cartridge as shown then carefully tighten the screws to secure the cartridge onto the headshell. Stylus Tip to be inline with headshell Mounting the Arm on to the Turntable You can now fine-tune the azimuth of the headshell by gently rotating the counterweight clockwise or anti-clockwise and viewing the cartridge/headshell from the front. (Do not move the counterweight back and forth as this will alter the tracking force) Cartridge/headshell would be parallel to the platter/record when the azimuth is correct. (It is important to have the anti-skate weight in place when carrying out this adjustment) Increase To set tracking weight Place the stylus balance on the platter and remove the stylus guard and check the tracking weight by gently lowering the stylus in the groove over the desired tracking weight marker (Note: 10mN = 1.0g). Correct position of balance (Flush with holder) To check the Vertical Tracking Angle (VTA), place the stylus on a flat stationary record and observe if the arm tube is parallel with the surface of the record. Slacken the VTA grub screw to lift or lower the arm in the arm pillar holder to change the VTA. (Always hold the arm by the armrest plate and not the bearing yoke while carrying out any adjustments) ROKSAN Alignment protractor RECORD PLATTER PLATTER 3.0g + 2.0-3.0g 1.5-2.0g 1.0-1.5g 1.0-1.5g Transit Screw Right Channel (+) RED Left Channel (+) WHITE Right Channel (-) GREEN Left Channel (-) BLUE NOTE: If you wish to fit the finger lift, place it above the headshell and then run the bolts through the holes. Always check the clearance between the finger lift and dust cover if applicable. Refer to the figure below for easy alignment of the cartridge in the headshell. (Always hold the arm by the arm tube and not the bearing yoke when mounting the cartridge) To re-pack it with the turntable, refer to the packaging section of your turntable user manual. To remove the arm, unplug the arm cable from the bottom of the arm pillar, slacken the VTA grub screw and gently pull the arm out of the arm pillar holder. With the arm in its locked transit position, place it securely in its packaging NOTE: The counterweight is very heavy and must be properly secured in the packing to avoid damage to the arm or the cartidge. UNIPIVOT TONEARM Guarantee Your Roksan Nima Unipivot Tonearm is guaranteed against any defect in materials and workmanship for a period of two years from the date of purchase. This guarantee only becomes effective if the warranty card is validated (by the ROKSAN retailer from whom the equipment was purchased) and returned to ROKSAN within 28 days of purchase. This guarantee excludes: 1. Damage caused due to accident, misuse, neglect and incorrect installation, adjustment or repair. 2. Liability for damage or loss during transit from the retailer or purchaser to ROKSAN or its authorised distributor for the purposes of repair or inspection. Carriage costs to ROKSAN shall be borne by the consignor. All claims under this guarantee must be made through an authorised ROKSAN retailer. If equipment returned for repair to ROKSAN is found on inspection to comply with the product specification ROKSAN reserves the right to make a charge for examination and return carriage. ROKSAN AUDIO LIMITED UK TEL. PLATTER NOTE: The Unipivot Spike screw can also be adjusted up or down (1-1.5mm max.) to fine tune the VTA. Take extra care to avoid damage to the pivot bearing if you attempt to use this adjustment. Place the Anti-skate Weight thread loop over the corresponding range for recommended anti-skate force. Pass the thread over the Anti-skate Thread Bar and let it hang/rest naturally down. Anti-skate weight CORRECT AZIMUTH VIEW FROM ABOVE If the arm is still in its locked transit position, hold the bearing yoke and with a gentle rocking motion push it down. The bearing will disengage from its locked transit position and the unipivot spike screw will fall into its bearing seat ready for normal use. Now remove the beaded tie-wrap to release the arm. To change the tracking weight, lift the stylus away and clear of the balance and gently move the counterweight towards the bearing yoke to increase or away from it to decrease the tracking weight. (Always set the tracking weight according to cartridge manufacturer's specification) PLATTER Tighten the grub screw once the VTA is set correctly. Use the Roksan Alignment Protractor to assist you in VTA and cartridge alignment. Rotate a few degree VIEW FROM THE BACK Bearing Yoke Lift/Lower Mechanism Lever The tonearm is sent with its Bearing Yoke pulled up and locked in transit position with transit screw and the Protective Tie-wrap securely holding the Arm Tube. This unique design protects the bearing in transit and keeps the arm rigid while mounting the phono cartridge onto the headshell. Use good quality stainless steel M2.5 socket head cap screws and nuts to mount the cartridge but do not tighten them fully until alignment has been completed. Carefully remove the tape holding the cartridge tags and avoid pulling the tags as they may break. Following the standard colour convention carefully push the tags onto the cartridge pins. There are no user-serviceable parts inside your Roksan Nima Unipivot Tonearm. If a fault should develop, refer any servicing to your appointed ROKSAN dealer, distributor or ROKSAN approved service agent. Always use the stylus guard when fitting the arm to the turntable to avoid accidental damage. Carefully insert the arm pillar into the arm pillar holder and gently push it down all the way. With the arm in its rest position and parallel to the side of the turntable tighten the VTA grub screw but do not over tighten. See Transit Screw Notes before fitting the counterweight peg. Now with the peg securely in place fit the counterweight approximently half way up. The counterweight hole is off centre and thus aids easy azimuth adjustment. Position and slightly rotate the counterweight as shown, to help headshell azimuth to be nearer to its correct setting. (Final azimuth setting will be carried out later) Decrease Protective Tie-wrap (Releasable) Mounting the Cartridge ? REPACKING To re-pack the tonearm or to transport your turntable with the tonearm mounted, first remove the counter weight and lock the bearing yoke/arm tube in its transit position. Hold the bearing yoke and gently pull it up with a gentle rocking motion. Once you will feel a positive click/stop (after about 3-5mm) stop pulling up. The bearing yoke is now locked in its transit position with the unipivot spike safely away from its bearing seat. To secure the to nearm, pass the beaded tie-wrap though the armrest hole and tie it around the arm tube. See Transit Screw Notes for removing the C/W Peg and locking the arm in its transit position. Carefully remove the anti-skate weight and place it in the packing. Now the arm is safe for transit or removal from the turntable. FAX. +44 (0)208 900 6801 +44 (0)208 900 6802 +44 (0)208 900 0734 Specification Bearing..................................................Stainless Steel Unipivot Bearing Yoke....................................................................Acrylic Arm Tube...........................................................Aluminium Alloy Headshell.........................................................................Acrylic Effective Length.............................................................240mm Overhang.......................................................................17.5mm Distance from Record Centre....................................222.5mm Headshell Offset Angle..........................................22.9 Degree Effective Mass.....................................................................11 g Mounting Hole Diameter..................................................23mm Arm Board Thickness.......................................7-25mm (max.) Recommended Cartridge Weight...................................5-12 g Recommended Tracking Weight................................1.5-3.5 g Internal Wiring.............................Special Roksan Flexible PCB Tonearm Cable...............Shielded Coaxial with Grounding wire Connectors....................5-Pin Gold Plated to RCA Gold Plated All specifications are liable to change without prior notice. E & O.E. Printed in England Designed by Usermanual www.roksan.co.uk The best of Technology c 2005 Roksan Audio Limited O