1
TECHNICAL USER MANUAL v1.0
CODEX SYSTEMS TECHNICAL ASPECTS
27.12.2010
Table of Contents
Introduction...................................................................................................................................................................................................3
1
Using Linux on the Codex .............................................................................................................................................................3
1.1
Logging on to Linux.......................................................................................................................................................................................3
1.2
Restarting the Codex software without rebooting ...........................................................................................................................3
1.3
Exiting Linux.......................................................................................................................................................................................................3
1.4
System shutdown from the Linux prompt .........................................................................................................................................4
1.5
Filesystem consistency (after sudden closedown) ........................................................................................................................4
1.6
Remote access to the Codex system disk........................................................................................................................................4
1.6.1
Remote access on Windows ............................................................................................................................................................4
1.6.2
Remote access on Macintosh..........................................................................................................................................................5
1.7
Some Basic Linux commands ...............................................................................................................................................................5
1.8
File locations......................................................................................................................................................................................................7
2
Mounting an external drive/USB key ........................................................................................................................................7
3
Working with Codex over a network .........................................................................................................................................8
3.1
Network settings on the Codex machines .........................................................................................................................................8
3.2
Configuring network setting Manually....................................................................................................................................................8
3.2.1
Check Codex’s IP address and make sure it’s configured correctly.............................................................................8
3.2.2
Edit the system’s IP address .............................................................................................................................................................9
3.2.3
Refresh the Ethernet changes ......................................................................................................................................................10
3.2.4
Using dynamic IP addresses (DHCP) ........................................................................................................................................10
3.3
Network setting for other computers connected to the Codex ............................................................................................10
3.4
Connecting to the Codex ......................................................................................................................................................................... 11
3.4.1
Controlling the Codex from a remote computer to run the UI.......................................................................................11
3.4.2
Connecting to the Codex to access the Linux command line.......................................................................................11
3.4.3
Connecting to the Virtual File System (VFS)............................................................................................................................12
3.4.4
File and directory structure on the VFS.....................................................................................................................................12
3.4.5
If the VFS appears to be empty ....................................................................................................................................................13
4
Filecard structure ............................................................................................................................................................................ 13
4.1
Different Filecards for different users................................................................................................................................................. 13
4.2
The configuration of the Filecard: filecard.xml...............................................................................................................................13
4.2.1
The standard filecard.xml .................................................................................................................................................................13
4.2.2
Editing filecard.xml ...............................................................................................................................................................................15
4.2.3
Making your own labels or fields ...................................................................................................................................................15
5
Naming conventions for shots and VFS files ..................................................................................................................... 15
5.1
Tokens .............................................................................................................................................................................................................. 16
5.2
Rules for Token-Names........................................................................................................................................................................... 16
5.3
Naming Shots ...............................................................................................................................................................................................16
5.4
Naming VFS files .........................................................................................................................................................................................17
6
Setting up the Virtual File System (VFS)................................................................................................................................ 19
6.1
Setting-up VFS Configurations ..............................................................................................................................................................19
6.2
Adding or editing VFS entries ................................................................................................................................................................20
6.2.1
Filename ...................................................................................................................................................................................................20
6.2.2
Owner/User/Group..............................................................................................................................................................................20
6.2.3
Scaling .......................................................................................................................................................................................................20
6.2.4
Conversion Quality ...............................................................................................................................................................................20
6.2.5
Compression ..........................................................................................................................................................................................20
6.2.6
LUT ..............................................................................................................................................................................................................21
6.2.7
CDL .............................................................................................................................................................................................................21
6.2.8
DPX Options............................................................................................................................................................................................21
6.3
Filter: controlling contents of VFS Directories ................................................................................................................................21
6.4
Limitations of the VFS ............................................................................................................................................................................... 22
7
Using LUTs......................................................................................................................................................................................... 22
7.1
LUTs for Monitoring ....................................................................................................................................................................................22
7.1.1
Using a preset LUT, or creating a new one.............................................................................................................................23
7.1.2
Loading an existing LUT from a file.............................................................................................................................................23
7.1.3
LUTs for Data-mode material.........................................................................................................................................................23
7.2
LUTs for Import / Export.......................................................................................................................................................................... 24
7.3
LUTs for the VFS .........................................................................................................................................................................................24
7.4
Local LUTs ...................................................................................................................................................................................................... 24
7.5
LUT file formats ............................................................................................................................................................................................24
7.6
To use an external LUT directly on the Codex ..............................................................................................................................25
7.7
CDL LUTs ........................................................................................................................................................................................................ 25
7. 7.1
Enabling the Codex machine for CDL Data recording ......................................................................................................25
7. 7.2
Adding the 'CDL Data' field to the Filecard...............................................................................................................................26
7. 7.3
Recording CDL Data...........................................................................................................................................................................26
8
Offloading files from Codex systems ..................................................................................................................................... 26
8.1
Introduction to Offloading......................................................................................................................................................................... 26
8.2
Transfer Rates...............................................................................................................................................................................................26
8.3
Offloading to a hard disk.......................................................................................................................................................................... 27
CODEX TECHNICAL USER MANUAL V1.0 11.10
PAGE 1
8.3.1
Outline of compatible drive types, connections, and offload methods......................................................................27
8.3.2
File systems and interoperability ...................................................................................................................................................27
8.3.3
Determining the drive name (for formatting and/or mounting of a USB device) ................................................27
8.3.4
Formatting a hard drive using Linux ...........................................................................................................................................28
8.3.5
Mounting/unmounting a USB device for offloading ...........................................................................................................29
8.3.6
Setting up the Codex to interface with a USB device.........................................................................................................29
8.3.7
Setting up the Codex to interface with a Fibre Channel RAID ........................................................................................29
8.3.8
Setting up the Codex to interface with a network server via Gigabit/10-Gigabit Ethernet.................................30
8.3.9
The hard disk offload process.......................................................................................................................................................30
8.3.10
Setting up rsync to copy files from the VFS to a networked RAID system ..........................................................31
8.3.11
Offloading to a network server with rsync .............................................................................................................................32
8.4
Offloading to LTO tape.............................................................................................................................................................................. 32
8.4.1
Setting up the Codex to interface with an external LTO drive or Autoloader...........................................................32
8.4.2
Setting up in-built LTO drives in the Portable Transfer Station or Lab........................................................................33
8.4.3
General Information and Important Checks for LTO offloads........................................................................................33
8.4.4
The LTO Offload process.................................................................................................................................................................35
8.4.5
Format of tape offloads ....................................................................................................................................................................35
8.5
Unarchiving material from LTO tapes archived on Codex ...................................................................................................... 36
8.6
Installing/updating the Offloader and Tape Offloader software............................................................................................. 37
9
Setting up a ssh reverse tunnel ............................................................................................................................................... 38
10 Appendices........................................................................................................................................................................................ 38
10.1
Metadata Property Names and Labels .......................................................................................................................................... 38
10.2
Single-letter tokens applicable to VFS only .................................................................................................................................. 38
10.3
Single-letter tokens applicable to both VFS and Shot naming rule.................................................................................. 39
10.4
The {Datapack} token for Roll Naming Rule ...............................................................................................................................39
10.5
VFS Case Study ........................................................................................................................................................................................39
10.5.1
DPX Virtual File Setup......................................................................................................................................................................41
10.5.2
WAV Virtual File Setup .....................................................................................................................................................................42
10.5.3
MOV Virtual File Setup .....................................................................................................................................................................42
10.5.4
MXF Virtual File Setup......................................................................................................................................................................43
10.6
Loading an ALE/EDL from a USB stick or over a network ................................................................................................44
10.7
Updating Datapack firmware ..............................................................................................................................................................45
10.8
Removing a Codex Studio system from it's flightcase rack................................................................................................45
10.9
Cleaning air filters in Codex systems............................................................................................................................................... 45
10.9.1
Cleaning the Base Unit air filters ................................................................................................................................................45
10.9.2
Cleaning the Portable Disk Bay air filters ...............................................................................................................................46
10.9.3
Cleaning Recorder Datapack air filters....................................................................................................................................46
10.10
Replacing a hard drive in a Recorder Datapack ....................................................................................................................46
11 Latest Codex releases.................................................................................................................................................................. 47
CODEX TECHNICAL USER MANUAL V1.0 11.10
PAGE 2
Introduction
This manual is intended to provide help and information in various more-technical aspects of Codex systems,
such as networking, naming-conventions, LUTs, the Virtual File System, Offloading to LTO or RAID systems,
and software installation. It can be found at http://www.codexdigital.com/techdocs
Software updates and installation instructions can be found at http://www.codexdigital.com/software
1
Using Linux on the Codex
Codex machines run a customized version of Linux, which is always present and available behind the normal
Codex User Interface (Codex UI). Many of the setup and installation procedures require direct access to Linux.
In order to do this, you will first need to connect a keyboard, which may be plugged into either USB port on the
machine.
To switch to the Linux screen: press C trl/Alt/ F1
To switch back to the Codex UI: press Ctrl/Alt/ F7 (Ctrl/Alt/ F3 on the Codex Portable)
If your system does not have a Touchscreen, or if you do not have a screen connected, the Linux command
line can be accessed from a remote computer – see the section Co nnectin g t o t he Code x t o acce ss the
Linu x co m mand line.
1.1
Logging on to Linux
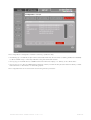
The Linux screen will initially be full of some of the startup logging information, which you can usually ignore.
You need to enter a username and password, which by default are both simply co dex. They can be changed
if necessary, but this should only be done with the help of someone familiar with Linux, since you could easily
lose all access if mistakes were made.
To log-on, press <enter> then type:
codex <enter>
You will now see a prompt, which will look like this:
[codex@codex11020 codex]$
The digits are based on the serial number of the machine and will therefore vary. This logon allows you to do
various basic things on the machine, but in order to make serious adjustments or install new software you
have to upgrade your status to that of Superuser.
Type:
su <enter>
When prompted for a password type:
codex <enter>
You are now logged in as root, the Linux name for the chief user. This is the equivalent of the Administrator
on a Windows systems.
The root user on Lin ux can e xecute a ny co mma nd – inclu din g the deletion of vit al sy ste m files
– so cautio n an d cert aint y is necess ary be fo re p er for ming any t asks.
1.2
Restarting the Codex software without rebooting
Note: Eject Datapacks before doing this.
Logged in as root, type:
telinit 3 <enter>
Wait for the Linux prompt to re-appear. If it does not, press CTRL-ALT-F1. Then type:
telinit 5 <enter>
1.3
Exiting Linux
Logged in as root, type:
exit <enter> to leave the root user, then
CODEX TECHNICAL USER MANUAL V1.0 11.10
PAGE 3
logout <enter> to exit the Linux prompt.
1.4
System shutdown from the Linux prompt
Logged in as root, type:
shutdown -h 0 <enter>
1.5
Filesystem consistency (after sudden closedown)
Under rare circumstances following a power loss, the filesystem checker may detect that changes need to be
made to the filesystem to make it consistent again. This is quite rare as it is a journaling filesystem that
normally recovers automatically. If this happens, the next time the machine it is started up, it will not load the
Codex UI screen but will instead go directly to the Linux screen.
You will be prompted to type the root password (codex by default) and then you are dropped directly to a
prompt that says:
recover filesystem #
(or something similar – there are variations).
To recover filesystem consistency, you now need to type the command:
fsck <enter> and answer yes to anything it asks you.
When the filesystem checker has completed, you should type:
reboot <enter>
This restarts the system, which should now start normally.
1.6
Remote access to the Codex system disk
Commonly, you may need to access (share) the Codex system disk from another computer, in order to copy
programs or other files to and from it. You must, of course, be connected already: if not, first refer to
Connecting to Codex over a network.
You will be connecting as user ro ot , with password co d ex – this gives you full access to the machine.
Be ext re mely ca re ful not to mo ve or delete an y files whe n con nected in t his wa y!
Details of how to set up access to a disk depend on your computer and operating system – below are the
most common examples.
Note: You can only have a single logon at a time from any given computer. Therefore, if you are already
connected to the Virtual File System (VFS) you must disconnect this first.
The direction of slashes in filenames depends, regrettably, on the operating system. Linux and Apple OS use
forward slashes (/). Windows (usually) uses backward slashes (\). It is important to get this right.
1.6.1
Remote access on Windows
This can be done from the Command Line window or from Windows Explorer:
1.6.1.1
Command Line
First determine the IP address of the Codex (if necessary, see Co nfi gurin g net work settin g s manually –
I NSE RT HYP ER LI N K). For this example let's say the IP address is 192.16 8.1.120
Access the command prompt by selecting st art and then R un… Type cmd in the box which appears and
click OK. At the prompt, type:
net use * \\192.168.1.120\root codex /user:root <enter>
CODEX TECHNICAL USER MANUAL V1.0 11.10
PAGE 4
Be careful to observe the spaces and the direction of the backslashes.
This command line specifies:
the requested disk-letter that the Codex drive will be assigned (* means next available);
the Codex address and directory to connect to;
the password and;
the Codex user to connect as.
It will connect the Codex root as the next available disk drive-letter (which will be reported), and you can now
use it as if it was a local disk on your machine. If you want to specify the drive-letter yourself, replace the *
with the letter plus colon that you want (e.g. Z:)
1.6.1.2 Windows Explorer
Right-click the ‘My Computer’ icon on the Desktop and select ‘Map Network Drive’. A box will appear with the
next free drive letter allocated, though this can be changed if you wish. Using the same IP address from the
previous example, in the ‘Folder’ field type:
\\192.168.1.120\root
Press the ‘Finish’ button or <enter>. In the box which appears enter the username root and the password
codex. You will now be connected to the root directory of the Codex system.
1.6.2
Remote access on Macintosh
Bring up Finder and then the Connect To Server dialog box either by pressing Apple-K or selecting G o and
Connect to Ser ver from the menu.
Enter smb://192.168.1.120/root (whatever IP address the Codex is set to) into the server address box and
press Co nnect. You should see a Connecting to server window appear.
When the SMB/CIFS File System Authentication dialog appears, enter root in the Name box and in Password
type codex (by default). Press O K.
A new Finder window will now open showing the files on the Codex system.
1.7
Some Basic Linux commands
This section is for anyone who needs to make any technical adjustments but is unfamiliar with commandlines. There are thousands of Linux commands, but here are a few of the basic ones that will help you
perform the Codex housekeeping tasks.
Please keep in mind that the huge number of powerful commands means that it is quite easy to change the
system unintentionally, which is likely to stop it working in ways that can be difficult to diagnose. Therefore, treat
the Linux command line with care and avoid typing more than the minimum necessary to do the work.
The prompt always shows you which directory you are in (except on the Codex Portable). When you first log in
and become Superuser, you are in the root directory and the prompt will be something like:
[codex@codex11020 codex]$
depending on your serial number. Whenever you see this prompt followed by nothing else, the system is ready
for a command. If there is anything else on the line, you can remove it at any time by pressing CTRL-C. All
commands are case-sensitive - hello is not the same as HELLO or Hello – and are completed by
<enter>.
All these commands have many options, which are usually not needed but can be found by typing man
<command>. Alternatively, add
-–help
to the command (e.g. ls -–help <enter>).
To prin t (display) the directory you are in use the pwd command:
pwd <enter>
To list the contents of a directory, use the ls command:
ls <enter>
To cha nge di rector y, use the cd command, e.g.:
cd /home/codex <enter>
The root directory has the name / (forward slash). The directory is a tree, so if you are on one branch and
want to move to another, you have to start again at the root, using the slash - as in the example above. Linux
helps you with this navigation by providing name-completion on directories and filenames – if you start a path
CODEX TECHNICAL USER MANUAL V1.0 11.10
PAGE 5
and then press Ta b it will complete the name. In the example above, you could type:
cd /h<tab>/c<tab> <enter>
Note that this only works if there are no other choices left after the letters you have typed – if pressing Ta b
doesn't complete anything there are other directories which match, and you will have to type more letters to
disambiguate them. Repeatedly pressing Ta b will make the system display all the options which match what
has been typed so far.
To m a ke a new di rect ory use the mkdir command. For example:
mkdir /tmp/import <enter>
This will create a directory called import in the pre-existing tmp directory. New directories should only be
created in /tmp, /root, or /home/codex.
Note: the /tmp directory on the Codex Portable is stored on the system RAM, i.e. anything in /tmp will be lost
when the machine is switched off.
To co nnect an e xternal device (such as a CDROM, hard-drive or USB memory stick) use the
command:
mount
mount /mnt/cdrom <enter>
The device can only be omitted from a mount command if the mount point is specified in /etc/fstab. For
USB sticks/drives the device must also be specified in order for the mount command to work. With no
Datapacks loaded a connected USB device will be assigned the device name sdb1 by the system (this will be
sda1 on a Codex Portable). To mount it use the command:
mount /dev/sdb1 /mnt/usb <enter>
Note: Linux is not very good at dealing with external devices automatically in the way that Windows or OSX are.
Instead, you must mount the device as a named directory.
To di scon nect the device, use the umount command:
umount /dev/sdb1 /mnt/usb <enter>
This is mu st be d one be fore rem ovin g a device, and is akin to the 'Safely Remove Hardware' option on
Windows. Unlike Windows or OSX, Linux is unlikely to recognize that a device has gone, and ba d t hing s ca n
happen if t his i s n ot d one.
To co py a file use the cp command:
cp <sourcefile> <destination> <enter>
For example, here's how you copy a new LUT file from a USB stick (assuming the file is in the top-level
directory of the USB stick and you have already mounted it):
cp /mnt/usb/<lutfilename> /etc/codex/luts <enter>
To edit text files:
Certain system configuration files may sometimes need to be edited: most commonly, the files that control the
network settings. These files can be edited from another computer connected to the Codex, but it may be
necessary or easier to do it directly on the machine itself.
The standard text-editor in Linux is called by the command vi, and is a throwback to the early days of
computing. Though it is powerful, it is also very unintuitive. Here are the very few commands you need to use
it for this purpose:
To edit a file
vi <filename> <enter>
To move the cursor
arrow keys
You are initially in command mode which allows movement around the file but not editing.
To change to insert mode (for editing)
i
Then type whatever you need to change. The Backspace and Delete keys work as expected.
To ‘comment out’ (make inactive) a line add a # to the beginning
Similarly, to ‘comment in’ (make active) a line remove the # from the beginning
To return to command mode
Esc
To exit and save changes
:wq! <enter>
CODEX TECHNICAL USER MANUAL V1.0 11.10
PAGE 6
(notice the colon : which is part of the command)
:q! <enter>
To exit without saving changes
If you insist, more commands can be found at http://www.ss64.com/bashsyntax/vi.html
To view the conte nt s o f a file:
less <filename>
1.8
File locations
The Codex files are in several directories on the system, depending on whether they are program files, logfiles,
configuration files or LUTs. The logfiles are very useful for troubleshooting and you may need to read them or
send them to Codex for diagnosis.
The configuration files store basic setup and project settings, and other items such as the filecard layouts: you
can replace them with your own variations if desired.
The LUT files are applied for viewing and the generation of VFS files. The system is shipped with several
standard ones, but you can add your own.
Programs:
/home/codex contains the executables on Studio systems. /usr/local/codex/bin contains the executables
on Codex Portables. There are two main programs, the server and the user-interface. The server does the
actual work of recording, transcoding etc, and the user-interface allows you to control it. This architecture
allows the same user-interface program to be used on remote computers as well as the Codex itself.
drserver
- the server
drui
- the user-interface
Logfiles:
/var/log/ contains all logfiles (general system logs as well as Codex-specific ones). The Codex logfiles are:
drserver.0.log
- the latest log file generated by the server
localdb
- this database file can become corrupted by a power cut, but can be safely
deleted
Note: The Portable does not store logfiles after a shutdown, so if a logfile is required is must be retrieved after
the occurrence of a problem but before shutdown.
Configuration files:
/etc/codex contains all configuration files. These are:
filecard.xml
- the configuration file for the shot-metadata filecards.
sysconfig
config.xml
- server configuration file, D O N OT E D IT
druiconfig.xml
- user-interface configuration file, D O N OT E D IT
LUTs:
/etc/codex/luts contains all LUT files.
There are no other locations used directly by the Codex software.
Be ver y ca ref ul no t to delete or m o ve any p ro gra m or con figuration files.
2
Mounting an external drive/USB key
Note: There is no direct UI support for this, and USB on Linux is not perfectly developed. For non-technical
users, transferring files between a USB device and the Codex is more easily accomplished by networking a
laptop to the Codex and plugging the USB device into that.
This method allows simple drag-and-drop copying.
CODEX TECHNICAL USER MANUAL V1.0 11.10
PAGE 7
Log on as root (see Logging-on to Linux). Plug the device into either USB port. Wait a while until it gets
mapped to a SCSI drive. You might see messages come up during this process. If not, type:
dmesg | tail <enter>
This should show the device being recognised and mapped to /dev/sd<n>.
You can also type:
cat /proc/partitions <enter>
to see which one it might be – there should be a partition sdb1 assuming the device is formatted. Then type:
mount -o umask=0 /dev/sdb1 /mnt/usb <enter>
The drive is then mounted in /mnt/usb. The umask=0 ensures all users can write to a FAT32 filesystem. You
can then export to it or import from it in the UI, or just use
remember to type:
cp
to copy directly from the VFS. When finished,
umount /mnt/usb before unplugging the device.
3
Working with Codex over a network
In normal operation, Codex makes use of the network for two independent purposes:
1)
2)
To be controlled from a remote computer
Acting as a server for providing files to other computers
This requires certain network settings on the Codex for each purpose, along with settings on the remote
machines connected to it.
3.1
Network settings on the Codex machines
All Codex machines are shipped with a standard fixed IP address and Netmask. This is based on the following
range:
192.16 8.1.xxx
(IP address)
255.255.255.0
(netmask)
xxx is the unique address of each Codex and, as shipped, is the last two digits of the serial number + 100. So
machine number 20 has the address 192.16 8.1.120.
There are two Ethernet ports on the machine: either can be used, but as delivered all connections are
normally expected to be on Port 1 (which is known in Linux terminology as eth0). You can use both ports
simultaneously on two networks but not on the same network – the netmask dictates that the first three
numbers of the IP address are the same for all machines on the network. A different network would have an
alternative set of three numbers at the start of the IP address, followed by the individual unique addresses for
machines on that network.
Management of the network settings on Codex is currently done directly from the Linux command line. In
order to be able to do this you need to log on to Linux. If you want to change anything, you will also have to
give yourself Superuser status. If necessary, see Using Linux on the Codex.
For details of how to change the IP settings for a Codex machine see the next section.
3.2
Configuring network setting Manually
3.2.1
Check Codex’s IP address and make sure it’s configured correctly
1. Connect to the Linux command line of the Codex system. On systems with a Touchscreen, connect a
keyboard to the front of the Codex system using either of the USB ports.
2. Press Ctrl/Alt/ F1 to bring up the Linux virtual console screen (to return to the Codex UI screen at any
time press Ctrl/Alt/ F7 on Studio systems or Ctrl/Alt/ F3 on a Portable)
3. For systems without a Touchscreen see Connecting to a Codex system to access the Linux command
line.
4. Login as codex, with default password codex
5. Type su to switch user to root – the default password is codex
CODEX TECHNICAL USER MANUAL V1.0 11.10
PAGE 8
6. Type ifconfig. A list will be generated that looks somewhat like this:
eth0
Link encap:Ethernet
HWaddr 00:30:48:20:DE:D8
inet addr:192.168.2.3
Bcast:192.168.2.255
Mask:255.255.255.0
inet6 addr: fe80::230:48ff:fe20:ded8/64 Scope:Link
UP BROADCAST MULTICAST
MTU:1500
Metric:1
RX packets:0 errors:0 dropped:0 overruns:0 frame:0
TX packets:0 errors:0 dropped:0 overruns:0 carrier:0
collisions:0 txqueuelen:1000
RX bytes:0 (0.0 b)
TX bytes:0 (0.0 b)
Base address:0x2000 Memory:d4400000-d4420000
There are variations, and there may be much more text than this, but you are interested only in blocks
beginning eth0 or eth1, and lines that begin with inet addr. These lines show the system’s current IP
address(es) and netmask(s).
There are two network ports: eth0 is port #1 on the back panel, and eth1 is port #2 – the ports only appear in
the output of ifconfig if they are enabled and running. New machines have Port 1 (eth0) configured with a
manual IP address, and Port 2 as a dynamic DHCP port.
The original IP address for the machine would be set to 192.168.1.1xx (where the xx are the last digits of the
system’s serial number.) You can tell what the serial number is by looking at the Linux prompt – if it says
Codex11012 then it is machine number 12 and the IP address would have been set to 192.168.1.112.
Note: You can use both ports, but don’t connect both to the same LAN!
3.2.2
Edit the system’s IP address
To change the IP address and netmask, most usually to adapt the Codex to an existing network, the Linux
network configuration file has to be edited. This can be done on the machine itself or from any computer
networked to the Codex using the standard vi editor. To configure port 1, type:
vi /etc/sysconfig/network-scripts/ifcfg-eth0 <enter>
To configure port 2, type:
vi /etc/sysconfig/network-scripts/ifcfg-eth1 <enter>
You are now in the vi editor, which should be showing the contents of the file somewhat like this:
DEVICE=eth0
ONBOOT=yes
IPADDR=192.168.1.101
NETMASK=255.255.255.0
GATEWAY=192.168.1.1
Type i to enter insert-editing mode and change what you need to:
ONBOOT=yes
IPADDR=(whatever the IP address is to be set to!)
NETMASK=(the correct netmask)
GATEWAY=(the appropriate gateway)
Once you’ve finished editing, press E sc to exit editing mode. Finally, type :wq!(to write changes and q uit).
You then need to refresh the Ethernet changes (see below).
Note: if you want to quit without writing any changes, type :q! Instead.
The G ATEWAY entry is used to connect to other networks. By default eth0 is used for this purpose, and both
CODEX TECHNICAL USER MANUAL V1.0 11.10
PAGE 9
network connections cannot be used in this way simultaneously.
3.2.3
Refresh the Ethernet changes
If using port 1, type:
ifdown eth0 <enter>
ifup eth0 <enter>
If using port 2, type:
ifdown eth1 <enter>
ifup eth1 <enter>
If you are connected via ssh from a networked computer, typing ifdown will break the connection. In this case,
type:
ifdown eth0
ifup eth0 <enter>
This will reset the network port and you can then connect using the new network settings on the Codex.
Finally, type:
exit <enter> to leave the root user and then:
logout <enter> to exit the Linux prompt.
3.2.4
Using dynamic IP addresses (DHCP)
We do not normally recommend this. If you feel that you must, contact Codex support.
3.3
Network setting for other computers connected to the Codex
Each computer connected to the Codex must have a compatible IP address and netmask. The details of this
will depend on the particular computer and network, but if the Codex defaults are used you would set each
machine as follows:
192.16 8.1.xxx
(IP address)
255.255.255.0
(netmask)
xxx is the specific address of each computer: they can be within the range 2-254 (1 is not recommended as
this is often the address of the network router), but must of course all be different from each other and the
Codex.
Once these settings have been made, it should be possible to communicate with the Codex. You can quickly
check whether this is successful by opening a command-line box on your computer and typing:
ping 192.168.1.120 <enter> (or whatever the address of the Codex is)
(Use st art | R un... | c md <O K> on Windows or the Terminal application on Mac.)
If you are connected properly this program will report something like this:
Pinging 192.168.1.65 with 32 bytes of data:
Reply from 192.168.1.65: bytes=32 time<1ms TTL=128
Reply from 192.168.1.65: bytes=32 time<1ms TTL=128
Reply from 192.168.1.65: bytes=32 time<1ms TTL=128
CODEX TECHNICAL USER MANUAL V1.0 11.10
PAGE 10
Reply from 192.168.1.65: bytes=32 time<1ms TTL=128
Note: Most computers have a firewall to protect from malicious attacks. It is likely that this firewall will at first
prevent a proper connection to the Codex, and this has proved to be the most common reason for problems.
We recommend disabling the firewall while trying to connect for the first time: once the settings have been
shown to work the firewall can be switched back on. If this breaks the connection, it will be possible to
configure options in the firewall to allow the Codex connection – details of this depend on the individual firewall,
but we should be able to help if necessary.
3.4
Connecting to the Codex
Once the network settings are correct, you can connect the computer to the Codex machine and work with it
either to control it directly, or to copy files from the Virtual File System (VFS).
3.4.1
Controlling the Codex from a remote computer to run the UI
The same user-interface that runs on the Codex itself can be run unchanged on any other computer, whether
a Windows PC or a Macintosh. The program packages to do this can be found along with installation
instructions at:
http://www.codexdigital.com/software/
Note that there are usually several versions of these on the website: you must choose the one that matches
the software version on your Codex (which can be quickly found by pressing the i button on the Setu p t ab).
3.4.1.1 Windows UI package
The package will have a name such as codexui-win-1.2.2j.zip. The programs are installed by simply extracting
all the files in the package into one directory and then running the program drui.exe.
You may wish to create a shortcut to drui.exe on your desktop.
Note: the PC versions also require Intel’s IPP run-time library to be installed. If this is not done, the program will
report failure to find modules such as ‘ippcore.dll’. The library is named ipp-runtime.zip, is a normal Windows
installation package, and is found on the same page as the Codex software. This installation will only need to
be done once even if you install newer UI packages.
3.4.1.2 Macintosh UI package
The package will have a name such as codexui-osx-1.2.2j.dmg. Open the .dmg file and drag the Codex UI
application package into Applications. The application is a universal binary and so will run on PowerPC and
Intel Macs
3.4.2
Connecting to the Codex to access the Linux command line
3.4.2.1 From a Windows machine
Download the free ssh client program putt y from http://www.putty.org
Ensure that the Windows machine and the Codex are connected over a network. Open the putty application
and enter the IP address of the Codex in the 'Host Name (or IP address)' field. You will then need to log onto
the Codex using the user codex and password codex. For certain operations you may need to upgrade to a
Superuser by typing su and the password codex.
3.4.2.2 From a Macintosh machine
Open the Te r minal application. Type:
ssh [email protected]
You will then have to enter the password which is codex.
Then upgrade you status to Superuser as per the instructions in the previous section if required.
CODEX TECHNICAL USER MANUAL V1.0 11.10
PAGE 11
3.4.3
Connecting to the Virtual File System (VFS)
The VFS presents the shots, as files of different types, to computers connected on the network. The top-level
directory of the VFS always has the name codexvfs, and the shots appear in this directory and sub-directories
below it - the exact layout depends on how the system has been configured (see Setting-up the VFS).
In order to connect to the VFS, you must establish a connection to the Codex machine's codexvfs directory.
Details of how you do this depend on your operating system, and there are usually several choices – here are
some common examples.
Note: you cannot connect to the Codex system as more than one user at a time, i.e. if you have already
connected to the root directory as a root user you will have to disconnect before being able to connect to the
codexvfs directory as a normal codex user. Alternatively you could navigate to the codexvfs directory which
is located in /mnt.
Howe ve r, you sh ould not re main c onnec ted a s a root user lon ger tha n nece ss ary to minimi se
the cha nce o f accident al dra ggin g a nd d rop ping of files.
3.4.3.1 Connecting Windows machines to the VFS
This can be done from a command-line window or from Windows Explorer:
Command Line:
First determine the IP address of the Codex. For this example let's say it is 192.16 8.1.120
At the prompt, type:
net use * \\192.168.1.120\codexvfs <enter>
You will be asked for a username, type:
codex <enter>
and then a password, again type:
codex <enter>
Be careful to observe the spaces and the direction of the backslashes.
This command will connect the Codex codexvfs directory as the next available disk drive-letter (which will be
reported). You can now use it as if it was a local disk on your machine. If you want to specify the drive-letter
yourself, replace the * with the letter you want plus a colon (e.g. Z:)
Windows Explorer:
Right-click the ‘My Computer’ icon on the Desktop and select ‘Map Network Drive’. A box will appear with the
next free drive letter allocated, though this can be changed if you wish. Using the same IP address from the
previous example, in the ‘Folder’ field type:
\\192.168.1.120\codexvfs
Press the ‘Finish’ button or <enter>. In the box which appears enter the username codex and the password
codex. You will now be connected to the codexvfs directory.
3.4.3.2 Connecting Macintosh machines to the VFS
Bring up Finder and then the Connect To Server dialog box either by pressing Apple-K or selecting G o and
Connect to Ser ver from the menu.
Enter smb://192.168.1.120/codexvfs (whatever IP address the Codex is set to) into the server address box
and press Co nnect. You should see a Connecting to server window appear.
When the SMB/CIFS File System Authentication dialog appears, enter codex in the Name box and in
Password type codex (by default). Press O K.
A new Finder window will now open showing the VFS files on the Codex system.
3.4.4
File and directory structure on the VFS
The codexvfs directory you are now connected to is the root of a directory tree which presents the shots on
the Codex as files of different types. None of these files actually exist until they are asked for – only their
names, sizes and so on are presented: this is why the system is called Virtual.
CODEX TECHNICAL USER MANUAL V1.0 11.10
PAGE 12
The la yout and na mes of these directories and their contents is entirely configurable to suit the user.
Therefore, what you see once you have logged onto the VFS may be very variable, depending on what shots
are on the Codex and how the VFS is configured. Indeed, you may initially see nothing.
3.4.5
If the VFS appears to be empty
There are three possibilities: either there are no shots (nothing recorded or no Datapacks loaded), there is no
VFS configuration loaded, or there are filters set up in the VFS and no shots satisfy the filter conditions..
If the Codex UI shows that there are shots loaded, check the VFS configurations on the S ETU P t ab|VF S
sc reen. Full details of the VFS and how to load or change the configurations may be found in the section
Setting up the Virtual File System.
4
Filecard structure
The structure of the shot filecards (that is, the description of all the fields of metadata that can be entered –
but not the metadata itself) is kept in the file filecard.xml. This is a human-readable text file conforming to
normal XML structures.
You can change the labels of the fields in the filecard, and even the overall structure and layout, by editing this
file to suit your production (we recommend consulting Codex if you want to make major changes).
The Codex database makes no restrictions whatsoever on the types of metadata that can be stored. The
standard filecard structure covers the basic items that productions need, but you can remove them or add
others.
4.1
Different Filecards for different users
If you want to control the Codex from a remote computer, it needs its own copy of filecard.xml installed along
with the UI program (see Installing the UI on remote computers). Commonly, all the computers on a project
would have the same file, but this is not mandatory: for example, you could leave out some of the fields – or
make entirely new versions – to control access to the metadata by different classes of user. Fields can also
be set to be non-editable, which allows users to see those fields without being able to modify them.
4.2
The configuration of the Filecard: filecard.xml
4.2.1
The standard filecard.xml
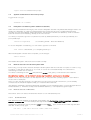
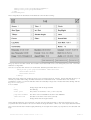
Here is the standard filecard description:
<?xml version="1.0" encoding="UTF-8"?>
<filecardlayout>
<tab name="Main">
<entry x="0" y="0" prop="Scene"/>
<entry x="1" y="0" prop="Take"/>
<entry x="2" y="0" prop="CircleTake" label="Circle">
<choice>Yes</choice>
<choice>No</choice>
</entry>
<entry x="0" y="1" prop="ShotType"/>
<entry x="1" y="1" prop="IntExt" label="Int / Ext">
<choice>Interior</choice>
<choice>Exterior</choice>
</entry>
<entry x="2" y="1" prop="DayNight">
<choice>Day</choice>
<choice>Night</choice>
</entry>
<entry x="0" y="2" prop="TStop"/>
<entry x="1" y="2" prop="Focus"/>
<entry x="2" y="2" prop="Lens"/>
<entry x="0" y="3" prop="Filter"/>
<entry x="1" y="3" prop="ShutterAngle">
<default>180.00</default>
</entry>
<entry x="2" y="3" prop="SourceDevice">
</entry>
<entry x="0" y="4" w="2" h="2" prop="Comments" text="y"/>
CODEX TECHNICAL USER MANUAL V1.0 11.10
PAGE 13
<entry x="2" y="4" prop="ProductionName"/>
<entry x="2" y="5" prop="ShotName"/>
</tab>
</filecardlayout>
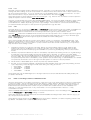
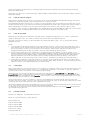
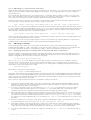
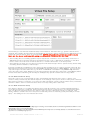
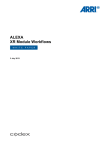
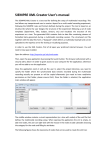
This configuration file describes a Filecard that looks like the following:
The grey area of the card is fixed, and contains information that is not to be changed by the user. The white
fields are configurable.
Here is a complete XML element on the filecard, describing the field name Circle:
<entry x="2" y="0" prop="CircleTake" label="Circle">
<choice>Yes</choice>
<choice>No</choice>
</entry>
Each element is defined by a start tag, then some properties, then an end tag. Notice that XML allows you to
embed properties within a tag, and also that there are nested elements – the field has some choices
predefined. In fact, you can see that the entire file is actually a single set of nested elements starting with the
tag <filecardlayout>.
In more detail:
<
all tags begin with an angle bracket
entry
the start tag
x="2" y="0"
the position of the field (x = “0”, y = “0” is top left)
prop="CircleTake"
the name of this metadata as stored in the database
label="Circle"
the label of the field on the card (optional)
>
all tags finish with an angle bracket
Notice that all values are surrounded by “quotes”: this is because the tag for the element and some of its
properties have been written in short form within the angle brackets – this is one of the styles that XML allows.
The choices list has been written slightly differently, in the style where each property has its own start and end
tags:
CODEX TECHNICAL USER MANUAL V1.0 11.10
PAGE 14
<choice>Yes</choice>
<choice>No</choice>
Because each property has its own tags, there is no need for quotes in this case. The choices list is nested
within this entry element, so we also need to finish with an end-tag for the whole element:
</entry>
Notice the forward slash / denoting that this is an end tag.
The predefined choices for fields are actually stored in filecard.xml. However, you can change these choices
directly from the UI, so there is no need to edit the file just for this purpose. If you enter a new choice, simply
open the drop-down menu for the field and select the green tick next to your new choice to save it as an
option which can be selected for subsequent shots. Pre-set choices may also be removed by selecting the
red cross from the drop down box.
4.2.2
Editing filecard.xml
The file can be edited in any text editor, but you must take care to stick to the basic XML rules. There are
specialist programs for this, or WordPad in Windows and TextEdit in OSX are both suitable as long as the XML
rules are adhered to – they provide no indication of mistakes.
If you change the location or size of a field, you must also change the others to compensate, or the filecard
will become unreadable. Similarly, the filecard will be unreadable if all the space is not accounted for – the
easiest way to avoid this is by setting any unwanted prop and label names blank (e.g. prop=””) but maintaining
their co-ordinate values. Therefore, if you would like filecards that are very different from the standard, we
suggest you contact Codex for advice, or to do it for you.
Here are a couple of examples of simple changes you might make yourself:
To c han ge t he na me o f a field: select the <entry... > line for the field you want to change. Change the word
in quotes after prop= - don't forget to keep the quotes.
To m a ke a field n on-e dit able: select the <entry... > line. Just before the closing
this:
/> add a s pace then
editable=”No”
Note that metadata property names (prop=””) must themselves be valid XML tag names, i.e. contain no
spaces or other illegal characters. The label attribute can contain any character. For example, the line:
<entry x="2" y="1" prop="DayNight" label = “Day/Night”>
defines a property in the database named DayNight, but the field on the filecard is labeled Day/Night.
Note: all of the standard metadata fields (properties) have English labels pre-defined in the software, so it isn’t
necessary to specify these in filecard.xml – they are used anyway.
4.2.3
Making your own labels or fields
You can override the built-in labels with your own, or add entirely new fields. If you want alternative labels, or to
define new fields, you will need to specify the labels. For example, if you wanted the Circle field to be called
Print instead, you would change the entry to:
<entry x="2" y="0" prop="CircleTake" label="Print">
5
Naming conventions for shots and VFS files
The Shot Naming Rule is defined on the S ETU P t ab | S L AT E sc reen. Shot names within the Codex itself,
and the filenames given to shots within the Virtual File System (VFS) are generated automatically from the shot
metadata (you can of course also override any shotname manually). The rules for automatic generation can
be specified in as much detail as necessary using the Codex scripting conventions.
The key to the scripting of shot and file names is the use of Tokens, which are symbols or words that
represent items of metadata for shots, such as Scene, Take or Width. These tokens are then replaced by the
actual values for the particular shot.
The filenames in the VFS are based on the shotnames, but do not have to be the same – indeed, it is usually
desirable to add different elements to the filename according to the type and usage of the file.
There are standard predefined rules for all of this, available from drop-down lists in the Codex UI, but if you
want to define your own rules, or more complex variants, the next sections describe how Tokens are defined
and how to use them.
CODEX TECHNICAL USER MANUAL V1.0 11.10
PAGE 15
5.1
Tokens
The name of any metadata field (such as Roll, Scene, Take or any other field found on the Filecard or
S ETU P t ab screens) can be turned into a token by using the name of the field enclosed in {braces} – for
example
{Scene}.
When the shot is named, these tokens are then replaced by the current value of that field. For example, if you
describe the rule for shotnames as follows:
Test {Scene}-{Take}
then for each shot the words in braces will be replaced by the current Scene and Take value, and the rest
used as written. If the Scene is 1 4 and the Take is 5, the shotname would become:
Test 14-5
The values don't have to be numbers, of course. Scene Fre dd y and Take t9 9B becomes:
Test Freddy-t99B
5.2
Rules for Token-Names
All of the metadata is described by internal fieldnames, which are the ones used in the XML structures of the
configuration files and within the database. These names are ultimately what the token-replacement system
uses: the built-in ones are listed below and have to be case-sensitive and without spaces, in order to conform
to XML rules. Examples are
ProductionName and CircleTake.
However, the user doesn't normally see these fieldnames, but the friendly labels or usernames on the Filecard
and S ETU P t ab screens. All the common fieldnames can be described by these usernames, such as
Production
and
Circle.
These names are not case-sensitive and may contain spaces.
Note: if you invent new fieldnames in your filecard.xml they will not have friendly labels to match – you will have
to assign a label as well.
{r} is the
{OriginalRoll} – but they are mainly for special purposes within the setup of the VFS. For
example, if you are generating dpx files - which are one-per-frame - {f} can be used to put the frameThere are also a number of single-letter tokens. Some of these are conveniences - for example
same as
number in each filename. This is discussed further in the VFS section and there are full lists of all legal tokennames in an Appendix.
Note: the rules for tokens in shot names and VFS names are slightly different. Generally speaking:
Labels (user friendly names) should be used as tokens in the Shot Naming Rule and Roll Naming Rule
Metadata property names should be used as tokens in the VFS setup
Some single-letter tokens, such as {f}, only work in the VFS, as they have no meaning in the context of shot
naming. For a list of metadata labels and single letter tokens see the Appendix.
5.3
Naming Shots
The shotname conventions are defined from the S ETU P t ab|S L ATE sc reen. The most common
conventions are built-in: you can modify them or type-in entirely new ones. In the drop-down list there are
convenient buttons to remove existing choices (a red cross) or add new ones (a green tick): the choices are
stored in the file druiconfig.xml.
CODEX TECHNICAL USER MANUAL V1.0 11.10
PAGE 16
Examples:
{Scene}-{Take}
expands to 10-2
{Director} Test {Scene}
expands to Altman Test 19 (note the spaces)
As you type the shotname specification, you are shown an example of what you will get. If the example is
empty, or it doesn't make sense, something is wrong – check that you have a meaningful token and that
there are proper {braces} around the tokens, not (brackets), and that they match properly.
You will also be warned if your rule will produce duplicate shotnames. Try very hard to avoid rules which
produce duplicate shotnames. The system continues to work because every shot has a Universally Unique
Identifier (UUID) separate from the shotname: but everyone you give the shots to will become very, very
confused.
5.4
Naming VFS files
The VFS filenames are set up in the S ETU P t ab|VF S screen, from the Virtual File Setup card that pops up
when you press A dd or E dit. There are a number of fields on this card, of which the filename is only a part –
the complete process is described in detail in the next section, Setting-up the VFS.
CODEX TECHNICAL USER MANUAL V1.0 11.10
PAGE 17
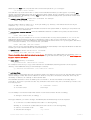
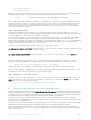
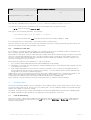
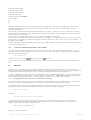
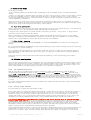
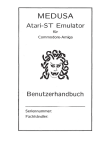
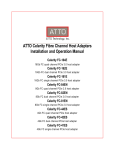
The VFS scripting allows you to set up not only filenames, but separate named sub-directories and even entire
trees. This is very useful for presenting the same shots in different forms for different uses. Here's a simple
example:
In this case, all the shots appear together in various directories as Avid MXF files, Quicktime files, and so on.
But the shots also appear as DPX files in their own individual sub-directories. The reason for this is that there
is one DPX file for every frame, and shots need to be kept separate.
As with shot-naming, there are preset choices for the VFS filenames, tailored to the file type in question, and
you can also construct your own.
Special mention should be made for Avid MXF files – although not mandatory, is is strongly recommended to
use the following Filename structure in the VFS to prevent filenames exceeding 31 characters, which can lead
to problems in Avid editing systems:
{r}{c}{d}_{t}.{e}
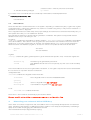
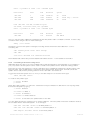
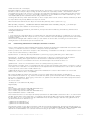
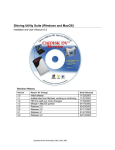
The bottom of the Virtual File Setup card shows you examples of the filenames you will get, including the full
directory-path if specified.
In the example above, the Filetype is dpx and the Filename string is:
{s}/{e}{f%5}.{e}
which expands to:
<Shot>/<Type>/<Frame>.<Type>
CODEX TECHNICAL USER MANUAL V1.0 11.10
PAGE 18
Notice the %5 in {f%5}. This defines the number of digits in the framenumber – in this case 5, padded with
zeroes as necessary. Similarly, {f-5} limits this number to a maximum of 5 digits, while {f+1000} would add
1000 to any frame number. All these different options can be used at once to modify numeric values if
required.
Another useful token is {g} which will insert a number value for frames-since-midnight. This can be useful for
creating sequences of files which are numerically continuous, which is required by most DI and VFX systems.
A common option to use is {g%8}, giving a frames-since-midnight value of 8 digits for all files.
The first example shot is named 1_1. The result is a directory named 1_1, with a sub-directory named dpx,
containing one file per frame, each named with a 5-digit framenumber and dpx. So:
1_1/dpx/00000.dpx
1_1/dpx/00001.dpx
and so on...
Here are some more filename examples, ranging from very simple to more complex:
{s}.{e}
expands to <Shotname>.<Extension> (all shots in the codexvfs
root directory, e.g.
{r}/{s}.{e}
freddy.avi)
expands to <Roll>/<Shotname>.<Extension> (separate subdirectory for each Roll, e.g.
{e}/{r}/{s}{f%5}.dpx
test/freddy.avi)
expands to <Extension>/<Roll>/<Shotname><'5-digit framenumber'> (sub-directory named dpx, Roll directory, one dpx file per
shot, e.g.
dpx/100/freddy00012.dpx)
As with the shotnames, if it looks wrong, it is wrong: check the tokens and the braces. With the VFS, there is
one further thing to look out for: if the specification is incomplete, you may produce duplicate filenames, which
have major impacts on the performance and should be carefully avoided. For example, this specification:
{r}.{e}
This expands to <Roll>.<Extension> - for example test.avi - and if you used it, every single shot with the same
Roll would get the same filename. The system will give each file a number – test.avi (2) etc - to avoid clashes,
but this will affect the speed at which the VFS creates the list of files.
In the cases where there is one file-per-frame it is especially important to include something to define a
different filename for each frame, such as the frame-number in the examples above, or timecode. Otherwise
there would potentially be thousands of files all with the same name.
The sy ste m war ns yo u if the re may be duplicate filename s – do not i gno re thi s warnin g .
A full listing of token letters, names and user-friendly labels, along with where to use them, is contained in an
Appen dix.
6
Setting up the Virtual File System (VFS)
The VFS allows shots to be seen on a network as files of different types. It is called Virtual because these files
can be seen by the client computers as entries in directories, but the actual contents are not created until a
client asks for a file to be copied or viewed across the network.
This allows very easy and efficient access to the shots. Most files can be generated very quickly – often
streamed in real-time or better – though of course the throughput depends on how many clients need
simultaneous access.
The Codex can have multiple VFS Configurations, and each Configuration can have multiple directories of the
same or different file-types. Shots can appear in multiple directories, so that the same shot can be made
available in different simultaneous formats, for different purposes.
All VFS setup is done form the S ETU P t ab|VF S screen.
6.1
Setting-up VFS Configurations
The NEW CONFIG button creates a new VFS configuration, which will initially be empty. When creating a new
VFS Configuration there are several global properties which can be set to ensure compatibility with the system
which will be using the files. These are:
Filename case:
Either Upper and lower or Lo wer o nly as required
Illegal chars : Either \/:<>* |? or \ /:<>*| ?'ӣ#@;,^&< sp> as required
Replace with: Either _ or – as required
CODEX TECHNICAL USER MANUAL V1.0 11.10
PAGE 19
The EDIT CONFIG button allows you to edit the global properties of an existing configuration.
6.2
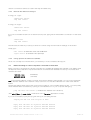
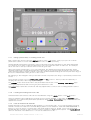
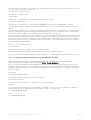
Adding or editing VFS entries
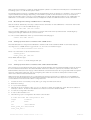
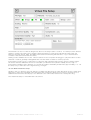
Each entry in the configuration defines a rule for the VFS to present files. Press the ADD or EDIT button. This
pops up a form:
This form fully defines the file type, directory and name, scaling, compression, etc. Most of this is fairly
straightforward. Here are brief notes on some fields:
6.2.1
Filename
The string in this field defines the way in which the VFS shows the shot filenames and directory structure.
There is a drop-down list of common formats, which changes for each filetype, or you can construct your
own. This is discussed in detail in the previous section, Namin g Co n ve ntion s.
The common formats are different for different filetypes because some filetypes cover entire shots (e.g. avi)
while others produce one file per frame (e.g. dpx). In the latter case, you would usually want separate
directories for each shot to avoid confusion.
The Example Files field shows results for a couple of shots, and warns if there will be any duplicate filenames:
avoid letting this happen!
6.2.2
Owner/User/Group
These fields control the Linux file permissions. Unless you understand how file permissions work, it is best to
leave these at their defaults.
6.2.3
Scaling
This controls the size of the output if it is to be different from the original. It may be Relati ve, in which case
you are given a list of standard scales such as ½ or ¼, or Fixe d, in which case you specify the exact size
yourself.
6.2.4
Conversion Quality
This controls whether conversions (if any) are optimised for speed (Low) or quality (Hig h). If you want to
stream a shot in real-time over the network you need to choose Low. For the best possible converted
bitmap, choose Hi gh. Me dium is usually a good choice. This option mainly impacts upon the quality of
Scaling.
6.2.5
Compression
Some filetypes allow compression: currently, JPEG is supported for avi files, while DnxHD and JPEG can be
used for Avid MXF and mov files. Again, if you want clients to be able to play shots in real-time over the
network, or the files are intended for offline editing, choose compression. If they simply want the best possible
picture for online editing or a local copy, don't.
Uncompressed mov or avi files are not recommended due to their very large size. If you want to work with
uncompressed material, dpx files are the best option.
CODEX TECHNICAL USER MANUAL V1.0 11.10
PAGE 20
6.2.6
LUT
This field controls whether a LUT is applied to the file. Typically, you would apply a LUT to filetypes used for
viewing and offline editing (such as compressed mov files) but not to files used for VFX or DI processes (such
as uncompressed dpx files). A pop-up card shows you the available LUTs – choose from the list. You can
also build new LUTs or import external ones – this is described in the section LU Ts .
Note: Remember to check that the LUT is the correct type – e.g. 8-bit for AVI, not 10-bit, to ensure optimum
quality and speed. See the section LU T file for mat s.
Any type of LUT applied through the VFS will affect RGB values. As such, any YCbCr material to which a LUT
is being applied for output will be converted into RGB for the LUT processing and then output as RGB or
converted back to YCbCr depending upon the output settings. The number of conversions and LUTs being
processed will have an impact on the speed of file generation through the VFS.
6.2.7
CDL
This field allows you to select from N o, Ye s , or + Pos t LUT. Codex systems can record CDL metadata from
DP Lights, FilmLight, and Digital Vision colour correction and on-set colour grading systems. Once this
metadata has been recorded with a shot it is always carried through the post-production chain.
Selecting Ye s means this metadata will be used to burn-in a shot specific look for material output through the
VFS. Pos t LU Ts can be stored on the machine and applied at this stage also, but on a per VFS File Type
basis. CDL Data and Post LUTs might be applied to dailies and offline editing files.
6.2.8
DPX Options
This controls whether the files are output in their existing format or converted to 10-bit RGB dpx files. This
decision is dependent on various factors, such as the post-production workflow requirements. While 10-bit
RGB dpx files are a very common path for post-production, there are several reasons why you may want to
keep the files in their existing format:
1.
material recorded from a camera outputting data is recorded in Bayer pattern format. While Codex
systems can perform de-Bayering for monitoring and the output of dpx files as RGB, there are also
several camera specific software programs available for performing de-Bayering which produce better
results.
2.
wavelet compressed material (recorded on a Portable) outputted in it's existing format (i.e. original Storage
Format and compression Quality) will result in smaller files for archival. For example, a 10-bit YCbCr
uncompressed dpx file is 5.27MB whereas a 10-bit YCbCr dpx file output with 4:1 wavelet compression is
around 1.3MB. This may be advantageous to maximise storage capacity, but be aware that any
compressed dpx files are not viewable by other systems (due to there being no standardization for wavelet
compression) and need to be run through a Codex system in order to be decompressed.
3.
The Convert to 10-bit RGB option will uncompress any wavelet material.
4.
the size of uncompressed material outputted as dpx files will differ when using the Keep Existing Format
option depending on the Storage Format used during recording, as follows:
•
•
•
•
8-bit YCbCr
10-bit YCbCr
8-bit RGB
10-bit RGB
3.95MB
5.27MB
5.93MB
7.91MB
Once again, this may be advantageous for storage reasons, but ensure that the files will satisfy all the post
production demands.
6.3
Filter: controlling contents of VFS Directories
All shots can appear in more than one directory of the VFS. The most usual reason for this is to present them
in various formats – the shot will appear in an AVI directory, a DPX directory, different resolutions and so on.
But shots can also appear in multiple directories of exactly the same type. The reason why this is useful is
that all directories can be filtered to contain only shots which have certain values for their metadata. For
example, you can have directories of only Circle Takes, or from a particular Roll or Source – or any
combinations of these.
All the metadata fields can be used, whether from the shot's Filecard or from the settings in the S ETU P t ab ,
such as P R OJ E CT and S OU RC E settings. However:
Note: Filter strings are Case Sensitive and use Internal Metadata and Single Letter Token Names (e.g. {r}, {s},
etc.), as per the rest of the VFS.
Apply filters by typing strings into the Filter field. An empty field or asterisk (*) means 'everything', which is set
by default. The table below contains some example filters.
CODEX TECHNICAL USER MANUAL V1.0 11.10
PAGE 21
Filter
Directorie s will cont ain:
{CircleTake}="Yes"
only shots whose Filecard shows Ye s in the Circle Field
{OriginalRoll}=”Test 2”
only shots with Test 2 as their Roll (on Filecard)
{SourceId}=”B”
only shots recorded with Source ID set to B
Note that the metadata tokens must be in {braces} and token values must be in "quotes".
You can also combine these expressions into complex statements. Operators include:
=, != (means not-equal), a nd, o r, not
and may be surrounded by brackets. For example:
{CircleTake}="Yes" and ({w}=4096 or {w}=1920)
i.e. only shots which have Ye s in the Circle Field and whose width is 4096 or 1920.
If you need any help in constructing complex filters please contact Codex.
Note: the values for {w}= are not in quotes. This is because they are not strings like all the typed-in values, but
are numeric values (in this case the Width of the picture).
6.4
Limitations of the VFS
It is possible to overload the VFS, particularly if you have a large amount of material loaded (for example, in a
Lab or Portable Transfer Station with Datapacks and Internal Storage).
The limitation is the sheer number of files the VFS contains, and can be reached if large numbers of shots are
set to be presented as individual dpx files – the approximate number of files which can create problems is
around 1.5 million. When this threshold is exceeded it will be indicated by instability, crashes, or OOM (out of
memory) messages on a Linux screen.
There are three central recommendations in order to avoid this:
1.
Do not load multiple Datapacks and the Internal Datapack unnecessarily
2.
Use Filters on the VFS, such as filtering the loaded material by Roll in order that the VFS presents only files
from the Roll you require
3.
Keep VFS Configurations to the minimum required for a task, i.e. do not have several different types of
dpx file within the VFS at one time unless it is necessary – you can always switch between different VFS
configurations for access to different file types
Additionally, it is not recommended to have large amounts of different filetypes in one VFS configuration. It is
better to have the filetypes divided between configurations where possible – you can then switch
configurations for different purposes and the VFS will rebuild the list of available files
Note: Codex is currently working to improve VFS performance in relation to these limitations.
7
Using LUTs
This section describes details of how to manage Look-Up Tables (LUTs). Codex uses LUTs purely for output
purposes (viewing and export), and for import of existing files - source material is always recorded and stored
entirely unmodified, for maximum quality.
At present, LUTs are simple one-dimensional tables. All LUTs are RGB and will operate fully on RGB signals.
For YCbCr material any LUT applied will only affect the luma (brightness) of the shot.
7.1
LUTs for Monitoring
This LUT is 10-bit to 10-bit, and modifies the HD (and DVI) outputs during record, monitoring and playback.
The monitoring LUT can be selected from the LU T button on the MAI N t ab or D UAL t ab. LUTs can be
applied in several ways:
CODEX TECHNICAL USER MANUAL V1.0 11.10
PAGE 22
7.1.1
Using a preset LUT, or creating a new one.
Both of these are done by using the S ETU P button on the LU T screen. This pops up a form in which
parameters, based on source material type and monitor, may be set directly.
Several standard presets are included for various cameras: these are selected from the Quick Select field.
You can then, if you wish, modify the parameters on the form and save them for later use. The example
above is a LUT for the Viper camera, and corrects its green cast.
When using these preset LUTs or your own parameters, the adjustment arrow buttons are active. These
effectively change the contrast and brightness of the image by moving the black and white points. The LUT
graph shows the effect of these controls on the LUT, and the shaded rectangle shows the pixel value range of
the source material that is being shown on the monitor.
By changing to the Histogram view you can see how this compares to the range of pixel values present in the
source.
There are also special one-touch H I G H, M I D, LOW and A L L buttons. These provide an instant way of
studying various parts of the image dynamic range.
The R E S ET button restores the LUT to the parameters last chosen on the Look up Ta ble Set up page,
undoing any adjustments and removing any LUT loaded from a file.
The S AV E button saves the current LUT, with any adjustments, to a file. A new or existing filename can be
used.
7.1.2
Loading an existing LUT from a file
LUTs that have been saved to a file can be reloaded later using the LOAD button on the LUT screen.
Note: for loaded LUTs the adjustment controls are not currently available. In this case, the R E S ET button
unloads the LUT, restores the parameters specified on the Lo okup Ta ble Setup page, and re-activates the
adjustment controls.
7.1.3
LUTs for Data-mode material
Certain cameras produce material as data, instead of (or as well as) video. For monitoring data sources an
internal conversion is made from the linear Bayer pattern source material to 10-bit HD 1920x1080 RGB. A
Cineon log curve is used to compress the 14-bit linear dynamic range to 10-bits. The monitoring LUT is
applied after this conversion, and converts from the log space to display-gamma space. The Quick Select
can form the basis of a suitable LUT, or one can be loaded from a file.
CODEX TECHNICAL USER MANUAL V1.0 11.10
PAGE 23
Note: the histogram is also shown in 10-bit log space, and hence matches up with the selected 10-bit log
black and white points.
During the conversion from the linear sensor data to RGB, a white balance vector and a Rec. 709 conversion
matrix are applied.
7.2
LUTs for Import / Export
LUTs can be applied when exporting or importing shots using the EXPORT and IMPORT pages.
loaded from a file and applied (only) during the import or export process.
The LUT is
Most standard LUT files should work. However, for best results the size of the LUT should match the source
shot/file and the range of the LUT should match the destination shot/file. If the supplied LUT doesn't match, it
will be scaled and converted to suit: this will however have some impact on the speed of the process.
For instance, when exporting a 10-bit RGB shot to a BMP file (which is 8-bit RGB), an ideal LUT would consist
of 3 channels, each containing 1024 entries (2^10) with values ranging from 0-255 (2^8).
7.3
LUTs for the VFS
Each file type specified in the VFS can optionally have a separate LUT applied to it, in order to optimise the
quality for that type of file. The rules for these LUTs are the same as described above.
The LUT is chosen by clicking on the LUT field in the Virtual File Setup page – a pop-up appears with the
available choices.
Notes:
1.
For best performance and results, it is important that the structure of the LUT should match the source
shot and file type as described in the section above. There can be a severe performance hit if the LUT is
the wrong number of bits, so it is strongly recommended to get this right. This will normally be very
straightforward and will usually only need to be done when changing camera types.
2.
In the unusual case where it is necessary to mix different types of material on a single system (e.g. if
different cameras/settings are used to record RGB and Bayer material), managing VFS LUTs becomes
more complex. Here, we advise making certain the Source Name is different for shots made with the
different cameras. The shots can then be put into different VFS directories by filtering of the Source
Name, with the correct LUT being used or each source. VFS filtering is described in the VFS section.
3.
VFS LUTs are cached for best performance, so if a LUT file is replaced with another of the same name,
the system will need to be restarted for the new values to take effect. Therefore, if experimenting with VFS
LUTs, it is best to use a different filename for each variant.
7.4
Local LUTs
When the Codex UI is controlled from remote computers on a network, each computer can also have its own
variant LUTs which can be quickly used by - or permanently uploaded to - the Codex. In this way, different
operators can monitor the shots in a form that suits their needs.
When the UI is run remotely, the LUT pop-ups have two extra buttons: Local/Ser ver and Tr an s fer. The
Local/Ser ver button toggles between viewing the LUTs available on the Codex, and viewing any extra LUTs
available on the remote machine. The Tr a ns fer button may be used to copy the highlighted LUT to/from the
Codex and the remote machine running the UI.
Note: Local LUTs are only for monitoring – they are not available for the VFS outputs: these use only the
central LUTs on the Codex. However, you may of course import as many LUTs onto the Codex as you need:
once they have been imported, they can be applied in the VFS.
Therefore, if different VFS users need different LUTs you can set up different directories which use the various
LUTs. Then, each user can simply look in the appropriate directory.
An example of an external LUT is included in the current software releases. It is named lo glut and converts
log material to 8-bit gamma.
7.5
LUT file formats
The file is in ASCII text. The start will be like this:
# LUT to convert 10-bit log to 8-bit gamma.
# Input black: 64
# Input white R: 800
# Input white G: 800
# Input white B: 800
# Input max: 1023
# Output black: 0
CODEX TECHNICAL USER MANUAL V1.0 11.10
PAGE 24
# Output white R: 255
# Output white G: 255
# Output white B: 255
# Output max: 255
# Output gamma: 2.200000
LUT: 3 1024
0
0
......
All lines prefixed by # are comments and ignored except that the comment line containing the source and
destination bit depth (the first line here) is used by the system (it looks for the -bit suffixes and uses the
numbers after them).
This format is preferred and should be straightforward to provide. However, in order to make it even easier to
import LUTs from elsewhere, if the destination bit depth is not specified it will be deduced from the maximum
value present in the LUT itself.
There is only one header line, starting with LUT and followed by two numbers:
The first number specifies the number of channels (3 for RGB, 1 for a single channel). The second number
is the number of entries per channel <e> (which should be equal to 2 to the power of the source bit-depth – in
this case 2^10, 1024).
Following that are <e> lines containing the entries for the first channel of the LUT, followed by another <e> lines
for the second channel, etc.
7.6
To use an external LUT directly on the Codex
You can use the Codex UI running on a remote computer to import the LUT, as described above. Or, you
can simply copy the LUT directly into the Codex using one of the methods for getting files onto the machine.
The LUT should be placed in:
/etc/codex/luts
Once this is done you can LOA D the LUT from the LU T screen.
Note: LUTs for monitoring should match the source format (usually 10-bit) and the video output (always 10bit).
7.7
CDL LUTs
All Codex recording systems can record CDL Data which is then carried with the files into post production.
Studio systems can apply CDL Data to files which are output through the VFS. The colour correction systems
currently supported by Codex systems are produced by Filmlight, DP Lights, and Digital Vision.
In order for CDL Data to be recorded a configuration file in the Codex filesystem has to have the correct option
enabled (depending on which colour correction system is being used). Additionally the Filecard (filecard.xml)
has to have a 'CDL Data' field added. The next sections explain how to make these changes:
7.7.1
Enabling the Codex machine for CDL Data recording
A file named sysconfig.conf controls various appended system features such as CDL support. This file may,
therefore, not exist on older machines – if you need a copy of this file contact Codex support.
To enable this file for CDL support, access the Linux command line and promote yourself to a Superuser as
described previously. Unload any Datapacks and stop the Codex software by typing:
telinit 3 <enter>
Now type:
vi /etc/codex/sysconfig.conf <enter>
To edit the file press 'i' to enter Insert mode. Find the line in the file which refers to the colour correction
system being used and delete the # symbol at the beginning – this will enable the line. For example, a
standard sysconfig.conf file will contain the line:
#DigitalVisionCDLEnabled
Which should be changed to:
CODEX TECHNICAL USER MANUAL V1.0 11.10
PAGE 25
DigitalVisionCDLEnabled
Only one of the lines referring to colour correction systems can be enabled at a time.
Press ESC to exit Insert mode and type:
:wq! <enter>
This will exit and save the changes. Now restart the Codex software by typing:
telinit 5 <enter>
7.7.2
Adding the 'CDL Data' field to the Filecard
A field named C D L Dat a must be added to the Filecard for the recording of CDL Data. Please refer to the
Filecard section of this manual for information about changing the Filecard (filecard.xml) on Codex systems.
7.7.3
Recording CDL Data
To record CDL Data you must have one of the supported colour correction systems networked to the Codex
machine. Once this is done, on the CONTROL screen specify the IP address of the colour correction system
in the CDL Server field.
When you put the Codex machine into record mode it will gather the CDL settings from the CDL Server. If
there is an error this will be reported on the Status Bar. Otherwise, when the Filecard is viewed after a
recording has completed you will see the recorded CDL values displayed in the CDL Data field of the shot
Filecard.
8
Offloading files from Codex systems
8.1
Introduction to Offloading
There are two principle types of storage medium which have been extensively tested for the offloading of
material from Codex systems: hard disk (either singly or configured as a RAID), and LTO4 magnetic data
storage tape. These two mediums require significantly different approaches, and as such will be dealt with
separately.
The Codex software has an Offloader utility built into the Codex User Interface (Codex UI) which, when correctly
configured, can connect to hard disk systems, the optional LTO4 drives in the Codex Lab and Portable
Transfer Station, and LTO Autoloaders1. The purpose of the Offloader is to automate the process of archival
as much as possible by using the Virtual File System (VFS) to generate file types in a structure which is
specific to the requirements of a production. The Offloader copies these files automatically to either hard disk
or LTO tape.
The Offload screen of the Codex UI is divided into two halves – the top half controls the Disk Offloader which
interfaces with hard disk systems, and the bottom half controls the Tape Offloader which interfaces with LTO
drives. The Disk and Tape Offloaders are driven by different parts of the Codex software and, due to the
nature of hard disk (non-linear) and LTO tape (linear), the two parts of the Offloader operate in a slightly
different way – this will be covered in the sections which follow.
Both hard disk and LTO4 tape have advantages, and productions will often be required to keep an LTO4
archive for insurance purposes. Data stored on LTO tape is stable for many years, and the initial outlay for
individual tapes is relatively low. However, the data does need to be unarchived before it is usable. In
comparison a hard disk allows fast access to material, but maintaining the data on hard disks over an
extended period can be more costly. On balance there are good reasons for both options to be used, and the
requirements and restrictions of each production will determine whether one or both of these archival
methods provide the best solution.
When a Datapack is loaded the VFS will take a short time to compile, and for this reason it is advised to view
the contents of the VFS via a networked computer with Explorer or Finder before commencing an offload.
This also enables you to confirm that the contents of the VFS for offloading matches your expectation.
8.2
Transfer Rates
Transfer rates for offloading to LTO4 tape are generally limited by the write speed of the tapes – around
100MB/s would normally be expected.
Transfer rates for offloading to hard disk are dependent upon such a wide variety of factors that it is difficult to
cover every possible scenario. The type of connection, operating system, file system, storage medium, and
many more things can all have an impact. Each system needs to be dealt with on a case-by-case basis, but
1
Codex has tested a range of Autoloaders and can provide a list of recommended makes and models.
CODEX TECHNICAL USER MANUAL V1.0 11.10
PAGE 26
through our own testing Codex is able to give an indication of the transfer rates possible when utilising certain
hardware and software combinations. Please contact Codex if you want to discuss your requirements.
8.3
Offloading to a hard disk
8.3.1
Outline of compatible drive types, connections, and offload methods
Codex systems can offload to a range of drive types using different configurations and methods.
Device:
Connectio n:
US B hard dri ve
Locally att ached via U S B ports o n Co dex f ro nt p anel
Net work ser ver
Net worke d via built in Giga bit E thernet or optio na l 10-Giga bit E thernet
Fibre Cha nnel RAI D
Locally att ached via o ptional Fib re C hannel ca rd
Once
using
using
more
the device is connected and the Codex system has been configured, offloading will normally be done
the Offloader utility from the Codex UI. Files can be copied from the VFS directory to an attached device
the Linux command line – this is no less efficient (in some cases it is more efficient), but does require
advanced knowledge of the Linux operating system and commands. Codex can provide advice on this.
An alternative option for copying files to a USB drive is to connect it to a computer which is networked to the
Codex system. The codexvfs directory will be visible from the networked computer and files can be copied to
the USB drive using a drag-and-drop method. While this is convenient, due to the transfer speed it is
unpractical for significant amounts of full-resolution uncompressed files. Similarly, the drag-and-drop method
may not be optimal for high performance RAID systems, which have a write-speed exceeding the possible
transfer speeds of this connection.
8.3.2
File systems and interoperability
The table below identifies the supported file systems of the three main operating systems users will have to
consider when dealing with offloads to hard disk.
Operatin g Sy ste m
Fully su pporte d file sy ste ms
Win dow s X P/Vist a
FAT, FAT 16, FAT32
Linu x
FAT 3 2, E xt2, Ext3, X F S
Mac
FAT 3 2, H F S+
The suggested options, along with their limiting factors, are:
4.
5. FAT 3 2 if the drive is to be accessed in Windows and on a Mac. This has a 4GB file size limit which may
prevent it's use if high quality proxies are required of lengthy shots (for example, a DNxHD185 Avid MXF
file would exceed this size if longer than 173 seconds). Also if this filesystem is created in Windows there is
a 32GB partition limit - but you can create larger partitions under Linux that are still accessible in Windows.
6. XF S if the drive is only to be accessed by Linux machines. This filesystem is faster to read/write than
FAT32 and does not suffer from fragmentation issues. Ext3 can also be used in this context, except on
a high-performance RAID system.
7. HF S+ if just for Mac.
N.B. NTFS formatted drives cannot be offloaded to directly as this filesystem is not fully supported under
Linux. However, you can copy to an NTFS volume on another computer from over a network using the dragand-drop method described above.
Additionally, the limiting bandwidth when offloading to a USB hard drives will almost definitely be the USB
speed (unless its a very complex file type - e.g. lots of compression, colour conversion, scaling etc.) which is
around 30MB/s, absolute maximum.
8.3.3
Determining the drive name (for formatting and/or mounting of a USB device)
Power up Codex system, do not load any Datapacks, and connect the USB drive. Typically with no other
drives attached the USB drive will be assigned the drive name /dev/sdb1, but if you have other drives
connected here is how to determine the drive name. Login as root and type:
fdisk -l <enter>
You will see all the drives and their partitions listed. One drive will be your USB drive.
Disk /dev/sda: 81.9 GB, 81964302336 bytes
255 heads, 63 sectors/track, 9964 cylinders
CODEX TECHNICAL USER MANUAL V1.0 11.10
PAGE 27
Units = cylinders of 16065 * 512 = 8225280 bytes
Device Boot
Start
End
Blocks Id
System
/dev/sda1
1
1993
16008741
83
Linux
/dev/sda2
1994
2243
2008125
82
Linux swap / Solaris
/dev/sda3
2244
9964
62018932+
83
Linux
Disk /dev/sdb: 1010 MB, 1010826752 bytes
255 heads, 63 sectors/track, 122 cylinders
Units = cylinders of 16065 * 512 = 8225280 bytes
Device Boot
Start
End
Blocks Id
System
/dev/sdb1
1
123
987104 b
W95 FAT32
Here you can see that a 1GB drive is attached as sdb with partition sdb1 formatted to FAT32.
confusion when using the above method then type
If there is any
dmesg | tail <enter>
This lists the most recent system messages, including devices which have been attached – look for
something like:
sdb: assuming drive cache: write through
sdb: sdb1
sd 4:0:0:0: Attached scsi removable disk sdb
This indicates that a drive has just been attached and that it is sdb1 - i.e. accessible as /dev/sdb1
8.3.4
Formatting a hard drive using Linux
USB hard drives will often come pre-formatted with a particular filesystem. If the filesystem is not suitable for
your purposes the Codex system can be used to create a new partition and/or delete the existing partition.
During this process, the first thing to ensure is that there are no Datapacks loaded in the Codex system. This
being the case, when a USB drive is connected it will be assigned the device name /dev/sdb (the Codex
system drive is sda), and any existing partitions will be /dev/sdb1, /dev/sdb2, etc.
Logged into the Codex system as root, once you are absolutely sure of the drive name type:
fdisk /dev/sdb1 <enter>
To create a new partition type:
n <enter> and then
p <enter>
Using all the disk (cylinder 1 to max size - beware there may be limitation in disk size if it is a very large disk),
then set the filesystem by typing:
t <enter> and then
83 <enter> for Ext3, or
b <enter> for FAT32, or
af <enter> for HFS+, and then
w <enter> to write this to the partition table on the disk.
You can delete and and/or reset the type of existing partitions. Once the partition has been created it needs to
be formatted with the desired filesystem. To do this type:
mkfs.ext3 /dev/sdb1 <enter> for an Ext3 partition, or
mkfs.vfat -F32 /dev/sdb1 <enter> for a FAT32 partition, or
mkfs.hfsplus /dev/sdb1 <enter> for an HFS+ partition
CODEX TECHNICAL USER MANUAL V1.0 11.10
PAGE 28
N.B. It may be necessary to create an HFS+ filesystem partition on a Mac as mkfs.hfsplus is not available as a
formatting option on older Codex system disks.
Linux RAID systems may be formatted with an XFS filesystem which is efficient for offloading – this procedure
requires advanced knowledge depending on the RAID in question, and will therefore not be covered here.
The Codex Portable can be used to format USB drives to FAT32 and Ext3 file systems only. Additionally, if a
USB drive is connected to a Portable without a Datapack loaded, the USB drive name will be /dev/sda1
8.3.5
Mounting/unmounting a USB device for offloading
Use the method described previously to determine the drive letter for the USB device. If the drive name was
/dev/sdb1 then to mount the USB device, type:
mount /dev/sdb1 /mnt/usb <enter>
This mounts the USB device to the directory /mnt/usb which has been specified as the offload target by
making the changes detailed in the previous section.
To unmount the USB device when you have finished offloading type:
umount /dev/sdb1 <enter>
8.3.6
Setting up the Codex to interface with a USB device
The Disk Offloader is configured as standard to interface with a Fibre Channel RAID. Follow these steps to
reconfigure it for a USB device. Logged in as root, from the command line type:
vi /etc/codex/offloader.conf <enter>
Press 'I' to enter Insert mode and add the lines:
disable_mount
mount_point_dir /mnt/usb
Press 'ESC' and then type:
:wq! <enter> to write changes and quit.
8.3.7
Setting up the Codex to interface with a Fibre Channel RAID
The primary recommended storage when using the Disk Offloader is a Fibre Channel RAID, which will result in
the most efficient file transfers. The Disk Offloader within the software is optimised to interface with a Fibre
Channel RAID, and Codex can supply a Fibre Channel card which has been thoroughly tested with the system.
Note: the instructions below are only for configuring the Codex for use with a Celerity Fibre Channel card,
which is the aforementioned tested card.
Within the Codex file-system there is a configuration file which must be set to contain the correct SCSI bus
numbers for the Fibre Channel card. With a Fibre Channel card fitted follow the steps below to determine the
correct SCSI bus numbers and edit the configuration file:
1.
Access the Linux command prompt and log in using the instructions above.
2.
Enter the following:
3.
ls -l /proc/scsi/celerityfc
4.
This will show the contents of the celerityfc directory, which will contain two other directories called, for
example, 3 and 4. These are the SCSI bus numbers for the Fibre Channel RAID.
5.
To view the configuration file enter:
6.
vi /etc/codex/offloader.conf
7.
This will bring up the configuration file which looks like this:
# Codex Offloader SAS configuration file
target
localhost
port
26000
vfs
/mnt/codexvfs
mount_point_dir /mnt/offload
first_scsi_bus 3
CODEX TECHNICAL USER MANUAL V1.0 11.10
PAGE 29
num_scsi_buses 2
xfer_chunk_size 1048576
8.
The num_scsi_buses line should be set to 2 if you want to offload to two drives at once (mirrored), or
disabled by adding a # at the beginning of the line if only the first bus is to be used. If the configuration
needs editing press 'I' to enter Insert mode and then edit as required.
9.
Press 'ESC' to exit Insert mode and type:
:wq! <enter> to write the changes and quit
A Fibre Channel RAID can be hot-mounted and unmounted using the MOUNT/UNMOUNT button on the
OFFLOAD screen.
8.3.8
Setting up the Codex to interface with a network server via Gigabit/10-Gigabit Ethernet
In addition to Fibre Channel RAID systems the Codex can also offload to networked systems connected via
Ethernet – either Gigabit (Gig-E) or 10-Gigabit (10-Gig). Gig-E comes as standard on Codex machines, and a
10-Gig card is an optional extra. There are certain 10-Gig cards which Codex recommend and have been
tested thoroughly with the system.
In comparison to the direct SCSI attached USB drive or Fibre Channel RAID, this type of connection uses one
of several network protocols for data transfer. These various protocols, combined with the different hardware
options available, can provide significantly different transfer rates – contact Codex if you need advice.
The Disk Offloader can be used to transfer files to a network server, but this method is not optimal and
therefore is recommended for when material can be drip-fed across to the RAID throughout the day with the
Disk Offloader in Auto matic mode. To improve transfer speeds over a network the use of open source
network protocol rsync is recommended – the set up of this is covered in Setting up rsync to copy files from
the VFS to a networked RAID system.
First, the network server must be on the same network as the Codex. For information on networking to a
Codex machine please see Working with Codex over a network.
Create an appropriate directory within /mnt to mount the network server to – as root, type:
mkdir /mnt/network-server <enter>
Then, to mount the network share of the RAID from the command line, type:
mount -t cifs //<ip address of RAID>/<shared drive> /mnt/network-raid
user=<username>,password=<password> 0 0 <enter>
The RAID system should now be mounted on the /mnt/network-raid directory. Now the offloader configuration
file needs to be edited appropriately. Type:
vi /etc/codex/offloader.conf <enter>
Press 'I' to enter Insert mode and add the lines:
disable_mount
mount_point_dir /mnt/network-raid
Press 'ESC' and type:
:wq! <enter> to write changes and quit
To unmount the networked RAID after offloading type:
umount /mnt/network-raid <enter>
8.3.9
The hard disk offload process
The Disk Offloader is designed to synchronize the contents of everything in a certain part of the VFS onto
removable storage. It can run automatically or manually (set the mode on the S ETU P / OFF LOAD page).
In Manual mode it performs back up only when you're on the S ETU P / OFF LOAD page; in Au to matic
mode it runs in the background continuously, although priority is always given to recording.
The Operatio n field should normally be set to Back up. It can be made to Verif y as well.
You should set the VFS Directory field to the sub-directory on the VFS that you want to back up.
Assuming you want to back up dpx files for each shot, in the VFS Configuration add a dpx File Ty pe with a
Filename something like this:
offload/{r}/{s}/{s}_{g%8}.dpx
Set VF S Directory field on the O FF LOA D page to 'offload' in this case. Anything in your VFS under the
directory 'offload' will be backed up, so you can add mov files or other file types. On your external disk the top
CODEX TECHNICAL USER MANUAL V1.0 11.10
PAGE 30
level directory will be the roll name, {r}.
It is cr ucial to A LW AYS ha ve the roll name as the top-le vel di rector y o n the t arget dri ve as
sho wn in this exa mple. This allows multiple rolls to be backed up onto a single external target without
conflict, and is important for the correct operation of automatic mode.
WAR N I N G: If you atte mpt to back u p a direct ory with a na me which al read y exi st s o n the t arge t
disk the O ffloa der will o verwrite the p re-exi stin g d irector y. I f you i ncor rectly speci fy the VF S
Director y field the Of floader can delete wh ole di rectory t ree s or the enti re c onten ts of the t arge t
disk. The be st way to a void this is t o set u p a sh are point on the net work ser ver so t he
Offl oader o nly c onnec ts to t he releva nt par t o f t h e ser ve r, the reb y minimisin g the poten tial for
dama ge cau sed by mi scon fig uration.
The network server should have been prepared with a compatible file system and the Codex system
configured to mount the device using the information in the previous sections. Once this has been done and
the VFS is setup:
1.
Go to the SETUP tab / OFFLOAD screen
2.
Press the MOUNT button
3.
In the Devices: field will appear either '/mnt/offload/0' (for Fibre Channel) or '/mnt/usb' (for USB attached
devices) or '/mnt/network-raid' (for a networked RAID system)
4.
Set the Offloader operation mode to Automatic or Manual as required
5.
If not already done, load your Datapack(s) and give the VFS a minute to build the list of files for offloading
6.
Before beginning the offload it is generally advised to browse the contents of the VFS directory you are
about to offload using a networked computer. This is to confirm that the contents of the VFS matches
your expectation (there are settings within the VFS which can effect this, such as Filters, for example)
7.
Once the contents of the VFS has been checked press START. In Manual mode the operation will stop
when you leave the OFFLOAD screen. In Automatic mode it continues until everything is up to date. Any
shots already on the VFS will immediately be backed up. When synchronizing the contents of the target
drive to the VFS, the logic of the offloader disregards any top-level directories which do not match the toplevel directory specified in the VFS. This allows for previous offloads to be maintained, but does mean that
if there is a matching top-level directory already on the external array that is no longer on the Datapack
then it will be replaced. If the top-level directory does match, then any directories within it which do not
match those in the VFS will be deleted. In Automatic mode, if you modify metadata for any shot already
backed up, it will be replaced on the external drive with the new version. Any new recordings will start being
backed up as soon as the recording finishes. The status display on the OFFLOAD screen tells you
(roughly) how long it will take to finish.
8.
Before switching off or disconnecting the drive, make sure the Offloader has finished or use STOP to stop
it. Then unmount the drive – either from the command line if it is a USB drive or networked server, or
using the UNMOUNT button if it is a Fibre Channel RAID.
8.3.10 Setting up rsync to copy files from the VFS to a networked RAID system
Codex machines have rsync installed as standard, but in order for this protocol to work an rsync server will
need to be set up on the RAID. To download rsync for a Linux/Unix machine visit
http://www.samba.org/rsync/. There is a Windows version of rsync, but it is not recommended due to it's poor
performance.
The VFS should be used when copying files with rsync. For ease of use this should be arranged with a
configuration where all files required are contained within sub-directories of a top level directory whose name is
generated from the material Roll name.
The Codex machine running the rsync server will have a configuration file which specifies a destination path.
This is the mount point for for the transfer. This configuration file can be found at /etc/rsyncd.conf and
should be edited to look something like this:
[backup]
path = /mnt/network-server
read only = false
where raid is a short and memorable path to specify for the transfer.
The network server will need to be mounted internally to the appropriate directory using the command:
mount /dev/<RAID drives> /<path specified in rsyncd.conf>
Which in this case would be:
mount /dev/sdb /mnt/network-server
Note: for proper security on the network there are additional commands, but that is outside the scope of these
instructions.
CODEX TECHNICAL USER MANUAL V1.0 11.10
PAGE 31
8.3.11 Offloading to a network server with rsync
Newer Codex machines have an rsync server configured from the factory. If you have an older machine and
want to run rsync please contact Codex Digital for information. The configuration file for rsync is located in
/etc/rsyncd.conf
From the Codex, access the Linux command prompt. Locate the directory that you wish to copy from the
VFS – this will usually be the <rollname> directory which will contain sub directories (for audio, metadata, lowres proxies, etc.), but rsync will copy everything within the directory that is specified.
Once the rsync server is running on the network server and the machines are networked together, from the
command line on the Codex type the following to begin copying files:
rsync -rptWv --size-only /mnt/codexvfs/<Roll for offload>
rsync://<destination>
The destination requires the IP address of the network server and the directory which the files will be copied
to – this is determined by the destination path in rsyncd.conf (rsync can also create additional sub-directories
as part of this process if required). Using the settings specified above, if the IP address of the network server
was 192.168.1.150 then the whole command would be:
rsync -rptWv --size-only /mnt/codexvfs/101
rsync://192.168.1.150/backup
This would result in the entire contents of the top level directory being copied. This can be repeated at the end
of every day as a standard back up procedure.
The rsync process can be stopped at any time from the command line by pressing CTRL-C. It can then be
re-started when required, and won't re-copy things that have already been done.
8.4
Offloading to LTO tape
There are many LTO machines on the market, as well as the option to have LTO drives fitted in a Codex
Portable Transfer Station or Lab. Depending on the set up being used by a production, the configuration file
for the Tape Offloader will need to be edited accordingly – this is covered in the sections below.
8.4.1
Setting up the Codex to interface with an external LTO drive or Autoloader
The tape offloader configuration file needs to be edited depending on whether an external machine is being
used for a single or a duplicate tape archive. By default the configuration file is set for duplicate archiving. To
edit the configuration file, from the command prompt enter:
vi /etc/codex/tape_offloader.conf
The active_drive_mask line dictates how many devices will be used and, therefore, whether a single or
duplicate archive will be created. This is a binary mask, indicated in the configuration file by the line above
active_drive_mask which is commented out with a #. To change this for creating a single archive press 'I' to
enter 'Insert' mode, and edit the line to read:
active_drive_mask 1
Press 'Esc' to exit 'Insert' mode and type:
:wq! <enter> to write changes and exit.
Third party LTO drives and Autoloaders can be connected to a Codex via parallel SCSI, which necessitates the
installation of an optional parallel SCSI card in the Codex machine. The optional SCSI card has two ports, and
when connecting to external dual drive LTO machines the specific details of which port is connected to which
external device ( LTO drive) does matter.
The process to ensure that the drives are connected correctly is as follows:
1.
Connect the machines and switch on the LTO machine first. Wait until it has finished initialising before
switching on the Codex. This may take several minutes. When the display on the LTO machine reports
that it is 'ready' then switch on the Codex.
2.
From the command prompt on the Codex type mtx status ( mtx commands act on the robot which
moves tapes within an LTO machine, as opposed to mt commands which act on the drives in the
machine). This will report whether the various drives and slots have any tapes loaded.
3.
If the first drive does not already contain a tape then load one. This can be done from a front slot on some
LTO machines using the machine's menu options. Alternatively, after running the mtx status command
you will know which slots contain tapes and can run a mtx load <source> <destination> command.
For example, if slot 6 contained a tape you would type mtx load 6 0 to load the tape from slot 6 into the
first drive.
4.
If the second drive is not empty you will need to eject the loaded tape. Again, you may be able to do this
from the machine's menu. If not, type mtx unload <destination> <source>.
5.
Now that the status of the drives has been confirmed, to make sure the drives within the LTO machine
are mapped correctly to the SCSI card in the Codex, type mt -f /dev/nst0 which will display the status
of the drive which is mapped to the first SCSI port on the Codex. This should now contain a tape.
6.
To double check that the second drive is mapped correctly type mt -f /dev/nst1. This drive should be
empty.
CODEX TECHNICAL USER MANUAL V1.0 11.10
PAGE 32
7.
If the drives are mapped the wrong way round then swap the cables within the Codex.
Additionally, there are certain settings which should be changed on an external tape drive or Autoloader to
guarantee maximum integrity for offloading.
With the Codex and LTO machines connected, powered up, and the Codex connected to the internet enter:
yum install sg3_utils
Then enter:
sg_wr_mode -–contents=18,06,06,00,00,00,00,00 -d -p18
/dev/nst0
This will reset the TLR bit for the first tape drive. If two drives are being used then repeat this command, but
change the end of the command to read nst1.
8.4.2
Setting up in-built LTO drives in the Portable Transfer Station or Lab
The Portable Transfer Station can be purchased with one or two optional in-built LTO drives. If these are
purchased then the machine will be configured to recognise these drives automatically. Machines fitted with
two LTO drives will be set for duplicate backups – if you want to do a single backup follow the instructions at
the beginning of the previous section on how to edit the configuration file.
For start-up it is imperative that the lower half of the Portable Transfer Station is powered and switched on
before the top half. As the Codex software starts it will scan for the LTO drives and initialise them as they are
recognised.
8.4.3
General Information and Important Checks for LTO offloads
It is highly recommended to use LTO tapes with barcode labels – Codex can supply these for a competitive
price. While the LTO drives in the Portable Transfer Station cannot read barcode labels, the majority of LTO
autoloaders can and using labelled tapes will simplify the offload process and the cataloguing and organisation
of a tape archive. The following information should be fully read to understand the LTO offload process, the
checks required, and the limitations.
1. Check the VF S be fo re st arting an o ffloa d
The tape offloader operates on the VFS, not at a per Datapack level. When you load a Datapack the shots are
built into files on the VFS according to your VFS setup. The directory structure may be influenced by metadata
in the shots, including Scene, Take, Roll etc.
One common situation is having more than one Roll on a single Datapack, for instance when working in
parallel with video tapes having a lower capacity. This would not be obvious other than by looking at the VFS
(the Roll display on the STORAGE tab indicates the most recent roll setting).
When you start an offload, you may well be restricting the offload to a particular subdirectory in the VFS, often
a top level directory named after the Roll. In this case, only shots with that Roll identifier will form part of the
archive. If for any reason there are shots on the Datapack with another Roll, either intentionally or by accident,
you may incorrectly assume the entire Datapack has been archived when in fact only a part of it has.
The only way to guard against this kind of error is to visually check the VFS against your expected shot list,
before starting the offload.
In any event, this is a good opportunity to run through the metadata for each shot to check it is all correct and
that you have all the shots you expect.
2. Recom mende d co nfi guratio n
To be more explicit about the issues mentioned above: the easiest way to use the Tape Offloader is to offload
a Datapack at a time, with each Datapack containing a single Roll perhaps representing a days work. With a
VFS set-up with the Roll as the top level directory and with each file format in a separate subdirectory under
which there is a per-shot folder which also includes a unique id (which all shots are allocated) to prevent
accidental clashes due to duplicate names, Rolls or timecodes.
For instance from the VFS sub-page off the control page:
dpx
wav
xml
{r}/{e}/{r}_{s}_{u}/{r}_{s}_{g}.{e}
{r}/{e}/{r}_{s}_{u}/{r}_{s}_{c}.{e}
{r}/{e}/{r}_{s}_{u}/{r}_{s}_{g}.{e}
where:
{r}
{e}
{s}
{u}
{g}
{c}
rollname
extension
shotname
unique id
frames since midnight
channel id
CODEX TECHNICAL USER MANUAL V1.0 11.10
PAGE 33
This ensures a uniform structure to archives and that, because the filepath is stored in the archive, there is
enough information in the archive to search for frames and shots matching on shot, roll or timecode.
3. Veri fication
When in Backup+Verify mode, a tape verification pass is performed which doubles the overall time required
for backups. This verification checks what is read back from the tape against a precalculated checksum for
each filemark. So verify confirms that what was originally written to the tape is what is on the tape, and that the
tape is physically readable. It does NOT and cannot check that what is on the tape is what you expected!
Hence the importance of performing additional checks as part of your archive routine.
4. Do n ot c han ge any thin g durin g a t ape o f fload
Please do not load or unload any Datapacks, or change any shot metadata (using a remote UI for instance)
during an offload.
If any of these things occur during the offload, then you will be warned, and asked if you want to restart from
the beginning with the new VFS setup, continue with the original list of files to offload or abort.
5. How to tell which t apes ha ve been u sed
At the end of the offload you will be told which tapes have been used during the offload.
The file /etc/codex/tape-offloads/tape_list.log contains a complete list of all tapes successfully written to, when
and what was archived to them. It also lists tapes that couldn't be used (due to write protected or read/write
errors etc.). The Tape Offloader will not re-use any tapes in this list.
This file can also be edited - e.g. if you remove write protect on a tape that couldn't be used and want to re-use
it, just remove it from the file).
The TOC files for each archive also contain the tape numbers and more (see below for more information).
6. Checks t o per for m w hen the of fload i s co mpl ete
As an additional safety check, we recommend you compare the TOC files for each archive against your
original shot list, BEFORE re-using the Codex Datapack.
By networking to the Codex you can access the TOC files on the Codex system drive. When connected to the
codex as 'root' please take extra care not to accidentally drag-and-drop any directories!
Each tape archive is recorded in a directory /etc/codex/tape-offloads/tape-archive-<nn> where <nn>
increments for each new archive.
Inside that directory are subdirectories for each tape drive used in the archive (nst0, nst1 etc)
In those directories there are files called <tapebarcode>.TOC
The TOC for each tape in the archive contains the file listing for all the tapes.
If you load the TOC for the last tape into a text editor (Wordpad in Windows or Textedit in OSX) and skip to
each Filemark entry (there are ~100+ per LTO3 tape) you can see which shots were included.
7. A dditional QA check s
The checks in (6) are the bare minimum - another highly recommended step is to look at some of the
archived material, just as you would do as a matter of course with video tape or film.
This is especially important if you are not keeping any other online disk copy of the material.
A random unarchive of a few tar files each day and a quick scan through the frames would provide
confidence that everything is still set up correctly.
For the purposes of unarchiving material there are several scripts which are installed as standard on Codex
machines. These scripts are written for material archived with a particular directory structure. If your
production's archive directory structure differs from that mentioned in section 2. Reco m mende d
confi guratio n then these scripts will need alteration to work correctly. Details of the scripts and how they can
be used are in the later section Unarchiving material from LTO tapes archived on Codex.
8. Cleaning u p
If you run a lot of Datapacks through a system, you may end up with a lot of cached shot metadata on your
system drive (known as 'offline shots'). Eventually this can cause the system to become sluggish. You should
periodically 'delete all offline shots' using the user interface function on the management page. Note this only
deletes the cached metadata, it doesn't delete any actual material.
In the current offloader build 0.99g, a lot of files are left in /etc/codex/tape-offloads/tape-archive-<nn>
directories. This includes the .TOC (table of contents) files for the tapes which you might want to preserve –
although these are also written to the tapes, they are easier to access while on the Codex, and the post house
dealing with the tapes will appreciate these being delivered on a separate hard drive along with the tapes.
These can easily be copied across from the Codex using Windows Explorer or Mac Finder if they are required.
The other information will need to be periodically tidied up. This can be done from the Codex command line if
you know basic Linux commands, or through Samba connected to the Codex filesystem (carefully).
CODEX TECHNICAL USER MANUAL V1.0 11.10
PAGE 34
9. Some k now n b ugs
These apply to 0.99g:
- Time remaining display can be inaccurate - particularly if lots of small files and/or not a DPX file based
offload.
- There is no easy way to offload multiple rolls each onto their own set of tapes. At the moment each roll must
be done as a separate offload, or set the VFS base directory to offload everything onto one set of tapes.
- Using the getframes.sh script to unarchive frames to disk from a tape offload can unarchive twice as much
of the material as you asked for.
Although not a bug, another thing which may affect LTO backups is discontinuous or repeating timecodes
within a shot. These may result in small numbers of frames being archived into a Filemark on the tape, which
will slow down both the archiving and unarchiving of this material.
10. Ta pe dri ve c onnec tion
At the moment we only support an auto tape changer with a common set of tapes that one or two tape drives
can access OR one or two single tape drives (with manually inserted tapes).
If using two tape drives, then 2 complete offload copies will be produced - one per drive. A single offload
cannot be performed across two tape drives.
When connecting a multi-drive tape autoloader, please ensure that the 'first' drive (check your autoloader
manual) is connected to the first SCSI bus and the second drive to the second SCSI bus. If they are daisychained onto a single SCSI bus, ensure the first drive has the lower SCSI ID.
11. Dri ve fa ults / cleanin g
You should see an average of at least 50-60MB/s on LTO3 and 80-90MB/s on LTO4 for both writing and
reading.
If your offloads are taking substantially longer than this (taking into account the verification pass), the drive may
be getting worn or require cleaning.
If you experience any tape failures you should also clean the drive, as normally recommended by the tape
drive manufacturer. Tape failures should be very rare, if you have a lot of them then it probably indicates a
faulty tape drive.
Codex can perform low-level drive performance tests and advise if you are experiencing performance
problems.
12. Of floader c on figurati on
As previously mentioned, there is a configuration file /etc/codex/tape_offloader.conf with various setup options.
These control things like the number of drives to use (which equates to the number of copies made), how to
deduce tape type if not obvious from the barcodes, and the number of files in each tar archive on tape. We
can provide assistance in initially setting up this file for your hardware configuration.
8.4.4
The LTO Offload process
With all of the above considered, the process of archiving to tape is relatively simple. With all devices
configured and connected correctly, on the O FF LOAD screen press M OU NT. The Ta pe field will report
either n st0 or n st0 an d n st1 depending on if there are one or two LTO tape drives connected. Specify the
VF S Directory for the offload and press S TA R T. If you are using a Portable Transfer Station with in-built LTO
drives you will be required to enter the barcodes for the LTO tapes as they are loaded. If the offload will require
more than one tape for each copy then you will need to be present to load subsequent tapes during the
process.
If you have loaded sufficient tapes into an autoloader which reads barcodes then the process can be started
and left to complete.
8.4.5
Format of tape offloads
Format of table of contents (toc) files written to tape:
The toc files (table of contents) are written as the first file on each tape of an offload. They are also stored on
the system drive of the machine doing the offload under /var/log, in a unique directory of the format tapearchive-nn (where nn is a unique number) under which there is one or more subfolders for each drive an
offload was made to (e.g. for a single tape archive there might be just an nst0 folder, but for 2 copies of an
offload there would be a nst0 and nst1 folder) on the machine that the tape offload was created on.
It is st ron gly ad vise d to cop y t hese TO C files f ro m the Code x sy ste m dri ve to a not her stora ge
location af ter each of fload (they can be dragged and dropped onto the hard drive of another computer if it
is networked to the Codex). They will be required for the location of material within your tape archive and,
although they can be unarchived from the tapes themselves (a slow process), having them in two easily
accessible locations gives security in case there is a problem with the Codex system drive, and if a separate
system is being used for unarchival then having these files is essential.
These TOC files list the Filemarks on the tape and the files contained within these (commonly dpx frames, but
perhaps also mov files or other low res proxies). They also include the other tapes used in that offload if it
spans over more than 1 tape - and also indicate which tape this is the table of contents for (so this should
CODEX TECHNICAL USER MANUAL V1.0 11.10
PAGE 35
match the barcode on the tape).
Everything written to tape is done wrapped in a tar file. Some files, e.g. dpx's, are bundled together into larger
tar files in order to keep the tape running as near its maximum speed as possible - otherwise the offload
would take a huge amount of time to complete. Currently the best settings for writing tapes we have found is
to switch compression on (e.g. mt -f /dev/nst0 compression 1), set variable block size in hardware (e.g. mt -f
/dev/nst0 setblk 0) and read/write with tar using a 64k block size.
As things are tarred up, after each Filemark (i.e. files on tape) there is a list of files in that tar, divided by a dash.
For dpx's there may be say 500 source dpx's in one file.
When the files are archived to the tape, we include the path they were copied from, e.g.
055/dpx/055_128_524_1_ce830679-2108-4a51-88da-8da12c631479/055_128_524_1_1213915.dpx
The file path should be based on the following format
<rollname>/<filetype>/<rollname>_<shotname>_<unique-shot-id>/<rollname>_<shotname>_<frames since
midnight>.<extension>
So that:
1. if we search all of the tapes table of contents files, we can find where all files for a particular roll or shot are,
2. when unarchived, with the unique shot id, you can't overwrite a shot accidentally given the same name/have
a filename clash
frames since midnight and rollname mean you can search for timecodes (converting from frames since
midnight at the correct frames per second) and rolls.
8.5
Unarchiving material from LTO tapes archived on Codex
Note: to allow maximum interoperability with the tape offloads, the tar files are created with a block size of 64k
- when you unarchive be sure to use the b 128 option which specifies this.
Codex provide some useful Linux scripts for the unarchiving of material from LTO tape – these can be found
in the /home/codex directory of the Codex.
tapearchive.sh - is called by the Tape Offloader to performing copying and tar'ing from disk to tape.
tapeverify.sh - is called by Tape Offloader to verify the files on tape by comparing the md5 checksum
generated by reading them again with the md5 checksum created when they were written.
findtape.sh - used on command line in Linux to find which tape a shot/roll/timecode is on
getframes.sh - used on command line in Linux to load tape and copy files from it.
These scripts could also work on a machine say in the post-house accessing the frames - however in order to
work there, ALL of the table of contents files from the tape-archive-nn subdirectories in /etc/codex would have
to be copied into /etc/codex on that machine too.
Additionally Codex recommend that the same Linux distribution is used on this machine to remove the
likelihood of problems due to compatibility.
By running findtape.sh (which uses toc.awk) you find on which tape(s) and where on that tape a
shot/roll/timecode section is, e.g.: at the command line (either open a virtual terminal on the machine itself by
typing, say, ALT-CTRL-F1 and logging on as user root, password codex OR connect with a putty ssh session
as user root, password codex):
cd /home/codex
./findtape.sh -v shotname="128_488_1"
Might display:
Results
Nov 7 10:44 (./tape-archive-98/nst0/KAM104L4.toc)
Tape: KAM104L4 marks: 1-4 201 235
Nov 7 10:40 (./tape-archive-98/nst1/KAM105L4.toc)
Tape: KAM105L4 marks: 1-4 201 235
This means the shot is on two tapes (2 backups) and there is data related to that shot in file 1, 2, 3 and 4 and
file 201 and file 235. In this case files 1-4 contain the dpxs and file 201 has the audio data and 235 contains
the xml data. So you could load, say, tape KAM104L4 into the tape changer, and then use getframes.sh to
get all the frames from that shot, e.g:
./getframes.sh KAM104L4 1 4
./getframes.sh KAM104L4 201
./getframes.sh KAM104L4 235
This will then search for the tape in the tape loader and if present extract all the dpx frames and place them in
a directory structure underneath /home/codex - e.g. /home/codex/052/dpx/052_128_488_1_eabc0a03-f589425f-8112-e13e7bd2a28c. You can then view them using a dpx viewer, or copy them to where ever.
CODEX TECHNICAL USER MANUAL V1.0 11.10
PAGE 36
N.B. There is limited space on the system disk of the Codex (which is where the dpx's are unarchived to) so
you may need to copy them off bit by by.
You can also search for rolls, e.g:
./findtape.sh -v rollname="22"
or timecodes:
./findtape.sh -v rollname="22" -v timecode1="14:17:15:09" -v fps=25
or sections of timecodes:
./findtape.sh -v rollname="22" -v timecode1="14:00:00:00" -v timecode1="15:00:00:00" -v fps=25
Note that with timecode searching you need to specify frames per second, unless its 24fps which is the
default.
The other script, getframes.sh, is used to load tapes and untar files into the current directory. Just pass in tape
name and start (and optional end) filemark and it will search for the tape, load it, and shuttle to the correct
place and copy files off tape onto harddrive (under the directory you run it from).
If you are running getframes.sh on a Codex Recorder or Transfer Station then material unarchived from LTO
will be stored on the system hard drive. There is a partition on the system drive which is recommended for
this purpose, and will allow for the storage of approximately 10 minutes of dpx files (an additional 1TB drive
can be fitted for this purpose – contact Codex for further details) . Follow these steps to mount the partition:
mount /dev/sda3 /mnt/material
Then go to the mounted directory:
cd /mnt/material
And run the getframes.sh script in order to unarchive material:
/home/codex/getframes.sh <tape name> <start filemark> <optional end filemark>
Once you have finished with the material it can be deleted from /mnt/material using the dpxdelete.sh script.
8.6
Installing/updating the Offloader and Tape Offloader software
The latest software packages for the Disk Offloader and Tape Offloader can be downloaded from
www.codexdigital.com/software under the heading Othe r Codex Soft wa re.
Once you have downloaded the file use Explorer or Finder to access the Codex file system and copy the
package to the /tmp directory. As an example, let's say you have downloaded the offloader-0.99g-sas.tgz
package. Once it has been copied into /tmp access the Linux command prompt. Login as root and enter:
cd /home/codex
Then enter:
tar zxf offloader-0.99g-sas.tgz
This will unpack the file within the directory. Then enter:
cd offloader-0.99g-sas
You will now be in the directory for installation, from where you enter:
./install
The new offloader software will now be installed. As a matter of course, once the software is updated you
should delete any unnecessary files from the install process. To do this, enter:
rm -f offloader-0.99g-sas.tgz
And:
rm -f offloader-0.99g-sas
CODEX TECHNICAL USER MANUAL V1.0 11.10
PAGE 37
9
Setting up a ssh reverse tunnel
For problem solving in unusual circumstances it can be useful for a Codex engineer to connect to the system
over the internet – a reverse tunnel facilitates this. A script is installed on Codex systems to assist in setting up
a reverse tunnel.
First, make sure the Codex system is on a network which can access the internet. Logon to the Linux
command line and promote yourself to root. Then type:
cd /home/codex <enter>
Followed by:
./codex_help.sh -port 2222 <enter>
You will be asked for a password – contact Codex for this.
If a problem occurs with any of these steps then contact Codex support for advice.
10
Appendices
10.1
Metadata Property Names and Labels
User-Fr iendly Label
Met adata Propert y Name
Synonym
Produc tion
Produc tion Name
Setup / P ro ject
Produc tion
Company
Produc tionCo mpany
Setup / P ro ject
Unit
Produc tionUn it
Setup / P ro ject
Di rector
Di rector
Setup / P ro ject
DoP
Di rectorOfPho tography
Setup / P ro ject
Camera Assist ant
CameraAssist ant
Setup / P ro ject
Codex Operator
CodexOperator
Setup / P ro ject
Sound Recordist
SoundRecord ist
Name
ShotNa me
{s}
Fileca rd, Setup / S late Nam ing Ru le
Roll
Orig inalRol l
{r}
Storage, Fi lecard
Scene
Scene
Fileca rd
Ta ke
Ta ke
Fileca rd, auto inc remen ted
Shot
Shot
None by defaul t
Slate
Slate
None by defaul t
Ci rcle Ta ke
Ci rcle Ta ke
Fileca rd
Shot Type
Shot Type
Fileca rd
Interior/ Exterior
IntExt
Fileca rd
Day/ Night
DayNi ght
Fileca rd
Commen ts
Commen ts
Fileca rd
T- St op
Ts t op
Fileca rd
Focus
Focus
Fileca rd
Lens
Lens Type
Fileca rd
Fil ter
Fil ter
Fileca rd
Source Ty pe
Source Type
Setup / S ou rces
Source I D
SourceId
Setup / S ou rces
Source Name
SourceDevice
Setup / S ou rces, Fi lecard
Serial No
SourceSeria l
Setup / S ou rces
Shutter An gle
Shutter Ang le
Fileca rd
Snapshot
Snapshot
Set to “ Yes” by snapshot reco rd func tion
None by defaul t
10.2
Single-letter tokens applicable to VFS only
{s}
{d}
{D}
{f}
{e}
{c}
{t}
{T}
Synonym for {ShotName}
Date shot was recorded
Date and time shot was recorded
Frame number
Extension (file type)
Channel number (Video and A udio)
Timecode (as hhmmssff string)
Start timecode of shot
CODEX TECHNICAL USER MANUAL V1.0 11.10
Usage
PAGE 38
{g}
{G}
{n}
{b}
{B}
Timecode (as framecount from midnight)
Start timecode (as framecount from midnight}
Total number of frames in the shot
Userbit per frame
Start userbit for shot
10.3
Single-letter tokens applicable to both VFS and Shot naming rule
{w}
{h}
{u}
Width (VFS: after any scaling)
Height (VFS: after any scaling)
Uuid (128-bit unique identifier of every shot – xxxxxxxx-xxxx-xxxx-xxxxxxxxxxxxxxxx)
Synonym for {OriginalRoll}
{r}
Tokens can optionally have a minimum and/or maximum width specified for the expansion. This is most
commonly used with tokens that produce numbers, but work with any single-letter token.
To specify a minimum width n add %n after the token.
To specify a maximum width n, add -n after the token
Examples:
{f}
{f%5}
{r}
{r-8}
Frame number 0-99999
Frame number 00000 – 99999
Roll (“A long name”)
Roll (“A long n”)
10.4
The {Datapack} token for Roll Naming Rule
The {Datapack} token can be used only for the Roll Naming Rule. It refers to the Roll name on the STORAGE
tab. When shooting multiple sources on a single Datapack (using a Codex Portable) the Roll Naming Rule
can be set to {Datapack}{Source ID} which ensures that shots will have unique Rolls – a requirement for some
editing systems, particularly when working with stereoscopic material.
10.5
VFS Case Study
The VFS configuration can initially seem quite confusing. As such, the following example and explanation is
provided. The following example VFS configuration was designed in communication with the various end
users of the files to maximise clarity for the users and minimise problems downstream when using the files in
a variety of well known software. It was designed for a specific production workflow, so will not be appropriate
for all scenarios, but should provide a good example of the way in which the VFS can be used and some
important things to consider when configuring the VFS for use with your production.
In this example, the Shot Naming Rule is set to {Scene}-{Take}. There are 2 Rolls named 101 and 102. Each
Roll contains several Scenes and Takes.
Below is the VFS configuration as viewed from the Codex UI:
CODEX TECHNICAL USER MANUAL V1.0 11.10
PAGE 39
This configuration is designed to make the following operations easy:
• the backing-up of material (as dpx frames, associated wav files, and xml files containing additional metadata)
to either a RAID Array or LTO Tape Machine using the OFFLOAD screen.
• the copying of Avid MXF files to a USB/Firewire hard drive via a laptop, for delivery to the offline editor.
• the copying of mov files to USB/Firewire hard drive, which provides an easy access reference library of what
has been shot for the Director or Cinematographer.
The configuration above would result in the following directory structure:
CODEX TECHNICAL USER MANUAL V1.0 11.10
PAGE 40
As can be seen, the first level of the directory tree consists of directories named 101, 102, mov, and mxf. In
this first level, the directories named after Rolls contain directories of dpx, wav, and xml files for individual
shots 2. This is designed to make backing-up simple using the OFFLOAD page. It means that when offloading
to either a RAID Array or Tape Machine, the Roll name can be entered into the VFS Directory field of the
OFFLOAD page and the entire contents of that directory will be backed-up. In this case, that would be all full
resolution dpx frames, associated wav files, and xml files containing additional metadata which will be
unarchived3 when the time comes to do the conform and online edit.
In terms of the day-to-day production process, the morning's shots can be copied across to separate hard
drives as Avid MXF and mov files at lunch time, and the afternoon's shots immediately after shooting has
finished for the day. The drive containing Avid MXF files can then be sent to the offline editor. Once this has
been completed then the RAID/Tape archive process can be started, and left to run overnight.
It is not advi sed to tr y an d c reate the mo v/ Avid MX F files and the dp x/ wav /x ml files
simult aneou sly a s t his will place g reat dema nd o n the p roce ss ors in the Code x an d dra stically
slow t he w hole p roces s d own !
10.5.1 DPX Virtual File Setup
The Virtual File Setup for dpx files is as follows:
2
The long series of numbers and letters is generated by the {u} in the VFS Filename settings for each file type. It is a unique shot identifier
which is not compulsory and most of the time will be ignored, but rules out the possibility of having duplicate shot names within the VFS.
3
Please refer to the document 'Offloading Files from Codex' which can be downloaded from http://www.codexdigital.com/techdocs for
comprehensive information on this subject.
CODEX TECHNICAL USER MANUAL V1.0 11.10
PAGE 41
The first thing to note with this Virtual File Setup is the Filename. The last Token, {g}, gives the frames since
midnight. This creates dpx files which are sequential, as opposed to using {t} which gives the SMPTE timecode
at the end of the file name, which is non-sequential. S MPTE timeco de s ho uld n ot be u sed becau se
the re a re t wo major p roblem s wit h u sin g n on- se quential filena me s for d px files:
• when loading files, most editing systems require sequences of frames to be consecutively numbered. If
SMPTE timecode is used, the sequence will break every 24 (or 25, or 30) frames, meaning you will either
have to load 1 seconds worth of frames at a time, or re-name all the files – both bad options.
• when archiving to tapes, a non-continuous sequence will cause the tape drive to pause at every break, vastly
increasing the time it takes to write the tape.
Conversion Quality should always be set to High if the files created are to be used for the final online edit. The
DPX Options should be set to Convert to 10-bit RGB if the final edit will be in 1920x1080HD. If source image
output is a higher resolution than this (e.g. Arri D-21 in ARRI-RAW 12-bit data mode [2880x2160]) then this
option should be set to Keep Existing Format. This means the dpx files will be left in their original Bayer pattern
format, which after unarchiving will normally be de-Bayered by specific software before being edited4.
10.5.2 WAV Virtual File Setup
The main option to be concerned with is Audio, and whether this has been set to Mono or Stereo. The
number of files presented by the VFS will depend on the settings of this option, and how many audio channels
have been recorded. For example, if you have recorded 6 channels of audio, and the VFS is set to present the
wav files in Stereo, then for each shot there will be 3 corresponding stereo audio files.
10.5.3 MOV Virtual File Setup
The directory named mov contains sub-directories for each Roll, which in turn contain individual Quicktime
movie files of each shot on that Roll. These Roll directories can be copied across to a local hard drive at the
end of a day's shooting and can be very useful for the purposes of the Director/DoP. For example, if the
Director wants to review a shot from the previous week they can do it extremely quickly and easily from their
laptop5. The settings for the mov files are as follows:
4
The Codex does perform real time 'quick' de-Bayering for monitoring of such material, but we recommend using dedicated software for a full
quality de-Bayer before post-production/editing.
5
The alternative would be to copy the material back from a RAID Array which may not be conveniently situated, or to unarchive the shot from
tape, which is a considerably longer process.
CODEX TECHNICAL USER MANUAL V1.0 11.10
PAGE 42
The Filename for the mov files is designed to allow for the easy location of a shot. For example, if the Director
wishes to review a shot they can consult the Script Supervisor's notes and locate the Shot they wish see
based on the Roll, Scene, Take, and Date (in this case remembering that the Shot, or {s}, in the Filename
consists of the Scene and Take numbers).
Scaling is set to Relative and ½ size. This is because most computers will struggle to play full scale mov files,
whereas ½ scale is generally manageable and of a size which is useful for review purposes.
Compression is set to jpeg to reduce the mov file size, and unless the laptop being used for viewing has an
HD screen then the difference will not be noticeable, provided the Compression Quality is set to High. If
Compression Quality is set to Medium or Low this will create considerably smaller files (approximately ½ or 1/3
the size), but you will notice some slight blurring on edges.
10.5.4 MXF Virtual File Setup
Similar to the mov directory, the mxf directory contains sub-directories for each Roll which in turn contain Avid
MXF files for each shot (separate video and audio files). These Roll directories would be copied across to a
USB/Firewire hard drive via a laptop to be delivered to the offline editor at the end of a days shooting.
The Virtual File Setup for Avid MXF files is as follows:
CODEX TECHNICAL USER MANUAL V1.0 11.10
PAGE 43
The Filename is the most important thing to note in this case. It is modelled on the mxf file names created by
Avid, and ensures that the names of the individual mxf files will never exceed 31 characters: a threshold which
if exceeded is prone to causing trouble if the files are used in Avid editing systems.
The DnxHD Compression setting creates files of a small and manageable size, whilst retaining sufficient quality
for the offline edit. The Compression Quality setting changes the bit-rate (and, hence, size) of the file. When
set to Low the VFS will create DNxHD36 (36Mb/s) files, on High it will create DnxHD185 files.
If you require more information or advice on setting up the VFS please contact Codex Digital using the details
at the end of the manual.
10.6
Loading an ALE/EDL from a USB stick or over a network
Follow these steps to load an ALE/EDL from a USB stick:
1.
Copy the ALE/EDL to the top level of a USB stick using a computer (i.e. Not within a folder).
2.
Insert the USB stick into one of the USB ports on the front panel of the Base Unit.
3.
Plug a USB keyboard into the other USB port on the Base Unit.
4.
Press CTRL-ALT-F1 to access the Linux screen (if the machine does not have a touchscreen there is a
free program called putty which allows you to access the Linux screen of the Base Unit from a networked
computer).
5.
Enter the username root and password codex
6.
The USB stick will automatically be assigned with a drive letter. This will depend on how many and which
types of Datapack are loaded into the system. For example, a Rugged Datapack containing 3 hard drives
would be assigned letters 'a', 'b', and 'c', and the USB stick would therefore be assigned letter 'd'. To
determine which letter has been assigned to the USB stick type the command fdisk -l. This will present a
list of the loaded devices (/dev/sda1, /dev/sdb1, etc.), of which the USB stick will be the device with the
lowest number of Blocks. Note which device is the USB stick.
7.
If, for example, the USB stick is /dev/sdd1 then type
mount /dev/sdd1 /mnt/usb
8.
Press CTRL-ALT-F7 to return to the Codex UI screen (unless it is already running over a network)
9.
If using the CONFORM feature, for example, press the button and when asked to specify the Filepath
enter /mnt/usb/<filename>.edl
10. Once you have finished using the USB stick return to the Linux screen and type umount /dev/sdd1
/mnt/usb to unmount the USB stick before removing it.
CODEX TECHNICAL USER MANUAL V1.0 11.10
PAGE 44
Follow these instructions to load an ALE/EDL over a network:
1.
As standard, the IP address of the first network port on the system will be related to it's serial number,
which is located on the rear of the machine. For example, if the machine serial number is 11009 then the
IP will be 192.168.1.109, if the serial is 11010 then the IP will be 192.168.1.110, etc. The IP address may
have been changed to fit in with a pre-existing structure, in which case it should be known already.
2.
With a computer networked to the system, connect to the root directory (e.g. 192.168.1.110). The
username is root and the password is codex. Then copy your ALE/EDL to the tmp directory. If your file is
called test.edl then in the Filepath box which appears when you select CONFORM, for example, you would
enter /tmp/test.edl
3.
Once you have finished with the ALE/EDL you should delete it from the tmp directory to preserve system
memory space.
10.7
Updating Datapack firmware
In the unusual occurrence of a Datapack developing a fault, it should be returned to Codex for repair.
Alternatively Codex can dispatch a replacement hard drive with the appropriate firmware. In the rare event that
a hard drive has been sourced from elsewhere the firmware will have to be set, and the following information
is provided for this circumstance only. Additional, it is only applicable for Seagate Savvio 146GB drives.
Ensure no other Datapacks are loaded. With the hard drive fitted and the Datapack loaded:
• First, you must determine the drive letter of the replacement drive. With the Datapack loaded and the Codex
software running go to the STO R AG E t ab and press the S panner on the bottom left of the Datapack
graphic. The drives will be numbered: make a note of the number for the new drive which will be marked as
Free.
• The number will match to a device name in Linux. On a Studio machine the system drive is sda and the first
drive in the Datapack is sdb, the second sdc, etc. The Portable has no system drive so the first drive in the
Datapack is sda, the second sdb, etc.
• Go to the Linux command screen and type (substituting sda in this example with whatever the relevant
device name is):
sdparm –clear WCE –save /dev/sda <enter>
sdparm –vendor=sea –clear=JIT0,JIT1,JIT3 –save /dev/sda <enter>
10.8
Removing a Codex Studio system from it's flightcase rack
Codex Studio systems may come supplied in a flightcase rack. Please note that, although the Codex Studio
systems are constructed from either two or three parts, the units are supported by each other and so should
only be removed in sequence from the top down.
First, turn off the system and remove all video cables, network cables, and power cords from the rear of the
system.
Then, remove any hatches from the rear panels my unwinding the screws. Disconnect any cables connecting
the different sections of the machine together.
It is now safe to undo the screws from the corners of the section front panels, and remove the sections from
the flightcase, starting at the top!
When re-installing the system in a new location be sure that the cables are all reconnected correctly before
powering the system. For details of the connections refer to the Codex Studio systems manual.
10.9
Cleaning air filters in Codex systems
Codex systems require occasional cleaning of the intake fan air filters to ensure that the internal temperature is
being properly controlled and, therefore, that the system is working efficiently. The following sections explain
how to clean the air filters for different Codex products:
10.9.1 Cleaning the Base Unit air filters
1.
If mounted within one, remove the unit from it's flightcase rack.
2.
Version 1 Base Units have 26 screws holding the lid in place. These all need to be removed with a 2mm
hex-key and the lid can then be lifted off.
3.
Locate the two fan units, situated on the left and right-hand side of the system, just behind the front panel.
Each fan is covered with a foam air filter, inside a plastic surround. Unclip each plastic cover to remove
the foam filters and give each one a thorough vacuum-clean to clear any dust or dirt which may have
clogged the filter.
4.
While the lid is removed it is also advised to spray compressed air around the inside of the unit to dislodge
any dust which has made it's way past the filters.
CODEX TECHNICAL USER MANUAL V1.0 11.10
PAGE 45
5.
Then, replace the filters securely back onto the fans and replace the unit’s lid.
6.
Version 2 Base Units have 3 rows of 3 screws holding the lid in place. These are coloured black to
distinguish them from the other screws in the lid. These need to be removed with a 2mm hex-key and the
lid can then be slid backwards using the recessed black plastic handle and removed.
7.
Locate the two fan units, situated on the left and right-hand side of the system, just behind the front panel.
Direct compressed air through the fans from the inside to expel any dust caught by the air filters.
8.
Replace the unit's lid.
10.9.2 Cleaning the Portable Disk Bay air filters
1.
If mounted within one, remove the unit from it's flightcase rack.
2.
Remove black screws from the rear and sides of the lid. The lid can now be removed by lifting it from the
rear and pulling it diagonally rearwards and upwards.
3.
Direct compressed air through the fan on the front panel of the unit from the inside to expel any dust
caught by the air filter.
4.
While the lid is removed it is also advised to spray compressed air around the inside of the unit to dislodge
any dust which has made it's way past the filters.
5.
Replace the lid.
6.
Finally, use a vacuum to remove any dust caught by the filters on the narrow air inlets next to the Disk
Ports.
10.9.3 Cleaning Recorder Datapack air filters
Although there are no air filters in a Recorder Disk Bay there are individual air filters in each Datapack. To
expose the Datapack air filters, simply turn the Datapack over and slide back the metal cover using your
fingertips. This cover is spring-loaded, so will have to be held open whilst vacuum-cleaning the foam air filters!
10.10
Replacing a hard drive in a Recorder Datapack
1.
First, remove the four screws holding the handle assembly in place, using a 2.5mm hex key. It’s usually
easier to stand the Datapack on its end whilst doing this.
2.
Next, carefully lift the front handle assembly, noting the cable connections inside.
3.
Before removing any of the cables from the lid, make sure to remove jumper J 7, located near the battery.
Now put it somewhere safe, as it’s important...
4.
Remember to replace this after all the cables have been reconnected - in step 11 on page 3 - as the last
step before screwing the lid back on.
5.
Undo the ‘bullet connector’ in the earth cable. This will probably require both hands, so it’s actually easier
to turn the handle assembly through 90° and rest it back on the Datapack body whilst doing this (as
shown). Then, remove the wide ribbon cable from inside the handle assembly itself - the connector
should just slide off - and the two thinner ribbon cables. With these last two, there is no need to note
which cable is connected to which connector as they’re interchangeable.
6.
Lift out the metal reinforcement plate. Again, there’s no need to make a note of the orientation of this plate
as it’s symmetrical and doesn’t have a particular front, back, top or bottom.
7.
Next, pull out the rubber shockmount. This is a very tight fit, but can be manhandled fairly roughly to
remove it! It’s usually easiest to slip two fingers underneath (as illustrated) and pull it out one corner at a
time. Try not to snag the dangling disk cables when removing this piece. You may at this point be
thinking “there’s no way that’s going back in there”... but it will.
8.
Once the rubber shockmount has been removed, it should be possible to slide the diskcage out of the
Datapack body. Carefully place the diskcage down flat on the table, bearing in mind that the disks are now
unprotected from shock and vibration! The individual disks (1-10) are numbered, for easy identification.
9.
To replace an individual disk, remove the 4 crosshead screws holding it in the cage (two on each side)
and slide the disk out of the cage using your thumb and forefinger (as shown). If the disk refuses to
move, try slackening the screws on the adjacent drives each side of it (remembering to tighten them back
up later!)
10. Once the disk drive has been replaced in the diskcage (and all the screws tightened up) slide the diskcage
back into the Datapack body (noting which side of the diskcage is marked “TOP”) until it seats correctly in
the lower shockmounting. At this point, it may be easier to tilt the Datapack and manoeuvre the zif
connector (shown left) into position with your fingers, through the hole at the rear of the Datapack.
11. Next, replace the rubber shockmounting – breathe deeply and stay calm as there is a knack to this....
First, with the Datapack standing on end with the top surface facing away from you, place the right-hand
edge of the rubber mount into the right-hand side of the Datapack opening (as illustrated) - noting the
word “TOP” embossed on the rubber shockmount, indicating its orientation - then thread the three ribbon
cables and the single earthing cable through the centre hole in the shockmount. Then, being careful not to
trap any of the cables underneath, reach through the opening in the shockmount and use two fingers to
push the diskcage slightly to the left - you can use the vertical metal bar on the top of the diskcage to do
this. By nudging the diskcage to the left, you should now be able to snap the right-hand side of the rubber
shockmount into place.
CODEX TECHNICAL USER MANUAL V1.0 11.10
PAGE 46
12. Next, repeat the same operation to snap the left hand side of the rubber shockmount into position. Use
your fingers to push the diskcage slightly to the right and the bottom left-hand corner of the shockmount
should eventually snap into place... and yes, it does have to fit that tightly... One thing to look out for here is
the top left-hand corner of the rubber shockmount getting caught against the white slide rail pillar inside
the Datapack body. With careful manoeuvring the shockmount will snap perfectly into place, but this
procedure is worth practicing a few times until you get the hang of it!
13. Now, replace the metal reinforcing plate and reconnect the three ribbon cables and single earthing cable
to the handle assembly (remembering that the two thin ribbon cables are actually interchangeable). The
picture on the left shows the correct orientation for the ribbon cable connectors (though they will only
actually fit one way round). After connecting these cables, remember to replace jumper J 7, removed in
step 3. You haven’t lost it, have you?! Finally, replace the whole handle assembly and screw the whole
thing back together with the four 2.5mm hex-headed screws to complete!
14. Please ens u re ne ver t o lea ve t he ha ndle a sse mb ly clipped onto the Dat apack bu t n ot
sc rewed on, a s it’s all too ea s y to accident ally pick the Dat apack u p b y t he u nsec u red
handle w hich w ould ha ve dis ast rou s c on seque nc es!
11
Latest Codex releases
The Codex Software and User Manuals are constantly being updated as the latest features are implemented
into the system. For the latest software updates and installation instructions please visit
www.codexdigital.com/software or contact Codex Digital.
The Codex Technical Manual provides information on the more-technical aspects of Codex systems such as
networking, LUTs, using the Virtual File System, Offloading to RAID systems or LTO tape, and maintenance.
To download this document please visit www.codexdigital.com/techdocs
CODEX TECHNICAL USER MANUAL V1.0 11.10
PAGE 47
24 hour support line +44 (0) 7985 467 665
CODEX DIGITAL LIMITED 60 POLAND STREET LONDON ENGLAND W1F 7NT U K
TEL +44 (O)20 7292 6918
CODEXDIGITAL.COM
Codex Digital Limited reserve the right to alter the specification at any time and without prior notice. © Copyright Codex Digital Limited. July 2010
[email protected]