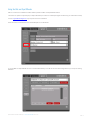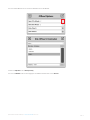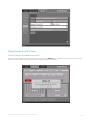
1
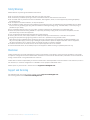
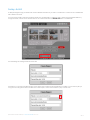
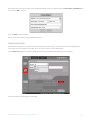
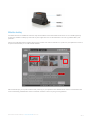
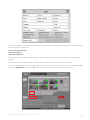
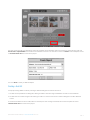
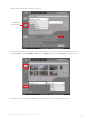
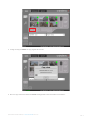
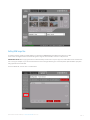
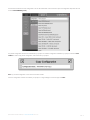
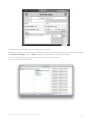
USER GUIDE
CODEX TRANSFER STATION FOR MAC OS X
PROCESSING ARRIRAW
REVISION 11.14.2012
CODEX TRANSFER STATION FOR MAC OSX - PROCESSING ARRIRAW REV 11.14.12
PAGE 1
CODEX TRANSFER STATION FOR MAC OS X
PROCESSING ARRIRAW
CONTENTS
4Introduction
4Software
5
Loading and Unloading a Capture Drive or Datapack
5
Codex Software Overview
6
Creating a first ALE
7
Filtering the Shot Table
10 Creating a PDF Shot Report
11 Creating a final ALE
12 Cloning from a Capture Drive or Datapack to the Internal Storage
15 Getting RAW image files
19 Getting Proxy files for editing
21 Using the Disk and Tape Offloader
26 Deleting media to return to set
CODEX TRANSFER STATION FOR MAC OSX - PROCESSING ARRIRAW REV 11.14.12
PAGE 2
Safety Warnings
Please observe any warnings and follow all instructions.
Do not use this equipment near water and clean only with a dry cloth.
Do not block any ventilation openings. Install in accordance with the manufacturer’s instructions.
l Do not install near any heat sources such as radiators, heat registers, stoves, or other equipment (including amplifiers) that produce heat.
l Do not expose to excessive vibration, or drop this product.
l Do not defeat the safety purpose of the polarised or grounding-type plug. A polarised plug has two blades with one wider than the other. A grounding-type plug has two blades and a third grounding prong. The wide blade, or the third prong, is provided for your safety.
l If the provided plug does not fit into your outlet, consult an electrician for replacement of the obsolete outlet.
l Protect the power cord from being walked on or pinched, particularly at plug ends, convenience receptacles, and the point where they exit from the equipment.
l Only use attachments/accessories specified by the manufacturer.
l Use only with the cart, stand, tripod, bracket, or table specified by the manufacturer, or sold with the equipment.
l Unplug this equipment during lightning storms or when not in operation for long periods of time.
l Refer all servicing to qualified service personnel. Servicing is required when the equipment has been damaged in any way, such as power-supply cord or plug is damaged, liquid has been spilled or objects have fallen into the equipment, has been exposed to rain or moisture, does not operate normally, or has been dropped.
l To reduce the risk of fire or electric shock, do not expose equipment to rain or moisture.
l To avoid electrical shock, do not attempt to open this equipment. Refer servicing to qualified personnel only.
l
l
Disclaimer
Codex products are continually developed to remain at the forefront of the industry, and as such the information in this guide
is subject to change without notice. Whilst Codex endeavour to ensure that all documentation provided is correct at the time of
writing, this document is not guaranteed to be error-free.
Codex does not assume responsibility for issues or losses due to misinterpretation of the information in this document, errors in
this document, or incorrect configuration or installation of the equipment described herein.
Please report any errors found in this document to [email protected]
Support and Servicing
For assistance with your Codex product please contact [email protected]
For servicing please contact [email protected]
CODEX TRANSFER STATION FOR MAC OSX - PROCESSING ARRIRAW REV 11.14.12
PAGE 3
Introduction
This guide is written to describe using the Transfer Station for Mac OS X in a workflow for ARRIRAW. After an Onboard S or M has been used to
record ARRIRAW, the media (Capture Drive or Datapack) is loaded into the Transfer Station, which can be used to:
• Check and correct shot metadata
• Produce PDF reports for the production
• Produce ALE files for editorial
• Clone the data to RAID protected internal storage (with Mac Pro)
• Process the data to RAW image files (.ari) for archiving and finishing
• Process the data to proxy files (.mov/.mxf) with LUT/Burn-In for editorial and dailies
• Create secure, verified archives of the data to disk or LTFS tape
This guide will show these steps as an example of a workflow that could be used.
Software
Go to www.codexdigital.com/software to register and download software. There are installation instructions available from this webpage.
The software webpage is divided into sections. It is recommended to download the newest version (at the top of each section) of each required
software component when first installing a system. To use the Transfer Station for Mac OS X the following software components must be
installed:
Required software
Codex Server
Codex UI
FTDI USB driver
ATTO H680 / H6F0 driver
OSXFUSE
Example filename
codexserver-osx-2012.r2.2502.dmg
codexui-osx-2012.r2.2502.dmg
FTDI USB Serial driver v2.2.16
ATTO ExpressSAS H680 drivers v1.62
OSXFUSE-2.5.1
Note: All software is in the ‘Codex Transfer Station software for OS X’ section except for the Codex UI software, which is in the ‘Codex User
Interface software for OS X’ section.
Support
For support enquiries contact [email protected]
Cabling
The diagram below shows the correct cabling set up for the Transfer Station for Mac OS X. Please refer to the Codex MacPro Configuration
Guide for further details.
CODEX TRANSFER STATION FOR MAC OSX - PROCESSING ARRIRAW REV 11.14.12
PAGE 4
Loading and Unloading a Capture Drive or Datapack
Capture/Transfer Drive – fully insert the Capture Drive into one of the ports on the Transfer Station. The LED on the Capture Drive will flash
green once it has loaded. To unload press the eject button on the front of the Capture Drive. When the LED is solid blue it is safe to remove the
Capture Drive.
Datapack – the Datapack should find a natural position when placed on the Transfer Station due to the interlocking design of the loading
mechanism. Ensure that the Datapack is mated flat with the Transfer Station before turning the locking lever. Turn the locking lever 180 degrees
clockwise to load the Datapack. When unloading the Datapack turn the locking lever approximately 20 degrees anti-clockwise to the first
position and wait until the LED on the Datapack becomes solid red. This means it is safe to fully unlock.
WARNING: The LED on a Datapack/Capture Drive flashes green when it is being read or written. Do not unload storage when it is being read
or written, as this can compromise the data integrity.
Codex Software Overview
When the Codex UI software is opened the ‘Connect To Server’ box will be shown.
• Leave ‘localhost’ in the box, this is correct
• Click the checkbox icon to connect the Codex UI to the Codex Server.
The Codex UI is divided into the MAIN, STORAGE, and SETUP tabs:
• MAIN tab is primarily used for editing shot metadata and creating reports.
• STORAGE tab is used for operations such as creating and deleting the Roll on the media. It also shows the number of shots and the total duration of shots on the Roll.
• SETUP tab is used for configuring the Codex software to provide deliverable files. It also contains project settings such as the recording format and Shot/Roll naming rules.
THUMBNAIL /LIST VIEW
FILTER
FILECARD
• Filecard – to view and edit shot metadata
• Thumbnail/List View – to toggle between a thumbnail (as shown) or list view of shots
• Filter – to limit the shots that are displayed, based on media location, and/or metadata
CODEX TRANSFER STATION FOR MAC OSX - PROCESSING ARRIRAW REV 11.14.12
PAGE 5
Creating a first ALE
An ALE (Avid Log Exchange) is a text file that contains metadata information for your shots. In the file there is a column for each metadata item
that is stored for the shots.
It can be useful to create an ALE when media first arrives at the Transfer Station. This ALE file gives a record of all shot metadata before any
changes are made, and this can be useful for reference. To create the ALE click the CREATE ALE button on the MAIN tab:
The initial settings for creating the ALE are shown here:
The folder icon on the right of the Filename box can be used to open a browser to set the destination for the ALE, or if you know the path you
can type it. You must type the name for the ALE at the end of the path, and the correct extension (.ale), as shown here:
CODEX TRANSFER STATION FOR MAC OSX - PROCESSING ARRIRAW REV 11.14.12
PAGE 6
Next choose the Source shots for the ALE. This is normally done per Roll, so open the drop down list to set Source shots to Specified roll and
then choose the Roll from the list:
Then click DO IT to create the ALE file.
Now you have a record of all the original metadata for reference.
Filtering the Shot Table
It is possible to have more than one Codex storage media loaded at the same time (e.g. a Capture Drive and the Internal Storage disks).
In this case it can be useful to filter the Shot Table, so you can only see shots on a chosen media location.
Click the Filter icon (spyglass) on the left of the MAIN tab, and then open the Datapack drop down list to make a selection:
The physical location for these settings is shown below:
CODEX TRANSFER STATION FOR MAC OSX - PROCESSING ARRIRAW REV 11.14.12
PAGE 7
Metadata checking
It is advised to check the metadata for shots when they are first loaded on the Transfer Station for Mac OS X. This is a valuable opportunity
to correct any mistakes or identify any issues that may have happened on set. This will minimise the chance of any problems later in postproduction.
Click on the thumbnail/shotname to highlight the first shot on the Roll. Then click the ‘Filecard’ icon, or press F on your keyboard as a shortcut,
to open the Filecard where you can view and edit metadata:
With the Filecard open you can press the down arrow (cursor key) on your keyboard to view metadata for the next shot. It is advisable to first
check that all existing metadata looks correct and sensible, and also to check for anything in the Log Note box:
CODEX TRANSFER STATION FOR MAC OSX - PROCESSING ARRIRAW REV 11.14.12
PAGE 8
In the event of a problem during recording the Onboard S / M can put information in the Log Note box automatically. Here are some examples
you should check the Log Note box for:
“No video input signal detected”, or
“Video frame dropped”, or
“Timecode break detected”
Any messages like this should be cross referenced with the camera sheet to check if the problem was recognised on set, and reported if
necessary.
You can click in any of the white boxes to edit or add metadata to an individual shot, and then click the check icon to save.
It can be useful to add the Day and Date information if this was not entered on the Onboard recorder on set, and this can be added to multiple
clips using the EDIT SHOTS feature. Click the ALL button so that all the shots on the media are marked with a green square:
CODEX TRANSFER STATION FOR MAC OSX - PROCESSING ARRIRAW REV 11.14.12
PAGE 9
Then click the EDIT SHOTS button to view/edit metadata for all the selected shots:
The Date information should be in the format YYYYMMDD to be applied correctly to PDF reports (which will be discussed later in this guide).
After entering any changes click the check box and you can choose to apply the new metadata to all the shots:
Creating a PDF Shot Report
A PDF Shot Report can be created giving an overview of the media, which can be very useful for a production.
Click the REPORT button to open the options for creating a report:
CODEX TRANSFER STATION FOR MAC OSX - PROCESSING ARRIRAW REV 11.14.12
PAGE 10
Like when creating the ALE, the initial settings need to be completed. Set the destination Filename including the correct extension (.pdf). Set
Source shots as Specified Roll and choose the correct Roll from the list. You can also enter a name for the Author of the Shot Report, and set
the Timecode frame rate to be correct for the project:
Then click DO IT to create your PDF Shot Report.
Creating a final ALE
If the project is being edited in Avid then providing an ALE with editing files is useful for two reasons:
1. The ALE can be imported with the editing files, allowing the editor to view all the original metadata for the shots in the Avid software.
2. The ALE shows the number of original shots meaning the editor can confirm that the correct number of editing files have been delivered
to them.
To create the final ALE to send to the editor, follow the same steps as when creating the first ALE, but this time it is important to set the
Timecode frame rate to be correct for the project:
CODEX TRANSFER STATION FOR MAC OSX - PROCESSING ARRIRAW REV 11.14.12
PAGE 11
Then click DO IT to save the ALE.
Cloning from a Capture Drive or Datapack to the Internal Storage
With the correct licence installed the Codex software can use disks fitted to the Internal Drive bays of the Mac Pro.
Contact [email protected] if you require a licence for this feature. Skip to the section ‘Getting RAW image files’ if this licence is not
installed, or if you do not need to clone the data to the internal disks.
This feature allows data to be cloned in the original recorded format, before it is processed as either RAW image or editorial files for postproduction. A full guide to configuring a MacPro with internal disks is available here: http://www.codexdigital.com/?action=asset&id=413
IMPORTANT NOTE: After cloning shots to the Internal storage always go to the STORAGE tab and eject the Internal storage block. This will
prevent there being multiple copies of your shots loaded when you copy RAW or proxy files from the Codex VFS to another hard drive.
Follow these steps to clone data to the Internal Storage:
1.With a Transfer Station attached and a Capture Drive or Datapack loaded in addition to the Internal Storage the STORAGE tab appears like this:
The bottom half of the STORAGE tab represents the physical locations for the media.
2. To clone data to the Internal Storage go to the MAIN tab. Select the Filter button on the left of the screen (spyglass icon) and open the CODEX TRANSFER STATION FOR MAC OSX - PROCESSING ARRIRAW REV 11.14.12
PAGE 12
Datapack drop down list to select the location to copy from:
Click Filter button to
choose shots for clone
3. Click the Shots View button (above the Filter button) to view the shots on the media you have chosen. From the bottom left of the screen click COPY and set the Copy Mode as Clone. Open the Target drop down list to chose Internal as the target for your copy:
4. Then below the shot thumbnails/list click the ALL button so that all shots to copy are marked with a green square:
CODEX TRANSFER STATION FOR MAC OSX - PROCESSING ARRIRAW REV 11.14.12
PAGE 13
5. To begin the copy click DO IT. The copy progress will be shown:
6. When the copy has finished a COPY SUCCEEDED message will be shown at the bottom of the Codex UI:
CODEX TRANSFER STATION FOR MAC OSX - PROCESSING ARRIRAW REV 11.14.12
PAGE 14
Getting RAW image files
To maintain maximum quality the Codex software can package the ARRIRAW data recorded from the Alexa into .ari files.
These contain the original camera sensor data along with a range of useful metadata, and there is a file per frame.
IMPORTANT NOTE: Before copying files from the Codex VFS always check there is only one copy of the shots loaded. There could be more
than one copy, for example, if you have cloned shots to the Internal storage. Performing this check will prevent duplicate RAW or proxy files
being copied from the Codex VFS.
Go to the SETUP tab, and then click on the VFS button.
CODEX TRANSFER STATION FOR MAC OSX - PROCESSING ARRIRAW REV 11.14.12
PAGE 15
The first time the software is used, Configuration is set to <None Selected>. Click the arrow to open the Configuration drop down list and
choose Codex ARRIRAW (preset):
This preset configuration needs to be customised for your project. To make the configuration suitable for your project now select COPY
CONFIG to create a copy of this configuration, and rename it for your project:
Note: any renamed configuration cannot have the first word ‘Codex’
Once the configuration has been renamed for your project, to change settings for the ari File Type click EDIT.
CODEX TRANSFER STATION FOR MAC OSX - PROCESSING ARRIRAW REV 11.14.12
PAGE 16
This opens up more options for that File Type. THE NEXT STEP IS CRITICAL TO A SUCCESSFUL CONFORM PROCESS.
Now set the Tc Rate for the selected File Type to be correct for your project:
This setting means that the timecode in the files will be at the correct rate for your project.
Now you have set the type of files that the Codex software will process, and the timecode rate for them.
Then go to the Codex VFS drive to access the files:
CODEX TRANSFER STATION FOR MAC OSX - PROCESSING ARRIRAW REV 11.14.12
PAGE 17
The ‘Codex VFS’ drive should normally be visible with Finder and on the Desktop. If not then make sure that Finder Preferences is set to show
Hard disks on the Desktop:
Files can be copied from the ‘Codex VFS’ drive using any copy tool.
The Codex software offers the Disk and Tape Offloader feature for making verified copies of files from the ‘Codex VFS’ drive to disk or LTFS
tape. This will be discussed later in this guide in the section “Using the Disk and Tape Offloader”.
CODEX TRANSFER STATION FOR MAC OSX - PROCESSING ARRIRAW REV 11.14.12
PAGE 18
Getting Proxy files for editing
IMPORTANT NOTE: Before copying files from the Codex VFS always check there is only one copy of the shots loaded. There could be more
than one copy, for example, if you have cloned shots to the Internal storage. Performing this check will prevent duplicate RAW or proxy files
being copied from the Codex VFS.
There are two Configuration preset examples for creating proxy files for editing:
1. Codex FCP Editorial (preset) - this will create ProResLT files. There is no Scaling, LUT or Burn-In applied by default. This preset should be edited to use for your project.
2. Codex Avid Editorial (preset) - this will create DNxHD 115/120 files. There is no LUT or Burn-In applied by default. This preset should be edited to use for your project.
Choose the correct Configuration for your project:
This preset configuration needs to be customised for your project. To make the configuration suitable for your project now select COPY
CONFIG to create a copy of this configuration, and rename it for your project:
Note: any renamed configuration cannot have the first word ‘Codex’.
Once the configuration has been renamed for your project, for each file type click to select it and then click EDIT. This opens up more options
for that File Type. THE NEXT STEP IS CRITICAL TO A SUCCESSFUL CONFORM PROCESS.
Now set the Tc Rate or Fps Rate for the selected File Type to be correct for your project (and remember you must do this for all File Types):
CODEX TRANSFER STATION FOR MAC OSX - PROCESSING ARRIRAW REV 11.14.12
PAGE 19
This setting means that the files will be at the correct editing rate for your project.
DNxHD files will always be scaled to 1920x1080. If setting up ProRes files (starting with FCP Editorial preset) it is also generally recommended
to set Scaling as Fixed, Height to 1920, and Width to 1080. Applying LUTs and Burn-Ins is detailed in the VFS Guide.
Now you have set the type of files that the Codex software will process, and the frame rate for them.
Then copy the files from the Codex VFS drive:
CODEX TRANSFER STATION FOR MAC OSX - PROCESSING ARRIRAW REV 11.14.12
PAGE 20
Using the Disk and Tape Offloader
With the correct licence installed the Codex software provides the Disk and Tape Offloader feature.
This feature can perform a byte-for-byte (or md5) verified backup to 2 disk and 2 LTFS tape targets simultaneously (or combinations thereof).
Contact [email protected] if you require a licence for this feature.
When this feature is activated there is an OFFLOAD option on the SETUP tab:
To use the Disk and Tape Offloader for Canon Cinema RAW material you should use the same VFS Configuration that you set up for creating
RAW files:
CODEX TRANSFER STATION FOR MAC OSX - PROCESSING ARRIRAW REV 11.14.12
PAGE 21
Go to the OFFLOAD screen and set the Mode to Manual:
Then click to open the OPTIONS:
These are set at zero (0) by default. Set these to how many LTFS tape and Disk offloads you required:
CODEX TRANSFER STATION FOR MAC OSX - PROCESSING ARRIRAW REV 11.14.12
PAGE 22
Then click the File Browser icon to choose the destination for the disk offloads:
Confirm that Operation is set to Backup+Verify.
Then click the MOUNT button and the target(s) for the offload should be shown next to Devices:
CODEX TRANSFER STATION FOR MAC OSX - PROCESSING ARRIRAW REV 11.14.12
PAGE 23
At this point it is advised to view the contents of the Codex VFS drive, to confirm it contains the files you want to offload.
If required you can choose a VFS Directory – for example you may want to offload just one Roll from all those that are loaded:
Then click START. After scanning the VFS the software will you to enter a user friendly name for the offload. The default is ‘unnamed’, so this
could be changed to the Roll name for example:
CODEX TRANSFER STATION FOR MAC OSX - PROCESSING ARRIRAW REV 11.14.12
PAGE 24
Then you will be asked to enter the name(s) of the media being used, for logging purposes:
The software will then proceed with the offload, showing the names of the files as they are copied, and the estimated time remaining to
completion:
When the offload has completed successfully the software will show how many files have been backed up and verified:
CODEX TRANSFER STATION FOR MAC OSX - PROCESSING ARRIRAW REV 11.14.12
PAGE 25
Deleting the media to return to the set
To delete the media go to the STORAGE tab of the Codex UI.
Here you can select the Roll in the top half of the screen, and then click the DELETE button. The software will ask if you are sure you want to
delete. If you are sure that your data is backed up then click OK and the Roll will be deleted:
CODEX TRANSFER STATION FOR MAC OSX - PROCESSING ARRIRAW REV 11.14.12
PAGE 26
Notes
24 hour support line +44 7985 467 665
CODEX DIGITAL LIMITED 60 POLAND STREET LONDON ENGLAND W1F 7NT UK
TEL +44 207 292 6918 CODEXDIGITAL.COM [email protected]
Codex TRANSFER
Digital Limited
reserve
alter the specification
any
time and without prior notice. © Copyright Codex Digital Limited November 2012.
CODEX
STATION
FOR the
MACright
OSXto- PROCESSING
ARRIRAW atREV
11.14.12
PAGE 27