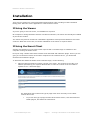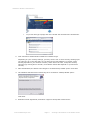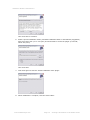
1
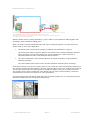
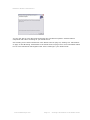
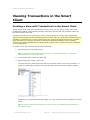
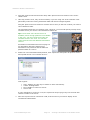
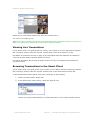
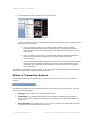
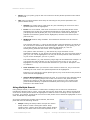
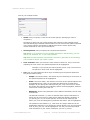
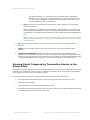
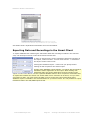
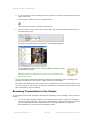
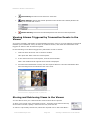
milestone
XProtect
Transact 2.5
User’s Manual
Milestone XProtect Transact 2.5
Target Audience for this Document
This document is intended for end users who solely use Milestone XProtect Transact for browsing
transaction data and video recordings. This document describes how to browse transaction data
and video recordings together using the Viewer or the Smart Client.
This document does not explain how to install and configure Milestone XProtect Transact as an addon to a Milestone XProtect surveillance system. Such installation and configuration of Milestone
XProtect Transact is covered in a separate Milestone XProtect Transact Administrator’s Manual.
XPT25-um-e1-040510
www.milestonesys.com
Page 2
Target Audience for this Document
Milestone XProtect Transact 2.5
Copyright, Trademarks and Disclaimer
Copyright
© 2010 Milestone Systems A/S.
Trademarks
XProtect is a registered trademark of Milestone Systems A/S.
Microsoft and Windows are registered trademarks of Microsoft Corporation.
All other trademarks mentioned in this document are trademarks of their respective owners.
Disclaimer
This help system is intended for general information purposes only, and due care has been taken in
its preparation.
Any risk arising from the use of this information rests with the recipient, and nothing herein should
be construed as constituting any kind of warranty.
Milestone Systems A/S reserve the right to make adjustments without prior notification.
All names of people and organizations used in this help system's examples are fictitious. Any
resemblance to any actual organization or person, living or dead, is purely coincidental and
unintended.
This product may make use of third party software for which specific terms and conditions may
apply. When that is the case, you can find more information in the file
3rd_party_software_terms_and_conditions.txt located in your Milestone surveillance system
installation folder.
www.milestonesys.com
Page 3
Copyright, Trademarks …
Milestone XProtect Transact 2.5
Contents
INTRODUCTION .......................................................... 5
What Happens when You Browse Transactions and Video Together? ... 5
SYSTEM REQUIREMENTS ............................................ 7
INSTALLATION ........................................................... 8
If Using the Viewer ............................................................................... 8
If Using the Smart Client ...................................................................... 8
VIEWING TRANSACTIONS IN THE SMART CLIENT .... 12
Creating a View with Transactions in the Smart Client ....................... 12
Viewing Live Transactions .................................................................. 14
Browsing Transactions in the Smart Client ......................................... 14
Status of Transaction Sources ............................................................ 15
Transaction Search Features in the Smart Client ................................ 16
Viewing Alerts Triggered by Transaction Events in the Smart Client ... 19
Printing Transactions from the Smart Client ....................................... 20
Exporting Data and Recordings in the Smart Client ............................ 21
VIEWING TRANSACTIONS IN THE VIEWER............... 22
Creating a View with Transactions in the Viewer ................................ 22
Browsing Transactions in the Viewer .................................................. 23
Transaction Search Features in the Viewer ......................................... 24
Viewing Alarms Triggered by Transaction Events in the Viewer ......... 25
Storing and Retrieving Views in the Viewer ........................................ 25
REMOVING THE SOFTWARE ...................................... 26
Removing the Smart Client Plugin ...................................................... 26
www.milestonesys.com
Page 4
Contents
Milestone XProtect Transact 2.5
Introduction
Milestone XProtect Transact is a powerful tool for tracking transactions linked with video recordings
of the transactions taking place.
Milestone XProtect Transact is an add-on to Milestone's IP video surveillance solutions XProtect
Basis+, XProtect Professional, XProtect Enterprise and XProtect Corporate. Milestone XProtect
Transact can combine your digital video monitoring with transaction data from many kinds of
transaction data sources and for many purposes. You get a 1-to-1 correspondence of images to
transactions and the transaction data is time-linked with simultaneous display of transactions and
camera recordings.
Common transaction data sources are PoS (Point of Sale) or ATM (Automated Teller Machine)
which enables you to easy investigate and prove fraud. But actually any transaction data source
that you would like to time-link with digital video monitoring can be combined through Milestone
XProtect Transact. A few examples of other transaction data sources and purposes are: number
plate recognition for collection of road taxes, access control for combined visual identification for
higher security—but the only limit is your imagination. Note, that some solutions might require
additional programs and/or customizations.
The examples used in this manual show typical retail situations and transactions data from PoS
(Point of Sale) or ATM (Automated Teller Machine). For these purposes Milestone XProtect Transact
speeds up investigations into fraud by integrating digital video surveillance images with PoS (Point
of Sale) or ATM (Automated Teller Machine) transaction data: 1-to-1 correspondence of images to
transactions. Transaction data is time-linked with video images of cash registers/ATMs for
simultaneous display of transactions and camera recordings. Whether the problem is internal or
external perpetrators, it is easy to find suspicious transactions with Milestone XProtect Transact's
features for searching transactions by cash register/ATM, camera, data, time or free text. See
Viewing Transactions on page 8 for more information.
See Interaction with Sources and Surveillance Solutions on page 5 for more information about how
Transact interacts with the sources and your surveillance solution.
What Happens when You Browse Transactions and Video
Together?
There are several components in the Transact communication flow.
In short, Milestone XProtect Transact consists of a Transact Server and a Transact Database.
The Transact Server has a service that listens for transactions from sources. When the Transact
Server receives transaction data from a source, it stores the data in the Transact Database.
Video recordings are stored independently on your surveillance server, as defined through the
configuration of your XProtect surveillance solution.
www.milestonesys.com
Page 5
Introduction
Milestone XProtect Transact 2.5
Example only: The blue arrows outline video recordings from the surveillance system,
while the red arrows outline transaction data from sources.
In addition to an ATM, transaction data may also come from a cash register or
any other RS-232-enabled device.
With the Smart Client or Viewer application, you are able to view transaction data together with
recordings of the transaction taking place.
When you want to browse transaction data and video recordings together, you open either the
Smart Client or the Viewer application.
•
The Smart Client requires that a plugin is installed; see Installation on page 8.
The Smart Client offers extremely feature-rich access to time-linked transaction data and
video recordings, among other things view of live transactions, export and print of
transaction data and video, and advanced search features.
•
The Viewer application comes with all XProtect surveillance solutions except Milestone
XProtect Corporate.
The Viewer offers basic access to time-linked transaction data and video recordings.
In the Smart Client or Viewer you simply create a view, select the required transaction data source
(for example a particular cash register), then the required video sources (for example two cameras
covering the area around the cash register from different angles), and you are ready to browse.
See Creating a View with Transactions in the Smart Client on page 12 and Creating a View with
Transactions in the Viewer on page 22 for more information.
The time-linking of the transaction data and video recordings enables you to view and browse the
transaction data and video recordings simultaneously.
Browsing of transactions and video recordings in the Viewer and the Smart Client respectively
www.milestonesys.com
Page 6
Introduction
Milestone XProtect Transact 2.5
System Requirements
The following are minimum system requirements:
CPU:
Intel Pentium 4 or compatible, minimum 2.4 GHz.
RAM:
512 MB.
Network:
Ethernet (100 Mbit recommended).
Graphics Card:
AGP or PCI-Express, 1024×768.
Operating System:
Microsoft Windows XP Professional, Microsoft Windows Server 2003,
Microsoft Windows Server 2008, Windows Vista or Windows 7 – both 32
and 64 bit versions.
Software:
Microsoft .NET 3.0 Framework required.
www.milestonesys.com
Page 7
System Requirements
Milestone XProtect Transact 2.5
Installation
There are two options for viewing transaction data together with recordings of the transaction
taking place: With the Viewer application or with the Smart Client.
If Using the Viewer
If you are going to use the Viewer, no installation is required:
On computers running Milestone XProtect surveillance solutions, the Viewer will already be installed
as part of the solution.
The Viewer may also be included as a standalone application with exported transaction and video
evidence. When this is the case, no further installation of the Viewer is required either.
If Using the Smart Client
Viewing of transactions in the Smart Client requires that a Transact Plugin is installed on the
computer running the Smart Client.
Everyone using a Smart Client with Transact must download and install the plugin. Even if you are
going to use the Smart Client on the same computer as the Transact Server, you should still
download and install the plugin.
To download and install the Smart Client Transact Plugin, do the following:
1. Open an Internet Explorer browser (version 6.0 or later), and connect to the URL or IP
address specified by your system administrator in order to connect to the surveillance
system server´s download page.
The illustration above shows the type of page most users are likely to see. Other
versions also exist:
•
If you see this type of page find the Smart Client section, click Download and
Install plugins, and follow the instructions.
www.milestonesys.com
Page 8
Viewing Transactions in the Smart Client
Milestone XProtect Transact 2.5
•
If you see this type of page click the relevant link and follow the instructions.
2. Click Transact to download and install the Transact Plugin.
Depending on your security settings, you may receive one or more security warnings (Do
you want to run or save this file?, Do you want to run this software? or similar; exact
wording depends on your browser version). When this is the case, accept the security
warnings (by clicking Run or similar; exact button names also depend on your browser
version).
3. Once downloaded, the Smart Client Plugin for Transact Setup wizard opens. Click Next.
4. The Milestone XProtect Smart Client Plug-in for Transact 2.5 Setup Wizard opens:
Click Next.
5. Read the license agreement, and select I Agree to accept the license terms:
www.milestonesys.com
Page 9
Viewing Transactions in the Smart Client
Milestone XProtect Transact 2.5
Then click Next to continue.
6. Select required installation folder (a default installation folder is automatically suggested).
Also select who (just you or everyone) should be able to access the plugin (if in doubt,
select Everyone):
Then click Next.
7. Click Next again to start the actual installation of the plugin:
8. When installation is complete, click the Close button:
www.milestonesys.com
Page 10
Viewing Transactions in the Smart Client
Milestone XProtect Transact 2.5
You are now able to view data received through the surveillance system's Transact add-on
component with video recordings in your Smart Client.
See Creating a View with Transactions in the Smart Client on page 12, Viewing Live Transactions
on page 13 and Browsing Transactions in the Smart Client on page 14 for more information about
how to view transaction data together with video recordings in your Smart Client.
www.milestonesys.com
Page 11
Viewing Transactions in the Smart Client
Milestone XProtect Transact 2.5
Viewing Transactions in the Smart
Client
Creating a View with Transactions in the Smart Client
If your Smart Client user rights permit you to create views, you are able to create views with
transactions together with recordings. Simply create the required view with Transact content on
the Smart Client's Setup tab.
Creating a view may not be necessary if views in shared groups are used in your organization.
Views in shared groups can be shared among Smart Client users. If a view with Transact content is
available in a shared group, you may simply select the view on the Smart Client's Live or Browse
tabs, and begin live viewing or browsing of transaction data with matching video recordings.
Consult your system administrator if in doubt about whether views in shared groups are available
in your organization.
To create a view with Transact content, do the following:
1. Open and log in to the Smart Client.
Tip: For information about how to open and log in to the Smart Client, see separate
documentation for your Smart Client.
2. In the Smart Client, select the Setup tab.
3. On the Setup tab, create a new view.
You may select any view layout from the list, but some layouts, such as the Transact + 2
layout, are particularly suited for viewing transaction data and camera images together:
Example of available layouts; more layouts may
be available in your version.
Depending on requirements and user rights, you may create the view in a shared or private
group.
Tip: For further information about how to create views, see separate documentation for
your Smart Client.
www.milestonesys.com
Page 12
Viewing Transactions in the Smart Client
Milestone XProtect Transact 2.5
4. Drag the required cameras from the Setup tab's System Overview section to the view's
camera slots.
5. This step, and the next, may not be necessary if you are using one of the Transact views
particularly suited for viewing transaction data and camera images together.
Drag the System Overview section's Transact Source entry to the slot in which you want to
view transaction data.
The transaction data slot now changes color. However, you must still specify exactly which
Transact source you want to view transaction data from.
Tip: If more than one Transact source is
available, and if enough positions are available
in the view, you can include more than one
Transact source in the view. You can also
create several views with different transaction
sources.
See Status of Transaction Sources on page 15
for information about the status bar of
transaction view positions and the different
possible states of a source.
6. Select the view's transaction data position, then expand the Setup tab's Properties section
and expand the list over Transact servers:
Color legend:
•
•
•
•
Gray: Starting up (will only be visible on slow connections).
Yellow: Getting status.
Red: Unable to connect to server.
Green: OK.
If color indication for a service is red, the system will keep trying every five seconds until
contact is made to the server.
7. Once the required server connection is OK, click the source you wish to display in the
Transaction Data Position:
www.milestonesys.com
Page 13
Viewing Transactions in the Smart Client
Milestone XProtect Transact 2.5
Repeat if your view should contain more than one Transact source.
The view is now ready for use.
Tip: You are able to change the font size used for displaying the transaction data as well as the line
width. You change these settings in the Setup tab's Properties section.
Viewing Live Transactions
If your Smart Client user rights permit live viewing, you are able to view live transactions together
with recordings. Simply select the required Transact view on the Smart Client's Live tab.
See Status of Transaction Sources on page 15 for information about the status bar of transaction
view slots and the different possible states of a source.
For further information about using the Smart Client's Live tab, see separate documentation for
your Smart Client.
Browsing Transactions in the Smart Client
If your Smart Client user rights permit you to browse, you are able to browse transactions together
with recordings. Simply select the required Transact view on the Smart Client's Browse tab.
To browse transaction data together with video recordings, do the following:
1. Select the Smart Client's Browse tab.
2. In the Browse tab's Views section, select the required view:
Example: Selecting a view
Consult your system administrator if in doubt about which views contain Transact content.
www.milestonesys.com
Page 14
Viewing Transactions in the Smart Client
Milestone XProtect Transact 2.5
3. The selected view will be displayed on the Browse tab:
The transaction that is time-linked with the currently
shown video is highlighted with a yellow bar.
You are now able to browse the transaction data and corresponding video recordings on the
Smart Client's Browse tab:
•
Use the navigation features on the Smart Client's Browse tab for browsing
transactions/recordings backward or forward in time. For detailed information
about the Smart Client's browsing features, see separate documentation for your
Smart Client.
•
Use your mouse's scroll wheel or drag up/down inside the displayed transaction
data to move backward or forward in time. Video recordings will move
correspondingly.
•
Use the search panel located inside the Transact view on the Smart Client's Browse
tab for searching transaction data and view search results with matching video
recordings. See Transaction Search Features in the Smart Client on page 16 for
more information.
See Status of Transaction Sources on page 15 for information about the status bar of transaction
view slots and the different possible states of a source.
Status of Transaction Sources
A transaction data view slot is identified by a status bar, located in the top of the transaction
position.
Example of a transaction view slot's status bar
The status bar displays the name of the transaction source and the state of the source. A source
can have the following states:
•
Running: Smart Clients receives data from the source.
•
Suspended: Your Transact administrator has temporarily suspended the transaction
source. Contact your administrator and ask for resumed access to transaction data from
this source.
•
Not connected: The Transact service is not running. Contact your administrator and ask
for access to transaction data from this source.
www.milestonesys.com
Page 15
Viewing Transactions in the Smart Client
Milestone XProtect Transact 2.5
•
Undefined: The defined source in the Smart Client view has been deleted in Transact.
Contact your administrator and ask for access to transaction data from this source.
•
No data in source: The defined source exists in Transact, but no data is sent/received.
Contact your administrator and ask for access to transaction data from this source.
Transaction Search Features in the Smart Client
When a Transact view is displayed in the Smart Client's Browse tab, a search panel is available
below the displayed transactions.
You can select between two different search methods in the search panel's Search type field.
•
The Simple search method lets you search for single phrases at a time.
•
The Multiple search method lets you search for multiple phrases at a time, with the
possibility of using different colors for highlighting occurrences of phrases with different
importance.
The content of the search pane changes depending on whether you have selected the simple or
multiple search method.
Simple search method and the multiple search method respectively. Both with the [Search Result Window] to
the right.
Using Simple Search
If you have selected the simple search method, the search panel will have the following content:
•
[Search Phrase Field]: Lets you search transaction data for a particular phrase.
Lines in which the specified phrase appears will immediately be highlighted by blue squares
in front of the lines in the transaction window:
The next 10 occurrences containing the required search
phrase are also immediately displayed in the [Search
Result Window] to the right of the search panel.
Tip: With the search panel's other features, such as the
Case Sensitive check box, you are able to narrow your
search criteria. See the descriptions of these features in
the following.
Tip: You can quickly jump between occurrences of the specified phrase by clicking the Up
and Down buttons or by clicking on the different occurrences in the [Search Result
Window].
•
Up: Lets you quickly jump to the previous occurrence of the phrase specified in the search
phrase field.
www.milestonesys.com
Page 16
Viewing Transactions in the Smart Client
Milestone XProtect Transact 2.5
•
Down: Lets you quickly jump to the next occurrence of the phrase specified in the search
phrase field.
•
Use: Lets you select between three ways of searching for the phrase specified in the
[Search Phrase Field]:
•
Simple: Use simple search, with which any line containing an occurrence of the
specified phrase will be highlighted.
•
Exact: Use exact match, with which occurrences of the specified phrase will be
highlighted only if they are preceded and followed by a blank space. Example: If
you specify the search phrase jack, only occurrences in which the phrase jack
appears surrounded by spaces will be highlighted, whereas occurrences such as
jacket will not.
•
Wildcards: Search using wildcards. Three different characters can be used as
wildcards:
The asterisk character (*). Place an asterisk after required characters to search for
all occurrences in which those characters appear. Example: If you specify jac* as
your search phrase, all occurrences containing the letters jac, such as
leatherjacket, jackboots and similar, will be highlighted.
The question mark character (?), with which any single character can be
substituted. Example: If you specify the search phrase j?ck, all occurrences such as
jack, jock, etc. will be highlighted. You may use several question mark characters
in your search. Examples: jac???n or j?cks?n.
The hash character (#), with which any single digit can be substituted. Example: If
you specify the search phrase 4#, all occurrences such as 40, 41, etc. will be
highlighted. You may use several hash characters in your search. Examples: 4##
or 12#4##7.
•
Case sensitive: When you select the Case sensitive check box, only occurrences
matching the case used in the specified phrase will be highlighted.
Example: If you specify the search phrase gloves, only occurrences of the phrase in
lower case will be highlighted.
•
[Search Result Window]: Displays the next 10 occurrences of the defined search
phrase. You can quickly jump to one of the occurrences in the [Search Result
Window] by clicking on the date and time of the occurrence. The content in the
[Search Result Window] is updated immediately when using one of the browse
functions in the Smart Client.
Using Multiple Search
Using multiple search, is for instance a clothes store manager able to search for transactions
including the phrases silk tie, socks, t-shirt and return at the same time. He is able to specify that
occurrences of each phrase should be highlighted in different colors according to their importance.
He might, for example, specify that occurrences of the phrase return should be highlighted in red in
order to indicate Very Important.
If you have selected the multiple search method, the search
panel will have the following content:
•
Setup: Clicking the Setup button will open the Search
Setup window. Further clicking the Search Setup
window's Add... button opens the Define Search window,
which lets you define each of the search phrases to be
www.milestonesys.com
Page 17
Viewing Transactions in the Smart Client
Milestone XProtect Transact 2.5
used in your multiple search.
•
Name: Lets you specify a name for the search phrase. Specifying a name is
compulsory.
Specifying a name lets you quickly identify each element of the multiple search,
whereas identifying individual elements based on the actual search phrase specified
in the Search pattern field would be difficult because the search phrase may
contain wildcards or other special characters.
•
Search pattern: Lets you specify the required search phrase.
Tip: Based on your selection in the Use field (described in the following), you are
able to use wildcards, etc. in your search phrase.
Tip: With the search panel's Case Sensitive check box (described in the following),
you are able to narrow your search criteria.
•
Case sensitive: When you select the Case sensitive check box, only occurrences
matching the case used in the specified phrase will be highlighted.
Example: If you specify the search phrase gloves, only occurrences of
the phrase in lower case will be highlighted.
•
Use: Lets you select between three ways of searching for the phrase specified in
the [Search Phrase Field]:
o
Simple: Use simple search, with which any line containing an occurrence of
the specified phrase will be highlighted.
o
Exact: Use exact match, with which occurrences of the specified phrase will
be highlighted only if they are preceded and followed by a blank space.
Example: If you specify the search phrase jack, only occurrences in which
the phrase jack appears surrounded by spaces will be highlighted, whereas
occurrences such as jacket will not.
o
Wildcards: Search using wildcards. Three different characters can be used
as wildcards:
The asterisk character (*). Place an asterisk after required characters to
search for all occurrences in which those characters appear. Example: If
you specify jac* as your search phrase, all occurrences containing the
letters jac, such as leatherjacket, jackboots and similar, will be highlighted.
The question mark character (?), with which any single character can be
substituted. Example: If you specify the search phrase j?ck, all occurrences
such as jack, jock, etc. will be highlighted. You may use several question
mark characters in your search. Examples: jac???n or j?cks?n.
www.milestonesys.com
Page 18
Viewing Transactions in the Smart Client
Milestone XProtect Transact 2.5
The hash character (#), with which any single digit can be substituted.
Example: If you specify the search phrase 4#, all occurrences such as 40,
41, etc. will be highlighted. You may use several hash characters in your
search. Examples: 4## or 12#4##7.
•
Type: Lets you select between four importance levels: Normal, Very Important,
Important and Info.
When occurrences of a phrase are found during a multiple search, the occurrences
will be highlighted in different colors according to the selected importance level for
each phrase. For example, phrases defined as Very Important will be highlighted in
red.
Tip: You can quickly jump between occurrences of the specified phrases by clicking
the Up and Down buttons or by clicking on the different occurrences in the [Search
Result Window].
•
Up: Lets you quickly jump to the previous occurrence of one of the specified search
phrases.
•
Down: Lets you quickly jump to the next occurrence of one of the specified search
phrases.
•
[Search Result Window]: Displays the next 10 occurrences of the defined search
phrases. You can quickly jump to one of the occurrences in the [Search Result Window] by
clicking on the date and time of the occurrence. The content in the [Search Result Window]
is updated immediately when using one of the browse functions in the Smart Client.
Viewing Alerts Triggered by Transaction Events in the
Smart Client
If you have created a transaction event and added a generic event in your surveillance system that
matches your transaction event, an alert is created in the Smart Client, each time the transaction
event triggers an action in the surveillance system.
Do the following to see alerts triggered by transaction events in the Smart Client:
1. From the Browse tab's Alerts section, select the required alert from the Alerts list.
2. Click the Get List button.
This will display a list of detected transaction events.
3. From the listed transaction events, click the required alert to view the transaction data and
recordings from the selected alert in the view.
www.milestonesys.com
Page 19
Viewing Transactions in the Smart Client
Milestone XProtect Transact 2.5
The transaction that is time-linked with the currently
selected alert is highlighted with a yellow bar
Printing Transactions from the Smart Client
With the Browse tab's Print section, you are able to print transaction data. The current transaction
receipt (till receipt or other) is printed. The current transaction is highlighted with a yellow bar in
the transaction view slot.
When you print a transaction receipt, an image of the receipt is automatically included in a small
surveillance report, in which you are also able to include notes about the transaction.
Transaction receipts longer than 70 lines are not suitable for printing. The printed receipt will be
too small to read.
To print a transaction, do the following:
1. Select the transaction view slot.
2. Select the required transaction by browsing to the right date and time. See Browsing
Transactions in the Smart Client on page 14 for more information.
3. Click the Print section's Print... button.
This will open the Smart Client Surveillance Report window with a preview of the
transaction to be printed as well as information about source name, capture time, print
time and user name of the user printing the image.
You are also able to include a user's note, for example a description of the recorded
incident.
www.milestonesys.com
Page 20
Viewing Transactions in the Smart Client
Milestone XProtect Transact 2.5
Window with preview and information about your print.
Date and time format may be different on your computer.
See Smart Client's separate documentation for more information.
Exporting Data and Recordings in the Smart Client
To export database files containing the transaction data and recordings included in the selected
view, use the Export section on the Smart Client's Browse tab:
In order to include all the view's transaction data and recordings in
the export, make sure that - Current View Sources - is selected in
the Export section's Source list.
Clicking the Database Export... button lets you specify further
settings as well as perform the actual export.
As part of the database export settings, you will be able to include a
standalone Viewer application in the export. When dealing with
transaction data, the Viewer application must be included in the
export in order to be able to view the exported database files on other computers. Remember that
an export that includes the Viewer can contain data from a maximum of 24 hours, so if you have
seven days of data, you must export the data in seven export files. More information about
database export is available in the documentation for your Smart Client. It is not possible to export
transaction data in the AVI/JPEG Export format.
www.milestonesys.com
Page 21
Viewing Transactions in the Smart Client
Milestone XProtect Transact 2.5
Viewing Transactions in the Viewer
Creating a View with Transactions in the Viewer
The following describes how to setup the Viewer to display transaction data:
1. Open the Viewer.
Tip: For information about how to open the Viewer, see separate documentation for your
XProtect surveillance solution.
2. In the Viewer's toolbar, click the Settings button:
This will open the Viewer's Settings control panel in the bottom of the Viewer window.
3. In the Settings control panel's Monitor View Layout list, select Transact:
This will apply the Viewer's Transact layout, with which it is possible to view transaction
data together with video recordings from up to two cameras:
4. In the Viewer's toolbar, click the Database Information button:
This will open the Viewer's Database Information control panel in the bottom of the Viewer
window.
5. Select the upper right camera slot, then use the Video Feed list (may also be called the
Video Connection list) in the Database Information control panel to select which camera
you want to view recordings from in the selected camera slot:
www.milestonesys.com
Page 22
Viewing Transactions in the Viewer
Milestone XProtect Transact 2.5
6. If you would like to view recordings from two cameras, repeat the procedure for the lower
right camera slot.
7. In the Viewer's toolbar, click the Transact button:
This will open the Viewer's Transact control panel.
8. On the Transact control panel's Source tab, select the required transaction data source in
the Select Source list:
Transaction data and video recordings are now displayed together:
The transaction matched by the currently displayed camera images
is highlighted in yellow:
Tip: You are able to change the font size used for displaying the
transaction data. You change the font size on the Transact control
panel's Layout tab.
You are now able to browse the transaction data and corresponding video recordings. See
Browsing Transactions in the Viewer on page 23 for more information.
See Storing and Retrieving Views in the Viewer on page 25 for more information about how to
save your layout for easy reuse next time you would like to view and browse transaction data
and corresponding video recordings.
Browsing Transactions in the Viewer
You are able to browse the transaction data and corresponding video recordings. There are three
options:
•
You can use the navigation features in the right side of the Viewer window, including the
convenient Timeline Browser, for browsing transactions/recordings backward or forward in
time. For detailed information about the Viewer's browsing features, see separate
documentation for your XProtect surveillance solution.
www.milestonesys.com
Page 23
Viewing Transactions in the Viewer
Milestone XProtect Transact 2.5
•
You can use your mouse's scroll wheel or drag up/down inside the displayed transaction
data to move backward or forward in time. Video recordings will move correspondingly.
•
You can use the Transact control panel's Navigation tab for searching transaction data and
view search results with matching video recordings. See Transaction Search Features in the
Viewer on page 24 for more information.
Transaction Search Features in the Viewer
When you select the Viewer's Transact control panel, you are able to use the following search
features on the Navigation tab:
•
Phrase: Lets you search transaction data for a particular phrase.
Lines in which the required phrase appears will immediately be
highlighted by green squares in front of the lines:
•
Case Sensitive: Lets you narrow the search criteria based on the
phrase specified in the Phrase field. When you select Case Sensitive,
only search results matching the case used in the specified phrase will be highlighted.
Example: If you specify the search phrase scarf only occurrences of the phrase in lower
case will be highlighted.
•
Exact Match: Lets you narrow the search criteria based on the phrase specified in the
Phrase field. The search criteria phrase is not case sensitive unless you also have selected
the Case Sensitive option.
When you select Exact Match, occurrences of the specified phrase will only be highlighted if
they are preceded and followed by a blank space.
Example: If you specify the search phrase Gloves, only occurrences such as Gloves,
Leather Gloves, etc. will be highlighted, whereas occurrences such as LeatherGloves,
Gloves-Leather, etc. will not.
•
Prev. Match: Lets you quickly jump to the previous occurrence of the phrase specified in
the Phrase field.
Tip: If no phrase is specified in the Phrase field, clicking the Prev. Match button will quickly
take you to the beginning of the first transaction in the database.
•
Next Match: Lets you quickly jump to the next occurrence of the phrase specified in the
Phrase field.
Tip: If no phrase is specified in the Phrase field, clicking the Next Match button will quickly
take you to the end of the last transaction in the database.
•
Prev. Trans.: Lets you quickly jump to the beginning of the previous transaction.
•
Next. Trans.: Lets you quickly jump to the beginning of the next transaction.
•
[Scroll Up]: Scrolls one line up for each click.
www.milestonesys.com
Page 24
Viewing Transactions in the Viewer
Milestone XProtect Transact 2.5
•
[Scroll Down]: Scrolls one line down for each click.
•
[Store Phrase]: Stores the phrase specified in the Phrase field. Stored phrases can
quickly be selected and reused:
•
[Delete Phrase]: Removes the selected phrase from the list of stored phrases.
Viewing Alarms Triggered by Transaction Events in the
Viewer
If you have created a transaction event and added a generic event in your surveillance system that
matches your transaction event, an alarm is created in Viewer, each time the transaction event
triggers an action in the surveillance system.
Do the following to see alarms triggered by transaction events in Viewer:
1. Click the Alarm Overview icon in Viewer's toolbar.
This opens the Alarm Overview control panel.
2. In the Alarm Overview control panel, click the Events button.
Now a list of alarms that originate from events is displayed.
3. From the listed transaction events, click the required alarm to view the transaction data
and recordings from the selected event in the view.
The transaction that is time-linked with the currently
selected alarm is highlighted with a yellow bar
Storing and Retrieving Views in the Viewer
You are able to store your views and later retrieve them when required.
To store your current view, select Add to Views... from the Views menu at the top
of the Viewer window, specify a name for the view, and click OK.
To retrieve a previously stored view, select the required view in the Views Menu:
www.milestonesys.com
Page 25
Viewing Transactions in the Viewer
Milestone XProtect Transact 2.5
Removing the Software
You are able to remove your Transact related installations in the following way:
Removing the Smart Client Plugin
To remove the Smart Client plugin required for viewing transaction data in the Smart Client, do the
following:
1. On the computer on which the Smart Client plugin is installed, select Start > Control Panel
> Add or Remove Programs to open the Add or Remove Programs window.
2. In the Add or Remove Programs window, select the Milestone XProtect SmartClient Plug-in
for Transact entry, and click the Remove button.
3. You will be asked to confirm that you want to remove Milestone XProtect SmartClient Plugin
for Transact from the computer. If you are sure that you want to remove the plugin, click
the Yes button and follow the remaining instructions.
www.milestonesys.com
Page 26
Removing the Software
Milestone XProtect Transact 2.5
Milestone Systems offices are
located across the world. For
details about office addresses,
phone and fax numbers, visit
www.milestonesys.com.
www.milestonesys.com
Page 27
Milestone Systems Office Locations