1
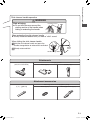
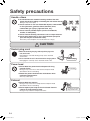
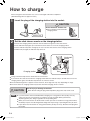
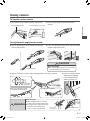
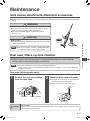
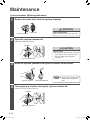
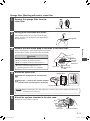
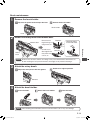
Instruction Manual Hitachi Cordless Stick Cleaner Model PV-XA100 Contents Before use lPart names and assembly............... lSafety precautions........................... lNotes on use..................................... E-2 E-4 E-7 How to use lHow to charge................................... E-8 lHow to operate.................................. E-9 Stick cleaner...................................... E-9 Handy cleaner................................... E-9 lHow to clean..................................... E-10 Stick cleaner...................................... E-10 Handy cleaner................................... E-11 When Finished cleaning lEmptying the dust case................... Checking the Max line....................... Detaching the dust case.................... Emptying the dust case..................... lStowing the cleaner.......................... How to store...................................... lMaintenance...................................... Stick cleaner, attachments, attachment accessories.... Dust case, filters, cyclone chamber.... Power head....................................... Thank you for purchasing a Hitachi Cordless Stick Cleaner. This cleaner is for household use only. Do not use for business purposes or purposes other than cleaning. For proper use, please read these Operating Instructions thoroughly before using the cleaner. E-12 E-12 E-12 E-13 E-14 E-14 E-15 E-15 E-15 E-18 Appendix lTroubleshooting................................ lWhen disposing of the product....... lReplacement Parts........................... lSpecifications................................... E-20 E-22 E-23 E-23 Keep this manual for future reference in an easily accessible place. For proper use, please read "Safety Precautions" (P.E-4–E-6) TS_PV-XA100.indd 1 7/10/2014 11:55:31 AM Part names and assembly Handy cleaner (P.E-9, E-11, E-14) Stick cleaner (P.E-9, E-11, E-14) Handy cleaner handle l The battery is built into the handy cleaner handle. Handy cleaner control button (P.E-9) Stick cleaner control button (P.E-9) Dust disposal button (P.E-12) Indicator lamp Stick cleaner handle (P.E-8, E-9) Dust case (P.E-12, E-13, E-15) Handle storage button (P.E-3, E-14) Inlet Handy cleaner release button (P.E-9) Attachment groove Stand Attachment groove Protrusion Power head release button l Insert the protrusion into the attachment groove of the stick cleaner. Click Power head (P.E-10, E-18, E-19) LED lights Multi angle brush nozzle (P.E-9) (P.E-8) Charging station Crevice nozzle Stand Plug Protrusion Safety switch Base Cord l Attach the accessories to the charging station. l Attach the multi angle brush nozzle to the crevice nozzle. lInsert the stand into the base. Rotary brush E-2 TS_PV-XA100.indd 2 7/10/2014 11:55:32 AM Part names and assembly Stick cleaner handle operation WARNING Risk of injury. Rotating section lDo not hold the area around the rotating section of the handle when folding or extending the handle. When extending the stick cleaner handle lSlowly rotate and extend until you hear a "click" sound. When folding the stick cleaner handle 1 Hold the stick cleaner handle and press the handle storage button to release the handle lock. Slowly rotate. 2 Slowly rotate and fold. Handle storage button Attachments Power head (1 pc.) (Smooth head D-DP4E) Charging station Base (1 pc.) Stand (1 pc.) Attachment accessories Crevice nozzle (1 pc.) (P.E-11) Multi angle brush nozzle Brush (1 pc.) (P.E-11, E-12) Multi angle nozzle (1 pc.) E-3 TS_PV-XA100.indd 3 7/10/2014 11:55:33 AM Safety precautions Be sure to follow these directions. In order to prevent personal injury or damage to the property of the user or other persons, please read and understand (the safety precautions) thoroughly and follow them correctly. The severity of injury or damage that occurs when ignoring instructions and improperly using the cleaner is classified and explained below. DANGER This indicates content that "may present imminent danger of serious injury or death". WARNING This indicates content that "may result in serious injury or death". CAUTION This indicates content that "may result in minor injury or property damage". Meaning of symbols Content that "prompts warning or attention". "Prohibited" content that must not be performed. "Directive" content that must be performed. Stick cleaner control button Handy cleaner Stick cleaner Charger terminal Cord Contacts Handy cleaner Handy cleaner control button Plug Stick cleaner 220240V Exhaust Power head Contacts Socket DANGER l Do not disassemble, repair, or alter. Doing so may cause leaking, heat generation, fire, or injury. For repairs, please consult with the Hitachi authorized service agent. l Keep the contacts of the stick cleaner, handy cleaner, and charging station away from water and other liquids. The internal battery may rupture and cause the product to catch fire or malfunction. l Do not connect the contacts of the stick cleaner, handy cleaner, and charging station with metal objects. Do not carry or store with metal necklaces, hairpins, etc. The battery may short-circuit and cause leaking, heat generation, rupturing, or fire. l Do not throw into fires or apply heat. The internal battery may rupture and cause fire. E-4 TS_PV-XA100.indd 4 7/10/2014 11:55:33 AM In the event of an abnormality or malfunction, stop using it use immediately. Safety precautions WARNING • The cleaner does not operate even after pressing the control button. • The power turns on and off when moving the plug or cord. • The cleaner does not operate even after switching to "High" or "Standard". • There is an abnormal sound during operation. • The body is deformed or abnormally hot. • The cord is damaged or abnormally hot. • There is a burning "smell". • There are other abnormalities. There is a risk of fuming, fire, or electric shock. Immediately request for inspection and repair by the Hitachi authorized service agent. Socket, plug, cord, charging station l Use AC 220-240V socket. l Periodically wipe off dust, etc. from the plug with a dry cloth. l Make sure to fully insert the plug. l Disconnect the plug from the socket when performing charging station maintenance. If the cord is damaged, it must only be replaced by the Hitachi authorized service agent in order to avoid a hazard. l Do not damage the cord. [Do not damage, tamper, unreasonably bend, pull, twist, tuck, or place heavy objects on the cord, etc.] l Do not use damaged cords and plugs, or loose socket. l Do not let the cord get caught in the rotating rotary brush. l Do not insert or disconnect with wet hands. l Do not charge using a combination other than the included charging station and stick cleaner. l Do not use the included charging station to charge other types of rechargeable batteries or non-rechargeable batteries. l During charging, the stick cleaner with the charging station must be placed in a well ventilated area. Doing so may cause fire or electrical shock. Power head l Do not touch the rotating rotary brush or safety switch. Do not touch. Safety switch This may cause injury. Be careful especially for children. l Do not place the power head on parts of your body (on top of your feet, etc.) when pulling the power head. Rotating rotary brush This may cause injury. E-5 TS_PV-XA100.indd 5 7/10/2014 11:55:33 AM Safety precautions Handle, others Doing so may cause injury. l Do not vacuum or use near flammable objects, combustibles, or fires [kerosene, gasoline, thinner, benzene, toner, combustible gas (sprays), cigarette butts, etc.]. l Do not vacuum pointed objects (such as thumbtacks, needles, or toothpicks). l Do not vacuum foaming substances such as carpet cleaners. l Do not wash with water or use in the bathroom (except for parts that may be washed with water). Kerosene Gasoline Solvents Toner, iron powder, cleansers, large amounts of flour, etc. Combustible gas l Do not hold the area around the rotating section of the stick cleaner handle when folding or extending the stick cleaner handle. Foaming substances such as carpet cleaners Thumbtacks, needles, toothpicks These may cause eruption, fire, electrical shock, or injury. CAUTION Socket, plug, cord When disconnecting the plug, hold and pull the plug at the zz end, not the cord. Damaging the cord and shorting it may cause electrical shock or fire. zz Do not use while the cord is wound around the charging station. Hold the plug. Damaging the cord may cause electrical shock or fire. Power head zzDo not block the power head and operate for long periods of time. Doing so may cause fire or stick cleaner and power head deformation due to overheating. Do not block. zzDetach the power head from the stick cleaner when performing maintenance. This may cause injury. Exhaust Do not block the exhaust. zz Doing so may cause fire or handy cleaner and power head deformation due to overheating. Do not expose your body to the air released from the zz exhaust for long periods of time. Doing so may cause low-temperature burns. Do not expose your body for long periods of time. E-6 TS_PV-XA100.indd 6 7/10/2014 11:55:34 AM Safety precautions Handle, others When carrying the stick cleaner, do not hold the handy cleaner handle. zz The stick cleaner may fall and cause injury or damage the floor. Keep away from fire. zz Shorting due to body deformation may cause electrical shock or fire. Flames may grow larger due to exhaust and cause fire. Notes on use Do not prop up the stick cleaner while it is operating. zz Do not leave the stick cleaner unattended while it is propped up. zz Set it on the charging station when storing. zz The stick cleaner may fall and cause injury or damage the floor. Discontinue operation when performing stick cleaner or handy cleaner maintenance. zz This may cause injury. Do not carry the cleaner while it is set on the charging station. zz The stick cleaner may fall and cause injury or damage the floor. l Children should be supervised to ensure that they do not play with the appliance. l This appliance is not intended for use by persons (including children) with reduced physical, sensory or mental capabilities, or lack of experience and knowledge, unless they have been given supervision or instruction concerning use of the appliance by a person responsible for their safety. l Only allow children at least 8 years old to use the charging station. Give sufficient instruction so that the child is able to use the charging station in a safe way and explain that it is not a toy and must not be played with. l Instruct the child not to try and recharge non-rechargeable batteries because of the danger of eruption. l Example the charging station regularly for damage, especially the cord, plug and enclosure. If the charging station is damaged, it must not be used until it has been repaired. Notes on use To prevent malfunctions, etc., follow the directions below. Also, for proper use, please read the Note in the main text thoroughly. Do not subject the power head to strong physical shock. zz Do not ride on the stick cleaner, nozzle, or the zz Doing so may cause damage. charging station. Doing so may cause malfunctions. Do not vacuum the following objects. zz Doing so may cause abnormal odors or malfunctions. zz Thoroughly air dry parts washed with water. • Water or liquids • Wet objects • Desiccants (moisture absorbents) • Large amounts of sand or powder • Long threads • Glass Failure to do so may cause abnormal odors or malfunctions. E-7 TS_PV-XA100.indd 7 7/10/2014 11:55:34 AM How to charge Please charge the cleaner before use, as it is not charged at the time of shipment. (Standard charge time is approx. 4 hours.) 1 Insert the plug of the charging station into the socket. CAUTION Risk of electrical shock or fire. zz Do not wind the cord around the charging station. Hold the plug. 2 Set the stick cleaner nozzle on the charging station. zz Insert the charging station protrusion into the attachment groove of the stick cleaner. zz The indicator lamp lights up in red when the stick cleaner is set on the charging station. zz If the indicator lamp does not light up in red, re-set the stick cleaner on the charging station. zz When fully charged, the indicator lamp turns off. Attachment groove Indicator lamp Charging station Protrusion Stand zz Charge with the handy cleaner attached to the stick cleaner. zz If you remove the stick cleaner from the charging station while the indicator lamp is off and then set it on the charging station again, the indicator lamp will turn on, which is normal. zz The standard charge time is approx. 4 hours. However, the charge time may vary depending on usage. zz The stick cleaner or charging station may become hot while charging, which is normal. CAUTION Note Risk of injury or damage to the floor. zz When disconnecting the plug, hold and pull the plug at the end, not the cord. zz If you have left the cleaner unattended without charging it for a long period of time (10 days or more), charge it for 4 hours or longer before use. (Failure to charge may impair battery performance.) zz To prolong battery life, charge regardless of the operating time. zz When you use the cleaner for the first time or when you have not used it for a long period of time, the battery may be over-discharged and charge time may be long or operating time may be short. zz If you will not use the cleaner for a long period of time (10 days or more), disconnect the plug from the socket. E-8 TS_PV-XA100.indd 8 7/10/2014 11:55:34 AM How to operate Stick cleaner 1 Remove the stick cleaner from the charging station. Stick cleaner handle zz Hold the stick cleaner handle and pull the stick cleaner upward. How to charge Press the control button of the stick cleaner. zz The indicator lamp lights up in green, the LED lights turn on, and operation begins. zz Every time the control button is pressed, operation switches in this loop order: "High" > "Standard" > "Power off". zz To stop operation, switch to "Power off". The indicator lamp and LED lights turn off and operation stops. Control button How to operate 2 Power High/Standard/Off CAUTION Risk of injury or damage to the floor. Indicator lamp zz Do not prop up the stick cleaner while it is operating. LED lights zz The rotary brush of the power head does not rotate even if you press the control button of the handy cleaner. Press the stick cleaner control button. Handy cleaner 1 Detach the handy cleaner. zz Press the release button to detach while holding the stick cleaner in place. Release button CAUTION Risk of malfunction. Do not attach or detach the handy cleaner during operation. zz Handy cleaner Risk of injury or damage to the floor. Do not prop up the stick cleaner while the handy cleaner is detached. zz The stick cleaner will become unstable. Set it on the charging station, zz lean it against an object so that it does not fall, or lay it down on the floor. 2 Press the control button of the handy cleaner. zz The indicator lamp lights up in green and operation begins. zz Every time the control button is pressed, operation switches in this loop order: "High" > "Power off". zz To stop operation, switch to "Power off". The indicator lamp turns off and operation stops. Indicator lamp Control button Power On/Off E-9 TS_PV-XA100.indd 9 7/10/2014 11:55:35 AM How to clean Stick cleaner Use in accordance with the floor type. zz You can clean proficiently by moving the power head back and forth across floor. Clean by moving back and forth. You can collect dust thoroughly when pulling back. Carpet zz When cleaning a new carpet for the first time, the cleaner may collect many loose threads. To prevent damage to the floor, move along the grain of the flooring. Flooring zz If dust remains on the floor after pulling the power head towards yourself, lift the power head and vacuum again. Risk of injury. WARNING Do not place the power head on parts of your body (on top of your feet, etc.) when pulling the power head. zz There is a risk of getting caught in the rotating rotary brush. Risk of damage to the floor. Do not leave the power head in the same position during operation. Do not firmly press the power head against the floor. CAUTION zz The floor may be damaged if it is easily damaged such as cypress or padded flooring*. *Padded flooring is flooring where the surface is cushioned using vinyl chloride, etc. Risk of damage to the floor. Brushes zz If dust gets tangled in the wheels, the wheels cannot rotate, Brushes Wheels which may cause wear and tear and floor damage. Periodically perform maintenance. (P.E-18) zz If the brushes, wheels, or rotary brush are worn out, please consult with the dealer as soon as possible. (We recommend replacing the Rotary brush brushes, wheels, and rotary brush at the same time) The safety switch of the power head When you lift the power head from the floor, the safety switch activates and the rotary brush stops rotating for your safety. Safety switch Stops Rotates zz For maintenance of the safety switch WARNING (P.E-17) Risk of injury. Do not touch the safety switch or the rotating rotary brush of the power head. zz The rotary brush may rotate. Be careful especially around children. E-10 TS_PV-XA100.indd 10 7/10/2014 11:55:35 AM Handy cleaner Using the crevice nozzle l This nozzle cleans narrow crevices and corners. For cleaning corners For cleaning crevice of a sofa l Use by attaching to the inlet of the handy cleaner. How to clean inlet Using the multi angle brush nozzle l Use by attaching the crevice nozzle or to the inlet of the handy cleaner. l It is a free rotating nozzle that can reach far above furniture and into crevices. Inlet CAUTION Risk of damage. Crevice nozzle l Do not press against areas that are particularly easy to be damaged, such as pianos. l You can change to various angles according to the area to be cleaned. l If you are using the nozzle with the brush removed, use it to collect dust on clothing, curtains, etc. You can rotate in 90° increments. You can remove the brush and perform maintenance. 3 angles are available. Brush Slide Risk of injury. WARNING l When changing the angle, do not hold the rotating section. Your hand may get pinched. l Do not rotate while your fingers are inserted into the inlet of the multi angle brush Inlet (do not nozzle. Your fingers may get pinched. insert fingers) Rotating section E-11 TS_PV-XA100.indd 11 7/10/2014 11:55:36 AM How to clean Note l When using the multi angle brush nozzle, do not let it fall from high places or add excessive force in the direction of the arrow in A . Doing so may result in damage. l You can wash the multi angle brush nozzle with water. After washing, thoroughly air dry before use. Vacuuming water may result in damage. l If fibrous dust clogs the end or interior of the multi angle brush nozzle, suction power is reduced, so remove the dust. Emptying the dust case l Cyclonic cleaners have the advantage of not requiring paper bags, but to clean with high suction power, we recommend frequent disposal of dust and filter maintenance. Note l Fine dust may disperse in the air when emptying the dust case. Empty the dust case in a well-ventilated environment such as outdoors, or wear a mask and avoid breathing in the dust. Checking the Max line Note l If you vacuum dust after exceeding the "Max line", the dust will spill from the inlet of the dust case. To clean with high suction power, we recommend frequent disposal of dust. l When you complete cleaning, stop operation and check the "Max line". l Empty the dust case before exceeding the "Max line". M ax Dust case Max line Detaching the dust case Detach the handy cleaner from the stick cleaner. (P.E-9) Dust disposal button Hold the dust case and handy cleaner, and remove while pressing the dust disposal button. CAUTION Risk of injury or damage to the floor. l Pressing the dust disposal button while not holding the dust case will cause the dust case to fall. Dust case E-12 TS_PV-XA100.indd 12 7/10/2014 11:55:36 AM Emptying the dust case 1 Remove the cyclone chamber. Handles Hold the two handles and remove the cyclone chamber from the dust case. l The dust may spill when removing the chamber. Remove it over a newspaper, etc. CAUTION Dust case Cyclone chamber Risk of injury. l You may have unintentionally vacuumed sharp objects such as glass shards or pins. Be careful when performing maintenance. Empty the dust case. Put the dust case into a large trash bag and empty it. Dust case Dust 3 Trash bag Attach the cyclone chamber to the dust case. Attach in the reverse order of removal. Dust case 4 Emptying the dust case 2 How to clean Note Cyclone chamber Attach the dust case to the handy cleaner handle. Insert the handy cleaner handle protrusion into the hole of the dust case. Handy cleaner Attach until you hear a "click" sound. Click Protrusion Dust case Hole l We recommend that you perform maintenance when you are concerned about dirt. (P.E-15) E-13 TS_PV-XA100.indd 13 7/10/2014 11:55:37 AM Stowing the cleaner How to store After using the stick cleaner Press the control button of the stick cleaner to stop operation. (P.E-9) Attachment groove Insert the stand protrusion into the attachment groove of the stick cleaner. (P.E-8) l When you set the cleaner on the charging station while it is operating, operation stops and charging begins. Protrusion Stand Charging station After using the handy cleaner Press the control button of the handy cleaner to stop operation. (P.E-9) Attach the handy cleaner to the stick cleaner. l When you set the cleaner on the charging station while it is operating, operation stops and charging begins. DANGER Risk of leaking, heat generation, rupture, or fire. Handy cleaner l Do not carry or store with metal necklaces, hairpins, etc. If you want more compact storage Hold the stick cleaner handle and press the handle storage button to release the handle lock. Stick cleaner handle Slowly rotate and fold. Risk of injury. WARNING l Do not hold the area around the rotating section of the handle when folding or extending the handle. Slowly rotate. Handle storage button CAUTION Note Risk of injury or damage to the floor. l When carrying the cleaner while it is set on the charging station, the stick cleaner may detach. l Do not leave the stick cleaner unattended while it is propped up. l Do not store in places of high temperature, such as near heaters or under direct sunlight for long periods of time. Doing so may cause malfunctions. E-14 TS_PV-XA100.indd 14 7/10/2014 11:55:37 AM Maintenance Stick cleaner, attachments, attachment accessories l Perform maintenance when you are concerned about dirt. Wring out a soft cloth soaked with water before wiping. WARNING Risk of eruption, fire, electric shock, or injury. l Disconnect the plug of the charging station from the socket when performing charging station maintenance. l Do not use flammable objects, combustibles (thinner, benzene), etc. CAUTION Risk of injury. l Discontinue operation when performing stick cleaner or handy cleaner maintenance. Stowing the cleaner Note l Do not use alcohol, cleansers, chemical dustcloths, etc. They may cause cracks or discoloration. Dust case, filters, cyclone chamber Note l Fine dust may disperse in the air when performing maintenance. Empty the dust case in a well-ventilated environment such as outdoors, or wear a mask and avoid breathing in the dust. Maintenance l Cyclonic cleaners have the advantage of not requiring paper bags, but to clean with high suction power, we recommend frequent maintenance. Dust case (Washing with water) 1 Remove the cyclone chamber from the dust case. Dust case 2 Wash the dust case with water. l Thoroughly air dry the dust case. (The drying time varies depending on the environment.) l Attach in the reverse order of removal. Cyclone chamber Dust case CAUTION Risk of injury. l You may have unintentionally vacuumed sharp objects such as glass shards or pins. Be careful when performing maintenance. E-15 TS_PV-XA100.indd 15 7/10/2014 11:55:38 AM Maintenance Cyclone chamber (Washing with water) 1 Remove the clean filter from the cyclone chamber. CAUTION 2 Risk of malfunction. Clean filter Cyclone chamber l Do not wash the clean filter with water. Open the cyclone chamber lid. Adjust the handle with "Release". Handles ase Rele Release Lo ck Lock Risk of injury. l You may have unintentionally vacuumed sharp objects such as glass shards or pins. Be careful when performing maintenance. Cyclone chamber lid 3 CAUTION Wash the cyclone chamber and cyclone chamber lid with water. se Relea Lock Note Cyclone chamber 4 Cyclone chamber lid l Gently remove the dust stuck inside before washing with water. Thoroughly dry it before closing the cyclone chamber lid. Attach in the reverse order of removal. Handles Lo ck ase Rele Release Lock Cyclone chamber lid E-16 TS_PV-XA100.indd 16 7/10/2014 11:55:38 AM Sponge filter (Washing with water), clean filter 1 Remove the sponge filter from the clean filter. Sponge filter 2 Gently press and wash with water. After washing, remove excess water and air dry it for approx. 12 hours. (The drying time varies depending on the environment.) Sponge filter Remove the dust stuck deep in the folds of the clean filter. Maintenance 3 Clean filter Put the clean filter into a trash bag and gently tap it against the floor approx. 5 times to remove the dust stuck inside. CAUTION Risk of malfunction. Face the side with the dust downward. l Do not wash the clean filter with water. l Do not scrub the clean filter with a brush, etc. Risk of damage. l If there a risk of damaging the floor, lay something thick first, such as a newspaper. 4 Gently tap against the floor. Trash bag Attach the clean filter. Sponge filter r mark se Lock Relea ax M Lock ase Rele Attach the sponge filter to the clean filter. Adjust the r marks of the cyclone chamber and clean filter and firmly press all the way. Adjust the r marks. Cyclone chamber Note 5 Clean filter l When attaching the clean filter, adjust the r marks of the cyclone chamber and clean filter and firmly press all the way. Attach the cyclone chamber to the dust case. Attach in the reverse order of removal. Dust case Cyclone chamber E-17 TS_PV-XA100.indd 17 7/10/2014 11:55:39 AM Maintenance Protective filter (Washing with water) 1 Remove the protective filter from the handy cleaner handle. 2 Gently press and wash with water. Protective filter Protective filter Note Handy cleaner l Tap to remove excess water and air dry it for approx. 12 hours. (The drying time varies depending on the environment.) l After it dries, attach it to the handy cleaner handle. l Do not use cleansers or bleach, and do not wash using a washing machine. Also, do not dry it with hot air such as that from a hair dryer. It may cause a deterioration in performance, damage, or deformation. l Install surely the dust case, cyclone chamber, sponge filter, clean filter and protective filter before operate. It may cause the motor trouble. Power head l Perform maintenance when suction power is weak or when you are concerned about dirt. l We recommend periodic maintenance (about once a month). Dust stuck to the safety switch, rotary brush, brush, wheels, air inlet, and rotating sections may cause reductions in suction power or malfunctions. CAUTION Risk of injury. l Detach from the stick cleaner when performing maintenance. Remove tangled dust Remove tangled dust using tweezers, etc. Rotating sections Wheels Tweezers Safety switch Air inlet Brushes Brushes Rotary brush Risk of damage to the floor. CAUTION Note l If dust gets tangled in the wheels, the wheels cannot rotate, which may cause wear and tear and floor damage. l If the brushes, wheels, or rotary brushes are worn out, please consult with the dealer as soon as possible. (We recommend replacing the brushes, wheels, and rotary brush simultaneously) l Do not subject the safety switch to excessive force. Doing so may cause damage. E-18 TS_PV-XA100.indd 18 7/10/2014 11:55:39 AM Brush maintenance. 1 Remove the brush holder. Flip over the power head and open the lever. Remove the brush holder. Brush holder Lever 2 Detach the rotary brush and remove dust. Remove dust. Tweezers Remove the dust tangled in the groove using tweezers, etc. Wash the rotary brush with water. Groove Rotary brush Note 3 Maintenance Cut and remove dust tangled in the rotary brush using scissors, etc. Scissors l Do not use cleansers, bleach, etc. Doing so may cause discoloration, deformation, etc. l After washing the rotary brush with water, thoroughly air dry it before attaching it. Attach the rotary brush. Adjust the rotary brush with the groove. Attach to its original position. Groove 4 Attach the brush holder. Insert the hook. Attach the brush holder. Close the lever. Hook Note お願い When attaching the brush holder, fasten the hook first. Failure to do so may cause damage. ●ブラシホルダーを取り付ける際には、つめを先に引っ掛けてください。破損の原因となります。 E-19 TS_PV-XA100.indd 19 7/10/2014 11:55:40 AM Troubleshooting Before requesting for repair Check the following points again The body does not operate or the rotary brush of the power head does not rotate. The safeguard may be operating. Release the safeguard with the following instructions. The rotary brush of the power head does not rotate. Safeguard and cause If the cleaner continues to operate with a foreign substance in the rotating rotary brush, the rotary brush will stop rotating automatically to prevent the motor from heating up. Foreign substance stuck in cleaner Pressed against the floor, carpet, etc. Press the control button of the stick cleaner to stop operation. Instructions Remove the foreign substance from the rotary brush. (P.E-17, E-18) Do not firmly press the power head against the floor or carpet. The safeguard is released after a few minutes, and you can use the cleaner again. E-20 TS_PV-XA100.indd 20 7/10/2014 11:55:40 AM Other problems Problem Suction power is weak. The cleaner does not operate. Operation stops. Operating time is short even after charging. Things to check Countermeasure Page Is the remaining battery level low? Set the stick cleaner on the charging station for charging. P.E-8 Is the dust case full of dust? Emptying the dust case. P.E-13 Is dust stuck in the filters? Clean the filter. P.E-16 P.E-18 Is dust clogging the cyclone chamber Remove the dust. inside the dust case? P.E-17 Is dust clogging the power head? Remove the dust. P.E-18 P.E-19 Is the remaining battery level low? Set the cleaner on the charging station for charging. P.E-8 Is the cleaner set on the charging station? Detach it from the charging station. - Is the handy cleaner securely attached to the stick cleaner? Securely attach it. P.E-14 Is the remaining battery level low? Set the cleaner on the charging station for charging. P.E-8 Did you leave the stick cleaner unattended The battery capacity may be for a long period of time without charging it? temporarily recovering poorly. Repeat the procedure of using the Have you repeatedly charged the battery after finishing using the stick cleaner while the battery cleaner until the battery is exhausted was not completely discharged? (Memory effect) and charging fully 2 or 3 times. P.E-8 Is the battery exhausted? If the operating time is particularly short even after charging correctly, the battery is exhausted. Please consult with the Hitachi authorized service agent. - - The handy cleaner or charging It gets warm due to the flow of electrical current to the control circuit, which station is warm (while charging). is normal. - washing? After washing, thoroughly air dry the filters. P.E-15 ~ P.E-18 P.E-15 ~ P.E-18 Is the remaining battery level low? Set the cleaner on the charging station for charging. P.E-8 Is the handy cleaner control button pressed? Press the stick cleaner control button. P.E-9 Is dust clogging the filters, dust case, or An abnormal odor is cyclone chamber? coming from the Are the filters thoroughly dried after exhaust. The rotary brush of the power head does not rotate or rotates poorly. Clean the filter. Is the handy cleaner securely attached to the stick cleaner or power Securely attach it. head? Is the power head not touching the floor? The power head is designed to stop when it is lifted from the floor. Place the power head on the floor. Is dust stuck to the rotary brush, safety Remove the dust. switch, etc.? Troubleshooting The exhaust or handy The motor is being cooled via air flow, which is normal. cleaner is warm (during operation). P.E-2 P.E-10 P.E-18 P.E-19 E-21 TS_PV-XA100.indd 21 7/10/2014 11:55:40 AM Troubleshooting Problem Things to check The LED lights do not turn on or are dim. There is a clattering sound coming from the power head. There is an abnormal sound coming from around the dust case. The indicator lamp does not light up in red even when the stick cleaner is set on the charging station. Countermeasure Page Is the remaining battery level low? Set the cleaner on the charging station for charging. P.E-8 Is the handy cleaner control button pressed? Press the stick cleaner control button. P.E-9 - The safety switch is designed to produce the sound, which is normal. Are the clean filter and dust case securely attached? Securely attach it. P.E-13 P.E-16 Is the cyclone chamber lid firmly closed? Firmly close it. P.E-17 Is the plug of the charging station firmly inserted into the socket? Firmly insert the plug. P.E-8 Is the stick cleaner securely set on the charging station? Securely set it. P.E-8 Is the handy cleaner securely attached to the stick cleaner? Securely attach it. P.E-14 Is the battery fully charged? When fully charged, the indicator lamp turns off. P.E-8 Are the metal contacts of the charging Remove any dirt on the contacts with station or stick cleaner dirty? a dry cloth. The indicator lamp alternately flashes in red and green when the stick cleaner is set on the charging station. The indicator lamp flashes in red when the stick cleaner is set on the charging station. Does the cleaner not operate or is operating time short? The battery is exhausted. Please consult with the Hitachi authorized service agent. - - The handy cleaner is malfunctioning. Detach it from the charging station and consult with the Hitachi authorized service agent. - Do not attempt to repair it yourself. Please consult with the dealer. - If the problem persists When disposing of the product This product uses a nickel-metal hydride battery. Nickel-metal hydride batteries are a valuable, recyclable resource. l The battery is built into the handy cleaner handle. l The battery is a consumable. If the operating time is particularly short even after fully charged, there is a problem with the battery life. Replace the handy cleaner handle of the replacement parts. (P.E-23) For matters concerning the disposal of used products, we request that you inquire at your local governing policy and cooperate with recycling regulations. *Recycling rules may vary depending on the local governing policy. E-22 TS_PV-XA100.indd 22 7/10/2014 11:55:40 AM Replacement Parts Crevice nozzle Multi angle brush nozzle No. PV-BA100-017 When ordering No. PV-XA100-910 When ordering Handy cleaner handle Protective filter Clean filter with Sponge filter Rotary brush No. PV-XA100-903 (Champagne) No. PV-XA100-904 (Red) When ordering No. PV-BA100-005 When ordering No. PV-BA100-009 When ordering No. PV-BA100-013 When ordering l When replacing the battery, also replace the handy cleaner handle. (The battery is built into the handy cleaner handle.) l Since batteries are consumables, a fee will be charged. Specifications Dimensions Weight Stick cleaner (L × W × H) Handy cleaner (L × W × H) Stick cleaner Handy cleaner Attachm e n t s Attachme n t a c c e s s o r i e s 250mm × 280mm × 685mm Power head ···························································· 1 pc. Charging station (Base, Stand)······················ 1 pc. each Crevice nozzle························································· 1 pc. Multi angle brush nozzle · ········································1 pc. Replacement Parts Specifications Input Output Charging Charge time station Cord length Outer dimensions (L × W × H) Weight Dimensions when stored (L × W × H) Dimensio n s w h e n s t o r e d (with stick cleaner handle folded) (L × W × H) Cordless Stick Cleaner PV-XA100 DC14.4V 1,500mAh 64dB 0.25L Nickel-metal hydride battery (12 cells) (built into handy cleaner handle) High: Approx. 12 minutes (At full charge, new battery, 20°C) Standard: Approx. 30 minutes 170mm × 270mm × 1,100mm 420mm × 115mm × 127mm 2.8kg 1.4kg AC220-240V 50-60Hz 0.25A DC18.5V 0.4A Approx. 4 hours 1.2m 205mm × 280mm × 340mm 1.2kg 205mm × 280mm × 1,150mm Troubleshooting When disposing of the product Product n a m e Model na m e Rated voltage Nominal capacity Operating noise Dust collection capacity Battery Body Continuous operating time E-23 TS_PV-XA100.indd 23 7/10/2014 11:55:41 AM