1
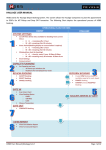
eTransport User Manual
Stirling Solutions
eTransport Administrators Manual
1
eTransport User Manual
Index
Admin Help ........................................................................................................................................... 25
Administration Options - Overview ........................................................................................................ 6
Authorising Jobs ..................................................................................................................................... 7
eTransport Reports ............................................................................................................................... 17
Customer Jobs Added Today............................................................................................................. 17
Delivery Manifest .............................................................................................................................. 17
Delivery Note .................................................................................................................................... 17
My Jobs Added Today ....................................................................................................................... 17
Sticky Labels ...................................................................................................................................... 17
Traffic Jobs Added Today .................................................................................................................. 17
Web Labels ........................................................................................................................................ 17
Web Tickets ....................................................................................................................................... 17
Exclusion Dates ..................................................................................................................................... 15
Adding New Dates............................................................................................................................. 15
Editing An Exclusion Date ................................................................................................................. 16
Removing An Exclusion Date ............................................................................................................ 16
Global Service Levels ............................................................................................................................. 21
Adding A New Global Service Level .................................................................................................. 21
Removing A Global Service Level ...................................................................................................... 21
Global Surcharges ................................................................................................................................. 22
Adding A Global Surcharge ............................................................................................................... 22
Removing A Global Surcharge........................................................................................................... 22
Hide Controls ........................................................................................................................................ 23
Applying Hide Contols To A User ...................................................................................................... 24
Changing The Access To Analysis & User Defined Codes.................................................................. 23
Introduction ............................................................................................................................................ 4
Logging On .............................................................................................................................................. 5
News Articles ........................................................................................................................................ 18
Adding A New Article ........................................................................................................................ 18
Posting Jobs............................................................................................................................................. 8
eTransport........................................................................................................................................... 8
Stirling Transport ................................................................................................................................ 9
Services ................................................................................................................................................... 6
Special Instructions ............................................................................................................................... 13
Adding New Instructions ................................................................................................................... 13
Removing Instructions ...................................................................................................................... 14
Terms And Conditions ........................................................................................................................... 14
Adding A New Version ...................................................................................................................... 14
Themes .................................................................................................................................................. 24
User Account
Accounts Filter .................................................................................................................................. 12
Applications....................................................................................................................................... 11
Company Depot ................................................................................................................................ 12
Company Name................................................................................................................................. 11
Cut Off Time ...................................................................................................................................... 12
Deleting A User ................................................................................................................................. 13
Display Jobs Not Older Than ............................................................................................................. 12
Edit User Service Levels .................................................................................................................... 12
Edit User Surcharges ......................................................................................................................... 12
2
eTransport User Manual
Email.................................................................................................................................................. 11
Enable Full , Half, Quarters ............................................................................................................... 12
Enable Service Levels ........................................................................................................................ 12
Enable Surcharges ............................................................................................................................. 12
First Name ......................................................................................................................................... 11
Home Page URL................................................................................................................................. 12
Password ........................................................................................................................................... 11
Roles .................................................................................................................................................. 11
Security Answer ................................................................................................................................ 11
Security Question .............................................................................................................................. 11
Show Home Page News .................................................................................................................... 12
Sub Account ...................................................................................................................................... 12
Surname ............................................................................................................................................ 11
Title ................................................................................................................................................... 11
User Terms And Conditions .............................................................................................................. 12
Username .......................................................................................................................................... 11
3
eTransport User Manual
Introduction
This document is intended for use as a reference manual for users of the eTransport application
provided by your haulier and allows the end user, depending upon the permissions they are given,
to:
•
•
•
•
•
Add new jobs for the transport company
View any existing jobs that the haulier is or has worked on
Search for jobs using various criteria
View POD’s online
Be kept up to date with the progress on a job through to delivery
Note: The screens displayed within this manual may vary slightly due to them being modified to suit
the business.
4
eTransport User Manual
Logging On
1. Open Internet Explorer and enter the web site address as listed on the previous page.
2. Once the screen below is displayed enter your login details and then click on the ‘Login’
button.
3. If you happen to get either the ‘Username’ or ‘Password’ incorrect then the screen below
will be displayed. Try re-entering your login details again but if the problem persists then you
will need to contact your haulier so that they can re-set your login details.
4. A successful login will display a screen similar to the one below with all the options available
displayed down the left side of the screen.
5
eTransport User Manual
Once you have logged in clickmon the ‘+’ next to the ‘Admin’ menu option to display the list
of administrative tools available.
Administration Options
Option
Services
Use
Users
•
•
•
View the number of jobs that require authorisation
View the number of jobs that are ready for posting
Setup new and edit existing users
Special Instructions
•
Add, edit and delete the eTransport Special Instructions
for both collections & deliveries
Terms and Conditions
•
Add, edit and delete the Terms and Conditions of business
Exclusion Dates
•
Reports List
•
News Articles
•
Global Service Levels
•
Setup up exclusion dates when customer job entry will be
restricted
Setup and select which reports the eTransport user will be
able to run.
Add, edit and delete the news articles that appear on the
first page after logging in
Add, edit and delete the Global Service Levels
Global Surcharges
•
Add, edit and delete the Global Surcharges Levels
Hide Controls
•
Themes
•
Changes whether or not the Analysis Codes and User
Defined fields are visible to users on a global basis
Change the appearance of eTransport
Admin Help
•
Help files to assist you in the use of the administrative
options within eTransport
Services
The services screen displays the current position of jobs that customers have input into the system
via eTransport.
N.B. If your eTransport system has been set up to automatically process jobs you may find that the
numbers against both the jobs requiring authorisation and those that require posting is always ‘0’.
6
eTransport User Manual
Authorising Jobs
If a user has entered a job into eTransport after the time that you specified as the ‘cut-off’ time then
the job will need to be authorised. The number of jobs requiring your attention will be listed here.
To Authorise Jobs
N.B. You will need to be logged into eTransport as either an administrator or customer service user
to be able to do this.
1. From the menu select ‘Admin – Services’ and a screen similar to the one below will be
displayed.
2. The number of jobs awaiting authorisation will be displayed and when you click on the
‘Authorise’ button the list of jobs awaiting authorisation will be displayed together with their
details so you can decide if you wish to accept the work.
3. To select a job for authorisation place a tick in the left of the two columns by clicking in the
square or if you do not wish to accept it then place a tick in the right of the two columns. It is
possible to select all the jobs for either acceptance or rejection by using the tick boxes at the
top of the screen.
4. To authorise the selected job/s click on the
icon or on the
icon to reject it/them.
If a job is rejected the customer will be able to see this in the ‘Status’ column within the
‘Jobs List’ screen. They will then be able to edit the job, correcting why they think that the
job was rejected, and then resubmit it. If the job then meets the correct criteria then it will
not require re- authorisation and will go straight to the list of jobs awaiting posting.
7
eTransport User Manual
Posting Jobs
If your system is set up so that you keep control of when the jobs are posted from the eTransport
system to the Transport application then you will need to post the job/s.
This is a two stage process where the job/s are posted from eTransport to an interim location and
then imported into Transport, either or both of these steps can however be automated but please
bear in mind that if it is fully automated then you will have no control over when jobs will appear in
Transport.
Post Jobs In
eStirling
eTransport
Jobs
Post Jobs In
Transport
Interim Table
Stage 1
Stage 2
Transport
Jobs
Posting Jobs – Stage 1 (eTransport To The Interim Table)
1. From the menu select ‘Admin – Services’ and a screen similar to the one below will be
displayed with the number of jobs awaiting posting displayed.
2. Click on the ‘Post’ button to start the posting process and a list of jobs that are waiting to be
posted will be displayed from which you can select the jobs that you wish to accept.
3. To select a job/s to post by placing a tick in the left of the two columns by clicking in the
square or if you do not wish to accept it then place a tick in the right of the two columns. It is
possible to select all the jobs for either acceptance or rejection by using the tick boxes at the
top of the screen.
8
eTransport User Manual
4. To authorise the selected job/s click on the
icon or on the
icon to reject it/them.
If a job is rejected the customer will be able to see this in the ‘Status’ column within the
‘Jobs List’ screen. They will then be able to edit the job, correcting why they think that the
job was rejected, and then resubmit it. If the job then meets the correct criteria then it will
not require re- authorisation and will go straight to the list of jobs awaiting posting.
Posting Jobs – Stage 2 (The Interim Table To Transport)
In the Stirling Transport program select from the menu ‘File – Import Jobs – Link App’ and
then click on the ‘Go’ button. The jobs that are waiting to be imported will start to import
and confirmation of the progress will be displayed in the lower part of the screen.
9
eTransport User Manual
Users
This option is used to set:
• Up new & maintain existing users within the online system
• Which applications the user can have access to and what the user is able to do within these
applications
• A ‘Cut Off’ time after which any jobs entered will require authorisation
• Whether or not the user can view any news items posted
• How far back the user can view jobs
• The format that they can enter pallets, full, halves & quarters
• The service level/s and surcharge/s available
• The depot that user belongs to (if linked to a multi-depot system)
• Which ‘Terms & Conditions’ are applicable to the selected account/s
• Which sales account/s they can view job details for
Setting Up A New User
To set up a new user:
1. From the ‘Admin’ menu options select ‘Users’ and a list of any existing users will be
displayed is a screen similar to the one below
2. To add a new user select the application that you want the new user to have access to from
the application drop down box.
3. Enter the account code of the sales account the user is to be linked to in the ‘Accounts Filter’
box. As you type in the account code the first of the sales accounts that fit the criteria
entered will be displayed in the ‘Accounts’ box, when you have entered enough of the code
click on the drop down to see a full list. Select the account from this list.
10
eTransport User Manual
4. Click on the ‘Add User’ button to add a new user to the selected account and then complete
the required details as follows:
Field Name
Title
First Name
Required
No
No
Surname
Username
No
Yes
Password
Yes
Company Name
Email
Security Question
Yes
No
No
Security Answer
Applications
No
Yes
Select User/Application
Settings
Roles
Yes
Yes
Details
Title of the user
The first name of the user. If this is completed
then eTransport will display the name on the
welcome screen otherwise it will display the
login name.
Last name of the user
The name the user will use to log into the
eTransport system
The users password. The user is able to change
this once they have logged in the firs time
Name of the company the user is linked to
Email address of the user
Question used to verify the user should a
username or password be forgotten, select
from the drop-down box
Answer to the above question
Select the application/s you wish the user to
have access to.
Select the default application for this user.
All users will need ‘Allow Access (Guest)’
combined with one of the other roles to access
the system.
• Admin – User has administrative rights
within eTransport
• User – User can enter, view and search
jobs as well as view POD’s on the
system
• Allow Access (Guest) – All users must
have this selected to be able to access
the eTransport system
• Customer Services – A user who works
for the haulage company and needs
access to authorise and post jobs
11
eTransport User Manual
POD Viewer – Can view and search for
jobs as well as view POD’s but cannot
add new jobs
The time after which any job entered for
todays date would require authorisation
If you want the user to view a different home
page then enter the URL here
Whether or not you want the user to be able
to see posted news items
How far back you would like the user to be
able to search/view historical jobs
Used if you have set up a relationship with
The pallet sizes you would like the users to be
able to enter. If none are selected then they
will only be able to enter a quantity
Adding user based service levels. Used if you
want the user to have different service levels
from the global ones. Only available after you
have saved the user.
Adding user based surcharges. Used if you
want the user to have different surcharges
from the global ones. Only available after you
have saved the user.
Which, if any, service levels the user can select
from. (Global are set up elsewhere within the
admin option.)
Which. If any, surcharge code the user can
select from. (Global are set up elsewhere
within the admin option.)
Used if the haulage company is running the
multi-depot version of Traffic Desk. Select
which depot the customer would be entering
jobs for.
Select from the list which set of Terms &
Conditions apply to this user. Only available
after you have saved the user.
For use with Palletways customers to whom
you are going to provide Palletways preprinted labels to.
Used to filter out the sales account if you wish
to add more than one account to this user.
(May be used if you have a customer who has
more than one account / site or for a member
of your sales team who is responsible for
•
Cut Off Time
No
Home Page URL
No
Show Home Page News
No
Display Jobs Not Older Than
No
Sub Account
Enable Full , Half, Quarters
No
No
Edit User Service Levels
No
Edit User Surcharges
No
Enable Service Levels
Yes
Enable Surcharges
Yes
Company Depot
– Only displayed if you are
running a multi-depot
transport system
User Terms And Conditions
Yes
Generate Pallet Barcodes
No
Accounts Filter
No
No
12
eTransport User Manual
Save Button
multiple accounts.
Saves the data / changes that you have made
for this user.
Yes
Deleting A User
If you want to remove a user from the list of users then enter the screen with all the usernames
displayed and then scroll across to the very right hand edge where you will see a red ‘X’. Click on the
‘X’ to remove the user permanently.
N.B. It is not possible to reverse this so you need to be sure you want to do this. If you just need to
temporarily stop the user having access then you could just change their password instead.
Special Instructions
These are instructions that the user can select when entering a job, both on collection and delivery,
which will appear in the Transport job in the Collection or Delivery Instructions. It does not stop the
user adding extra instructions as well.
To Add Instructions
1. From the menu select ‘Admin – Special Instructions’ and a list of any existing instructions will
be displayed
2. Click on the ‘Add’ button to add a new instruction and you will see a screen as below.
Complete the details as follows:
• Name – The name of the Special Instruction as you would like the customer to see it.
• Code – The three letter code for Special Instruction as you would like it to appear in
the collection or delivery instructions in Transport.
13
eTransport User Manual
•
•
Service Type – Whether this instruction is a collection or delivery instruction. You
will need to add a special instruction twice if you want it to be available for both
collection & delivery.
Internal Code – Ignore this as it will complete itself.
3. Click on the ‘Save’ button to save the instruction and add it to the list.
Removing A Special Instruction
If you wish to permanently remove a ‘Special Instruction’ from the list then scroll across to the right
edge of the list of Special Instructions and click on the red ‘X’ and then confirm that you wish to
delete it.
N.B. This is not reversible to only do this if you are completely sure you wish to remove it.
Terms And Conditions
The Terms & Conditions are allocated against a user when you set them up with the user having to
agree to them the first time that they log into eTransport system. You can have as many different
versions of Terms & Conditions on the system as you need but they will all need to be written in
‘HyperText Markup Language (HTML)’ so that the eTransport system is able to read the file.
If you feel that you are confident in doing do you can edit the existing or add new terms and
conditions using Microsoft® Word or any other HTML editing package. If using MS Word make sure
that when you save the file that it is saved as a web page, not a single page web page.
A copy of the existing T & C can be found on the web server in the following folder:
C:\Inetpub\wwwroot\eStirling\eTransport\TermsAndConditions
By default there is only one copy of the T & C’s on the system and will display the following text:
Please contact us for details of our current terms and conditions.
To Add A New Version Of Terms & Conditions
1. Create the new version using one of the methods suggested above and save the file into the
following location on the webserver:
14
eTransport User Manual
C:\Inetpub\wwwroot\eStirling\eTransport\TermsAndConditions
2. In eTransport select from the Admin menu ‘Terms and Conditions’
3. In the ‘Name’ enter the name of the new version of your Terms and Conditions so
that you can tell this one from the rest.
4. In the ‘File Name’ enter the name of the new webpage file that you copied onto the Web
Server exactly as you saved it.
5. If you want the new Terms and Conditions t be visible then ensure that there is a tick in the
box.
6. Save you new entry by clicking on the ‘Save’ button.
Exclusion Dates
It is possible for you to stop any users using of eTransport by adding certain date to the Exclusion
Dates of to only allow jobs that have been authorised by someone within your business.
Adding A New Exclusion Date
1. From the admin menu select ‘Exclusion Dates’ and list of all the existing exclusion dates will
be displayed.
15
eTransport User Manual
2. Click on the ‘Add’ button to add a new date.
3. In the ‘Name’ field enter a name for the date that you are going to ‘Close’.
4. Add the date that you are closing the system for in the ‘Date’ box in the format of
‘DD/MM/YYYY’
5. The ‘Allowed If Authorised’ tick box will allow users t enter job onto the system for collection
or delivery on this date but the user will be advised that the job will need to be authorised
by a representative from your company. (If you decide that you wish to use this facility then
please contact Stirling Solutions on 01530 811000 so that your eTransport configuration can
be checked.)
6. Click on the ‘Close’ button to save the entry.
To Edit An Exclusion Date
If you want to edit an Exclusion Date that has been entered:
1. Log in the same way as above so that the list of Exclusion Dates are displayed.
2. Locate the date that you wish to change and then click on the
line.
icon at the beginning of the
3. Make the required changes and then click on the ‘Save’ button.
Removing An Exclusion Date
If you wish to remove an Exclusion Date that has been entered:
1. Log in the same way as above so that the list of Exclusion Dates are displayed.
2. Locate the date that you wish to remove and click on the red ‘X’ at the end of the line.
16
eTransport User Manual
eTransport Reports
When the eTransport system is initially installed there will be a selection of reports that you can
make available to the people using eTransport. By default all of these report are ‘hidden’ so that the
normal user cannot see them allowing you to decide what they can produce reports for. Some of
the reports will also require the user to select the job/s that they want report/s for.
These default reports are as follows:
Default Report Name
What The Report Displays
My Jobs Added Today
Displays a list of all the jobs that the user has entered
for the current day.
Can be produced at any time.
A list of all the jobs that have been entered for that
customer for the current day.
Can be produced at any time.
Lists all the jobs that the Transport Office have added
including those that have been imported.
Can be produced at any time.
Produces labels for the customer to place on to items
that they require you to handle.
Can only be produced for jobs that have been imported
into Traffic Desk
Prints out a Delivery Note for each of the jobs that have
been selected.
Can only be produced for jobs that have been imported
into Traffic Desk
Produces a Manifest for the driver listing all the
selected jobs.
Can only be produced for jobs that have been imported
into Traffic Desk
Produces labels for the customer to place on to items
that they require you to handle.
Can only be produced for jobs that have not been
imported into Traffic Desk
Prints a Delivery Note for each of the selected jobs.
Can only be produced for jobs that have not been
imported into Traffic Desk
Customers Jobs
Added Today
Traffic Jobs Added
Today
Sticky Labels
Delivery Note
Delivery Manifest
Web Labels
Web Tickets
Job Selection
Required
No
No
No
Yes
Yes
Yes
Yes
Yes
To change the settings for a report:
1. Open the list of available reports from the ‘Admin’ menu option and the list will be
displayed.
17
eTransport User Manual
2. To change the setting for a report click on the
icon at the beginning of the report.
3. You can now change:
a. Description - The description of the report as viewed by the end user.
b. File Name – This is the name of the report that is stored on your server. You will
need to get Stirling Solutions to write the report if you do not have the software to
do this.
c. Report Number – This relates to part of the program so please check with Stirling to
find the correct code if you need to add one.
d. Report Type – If ‘Not Set’ is selected then the report will be available for imported
jobs, Pre-Posted reports are for reports prior to import into Transport.
e. Hide – If this is ticked the report will not be available to the end user.
News Articles
It is possible to add new article to the opening page of eTransport so that you can pass information
to your customers. This will be displayed as the news headline and then a couple of lines of the
article. It is possible to add a little more detail to the article if you are able to produce the text in
HTML (web page text).
Adding A New News Article
1. From the Admin menu select ‘News Articles’ and a list of any existing news articles will be
displayed.
18
eTransport User Manual
2. To add a new news article click on the ‘Add’ button to display the screen below:
3. Add the following details for the news article:
a. Name – Add a name for the news article. This would be the same as a news headline
if the article was in a magazine or newspaper.
b. Date Posted – This date will complete itself with the date that the article is created.
c. Date Expires – The date until which you want the article to be seen on the opening
page of eTransport. (Note: The article will be viewable until midnight of this date .)
d. Visible – Whether you want the article to be displayed on the opening page of
eTransport. If you wanted the article not to appear for a couple of days or your are
planning ahead then you can have the article setup but leave the ‘Visible’ option
unticked.
e. Article Content – The body of the article, add all the details for the article in this
area. You can copy and paste text from other locations i.e. Microsoft® Word. If you
have the knowledge it is also possible to insert HTML text where you can control the
formatting of the article a little better.
19
eTransport User Manual
Normally when you view a news article on the Home page you will see the headline
and then some of the news article which some people do not like the look of. It is
possible by using the text below in the ‘Article Content’ part of the page so make it
so only the name of the article appears on the home page and then when a user
clicks on the link they can view the full article.
<!DOCTYPE html PUBLIC "-//W3C//DTD XHTML 1.0 Transitional//EN"
"http://www.w3.org/TR/xhtml1/DTD/xhtml1-transitional.dtd">
<html xmlns="http://www.w3.org/1999/xhtml"><head>
<meta http-equiv="Content-Type" content="text/html; charset=iso-88591" />
<title>ADD THE HEADLINE IN HERE</title>
</head>
<body>
ADD THE ARTICLE CONTENT IN HERE
</body>
** NB ** Replace the bold text with your article details.
f.
Once you have entered all the information for the news article click on the ‘Save’
button to save the changes and add it to the list of articles.
4. To view the new entry select the ‘Home’ menu option from the menu on the left of the page
and as long as the user has permission the news headline/s will be displayed.
20
eTransport User Manual
Global Service Levels
The Service Levels that appear within your Transport system can be linked through to eTransport
thus allowing the customer to select the level of service when they enter a job into eTransport.
These service levels can either be set in the user setup to be specific to that user or global as a
system wide setting.
Adding A New Global Service Level
Global service levels are set up in the following way:
1. Log into eTransport with a username & password that has administrative rights.
2. From the menu on the left of the screen click on the ‘+’ next to ‘Admin’
3. From the menu select ‘Global Service Levels’ so that a screen similar to the one below is
displayed. You will see any service levels that have been previously set up in the list already.
4. To add a new Global Service Level click on the ‘Add’ button.
5. In the screen that is now displayed enter a user friendly description in the ‘Name’ field.
6. From the drop-down box next to ‘Transport Service Level’ select the relevant code that
appears in the Transport system.
7. If you want this service level to be the one that comes up as the default one in the job entry
screen tick the ‘Default’ box. Note: You can only have one service level as the default one so
if another service level has previously been set as the default one then this would overwrite
this.
8. Click on the ‘Save’ button to save the entry and you will see that it has been added to the list
of Global Service Levels available.
Removing A Global A Service Level
You may decide that you want to remove a service level from the list at some point and this
is achieved by displaying the list of service levels on the screen as in steps 1 – 3 above and
then clicking on the red ‘x’ at the end of the row. Remember when deleting a default service
levels that you may want to make another one the default.
21
eTransport User Manual
Global Surcharges
The Surcharges that appear within your Transport system can be linked through to eTransport thus
allowing the customer to select extra services when they enter a job into eTransport. The surcharges
can either be set in the user setup to be specific to that user or global as a system wide setting.
Adding A Global Surcharge
Global surcharges are set up in the following way:
1. Log into eTransport with a username & password that has administrative rights.
2. From the menu on the left of the screen click on the ‘+’ next to ‘Admin’
3. From the menu select ‘Global Surcharges’ so that a screen similar to the one below is
displayed. You will see any service levels that have been previously set up in the list already.
4. To add a new Global Surcharge click on the ‘Add’ button.
5. In the screen that is now displayed enter a user friendly description in the ‘Name’ field.
6. From the drop-down box next to ‘Transport Surcharge’ select the relevant code that appears
in the Transport system.
7. If you want this surcharge to be the one that comes up as the default one in the job entry
screen tick the ‘Default’ box. Note: You can only have one surcharge as the default one so if
another surcharge has previously been set as the default one then this would overwrite this.
8. Click on the ‘Save’ button to save the entry and you will see that it has been added to the list
of Global Surcharges available.
Removing A Global A Surcharge
You may decide that you want to remove a surcharge code from the list at some point and
this is achieved by displaying the list of surcharge codes on the screen as in steps 1 – 3 above
and then clicking on the red ‘x’ at the end of the row. Remember when deleting a default
surcharge code that you may want to make another one the default.
22
eTransport User Manual
Hide Controls
With the later versions of eStirling it is possible to allow the end user to view / edit any of the
Analysis Codes or User Defined Fields within the Transport screen. The settings for this can be set on
a global level or be set by user.
Switching on the access by the end user initially will need to be done by a member of the Stirling
Support team, please call 01530 811000 to have this done for you having your external IP address
available when you call.
Changing The Access To Analysis Codes & User Defined Codes
1. Log into eStirling with a username that has administrative access on the system.
2. From the menu on the left side of the screen click on the ‘+’ at the side of the ‘Admin’ menu
option and then select the ‘Hide Controls’ option.
3. The following screen should then be displayed with the options to select the Analysis Codes
and the User Defined Fields that you do not want the user to be able to access. Leave
‘<GLOBAL_TRANS_DEFAULT>’ selected as the user in the ‘Users’ box at the top of the screen
to set up the system wide settings. After you have setup the global setting up you will then
be able to apply these to individual users on the system.
The Hide Controls Screen
N.B. – A tick in one of the boxes will hide that field from view by the end user.
• ANC – Represents the ‘Analysis Codes’ in a Transport job
• UDF – Represents the ‘User Defined Fields’ in a Transport job
23
eTransport User Manual
4. Once you have selected which options you wish the user to view click on the save button.
Applying The Hide Controls Settings To A User
Once you have the global settings set up in the system you can now apply these to the users that
you wish to give access to.
1. Ensure that you have the user set up as detailed elsewhere in this guide.
2. Log into the ‘Hide Controls’ screen as above.
3. From the ‘Users’ dropdown box select the name of the user that you wish to set up access
for. The eTransport Controls screen will now be displayed together with an option to tick
‘Use Global Default settings’
4. If you want the user to have the same access as you previously set up as a global setting
then place a tick in the ‘Use Global Default settings’ tick box otherwise select the settings for
this user by ticking the boxes as required remembering a tick hides the field from the user
and does not display it.
5. Click on the ‘Save’ button to save you selection.
Themes
It is possible with this version of eTransport to change the colours of the backgrounds and menu
items.
1. Log into eTransport with a user that has administrative rights on the system.
2. From the menu on the left click on the ‘+’ next to ‘Admin’ and then select ‘Themes’ to
display a screen similar to the one below.
24
eTransport User Manual
3. The screen displayed will display all the colours that are used throughout the eTransport
system. To change a colour select the ‘radio’ button next to the part that you wish to
change.
Radio Button Selected
4. From the ‘Colour Pallet’ select the colour that you wish to change the selected option to or
type into the ‘Colour hex value box’ the hexadecimal colour code, this can be found by
searching the internet if you feel you need to. The larger colour sample box will display your
chosen colour.
Colour selected from the colour pallet
Colour of the selected item changes
5. Once you have made your changes click on the ‘Save’ button at the bottom of the screen.
You will get confirmation that you change/s have been saved.
6. Click on the ‘Home’ menu option or click on the ‘Refresh’ button to view your changes.
Admin Help
There is a full searchable help option available once you have logged into eTransport should you find
that you require further help.
To view the help files open up the Admin menu option by clicking on the ‘+’ next to ‘Admin’ and then
click on ‘Admin Help’. A new screen will open with a full searchable help system similar to ones you
may have seen elsewhere.
25