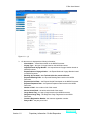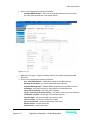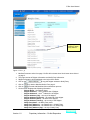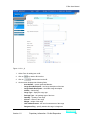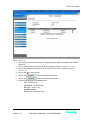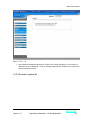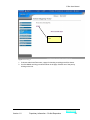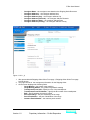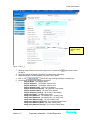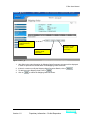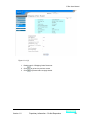
1
E-Doc User Manual E-Port User Manual - E-doc module Version 1.0 Proprietary Information – Do Not Reproduce 1 E-Doc User Manual VERSION HISTORY VERSION 1.0 Version 1.0 DESCRIPTION Initial Release DATE 05/06/13 UPDATED UPDATE AUTHOR SECTION(S) TYPE(S) All All Pui Pui Proprietary Information – Do Not Reproduce 2 E-Doc User Manual TABLE OF CONTENTS Contents SECTION 1 E-DOC ................................................................................................................................ 4 1.1 NOSA DOCUMENT.............................................................................................................................. 4 1.1.1 SUBMISSION OF NOSA DOCUMENT .................................................................................................. 4 1.1.2 ABA DOCUMENT ............................................................................................................................ 15 1.1.3 MANIFEST DOCUMENT .................................................................................................................... 25 1.1.4 SHIPPING ORDER DOCUMENT ......................................................................................................... 50 1.1.5 VESSEL REGISTRATION .................................................................................................................. 69 1.1.6 JOIN VENTURE ............................................................................................................................... 75 Version 1.0 Proprietary Information – Do Not Reproduce 3 E-Doc User Manual Section 1 E-Doc There are 9 modules under EDoc. These modules are NOSA, ABA, Manifest, Shipping Order, Vessel Registration and Join Venture. 1.1 NOSA Document 1.1.1 Submission of NOSA Document This module will submit a new NOSA Document to IPMS. Receiving Port assigned to user. Figure 1.1.1.1_1 1. 2. Version 1.0 Click on the NOSA Menu at left hand side, and then click on <Submit> in the drop down menu. A page of Receiving Port Selection will be displayed. Click on one of the Receiving Port Link to proceed. Proprietary Information – Do Not Reproduce 4 E-Doc User Manual Figure 1.1.1.1_2 3. Version 1.0 On the screen is displayed the following information : - Vessel Name – Vessel Name based on the NOSA Document. - Voyage Type – the type of Voyage based on the NOSA document. - Import/Inbound Voyage Number – the Import/Inbound Voyage Number based on NOSA Document - Export/Outbound Voyage Number – the Export/Outbound Voyage Number based on NOSA Document - Berthing At (Terminal) – the Terminal which the vessel will berth. - Expected Berthing Date – the Expected Berthing Date based on the NOSA Document - Expected Arrival Date – the Expected Arrival Date based on the NOSA Document - Expected Departure Date – the Expected Departure Date based on the NOSA Document. - Number of Call – the number of call of this vessel. - Advice Arrival Draft – the advice arrival draft of the vessel. - Cargo Status Flag – the type of cargo based on the NOSA document - Dangerous Cargo Flag – the Dangerous Cargo Flag based on the NOSA Document - Customs Registration Number – the customs registration number. - Party to Bill – the party to be billed. Proprietary Information – Do Not Reproduce 5 E-Doc User Manual 4. Click on the Search Link besides the Vessel Name Field in order to search for a Vessel Name. Type in the search criteria & Click on <Search> Click on one of this will return with Vessel name starts with the correspondent Character. Figure 1.1.1.1_3 1. Search Screen for Vessel Name. Choose either key in the search criteria or click on one of the fixed link below in order to get the correct vessel name from database 2. On the screen is displayed the following information: - Vessel Name Contains– Search Criteria for the Vessel Name. Check this Box to select Vessel Name Figure 1.1.1.1_4 1. Select one of the Vessel Name and click on Select. This window will be closed after click the select button 2. On the screen is displayed the following information: - Vessel Name – all available / related vessel names will be displayed. Version 1.0 Proprietary Information – Do Not Reproduce 6 E-Doc User Manual Figure 1.1.1.1_5 1. Second page of NOSA Online Form. This part is for Shipping Information. 2. On the screen is displayed the following information: - Maiden Voyage – To specify whether it is a maiden voyage. - Wharf Side – the wharf location - Crew Information – the crew information - Special Equipment 1 – the special equipment - Special Equipment 2 – the special equipment - Remarks – the remarks - Tug Assistance – to specify if tug assistance required - Passenger Disembark – the passenger disembark flag - Dry Dock – the dry dock flag - Dry Dock From – the dry dock start date - Dry Dock To – the dry dock end date Version 1.0 Proprietary Information – Do Not Reproduce 7 E-Doc User Manual To add in the cargo information Figure 1.1.1.1_6 3. Third page of NOSA Online Form. This part is for Cargo Information. Version 1.0 Proprietary Information – Do Not Reproduce 8 E-Doc User Manual Figure 1.1.1.1_7 4. 5. 6. 7. 8. 9. Fourth page of NOSA Online Form. This part is on Port Information. On the screen is displayed the following information: Port of Origin – the Origin Port based on NOSA Document Port of Destination – the Destination Port based on NOSA Document Port of Last Call – the Last Call Port based on NOSA Document Port of Next Call – the Next Call Port based on NOSA Document Check box to select attachment Figure 1.1.1.1_9 1. Final page of online NOSA Submission Form 2. On the screen is displayed the following information: Version 1.0 Proprietary Information – Do Not Reproduce 9 E-Doc User Manual 3. Attachment – specify whether the NOSA document is attach with ABA, Manifest, or Shipping Order or None. Click on button to submit NOSA document. Click on the NOSA Document ID to re-submit if there’re errors while submitting the document. Figure 1.1.1.1_10 1. Result Screen will be displayed after submission of each document. 2. This is an example of submission with errors. Click on the NOSA Document ID to resubmit. Version 1.0 Proprietary Information – Do Not Reproduce 10 E-Doc User Manual Click on NOSA Document ID to view submitted NOSA Details Figure 1.1.1.1_11 1. Example of successful submission screen. 1.1.1.1 NOSA List This module will displayed list of submitted NOSA document for tracking purpose. Click on the NOSA Document Number to view details Figure 1.1.1.2_1 Version 1.0 Click on <View> in drop down menu to display NOSA List This link will shown when the login user is from HO Proprietary Information – Do Not Reproduce 11 E-Doc User Manual 1. Submitted NOSA Document List. Will show 10 records per page. Most recent record will be shown in the beginning. 2. On the screen displayed fields are: - No – Number of NOSA Document - NOSA Number – NOSA Document Number - Vessel Name – Vessel Name based on NOSA Document - Receiving Port – Receiving Port based on NOSA document - Submit Date / Person – Submission date time and Person Submit based on the NOSA Document - Status – NOSA Document Status – Not Submitted, Pending, Rejected, Accepted, Duplicated. Click on <Print> to launch a new window displays NOSA details which available for print Click on <Amend>, NOSA Document Online form will be launched, with the original data inside as predefined. Click here to back to NOSA Document List Figure 1.1.1.2_2 1. The details of first page of NOSA Document will be displayed as the above screen. Version 1.0 Proprietary Information – Do Not Reproduce 12 E-Doc User Manual Figure 1.1.1.2_3 2. The details of second page of NOSA Document will be displayed as the above screen. Figure 1.1.1.2_4 3. The details of third page of NOSA Document will be displayed as the above screen. Version 1.0 Proprietary Information – Do Not Reproduce 13 E-Doc User Manual Figure 1.1.1.2_5 4. The details of final page of NOSA Document will be displayed as the above screen. 1.1.1.2 Amendment of NOSA NOSA Document Online Form will be displayed as shown in Figure 1.1.1.1_2 when click on the Amend Button, 1.1.1.3 View Error List of NOSA When a NOSA Document is rejected by IPMS, the Error Description will be shown in the Error List. Click here to display Error List Figure 1.1.1.4_1 5. The status of rejected NOSA Document. 6. View Error List Link will be displayed beside Status Field. Version 1.0 Proprietary Information – Do Not Reproduce 14 E-Doc User Manual Click on <Close> to close window Figure 1.1.1.4_2 1. Error List of rejected NOSA Document 2. On the screen is displayed the following information: - Remarks –the description of the error receive from ipms. 1.1.2 ABA Document There are two main modules under this portion: Submission and Tracking. 1.1.2.1 Submission of ABA Document Submission of ABA Document can be done when a NOSA Document is accepted by IPMS and also SCN or NOSA Number is available. Without a valid SCN or NOSA Number, submission of ABA Document cannot be done. Version 1.0 Proprietary Information – Do Not Reproduce 15 E-Doc User Manual Receiving Port assigned to user. Click on ABA, a drop down of sub menu will be shown. Figure 1.1.2.1_1 3.In order to submit ABA Document, first step will be selecting a Receiving Port which is related to the ABA Document. 3.On the screen displayed the Receiving Port which will received the ABA Document Click on <Search> to display Search Screen for SCN Number and NOSA Number Click on <Reset> to reset value Figure 1.1.2.1_2 1. Second step will be selecting a valid SCN or NOSA Number which match with the corresponding NOSA Document. Version 1.0 Proprietary Information – Do Not Reproduce 16 E-Doc User Manual 2. On the screen displayed the following information: - SCN Number – SCN Number that match with a NOSA Document. Can click on search for a lookup screen or direct key in the valid SCN Number. - NOSA Number – SCN Number that match with a NOSA Document. Can click on search for a lookup screen or direct key in the valid SCN Number. 3. Click on to proceed. Type in the SCN search criteria & Click on <Search> Figure 1.1.2.1_3 1. SCN Lookup screen. This screen will be launched when click on the ‘Search’ link on the first step of ABA online form. 2. On the screen displayed the following information: - SCN Number Contains – search criteria for SCN Number - List All – List all available SCN Number. Figure 1.1.2.1_4 Version 1.0 Proprietary Information – Do Not Reproduce 17 E-Doc User Manual 1. Search result screen will be displayed after click on the search button / list all at the SCN Lookup screen 2. On the screen displayed the following information: - Available SCN Number – select one of the SCN Number and click on select, this value will be passed back to the parent window. Type in the NOSA search criteria & Click on <Search> Figure 1.1.2.1_5 3. NOSA Lookup screen. This screen will be launched when click on the ‘Search’ link on the first step of ABA online form. 4. On the screen displayed the following information: - NOSA Number Contains – search criteria for NOSA Number - List All – List all available NOSA Number. Figure 1.1.2.1_6 3. Search result screen will be displayed after click on the search button / list all at the NOSA Lookup screen Version 1.0 Proprietary Information – Do Not Reproduce 18 E-Doc User Manual 4. On the screen displayed the following information: - Available NOSA Number – select one of the NOSA Number and click on select, this value will be passed back to the parent window. Figure 1.1.2.1_7 1. ABA online form page 1. Display necessary fields for fill in before submitting the ABA Document. 2. On the screen displayed the following information: - S.S. / M.V.(Vessel Name) – Vessel Name based on the ABA Document. - Berthing At (Terminal) – the Terminal which the vessel will berth. - Expected Berthing Date – Expected Berthing Date based on the ABA Document - Anchorage– Anchorage required by vessel based on the ABA Document - Heavy Lift to Discharge – the heavy lift to discharge - Cargo / Container(s) for direct delivery – the Cargo/Container(s) for direct delivery - Fresh Water required – the tonnage of Fresh Water required - Overall Length – the Overall Length of the vessel in meter - Gross Tonnage – the Gross Tonnage of the Vessel - Advice Arrival Draft – the advice arrival draft of the vessel - Bunker Service – bunker service flag - Repair Service – repair service flag Version 1.0 Proprietary Information – Do Not Reproduce 19 E-Doc User Manual - Other Service – specify other service required 4. Click on button to submit ABA. ABA Document Number generated by the application. Click to view ABA details. Figure 1.1.2.1_8 1. After submitted the ABA Document, result page will be shown. 1.1.2.2 ABA Document List This module will display list of submitted ABA Document for tracking on the status of each document. Version 1.0 Proprietary Information – Do Not Reproduce 20 E-Doc User Manual Click on the ABA Document Number to display ABA Document Details Figure 1.1.2.2_1 1. ABA Document Listing Page. Only will displayed 10 Records per page, order by latest record. Version 1.0 Proprietary Information – Do Not Reproduce 21 E-Doc User Manual Click on <Print> to launch a new window displays ABA details which available for print Figure 1.1.2.2_2 1. ABA Document details. Version 1.0 Click on <Amend>, ABA Document Online form will be launched, with the original data inside as predefined. Proprietary Information – Do Not Reproduce 22 E-Doc User Manual Figure 1.1.2.1_3 1. Print out format for ABA Document. This screen will be displayed in a new Window when click on the <Print> Button. 1.1.2.3 View Error List of ABA When a ABA Document is rejected by IPMS, the Error Description will be shown in the Error List. Click here to display Error List Figure 1.1.2.3_1 1. The status of rejected ABA Document. Version 1.0 Proprietary Information – Do Not Reproduce 23 E-Doc User Manual 2. View Error List Link will be displayed beside Status Field. Click on <Close> to close window Figure 1.1.2.3_2 1. Error List of rejected ABA Document 2. On the screen is displayed the following information: - Remarks –the description of the error receive from IPMS. Version 1.0 Proprietary Information – Do Not Reproduce 24 E-Doc User Manual 1.1.3 Manifest Document There are 3 main modules for Manifest – submission, tracking and resubmit on failed document. Upon tracking process, there’re few added functions to enhance the process of submitting a Manifest Document, which are Amend on Manifest Document and also Resubmit the Manifest Document. 1.1.3.1 Submission of Manifest Document There are 2 types of submission, either by filling the online form or by upload a defined text file. 1.1.3.1.1 Submit via Online Form Click on the Submit menu item Figure 1.1.3.1.1_1 1. When click on the Submit menu item under Manifest, a page of choosing the submission type will be displayed. 2. The submission type will be ‘Submit via Online Form’ or ‘Submit with Upload File’ Version 1.0 Proprietary Information – Do Not Reproduce 25 E-Doc User Manual Click here to add a new Manifest Document Click on this link to go back to previous page Figure 1.1.3.1.1_2a a. If choose submit with online form, there will be 2 condition, application will check whether there’s any temporary manifest list which stored online but haven’t submitted to IPMS yet. If there’re records, then a page for temporary manifest list will be displayed (figure 1.1.3.1.1_2a), else, a page for choosing receiving port will be shown (figure 1.1.3.1.1_2b). b. On the temporary manifest list screen, displayed the following field: i. No – Counter for number of records ii. Manifest ID – Manifest Document ID which hasn’t submitted to IPMS yet. iii. Submission Date – Date the document created. iv. BL – BL Number for the Manifest/ v. Delete - used to delete a temporary manifest. Click on the to delete the manifest document 3. Click to add in new Manifest Document 4. Click on the Manifest ID will launch the Manifest BL List page. (referred to Figure 1.1.3.1.1_10) Version 1.0 Proprietary Information – Do Not Reproduce 26 E-Doc User Manual Available Receiving Port Click here to go back to previous page Figure 1.1.3.1.1_2b 1. If choose submit with online form, there will be 2 condition, application will check whether there’s any temporary manifest list which stored online but haven’t submitted to IPMS yet. If there’re records, then a page for temporary manifest list will be displayed (figure 1.1.3.1.1_2a), else, a page for choosing receiving port will be shown (figure 1.1.3.1.1_2b). 2. This page will show after user click on in temporary Manifest List page. (referred to Figure 1.1.3.1.1_2a) 3. List of available receiving port will be shown in the page. Choose one of the port by clicking on the link. Version 1.0 Proprietary Information – Do Not Reproduce 27 E-Doc User Manual Figure 1.1.3.1.1_3 1. After select the receiving port, this page will be shown 2. Select related SCN Number from the drop down list. If no SCN number is available, no related record message will be shown. 3. Click to go back to previous page. 4. Click to proceed with the online submission process. 5. Click to reset the data to default value. 6. On the screen displayed the following field: - SCN Number – SCN Number that link with NOSA Document and also match with the receiving port selected in the previous page. Version 1.0 Proprietary Information – Do Not Reproduce 28 E-Doc User Manual Click Search to launch lookup screen for Master BL Number and Container Number Figure 1.1.3.1.1_4 1. After select the SCN Number, Manifest Document online form page 1 for BL details will be shown. 2. Click to go back to select SCN page. 3. Click to proceed with Manifest submission process. 4. On the screen displayed the following fields: - BL Number – the BL Number - BL Type – the BL Type - Master BL Number – the Master BL Number, fill only when BL Type is ‘Child’ - Master Container Number – the Master Container Number, fill only when BL Type is ‘Child’ - Foreign/Domestic - Specify whether it is foreign or domestic vessel - Cargo Identification Number – the cargo identification number - Inland Origin – Specify the inland origin - Inland Destination – Specify the inland destination - Transhipment – Specify whether this is transshipment cargo - Transhipment to SCN – Specify the scn of the transhipment - Transhipment to S/O Number – Specify the SO number of the transhipment Version 1.0 Proprietary Information – Do Not Reproduce 29 E-Doc User Manual - Total Cargo Values – Specify the total cargo values Consignee Name – the consignee name based on the Manifest Document Consignee Address 1 – the consignee address line 1 Consignee Address 2 – the consignee address line 2 Consignee Address (City) – the consignee address City Consignee Address (Postcode) – the consignee address Postcode Consignee Address (State/Province) – the consignee address State Consignee Address (Country) – the consignee address Country Figure 1.1.3.1.1_5 1. After proceeded with Manifest Online Form page 1 for BL, Manifest Online Form page 2 for BL will be shown. 2. This page consists of the consignment information for the Manifest BL. 3. Click to go back to Manifest online form page 1 for BL. 4. Click to proceed with Manifest online submission process. 5. On the screen displayed the following fields: - Cargo Marking – the general cargo marking - Cargo Details Marking – the general cargo details marking - Bulk – specify the bulk flag of cargo - Port of Origin – the port of origin of the cargo - Port of Loading – the port of loading of the cargo - Customs Permit Number – Specify the customs permit number Version 1.0 Proprietary Information – Do Not Reproduce 30 E-Doc User Manual Copy Shipper Address to Notify Party Address Figure 1.1.3.1.1_6 1. Manifest Document online form page 3 for BL will be shown when ‘Next’ button been clicked on page 2. 2. This page consists of Shipper Information and Notify Party Information. 3. Shipper Information will be defaulted to the login user’s details. 4. Click on the 5. Click on to copy the shipper address to Notify Party to go back to Manifest Online Form page 2. 6. Click on to proceed with Manifest Online submission process. 7. On the screen displayed the following information: - Shipper Name – the Shipper Name st - Shipper Address 1 – the 1 address line of Shipper nd - Shipper Address 2 – the 2 address line of Shipper - Shipper Address (City) – the city of the shipper - Shipper Address (Postcode) – the postcode of the shipper - Shipper Address (State) – the state of the Shipper - Shipper Address (Country) – the country of the Shipper - Notify Party Name – the Notify Party name - Notify Party Address 1 – the address line 1 of Notify Party - Notify Party Address 2 – the address line 2 of Notify Party - Notify Party Address (City) – the city of Notify Party Version 1.0 Proprietary Information – Do Not Reproduce 31 E-Doc User Manual - Notify Party Address (Postcode) – the postcode of Notify Party Notify Party Address (State) – the state of Notify Party Notify Party Address (Country) – the country of Notify Party Figure 1.1.3.1.1_7 1. After filling in the main information for BL, this page will be displayed in order for preview item list that attach to the BL. 2. Click on 3. Click on 4. Click on if there’s any changes to make for the BL details. for adding another BL to attach with the Manifest. to add item for the current BL. 5. Click on to go to the page which show all BLs that attached to the current Manifest (referred to Figure 1.1.3.1.1_10). 6. Click on to submit the Manifest Document . 7. On the screen displayed the following information: - Item Number – the Item Number - Cargo Description – description for Item. - Quantity – quantity of the item declared - Volume – volume of the item declared - Weight – weight of the item declared - Delete – Delete action for item. Version 1.0 Proprietary Information – Do Not Reproduce 32 E-Doc User Manual Figure 1.1.3.1.1_8 1. Online Form for adding item to BL. 2. Click on to go back to BL Item list. 3. Click on to add the item into the BL. 4. On the screen displayed the following fields: - Item Number – system generated Number - Cargo Short Description – the Cargo description of the item - Cargo Details Description – the details cargo description - Vehicle – Vehicle flag - Cargo Type – Spcify the cargo type - Package Type – the package type of the item - Quantity – quantity of the cargo - Volume – volume of the cargo - Weight – weight of the cargo - Unit of Measurement– the unit of measurement of the cargo - Dangerous Flag – specify whether this cargo is dangerous Version 1.0 Proprietary Information – Do Not Reproduce 33 E-Doc User Manual - Dangerous IMDG Code – specify the imdg code of the dangerous cargo Item Transhipment – Specify whether the item is a transhipment cargo Transhipment Date – Specify the date of transhipment Land Transhipment – Specify whether the item is a land transhipment cargo Inland Destination – Specify the inland destination Figure 1.1.3.1.1_9 1. Online Form for adding item’s Container Details. This form only will shown when the cargo classification selected for Item is CONTAINER. 2. Click on to go back to Add Item Form. 3. Click on to add the item’s Container Details into the BL. 4. On the screen displayed the following fields: Version 1.0 Item Number – system generated Number Proprietary Information – Do Not Reproduce 34 E-Doc User Manual Container Number – the Container Number of the item Container Category – the Container Category of the item Container Status – the Container Status of the item Container Size – the Container Size of the item Container Type – the Container Type of the item Package Inside Container – the package of the cargo inside the container Seal Number – the seal number of the container Seal Type – seal type of the container Weight Class – the weight class of the container Temperature – the temperature for loading / unloading the container (can be in Celsius or Fahrenheit) ETA / ETD Date – the Estimated Time of Arrival / Estimated Time of Departure of the Vessel Haulier Code – the haulier code Operator Code – the operator code Direct to Service Area – direct to service area flag Consolidated Cargo – the Consolidated Cargo Flag of the cargo Dockside(Ex-Shed) – dockside flag Ex-Wharf Flag – ex-wharf flag Remarks - remarks Version 1.0 Proprietary Information – Do Not Reproduce 35 E-Doc User Manual Figure 1.1.3.1.1_10 1. After add the item, new item will be appended in the list shown in this page. 2. Click on at ‘Delete’ column to delete the item. 3. Can continue the process with add item to the current BL or add BL to the current Manifest. 4. After added all necessary BL and item, click on Document. Version 1.0 to submit the Manifest Proprietary Information – Do Not Reproduce 36 E-Doc User Manual Figure 1.1.3.1.1_11 1. BL List page for a Manifest Document. This page displays all BLs that attach to the Manifest Document. 2. Click on the BL Number will launch the BL Details page (referred to Figure 1.1.3.1.1_4) 3. Click on the Add Item link will launch the add Item form for the BL. (referred to Figure 1.1.3.1.1_8) 4. Click on the to delete the BL. 5. Click on the to delete the Manifest Document 6. Click on the to submit the Manifest Document. 7. On the screen displayed the following fields: - No – Counter to BL - BL Number – the BL Number - BL Type – the BL Type - Add Item column - Delete – link for delete function. Version 1.0 Proprietary Information – Do Not Reproduce 37 E-Doc User Manual System generated Manifest Document ID Figure 1.1.3.1.1_12 1. After submitted the Manifest Document, a result page as shown above will be displayed. Version 1.0 Proprietary Information – Do Not Reproduce 38 E-Doc User Manual Figure 1.1.3.1.1_13 1. After submitted the Manifest Document, if there’s error during submission, an error page as shown above will be displayed. The error message displayed will be based on the error found during submission process. 1.1.3.1.2 Submit via upload file Version 1.0 Proprietary Information – Do Not Reproduce 39 E-Doc User Manual Figure 1.1.3.1.2_1 1. In order to submit a Manifest via Upload File Method, after click on Submit at left hand side menu, click on the button of Version 1.0 Proprietary Information – Do Not Reproduce . 40 E-Doc User Manual Figure 1.1.3.1.2_2 1. Click on for browsing the file that needed to be uploaded. 2. After selected the file, click on Version 1.0 to submit the manifest document. Proprietary Information – Do Not Reproduce 41 E-Doc User Manual Figure 1.1.3.1.2_3 1. After signed, a Manifest Upload Reference ID will be displayed. Sending the document will be done in backend process. 1.1.3.2 Manifest List Click on View link in Manifest menu item. Figure 1.1.3.2_1 Version 1.0 Proprietary Information – Do Not Reproduce 42 E-Doc User Manual 1. After click on the View menu item at left hand side of the screen under Manifest main menu, a screen displayed all the list of submitted Manifest will be shown. 2. Click on the Manifest ID will go to the BL list page that display all BLs attached to the selected Manifest Document. Figure 1.1.3.2_2 1. This page displayed all BLs in the Manifest. 2. Under the Item Column, there’s a link for view the Item list for the BL. Click on the view Item list. 3. Click on Version 1.0 to if want to go back to the Manifest List Page. Proprietary Information – Do Not Reproduce 43 E-Doc User Manual Figure 1.1.3.2_3 1. After click on the BL Number Link at the Manifest BL List page, the details of the Manifest BL will be shown in 4 pages. The above is the first page of the Manifest Details. Version 1.0 Proprietary Information – Do Not Reproduce 44 E-Doc User Manual Figure 1.1.3.2_4 1. Details page 2 of Manifest Document. Version 1.0 Proprietary Information – Do Not Reproduce 45 E-Doc User Manual Figure 1.1.3.2_5 1. Details page 3 of Manifest Document. Version 1.0 Proprietary Information – Do Not Reproduce 46 E-Doc User Manual Figure 1.1.3.2_6 1. Details page 4 which listed all the items that attached to the Manifest. 2. Click on the Manifest Item’s cargo description will lead to a page which displays the item details. 3. Click on to go back to the previous page. 1.1.3.3 Manifest Failed Document Manifest Failed Document is a special function for user to track on the fail submission of Manifest Document based on upload features. All Manifest Document uploaded by user using predefined upload file format will be validate by backend process and for those with errors will be stored in the Manifest Failed Document. Resubmit of the document can be done online. When click on the Fail link on the Manifest menu item, a page to display all Failed Manifest List will be shown. Version 1.0 Proprietary Information – Do Not Reproduce 47 E-Doc User Manual Figure 1.1.3.3_1 1. Failed Manifest List Screen. On the screen displayed the following fields No – Counter to Manifest List Manifest Upload Ref No – Manifest Upload Reference Number. Click on this link will display the details of the Failed Manifest for amendment and resubmit again. Submission Date – Submission date / file upload date of Manifest Document Error Message – Error message link to display errors found while submitting the Manifest Document in a new pop up window. Manifest Submission ID – Manifest Submission ID for those Manifest details which successfully submitted to MPS System. Click on this will link to the Manifest Details Page. Version 1.0 Proprietary Information – Do Not Reproduce 48 E-Doc User Manual Figure 1.1.3.3_2 1. Error message page while user click on the Error link on Failed Manifest Link page. Figure 1.1.3.3_3 1. Failed Manifest Details page 1 Screen. On the screen displayed the following fields No – Counter to Manifest List BL Number – BLs that attached to this Manifest BL Type – Type of BL attached. Delete – Click on this Upload Ref No – Manifest Upload Reference Number. Receiving Port – Receiving Port for this Manifest Document SCN – SCN that attached to this Manifest Document. 2. Click on the Version 1.0 will delete off the related BL. button to submit the Manifest Document. Proprietary Information – Do Not Reproduce 49 E-Doc User Manual 1.1.4 Shipping Order Document There are 2 main modules for Export Declaration – submission and tracking. Upon tracking process, there is added feature for resubmit the Shipping Order Document if the document is not sent to MPS system yet. Amendment process only available for those document already sent to MPS system. 1.1.4.1 Submission of Shipping Order Document There are 2 types of submission, either by filling the online form or by upload a defined text file. 1.1.4.1.1 Submit via Online Form Figure 1.1.4.1.1_1 1. When click on the submission type will be displayed. 2. The submission type will be ‘ menu item under ED / BL, a page of choosing the or ‘ Click on the Submit menu item Version 1.0 Proprietary Information – Do Not Reproduce 50 E-Doc User Manual Figure 1.1.4.1.1_2 1. If click on in the Submission type Screen, if there’s temporary records in the db, then this page will be displayed with the current record in temporary table. If want to continue with temporary record, can click on the document id to continue. If not, can click on to add new Shipping Order Document. 2. To delete temporary Shipping Order record, click on . Version 1.0 Proprietary Information – Do Not Reproduce 51 E-Doc User Manual Available Receiving Port Figure 1.1.4.1.1_3 1. If choose submit new Document, a page for choosing receiving port will be shown. 2. List of available receiving port will be shown in the page. Choose one of the port by clicking on the link. Version 1.0 Proprietary Information – Do Not Reproduce 52 E-Doc User Manual Figure 1.1.4.1.1_4 1. After select the receiving port, this page will be shown 2. Select the related SCN from the dropdown list. If there’s no SCN available, an error message will be displayed. 3. Click on to proceed with submission process. 4. On the screen displayed the following field: - SCN Number – SCN Number that link with NOSA Document and also match with the receiving port selected in the previous page. - Receiving Port – the receiving port which will receive the SO document. Version 1.0 Proprietary Information – Do Not Reproduce 53 E-Doc User Manual Click Search to launch lookup screen for master BL Number and Container Number Figure 1.1.4.1.1_5 1. After select the SCN Number, Shipping Order Document online form page 1 will be shown. 2. Click on to proceed after fill in the necessary fields. 3. Click on to go back to previous page. 4. On the screen displayed the following fields: - SO Number – the Shipping Order Number - SO Type – the Shipping Order Type - Master SO Number – the Master Shipping Order Number, fill only when Shipping Order Type is ‘Child’ - Master Container Number – the Master Container Number, fill only when Shipping Order Type is ‘Child’ - Cargo Identification Number – the cargo identification number - Foreign/Domestic - Specify whether it is foreign or domestic vessel - Inland Origin – Specify the inland origin - Inland Destination – Specify the inland destination - Transhipment – Specify whether the Shipping Order is transshipment. - Total Cargo Values – Specify the total cargo values Version 1.0 Proprietary Information – Do Not Reproduce 54 E-Doc User Manual - Consignor Name – the consignor name based on the Shipping Order Document Consignor Address 1 – the consignor address line 1 Consignor Address 2 – the consignor address line 2 Consignor Address (City) – the consignor address City Consignor Address (Postcode) – the consignor address Postcode Consignor Address (State) – the consignor address State Consignor Address (Country) – the consignor address Country Figure 1.1.4.1.1_6 1. After proceeded with Shipping Order Online Form page 1, Shipping Order Online Form page 2 will be shown. 2. This page consists of the consignment information for the Shipping Order. 3. On the screen displayed the following fields: - Cargo Marking – the general cargo marking - Cargo Marking Details – the general cargo details marking - Transhipment From SCN – Specify the scn of the transhipment - Transhipment From B/L Number – Specify the BL number of the transhipment - Bulk – specify whether the cargo is in Bulk - Port of Discharge – the port of discharge of the cargo - Port of Destination – the port of destination of the cargo - Customs Permit Number – the customs permit number Version 1.0 Proprietary Information – Do Not Reproduce 55 E-Doc User Manual Copy Shipper Address to Notify Party Figure 1.1.4.1.1_7 1. Shipping Order Document online form page 3 will be shown when button been clicked on page 2. 2. This page consists of Shipper Information and Notify Party Information. 3. Shipper Information will be defaulted to the login user’s details. 4. Click on the button will copy the shipper address to Notify Party 5. On the screen displayed the following information: - Shipper Name – the Shipper Name - Shipper Address 1 – the Shipper Address line 1 - Shipper Address 2 – the Shipper Address line 2 - Shipper Address (City) – the city of the shipper - Shipper Address (Postcode) – the postcode of the shipper - Shipper Address (State) – the state of the Shipper - Shipper Address (Country) – the country of the Shipper - Notify Party Name – the Notify Party name - Notify Party Address 1 – the address line 1 of Notify Party - Notify Party Address 2 – the address line 2 of Notify Party - Notify Party Address (City) – the city of Notify Party - Notify Party Address (Postcode) – the postcode of Notify Party - Notify Party Address (State) – the state of Notify Party - Notify Party Address (Country) – the country of Notify Party Version 1.0 Proprietary Information – Do Not Reproduce 56 E-Doc User Manual Modify the Shipping Order Document Details Confirm to submit the Shipping Order Document Add Item for this Shipping Order Document Figure 1.1.4.1.1_8 1. After filling in the main information for Shipping Order Document, this page will be displayed in order for preview item list that attach to the Shipping Order Document. 2. If there’s a need on modify the Shipping Order Document Details, click on 3. To add item to the Shipping Order, click on 4. Click on to submit the Shipping Order Document. Version 1.0 Proprietary Information – Do Not Reproduce 57 E-Doc User Manual Figure 1.1.4.1.1_9 1. After click on button, the add item online form will be displayed. 2. On the screen displayed the following fields: - Item Number – system generated Number - Cargo Short Description – the Cargo description of the item - Cargo Details Description – the details cargo description - Vehicle Flag – Vehicle flag - Item Transhipment – Specify whether the item is a transhipment cargo - Transhipment Date – Specify the date of transhipment - Land Transhipment – Specify whether the item is a land transhipment cargo - Inland Destination – Specify the inland destination - Cargo Type – Spcify the cargo type - Package Type – the package type of the item - Quantity – quantity of the cargo - Volume – volume of the cargo - Weight – weight of the cargo - Unit of Measurement– the unit of measurement of the cargo - Dangerous Flag – specify whether this cargo is dangerous - Dangerous IMDG Code – specify the imdg code of the dangerous cargo - Direct to Service Area – direct to service area flag - Dockside(Ex-Shed) – dockside flag Version 1.0 Proprietary Information – Do Not Reproduce 58 E-Doc User Manual - Ex-Wharf Flag – ex-wharf flag Remarks - remarks Figure 1.1.4.1.1_10 1. After click on button in the item form, if selected Cargo Classification Type is ‘CONTAINER’ then the add Container Information page for item will be displayed. 2. On the screen displayed the following fields: - Item Number – item number get from previous page - Container Number – the Container Number of the item - Container Category – the Container Category of the item - Container Status – the Container Status of the item - Container Size – the Container Size of the item - Container Type – the Container Type of the item - Package Inside Container – the package of the cargo inside the container - Seal Number – the seal number of the container - Seal Type – seal type of the container - Weight Class – the weight class of the container Version 1.0 Proprietary Information – Do Not Reproduce 59 E-Doc User Manual - Temperature – specify the needed temperature for the Container ETA / ETD Date – the Estimate Time of Arrival or Estimate Time of Departure of the Container. Haulier Code – the haulier code Operator Code – the operator who in charge of the cargo Consolidated Cargo – Specify whether the container is consolidated cargo Figure 1.1.4.1.1_12 1. After add the item, new item will be appended in the list shown in this page. 2. Continue with add more items or submit if the document is done. Version 1.0 Proprietary Information – Do Not Reproduce 60 E-Doc User Manual System generated Shipping Order Document ID, Click on it will launch the Shipping Order Details page. Figure 1.1.4.1.1_14 1. After submitted the Shipping Order Document, a result page as shown above will be displayed. Figure 1.1.4.1.1_15 Version 1.0 Proprietary Information – Do Not Reproduce 61 E-Doc User Manual 1. After submitted the Shipping Order Document, if there’s error, error message page will be displayed. The error message will be based on the error found while trying to submit the document. 1.1.4.1.2 Submit via upload file Figure 1.1.4.1.2_1 1. In order to submit a Shipping Order via Upload File Method, after click on Submit at left hand side menu, click on the button of Version 1.0 . Proprietary Information – Do Not Reproduce 62 E-Doc User Manual Figure 1.1.4.1.2_2 1. Click on for browsing the file that needed to be uploaded. 2. After selected the file, click on Version 1.0 to submit the Shipping Order document. Proprietary Information – Do Not Reproduce 63 E-Doc User Manual Figure 1.1.4.1.2_3 1. After sign the document, the document will be sent to MPS System. If there’s no error found, this page will be displayed to indicate successful of sending the document. If there’s error, a page like figure 1.1.4.1.1_15 will be displayed. 1.1.4.2 Shipping Order List Fill in the page number & click ‘Go’ button to go to the selected page. Click on the document ID to view the details Version 1.0 Proprietary Information – Do Not Reproduce 64 E-Doc User Manual Figure 1.1.4.2_1 1. After click on the menu item at left hand side of the screen under Shipping Order main menu, a screen displayed all the list of submitted Shipping Order will be shown. 2. Click on the Shipping Order Document ID to view the details of the Shipping Order. Figure 1.1.4.2_2 1. After click on the Document ID Link at the Shipping Order List page, the details of the Shipping Order will be shown in 5 pages. The above is the first page of the Shipping Order Details. 2. Click to go back to previous screen 3. Click to proceed with next page details. Version 1.0 Proprietary Information – Do Not Reproduce 65 E-Doc User Manual Figure 1.1.4.2_3 1. Details page 2 of Shipping Order Document. 2. Click to go back to previous screen 3. Click to proceed with next page details. Version 1.0 Proprietary Information – Do Not Reproduce 66 E-Doc User Manual Figure 1.1.4.2_4 1. Details page 3 of Shipping Order Document. 2. Click to go back to previous screen 3. Click to proceed with next page details. Version 1.0 Proprietary Information – Do Not Reproduce 67 E-Doc User Manual Figure 1.1.4.2_5 1. Details page 4 which listed all the items that attached to the Shipping Order. 2. Click on the Shipping Order Item’s cargo description will lead to a page which displays the item details. 3. Click to go back to previous screen Figure 1.1.4.2_6 Version 1.0 Proprietary Information – Do Not Reproduce 68 E-Doc User Manual 1. When click on the Shipping Order Item’s Cargo Description link, the Shipping Order Item details page will be displayed. 2. Click to go back to item list page. 1.1.5 Vessel Registration 1.1.5.1 Submission of Vessel Registration This module will submit a new Vessel Registration Document to IPMS. Click on <Search> to display Search Screen for Port of Registry Click on Vessel Registration, a drop down of sub menu will be shown. Figure 1.1.6.1_1 1. Click on the Vessel Registration Menu at left hand side, and then click on <Submit> in the drop down menu. 2. On the screen is displayed the following information : - Name of Vessel – the Vessel Name - Short Name of Vessel - short name of the vessel - Shipping Agent Code – the Shipping Agent Code of Vessel - Vessel Type – the type of Vessel type - Foreign Domestic Flag – the Foreign or Domestic of Vessel - Vessel Category – Vessel category - Tramping Vessel – Tramping vessel flag Version 1.0 Proprietary Information – Do Not Reproduce 69 E-Doc User Manual - BIMP Vessel – BIMP vessel flag Vessel Fitness Certificate Checked – the Vessel Fitness Certificate Check of Vessel Port of Registry – the Vessel Registration Port Registration Expiry Date – Expiry date of the vessel registration Name of Vessel – Name of the vessel Master License Number – Master license number Hatch Cover – Hatch Cover of Vessel Number of Hatches – Number of hatches Owner Code – the Owner of Vessel Conference Code – the Conference Code of Vessel Charterer Code – the Charterer Code of Vessel CAPACITY OF CARGO HOLD: - Maximum Deck Tier– the maximum hold tier that the Vessel can handle - Grain Capacity – the Grain Capacity of Vessel Bales Capacity – the Bales Capacity of Vessel TEU Capacity – the TEU Capacity of Vessel Unit Capacity – the Unit Capacity of Vessel Passengers Capacity – the Passengers Capacity of Vessel RORO Capacity – the RORO capacity of Vessel Year Built – the year of the vessel built Call Sign – the Call Sign of vessel Alongside Flag – the alongside flag Maximum Hold Tier– the maximum hold tier that the Vessel can handle BRIDGE: - Bridge Location – the Bridge Location type of Vessel - Bridge Distance from Stern – the Bridge Distance from Stern of Vessel - Bridge Distance from Bow – the Bridge Distance from Bow of Vessel GANGWAY: - Gangway Location – the Gangway Location type of Vessel - Gangway Distance from Stern/Bow – Gangway Distance from Stern/Bow of Vessel RAMP: - Ramp Location – the Ramp Location type of Vessel - Port Side – the Port Side type of Vessel if the Ramp Location selected is Port Side - Starboard – the Starboard type of Vessel if the Ramp Location selected is Starboard - Version 1.0 Ramp Type – the Ramp type of Vessel Ramp Distance from Stern / Bow – the Ramp Distance From Stern/Bow of Vessel Proprietary Information – Do Not Reproduce 70 E-Doc User Manual TONNAGES: - Gross Registered Tonnage (GRT) – the Gross Registered Tonnage(GRT) of Vessel - Nett Registered Tonnage (NRT) – the Nett Registered Tonnage(NRT) of Vessel - Deadweight Tonnage (DWT) – the Deadweight Tonnage(DWT) of Vessel PHYSICAL DIMENSION: - Overall Length (LOA) – the Overall Length(LOA) of Vessel in Meter - Source of Overall Length – the source of overall length - Poop Length – the Poop Length of Vessel in Meter - Forehead Length– the Forehead Length of Vessel in Meter - Beam – the Beam of Vessel in Meter - Fully Loaded Draft (FLD) – the Fully Loaded Draft(FLD) of Vessel in Meter - Air Draft(AD) – the air draft of Vessel in Meter VESSEL FACILITIES INFORMATION: - Self Sustaining – the self sustaining flag - Deck Crane – the deck crane flag - Deck Crane Tonnage – the deck crane tonnage in Meter - Swing Boom - the swing boom flag - Swing Boom Tonnage – the swing boom tonnage in Meter - Heavy Lift Boom – the heavy lift boom flag - Heavy Lift Boom Tonnage – the heavy lift boom tonnage in Meter - Other Equipment – the other equipment flag - Other Equipment Tonnage – the other equipment tonnage in Meter - Remarks - remarks 3. Click on the Search Link besides the Port of Registry Field in order to search for a Port Name. Type in the search criteria & Click on Search Button Click on one of this will return with Port Name starts with the correspondent Character. Figure 1.1.6.1_3 Version 1.0 Proprietary Information – Do Not Reproduce 71 E-Doc User Manual 1. Figure above shows the Search Screen for Port Name. Choose either key in the search criteria or click on one of the fixed link below in order to get the correct Port Name from database 2. On the screen is displayed the following information: - Port Name Contains– Search Criteria for the Port Name. Check this Box to select Vessel Name Figure 1.1.6.1_4 1. Display list of Port Name. 2. Select one of the Port Name and click on Select. This window will be closed after click the select button 3. On the screen is displayed the following information: - Port Name – all available / related port names will be displayed. 4. After filling in all the forms, click on Document to IPMS. Version 1.0 button to submit Vessel Registration Proprietary Information – Do Not Reproduce 72 E-Doc User Manual 1.1.5.2 View Vessel Registration This module will displayed list of Registered Vessels. Click on the Vessel Name to view details. Click on <View> in the drop down menu to display Registered Vessel List Figure 1.1.6.2_1 1. Registered Vessel List. 2. The page will show Maximum 10 records per page. Most recent record will be shown in the beginning. 3. On the screen displayed fields are: - No – Number of Registered Vessel - Vessel Name – Registered Vessel Name - Vessel Type – Registered Vessel Type - Port Registration – Port Registration of Vessel - Foreign Domestic – Vessel of Foreign or Domestic type - Submit Date/Person – Submission date time and Person Submit. - Status – Vessel Register Status – Not Submitted, Pending, Rejected, Accepted, Duplicated. Version 1.0 Proprietary Information – Do Not Reproduce 73 E-Doc User Manual Figure 1.1.6.2_2 1. Registered Vessel Details. Version 1.0 Proprietary Information – Do Not Reproduce 74 E-Doc User Manual 1.1.6 Join Venture 1.1.6.1 Submission of Join Venture This module will submit companies to Join Venture List of selected Vessel Name. Type in the search criteria & Click on <Search> to display Search Screen for Vessel Name in new window Click on Join Venture, a drop down of sub menu will be shown. Figure 1.1.7.1_1 4. Click on the Join Venture Menu at left hand side, and then click on <Submit> in the drop down menu. 5. This page is to select a Vessel Name for Join Venture purpose. Version 1.0 Proprietary Information – Do Not Reproduce 75 E-Doc User Manual Type in the search criteria & Click on <Search> Click on one of this will return Fig with Vessel name starts with the correspondent Character. Figure 1.1.7.1_2 3. Search Screen for Vessel Name. Choose either key in the search criteria or click on one of the fixed link below in order to get the correct vessel name from database 4. On the screen is displayed the following information: - Vessel Name Contains– Search Criteria for the Vessel Name. Check this Box to select Vessel Name Figure 1.1.7.1_3 3. Select one of the Vessel Name and click on Select. This window will be closed after click the select button 4. On the screen is displayed the following information: - Vessel Name – all available / related vessel names will be displayed. Version 1.0 Proprietary Information – Do Not Reproduce 76 E-Doc User Manual 5. After select a Vessel Name, click on to proceed. Select filter type Check Company to remove Figure 1.1.7.1_4 5. 6. Version 1.0 Search Company : - Click on <List All Companies> to display all companies - Or, type in search criteria and choose filter type (Begins with / Contains) - Then, click on <Filter> to filter company list Company List : - Display list of join venture companies and valid period - Click <Remove> to remove selected company from the display list Proprietary Information – Do Not Reproduce 77 E-Doc User Manual Check Company to add to Join Venture list Figure 1.1.7.1_5 4. Company List. The company which is already in the Join Venture list will not be displayed. 5. On the screen displayed fields are: - No – Number of Company - Company Name – Company Name - HO/Branch Name – specify company’s branch name or HO name - Valid Perioud – specify valid perioud of join venture 6. Click on <Add> to add selected companies from display list. 1.1.6.2 View Join Venture This module will display list of Join Venture Companies. Version 1.0 Proprietary Information – Do Not Reproduce 78 E-Doc User Manual Type in the search criteria & Click on <Search> to display Search Screen for Vessel Name Figure 1.1.4.2_1 1. Click on the Join Venture Menu at left hand side, and then click on <View> in the drop down menu. 2. The search Vessel Name module is similar to 1.1.4.1 3. After select a Vessel name, click on to proceed. Figure 1.1.4.2_2 1. Join Venture List of specified Vessel Name 2. On the screen displayed fields are: - No – Number of Company - Company Name – Company Name - HO/Branch Name – specify company’s branch name or HO name - Valid Perioud – specify valid perioud of join venture Version 1.0 Proprietary Information – Do Not Reproduce 79