1
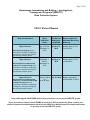
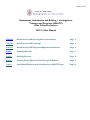
Page 1 of 12 Harassment, Intimidation and Bullying – Investigations, Trainings and Programs (HIB-ITP) Data Collection System 2013-14 User Manual Part 1A: Data Entry for HIB Investigations and Incidents Page 3 Part 1B: Data Entry for HIB Trainings Page 4 Part 1C: Data Entry for HIB Programs/Approaches/Initiatives Page 5 Part 2: Updating Records Page 7 Part 3: Deleting Records Page 8 Part 4: Printing Status Reports and Ordering Full Reports Page 9 Part 5: Semi-Annual District-wide Certification of HIB-ITP Data Page 10 Page 2 of 12 Harassment, Intimidation and Bullying – Investigations, Trainings and Programs (HIB-ITP) Data Collection System 2013-14 User Manual Data for Submission Data Collection Dates Deadline for Submission to NJDOE Report to Board of Education/Governing Authority Report Period 1 July 1, 2013 to December 31, 2013 January 15, 2014 Between January 1 and June 30, 2014 September 1, 2013 to December 31, 2013 January 15, 2014 Between January 1 and June 30, 2014 January 1, 2014 to June 30, 2014 July 15, 2014 Between September 1 and December 31, 2014 HIB Trainings and Programs via the Harassment, Intimidation and Bullying – Investigations, Trainings and Programs (HIB-ITP) Data Collection System Report Period 1 HIB Investigations and Affirmed HIB Incidents (i.e., found to be HIB) via the Harassment, Intimidation and Bullying – Investigations, Trainings and Programs (HIB-ITP) Data Collection System Report Period 2 HIB Investigations and Affirmed HIB Incidents (i.e., found to be HIB) and HIB Trainings and Programs via the Harassment, Intimidation and Bullying – Investigations, Trainings and Programs (HIB-ITP) Data Collection System Only staff assigned with EVVRS district-level permission can access the HIB-ITP system. If you do not have a district-level, EVVRS account (user ID and password), please contact your district’s Homeroom Administrator (formerly the Web User Administrator) to obtain an account so you may access the HIB-ITP system. Page 3 of 12 Part 1: Data Entry A. To report the “Number of HIB Investigations” initiated and completed within 10 days and the “Number of HIB Incidents” that were affirmed (i.e., found to be HIB) by the board of education/governing authority: 1. Go to the NJDOE Homeroom at http://homeroom.state.nj.us/. 2. Click HIB–ITP. 3. Enter your four-digit district ID number, user ID, and password and click Login to display the Main Menu. 4. Click Data Entry Menu. 5. Select the appropriate reporting period from the drop-down list. 6. Click Enter and Edit HIB Investigation and Incident Numbers. 7. Enter the number of HIB investigations that were initiated for each school for the selected reporting period in the Total # Initiated box. 8. Enter the number of HIB investigations that were completed for each school within10 days for the selected reporting period in the # Completed within 10 days box. 9. Enter the number HIB incidents that were affirmed by the board of education/governing authority for each school for the selected reporting period in the Number of HIB Incidents Affirmed box. 10. When the HIB investigations and incidents data input are complete for your school(s), click Save and then click OK to submit. At this point, there are several options: 1) Click Back to Data Entry Menu to enter data for HIB trainings (Part 1b) or HIB programs (Part 1c); -OR2) Click the Back to Main Menu button to request reports (Part 4); to complete the semi-annual official data certification process, (Part 5); or to logout. Options to return to the Data Entry and Main Menus, to print and to logout are also located at the top of each page in the HIB-ITP system. Notes The number of reports of HIB that are investigated are entered in the Number of HIB Investigations box. The Number of HIB Incidents Affirmed by the Board of Education box is to be accessed only when BOTH an HIB investigation substantiates the report as HIB and the board of education/governing authority affirms the incident as HIB (i.e. found to be HIB). If the board of education/governing authority has not yet had an opportunity to affirm the results of an HIB investigation by the end of Report Period 1, you will be able to go back into the Report Period 1 data collection Page 4 of 12 in the HIB-ITP system during Report Period 2 to enter the Number of HIB Incidents Affirmed by the Board of Education box (see Part 2: Updating Records). Substantiated HIB incidents that are affirmed by the board of education/governing authority after the deadline for submitting Report Period 2 data cannot be entered into the HIB-ITP system, but supporting documentation should be made available to the NJDOE upon request. If the board of education/governing authority rejects a substantiated report of HIB (i.e. found NOT to be HIB), only enter the investigation in the Number of HIB Investigations box. The Number of HIB Investigations Initiated, the Number Completed within 10 days and the Number of HIB Incidents Affirmed by the Board of Education must be completed for each school in your district. The number of HIB incidents affirmed (i.e. found to be HIB) by the board of education/governing authority entered into the HIB-ITP system should match the number of HIB incidents entered into the Electronic Violence and Vandalism Reporting System (EVVRS) for each report period. School personnel responsible for completing the certification of HIB-ITP data two times per year through the HIB-ITP data collection system (Part 5), must ensure that all affirmed incidents of HIB (i.e., found to be HIB) have been reported accurately in both the HIB-ITP and EVVRS data collection systems and that the chief school administrator or charter school lead person has certified the official submission to the New Jersey Department of Education (NJDOE) prior to submitting the data. B. To report the “Number of HIB Trainings” that were conducted in each school or districtwide: 1. Go to the NJDOE Homeroom at http://homeroom.state.nj.us/. 2. Click HIB–ITP. 3. Enter your four-digit district ID number, user ID, and password and click Login to display the Main Menu. 4. Click Data Entry Menu. 5. Select the appropriate reporting period from the drop-down list. 6. Locate the section titled “Training Provided for the school or district-wide.” 7. Select a school or “district-wide” from the drop-down list. 8. Click Add New Trainings Provided. 9. Review the definition of “training” provided in the box at the top of the page. 10. Select the type of training by clicking the appropriate check box. If you select “Other Training Content,” select one or more of the topics that apply. Please note that meetings such as School Safety Team meetings, Anti-Bullying Specialist (ABS) meetings, and district/school staff meetings are not considered trainings for the purposes of this Page 5 of 12 data collection. Notes “HIB Training on District HIB Policy Only” cannot be selected along with “Other Training Content.” If your district conducted both “HIB Training on District HIB Policy Only” and “Other Training Content” as listed in the next section at the same session, these must be entered as separate trainings. If you select “check if the HIB training on district policy included instruction on preventing bullying on the basis of protected categories and other distinguishing characteristics,” then “HIB Training on District HIB Policy ONLY” must be selected as well. 11. Using the format indicated, enter the date on which the training was conducted. 12. Enter the total number of hours for which the training was conducted (e.g., .5, 2, 3.5, or 10). 13. Select the number of participants that received the training. 14. Select the target population for which the training was designed (check all that apply). 15. To enter additional trainings for the same school, during the same reporting period (if a school was selected) or district-wide (if district-wide was selected), click Save and Add more trainings and repeat steps 10 through 14. -OR16. To enter additional trainings for another designated school not originally selected, to change from school to district-wide, to change from district-wide to a school, or to change reporting periods, click Save and Go to training list, click OK to submit, and then click Back to Data Entry Menu and repeat steps 5 through 14. 17. If you do not want to save this training, click Cancel and Go to training list. At this point, there are several options: 1) Click Back to Data Entry Menu to enter data for HIB Investigations and Incidents (Part 1a) or HIB programs (Part 1c); -OR2) Click Main Menu button to request reports (Part 4); to complete the semi-annual official data certification process, (Part 5); or to logout. Options to return to the Data Entry and Main Menus, to print and to logout are located at the top of each page in the HIB-ITP system. C. To report the “Number of HIB Programs/Approaches/Initiatives” that were conducted in each school or district-wide: 1. Go to the NJDOE Homeroom at http://homeroom.state.nj.us/. 2. Click HIB–ITP. 3. Enter your four-digit district ID number, user ID, and password and click Login to display the Main Menu. Page 6 of 12 4. Click Data Entry Menu. 5. Select the appropriate reporting period from the drop-down list. 6. Locate the section titled “Program Provided for the school or district-wide.” 7. Select a school or “district-wide” from the drop-down list. 8. Click Add New Programs Provided. 9. Please review the definition of “program” provided in the box at the top of the page. 10. Select the program/approach/initiative provided from the drop-down list. If you select “Other” from the list, please provide a description of the program in the space provided. Note HIB-related discussions at such functions as Back-to-School Night, faculty meetings, and School Safety Team Meetings are not considered appropriate implementation of a program/approach/initiative for the purposes of this data collection. 11. Select “Yes” or “No” to indicate whether training was provided to support the program. 12. Using the format indicated, enter the date on which the program started. 13. Enter the total number of hours for which the program was conducted (e.g., .5, 2, 3.5, or 10). 14. Enter the number of days per week the program was provided (on average). 15. Enter the number of weeks per reporting period the program was provided. 16. Select the target population for which the program was designed (check all that apply). 17. Select the school-wide condition(s) for which the program was designed to address (check all that apply). For guidance on the school-wide conditions listed, click the Domains of Safe and Supportive School Conditions for Learning link. 18. Enter the first and last name of the person responsible for evaluating the program. Select a title from the drop-down list that most closely matches this person’s title within your school/district. 19. To enter additional programs for the same school or district-wide during the same reporting period, click Save and Add more programs and repeat steps through 6-18; -OR20. To enter additional trainings for another designated school not originally selected, to change from school to district-wide, to change from district-wide to a school, or to change reporting periods, click Save and Go to program list, then click Back to Data Entry Menu, and repeat steps 5 through 18. Page 7 of 12 21. If you do not want to save this program, click Cancel and Go to training list. At this point, there are several options: 1) Click Back to Data Entry Menu to enter data for HIB Investigations and Incidents (Part 1a) or HIB trainings (Part 1b); -OR2) Click Main Menu request reports (Part 4); to complete the semi-annual official data certification process, (Part 5); or to logout. Options to return to the Data Entry and Main Menus, to print and to logout are located at the top of each page in the HIB-ITP system. Part 2: Updating Records A. To Update “HIB Investigations and Incidents:” 1. From the Main Menu, click on Data Entry Menu. 2. Select the reporting period for which you will be updating. 3. Click Enter and Edit HIB Investigations and Incident Numbers. 4. Find the school for which you would like to update information and highlight the appropriate data field you would like to change. Enter the new number into that data field. The updated information will now appear in the data field. The default for these fields is “0.” 5. Repeat for each field that needs to be edited. 6. After all the revisions are entered, click Save and OK to submit. The “District Total” should reflect the new entries. 7. If you need to update an entry for a different report period, click Back to Data Entry Menu and repeat steps 2 through 6. B. To Update “Training Provided:” 1. From the Main Menu, click Data Entry Menu. 2. Select the reporting period for which you will be updating. 3. Select a school or “district-wide” and click Modify Existing Trainings. 4. Click the ID hyperlink associated with the training you would like to update. This will allow you to view and modify information associated with this training. Page 8 of 12 5. Update data by highlighting or selecting the appropriate data field(s). Enter the updated information. The updated information will appear in the data field(s). 6. When updating is complete, click Update and Back to training list. 7. To update additional trainings in the same school or district-wide, repeat steps 4 through 6. To update trainings in a new school or district-wide, click Back to Data Entry Menu, and repeat steps 3 through 7. If you want to update trainings for a school or district-wide in a different report period, click Back to Data Entry Menu, and repeat steps 2 through 6. C. To Update “Programs Provided:” 1. From the Main Menu, click Data Entry Menu. 2. Select the reporting period for which you will be updating. 3. Select a school or “district-wide” and click Modify Existing Programs. 4. Click the ID number associated with the training you would like to update. The ID number is a hyperlink that will allow you to view and modify information associated with this program/approach/initiative. 5. Update data by highlighting or selecting the appropriate data field(s). Enter the updated information. The updated information will appear in the data field(s). 6. When updating is complete, click Update and Back to program list and OK to submit. 7. To update additional programs in the same school or district-wide, repeat steps 4 through 6. To update programs in a new school or district-wide, click Back to Data Entry Menu, and repeat steps 3 through 7. 8. To update programs for a school or district-wide in a different report period, click Back to Data Entry Menu, and repeat steps 2 through 6. Part 3: Deleting Records Note: Information that is deleted cannot be retrieved. A. To Delete “HIB Investigations and Incidents:” 1. Delete investigation or incident numbers by highlighting or selecting the appropriate data field(s) and entering zero. Page 9 of 12 2. Click Save and OK to submit. B. To Delete “Training Provided:” 1. From the Main Menu, click Data Entry Menu. 2. Select the reporting period for which you will be deleting. 3. Select a school or “district-wide” and click Modifying Existing Trainings. 4. Select the delete check box(es) next to the associated ID number of the training(s) and click Delete and OK to submit. 5. To delete additional training(s) from another school or district-wide, click Back to Data Entry Menu and repeat steps 3 and 4. To delete training(s) from another school or district-wide in another reporting period, click Back to Data Entry Menu, and repeat steps 2 through 4. C. To Delete “Programs Provided:” 1. From the Main Menu, click Data Entry Menu. 2. Select the reporting period for which you will be deleting. 3. Select a school or “district-wide” and click Modifying Existing Programs. 4. Select the delete check box(es) next to the associated ID number of the program(s) and click Delete and OK to Submit. 5. To delete additional program(s) from another school or district-wide, click Back to Data Entry Menu and repeat steps 3 and 4. To delete program(s) from another school or district-wide in another reporting period, click Back to Data Entry Menu, and repeat steps 2 through 4. Part 4: Printing Reports A. To Print a Status Report: 1. From the Main Menu, click Data Entry Menu. 2. Select the reporting period from the drop-down list for which you want to print a status report. 3. To print a status report for HIB Investigations and Incidents, click Print Status Report. All data that has been entered will appear. Click Print at the top of the page. Page 10 of 12 4. To print a status report for Trainings Provided and/or Programs Provided, select the school or select district-wide for a district level report. Click Print Status Report. Trainings or Programs that have been entered will appear. Click Print at the top of the page. Note It is recommended that you set your printer properties to “landscape” when printing status reports. B. To Order Full Reports: 1. From the Main Menu, click Reports. 2. Select the report period from the drop-down list for which you would like to order reports. 3. Enter your last name and first name in space provided. 4. Enter your email address (required) and an alternate email address (optional) in the space provided. 5. Enter your phone number (required) and extension (optional) in the space provided. 6. Select the report(s) you would like to order and click Submit and OK to Submit. 7. You will receive the full report(s) you ordered via email from [email protected] on the next business day. 8. Click Print if you would like to print the report order confirmation. Click Main Menu to return to the Main Menu. Part 5: Semi-Annual District-wide Certification of HIB-ITP Data HIB-ITP data is required to be certified semi-annually through the Certification of HIB-ITP Data button. Certification for Report Period 1 is due by January 15, 2014. Certification for Report Period 2 is due by July 15, 2014. All data entered for both report periods must be verified for accuracy by the chief school administrator or charter school lead person prior to the submission of the semi-annual district-wide certification to the NJDOE as described below. 1. From the Main Menu, click Certification HIB-ITP Data. 2. Enter the first and last name of the person certifying for your agency in the space provided. 3. Select a position title from the drop-down list that most closely matches your job title. If you do not see a position title that closely matches your job title, select “Other” from the drop-down list. Type your job title in the space provided. Page 11 of 12 4. Select the reporting period for which you are submitting data and click Submit Data and OK to submit. 5. The Confirmation of Submission page will appear. Click Print to print a copy of this confirmation for your records. 6. Click Back to Main Menu to return to the Main Menu or click Logout to exit the system. For questions and additional technical assistance, please send an email to: [email protected] Page 12 of 12 s:\eval&dc\hib-itp 2013-14\hib-itp user manual_2013_2014 master.docx