1
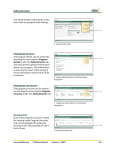
SSEM USER MANUAL
(SSEM Version 4)
Table of Contents
SSEM-4 Manual
Accessing SSEM
2
Selection Options
3
User Options
4
Form Wizard/PDF View Comparison
5
Setup Options
6
Form Listing
11
Icon Legend
14
Using Forms
15
Forms
19
Import from Bank
28
Print Merge
29
Finalize Forms
32
View Forms
36
Reports
37
Accessing Data Collection Form
39
1
Revised 073107 HAC LACA
ACCESSING SSEM
(SSEM Version 4)
The Special Services Education Module (SSEM) is a component of ProgressBook used for the creation
and storage of student specific forms. While designed to assist Special Educators in completing state
required documentation, it can also be used for other form needs. It is most commonly accessed by
first logging into ProgressBook.
The link to SSEM is located in the
upper right hand corner of the
user’s ProgressBook homepage.
Clicking on the “Special Services”
link will open the SSEM Homepage
in a new browser window.
If your browser is set up with popup blocker software, adjust
settings to allow new window to
open.
The SSEM Homepage is made of
up three parts:
- Selection Options
- Form Listings
- User Options
To return to the Homepage from
any screen in SSEM, click the
Homepage icon
SSEM-4 Manual
2
Revised 072007 HAC LACA
SELECTION OPTIONS
(SSEM Version 4)
The information in SSEM is student driven, so users must select a student to work with before a form
can be accessed. The Selection Options allow the user to select the desired student from the classes or
buildings depending on their access level.
There are two types of Selection Option setups: class-based access and district-wide access. ClassBased Access users are restricted to the classes they have access to in ProgressBook and can only
access students enrolled in those classes. District-Wide Access users are not restricted and can access
students by school building throughout the entire district.
Users with Class-Based Access
have two drop-down lists: Class
and Student
Class is a listing of all classes to
which the user has access. Users
cannot select the class of another
teacher unless that teacher has
shared the class.
Select the class in which the
desired student is enrolled.
Student is a listing of all students
in the selected class.
Select the desired student from the
drop-down list.
Users with District-Wide Access
have a search field and two dropdown lists: Building and Student
Building is a listing of all active
buildings within the school
district.
Select the building in which the
desired student is enrolled.
Last Name is a search field used to
narrow down the student listing.
Key last name search criteria and
click the Go button
to
repopulate Student list based on
keyed criteria.
keying “ba” lists all students whose last name begins with “ba” while keying “bays”
lists only those whose last name is “bays” or begins with the letters “bays”
Student is a listing of all students
based on the search criteria.
Select the desired student from the
drop-down list.
FY07-SSEM-Manual
3
Revised 072007 HAC LACA
USER OPTIONS
(SSEM Version 4)
User Options allow the user to specify settings for how they prefer to work. Users can also access
different functions of things they can do with the forms once they are created.
Form View allows the user to select the desired view for working on forms between PDF View and
Form Wizard View. Clicking on the icon will toggle between view selections.
-
PDF View allows the user to type information directly onto an electronic form, very similar to writing
directly on the form. If Adobe Reader is installed on the user’s machine, this will be the default selection.
Form Wizard view allows the user to type information into fields which will then be posted onto a read-only
version of the electronic form. This view is ideal for users with dial-up internet access and those with older
or slower computers.
Spell Check allows the user to determine perform a spell check on all keyed information.
-
In PDF View, after closing a form a Spell Check Review screen opens displaying all keyed data and allows
the user to run spell check on the entire document.
In Form Wizard view, a spell check button is available after each text field to check the immediately
preceding field for spelling errors.
Clicking on the icon will toggle between Spell On and Spell Off.
Print Merge allows the user to print more than one form into a group with automatic page
numbering.
Setup Options allow the user to customize their spell check dictionary within the software and
develop a set of goal, objective, and accommodation banks. These banks can be used to populate the
applicable forms with commonly used statements or phrases, reducing the redundancy work for the
user.
Finalize Forms allows the user to finalize all forms into a read-only group. These forms are still
available in the system but cannot be changed. It is recommeded that users finalize forms after they
have made changes from the IEP meeting so that the electronic forms match the legally signed
documents.
View Forms allows the user to view and print all finalized forms. Users with read-only access (Level
100) will be taken directly to the View Forms screen as their SSEM homepage.
Reports allows the user to generate reports off the information contained on finalized IEP sets.
Reports can be run by building, grade level within the building, or by individual student.
-
IEP Due Date report provides a listing of the date each student’s next IEP is due.
Accommodations report provides a listing of the tests each student is required to take and their testing
accommodations as outlined by their IEP.
EMIS Tools allows the user, with appropriate security access, to generate an EMIS report and student
data collection forms, pulling EMIS related data for special education students off their finalized IEP
forms. Also allows the user to generate and EMIS extract file to be imported into EMIS, reducing the
need for double entry of information.
District Transfer allows the user, with appropriate security access, to send finalized forms to another
district when a student transfers as well as receive forms from other districts using SSEM.
Current Version of the SSEM software.
SSEM-4 Manual
4
Revised 073107 HAC LACA
FORM WIZARD TO PDF COMPARISON
SSEM-4 Manual
(SSEM Version 4)
5
Revised 073107 HAC LACA
SETUP OPTIONS
(SSEM Version 4)
The first set up option is the ability to create and maintain a bank of phrases for use in the Goals,
Objectives, and Accommodations sections of the IEP document. These banks are user specific, but
banks shared across the district can be created and shared with building staff. Each bank can also be
organized into categories.
Click Setup Options icon in User
Options toolbar to access features
The user’s custom banks can be
accessed by clicking the “Edit
Banks” icon on User Setup Page.
The custom banks open allowing
the user to select the desired bank.
- SSEM Accommodations
- SSEM Goals
- SSEM Objectives
To add a category, click “Add New
Category” link.
FY08-SSEM-Manual
6
Revised 080607 HAC LACA
SETUP OPTIONS
(SSEM Version 4)
Key name of new category and
click Add New
button.
Repeat process to add additional
categories.
* Categories will be automatically
sorted in alphanumeric order.
To customize category order,
retype desired order in “Order”
column and click Save Categories
button.
Categories will be sorted in
specified order.
To prevent a category from
displaying when accessing banks
from a form, check “hide” box for
desired category.
To delete a category and all its
contents, click Delete icon
associated with desired category.
FY08-SSEM-Manual
7
Revised 080607 HAC LACA
SETUP OPTIONS
(SSEM Version 4)
To add items to a category, click
“view items” link associated with
desired category.
Category will open below
displaying all items.
Click “Add New Item” link to open
the item window.
Key description of the item to be
added.
Alias can be used as the summary
for the item if the description
begins similar to other items. This
will aid in finding the item later.
Items can be associated with
multiple categories if desired.
Click the checkbox beside the
desired categories.
Once complete, click Save button
to save item.
Codes can be included in the item
description to populate the
appropriate student name and
pronoun.
#first#
#he/she#
#He/She#
#him/her#
#Him/Her#
#his/hers#
#His/Hers#
#his/her#
#His/Her#
The student’s first name
“he” for males, “she” for females
“He” for males, “She” for females
“him” for males, “her” for females
“Him” for males, “Her” for females
“his” for males, “hers” for females
“His” for males, “Hers” for females
“his” for males, “her” for females
“His” for males, “Her” for females
To edit an existing item, click “edit
item” to open the item window.
FY08-SSEM-Manual
8
Revised 080607 HAC LACA
SETUP OPTIONS
(SSEM Version 4)
The second set up option is the custom dictionary which allows the individual user to designate words
or abbreviations that they would like spell check to overlook, most commonly student’s names and
special education jargon.
The user’s custom dictionary can
be accessed by clicking the “Edit
your Dictionary” icon on User
Setup Page.
The custom dictionary opens
displaying an alphabetical listing
of the words currently in the
dictionary.
To add a word, click on the “Add
New Word to Dictionary” link.
Key new word and click Save
button.
New word will be added to the list
alphabetically.
To edit an existing word, click red
pin
beside desired word. Key
changes to textbox and click Save
button.
Modified word will be saved to the
list alphabetically.
FY08-SSEM-Manual
9
Revised 080607 HAC LACA
SETUP OPTIONS
(SSEM Version 4)
To delete a word, click on the red
beside the desired
Delete icon
word.
Words can also be added to the
custom dictionary by clicking Add
button while running
spell check on a form.
FY08-SSEM-Manual
10
Revised 080607 HAC LACA
FORM LISTING
(SSEM Version 4)
The forms in SSEM are divided into two groups: Special Education and Spec Ed Supplementals. The
Special Education group contains the state Model Procedure forms where the Spec Ed Supplementals
group contains the additional tools developed locally to aid in recording information. Each group is
also divided into several form types which contain similar forms.
To change the selected group, click
the drop down box beside Select
Form Group
To then change the selected form
type, click the drop down box
beside Select Form Type
Each form is identified with a unique Form Name and Form Description and can be accessed through
the icons in the Select Action column. The forms within each Form Group/Type are listed below.
Special Education Group
The IEP form type contains the
state PR-02 and PR-07 forms.
The Progress Report form type
contains the IEP Progress Report.
The (EV) Evaluation form type
contains the state PR-04, PR-05,
and PR-06 forms.
SSEM-4 Manual
11
Revised 073107 HAC LACA
FORM LISTING
(SSEM Version 4)
The (PS) Procedural Safeguards
form type contains the state PR-01
and PR-03 forms.
The (DP) Due Process form type
contains the state PR-08 forms.
Sped Ed Supplementals Group
The (IAT) Intervention Assistance
form type.
The (EP) Evaluation Planning
form type.
SSEM-4 Manual
12
Revised 073107 HAC LACA
FORM LISTING
(SSEM Version 4)
The (ETR) Evaluation Team
Report form type.
The (ST) Supplemental Tools form
type includes a variety of
additional forms.
SSEM-4 Manual
13
Revised 073107 HAC LACA
ICON LEGEND
(SSEM Version 4)
Several icons are used repeated in the SSEM software. This legend provides quick explanation of the
features the icon designates.
SSEM Homepage
Navigates from any screen back to the SSEM homepage. It is located in the upper right corner of the SSEM
screens. Does not appear when forms are open, as the forms must be closed to navigate to the SSEM
homepage.
Create Form
Creates a new blank form.
Edit Form
Views an existing form in proposed state, not finalized. If specific form allows for multiple copies, will allow
user to create another new form.
Comments
Allows users to leave comments to one another without information displaying on the forms. Not
recommended tool as no distinction between no comments, comments left by current user, or comments left
by another user.
Save Form
Saves the information keyed on the form. It is recommended to save as the forms are being worked on to
prevent lost data. The Save Form buttons are located on every form in both the upper right and bottom right
corners.
Clear Form
Clears all information keyed on the form except the demographic information which pre-populates on the
form. If the data is cleared and then saved, there is no way to retrieve the cleared data. It is located on the
bottom left corner of forms. In the event of multiple page form, the Clear Form button will be located on the
last page.
SSEM-4 Manual
14
Revised 073107 HAC LACA
USING FORMS
(SSEM Version 4)
The majority of the work done in SSEM is on the forms. While there are several different forms, they
all function in the same manner.
Creating a New Form
Click on the Create Form icon
beside the desired form.
When the Create New Form screen
opens, the form will be named
using a default naming convention.
All form names cannot exceed 45
characters in length.
The default page name consists of
four parts:
- Today’s Date
- Form Short Name
- Creator Name
- Instance
It is recommended to change at
least the Form Short Name to a
more descriptive word or phrase.
Once the form is named, click the
Create New Blank Page button to
create the form.
Viewing an Existing Form
Click on the Edit Form icon beside
the desired form
When the Select Page to View
screen open, click on the View
Form Edit icon beside the desired
page to open the form
If Form allows multiple copies, all
created copies will be listed on the
Select Page to View screen.
SSEM-4 Manual
15
Revised 080607 HAC LACA
USING FORMS
(SSEM Version 4)
Creating another New Form
Click on the Edit Form icon beside
the desired form
When the Select Page to View
screen open, click on the Create
New Page button
If Form only allows one copy, the
Create New Page button will not
be visible.
When the Create New Form screen
opens, the form will be named
using a default naming convention.
It is recommended to change at
least the Form Short Name to a
more descriptive word or phrase.
All form names cannot exceed 45
characters in length.
Once the form is named, click the
Create New Blank Page button to
create the form.
SSEM-4 Manual
16
Revised 080607 HAC LACA
USING FORMS
(SSEM Version 4)
Creating a New Form using data
on an Existing Form
After naming the form on the
Create New form screen, click on
the Create From an Existing Page
button
When the Copy From Existing
screen opens, locate the desired
original form and click the red pin
on either side of the form row
This will create a new form but
copy the information keyed on the
original form. The original form
will not be changed.
* Blank Finalized Group Name indicates
form still in proposed state
* Narrow list by modifying the Form
Created Date Range
* Sort listing by clicking on any column
heading.
Saving a Form
To save information keyed on any
form, click one of the Save Form
buttons located on the form.
There are two Save Form buttons
located on every page of the form:
one at the top right corner and one
at the bottom right corner.
Once the form has been saved, the
Save confirmation box will display
to confirm the save completed.
Click OK to continue working on
the form.
SSEM-4 Manual
17
Revised 080607 HAC LACA
USING FORMS
(SSEM Version 4)
Closing a Form
Click Close button on right side of
dark blue bar, a close confirmation
box will appear.
Click OK to continue closing the
form
– or –
Click Cancel to return to the form.
* If spell check is turned on, user will be directed to the Spell Check Review Screen
* If spell check is turned off, user will be directed to the SSEM homepage
Commenting on a Form
It is not recommended to utilize
this feature due to inefficiency and
ineffectiveness of communication.
SSEM-4 Manual
18
Revised 080607 HAC LACA
FORMS
(SSEM Version 4)
PR-07 PAGE 1
(IEP) STEPS 1 AND 2 – Future Planning/Performance
*Required part of the IEP/EMIS Set
PR-07 PAGE 2
(IEP) STEPS 3 THROUGH 6 – Goals/Objectives
*Required part of the IEP/EMIS Set
SSEM-4 Manual
19
Revised 073107 HAC LACA
FORMS
(SSEM Version 4)
PR-07 PAGE 3
(IEP) SPECIAL FACTORS
*Required part of the IEP/EMIS Set
PR-07 PAGE 4
(IEP) CHILDREN/STUDENTS WITH VISUAL
IMPAIRMENTS
PR-07 PAGE 5
(IEP) DISCUSS AND DOCUMENT A STATEMENT OF
NEEDED TRANSITION SERVICES
SSEM-4 Manual
20
Revised 073107 HAC LACA
FORMS
(SSEM Version 4)
PR-07 PAGE 6
(IEP) STATEWIDE AND DISTRICTWIDE TESTING
*Required part of the IEP/EMIS Set
PR-07 PAGE 7
(IEP) SIGNATURE PAGE
*Required part of the IEP/EMIS Set
IEP ATTACH
IEP ATTACHMENT PAGE
SSEM-4 Manual
21
Revised 073107 HAC LACA
FORMS
(SSEM Version 4)
DATE CODE
EVENT DATE TYPE CODE
*Required part of the IEP/EMIS Set
PR-02 A
GENERAL INVITIATION
PR-02
PARENT INVITIATION
SSEM-4 Manual
22
Revised 073107 HAC LACA
FORMS
(SSEM Version 4)
Progress Report
PR-04
REFERRAL FOR EVALUATION
SSEM-4 Manual
23
Revised 073107 HAC LACA
FORMS
(SSEM Version 4)
PR-05
PARENT CONSENT FOR EVALUATION
PR-06 PAGE 1
EVALUATION TEAM REPORT (Part A) AREAS OF
ASSESSMENT
PR-06 PAGE 2
EVALUATION TEAM REPORT (Part B) DISABILITY
DETERMINATION
SSEM-4 Manual
24
Revised 073107 HAC LACA
FORMS
(SSEM Version 4)
PR-06 PAGE 3
EVALUATION TEAM REPORT (Part C) CRITERIA
FOR DETERMINING A SPECIFIC LEARNING
DISABILITY
PR-06 PAGE 4
EVALUATION TEAM REPORT ATTACHMENT PAGE
SSEM-4 Manual
25
Revised 073107 HAC LACA
FORMS
(SSEM Version 4)
PR-01
PRIOR WRITTEN NOTICE TO PARENTS
PR-01 Attachment
PRIOR WRITTEN NOTICE TO PARENTS
ATTACHMENT
PR-03 PAGE 1
MANIFESTATION DETERMINATION REVIEW
SSEM-4 Manual
26
Revised 073107 HAC LACA
FORMS
(SSEM Version 4)
PR-08
REQUEST FOR AN IMPARTIAL DUE PROCESS
HEARING
PR-08-Attach
REQUEST FOR AN IMPARTIAL DUE PROCESS
HEARING ATTACHMENT
SSEM-4 Manual
27
Revised 073107 HAC LACA
IMPORT FROM BANK
(SSEM Version 4)
Once user banks are built in Setup Options, the items in the banks can be added to the PR07P2 Goal
Page and the PR07P6 Testing Page using Import from Bank.
While working on the desired form,
Save any changes made to the
form.
Click Import from Bank button on
left side of dark blue bar.
The banks screen will open
displaying the fields items can be
added to in the left-side light blue
bar. Click on the section name to
select it.
To add a specific item, select the
Category the item is in, then select
the item from the list. Once
selected, click Add Item button to
add to workspace.
Click Save button prior to choosing
another section.
State Indicators can also be access
for reference on the form.
To add an indicator, save the
section and click Add Indicator
button.
On the Add Indicators screen,
select the desired content area and
grade level. Check the desired
indicators and click Add selected
items button to move indicators to
workspace.
*When adding indicator, software
will also add the corresponding
Standard and Benchmark.
Once all sections contain desired
items and have been saved, click
Return to IEP to see items on the
form itself.
FY08-SSEM-Manual
28
Revised 080607 HAC LACA
PRINT MERGE
(SSEM Version 4)
Print Merge is used to print more than one form into a group with automatic page numbering. This
feature can be used to print out the pages of an IEP prior to the IEP meeting or all of a student’s
Progress Reports at report card time.
The Print Merge screen can be
accessed by clicking the “Print
Merge” icon on the User Options
section of the SSEM Homepage.
The Form Merge screen opens with
the selected student’s proposed
forms in the blue “Choose Form(s)
to Print” list.
To add a form to the green
“Selected Form(s) to Print” list,
click on the blue Add icon
beside the desired form. Once the
selected form has been added to
the list, repeat for any additional
forms.
To add all proposed forms to the
green “Selected Form(s) to Print”
.
list, click Add All button
To delete a form from the “Selected
Form(s) to Print” list, click on the
red Delete icon
beside the
desired form.
To delete all selected forms from
the “Selected Form(s) to Print” list,
.
click Delete All button
FY08-SSEM-Manual
29
Revised 080607 HAC LACA
PRINT MERGE
(SSEM Version 4)
The selected pages will be Page
Numbered based on the Merge
Order.
To modify the Merge Order, type
the correct order in the desired
boxes and click Save Order button
.
Once all desired forms are selected
and correct Merge Order is
established, click “Complete
Merge” icon to open merged forms.
These forms will open in a new
Internet window allowing the user
to verify form selection and print
order.
To print merged forms, click the
Adobe print icon
window.
on form
DO NOT use File > Print or
browser print icon.
To close merge forms,
click the “x” on the right side of the
tab (IE 7)
- or Click the red “x” in the upper right
corner of internet window (IE 6 &
Safari)
FY08-SSEM-Manual
30
Revised 080607 HAC LACA
PRINT MERGE
(SSEM Version 4)
The software can also generate a blank set of forms when paper copies are necessary.
To print BLANK copies of forms,
select a student with no proposed
forms.
Check “Include Blank Forms”
checkbox.
To include selected student’s
demographic information on form,
leave “Auto Populate
demographics on blank forms?”
check.
For completely blank forms,
uncheck “Auto Populate
demographics on blank forms?”
Blank forms are easy to identify as
they have no “Page Name” listed in
the blue “Choose Form(s) to Print”
box.
To add a blank form to the green
“Selected Form(s) to Print” list,
click on the blue Add icon
beside the desired form. Repeat
for all desired forms.
Once all desired forms are selected,
click “Complete Merge” icon to
open merged forms.
Print and close merged forms as
usual using the Adobe print icon.
FY08-SSEM-Manual
31
Revised 080607 HAC LACA
FINALIZE FORMS
(SSEM Version 4)
Finalize Forms is used to convert editable forms into a read-only group for archiving purposes. It is
necessary to finalize the forms for users with Read access, level 100, to see the forms as well as to run
reports off the data contained on the forms.
The Finalize Forms screen can be
accessed by clicking the “Finalize
Forms” icon on the User Options
section of the SSEM Homepage.
The Finalize Forms screen opens
with the selected student and
requires user to select desired form
type to finalize.
FY08-SSEM-Manual
32
Revised 080607 HAC LACA
FINALIZE FORMS
(SSEM Version 4)
Once the IEP meeting has occurred and the forms updated with any changes made at the meeting, the
IEP/EMIS Set should be finalized. In addition to the other finalization benefits, this also allows the
EMIS reportable data to be populated on the EMIS Data Collection Form.
Select IEP/EMIS Set to finalize the
IEP forms.
The system will verify all the
required forms have been
completed for the IEP/EMIS Set.
- PR07P1 Cover Page
- PR07P2 Goal Page
- PR07P3 Special Factors Page
- PR07P6 Testing Page
- PR07P7 Signature Page
- DATE CODE Page
If all required forms are present,
the green “Selected Form(s) to
Finalize” list automatically
populates with the required forms.
The system will also add any
additional IEP related forms if they
exist:
- PR07P4 Visual Impair Page
- PR07P5 Transition Page
- IEP Attachment Page
- PR02 Parent Invitation
- PR02 A General Invitation
To add additional forms, click the
blue plus icon beside the desired
form(s).
To reorder the selected forms, key
the desired order in the Merge
Order column and click “Save
Order” button.
FY08-SSEM-Manual
33
Revised 080607 HAC LACA
FINALIZE FORMS
(SSEM Version 4)
To remove forms from the
finalized group, click the red x icon
beside the desired form.
*DO NOT remove one of the
required forms from the
IEP/EMIS Set
To preview the selected list, click
Preview Selected Forms button.
Form preview will open in a new
window similar to Print Merge.
Once the list is built and ordered,
key a name for the IEP Set.
It is recommended to key a more
specific name including both
school year and grade level.
Click the Finalize icon to complete
the finalization process.
The form set will open in a new
window/tab.
If a required form is missing a
message will appear informing
user that Finalization cannot be
completed.
Any missing forms will be listed in
the green section providing the
user up to two options:
- Create New allows user to
create a new copy of the form.
Clicking the icon will direct
user to the Form naming
screen.
- Use Previous allows the user
to use the form page from the
last finalized IEP for this
student. If no previous IEP
exists, no icon will display.
FY08-SSEM-Manual
34
Revised 080607 HAC LACA
FINALIZE FORMS
(SSEM Version 4)
It is recommended to finalize the Evaluation Forms when the ETR is complete. Progress Reports should also be
finalized just before the new IEP set is created so only the current progress reports are listed as proposed forms.
Both these sets are finalized as an Other Set.
Select Other to finalize a group of
assorted forms, including Progress
Reports or ETR forms.
Add forms by clicking the blue +
beside the desired form(s).
To reorder the selected forms, key
the desired order in the Merge
Order column and click “Save
Order” button.
To preview the selected list, click
Preview Selected Forms button.
Form preview will open in a new
window similar to Print Merge.
Once the list is built and ordered,
key a name for the Other set.
It is recommended to key a more
specific name including school
year, grade level, and type of forms
Click the Finalize icon to complete
the finalization process.
The form set will open in a new
window/tab.
FY08-SSEM-Manual
35
Revised 080607 HAC LACA
VIEW FORMS
(SSEM Version 4)
View Forms is the “file cabinet” which stores all finalized forms for a student are grouped into
IEP/EMIS sets, Other Sets, Archived sets (prior to 06/08/05), and All Finalized Form sets. They are
also viewable as a finalized group or by individual forms.
The View Forms screen can be
accessed by clicking the “View
Forms” icon on the User Options
section of the SSEM Homepage.
The View Forms screen opens with
the selected student’s IEP/EMIS
sets displayed.
To view a form set click on the
View icon . The forms will open
in a new window to be read or
printed.
To select another Finalized Set
Type drop down selection box and
choose desired set type.
To select another Display Type
drop down selection box and
choose desired display type.
Forms finalized as an IEP/EMIS Set will display “True” in the District Required Set
column, forms finalized as an Other Set will display “False.” This code indicates
whether the data on the finalized set will be accessible in the EMIS Tools section.
FY08-SSEM-Manual
36
Revised 080607 HAC LACA
REPORTS
(SSEM Version 4)
The Reports section allows the user to run reports off of information on finalized IEPs. Information
on reports can easily be copy and pasted into Excel spreadsheets for further data manipulation.
Reports can be run by building, by grade level within a building, or by a specific student.
The Reports screen can be accessed
by clicking the “Reports” icon on
the User Options section of the
SSEM Homepage.
The Reports screen opens with a
selection screen allowing user to
choose one of two report types:
- IEP Due Date
- Accommodations
The remainder of the selection
screen is comprised of the student
selection section and the date
selection section.
The date selection section
corresponds to the IEP effective
dates keyed on the cover page
(PR07P1) of the finalized IEP.
To run report for an entire
building, select desired building
from “Building” drop down box.
Modify dates to the desired date
range and click Run Report button.
FY08-SSEM-Manual
37
Revised 080607 HAC LACA
REPORTS
(SSEM Version 4)
To run report for a specific grade
level, select the desired building
from the “Building” drop down
box, then select the desired grade
level within that building from the
“Select Grade Level” drop down
box.
Modify dates to the desired date
range and click Run Report button.
To run report for a specific student,
select the desired building from the
“Building” drop down box, then
key all or part of student’s last
name in the “Search by Lastname”
field and click Go button. Student
list will populate with student’s
matching search criteria, select the
desired student.
Modify dates to the desired date
range and click Run Report button.
To sort report listing, click on the
column heading.
- one click sorts in ascending
order
- two clicks sorts in descending
order
To close the report, click Close
button on right side of dark blue
bar
The IEP Due Date Report displays
the:
- Last Name
- First Name
- Student ID
- School Name
- Grade Level
- IEP Due Date
Based on the date range chosen on
the selection screen.
The Accommodations Report
displays the:
- Last Name
- First Name
- Student ID
- School Name
- Grade Level of Test
- Subject Area of Assessment
- Manner of Testing
- Accommodations
Based on the date range chosen on
the selection screen.
FY08-SSEM-Manual
38
Revised 080607 HAC LACA
ACCESSING DATA COLLECTION FORM
(SSEM Version 4)
The EMIS Data Collection Form can be generated from the IEP data once the IEP has been finalized
as an IEP/EMIS Set. The EMIS Review Report must first be generated to then view the Data
Collection Form
The EMIS Tools screen can be
accessed by clicking the “EMIS
Tools” icon on the User Options
section of the SSEM homepage.
The EMIS Review Report
Selection Screen is comprised of
two sections:
- EMIS Report Criteria –
which IEPs populate the
report
- EMIS Report Fields – which
values from the selected IEPs
populate the report
Select the desired date range in the
EMIS Report Criteria.
Check the desired fields in the
EMIS Report Fields.
*To quickly display the report, it is
recommended to select only
- Student Name
- EMIS ID
- IEP Create Date
- IEP End Date
Click View Report button to display
report.
FY08-SSEM-Manual
39
Revised 080607 HAC LACA
ACCESSING DATA COLLECTION FORM
(SSEM Version 4)
Click on the Edit Forms icon beside
the desired student to display the
Data Collection Form.
To print the form, click on the
Adobe print icon.
Click Close to return to EMIS
Review Report.
FY08-SSEM-Manual
40
Revised 080607 HAC LACA