1
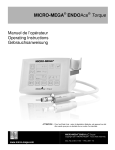
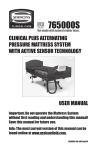
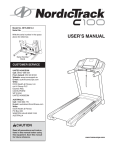
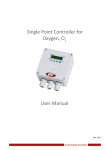
Directions for Use CAUTION: US Federal law restricts this device to sale by or on the order of a licensed dental professional Doc. No. 87514-0914 Table of Contents 1 2 Introduction ..................................................................... 3 Important Information ...................................................... 4 Indications for Use ............................................................. 4 Contraindications ............................................................... 4 Warnings ............................................................................ 4 Precautions ........................................................................ 6 Adverse Reactions ............................................................. 6 Applied Symbols ................................................................ 7 3 Product Overview ............................................................ 8 Overview of the Unit ........................................................... 8 Back Panel ......................................................................... 9 4 Installation and Preparation for Use .............................. 10 Location ........................................................................... 10 Installation ........................................................................ 10 System Icons ................................................................... 13 5 Set Up Mode ................................................................. 15 Set Up Mode Operations ................................................. 15 Calibration ........................................................................ 16 6 General Operation......................................................... 19 General Operation ........................................................... 19 Operational Mode Options ............................................... 20 7 Preparation Mode.......................................................... 21 All trademarks referred to are the property of their respective owners. Manufactured for: DENTSPLY Professional A division of DENTSPLY International 901 West Oakton Street Des Plaines, IL 60018-1843 USA www.dentsply.com Preparation Mode Operations ......................................... 21 Endodontic Mode .......................................................... 23 Endodontic Mode Operations .......................................... 23 9 Cleaning and Maintenance ........................................... 26 Cleaning .......................................................................... 26 Maintenance .................................................................... 26 10 Troubleshooting ............................................................ 27 11 Information on Electromagnetic Compatibility............... 28 12 Specifications ............................................................... 30 Control Unit ..................................................................... 30 Power Supply .................................................................. 30 Requirements to Control Unit .......................................... 30 Recommended Input Settings ......................................... 31 Operating Conditions of Control Unit and Power Supply . 31 Type Label....................................................................... 31 13 Spare Parts................................................................... 32 14 Warranty ....................................................................... 33 Maintenance & Repair – Within USA ............................... 33 Maintenance & Repair – Within Canada.......................... 33 8 1 Introduction 1 Introduction ® The Midwest E Electric Handpiece System is a dental handpiece system with various attachments, intended for cutting, shaping, filing, drilling, cleaning and polishing procedures in both general and endodontic dentistry. System Contents ® The Midwest E Electric Handpiece System is comprised of the following components: Page 3 ® Midwest E Electric Handpiece System ® Midwest E Motor Power Cord Mounting Attachment Directions for Use 2 Important Information 2 Important Information Indications for Use ® The Midwest E Electric Handpiece System is intended for use by dental professionals in the performance of dental restoration, prophylaxis and endodontic procedures. Attachments are offered to complement the system used for general dentistry work. The intended use of the respective attachment is dependent on the gear ratio. The System offers handpiece attachments for the removal of decayed matter, cavity and crown preparations, and removal of fillings and surface finishing of tooth and restoration surfaces. In addition, the system offers attachments for caries excavation and endodontics. Contraindications None known Warnings WARNING: This product is intended for use by dental professionals only. Before operating the system, carefully read and follow these intructions and save them for future reference. Observe all cautions and warnings including: Page 4 This Medical device is only intended for dental treatment As described in the Indications for Use, any other type of use or alteration to the product is prohibited and can lead to personal injury or damage to the product. Electric Dental Micromotors generate significantly more power than traditional air turbines and air motors. Due to this increased power and torque, poorly maintained, misused, worn, or damaged handpieces can potentially generate friction induced heat capable of causing serious burns to patients and staff. The following guidelines should be followed to ensure safe operation of electric handpieces: o Carefully follow these maintenance instructions. o Use only Midwest maintenance products. o Always examine the handpiece for damage before each use. Immediately stop using the handpiece if it begins generating heat, excessive noise, or vibration. o NEVER apply pressure to the chuck release button while the handpiece is rotating or use the handpiece as a cheek or tongue retractor! Only Use the AC Power Adaptor and Control Unit Supplied for this Equipment. Using other AC Power Adaptors or Control Units may cause personal injury or damage to the equipment. Proper Disposal is Required. To dispose of this device adhere to local, state, federal and/or other governing regulations. 2 Important Information Radio Frequency Interference ® The Midwest E Electric Handpiece System meets the electromagnetic compatibility (EMC) requirements as specified in the International Electrotechnical Commissions (IEC) 60601-1-2:2007 standard for electromagnetic compatibility. There may be potential difficulties if the device is not kept separate from other equipment, such as hand-held transmitters, cellular phones, and electrosurgical equipment that may generate strong radio frequency interference (RFI). The functions of implanted systems, such as pacemakers, can be influenced by electromagnetic fields. Inform patients of the risks before starting treatment. Use of damaged Edondontic files or Burs Use of damaged Endondontic files or Burs can result in personal injury or damage to the product. Stop using the device immediately in the event of damage, irregular running noises, excessive vibrations, unusual generation of heat or if the drill bit is not firmly gripped. Only Use Approved Files and Burs Unauthorized file systems can result in personal injury or damage to the product. o Only use authorized Ni-Ti file systems with a consistency of >2%, suitable for rotary systems. o Only use files with shafts meeting the requirements of ISO 1797-2, ISO 3630-1, and ISO 3630-2, with a shaft diameter of 0.092 to 0.093 inches. Service Using Authorized Personnel Only Supply of spare parts, service, and maintenance of the Midwest® E Electric Handpiece System is restricted to DENTSPLY authorized service personnel only. Use of other servicing or non-qualified parts is prohibited. NOTE: Send the product every 3 years for a service check. The safety check according to IEC 62353 and the measurement check will be carried out during service check. The safety checks in different countries can vary in compliance with country specific regulations and requirements for medical devices. The national valid regulations are to be observed. Endodontic Mode Attachments for root canal treatments should only be used in Endodontic Mode to prevent personal injury. Always comply with the endodontic handpiece and file manufacturer’s instructions regarding maximum speeds, torques, forward and reverse directions, and use of all instrumentation, drills, burs, etc., used in endodontic applications. Risk of Fire - Operation Oxygen Enriched Environment Do not operate this product in the presence of flammable anesthetics (such as ether) in combination with air, oxygen-enriched environments, or nitrous oxide; explosion can result. Reference IEC 60601-1. NOTE: Nitrous Oxide alone is not a flammable anesthetic. Page 5 2 Important Information Handpiece Attachments Follow and adhere all instructions described in the Handpiece Attachment Directions for Use. Ensure Handpiece Attachments are inserted completely, such that the attachment and motor are flush with each other. Follow the separate User Manual for attaching and using the dental attachments. Improper handling can result in personal injury. Inspect Power Cord and Control Unit Case Inspect the power cord and the control unit case before use for any damages to the cord, ground wire, or casing. Precautions Avoid Adhesive Labels on the Instrument Tubing Attaching adhesive labels or tape to the intrument tubing may cause the tubing to break. Cleaning the System o Do not use products containing acetone chlorine or bleach as disinfecting agents. o Do not immerse the system in solution. Motor Operation Note: To prevent overheating, the motor should not be operated at maximum speed and torque for more than 30 seconds in any 9 minute interval. This duty cycle is typical of its intended use. Adverse Reactions None Known. Page 6 2 Important Information Applied Symbols Appearing in the manual: A potential hazard to the operator/patient Important information for the operator. A potential hazard that may lead to damage to the device. Appearing on the unit: Operation mode: Duty cycle. The operation time is 0.5 minutes with a 9 minutes interval. Consult Directions For use Manufacturer MET test mark Disposal information see Important Information "Disposal" Appearing on the packaging: Fragile Stacking restrictions Humidity Keep dry Temperature range Quantity Transport upright Air pressure Exclusion of Liability Supply of spare parts, service and maintenance may only be carried out by authorized personnel. DENTSPLY shall assume no liability for accidental, special or consequential damage caused by maintenance or service of the Midwest E unit by third parties, or for use of equipment or parts manufactured by third parties, including loss of profit, any commercial loss, economic loss or loss incurred by personal injury. Never remove the cover of the device and never insert objects through the holes or openings on the case. Non-compliance may cause damage to the device and/or may endanger the user. Page 7 3 Product Overview 3 Product Overview Overview of the Unit Figure 1 – Overview of the Unit LCD Screen Control Unit ® Midwest E Motor Power Supply Unit Power Supply - Main Cord Motor Hose Installation Bracket Page 8 3 Product Overview Back Panel Figure 2 – Back Panel of the Unit 4-hole, 5-hole, or 6-pin Connector Power Supply Input Motor Hose Input Page 9 4 Installation and Preparation for Use 4 Installation and Preparation for Use WARNING: Installation of the device should be performed by a qualified service technician only Location A mounting accessory is supplied with the unit to aid installation of the system to a dental unit. The placement and mounting location of the device is at the discretion of the dental office. To mount the controller: Attach the supplied controller mounting bracket in the desired location. The bracket contains four holes on the surface wings to easily bolt it to the underside of a dental unit tray. Mounting Bracket Slide the controller unit into the bracket. Using the four screws and washers supplied, mount the unit to the bracket by aligning the four slots on the bracket base with the four holes on the bottom of the control unit. Installation Follow the following instructions to install the device: Connect Power Supply ® ® WARNING: Use only the Midwest E motor and power supply supplied with the Midwest E Electric Handpiece System. To connect the AC Power Adaptor: 1. Connect the power supply cord to the back of the control unit as shown in Figure 4 below. 2. Connect the power supply adaptor to the mains cable. 3. Plug the AC mains cable into a 120 VAC wall outlet. NOTE: Maintain a clear path to the back of the control unit when mounting the device to the dental unit, such that disconnection of the power line is still accessible. Page 10 4 Installation and Preparation for Use Figure 4 – Connect Power Supply Connect Drive Air Tubing to the Control Unit Connect the 4-hole, 5-hole, or 6-pin air and water supply tubing (according ISO 9168) to the four-hole connection of the control unit (See Figure 5 below). CAUTION: Compressed air supply must be clean, dry, and free from oil per ISO 7494-2. A filter, water trap, or air dryer may be required. Failure to adhere may damage the motor or attachments of the device. To prevent damage to the device, adhere to all pressure specifications as described in Chapter 12, Technical Specifications. The specified pressure into the control unit must be between 3.5 - 4.0 bar (50.8 to 58 psi). Figure 5 – Connect Tubing to the Control Unit Page 11 4 Installation and Preparation for Use Connect the Dental Motor 1. Connect the motor hose to the control unit Locate the motor hose pin connector on the back panel of the unit. Snap the hose male connector to the female end on the unit aligning the pins together as shown in the figure below. Figure 6 – Connect Motor Hose Tubing to the Control Unit NOTE: This motor hose can be disconnected from the control unit by pulling the connector away from the back of the unit for service and replacement. ® 2. Connect the Midwest E motor to the motor hose tube Lightly coat the O-rings on the motor with a lubricant spray. Align the pins on the motor with the holes on the motor hose until the two matches; twist the two together to lock as shown in Figure 7 below. NOTE: To Measure the air supply coming out of the end of the motor coupler as shown in Figure 8 below. The value must be at least 10 l/min. Figure 7 – Connect the Motor to the Supply Tubing Figure 8 – Air supply measurement Page 12 4 Installation and Preparation for Use System Icons Icons/Keys Used to Program and Operate the Device: Button Page 13 Icon Name PREP Function Preparation Mode Mode Main Menu ENDO Endodontic Mode Main Menu SETUP Set Up Mode Main Menu HANDPIECE LIGHT Instrument light on / off Submenu: illumination setting FIBER OPTIC Submenu: DELAY illumination setting - delay time Main menu and Set up menu CALIBRATION Calibration of foot control / working pressure Submenu in the Set up SPEAKER Speaker (on / off) (Audio) Submenu in the Set up CONTRAST/ BRIGHTNESS Display contrast/brightness setting Submenu in the Set up UP Change parameter values Submenu and main menu DOWN Change parameter values Submenu and main menu DIRECTION OF ROTATION Direction of rotation of the handpiece bur/file Main menu AUTO STOP Torque-Stop Mode: Auto Stop Main menu E1 to E5 (Endodontic mode) AUTO REVERSE Torque-Stop Mode: Auto Reverse Main menu E1 to E5 (Endodontic mode) AUTO REVERSE FORWARD Torque-Stop Mode: Auto Reverse Forward Main menu E1 to E5 (Endodontic mode) Submenu in the Set up 4 Installation and Preparation for Use Button Icon Name SPEED Function Bur speed Mode Main menu E1 to E5 and P1 to P3 GEAR RATIO Ratio setting of the low speed attachments Main menu E1 to E5 and P1 to P3 E1, E2, E3, E4 Memory cell for Endodontic mode Main menu P1, P2, P3, P4 Memory cell for preparation Main menu TORQUE Torque value setting Main menu E1 to E5 DEMO Demonstration of motor rotation without air connection Set up menu START Start motor Demonstration mode STOP Stop motor Demonstration mode SERVICE Service menu - for service technician ONLY Set up menu FACTORY RESET Factory settings Set up menu GEAR SETTINGS [A / B] Additional memory of reduction ratio for future handpieces with different ratios than currently available Set up menu to (E1, E2, E3, E4) to (P1, P2, P3, P4) Page 14 5 Set Up Mode 5 Set Up Mode Set Up Mode Operations To enter in the Set Up Mode menu, press on the SETUP icon on the left of the home screen. You will then enter into the Set Up Mode Menu as shown in Figure 10 below. Setup Mode SETUP Mode Icon FACTORY RESET Icon SERVICE Icon HANDPIECE LIGHT Icon CALIBRATION Icon FIBER OPTIC DELAY Icon GEAR SETTINGS Icon SPEAKER Icon CONTRAST/BRIGHTNESS Icon STANDBY TIME Icon AUTO REVERSE FORWARD TIME Icon Figure 11 – Setup Mode Menu DEMO Mode Icon Set Up Mode (SETUP) allows the user to adjust the following: Parameters Calibration Speaker LCD Illumination Fiber Optic Delay Handpiece Light Display contrast/brightness Reverse time of Torque-Stop Mode: Auto Reverse Forward option Demo Mode Standby Mode Additional Gear Settings Mode Factory Reset Service Mode Page 15 Setting options Foot Pedal (0-100% compression) on / off 1 - 10 1 - 5 sec. 1-9 more / less Factory setting 1 - 5 sec. 2 sec. Enter Demo Mode 0 - 90 min N/A 10 min 1:1 N/A N/A Factory Defaults Service Sub-Menu N/A on 5 2 5 zero setting 5 Set Up Mode Calibration ® Calibration of the Midwest E Electric Handpiece System should be performed each time the device has been installed or moved to different location where the air pressure from the foot pedal may vary. To Calibrate the Foot Control: 1. Press the SETUP icon to enter Set Up Menu. 2. Press the PSI/BAR icon to start the calibration process . 3. The PSI/BAR icon will be highlighted to show you are in calibration mode. Calibrating Maximum Foot Pressure: 4. At this time "MAX" will be displayed on the top left of the icon, if “MAX” is not already displayed on the Calibration Icon, continue to press the icon until "MAX" is displayed on the Calibration Icon. NOTE: When "MAX" is displayed, the unit is ready to calibrate the maximum pressure from the foot pedal. 5. While pressing and holding the foot control all the way down, Press and Hold the CALIBRATION icon, until a signal sounds. Once a sound is heard, maximum pressure has now been calibrated (to equal 100%). After the signal sounds, the system will automatically change the icon to "MIN", meaning the system is ready to calibrate the minimum pressure. NOTE: To calibrate the MAX pressure again, simply toggle the CALIBRATION back to MAX and repeat step 5. Calibrating Minimum Foot Pressure: 6. The CALIBRATION icon should now have "MIN" displayed on it. If it is not displayed, then continue to press the CALIBRATION icon until "MIN" is displayed on the CALIBRATION icon. NOTE: When "MIN" is displayed on the CALIBRATION icon, the unit is ready to calibrate the minimal pressure. 7. With your foot completely off the foot control, press and hold the CALIBRATION icon until a signal sounds. Once a sound is heard minimum pressure has now been calibrated (to equal 0%). The system will automatically save the values and exit the calibration mode, once the minimum calibration value has been set. The CALIBRATION icon will return to the picture shown on the right. 8. The Foot Control is now calibrated. Once the foot control has been calibrated, the product is ready for use. Page 16 5 Set Up Mode To Turn ON/OFF Speaker Sound : 1. Pressing the SPEAKER icon changes the operating status of the speaker. 2. If the icon has a slash through it, the speaker it is off; no slash indicates the speaker is on. To Adjust the Fiber Optic Handpiece Light Time Delay : 1. Pressing the FIBER OPTIC DELAY icon will activate the setting menu to change the delay time of the handpiece fiber optic light. 2. Pressing the "+" and "-" icons will toggle the time delay from 1 to 5 seconds (delay time). 3. Confirm the desired delay time by pressing the FIBER OPTIC DELAY icon again. The saved value will appear at the bottom right of the icon. To Adjust the Hand Piece Light : 1. Pressing the HANDPIECE LIGHT icon will activate the Handpiece light menu to adjust the handpiece light intensity. 2. Pressing the "+" and "-" icons will toggle light intensity. 3. Confirm the desired setting by pressing the HANDPIECE LIGHT icon again. The saved value will appear inside the icon. To Adjust the Auto Reverse Forward Time during Reverse 1. Pressing the AUTO REVERSE FORWARD TIME icon will activate the setting menu to change the reverse time. The device will go reverse for “T” amount of time for the auto reverse forward feature in ENDO mode. 2. Pressing the "+" and "-" icons will toggle the time 1 to 5 Seconds (reverse time). 3. Confirm the desired reverse time by pressing the AUTO REVERSE FORWARD TIME icon again. The saved value will appear inside the icon. To Adjust the Display Contrast or Brightness : 1. Pressing the CONTRAST/BRIGHTNESS icon will activate the setting menu to change the contrast/brightness of the LCD screen. 2. Pressing (and holding) the "+" and "-" icons will toggle the contrast. 3. Confirm by pressing the CONTRAST/BRIGHTNESS icon again. Page 17 5 Set Up Mode To Adjust Standby Mode : The standby mode switches off the display if the control is not active during the set time. By setting 0, the standby mode is switched off. By activating the foot control or touching the display, the display will wake up and all functions will be available. 1. Press the STANDBY TIME icon to enter the standby menu. 2. Pressing the "+" and "-" icons will toggle the time to enter standby mode. Possible settings include 0 to 90 minutes, in steps of 5 minutes. 3. Press the STANDY TIME icon again to confirm your choice. To Adjust the Additional Gear Memory Settings (A or B) : 1. Press one of the GEAR SETTINGS icons (icon A or B) to enter into the additional gear settings memory menu. 2. With the "+" or "–" icons, select the desired Gear Setting ratio desired. 3. Press the GEAR SETTINGS icon again to confirm the setting 4. Repeat the same procedure above for Gear Ratio B. To Reset Factory Settings : All manual settings can be re-activated to the factory settings by pressing the FACT SET icon button and holding until it beeps. NOTE: All manual settings will be cancelled when this button is pressed. Service Menu : This icon is for use by Authorized Service Technicians Only. To Enter Demo Mode : WARNING: Never use Demo Mode for patient treatment 1. To enter Demo Mode, select the DEMO icon. 2. The screen will jump to the last previous program used. 3. Press the START button to start the test. The motor will start running and continue to run for a maximum of 2 minutes. 4. The running cycle of the motor can be interrupted by pressing the STOP icon. 5. When the test is done, press DEMO icon or SETUP icon and the screen will go back to the previous menu or SETUP menu. Page 18 6 General Operation 6 General Operation General Operation WARNING: To Promote Infection Control: Always adhere to protective measures when handling the device with patients. After use with a patient, spray air and water through the device for at least 20 seconds. After prolonged storage of the device, first flush water and air lines to remove any stagnation that occurred during storage. Handpiece attachments and motors should be sterilized between patients. Sterilize both handpiece attachments and motors before use, both are supplied non-sterile. Follow all cleaning and maintenance procedures as described in the Cleaning and Mainenance Section 9 of this manual for the control unit and hoses. Always Confirm Safe and Accurate Device Operation by: Confirming all input values before use, including: motor speed in relation to the appropriate handpiece attached, torque limits, and drill direction. Monitoring device operation during use. Stop using the device immediately in the event of damage, irregular running noises, excessive vibrations, unusual generation of heat or if the rotary instrument is not firmly gripped. Ensuring the motor is running at the desired speed by pressing down on the foot control for 2 seconds before starting the procedure to allow the device to reach its target speed. Confirming device is not in Demo Mode. Never use Demo Mode for patient treatment. ® The Midwest E Electric Handpiece System is not intended to replace proper clinical judgment. Dentists and associated assistants should always adhere to their local standard operating procedures and ensure the device is working as intended prior to use. Page 19 6 General Operation Operational Mode Options ® The Midwest E Electric Handpiece System provides two operational Modes and one Set Up Mode for procedural use: Page 20 Preparation Mode (PREP) For general preparation, Non-Endodontic Procedures; information on Operating Instructions using PREP mode, can be found in "Preparation Mode Operations" on page 20. Endodontic Mode (ENDO) For performing Endodontic Procedures; information on operating instructions using ENDO mode can be found in "Endodontic Mode Operations" on page 22. Set Up Mode (SETUP) Allows user to change various settings on the device; information on operating instructions under the SETUP mode can be found in "Set Up Mode Operations" on page 15. 7 Preparation Mode 7 Preparation Mode Preparation Mode Operations Preparation Mode (PREP) allows the user to regulate the motor speed, direction, and light source (on/off) of the handpiece system. ® The Midwest E provides 4 default Memory Settings for ratio and speed (for details see the default values’ table for ratio and speed in Table 1 below). To individually change these settings simply "overwrite" them as described below. This allows one to compile their own preferences to fit their option needs. Preparation Mode PREP Mode Icon SPEED Icon HANDPIECE LIGHT Icon DIRECTION OF ROTATION Icons GEAR RATIO Icon PREP MODE MEMORY SETTING Icons (+/-) Parameter Icons Figure 9 – Preparation Mode Menu Screen Table 1 – PREP Mode Factory Settings Key P1 P2 P3 P4 Ratio / reduction rate 1:5 1:1 5:1 1:1 Speed 200,000 rpm 40,000 rpm 8,000 rpm 20,000 rpm Light on on on on PREP Mode allows each user to change the following settings: Gear Ratio Rotary Speed Direction of rotation (clockwise or counter-clockwise) Light on / off To Change PREP Mode Memory Settings: 1. Turn on the device. 2. Press PREP to access the Preparation Mode presets. 3. Press "P1", "P2", "P3," or "P4" icon to view and edit the settings (when activated the background becomes highlighted). Page 21 7 Preparation Mode To Change Gear Ratio : 4. Activate the gear ratio settings by pressing the GEAR RATIO icon. Select the appropriate increase or reduction ratio using the "+" or "-" Icons to match the gear ratio of the handpiece attachment currently being used. 5. Confirm the gear ratio by pressing the GEAR RATIO icon again. To Change Speed : 6. Activate the speed by pressing the SPEED icon (when activated, the background becomes highlighted). 7. Change the speed using the "+" or "-" icons until the speed desired is displayed. 8. Confirm by pressing the SPEED icon again, the color of the icon will return back to its original color. To Change Light Preference : 9. Select the fiber optic light option by pressing on the LIGHT icon. If the Symbol has a slash through it, the light is off; if there is no slash, the light is on. NOTE: The intensity of the light can also be changed separately in SETUP Mode. See directions for SETUP Mode on Page 15 for details. To Change Direction of Rotation : 10. Select the direction of motor rotation by pressing the DIRECTION OF ROTATION icon. 11. The arrow on the icon illustrates the direction of rotation (i.e. clockwise or counterclockwise) when the rotary instrument is facing away from the user. Storing Settings in Memory : 12. Pressing the P1 button and holding it in until the signal sounds stores all the settings set in menu option P1 for later use. NOTE: Changes to the speed, torque, and direction of rotation can be made while the device is in use. However, settings will not be overwritten in each program memory unless saved by the user. 13. Follow the same procedure for setting P2, P3, and P4 memories if desired. Table 2 below describes the maximum speed limits available for respective gear ratio in PREP (or ENDO) Mode. Speed selection at ratio 5 : 1 20 to 100 rpm : in steps of 5 100 to 1,000 rpm : in steps of 50 1,000 to 2,000 rpm : in steps of 100 2,000 to 8,000 rpm : in steps of 500 Speed selection at ratio 1 : 1 100 to 1,000 rpm : in steps of 50 1,000 to 2,000 rpm : in steps of 100 2,000 to 10,000 rpm : in steps of 500 10,000 to 40,000 rpm : in steps of 1,000 Table 2 – Speed Limits per Gear Ratio Settings Page 22 Speed Selection at ratio 1 : 5 500 to 1,000 rpm: in steps of 50 1,000 to 2,000 rpm: in steps of 100 2,000 to 10,000 rpm: in steps of 500 10,000 to 50,000 rpm: in steps of 1,000 50,000 to 100,000 rpm: in steps of 5,000 100,000 to 200,000 rpm: in steps of 10,000 8 Endodontic Mode 8 Endodontic Mode Endodontic Mode Operations Endodontic Mode (ENDO) allows the user to regulate/change the motor speed, torque, operational direction, and auto reversing or stop options of the handpiece system. The combination of the torque and Torque-Stop Mode options in Endodontic Mode allows the user to designate the motor torque limits and direct the motor into auto reverse once the specified torque limit is reached. ® The Midwest E provides 4 default Memory Settings for ratio, speed, torque, and direction (for details see the default values’ table for ratio, speed, and torque in Table 3 below). To individually change these settings simply "overwrite" them as described below. This allows one to compile their own preferences to fit their option needs. NOTE: In Endodontic Mode, the light source is set to "ON" for all presets. Endodontic Mode ENDO Mode Icon SPEED Icon TORQUE-STOP MODE Icon DIRECTION OF ROTATION Icon GEAR RATIO Icon TORQUE SETTING Icon ENDO MODE MEMORY SETTINGS Icon Figure 10 – Endodontic Mode Menu Screen (+/-) Parameter Icons Key E1 E2 E3 E4 Ratio / reduction rate 5:1 5:1 5:1 5:1 Speed Torque 300 rpm 300 rpm 300 rpm 300 rpm 1.5 Ncm 1.5 Ncm 1.5 Ncm 1.5 Ncm Direction of Operational Rotation Clockwise Clockwise Clockwise Clockwise Table 3 – ENDO Mode Factory Settings ENDO Mode allows each user to change the following settings: Gear Ratio Rotary Speed Direction of rotation Torque-Stop Mode (Auto Stop, Auto Reverse, Auto Reverse Forward) Torque limit Page 23 Torque-Stop Mode Auto Reverse Auto Reverse Auto Reverse Auto Reverse 8 Endodontic Mode CAUTION: When using ENDO Mode, the spray air and spray water must be switched OFF at the dental unit or foot control. To Change ENDO Mode Memory Settings: 1. Turn on the device. 2. Press ENDO to access the Endodontic Mode presets. 3. Press "E1", "E2", "E3," or "E4" icon to view and edit the settings (when activated the background becomes highlighted). Change Gear Ratio : 4. Activate the gear ratio settings by pressing the GEAR RATIO icon. Select the appropriate increase or reduction ratio using the "+" or "-" icons. 5. Confirm the gear ratio by pressing the GEAR RATIO icon again. Change Speed : 6. Activate the speed by pressing the SPEED icon (when activated, the background becomes highlighted). 7. Change the speed using the "+" or "-" icons until the speed desired is displayed. 8. Confirm by pressing the SPEED icon again, the color of the icon will return back to its original state. Change Torque Preference : 9. Select the torque by pressing the TORQUE icon. The icon will show the active status by becomes highlighted. 10. Select the appropriate torque value using the "+" or "-" icons. 11. Confirm by pressing the "TORQUE" icon again. Change Direction of Rotation : 12. Select the direction of motor rotation by pressing the DIRECTION OF ROTATION icon. 13. The arrow on the icon illustrates the direction of rotation (i.e. clockwise or counterclockwise) when the rotary instrument is facing away from the user. 14. During counter clockwise rotation the Torque-Mode is not activated (flashed out). Page 24 8 Endodontic Mode Change Torque-Stop Mode : 15. Select the direction of the auto reverse option for endodontic procedures by pressing the TORQUE-STOP MODE icon. 16. Continue to press the TORQUE-STOP MODE icon until. The desired direction option is displayed. The choices will be: Auto-Stop Auto-Reverse Auto-Reverse Forward (See time value set up in the "Set Up Mode" page 15.) Torque-Stop Mode allows the user to define the response of the system when the specified torque is reached on the endodontic file. Auto-Stop: When the specified torque value is reached on the endodontic file, the handpiece will stop. Auto-Reverse: When the specified torque value is reached on the endodontic file, the handpiece will reverse in direction until the user releases the foot pedal. Auto-Reverse Forward: When the specified torque value is reached on the endodontic file, the handpiece will reverse in direction for the specified time and then return to normal forward rotation. NOTE: The torque value determines the point at which the direction of rotation will stop in Auto-stop or reverse in direction when in Auto-reverse or Auto-reverse forward. Storing Settings in Memory : 17. Pressing the E1 button and holding it in until the signal sounds stores the options set in menu option E1. 18. Follow the same procedure for setting E2, E3, and E4 if desired. Page 25 9 Cleaning and Maintenance 9 Cleaning and Maintenance Cleaning The motor and attachments MUST be cleaned and sterilized after each patient use ® (refer to the Midwest E Motor and Handpiece Attachment Operator’s Manual for specific details). Clean the system (which includes the Control Unit, Hoses, and Motor Housing) with a clean, damp cloth using 60-70% isopropyl alcohol and water solution. NOTES: Do not exert any pressure on the LCD screen. Do not use products containing acetone, chlorine or bleach as disinfecting agents on the Control Unit. Never immerse the Control Unit in solvent. The device is not suitable for cleaning in an ultrasonic bath. CAUTION: Disinfectants containing phenol 3 may discolor the plastic housings and are not recommended ® for use on the Midwest E System. Maintenance WARNING: ® Repair and maintenance work on the Midwest E Electric Handpiece System must only be performed by authorized DENTSPLY personnel. DO NOT OPEN THE CONTROL BOX. There are no serviceable parts inside the control box. Page 26 10 Troubleshooting 10 Troubleshooting The medical device heats up and gets excessively hot when running without a load: Check and ensure the amount of cooling air coming from motor meets specification as described in the installation section on Page 12. The handpiece light is off: Check if the Handpiece Light control has been turned off – Refer to Page 15 in Setup Mode or Page 20 in Preparation Mode for turning on the handpiece light. Error Code “ERR 10” - Phase interrupted: Check the motor hose connection to the control unit and ensure it is securely connected. Reset the system by powering the unit OFF/ON by disconnecting/re-connecting the power supply on the back of the unit. Error Code “ERR 10” - Motor not connected correctly: Check and ensure the motor assembly is connected correctly to the motor hose per the installation instructions on Page 12. Reset the system by powering the unit OFF/ON by disconnecting/re-connecting the power supply on the back of the unit. Error Code “ERR 82” - Position sensor not connected: Check and ensure the motor hose is connected correctly to the control unit per the installation instructions on Page 12. Reset the system by powering the unit OFF/ON by disconnecting/re-connecting the power supply on the back of the unit. Error Code “ERR 84” - Phase short circuit Check for any damage on the tubing or motor assembly. Contact DENTSPLY Service Center on Page 32 if any damage found. Reset the system by powering the unit OFF/ON by disconnecting/re-connecting the power supply on the back of the unit. Incorrect motor speed and/or attachments during use: Check to ensure the handpiece attachment connected matches the “Gear Ratio” specified on the User Interface. Check to ensure the pressure into the Control Unit complies with the installation instructions and Technical Specifications table on Pages 29 and 30. NOTE: Resetting the system by powering it OFF/ON will not erase any settings set by the user. All user specified memory settings will still be saved. If necessary, insert a filter, water trap or air dryer to meet air requirements - see also: Chapter 12 Specifications. Page 27 11 Information on Electromagnetic Compatibility 11 Information on Electromagnetic Compatibility The medical device is suitable for use in the specified electromagnetic environment. The purchaser or user of the medical device should ensure that it is used in an electromagnetic environment as described below: Emission Test Compliance Electromagnetic Environment Radio-Frequency Emissions CISPR 11 Group 1 The medical device uses RF energy only for its internal function. Therefore, the RF emission is very low and not likely to cause any interference in nearby electronic equipment. Radio-Frequency Emissions CISPR 11 Class B The medical device is for use in all facilities including residential facilities and facilities that are directly connected to a public power supply that also Harmonic emissions IEC 61000-3-2 Class A supplies residential buildings. Voltage fluctuations / flicker emissions IEC Complies 61000-3-3 Immunity tests IEC 60601-test level Conformance level Electrostatic discharge (ESD) IEC 61000-4-2 ± 6 kV contact discharge ± 8 kV atmospheric discharge ± 6 kV contact discharge ± 8 kV atmospheric discharge Fast transient electrical disturbances/ Bursts IEC 61000-4-4 Surges IEC 61000-4-5 ± 2 kV for power lines ± 1 kV for signal lines Voltage interruptions, short-term interruptions and fluctuations of the supply voltage IEC 61000-4-11 ± 1 kV push-pull voltage ± 2 kV common mode voltage <5% UT for 0.5 periods 40% UT for 5 periods 70% UT for 25 periods <5% UT for 250 periods Magnetic field with a supply frequency (50/60 Hz) per IEC 61000-4-8 Conducted HF disturbances IEC 61000-4-6 3 A/m Radiated HF disturbances IEC 61000-4-3 3 V/m 80 MHz to 2.5 GHz Page 28 3 Veff 150 kHz to 80 MHz outside of the ISM bandsa Electromagnetic environment - guidelines Floors should be made of wood or concrete or have ceramic tiles. When the floor is covered with synthetic material, the relative humidity must be at least 30%. ± 2 kV for power lines The quality of the supply voltage should ± 1 kV for signal lines correspond to that of a typical business or hospital environment. ± 1 kV push-pull voltage The quality of the supply voltage should ± 2 kV common mode correspond to that of a typical business or hospital voltage environment. <5% UT for 0.5 periods The quality of the supply voltage should 40% UT for 5 periods correspond to that of a typical business or hospital 70% UT for 25 periods environment. When the user of the medical device <5% UT for 250 periods needs continued operation even when the power supply is interrupted, it is recommended to supply the medical device from an uninterrupted power supply or a battery. 3 A/m Power frequency magnetic fields should be at levels characteristic of a typical location in a typical commercial hospital. 10 Veff Portable and mobile radio devices should not be used closer to the medical device (including the electrical lines) than the recommenced safe distance calculated using the equation for the transmission frequency. Recommended safe distance: 10 V/m d = 0.50 P d = 0.35 P for 80 MHz to 800 MHz d = 0.70 P for 800 MHz to 2.5 GHz with P as the maximum rated power of the transmitter in Watts (W) according to the transmitter manufacturer, and d as the recommended safe distance in meters (m). b The field strength of stationary radio transmitters should be less than the conformance level at all frequencies in an onsite checkc. dDisturbances are possible close to devices that have the following symbol. 11 Information on Electromagnetic Compatibility NOTE: UT is the alternating mains voltage before the test level is used. NOTE 1: At 80 MHz and 800 MHz, the higher frequency range applies. NOTE 2: These guidelines may not be applicable in every case. The spread of electromagnetic waves is absorbed and reflected by buildings, objects and people. a The ISM frequency bands (for industrial, scientific and medical applications) between 150 kHz and 80 MHz are 6.765 MHz to 6.795 MHz; 13.553 MHz to 13.567 MHz; 26.957 MHZ to 27.283 MHz and 40.66 MHz to 40.70 MHz. b The conformance levels in the ISM frequency bands between 150 kHz and 80 MHz and the frequency range of 80 MHz and 2.5 GHz are intended to reduce the probability that mobile and portable communications equipment will produce disturbances when they are unintentionally brought near the patient. For this reason, the additional factor of 10/3 is used when calculating the recommended safe distances within these frequency ranges. c The field strength of stationary transmitters such as base stations of mobile telephones and land mobile radio devices, amateur radio stations, AM and FM, radio and television broadcasters cannot be theoretically predetermined. To determine the electromagnetic environment of stationary transmitters, a study of the location should be considered. When the measured field strength at the site where the medical device is used exceeds the above conformance level, the medical device should be monitored to demonstrate proper function. When unusual performance features are observed, additional measures may be necessary such as realigning or moving the medical device. d Within the frequency range of 150 kHz to 80 MHz, the field strength should be less than 3 V eff V/m. Recommended safe distance between portable and mobile HF telecommunications equipment and the medical device. The medical device is intended for use in an electromagnetic environment in which HF disturbances are controlled. The customer or the user of the medical device can help prevent electromagnetic disturbances by maintaining the minimum distance between portable and mobile HF telecommunications devices (transmitters) and the medical device depending on the output of the communication device as indicated below. Safe distance depending on the transmission frequency / m Rated power of the transmitter / W 150 kHz to 80 MHz d=0.35 P 80 MHz to 800 MHz d=0.35 P 800 MHz to 2.5 GHz d=0.70 P 0.01 0.04 0.04 0.07 0.1 0.11 0.11 0.22 1 0.35 0.35 0.70 10 1.11 1.11 2.21 100 3.50 3.50 7.00 For transmitters whose maximum rated power is not in the above table, the recommended safe distance d in meters (m) can be calculated using the equation for the respective gap, where P is the maximum rated power of the transmitter in Watts (W) according to the manufacturer's information. NOTE 1: At 80 MHz and 800 MHz, the higher frequency range applies. NOTE 2: These guidelines may not be applicable in every case. The spread of electromagnetic waves is absorbed and reflected by buildings, objects and people. Page 29 12 Specifications 12 Specifications Control Unit Motor speed range (forward / reverse): Output torque: Motor current: Motor voltage: Operation mode: Current of LED: Air outlet of the coupling (cooling air): Spray air pressure: Spray water pressure: Weight: Dimensions (Width/Height/Depth): Rotation: Sound level: Instrument connection: Protection class: Overvoltage category: Pollution degree: Device classification of applied part (EN 60601): Protection category: 100 – 40,000 max. 3.0 max. 5.7 max. 22 Duty cycle (0.5 on / 9 off) max. 250 10 1 to 2.5 bar (14.5 to 36.2 psi) 0.8 to 2.0 bar (11.6 to 29 psi) 0.69 (1.521) 110 x 76 x 175 mm (4.33 x 2.99 x 6.89 inch) clockwise / counter-clockwise < 40 ISO 3964 Part of class I system II P2 Type B IP 20 -1 Rpm (min ) Ncm A / Phase V AC minutes mA NI/min kg (lbs) dBa Power Supply Rated voltage: Rated frequency: Power consumption: Operation mode: Weight: Dimensions (Width/Height/Depth): Protection class: Overvoltage category: Pollution degree: Protection category: 100 – 240 50 / 60 120 Duty cycle (0.5 on/9 off) 0.57 kg (1.26 lbs) 73 x 41 x 175 mm (2.87 x 1.61 x 6.89 inch) I II P2 IP 40 V AC Hz VA min Requirements to Control Unit System pressure: Spray air: Spray water: Cooling air outlet on motor coupling: Air requirements: Air filter: Water quality: ph-value: Water filtration provided by customer: Page 30 3.5 to 4.0 bar (50.8 to 58 psi) 1.0 to 2.5 bar (14.5 to 36.2 psi) 0.8 to 2.0 bar (11.6 to 29 psi) 10 Dry, free from oil, clean, uncontaminated 50 Tap water 7.2 – 7.8 80 NI/min according ISO 7494-2 µm µm 12 Specifications Recommended Input Settings System pressure: Spray air: Spray water: 4.0 bar (58 psi) 1.0 bar (14.5 psi) 0.8 bar (11.6 psi) Operating Conditions of Control Unit and Power Supply Location: Ambient temperature: Relative humidity: Max. altitude: Permitted in interior rooms 10 to 35ºC (50 to 95ºF) 30 to 75 % 2000 m Storage and Transport Conditions PRECAUTION: Starting up the medical device after storage in very cold conditions can cause an operational failure of the medical device. Very cold devices must be brought to a temperature of 20ºC to 25°C (68ºF to 77°F) before being started up. Ambient temperature: Relative humidity: Air pressure: Keep dry -30 to 70ºC (-22 to 158 ºF) 5 to 95 % 700 to 1060 hPa Type Label The explanations of the symbols are described in Chapter 2 "Important Information". Page 31 13 Spare Parts 13 Spare Parts Spare Parts PART Page 32 PART NUMBER PART DESCRIPTION 875040 CONTROL UNIT 875070 POWER SUPPLY & CORD 875045 MIDWEST E MOTOR 875055 MIDWEST E MOTOR O-RINGS 875060 MIDWEST E MOTOR HOSE CONNECTION O-RING 875065 MIDWEST E MOTOR SEAL 875050 DETACHABLE HOSE 875035 DETACHABLE HOSE, CONTINENTAL DENTAL UNIT (BUGGY WHIP) 875075 INSTALLATION KIT 875080 LCD SCREEN EXTENSION KIT ® ® ® ® 14 Warranty 14 Warranty ® The Midwest E Electric Handpiece System and Motor is guaranteed to be free of defects in material and workmanship for a period of 36 months from date of purchase (Note: the handpiece attachments are guaranteed for 24 months) – provided the unit has been operated and maintained as prescribed in these Instructions for Use, at the discretion of DENTSPLY, and has not been subject to apparent misuse, abuse or accident. All questionable, defective or loose parts must be returned with proof of purchase, transportation prepaid. Not following the provided instructions for Installation, Operation and Maintenance will void the warranty. There are no warranties, express or implied, which extend beyond the description of the face hereof. DENTSPLY neither assumes, nor authorizes any person to assume for it, any other liability in connection with the sale or use of its products. Damages are limited strictly to repair or replacement of parts. DENTSPLY expressly disclaims liability for incidental and consequential damages resulting from the use of the products. Claims covered by this warranty will be honored when presented through your DENTSPLY Professional distributor within 30 days from discovery of defect within the applicable warranty period. Maintenance & Repair – Within USA Midwest Air Repair 901 West Oakton Street Des Plaines, IL 60018-1843 800-800-7202 Maintenance & Repair – Within Canada Contact your dealer of choice to arrange maintenance & repair. Page 33