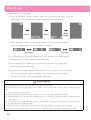
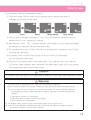
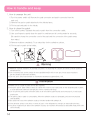
1
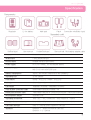
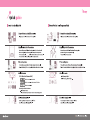
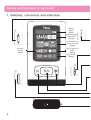
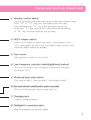
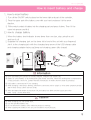
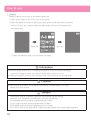
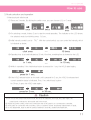
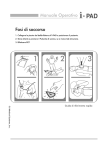
Portable menstrual pain reliever
I - 200L
2012. 05
Rev. 2.0
User Manual
Read this manual before using the product
for safety and use the product properly.
Ver 1.1 (2010.05)
CONTENTS
Preparation
3
Product features, Specification
4
Quick guide
6
Names and functions of each part
8
pad and patch
9
How to insert battery and charge
How to use
10
How to use
14
How to handle and keep
16
Troubles
17
Limited warranty
Others
Read this part before using the product.
■■ Dangers, warnings, cautions and information specified in this manual are to encourage you to use the product properly and to prevent damages to people or property
due to inappropriate use.
■■ You should follow the points below specified in this manual.
■■ Medirune expressly disclaims all damage resulting from breakdown or injury due to
random disassembly or careless handling.
■■ Keep this manual at hand for reference.
■■ The following are the points and their meanings specified in manual.
Ver 1.1 (2010.05)
Specification
Components
Regulator
Li-ion battery
Main pad
Patch
Connection wire(Patch type)
Separately sold
Gel(Pad type)
User manual
Holder(Pad type)
Stomach belt Recharging adapter,cable
Product
Personal combination stimulator
Model name
I-200L(advanced type)
Product name
Portable menstrual pain reliever
Power supply
DC 3.7V/1100㎃(Li. ion rechargeable battery)
Battery life span
Max 20 hour with TENS used
Max 2 hour with heat+TENS used
Battery charging time
Approx. 300 minutes (It depends on the conditions.)
Operating hour
20 min (default)
Heat feature
Strong : 40℃±1℃ / Weak : 37℃±1℃
Unit size
90㎜×52㎜×18㎜
Unit weight
78g(Battery included) / 50g(Battery excluded)
Patch & patch connection cable
50㎜×88㎜×2㎜(2sets included) / 1M
Pad & pad connection cable
145㎜×65㎜×4㎜(2sets of conductive gel included : 54㎜×35㎜×2㎜)/0.5M
Rechargeable adaptor
Separately sold
Operating environment
Temp:-20℃ ~ 40℃, Humidity:30% ~ 85%, Pressure:70 ~106KPa
Transport & store environment
Temp:-20℃ ~ 60℃, Humidity: below 95%, Pressure:70 ~ 106KPa
Unit class and type
Class Ⅱ / Internal power equipment / BF type
Standard
EN60601-1 : electric mechanical safety test
EN60601-1-2 : EMI test
3
Names and functions of each part
1. Switches, connectors and indicators
Battery
status
display
①
Menstrual pain
relief mode
display
Low-frequency
stimulus mode
display
HOLD fuction &
timer
display
Heat mode
display
Intensity
control
display
③
⑦
⑥
⑤
④
⑧
6
②
Ver 1.1 (2010.05)
Names and functions of each part
① Intensity control switch
- Used for menstrual pain relief mode and low-frequency feature mode.
- From“00”to“15”step, one click leads to the next step.
Once reaching step“15,”no further does the step go up.
- At the max“15”step, each click on switch will lower the intensity.
At“00”step, no further does the step go down.
② HOLD release switch
- Under HOLD condition, no switch input works. 2-second press of the
HOLD release switch will undo HOLD, then mode change, intensity control
and mode addition features are available.
③ Power switch
- Slide up/down the switch to turn it on/off.
④ Low-frequency selection switch(additional feature)
- Click once for pressing / twice for tapping / three times for massage /
four times for AUTO.
⑤ Menstrual pain relief switch
- Click once for relief A / twice for relief B / three times for relief C.
⑥ Heat mode selection switch(used for patch connection)
- Click once for strong heat / twice for weak heat / off.
⑦ Charging jack
- Used for charging battery.
⑧ Pad(patch) connection jack
- Plug the pad/patch connection cables.
7
Pad and Patchs
2. Indicators and features for pads and patch
■Patchs : used for menstrual pain relief and low-frequency features.
①
②
① Connection cord :
joining the pad connection cable.
② Electrode part :
attached to the affected area for
stimulation.
■Pad : used for heat feature
③
①
②
◎ When the product is first used, the gel is adhered with transparent film. From
both sides, the shaded area (semi-transparent) is to be detached and then attach
it to the pad.
① Electrode part : attached to the affected area for stimulation
② Heat part : attached to the affected area for heat therapy.
③ Connection cable & connector : connected to the patch connection
jack on the controller.
8
Ver 1.1 (2010.05)
How to insert battery and charge
1. How to insert battery
1. Turn off the ON/OFF switch placed on the lower right end part of the controller.
2. Press the upper part of the battery cover with your hand and press it to the arrow
direction.
3. Fit the metal contact of battery into the charging part and press it down. Then fit the
cover into groove and fix it.
2. How to charge battery
1. When the battery level indicator shows fewer than one bar, stop using the unit and turn it off.
2. Separate the charging jack on the lower left of end of the unit with your fingernail.
Join it to the charging jack with the charging lamp arrow of the USB charge cable
and charging adaptor facing up.(lamp red charging, green fully charge)
OFF
Information
◎ Upon purchasing, the product is not fully charged. Charge it fully before use.
◎ Battery is consumables, so its working time gets shorter over time. When the working time is shortened by
a half, purchase a new one. (Limited warranty menstrual is 6 months from the date of purchase.)
◎ USB cable is connected to PC for charging.
◎ While charging, if the lamp is blinking, remove the connector and re-plug it in. If the same symptom persists
after 4 times of trial, call the service center.
◎ When the battery life remains by less than 10%, the battery icon blinks and the buzzer goes off to
make‘beep’sounds three times.
Caution
◎
◎
◎
◎
While charging, the unit cannot work.
Use the specified battery only.
Do not remove the battery cover while the product is working.
When applying the battery to the unit, do not add too much pressure.
9
How to use
2. Starting
Starting is about how to turn on the power before use.
1) Slide up the switch on the unit to turn on the power.
2) When the power is turned on, the buzzer goes off once and every item is showed
on the LCD for 2 sec, then the stand-by state begins with the LCD showing only
the battery level.
Power ON
after 2sec
3) After the stand-by state, you can select the mode.
Information
◎ Once the power is turned on, if no switch input is given for 30 sec, the unit is automatically
turned off. To restart the power, turn down the power switch and then turn it on.
◎ When connect patch, cannot be use heat mode. (when connect pad, can be use heat mode.)
Caution
◎ Upon turning on the power, do not switch on the intensity controller abruptly. Too strong
intensity may cause a shock.
Danger
· The following medical equipments cannot be used together with this product. Otherwise, such equipments will malfunction. Consult a specialist first
◎ Implantable electronic medical equipment like pace maker
◎ Life support electronic medical equipment like ventilator
◎ Pluggable electronic medical equipment like ECG recorder
◎ Do not use the heat unit along with RF surgical unit, cardiac catheter and surgical medical equipment.
10
Ver 1.1 (2010.05)
How to use
3. Mode selection and operation
1) Menstrual pain relief mode
① There are 3 modes. By clicking the switch once, you can choose A, B, or C mode.
once
three
times
twice
② On selecting a mode, it takes 2 sec to start the mode operation. The indicator on the LCD shows
the selected mode icon blinking every 0.5 sec.
③ Initial intensity control is set to “00.” With the control switch, you can control the intensity, which
is indicated as below.
.....
click once
15 times
④ Operating hour is set and indicated as 20 min. Over time, remaining time is showed on the LCD.
.....
in 1 min.
in 19 min.
⑤ While in operation, if the Hold relese button is pressed for 1 sec, the HOLD state begins.
press for 1 sec.
⑥ If the HOLD release button on the main unit is pressed for 2 sec, the HOLD is released and
current operation status is indicated. Then, if no switch input is given
for 30 sec, it goes into HOLD state again.
press for 2 sec.
in 30 sec.
Caution
◎ Do not use the product around the heart, the neck, the abdomen, the head, the pubic region, the
parts injured or infected or skin trouble and in the mouth .
◎ Restart by power switch, when the connection wire of the patch is re-connected to controller.
◎ If the patch or connection wire is broken, call our customer center requesting replacement or repair.
◎ Do not disassemble, repair or alter the product randomly to avoid fire, accident and malfunction.
11
How to use
2) Heat mode(when using patch)
① There are consisted 2 modes. Press the switch once for strong mode. Press it twice for
weak mode. Press it three times for waiting mode after turn off heat mode.
once
twice
three
times
② When selecting a mode, in 2 sec operation starts. The LCD shows the selected
mode icon blinking every 0.5 sec to indicate it is working.
0.5 sec.
0.5 sec.
③ The operating hour is set and indicated as 20 min. Over time, the remaining time is indicated on the LCD.(See menstrual pain relief mode)
④ During operation, if no switch input is given for 30 sec, the HOLD state begins.
(See menstrual pain relief mode.)
⑤ Press the HOLD release switch on the main unit for 2 sec, and the HOLD is released.
Then, current operation status is indicated. If no switch input is given for 30 sec,
another HOLD begins. (See menstrual pain relief mode.)
Information
◎ The heat mode can be used only when the patch is connected.
◎ In menstrual pain mode, heat mode can be added. Click the heat switch 3 times, and the heat mode stops
and
only the weak pain mode works.
◎ When the battery level shows less than one bar, the heat may not work. Recharge the battery.
◎ Small stimulation does not mean the treatment process is not working. Different people feel different intensity
of stimulation.
◎ In heat mode, if any abnormality (bimetal, temp sensor trouble etc) arises, the buzzer goes off five times and
the LCD indicates the stand-by state.
◎ Restart by power switch, when the connection wire of the patch is re-connected to controller.
◎ If the patch or connection wire is broken, call our customer center requesting replacement or repair.
12
Ver 1.1 (2010.05)
How to use
3) Low-frequency stimulus mode(additional feature)
① There are 4 modes. Click the switch once for pressing, twice for tapping, three times for
pretissage, and four times for auto mode.
once
twice
three times
four times
② Once a mode is selected, it operates in 2 sec. The LCD shows the selected mode icon
blinking every 0.5 sec, meaning it is working.
③ Initial intensity is set to “00.” Using the intensity control switch, you can control and indicate
the intensity you want.(See menstrual pain relief mode.)
④ The operating time is set to 20 min. Over time the remaining time is indicated on the LCD.(See
menstrual pain relief mode.
⑤ In operation, when no switch input is given for 30 sec, the HOLD mode begins.
(See menstrual pain relief mode.)
⑥ Press the HOLD release switch on the main unit for 2 sec, and the HOLD is off. Then the
LCD shows current operation status. Afterward, if no switch input is given for 30 sec, another
HOLD begins.(See menstrual pain relief mode.)
Caution
◎ Sensitive users may get a shock depending on intensity, so be careful with the intensity control.
Warning
·You must consult a specialist first if you have one of the following symptoms.
Medirune expressly disclaims any damage resulting from using the product without consulting a doctor.
◎ You must make sure if it is OK with you to use the product when you have the following symptoms.
1) Acute diseases, tumors, cardiac dysfunction, thrombus, high fever, abnormal blood pressure,
diabetes
2) Dermatomal sensory loss, derrmatosis
3) Abnormal nerve sensations and blood circulation
4) Other diseases and complications
◎ The disabled, infants, pregnant women and mentally ill people must not use the unit.
◎ Those who have difficulties controlling body and sensing heat and subjective symptoms, drinkers
and sleeping-pill takers must not use the product.
13
How to handle and keep
1. How to arrange the unit
1) Turn the power switch off. Remove the pad connector and patch connector from the
main unit.
2) Remove the pad or patch attached to the affected area.
3) Fix the pad and patch to the holder.
2. How to clean the patch
1) Turn off the power. Separate the pad or patch from the connection cable.
2) Use your fingers to gently clean the patch in small amount of running water for seconds. (Be careful to keep the connection cord of the pad and the connector of the patch away
from water.)
3) Remove moisture completely. Try a natural dry for the adhesive surface.
4) Fix the pad or patch to the holder.
storage
Warning
◎ Medirune expressly disclaims any damage caused by not observing the cautions and other particular guidance
mentioned here.
◎ Do not continuously use the product for over specified time(20 min) on one spot. It may cause muscles to
get tired, leading to abnormal conditions.
◎ Do not use it around shortwave or microwave treatment equipment(min. 1M).
Information
◎ Make sure a couple of pads do not stick together.
◎ Keep the pad or patch always clean. Be careful not to leave your hand prints on the electrode pad or patch.
It could deteriorate adhesive strength.(See how to handle and keep.)
◎ Do not yank the pad or patch connection cables or do not bend the patch forcefully and unnecessa rily. It could cause
a malfunction.
◎ The gel for pads or patch is consumables. When the adhesive surface is damaged, purchase new products
sold separately.
◎ Be careful not to touch the adhesive surface. Hold the handle while taking it off.
◎ If the adhesive surface is too sticky or comes off, put it in the refrigerator for overnight. to restore adhesive force.
◎ If a piece of paper tissue sticks to the adhesive surface, do not take it off forcefully but add a little water, then it will
come off easily.
14
Ver 1.1 (2010.05)
How to handle and keep
3. How to maintain and checkup the product
1) To prevent accidents, use the parts the manufacturer recommends or sells.
2) Do not alter or disassemble the product, which will cause damage, malfunction, injury and
accidents.
3) Do not soak the product in water. If it is soaked in water, wipe it out immediately with a dry fabric.
4) If 3) happens, inquire of a local selling agent or our home page.
4. How to dispose of the product
- In accordance with the ordinances of each local municipality, dispose of the product appropriately.
Caution
◎ Do not use hot water, detergents and chemicals(thinner, benzol etc).
◎ Do not cause scratches to the adhesive surface with fingernails or brushes.
◎ Avoid frequent and long wash.
◎ Do not keep it in a hot and humid place with direct sunlight.
◎ Do not wipe out the adhesive surface with tissue or fabric.
◎ When wash them with water, becareful not to get pad connector and patch connector inside wet with water. It
could cause a malfunction.
◎ When substances with high thermal conductivity like the patch gel are used without turning on the
heat feature, patients’ body temp could drop.
◎ When the product malfunctions or you feel something wrong with your body while using it, stop it immediately.
Consult a doctor for body or skin trouble and follow the doctor’s instruction.
◎ To attach a pad or patch to other parts while using the product, be sure to convert the intensity
control button to “00” position and then attach it. Otherwise, it could cause a strong electric shock.
◎ Do not start other treatment while wearing the product. It could affect the product’s setting and timing.
◎ Do not use the product with infants or those who cannot express themselves properly. It could
cause accidents or diseases.
◎ Avoid wet places like bathrooms when using the product. Do not use it while taking a bath or
shower. It could cause a severe electric shock.
◎ Do not use the product while sleeping. It could cause malfunction or the pad or patch unnecessarily
move to other body parts.
◎ Do not use it while driving. If it is affected by some strong stimulation, it could cause accidents or problems.
◎ After using the product, do not leave the pad or patch attached to the skin. Extended attachment
could cause itches or troubles or infections on skin.
15
Troubles
Problem
Measures
Power is not on
●● If the battery is not fit it appropriately, check the polarity to re-insert.
●● If the battery is discharged, charge it again for re-use.
Power is on, but no
●● Check if the attached side of pad or patch is detached from the skin, and then adhere the attached part to the skin.
●● Check if two patches are connected to a connection line for one.
●● Connection to the connection line is not made.
●● Check if the intensity adjustment is set for “00”, and then adjust the intensity.
●● Check if the patch is overlapped for attachment.
stimulus is felt
Too weak stimulus
●● The adhesion of the pad or patch is detached.
●● The attached part is not adhered on the skin.
●● The intensity adjustment is weakened.
Power is off while
●● The battery has been discharged. Use it after recharging.
●● The service time of 20 minutes has been exhausted. Please use it again.
in use
Less adhesive pads
or patch
●● The transparent film of the attached side is not removed.
●● The attached side is dirty that it has to be washed before using it.
●● After washing it off, wiping off the moisture.
●● The attached side is damaged that it has to be replaced with new one.
No heating
●● If the remaining battery is insufficient, recharge it.
●● The patch is connected.
●● The connector of the pad is not connected or it is short-circuited.
In the event of
having possible
skin problem
during the use
●● Do not use after 20 minutes of continuous use.
●● When the attached side is dirty or dried, the attached part is washed off with
water.
●● When the attached side is damaged, replace it with new one since the pad
and gel are dispensable goods.
●● If you have skin problem or skin disease, stop using the product and consult
with physician.
16
Ver 1.1 (2010.05)
Limited warranty
Troubles
Limited Warranty
1. You are entitled to a 1-year warranty service for defects under normal use according to the user
manual and other caution phrases on the labels attached to the controller. The limited warranty
menstrual starts on the date of purchase.
2. If you need receive any repair service within the limited warranty menstrual, visit our web site or
call
our service center.
3. The limited warranty is not applied to the items below.
1) Troubles or damage resulting from user’s mistake or inappropriate repair or replacement or alteration
2) Troubles or damage due to intentional or accidental dropping of product after purchase
3) Defective functioning or damage attributable to fire, earthquake, flood, lightning, thunderbolt, other
natural disasters, pollution, surge, and abnormal power supply not specified(voltage, frequency etc)
4) Conditions not provided in this manual
5) When the date of purchase, customer’s name, and seller’s name are not written in this manual, or
when such records are modified
6) Consumables
7) When the cause of defective functioning does not lie in this product
8) Defects or damage by using the product in a way not specified in this manual
4. This manual is not reissued. Don’t lose this manual. Keep it carefully.
5. This document includes limited warranty information under the terms and conditions and within the
specified menstrual. This document of limited warranty does not restrain you of your legal rights.
Limited Warranty
Customer
Address
Place of purchase
Address
Name
☎TEL.
Seller’s name
Product name
Date of purchase(dd/mm/yy)
Model name
1-year warranty from the date of purchase
/
/
medirune co., Ltd.
17
CE Declaration of conformity
medirune Co.,Ltd.
#3-206,207 Medical device industrial complex, Taejang-Dong, Wonju,
Gangwon-Do, Korea
declares that the medical device described hereafter,
Product name : Period Pain Reliever
Model Name : I-200L
has been classified as Class lIb (Annex IX Rule 1, 9) and is in conformity with the essential requirements and provisions of Council Directive
2007/47/EC, is subject to the procedures set out in Annex II of Directive
2007/47/EC under the supervision of Notified
Nemko AS (NB. No ; 0470), P.O. Box 73, Blindern, N-0314 OSLO,
Norway.
Safety Performance
EN 60601-1 : 1990+A1:1993+A11:1993+A12:1993+A2:1995+A13:1996
EN 60601-2-10 : 2000+A1:2001 EN 60601-2-35 : 1996
EMC
EN 60601-1-2 : 2007 29 January 2010
President
Kang. S. W.
18
Ver 1.1 (2010.05)
Memo
19
Medirune Co., Ltd.
www.medirune.com
#3-206,207 Medical device industrial complex,
1720-26 Taejang-Dong, Wonju, Gangwon-Do, 220-120 Korea
Tel 033.765.5739 Fax 033.765.5793
EC REP European representative
Vario Tech GmbH
Ludwig Erhard Str. 30-34 65760
Eschbom / Germany
Tel +49 - 6196 - 7755 945
ISO - 13485
ISO - 9 0 0 1
: NO - 908145
: NO - 800438
0470