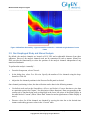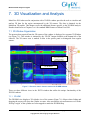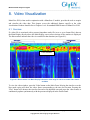
1
ManoView ESO Analysis Program _____________________________________________________________________________________________________________ ManoView TM ESO User Manual Version 3.0.1 DOC-1966-03 March 2013 ENGLISH This document contains proprietary information. Source: Given Imaging Copyright 2013, Given Imaging. All rights Reserved 1 ManoView ESO Analysis Program _____________________________________________________________________________________________________________ COPYRIGHT Copyright © 2013 Given Imaging Ltd. TRADEMARKS GIVEN, GIVEN & Design, PILLCAM, PILLCAM & Logo, PILLCAM IMAGING CAPSULE & Design, AGILE, RAPID, RAPID ACCESS, ORDERWIN, ORDER WHEN I NEED, FINGERS HOLDING A CAPSULE & Logo, FINGERS HOLDING PILLCAM CAPSULE & Logo, ICCE, ICCE Logos, International Conference on Capsule Endoscopy, VUESPAN, BRAVO PH SYSTEM, BRAVO, ENDONETICS, VERSAFLEX, GEROFLEX, REPHLUX TRACER, ION, GASTROTRAC, BILITEC, DIGITRAPPER, SLIMLINE, PHERSAFLEX, MANOSCAN, MANOSCAN 360, MANOSCAN Z, MANOSCAN 3D, MANOSCAN HD, MANOSCAN V, MANOSHIELD, MANOSHIELD AR, MANOVIEW, MANOVIEW Z, ACCUTRAC, ACCUTRAC Z, ACCUVIEW, ACCUVIEW Z, SURETEC, ACCUFET, ACCUFET Z, INSERTASSIST, BOLUSVIEW, POLYGRAF ID, RESPSPONSE, ION Z, and GPS are Trademarks and/or Registered Trademarks of Given Imaging Ltd., its subsidiaries, and/ or affiliates in the United States and/or other countries. All other company or product names are the trademarks or registered trademarks of their respective holders. All rights not expressly granted are reserved. U.S. Patent: 7,476,204 The ManoViewTM ESO Analysis Program is part of the ManoScanTM System. The ManoScan system manual should be referred to before using the system for data acquisition or diagnosis. Rx Only Given Imaging 3950 Shackleford Road, Suite 500 Duluth GA 30096 USA [email protected] Given Imaging GmbH Borsteler Chaussee 47 D-22453 Hamburg, Germany [email protected] This document contains proprietary information. Source: Given Imaging Copyright 2013, Given Imaging. All rights Reserved 2 ManoView ESO Analysis Program _____________________________________________________________________________________________________________ Table of Contents 1. INTRODUCTION ...................................................................................................................................................... 6 1.1 1.2 1.3 1.4 1.5 1.6 1.7 2. QUICK START........................................................................................................................................................... 9 2.1 2.2 2.3 2.4 2.5 2.6 2.7 2.8 2.9 3. 3D WINDOW ORGANIZATION.................................................................................................................................. 45 3D WINDOW CONTROLS ......................................................................................................................................... 47 3D ANALYSIS SETUP............................................................................................................................................... 48 VIDEO VISUALIZATION ...................................................................................................................................... 51 8.1 8.2 8.3 9. ANALYSIS WINDOW ORGANIZATION ...................................................................................................................... 41 3D VISUALIZATION AND ANALYSIS................................................................................................................ 45 7.1 7.2 7.3 8. REPORT WINDOW AND CONTROLS.......................................................................................................................... 37 COMBINED PRESSURE-IMPEDANCE ANALYSIS ......................................................................................... 41 6.1 7. USING MEASUREMENT FRAMES.............................................................................................................................. 34 INSERTING, REMOVING, AND EDITING FRAMES ...................................................................................................... 34 NAVIGATION BAR & TIME CONTROLS .................................................................................................................... 35 ZOOM CONTROLS.................................................................................................................................................... 36 REPORT WINDOW ................................................................................................................................................ 37 5.1 6. ANALYSIS WINDOW AND CONTROLS ...................................................................................................................... 20 PRESSURE PROFILE PANEL ...................................................................................................................................... 24 MENU CONTROLS AND OPTIONS ............................................................................................................................. 26 DATA DISPLAY PANELS .......................................................................................................................................... 32 FRAME EDITING & NAVIGATION .................................................................................................................... 34 4.1 4.2 4.3 4.4 5. RUNNING THE PROGRAM ........................................................................................................................................ 10 PRIOR TO ANALYZING EVENT FRAMES ................................................................................................................... 11 EDITING THE LANDMARK ID FRAME ....................................................................................................................... 12 EDITING SWALLOW FRAMES ................................................................................................................................... 14 GENERATING A REPORT .......................................................................................................................................... 16 SAVING AN ANALYSIS............................................................................................................................................. 16 SPECIAL ESOPHAGEAL WAVE MARKERS (CLASSIC ANALYSIS)............................................................................... 16 SPECIAL SWALLOW CHARACTERIZATION TAGS (CHICAGO CLASSIFICATION) ........................................................ 17 NON-ESOPHAGEAL STUDY AND MANUAL ANALYSIS ............................................................................................. 18 ANALYSIS WINDOW ............................................................................................................................................. 20 3.1 3.2 3.3 3.4 4. INTENDED AUDIENCE................................................................................................................................................ 6 PURPOSE OF THIS MANUAL ...................................................................................................................................... 7 ACRONYMS AND ABBREVIATIONS ............................................................................................................................ 7 INDICATIONS OF USE ................................................................................................................................................ 7 CONTRAINDICATIONS OF USE ................................................................................................................................... 8 INTENDED USE .......................................................................................................................................................... 8 WARNINGS / CAUTIONS ............................................................................................................................................ 8 OVERVIEW .............................................................................................................................................................. 51 CONTROLS .............................................................................................................................................................. 52 VIDEO FILE ASSOCIATION DETAILS ........................................................................................................................ 53 CHICAGO CLASSIFICATION SETUP & ANALYSIS ...................................................................................... 54 9.1 9.2 9.3 PARAMETERS .......................................................................................................................................................... 54 SETUP ..................................................................................................................................................................... 54 ANALYSIS ............................................................................................................................................................... 55 This document contains proprietary information. Source: Given Imaging Copyright 2013, Given Imaging. All rights Reserved 3 ManoView ESO Analysis Program _____________________________________________________________________________________________________________ 9.4 RESULT ................................................................................................................................................................... 56 APPENDIX A. ANALYTICAL PARAMETER NOTES ................................................................................................ 58 APPENDIX B. ANATOMICAL MARKER POSITIONING GUIDELINES ............................................................... 61 APPENDIX C. SWALLOW FRAME ANALYSIS GUIDELINES ............................................................................... 62 APPENDIX D. HOSPITAL INFORMATION SYSTEM (HIS) INTERFACE ............................................................ 63 INDEX ................................................................................................................................................................................. 64 CONTACTING GIVEN IMAGING ................................................................................................................................. 66 Tables TABLE 3-1 ANALYSIS WINDOW CONTROL BUTTONS .................................................................................................................................22 TABLE 3-2 PRESSURE PROFILE PANEL CONTROL BUTTONS .....................................................................................................................25 TABLE 3-3 FILE MENU OPTIONS ....................................................................................................................................................................26 TABLE 3-4 VIEW MENU OPTIONS ..................................................................................................................................................................26 TABLE 3-5 SETUP MENU OPTION...................................................................................................................................................................27 TABLE 3-6 TOOLS MENU OPTION ..................................................................................................................................................................31 TABLE 3-7 SMART MOUSE SUBMENU .............................................................................................................................................................31 TABLE 4-1 ZOOM TOOL BAR CONTROLS ......................................................................................................................................................36 TABLE 4-2 KEYBOARD/MOUSE SHORTCUTS ...............................................................................................................................................36 Figure FIGURE 1-1 MANOVIEW ESO ACTIVITY CYCLE ........................................................................................................................................... 6 FIGURE 2-1 ELEMENTS OF THE DISPLAY (MAIN DISPLAY SHOWN IN CONTOUR MODE) ....................................................................10 FIGURE 2-2 ANALYSIS WINDOW WITH PATIENT INFORMATION LOADED ..............................................................................................11 FIGURE 2-3 SPATIAL MARKERS .......................................................................................................................................................................13 FIGURE 2-4 PRESSURE ADJUSTMENT TOOLS ................................................................................................................................................14 FIGURE 2-5 SWALLOW MEASUREMENT ADJUSTMENTS. (A) CONTOUR MODE (B) LINE TRACE MODE..............................................15 FIGURE 2-6 A SNAPSHOT OF THE REPORT WINDOW...................................................................................................................................16 FIGURE 2-7 SIMULTANEOUS CONTRACTION (SC), MULTIPLE PEAK (MP), AND FAILED SWALLOW (FS) MARKERS ......................17 FIGURE 2-8 SWALLOW ABNORMALITY – HYPERCONTRACTILE CONTRACTION - INDICATED AT RIGHT BOTTOM OF EVENT FRAME .......................................................................................................................................................................................................18 FIGURE 3-1 MANOVIEW ANALYSIS WINDOW ORGANIZATION ...............................................................................................................21 FIGURE 3-2 ANALYSIS WINDOW (A) CONTOUR MODE (B) LINE TRACE MODE....................................................................................21 FIGURE 3-3 ANALYSIS WINDOW DISPLAYING PRESSURE DATA IN TRACE-ON-CONTOUR MODE ......................................................22 FIGURE 3-4 ALL DATA TABLE .........................................................................................................................................................................23 FIGURE 3-5 SETUP TABLE WINDOW ..............................................................................................................................................................23 FIGURE 3-6 SET LIMITS CONTROL (CONTOUR MODE) ..............................................................................................................................24 FIGURE 3-7 SET RANGE CONTROL (LINE TRACE MODE) .........................................................................................................................24 FIGURE 3-8 PRESSURE PROFILE PANEL.........................................................................................................................................................25 FIGURE 3-9 REPORT & ANALYSIS WINDOW. THE SELECTIONS RELATED TO CLASSIC MANOVIEW PARAMETERS HAVE BEEN UNSELECTED; SO THE CORRESPONDING CONTROLS ARE NOT VISIBLE ON THE MAIN DISPLAY OR IN THE REPORT ..........28 FIGURE 3-10 ESLEEVE WINDOW. (A) ESLEEVE/LES TRACE TAB (B) LESR TAB ....................................................................................29 FIGURE 3-11 TRACE CHANNEL CONTROL DISPLAY ...................................................................................................................................30 FIGURE 3-12 TRACE DISPLAY CHANNEL CONTROLS – SETUP LANDMARK REFERENCE ....................................................................30 FIGURE 3-13 ANALYSIS WINDOW- DATA PANEL ........................................................................................................................................32 FIGURE 4-1 NAVIGATION BAR ........................................................................................................................................................................35 FIGURE 4-2 ZOOM TOOL BAR .........................................................................................................................................................................36 FIGURE 5-1 MANOVIEW ESO REPORT WINDOW ORGANIZATION ........................................................................................................38 FIGURE 5-2 PROCEDURE DESCRIPTION PULLDOWN LIST .........................................................................................................................39 This document contains proprietary information. Source: Given Imaging Copyright 2013, Given Imaging. All rights Reserved 4 ManoView ESO Analysis Program _____________________________________________________________________________________________________________ FIGURE 5-3 CREATE REPORT ..........................................................................................................................................................................40 FIGURE 6-1 PRESSURE-IMPEDANCE DATA IN CONTOUR MODE ...............................................................................................................41 FIGURE 6-2 IMPEDANCE DATA IN LINE TRACE MODE ...............................................................................................................................42 FIGURE 6-3 A NORMAL SWALLOW PHYSIOLOGY SHOWN IN PROFILE PANEL .........................................................................................43 FIGURE 6-4 BOLUS STATUS CONTROL SHOWN DURING A PRESSURE-IMPEDANCE ANALYSIS ..............................................................44 FIGURE 7-1 PRESSURE DATA IN CONTOUR MODE WITH 3D HRM WINDOW.........................................................................................45 FIGURE 7-2 2D HRM VIEW .............................................................................................................................................................................46 FIGURE 7-3 2D/3D HRM VIEW .....................................................................................................................................................................47 FIGURE 7-4 BUTTONS FROM LEFT TO RIGHT: A) ANATOMY TOGGLE B) DEFLECTION/RANGE C) VIEW MODE D) CAPTURE E) HOME F) ZOOM..................................................................................................................................................................................47 FIGURE 7-5 3D CYLINDER ROTATION BUTTONS........................................................................................................................................48 FIGURE 7-6 ASYMMETRY TYPE SELECTIONS IN SETUP REPORT & ANALYSIS ........................................................................................49 FIGURE 7-7 PEAK INSPIRATION AND MID EXPIRATION TIME INSTANCES ARE INDICATED USING SHORT VERTICAL RED LINES ....................................................................................................................................................................................................................49 FIGURE 7-8 ANALYSIS OPTIONS FOR 3D ANALYSIS....................................................................................................................................50 FIGURE 8-1 BLUE MARKERS OVER MAIN DISPLAY INDICATE THE TIME RANGE FOR WHICH RECORDED VIDEO DATA IS AVAILABLE ...............................................................................................................................................................................................51 FIGURE 8-2 VIDEO WINDOW ..........................................................................................................................................................................52 FIGURE 9-1 SAMPLE SETUP REPORT & ANALYSIS FORM SETTING FOR CHICAGO CLASSIFICATION ................................................55 FIGURE 9-2 SWALLOW ABNORMALITY TAGS IN EVENT FRAME– A) PERISTALTIC INTEGRITY INDICATED AT THE RIGHT TOP B) HYPERCONTRACTILE CONTRACTION INDICATED USING ACRONYM AT THE RIGHT BOTTOM ............................................56 FIGURE 9-3 CHICAGO CLASSIFICATION PARAMETERS AND FINDINGS PRESENTATION IN REPORT FORM .....................................57 This document contains proprietary information. Source: Given Imaging Copyright 2013, Given Imaging. All rights Reserved 5 ManoView ESO Analysis Program _____________________________________________________________________________________________________________ 1. Introduction Welcome to ManoView ESO analysis program. The ManoView ESO analysis program, also referred as ManoView, provides tools to efficiently analyze information obtained via the ManoScan system consisting of one or more of following modules: ManoScan 360 High Resolution Manometry module, ManoScan Z High Resolution Impedance module, ManoScan V High Resolution Video Imaging module or the ManoScan 3D High Definition Pressure Imaging module. This user manual provides a description of ManoView ESO and its use. Open Patient Data File Adjust Frame Markers (Landmarks, Sphincter Pressures, Swallows) Print Report Save Analysis File Figure 1-1 ManoView ESO Activity Cycle The ManoView ESO application is an easy to use graphical tool for analyzing the pressure, impedance, and video images obtained via the ManoScan system. Figure 1-1 illustrates a normal activity flow when using this program for esophageal motility analysis. This version of ManoView ESO supports review and analysis of study files created with all previously released versions of ManoScan ESO (v1.2, 2.0, 2.1) and ManoView ESO (v1.4, 2.0, 2.0.1) software. 1.1 Intended Audience This document is intended for use by medical personnel in conjunction with ManoView ESO software application. Computer literacy and familiarity with Microsoft Windows® and graphical user interfaces is beneficial. This document contains proprietary information. Source: Given Imaging Copyright 2013, Given Imaging. All rights Reserved 6 ManoView ESO Analysis Program _____________________________________________________________________________________________________________ 1.2 Purpose of This Manual The ManoView ESO software program is a component of the ManoScan system and provides necessary tools for detailed analysis of pressure, impedance and / or video data acquired during ManoScan procedures. The program is intended to provide stand-alone and enhanced functionality relative to the analysis capability incorporated in the basic ManoScan ESO system software. The purpose of this manual is to provide instruction on using this software. Patient analysis and window controls are defined. 1.3 Acronyms and Abbreviations Acronyms and abbreviations used in this document are identified below: cm CFV CDP DP DCI DL FS GST HIS HRM HRM-Z IBP Centimeters Contractile Front Velocity Contractile Deceleration Point Double Peak Distal Contractile Integral Distal Latency Failed Swallow Gastric Hospital Information System High Resolution Manometry High Resolution Impedance Manometry Intrabolus Pressure IRP LES LESr mmHg MP MVS PIP s SC TDCC TSN UES Integrated Relaxation Pressure Lower Esophageal Sphincter LES Relaxation Millimeters of Mercury (pressure) Multiple Peaks Motility Visualization System Pressure Inversion Point Second Simultaneous Contractions Trace Display Channel Control Three Second Nadir Upper Esophageal Sphincter 1.4 Indications of Use The ManoScan system obtains a high resolution mapping of pressures levels (and optionally, impedance levels in case of ManoScan Z, or video data in the case of ManoScan V) within organs of the human gastrointestinal tract. These include the pharynx, upper esophageal sphincter (UES), esophagus, lower esophageal sphincter (LES), stomach, sphincter of oddi, small bowel, colon, duodenum and anorectal organs. It is used in a medical clinical setting to acquire pressures, impedance levels and video and store the corresponding data. The system also provides visualization and analysis tools and information. The real time data as well as the analysis information can be viewed for diagnostic and analysis purposes with an intention of assisting in the diagnosis and evaluation of gastrointestinal and swallowing disorders. The device is intended for use by gastroenterologists, surgeons and medically trained personnel. This document contains proprietary information. Source: Given Imaging Copyright 2013, Given Imaging. All rights Reserved 7 ManoView ESO Analysis Program _____________________________________________________________________________________________________________ 1.5 Contraindications of Use The use of the ManoScan system for pharyngeal/esophageal motility and impedance study and proximal gut (gastric/duodenal) manometry is contraindicated for the following: a) patients with an inability to tolerate nasal intubation, b) patients with significant bleeding disorders for whom nasal intubation has been deemed contraindicated, and c) patients with a known esophageal obstruction preventing passage of the instrument. The use of the ManoScan system for anorectal manometry is contraindicated for patients with known anal stricture/obstruction preventing insertion of the instrument. 1.6 Intended Use The ManoView ESO software program is a component of the ManoScan system and is intended to be used as an analysis tool that may be used for detailed analysis of pressure, impedance and / or video data acquired during ManoScan procedures. The tool is intended for use by trained medical personnel when performing analysis and may be used to generate reports, quantitative results and / or reference images. 1.7 Warnings / Cautions The ManoView ESO software program is a component of the ManoScan system and is intended to be used by trained medical personnel only in performing diagnostic analysis of data collected using these systems. This software tool assists in the diagnostic process by providing visual images and quantitative estimates of physiological parameters, but clinical conclusions should not be made without proper medical training on the applicable physiological elements and proper consideration and understanding of the patient history. Sections 2 through 5 illustrate the analysis and visualization features available with pressure data input. Section 6, 7 and 8 discuss the additional features that are enabled in the software while using combined pressure-impedance, pressure-video, and 3D-pressure input files. Section 9 discusses the details of Chicago Classification scheme. This document contains proprietary information. Source: Given Imaging Copyright 2013, Given Imaging. All rights Reserved ManoView ESO Analysis Program _____________________________________________________________________________________________________________ 2. Quick Start This chapter provides a short walkthrough of ManoView ESO using the file Quick_Start_Example.mvs provided as one of the case studies. This file is located in the Case Studies folder installed with the software. However, any typical esophageal motility study can be used to follow the steps mentioned in this chapter. The following system functions are discussed: Opening a Patient’s Study File Editing Measurement Frames Printing a Report Saving a Patient’s Analysis Figure 2-1 shows the Main Display that appears following the opening of a ManoScan data file. Both the Main and Pressure Profile displays may be viewed as a continuous color map or discrete line traces using the Display Mode controls. ManoView ESO broadly provides two schemes for analyzing esophageal motility pressure data (discussed below). The software provides separate analysis parameters, corresponding User Interface controls and report outputs for each scheme. These schemes are: Classic ManoView: this term is used to refer to conventional esophageal manometry methodology of analyzing pressure data at discrete channel locations specified w.r.t. LES position. Wave duration, wave amplitude etc. are some of the analysis parameters that are used. Chicago Classification: this is the implementation of the recently published Chicago Classification scheme for classifying esophageal motility disorders based on high resolution esophageal pressure topography. Integrated Relaxation Pressure (IRP), Distal Contractile Integral (DCI), Contractile Front Velocity (CFV), Distal Latency (DL), Peristaltic Break and Contractile Deceleration Point (CDP) are the analysis metrics defined with this scheme1. Note: the following section parallels the steps outlined by the “Guide” function, located on the top right side of the screen. By activating Guide, the user will be walked through the analysis process. 1 The International High Resolution Manometry Working Group, Chicago classification criteria of esophageal motility disorders defined in high resolution esophageal pressure topography, Neurogastroenterology & Motility, March 2012, vol 24: 57-65. This document contains proprietary information. Source: Given Imaging Copyright 2013, Given Imaging. All rights Reserved ManoView ESO Analysis Program _____________________________________________________________________________________________________________ Zoom Tools Time Bar Pressure Profile Display Main Display Navigation Bar Display Mode Controls Pressure Reference Control Figure 2-1 Elements of the display (Main Display shown in Contour mode) 2.1 Running the Program To run the program: Start the ManoView ESO Analysis Program by double-clicking on its icon or shortcut. When the program starts, the Open dialog box is displayed for convenience. Browse and select any patient or sample data file for review and a window similar to Figure 2-2 appears. This document contains proprietary information. Source: Given Imaging Copyright 2013, Given Imaging. All rights Reserved ManoView ESO Analysis Program _____________________________________________________________________________________________________________ Figure 2-2 Analysis Window with patient information loaded 2.2 Prior to Analyzing Event Frames Prior to starting analysis, a few basic steps are required to prepare the study for analysis. Setting Thermal Compensation: this adjustment adjusts the baseline pressures to account for signal drift caused by the warming of the pressure sensors while in the patient’s body o On the Navigation Bar at the bottom of window, click the icon display the end of the study where the patient was extubated. o Click, Drag and place Red Vertical Time Bar beyond anatomical pressure, “waterfall image” in the beginning of the atmospheric dangle with no external pressure being applied. o From the Tools Menu, select Set Thermal Compensation. at the end of the Bar. This will This document contains proprietary information. Source: Given Imaging Copyright 2013, Given Imaging. All rights Reserved ManoView ESO Analysis Program _____________________________________________________________________________________________________________ o Click on Set Range Button (located below the Pressure Color Bar on left side of Analysis Widow) to adjust color of Contour Mode. Adjust Minimum to eliminate any grey color ‘streaks’ and adjust Maximum to minimize any off scale pink colors. Review Study Measurement Frames: on the Navigation Bar at the bottom of window, click the icon on the left side of the Bar; this will allow you to review each individual Swallow Frame one at a time. During this process adjust, delete or add Measurement Frames as appropriate. o Adjust the swallow measurement frames left edge such that it includes approximately 3 seconds of time prior to the UES relaxation, to include a baseline for bolus transit pressures. o Adjust the swallow measurement frames right edge such that it includes the LES clamp down, approximately 10 seconds after LES relaxation. o To delete an Event Frame; place the Red Time Bar within the Frame, click on Tools Menu and select Remove Frame. o To add an Event Frame; place the Red Time Bar over the desired area of the study, click on Tools Menu and select Insert Frame and choose the Event to be added (Landmark Id or Swallow). 2.3 Editing the Landmark Id Frame The Landmark frame is identified by the green-gray rectangle with dashed outlines. To analyze and edit the diagnostic information in Landmark frame, do the following: Move the time bar to the Landmark frame and zoom in to expand this frame using the zoom button, indicated by icon. Click on “Landmark Id” or on the ‘O’ shaped open the frame and start editing2. Adjust the spatial markers: UES, LES, LES upper and lower boundaries, eSleeve upper and lower boundaries (if used, indicated by icon in the LES region of Pressure Profile), and PIP. Figure 2-3 identifies the adjustable spatial markers in Landmark Id frame. These adjustments, if necessary, are done by moving the controls vertically in the Pressure Profile panel and viewing the horizontal guidelines in the Contour mode. This establishes the positions of these landmarks for calculations within the program and for the analysis report. See Appendix B. Anatomical Marker Positioning Guidelines for more details. icon in the upper right corner of the frame to 2 A shortcut way to zooming in on a measurement frame is to double-click its corresponding rectangle in the Navigation Bar. The program will automatically open and center the frame and zoom in. Use the zoom button or right click and drag on the Main Display for additional magnification. This document contains proprietary information. Source: Given Imaging Copyright 2013, Given Imaging. All rights Reserved ManoView ESO Analysis Program _____________________________________________________________________________________________________________ Horizontal Guidelines Spatial Markers Figure 2-3 Spatial Markers Click the Display mode button located below the color bar on the left side of ManoView ESO window. This displays the pressure data in Traces mode. Click it again to toggle back to Contour mode. For Classic ManoView analysis, adjust the horizontal pressure adjustment tools at the LES (or eSleeve) and UES in line trace mode to establish the basal (resting) pressures (see Figure 2-4). Note: The editing tools are provided for all reported diagnostic parameters. While the program generally places these at satisfactory values, always verify that these are appropriately placed. This document contains proprietary information. Source: Given Imaging Copyright 2013, Given Imaging. All rights Reserved ManoView ESO Analysis Program _____________________________________________________________________________________________________________ Pressure Adjustment Tools Figure 2-4 Pressure Adjustment Tools 2.4 Editing Swallow Frames The Swallow frames are identified by solid rectangular boxes (refer Figure 2-5). The label name is mentioned in the upper left hand corner of each frame. Depending on the parameter settings in Report & Analysis form (available from Setup Menu), Chicago Classification or Classic ManoView analysis controls are displayed on the Main Display. See Section 9 for detailed discussion on setup and analysis controls for Chicago Classification. To analyze and edit the diagnostic information in a Swallow frame: Click on the icon located at right end of the navigation bar to move to the first swallow frame. Some of the characteristics of the swallow frame are marked by labels in the Main Display itself. These are: o Not Fld: Not failed (shown as Intact when Chicago Classification is enabled) o No SC: Not simultaneous o Single: Indicates single peaked contraction This document contains proprietary information. Source: Given Imaging Copyright 2013, Given Imaging. All rights Reserved ManoView ESO Analysis Program _____________________________________________________________________________________________________________ Adjust the following markers if necessary: LES relaxation markers, eSleeve, Start, Peak, and End Wave markers for the three esophageal body analysis locations (for Classic ManoView analysis) or the CFV, CDP, and DL markers (for Chicago Classification analysis). Some of these markers are shown in Figure 2-5 (a) and (b). If analysis of the UES and pharyngeal motility is desired, adjust the locations of the Start, Nadir, and End Relaxation for the UES and the Start, Peak, and End Waves for the pharyngeal channel located above the UES. See Appendix C. Swallow Frame Analysis Guidelines for detail guidelines on placing analysis markers for Classic and Chicago Classification schemes. Repeat this process for the remaining swallow measurement frames. Clicking on the icon located at the right of the Navigation Bar moves to the next event frame. The Navigational Bar’s colored dots change from red (unopened), to yellow (currently open), and then to green when closed to indicate which frames have been reviewed. Pharyngeal/UES wave markers Pharyngeal/UES wave markers Esophageal wave adjustment markers (Classic ManoView analysis) Esophageal wave adjustment markers eSleeve eSleeve LES relaxation markers LES relaxation markers (a) (b) Figure 2-5 Swallow Measurement Adjustments. (a) Contour mode (b) Line trace mode This document contains proprietary information. Source: Given Imaging Copyright 2013, Given Imaging. All rights Reserved ManoView ESO Analysis Program _____________________________________________________________________________________________________________ 2.5 Generating a Report To generate the report: Click the Report button in the main window. A window similar to the one shown in Figure 2-6 pops up. Customize the content for the report to be printed. This can be done by selecting the checkboxes and editing the fields as desired. The Report window includes pull-down lists from which to save and retrieve previously saved information and text, reducing report preparation time. The individual diagnostic parameters available may be customized through the Report & Analysis function in the Setup menu. This is described in detail in Section 3.3.3.1, Report & Analysis. Figure 2-6 A snapshot of the report window Select the Create button at the bottom of the report window after the appropriate content is set. Complete the “Create Report” dialog to create and print the report. The program can generate a summary report and a table of detailed parameters. It is possible to include images of each of the measurements in contour and/or line trace formats, and any screenshot captured images acquired (captured via the Capture Image button in the Main Window). The report is generated as a Microsoft Word document or PDF, which may be printed and saved. 2.6 Saving an Analysis It is possible to save patient analysis data to your computer or network drive after printing the report or at any time during the analysis process by selecting the Save Analysis option under File menu. Important Notes for Saving and Opening Files: It is advised to create and maintain a dedicated directory for analysis (*.mva) files separate from data acquisition (*.mvs) files to avoid confusion between the file types. Assure that when re-opening a previously saved analysis file, select analysis file type (*.mva), rather than the original data acquisition file (*.mvs) with the same basic file name. 2.7 Special Esophageal Wave Markers (Classic analysis) Certain special esophageal markers (shown Figure 2-7) exist in the region of the Esophageal Wave adjustments to characterize abnormal swallows; they are indicated by: This document contains proprietary information. Source: Given Imaging Copyright 2013, Given Imaging. All rights Reserved ManoView ESO Analysis Program _____________________________________________________________________________________________________________ SC: Simultaneous Contractions, DP/TP: Double/Triple Peaks, FS: Failed Swallow. The criterion for establishing each of these conditions is described in Appendix A. Analytical Parameter Notes. To override any of these markers, click on them to change their state or move their location. T Figure 2-7 Simultaneous Contraction (SC), Multiple Peak (MP), and Failed Swallow (FS) markers 2.8 Special Swallow Characterization Tags (Chicago Classification) Certain special swallow characterization markers (shown in Figure 2-8) are shown at lower-right of the event frame to characterize abnormal swallows; they are indicated by: Hyper: Hypercontractile contraction Rapid: Rapid contraction Premature: Premature contraction This document contains proprietary information. Source: Given Imaging Copyright 2013, Given Imaging. All rights Reserved ManoView ESO Analysis Program _____________________________________________________________________________________________________________ Figure 2-8 Swallow abnormality – Hypercontractile contraction - indicated at right bottom of event frame 2.9 Non-Esophageal Study and Manual Analysis By default, the analysis channels are located at LES, UES and at adjustable distances from these sphincters. However, the analysis channels need not be constrained in such a manner. ManoView ESO provides the functionality to select the position of the analysis channels independent of any anatomical landmark. To perform the analysis ‘manually’: From the Setup menu, select Channels. In the dialog box, select Free Selection. Specify the number of free channels using the dropdown list. Click Ok. Adjust the free channels positions in the Pressure Profile panel as desired. Once channel positioning is done, the data collection can be done in the following manner: Use built-in tools such as the SmartMouse, eSleeve, and Isobaric Contour function to view data at a particular point (refer Chapter 3 for description of these functions). Data corresponding to the current tool or function being used are displayed in the lower left corner of the Main Display in the table labeled “Current” (when “Show Data” button located at right bottom of Main Display is active). Discrete values for all the channels are obtained by moving the time bar to the desired time instance and reading pressure values in the “Current” table. This document contains proprietary information. Source: Given Imaging Copyright 2013, Given Imaging. All rights Reserved ManoView ESO Analysis Program _____________________________________________________________________________________________________________ Click “Log Data” button to store the data value displayed in the Current table. To save all log entries in a text file use “Save Log Data…” in the File menu. This document contains proprietary information. Source: Given Imaging Copyright 2013, Given Imaging. All rights Reserved ManoView ESO Analysis Program _____________________________________________________________________________________________________________ 3. Analysis Window This section contains details on the ManoView ESO Analysis Window controls and menus. These capabilities allow for a comprehensive analysis from the high-resolution esophageal pressure data. 3.1 Analysis Window and Controls The Analysis window provides multiple ways to access setup options and tools. Functions are accessible either through the menu system or on-screen control buttons and for most commonly used functions they are available both ways. 3.1.1 Analysis Window Organization The Analysis window operates in Contour and Line Trace modes. Contour mode provides a continuous time/space image of pressures, while line traces provide the pressure history of a given location. The location for each trace channel is shown in the Pressure Profile. The full Analysis Window is shown in Figure 3-1. 3.1.2 Contour Mode (Clouse Plot) The contour plot displays pressure encoded in color with sensor channel location along the vertical axis and time along the horizontal axis. A color–coded key is shown indicating the corresponding pressure values in mmHg at each end of the color scale. The key is adjustable to set minimum and maximum display pressure values (refer to Figure 3-2(a)). 3.1.3 Line Trace Mode The line trace mode displays pressure as a colored trace and accommodates up to 12 horizontal traces. The vertical space allocated for each trace is adjusted automatically as the number of displayed tracings is changed. Each trace has a legend/range control area at the left showing the current trace value (at time of Time Bar), trace position, and the maximum/minimum scale selected for the trace (refer to Figure 3-2 (b)). The minimum and full scale pressure ranges are adjusted by clicking on the legend/range control. Contour Mode and Line Trace Mode show the same information in the two primary display modes. 3.1.4 Trace –on-Contour Mode This mode displays the pressure or impedance line trace data superimposed over the contour plot. The data can be displayed in this mode by using the Display Mode Options button under the Tools menu. Figure 3-3 shows an example in Trace-on-Contour mode. This document contains proprietary information. Source: Given Imaging Copyright 2013, Given Imaging. All rights Reserved ManoView ESO Analysis Program _____________________________________________________________________________________________________________ Menu Bar Zoom Tool Bar Profile Panel Main Display Navigation Bar Window Controls Data Panel Patient Information Figure 3-1 ManoView Analysis Window Organization (a) (b) Figure 3-2 Analysis Window (a) Contour Mode (b) Line Trace Mode This document contains proprietary information. Source: Given Imaging Copyright 2013, Given Imaging. All rights Reserved ManoView ESO Analysis Program _____________________________________________________________________________________________________________ Figure 3-3 Analysis Window displaying pressure data in Trace-on-Contour mode 3.1.5 Control Buttons The Analysis Window provides control buttons for frequently used functions. Table 3-1 Analysis Window Control Buttons identifies these controls and describes their functionality. Table 3-1 Analysis Window Control Buttons Control Buttons Functionality Open Choose the patient data file for review. Capture Image Takes a “screen shot” of the current Main Display for later printing or saving in the Report. Guide Starts step by step analysis instructions for analyzing study. Report Activates the ManoView ESO Report Window (See Chapter 5). Data Table Activates the “All Data” Table window showing detailed study data. Set Range Activates the Set Range control (contour mode only). Play Plays the contour/trace line data as a video. Display Mode Changes the Analysis window from Line Trace to Contour Mode and back. 2D/3D If a 3D-ESO catheter is used, this will bring up a 3D Window which displays data corresponding to 3D sensors. Atmospheric /Gastric Changes the pressure baseline used for display purposes from gastric to atmospheric and back. This document contains proprietary information. Source: Given Imaging Copyright 2013, Given Imaging. All rights Reserved ManoView ESO Analysis Program _____________________________________________________________________________________________________________ Control Buttons Functionality On/Off Enables or disables all event frame visible on the Main Display without removing them permanently from the study. This can be used as alternative to Tools->Remove Frame feature which removes the frame permanently. Control available only when enabled from Tools→Display Mode Options. 3.1.5.1 Capture Image Pressing the Capture Image button records an image of the current Main Display for later inclusion in the Report. 3.1.5.2 All-Data Table Window The All-Data Table (activate via the “Data Table” button), shown in Figure 3-4 shows all current measurements in the analysis. A control is provided that links to the Setup Table in which selectable parameters desired to appear in the All-Data Table and Report (see below) can be chosen. 3.1.5.3 Setup Table Window The Setup Table (Figure 3-5) enables the user to select which parameters will be displayed on the Report Detail sheet and the All-Data table. Certain parameters will be selected by default and may not be deselected. When a user selects “Save As Default,” the selected parameters will be saved with the settings. The study summary data column will display the resting landmark and sphincter pressure data and the mean measured swallow data where applicable. Figure 3-4 All Data Table 3.1.5.4 Figure 3-5 Setup Table Window Range Button The Set Limits button activates a control that provides the ability to adjust the maximum and minimum pressures of the color contour plots in the Main Display (refer Figure 3-6). This document contains proprietary information. Source: Given Imaging Copyright 2013, Given Imaging. All rights Reserved ManoView ESO Analysis Program _____________________________________________________________________________________________________________ Figure 3-6 Set Limits Control (Contour Mode) 3.1.5.5 Range Dialog Box The Range Dialog Box is activated by clicking on left hand channel controls in the Line Trace mode. This provides the ability to adjust the range and baseline values for the individual traces or all traces at once when “All” is selected. This control is also used to set the range for the Pressure Profile when in the line trace mode (refer Figure 3-7). Figure 3-7 Set Range Control (Line Trace Mode) 3.1.5.6 Pressure Reference (Atmospheric / Gastric) Control The Pressure Reference control changes the pressure baseline used for display purposes from gastric to atmospheric and back. By default, all files open in Atmospheric mode so that setting Gastric is an overt action. The user should first identify an appropriate location for setting Gastric location using the Gastric marker in the pressure Profile. Selecting “Gastric” in the Pressure Reference control will cause all data in the program to be presented relative to this gastric value taken as the 30 s average (+/- 15 s) at the time of the Time Bar and at the location of the Gastric marker. Note that the pressure reference button does not affect any calculated parameters as any that are dependent on gastric pressure are always taken relative to gastric (taken at the location of the Gastric marker) at the time in the record of the parameter of interest. 3.2 Pressure Profile Panel 3.2.1 Pressure Profile Display Modes The Pressure Profile Display (right pane) shows the spatial distribution of pressure at the time of the Time Bar. It also includes the spatial markers used in localizing anatomical landmarks and setting spatial channel parameters such as eSleeve boundaries and gastric pressure location. Figure 3-8 gives This document contains proprietary information. Source: Given Imaging Copyright 2013, Given Imaging. All rights Reserved ManoView ESO Analysis Program _____________________________________________________________________________________________________________ example graphical variations of the configurations that may displayed using the Mode, Gastric, and Anatomy controls. a) Line trace pressure display with esophageal anatomy and gastric marker shown b) Same setup in “a” except pressure shown as color contour (pressure / color scale given in Main Display) c) Line trace pressure display with anatomy and gastric marker not shown Figure 3-8 Pressure Profile Panel 3.2.2 Pressure Profile Control Buttons Table 3-2 identifies the controls for the Pressure Profile Control Buttons. Table 3-2 Pressure Profile Panel Control Buttons Control Buttons Functionality Fr. Nares/Fr. LES /Sense Ch Changes the units shown on the display to “From Nares” (based on the catheter position contained in the original data file), From LES (LES is shown at the “0” position”), and Sensor Channel (1-36). This document contains proprietary information. Source: Given Imaging Copyright 2013, Given Imaging. All rights Reserved ManoView ESO Analysis Program _____________________________________________________________________________________________________________ Range Provides a slider control for setting the pressure limits when the Pressure display is in Line Trace mode (shown in subfigures “a” and “c” immediately to the lower right of the pressure profile data panel and indicating the limits 0-150 mmHg). Mode Toggles pressure display between trace and contour modes. Gastric Shows and hides the Gastric Marker. Anatomy Toggles on/off the Esophageal anatomy and provides a mode for generic landmark selection. 3.3 Menu Controls and Options The Analysis window includes four main menu selections at the top-left of the screen. These support: file handling (File), viewing patient information (View), analysis setup (Setup), and analysis tools (Tool). 3.3.1 File Menu The File menu supports file opening and saving in various formats, and program exit. Options identifies the file menu options and describe the functionality. Table 3-3 identifies each File Menu Option and describes its functionality. Table 3-3 File Menu Options File Menu Option Functionality Open Activates the Open dialog box to open either a ManoScan Acquisition (*.mvs) or previously saved ManoView ESO Analysis (*.mva) file. Save Analysis… Saves the current state of the analysis including original pressure, and current parameter values, and report information (when applicable). Save w/o Pat. Info Saves the current state of analysis but removes all patient identifying information from the study. Save Selected Data… Saves selected data in either text or ManoScan Acquisition (*.mvs) data format. Data is selected as the data range that is visible in the current Main Display. Save Data Log Saves logged data in text format (selected via the Log Data control above the Current display field near the bottom of the screen). Log file includes all entries from each time Log Data is selected since the last log was saved or program was started. Exit The FileExit option exits the ManoView ESO software application. This will close all files and exit the application. 3.3.2 View Menu The View Menu allows the user to open the Report form and view the “All Data” table. Table 3-4 identifies each View Menu Option and describes its functionality. Table 3-4 View Menu Options View Menu Option Functionality This document contains proprietary information. Source: Given Imaging Copyright 2013, Given Imaging. All rights Reserved ManoView ESO Analysis Program _____________________________________________________________________________________________________________ All Data Table Activates the All-Data table window (see Section 3.1.4.2 for details). Guide Window Displays the Guide function, which walks the user through the proper analysis steps. Video Window Activates a window that displays recorded video input during study. Requires the corresponding video file (.mvd) to be found. 3.3.3 Setup Menu The Setup menu supports customization of the ManoView ESO application. Analysis preferences and settings may be selected and used during analysis and reports. Table 3-5 identifies each Setup Menu Option and describes its functionality. Table 3-5 Setup Menu Option Setup Menu Option Functionality Report & Analysis Activates the Setup Report & Analysis window, which allows for the selection specific parameters to view during analysis and to include in the report. Save Settings Allows for the saving of currently selected settings (preferences) within the program such as pressure ranges, view configuration, pressure channel selection, and report settings. The program settings may be configured and named by the user. By saving in the name “Default” the program will start in the current settings configuration. Load Settings… Provides a list of previously saved settings (preferences) to select from. The program will adopt the settings of the selected file after completing the dialog box. Site Info Allows the user to input Site Information for inclusion in the Report (upper left hand corner). File Naming Allows the default naming convention for ManoView ESO Analysis (*.mva) files to be set and saved. This default may be overwritten when the file is saved. Analysis Options Allows the user to select the classification system and parameters for study analysis. Channels Opens the Setup Channels dialog (see Section 3.3.3.3). Mask Channels Allows for the masking of channels; those selected will be ignored by the program. Select the channel(s) to mask and the program will interpolate across adjacent channels in all displayed and calculated data. Masked channels are indicated by symbol in the Pressure Profile panel. If a channel was masked in the original ManoScan (*.mvs) file it will be masked when opened in ManoView ESO. All masked channels may be unmasked using this same Mask Channels control. Mask channels functionality is generally used when one or more of the catheter sensors are not functioning properly. Position Units Allows for selection of Position Units with the following options: “From Nares” (based on the catheter position contained in the original data file), From LES (LES is shown at the “0” position”), and Sensor Channel (1-36). Setup Units Allows to choose the format of date, time and height of patient to be printed in report. Languages Displays a list of selectable languages for the User Interface. After making a selection, the user interface will be translated the next time the software is launched. Folders Allows user to select the default locations of Report and HIS Export folders. This document contains proprietary information. Source: Given Imaging Copyright 2013, Given Imaging. All rights Reserved ManoView ESO Analysis Program _____________________________________________________________________________________________________________ 3.3.3.1 Report & Analysis The Setup Report & Analysis window allows for selecting parameters to be included in data table window and in the report. If a parameter is deselected on this across all fields on the setup window, the corresponding on-screen analysis tool(s) will not be displayed. Figure 3-9 shows a snapshot of the window. Unchecking the header (Classic ManoView or Chicago Classification) disables all the parameters within the group. In the sample case shown in the figure, all Classic ManoView parameters are disabled. Figure 3-9 Report & Analysis window. The selections related to Classic ManoView parameters have been unselected; so the corresponding controls are not visible on the Main display or in the report 3.3.3.2 Analysis Options The Analysis Options menu allows the user to select the scheme used to analyze the study, the eSleeve/LES trace settings, and the method of determining the LES relaxation analysis. The eSleeve emulates the functionality of a conventional sleeve sensor (i.e. it outputs a signal equal to the maximal pressure throughout its sensitive length). The eSleeve has the advantage that the full data set is preserved so that the axial pressure distribution may be visualized. In addition, the boundaries of This document contains proprietary information. Source: Given Imaging Copyright 2013, Given Imaging. All rights Reserved ManoView ESO Analysis Program _____________________________________________________________________________________________________________ the eSleeve may be adjusted during the analysis to position it at the appropriate location relative to the anatomy. Figure 3-10(a) shows the eSleeve/LES trace default setup control. The eSleeve margins are specified relative to the moveable LES marker. These margins also may be adjusted independent of the LES marker, by moving them in the Pressure Profile display. In addition, the markers may be locked to the upper and lower boundaries of the LES to reduce the number of markers to be adjusted (see Section 2.2). When eSleeve is not used, pressure data from LES channel alone are used for LES relaxation (residual pressure) measurement. Additionally, 3-sec Nadir and Integrated Relaxation Pressure (IRP) methods can be selected and adjusted to determine the method of analyzing LES relaxation analysis and residual pressure measurements. These options can be assessed though LESr tab shown in Figure 3-10(b). (a) (b) Figure 3-10 eSleeve window. (a) eSleeve/LES trace tab (b) LESr tab 3.3.3.3 Channels -Trace Display Channel Control The selection of channels that appear in the Main Display (Line Trace mode) may be made by Free Selection or reference to the anatomical landmark pointers (Landmark Reference) - see Figure 3-11. In addition, the channels may be repositioned using the channel markers in the Pressure Profile display. Channel selection is only available before any measurement frames have been opened (i.e. before analysis has begun). Further, computer assisted analysis to generate diagnostic parameters for the esophagus is only available when the channels are in Landmark Reference mode. The free selection of Impedance channels during impedance study analysis is also available from this menu. This document contains proprietary information. Source: Given Imaging Copyright 2013, Given Imaging. All rights Reserved ManoView ESO Analysis Program _____________________________________________________________________________________________________________ Figure 3-11 Trace Channel Control Display Free Selection Choose any number of channels between 1 and 12 for display using the control shown in Figure 3-11. These channels may be repositioned by sliding the corresponding markers in the Pressure Profile. When the Detent checkbox is selected, the free channel move only from one sensor position to another; they cannot be positioned in between the sensors. Note that the measurement frames will not open in analysis mode if Free Channel selection is invoked. Landmark Reference It is possible to select channels via Landmark Reference, this is required for auto-assisted measurement frame analysis (“analysis mode”). A snapshot of the setup window is shown in Figure 3-12. By default, the LES and UES channels will always be used for analysis mode and may not be deselected. In addition select at least three analysis channels associated with the LES and either 1 or 2 analysis channels associated with the UES. Additional auxiliary channels may be selected for viewing that will not be utilized in the generation of diagnostic parameters. Figure 3-12 Trace Display Channel Controls – Setup Landmark Reference 3.3.4 Tools Menu Options The Tools menu provides access to ManoView ESO’s analytical tools and allows for configuration of on-screen guidelines and markers. Table 3-6 identifies each Tool Menu Option and describes its functionality. 3.3.4.1 SmartMouse™ Submenu The SmartMouse™ tool provides analytical information by using right and left clicks of the mouse. The data is displayed next to the cursor and in the “Current” data table at the lower left of the screen. This document contains proprietary information. Source: Given Imaging Copyright 2013, Given Imaging. All rights Reserved ManoView ESO Analysis Program _____________________________________________________________________________________________________________ This submenu allows the SmartMouse to be turned on or off, and selected between two modes of operation. Table 3-7 identifies each Smart Mouse Submenu Option and describes its functionality. Table 3-6 Tools Menu Option Tools Menu Option Functionality Smart Mouse… Opens the SmartMouse submenu with diagnostic tools available through operation of the cursor (see Section 3.3.4.1). Guidelines… Opens a submenu that allows the user to turn on and off guidelines in the Contour display. Isobaric Contour… Toggles on and off Isobaric Contour control that shows a line in the contour main display mode at the constant contour pressure level adjustable via a control next to the color pressure map of the Main Display. The displayed pressure is relative to the current pressure reference. Additional isobaric contour may be enabled by pressing Shift key + left mouse click + mouse drag on the control located next to pressure map. The additional contour may be disabled by bringing the additional control close to the original control. Display Mode Options Allows one or more of the following display modes to be chosen: a) Enable Traces on Contour b) Enable Profile Trace Persistence c) Show Catheter in Profile d) Show Diaphragm in Anatomy e) Show Measurement Frames On/Off: enables On/Off button (available on left of Navigation Bar) Additional options are available for displaying impedance data when that version of the program is in use – See Section 6.1 Set Thermal Compensation Sets thermal compensation at the time of the Time Bar. (see Section 3.3.4.3). Detailed Thermal Compensation Sets thermal compensation at the time of a marker for each individual sensor channel. (see Section 3.3.4.3). Undo Last Thermal Comp Removes the last set thermal compensation Insert Frame Inserts a Landmark Id/Pressure or Swallow event at the time of the TimeBar. Remove Frame Removes any measurement event at the time of the Time Bar. Clear Analysis Clears all the analysis done in the .mvs file (including positioning of sphincters and PIP). Table 3-7 Smart Mouse Submenu Submenu Option Basic Functionality Contour mode: continuous data display at point of cursor, Time Bar shift (left click), rectangular region with pressure characteristics (min, max, mean pressure; velocity; changes in time, distance and pressure) in enclosed area (right click-drag). Line Trace Mode: Time Bar shift (left click), time between begin and end points (Right click-drag). Incl. Portable eSleeve Provides in Contour mode: Same functionality as basic except right click drag provides localized eSleeve functionality for enclosed area. Includes a plot of the eSleeve tracing and 3-second nadir value with the distal location of the enclosed area subtracted from the reading (e.g. for LES relaxation) unless “Alt” key is pressed. When “Alt” is pressed, the display is the simple eSleeve tracing for the selected area (i.e. the maximum pressure at every time within the enclosed area). Provides in Line Trace mode: Same functionality as basic. Off Turns off all smart mouse functions. This document contains proprietary information. Source: Given Imaging Copyright 2013, Given Imaging. All rights Reserved ManoView ESO Analysis Program _____________________________________________________________________________________________________________ 3.3.4.2 Display Mode Options Allows one or more of the following display modes to be chosen: a) Enable Traces on Contour b) Enable Profile Trace Persistence c) Show Catheter in Profile d) Show Diaphragm in Anatomy. Note: The user must press Display Mode button (located on the bottom left side of the analysis window) twice after clicking Enable Trace on Contour for the settings to take into effect. 3.3.4.3 Set / Detailed / Undo Thermal Compensation The Set Thermal Compensation control sets the thermal compensation at the time of the Time Bar. To do this, move the Time Bar to the desired location in the record (e.g. at a time immediately after catheter extubation when no pressure was applied to the catheter). By pressing Set Thermal Compensation, the data record will be zeroed at this location in time and the entire data record will be compensated accordingly (the indicated pressure profile at that point in time will be subtracted from the entire record). This technique, combined with the initial recording of the procedure without touching or otherwise applying pressure immediately after extubation, is recommended as a robust method of establishing proper thermal compensation. Detailed Thermal Compensation is similar to the Set Thermal Compensation control except that it allows for setting the point in time at which the zeroing of pressure will occur for each channel individually. An on-screen message explains this process. This is useful in a situation where the pressure was inadvertently applied to the catheter (e.g. pinched by the operator) at certain locations immediately after extubation. The times in the record for setting thermal compensation may be chosen to give optimal compensation while avoiding the times of applied pressure in the affected locations. Undo Last Thermal Compensation removes the last set thermal compensation. When saving a ManoView ESO analysis file, remember that the saved file will reflect the thermal compensation existing at the time the file was saved. 3.4 Data Display Panels The Data Panel area displays numerical data as registered within the program. The Data Display Area is divided by three sub areas: Current, Landmarks & Pressures, and Swallows as shown in Figure 3-13. A control in the upper right of this area will either show or hide these data panels. Figure 3-13 Analysis Window- Data Panel This document contains proprietary information. Source: Given Imaging Copyright 2013, Given Imaging. All rights Reserved ManoView ESO Analysis Program _____________________________________________________________________________________________________________ 3.4.1 “Current” Data Panel The Current Data Panel shows data from the current activities on screen. These include the time, position and pressure of the channels selected (i.e. those displayed in the Line Trace main display) at the time of the time bar, the current measurement data if a measurement frame is open, or the SmartMouse data if the SmartMouse is in use. Log the data from this panel using the Log Data control (see 3.3.1). The saved data log will include the entries for each time Log Data is selected since the last time the log file was saved or the program was opened. 3.4.2 Landmark & Pressures Data Panel The Landmarks & References Panel displays current pressures and positions of the anatomical landmarks as set in the Landmark Id and Sphincter Pressure measurement frame. 3.4.3 Swallows Data Panel The Swallows Panel displays the average of selected swallow measurements from all of the swallow measurement frames. 3.4.4 3D Table The 3D button above the data table will appear when the 2D/3D display option is enabled. By pressing the 3D Table, the data table will display the landmark locations, maximum pressure, minimum pressure, difference between max and min pressures, and the asymmetry data for selected guidelines at the timebar location. This document contains proprietary information. Source: Given Imaging Copyright 2013, Given Imaging. All rights Reserved ManoView ESO Analysis Program _____________________________________________________________________________________________________________ 4. Frame Editing & Navigation This chapter deals with the Frame Editing tools using which change the size of measurement frames and add new frames or delete existing ones. It also discusses the various controls to navigate from one frame to another. 4.1 Using Measurement Frames The Measurement Frames delineate special areas in the data record for which the program will assist in calculating diagnostic parameters. For esophageal manometry there are two types of Measurement Frames: “Landmark Id”, and “Swallows”. See Sections 2.3 and 2.4 for a description of editing anatomical landmarks and marker positions using the on-screen tools provided in the measurement frames. Note: Ensure that the marker adjustments are properly set relative to the data in order for the program to report proper diagnostic parameter values. Guidelines for using Measurement Frames 1. The Landmark Id frame must first be opened before the Swallow frames may be opened. 2. Frames are opened and closed by clicking on the open symbol in the upper right corner of the frame, or by double clicking on their rectangle icon in the Navigation Bar. An Open frame allows for the adjustment of the landmark markers and is signified by the frame border being red. The associated rectangle in the Navigation Bar will now become a yellow dot. 3. Only one frame may be open at a time. 4. Moving from one frame to the next is done by clicking on the first right arrow to the right of the Navigation Bar. Clicking the arrow closes the current frame and opens the next event for adjustment/analysis. It is also possible to close the current frame by clicking the “X” in the top right corner, then open the next frame following the same instructions as outlined in step 2 above. 4.2 Inserting, Removing, and Editing Frames 4.2.1 Inserting and Removing a Frame Frames are inserted by moving the Time Bar to the desired location in the data record and selecting ToolsInsert FrameLandmark Frame to create a Landmark Id frame or Swallow Frame to create a Swallow Frame. If the event is a Swallow type, the swallow frames are automatically reassigned new numbers in the report. A frame can be removed by moving the Time Bar over an existing frame and selecting ToolsRemove Frame. This document contains proprietary information. Source: Given Imaging Copyright 2013, Given Imaging. All rights Reserved ManoView ESO Analysis Program _____________________________________________________________________________________________________________ 4.2.2 Moving and Resizing a Measurement Frame Move the right and left sides of a measurement frame by left-clicking the upper or lower areas on the frame boundary then dragging to the desired location. This allows for the resizing or moving of frames. Moving and resizing of frames may be done at any time during the analysis. 4.2.3 Annotations Annotations can be added by right clicking anywhere on the Main Display and clicking on Add Annotation label. An existing annotation can be deleted by right clicking on the annotation line and clicking on Delete Annotation label. The annotation can be moved by left clicking and dragging the marker. Left clicking on the text allows the user to edit the current text associated with the annotation. 4.3 Navigation Bar & Time Controls The Navigation Bar allows the user to quickly move anywhere within the data record, as shown in Figure 4-1, the bar includes a slider that shows the width of the current main display and its location in the record. Green-gray (landmark Id) and blue-gray (swallow) rectangular areas show the location of measurement frames. A dot in the center of each rectangle is red if that frame has not been opened, yellow if it is currently open and green if it has been opened and closed. Arrow controls to the right and left allows for the navigation forward and backwards through the frames as described in the figure and automatically open and close measurement frames as described in the previous section. The time control allows for the adjustment of the width (duration) of data currently displayed in a manner parallel to the use of the Zoom tools described in Section 4.4. Clicking anywhere on the Navigation Bar or dragging the Slider will move the display to that region in the study. Panning to the left and right can be done by left-clicking any point on the main display and dragging. Go to End Go to Beginning Time Control Zoom Previous Frame Frame On/ Off Slider Status or Dot Marker Next Frame Figure 4-1 Navigation Bar This document contains proprietary information. Source: Given Imaging Copyright 2013, Given Imaging. All rights Reserved ManoView ESO Analysis Program _____________________________________________________________________________________________________________ 4.4 Zoom Controls The Navigation Bar supports the expansion and compression of the Landmark Id and Swallow frames in seconds. Figure 4-1 identifies the Navigation Bar controls. The Zoom Bar increases and decreases the amount of information displayed in the Main Display panel. Figure 4-2 identifies the Zoom Tool Bar controls. Zoom In Zoom Out Zoom Out Fully Figure 4-2 Zoom Tool Bar Table 4-1 identifies each tool bar control and describes its functionality. The displayed time range can be zoomed in by right-clicking on the Main Display and dragging it. Table 4-1 Zoom Tool Bar Controls Tool Bar Controls Functionality Zoom In Zooms in the display width to 1/2 size in seconds Zoom Out Zooms out the display width, doubling the size in seconds Zoom Out Fully Zooms out the display to show all the data in a single view Table 4-2 summarizes the shortcuts that can be used for easier navigation and frame editing. Table 4-2 Keyboard/Mouse Shortcuts Functionality Key combination Zoom in Control key + scroll downward Zoom out Control key + scroll upward Zoom in to any selected time range Right click + drag ‘Pan’ the main display Left click + drag Move time bar Scroll the mouse Open/close measurement frame for analysis Double click on the markers in the navigation bar Add/delete annotation Right click on Main Display This document contains proprietary information. Source: Given Imaging Copyright 2013, Given Imaging. All rights Reserved ManoView ESO Analysis Program _____________________________________________________________________________________________________________ 5. Report Window The ManoView ESO Analysis Report window provides features and capabilities for rapid report generation and customization to a user’s specific needs. The use of check boxes allows for selection of information categories, and pull-down lists let and the user save and re-insert commonly used textual information and ICD codes. The particular analysis parameters that are available in the report form may be custom-specified via “Report & Analysis” described in Section 3.3.3.1. After reviewing and completing the on-screen report form, a Report document is generated that may be printed and or saved in a separate file. All report information is also automatically saved within a saved ManoView ESO analysis (*.mva) file. 5.1 Report Window and Controls The Report window becomes part of the main analysis file and is stored when the analysis file is saved. 5.1.1 Report Window Organization The Report window consists of six information areas. Each may be included or excluded from the report except “Interpretation / Findings and Signatory Physician, which are always included. Figure 5-1 identifies the areas in the report form. Site Info – provides site or medical facility information. This information is carried over from the original data file (*.mvs) or may be specified in the ManoScan system program via the Setup menu. Patient Info – provides patient, examination, and physician information. These can be edited from the Report window. LES/Esoph Motility Summary – contains the indicated diagnostic information. UES/Pharynx Results – contains the indicated diagnostic information. Chicago Classification Findings – provides an overview of the patient’s swallow features as described by the Chicago Classification criteria. Procedure Description, Indications, Interpretation/Findings – lets the user input the indicated information or select from previously saved pull-down list. Signatory Physician – Allow for the name, title and/or affiliation of the signing physician to be input or select from previously saved pull-down list. This document contains proprietary information. Source: Given Imaging Copyright 2013, Given Imaging. All rights Reserved ManoView ESO Analysis Program _____________________________________________________________________________________________________________ Site Information Exam/ Patient Information Scroll Bar Esophageal Motility Summary UES/ Pharynx Summary Chicago Classification Finding Procedure Description Indications Interpretation/ Findings Impressions Signature Control Buttons Figure 5-1 ManoView ESO Report Window Organization This document contains proprietary information. Source: Given Imaging Copyright 2013, Given Imaging. All rights Reserved ManoView ESO Analysis Program _____________________________________________________________________________________________________________ 5.1.2 Customizing Pulldown Lists The Report window provides customizable pulldown lists to eliminate the need for re-typing commonly used information. The lists include: Procedural Description, Indications, ICD Code, Interpretations/Findings, ICD DX Code, and Signatory Physician. Adding, accessing, and removing data is similar for each list. A snapshot of the pulldown list is shown in Figure 5-2. List Name Field Figure 5-2 Procedure Description Pulldown List Adding To Pulldown List– To create a custom Procedure Description, enter the desired name (e.g. Small Bowel Manometry) in the List Name field. Then type the description in the Text Field and select Save. Note: Selecting Save will cause all text in the Text field to be saved under the current list name. If there is a blank text field and Save is selected, no text will be saved under the name in the List Name field. Using An Existing Pulldown – To use a previously saved description, select it from the pulldown list and select “Add from list:”. This will add the corresponding information to the end of any text already in the Text field. If an additional selection is made from the list, it will be added at the current insertion point (where text would be added if typing). Removing Pulldown List Elements –To delete a saved description, choose it from the list and select Delete. ICD Codes – ICD codes can be added or removed in the same fashion as described above. To add a code, type in the code and descriptive title (e.g. “ICD: 787.2 [Dysphagia]”) that should to appear on the report in the corresponding text field. No other text should exist in the text field at this time. Type the title desired to list this code by (e.g. “Dysphagia”) in the List name field for the ICD code and select Save. Deleting an ICD code is identical to the process described above. 5.1.3 Create Report After entering the appropriate information in the Report, select Create to create the report document. This will activate the window shown in Figure 5-3. From here, select the information to be included in the Report document. The Basic Report is the information set up in the Report window. The Detailed Parameter List is a list of parameters derived for every Measurement Frame (e.g. swallow). (The parameters that are included in the detailed report may be adjusted using the “Report & Analysis” function described in Section 3.3.3.1). Select plot images to include in the report – both of the This document contains proprietary information. Source: Given Imaging Copyright 2013, Given Imaging. All rights Reserved ManoView ESO Analysis Program _____________________________________________________________________________________________________________ measurement frames and those “screenshots” taken using the “Capture Image” function of the main display. Select the format of the report (choose from Word, Word 2003, or PDF). By pressing OK the program will generate a report document. Once generated, the report document may be printed and/or saved. Figure 5-3 Create Report This document contains proprietary information. Source: Given Imaging Copyright 2013, Given Imaging. All rights Reserved ManoView ESO Analysis Program _____________________________________________________________________________________________________________ 6. Combined Pressure-Impedance Analysis ManoView ESO provides the tools to visualize and analyze pressure physiology, bolus transit (impedance and video) together. The data are obtained via the ManoScan Z system. This chapter covers the additional features specific to the combined pressure-impedance analysis. The readers should refer Chapters 1 to 5 for ‘pressure only’ features of ManoView ESO. 6.1 Analysis Window Organization The analysis window operates in Contour, Line Trace and Trace-on-Contour modes, similar to the manner it displays the “pressure-only” data. Figure 6-1 Pressure-Impedance data in Contour mode This document contains proprietary information. Source: Given Imaging Copyright 2013, Given Imaging. All rights Reserved ManoView ESO Analysis Program _____________________________________________________________________________________________________________ Figure 6-2 Impedance data in Line Trace mode 6.1.1 Impedance 6.1.1.1 Contour Mode The contour mode displays both the pressure and impedance information as color plots. The impedance data are represented as monochrome color map (i.e., a magenta color corresponds to impedance data). The impedance data are superimposed over pressure contours. The software automatically sets the range for impedance color map when any impedance study file is opened. The user may adjust the range by moving the range labels up and down (refer Figure 6-1), thereby setting the contrast to the desired values (e.g. to enhance visualization of liquid or gas bolus). 6.1.1.2 Line Trace Mode The mode displays impedance and pressure data as colored trace for up to 12 channels. Figure 6-2 shows the impedance traces for a normal study. 6.1.1.3 Trace-on-Contour mode This mode displays the impedance or pressure traces superimposed over the contour plot. This document contains proprietary information. Source: Given Imaging Copyright 2013, Given Imaging. All rights Reserved ManoView ESO Analysis Program _____________________________________________________________________________________________________________ 6.1.1.4 Pressure-Impedance Profile Panel The profile panel shows both the pressure and impedance profile. An intuitive depiction of bolus transit is also done by using the impedance information. Figure 6-3 shows a normal swallow physiology in the profile panel. Pressure Impedance Figure 6-3 A normal swallow physiology shown in profile panel The impedance profile range control can be activated/deactivated using the corresponding option under Tools->Display Mode Options. 6.1.1.5 Show Z/Hide Z This control allows showing or hiding the impedance data in the Contour mode. It is located below the color bars on the bottom left side of the analysis window. 6.1.1.6 Display Mode This button allows switching the analysis window display to any of the available display modes. The available display modes can be selected by using Tools->Display Mode Options. 6.1.1.7 Display Mode Options The pressure and/or impedance data can be visualized in several combinations of contour and trace modes. The display modes can be selected using the Display Mode Options under the Tools menu. The display combinations that are available for main display are: Enable Traces on Contour This document contains proprietary information. Source: Given Imaging Copyright 2013, Given Imaging. All rights Reserved ManoView ESO Analysis Program _____________________________________________________________________________________________________________ Enable Impedance Traces Enable Impedance Traces on Contour The display combinations that are available for profile display are: Enable Profile Trace Persistence Show Catheter in Profile Show Diaphragm in Anatomy 6.1.1.8 Bolus Clearance The status of the bolus swallowed during test maneuver can be indicated for swallow frames at the time of analysis by toggling the Bolus cleared/ Incomplete Clearance tag. The bolus clearance status can be changed by clicking the magenta colored label indicating bolus status (shown in Figure 6-4). If this label is not visible on the main display, check the boxes which correspond to ‘Incomplete bolus clearance’ under Setup Report & Analysis. Based on the bolus status indicated in each frame, the incomplete bolus clearance is expressed as percentage of the total swallows in the Report. Bolus status label/control Figure 6-4 Bolus status control shown during a pressure-impedance analysis This document contains proprietary information. Source: Given Imaging Copyright 2013, Given Imaging. All rights Reserved ManoView ESO Analysis Program _____________________________________________________________________________________________________________ 7. 3D Visualization and Analysis ManoView ESO when used in conjunction with a 3D-ESO catheter provides the tools to visualize and analyze 3D data for the region encompassed by the 3D sensors. The data is obtained via the ManoScan 3D module. This chapter covers the additional features specific to the 3D HRM analysis. Readers should refer to Chapters 1 to 6 for standard HRM features of ManoView ESO. 7.1 3D Window Organization The pressure data acquired from the 3D sensors of the catheter is displayed in a separate 3D Window (see Figure 7-1). This window is initiated by the “2D/3D” button available at the bottom-left of the software. The 3D sensor zone is marked in blue in the profile panel to distinguish from regular sensors. 3D sensors zone marked in blue 3D sensors zone - 3D Window Figure 7-1 Pressure data in Contour mode with 3D HRM window There are three different views in the 2D/3D window that utilize the unique functionality of the 3D-ESO catheter. 7.1.1 3D HRM The 3D HRM view displays a 3D cylinder view of the sensors (Figure 7-1). Observe that clicking and dragging the mouse will cause the cylinder to rotate. Also note that the top and bottom as well as the 2D map “origin” of the cylinder are color-mapped to match the 2D HRM map. This document contains proprietary information. Source: Given Imaging Copyright 2013, Given Imaging. All rights Reserved ManoView ESO Analysis Program _____________________________________________________________________________________________________________ 7.1.2 2D HRM The 2D HRM view displays a cross section on the left and a 2D map of the 3D HRM plot. The 2D map view can be panned by dragging the bar located at the top of the view (see Figure 7-2). The cross sections locations can be set w.r.t LES and PIP anatomical markers. These locations are also shown in the 2D map by means of horizontal lines. See Section 7.3.2, Analysis Options for details on how to set the cross-section locations. Cross Section Locations Minimum pressure path Figure 7-2 2D HRM View The path of minimum resistance to the bolus flow is determined by the software and denoted using dotted line in the 2D map. The highest pressure point on this path is indicated using the red dot (see Figure 7-2). This document contains proprietary information. Source: Given Imaging Copyright 2013, Given Imaging. All rights Reserved ManoView ESO Analysis Program _____________________________________________________________________________________________________________ 7.1.3 2D/3D HRM The 2D/3D HRM view displays all the views discussed above at once (Figure 7-3). Figure 7-3 2D/3D HRM View 7.2 3D Window Controls Several controls are available to alter the display of the 3D window. These are shown in Figure 7-4 and Figure 7-5 and the functionalities are described below. Figure 7-4 Buttons from left to right: a) Anatomy Toggle b) Deflection/Range c) View Mode d) Capture e) Home f) Zoom 7.2.1 Anatomy Toggle The anatomy toggle button works in the 3D HRM and 2D/3D HRM views. It turns on and off the anatomy drawing. See a representation of the anatomical supplement in Figure 7-7. 7.2.2 Deflection/Range The deflection/range buttons will change the deflection/ranges of the cross section view in the 2D HRM and 2D/3D HRM views. This document contains proprietary information. Source: Given Imaging Copyright 2013, Given Imaging. All rights Reserved ManoView ESO Analysis Program _____________________________________________________________________________________________________________ 7.2.3 View Mode The button toggles between the following view mode: a) Wide cylinder b) Narrow cylinder c) Vector Volume. 7.2.4 Capture Takes a “screen shot” of the current view of 3D HRM window for later printing or saving in the Report. 7.2.5 Home & Zoom The Home button will place the 3D window back in its original place in the lower left hand corner of the contour screen in the event that it is moved somewhere else (or resized). The Zoom button will increase (and decrease) the size of the 3D window. 7.2.6 Rotation The rotation buttons translate the 3D cylinder view around its desired axis (Figure 7-5). Clicking these buttons will rotate clockwise. To rotate counter-clockwise, hold Shift then click the rotation buttons. Figure 7-5 3D Cylinder Rotation Buttons 7.3 3D Analysis Setup 7.3.1 Setup Report & Analysis The Setup Report & Analysis window (available from Setup menu) allows selection of the desired 3D parameters (see Figure 7-6). These parameters can be calculated at the following time instances: Peak Inspiration, Mid Expiration and Swallow Residual (see Section 7.3.2 for details on Swallow Residual). This document contains proprietary information. Source: Given Imaging Copyright 2013, Given Imaging. All rights Reserved ManoView ESO Analysis Program _____________________________________________________________________________________________________________ Figure 7-6 Asymmetry type selections in Setup Report & Analysis The Peak Inspiration & Mid Expiration time instance markers are available for the Landmark Event frame only (see Figure 7-7). They are indicated by vertical red lines in the Main Display spanning the length of the 3D sensors. Either of the location can be chosen by clicking on the corresponding red line. The 3D window displays the data corresponding to the chosen instance. The Regular/3D Table button (located below the Main Display) can be toggled to display/hide the 3D parameter values. Peak Inspiration and Mid Expiration markers Figure 7-7 Peak Inspiration and Mid Expiration time instances are indicated using short vertical red lines This document contains proprietary information. Source: Given Imaging Copyright 2013, Given Imaging. All rights Reserved ManoView ESO Analysis Program _____________________________________________________________________________________________________________ 7.3.2 Analysis Options The asymmetry ‘slice’ locations can be changed from Analysis Options dialog available from Setup Menu (see Figure 7-8). This dialog also allows to set how the Swallow Residual time is chosen. When the ‘User Defined Time for Residual Pressure’ is checked, a red vertical line in the region of swallow relaxation is provided when swallow frame is opened. All the 3D swallow analysis parameters are displayed for this time instance. When the ‘User Defined Time for Residual Pressure’ is unchecked, the average from the swallow relaxation (defined by 3sec Nadir or IRP) is taken to calculate the 3D swallow analysis parameters. Figure 7-8 Analysis Options for 3D Analysis This document contains proprietary information. Source: Given Imaging Copyright 2013, Given Imaging. All rights Reserved ManoView ESO Analysis Program _____________________________________________________________________________________________________________ 8. Video Visualization ManoView ESO, when used in conjunction with a ManoScan V module, provides the tools to acquire and visualize the video data. This chapter covers the additional features specific to the video visualization. Readers should refer to Chapters 1 to 6 for standard HRM features of ManoView ESO. 8.1 Overview If a video file is associated with a pressure/impedance study file (.mvs or .mva format files), then on the Main Display directly above the Main Display, one or more sections of blue markers is displayed. The blue markers indicate that video is recorded for that duration (see Figure 8-1). Video Markers Figure 8-1 Blue markers over Main Display indicate the time range for which recorded video data is available To view the video window, press the Video button on the Main Form. Moving the time bar over the blue mark region will show the video frame corresponding to the time bar location. Pressing the “Play” button will advance the time bar forward at an adjustable rate and cause the video frames to continuously update synchronously with the pressures displayed in the Profile Panel. This document contains proprietary information. Source: Given Imaging Copyright 2013, Given Imaging. All rights Reserved ManoView ESO Analysis Program _____________________________________________________________________________________________________________ 8.2 Controls The following buttons are available on the video window (see Figure 8-2): 1. Magnification buttons: the video display can be zoomed in, zoomed out or set to 100% zoom using the buttons 2. Crop button size). 3. Capture button Report. , and respectively. : to crop the video (for view purpose only; does not reduce the video file : to capture the image; the captured image is available for printing in the 4. Frame by frame navigation: the video display can be navigated one frame by frame the ‘<’ & ‘>’ keys on keyboard. Figure 8-2 Video Window This document contains proprietary information. Source: Given Imaging Copyright 2013, Given Imaging. All rights Reserved ManoView ESO Analysis Program _____________________________________________________________________________________________________________ 8.3 Video File Association Details When a pressure-video study is acquired and saved using ManoScan, the software creates two files with identical names: one for pressure/impedance data (extension: .mvs) and one for video data (.mvd). The ManoView ESO associates a video file with the mvs study file only if two files have the same name and they are in the same directory. When ManoView ESO saves a pressure-video analysis file (extension: .mva), it saves the name and location of the mvd file. Hence, ManoView ESO can associate the analysis file with the mvd file even if they are of different names and are placed in different directory, as long as the mvd file is not moved from original location. This document contains proprietary information. Source: Given Imaging Copyright 2013, Given Imaging. All rights Reserved ManoView ESO Analysis Program _____________________________________________________________________________________________________________ 9. Chicago Classification Setup & Analysis Chicago Classification is a recently developed scheme for classifying esophageal motility disorders based on high resolution esophageal pressure topography. This scheme is published by the International High Resolution Manometry Working Group3. ManoView ESO supports the Chicago Classification metrics parameters, and outputs corresponding diagnosis result suggestions in a semiautomated fashion. 9.1 Parameters The Chicago Classification scheme defines several analysis parameters based on high resolution esophageal pressure topography to characterize the swallows. A brief description of these parameters as described in the publication is provided below. Please refer Appendix A. Analytical Parameter Notes for elaboration on specifics of implementation and adoption of these parameters within the ManoView ESO software. Integrated Relaxation Pressure (IRP): Mean EGJ pressure measured with eSleeve for 4 contiguous or non-contiguous seconds of relaxation in the 10second window following deglutitive UES relaxation. Distal Contractile Integral (DCI): Amplitude x duration x length (mmHg-s-cm) of the distal esophageal contraction greater than 20 mmHg from proximal to distal pressure troughs. Distal Latency: Interval between UES relaxation and the CDP, expressed in seconds. Peristaltic Breaks: Gaps in the 20 mmHg isobaric contour of the peristaltic contraction between the UES and EGJ, measured in axial length. Contractile Front Velocity (CFV): Slope of the tangent approximating the 30 mmHg isobaric contour between proximal trough and the CDP. Contractile Deceleration Point: The inflection point along the 30 mmHg isobaric contour where propagation velocity slows demarcating the tubular esophagus from the phrenic ampulla. Note: The definitions of the CFV and CDP parameters are adopted by the software to enable robust implementation. Like all the analysis markers, the user should manually review and edit the position of these markers if the auto-placement is not satisfactory. 9.2 Setup The user may enable the Chicago Classification scheme from the Report & Analysis dialog available from the Setup Menu (see Figure 9-1). This is done by checking the ‘Chicago Classification’ checkbox therein. The user may keep ‘Classic ManoView’ checkbox selected (to enable corresponding line trace parameters) or may unselect it. 3 The International High Resolution Manometry Working Group, Chicago classification criteria of esophageal motility disorders defined in high resolution esophageal pressure topography, Neurogastroenterology & Motility, March 2012, vol 24: 57-65 This document contains proprietary information. Source: Given Imaging Copyright 2013, Given Imaging. All rights Reserved ManoView ESO Analysis Program _____________________________________________________________________________________________________________ Figure 9-1 Sample Setup Report & Analysis Form Setting for Chicago Classification The following Analysis Options settings are set by Default. If these are changed, the Chicago Classification Findings will not be presented in the Report Form: LES Relaxation: 4.0 sec IRP eSleeve: used DCI: 20mmHg isobaric contour 9.3 Analysis The analysis workflow for Landmark and Swallow frame is similar to that of conventional analysis. The Landmark frame is analyzed and then the Swallow frames. Refer Section 2, Quick Start for a overview of analysis & reporting in ManoView ESO. The peristaltic integrity for a swallow is classified into four types: Intact, Small Breaks, Large Breaks and Failed. The Failed swallows are further classified into Failed – Panesoph (indicating panesophageal pressurization) and Failed – Absent (indicating absent peristalsis). The peristaltic integrity tag is available at the right top of the event frame (see Figure 9-2(a)). This document contains proprietary information. Source: Given Imaging Copyright 2013, Given Imaging. All rights Reserved ManoView ESO Analysis Program _____________________________________________________________________________________________________________ The peristaltic integrity for Classic ManoView is defined differently than for Chicago Classification scheme. The Classic ManoView uses esophageal wave markers to categorize swallow as Failed or Not Failed. If both Chicago Classification and Classic ManoView are selected in the Setup Report & Analysis form, then the calculation of peristaltic integrity will be based on Chicago Classification scheme. Certain special swallow characterization markers only applicable to Chicago Classification are shown at lower-right of the event frame to characterize abnormal contraction pattern. They are indicated by Hyper (Hypercontractile), Rapid and Premature labels. (a) (b) Figure 9-2 Swallow abnormality tags in event frame– a) Peristaltic integrity indicated at the right top b) Hypercontractile contraction indicated using acronym at the right bottom 9.4 Result The software presents the results for each selected parameter in the Report Form and Report. Figure 9-3 shows a snapshot from the Report Form with relevant portions highlighted. The mean value of each parameter selected in Setup is displayed. The software also displays the final diagnostic findings based on Chicago Classification scheme. The parameter values for individual swallows can be viewed in All Data Table or in the Report document. The findings are based on published Chicago Classification scheme and are only intended to serve as a guide for patient diagnosis. This document contains proprietary information. Source: Given Imaging Copyright 2013, Given Imaging. All rights Reserved ManoView ESO Analysis Program _____________________________________________________________________________________________________________ Figure 9-3 Chicago Classification Parameters and Findings presentation in Report Form This document contains proprietary information. Source: Given Imaging Copyright 2013, Given Imaging. All rights Reserved ManoView ESO Analysis Program _____________________________________________________________________________________________________________ Appendix A. Analytical Parameter Notes Definitions: Frame Gastric Mean: The mean value of gastric channel during Measurement Frame. Global Gastric Reference: The gastric value used for display purposes only when Gastric pressure reference is selected. Established as 30 second average of Gastric channel at time of time Bar (+/- 15 s.) when “Gastric” is selected in Pressure Reference Control. Esophageal Channel Baseline: The 6 second mean at the beginning of a given Swallow Measurement Frame for a given esophageal analytical channel (one for which wave parameters are calculated). L1, L2, and L3: The distal, middle, and proximal channels respectively used for esophageal body analysis (these are set by default at 3, 7, and 11 cm or 5, 9, and 13 cm above the center of the LES). U1 and U2: The distal and proximal channels respectively used for UES/pharyngeal analysis. eSleeve: A function that outputs for every sample in time the maximum pressure at any site along an axial length defined by user-adjustable proximal and distal boundaries (patent pending). Classic ManoView Parameters: LES Pressure: Taken relative to frame gastric mean using eSleeve or LES channel (if eSleeve not used). Esophageal Wave Amplitude (@ L1, L2, and L3): Taken relative to esophageal channel baseline. UES Pressure and U1 & U2 Amplitudes: Taken relative to atmospheric pressure. Esophageal Multiple Peak Criterion: Any peak that has at least a 10 mmHg valley between it and an adjacent higher peak and is separated by at least 1 second from the neighboring curve. Simultaneous Contraction Criterion: Velocity between wave onsets at L1 and L3 of at least 6.25 cm/s. Failed Swallow Criterion: Swallow measurement frame containing at least two esophageal body analytical channels (i.e. at L1, L2, or L3) with peak amplitudes less than 20 mmHg. Failed Swallows are not counted in the group summary parameters for the esophageal body and LES other than in percent failed swallows. Intrabolus Pressure 1 (IBP1): Average pressure in the intrabolus pressure region taken during the time of the LESR solution and constrained by the condition of an absence of significant pressure gradient (> 2 mmHg) along the length of the IBP measurement. The pressure is taken relative to gastric pressure. This parameter is also known as IBPLESR. Intrabolus Pressure 2 (IBP2): The mean of the maximum pressure measured within the IBP within a noncontinuous duration of 3 second width. Here as in IBP1, the solution is restricted to not include regions of significant pressure gradient (> 2 mmHg) along the length of the IBP measurement. The pressure is taken relative to atmospheric pressure. This parameter is also known as IBP max. This document contains proprietary information. Source: Given Imaging Copyright 2013, Given Imaging. All rights Reserved ManoView ESO Analysis Program _____________________________________________________________________________________________________________ LES Relaxation (LESR): a) 3 second nadir: The lowest continuous 3 second mean value in a Swallow Measurement Frame using the difference between the eSleeve (or basic LES) and gastric channels. b) Integrated Relaxation Pressure(IRP): The lowest mean value measured by a non-continuous window of user specified width (set by default to 4s) using the difference between the eSleeve (or basic LES) and gastric channels [1]. Chicago Classification Specific Parameters Integrated Relaxation Pressure (IRP): Mean EGJ pressure measured with eSleeve for 4 contiguous or noncontiguous seconds of relaxation in the 10second window following deglutitive UES relaxation. The pressure is referenced w.r.t. gastric channel. The relaxation duration is user-adjustable. Distal Contractile Integral (DCI): The integrated value of pressure above some threshold over position and time. The time boundaries are limited to be within the measurement frame, the distal boundary is the upper margin of the LES and the proximal boundary is the pressure nadir between 1st and 2nd esophageal segments. The pressure threshold is adjustable and has default of 20 mmHg. Peristaltic Break: Gaps in the 20 mmHg isobaric contour of the peristaltic contraction between the UES and EGJ. Peristaltic breaks are used to classify the peristaltic integrity in one of the following types: a) Intact: 20 mmHg isobaric contour without large or small break (< 2cm) b) Small Breaks: Small break in the 20 mmHg isobaric-contour (2-5 cm in length) and DCI< 5,000 mmHg-s-cm c) Large Breaks: Large break in the 20 mmHg isobaric-contour (>5 cm in length) d) Failed – Absent: Absent peristalsis. Less than 3 cm integrity of the 20 mmHg isobaric contour distal to the proximal pressure trough in any swallow or DCI < 100 mmHg e) Failed – Panesoph: Panesophageal pressurization Contractile Front Velocity (CFV): Slope between two representative points on the contraction wave. The proximal point on the contraction wave is located at 50% of the distance between LES proximal and UES. The distal point on the contraction wave is located at 2cm from the LES proximal. This implementation in software differs from the published definition for Chicago Classification. The publication defines CFV as “slope of the tangent approximating the 30 mmHg isobaric contour between proximal pressure trough and the CDP”. This definition is adapted in the software to enable robust implementation while at the same time keeping the essence of the parameter. Like all the analysis markers, the user should reposition the CFV marker if the auto-placement is not placed approximately at the tangent of the wave propagation. Contractile Deceleration Point: The point on the CFV line located at 10% of the distance between LES proximal and UES. This implementation in software differs from the published definition for Chicago Classification. The publication defines CDP as “the inflection point along the 30 mmHg isobaric contour where propagation velocity slows demarcating the tubular esophagus from the phrenic ampulla”. This definition is adapted to enable initial placement of CDP marker in the software. Like all the analysis markers, the user use should reposition the CDP marker if the auto-placement is not performed appropriately. This document contains proprietary information. Source: Given Imaging Copyright 2013, Given Imaging. All rights Reserved ManoView ESO Analysis Program _____________________________________________________________________________________________________________ Distal Latency: Interval between UES relaxation and the CDP, expressed in seconds. Impedance Parameters Bolus Transit Time: The time interval between bolus entry and bolus exit point during a swallow. Maximum impedance drop at 5.0 cm and 20.0 above LES proximal boundary is used to determine the bolus entry and bolus exit instances. [3] Incomplete Bolus Clearance: The % of swallows for which the user has manually set the “Bolus Status” tag (in the Main Display) to “Incomplete Clearance”. REFERENCES [1] Ghosh SK, Pandolfino JE, Rice J, Clarke JO, Kwiatek M, Kahrilas PJ. Impaired deglutitive EGJ relaxation in clinical esophageal manometry: a quantitative analysis of 400 patients and 75 controls. Am J Physiol. 2007; 293:G878–G885. [2] The International High Resolution Manometry Working Group, Chicago classification criteria of esophageal motility disorders defined in high resolution esophageal pressure topography, Neurogastroenterology & Motility, March 2012, vol 24: 57-65. [3] Tutuian R. et al., Esophageal Function Testing With Combined Multichannel Intraluminal Impedance and Manometry: Multicenter Study in Healthy Volunteers, Clinical Gastroenterology and Hepatology, 2003; 1:174–182. [4] Kwaitek MA, Pandolfino JE, Kahrilas PJ, 3D-high resolution manometry of the esophagogastric junction, Neurogastroenterol Motil. 2011 Nov; 23(11):e461-9. This document contains proprietary information. Source: Given Imaging Copyright 2013, Given Imaging. All rights Reserved ManoView ESO Analysis Program _____________________________________________________________________________________________________________ Appendix B. Anatomical Marker Positioning Guidelines The following guidelines may be followed to set the anatomical markers in the event frames: The UES marker is placed in the middle of the horizontal UES pressure band. The LES marker bisects the end expiratory pressure profile of the LES. The LES upper margin (UM) marker is placed just at the upper extent of LES proximal, end expiratory, pressure signature. The LES lower margin (LM) marker is placed just at the lower extent of the LES distal, endinspiratory pressure signature. The PIP marker is placed where the "diamond pattern" of the green trace is at its maximum pressure reading and the blue trace is at its minimum pressure reading (i.e. where the green and blue traces from the PIP locater tool are most out of phase). The Gastric Marker is placed at 2.0 ± 0.1 cm below LES lower margin. Note: The Pressure Inversion Point (PIP) may not be available in the study if the intubated catheter does not pass through the diaphragmatic junction. For such studies, the esophago-gastric junction (EGJ) relaxation analysis should be performed with caution. The LES relaxation normal values provided in the software as well as the Chicago Classification results are not applicable. This document contains proprietary information. Source: Given Imaging Copyright 2013, Given Imaging. All rights Reserved ManoView ESO Analysis Program _____________________________________________________________________________________________________________ Appendix C. Swallow Frame Analysis Guidelines The following guidelines may be followed to set the analysis markers in the event frames: Classic ManoView Analysis LES relaxation brackets: Left side of bracket should line up with the UES Relaxation. The right side of the bracket should be positioned at the end of the esophageal body wave form. Esophageal wave markers: Place at the start, peak and end of the three esophageal body analysis locations. These locations may be best viewed in the Line Trace Mode. Red analysis flags Not Fld (Not Failed) vs Failed No SC (No Simultaneous Contraction) vs SC (Simultaneous Contraction) Esophageal Contraction Status: Single, Double, Triple (peaked contractions) Chicago Classification Analysis LES relaxation brackets: Left side of bracket should line up with the UES Relaxation. The right side of the bracket should be positioned at the end of the esophageal body wave form. Distal Contractile Integral (DCI): Place the proximal boundary of the DCI rectangular control at the proximal pressure trough. Contractile Deceleration Point (CDP): Place at the inflection point along the 30 mmHg isobaric contour where propagation velocity slows. Contractile Front Velocity (CFV): After placing CDP at appropriate location, move the proximal end of the CFV line such that is tangent to the 30 mmHg isobaric contour. Distal Latency (DL): Change the UES relaxation marker or the CDP point to modify the DL value. Red analysis flags Following options can be set for the peristaltic integrity: a) Intact, b) Small Breaks, c) Large Breaks, d) Failed – Panesoph and e) Failed – Absent. This document contains proprietary information. Source: Given Imaging Copyright 2013, Given Imaging. All rights Reserved ManoView ESO Analysis Program _____________________________________________________________________________________________________________ Appendix D. Hospital Information System (HIS) Interface The software allows export of patient information and analysis Report to a user-defined location. The system must have Microsoft Word 2007/2010 with Microsoft Save as PDF Add-in installed for ManoView ESO to be able to send Report to HIS in PDF format. The location can be set from Folders option under the Setup Menu. The file format for export is shown in the figure below. The Hospital Information System (Electronic Medical Record) can interface with the ManoScan ESO software to send patient information and to ManoView ESO software to receive the analysis Report. Figure: File Format for import/export of patient information This document contains proprietary information. Source: Given Imaging Copyright 2013, Given Imaging. All rights Reserved ManoView ESO Analysis Program _____________________________________________________________________________________________________________ Index A I abbreviations ................................................... 6 acronyms ......................................................... 6 Acronyms and Abbreviations ......................... 6 Adding To Pulldown List.............................. 38 All-Data Table Window ................................ 22 Analysis Window .................................... 19, 21 ICD Codes ..................................................... 38 impedance ..................... 5, 7, 30, 41, 42, 43, 44 Inserting and removing a Frame ................... 33 Inserting, Removing, and Editing Frames .... 33 Integrated Relaxation Pressure IRP ............................................ 6, 28, 54, 59 Intended Audience .......................................... 5 Intrabolus Pressure IBP ........................................................ 6, 58 Isobaric Contour...................................... 18, 30 C Capture Image ............................. 15, 21, 22, 39 Channels ............................................ 17, 26, 29 Clear Analysis ............................................... 30 Contour Mode ......................................... 19, 21 Contractile Front Velocity CFV ................................................. 6, 54, 59 Control Buttons ....................................... 21, 25 Create Report ................................................ 38 Customizing Pulldown Lists ......................... 38 D Data Display Panels ...................................... 32 DCI...................................................... 6, 54, 59 Display Modes .............................................. 24 Distal Contractile Integral DCI.................................................. 6, 54, 59 E eSleeve ........................................ 11, 26, 28, 31 F File Menu .......................................... 25, 26, 30 File Naming .................................................. 26 Free Selection................................................ 29 FS, Failed Swallow ................................... 6, 16 G Generating a Report ...................................... 15 GST ................................................................. 6 H HRM ............................................................... 6 L Landmark & Pressures Data Panel ............... 32 Landmark Reference ..................................... 29 LES LESr ...................................................... 6, 28 Lower Esophageal Sphincter ...................... 6 relaxation markers ..................................... 14 Line Trace Mode ..................................... 19, 31 Load Settings ................................................ 26 M Mask Channels .............................................. 26 Measurement Frame Editing ............... 8, 11, 13 Menu Controls and Options .......................... 25 Millimeters of Mercury mmHg ......................................................... 6 Motility Visualization System MVS ........................................................ 1, 6 Moving and Resizing a Measurement Frame 34 MP, Multiple Peaks................................... 6, 16 N Navigation Bar & Time Controls.................. 34 Non-Esophageal Study and Manual Analysis17 P Play ............................................................... 21 Pressure Inversion Point This document contains proprietary information. Source: Given Imaging Copyright 2013, Given Imaging. All rights Reserved ManoView ESO Analysis Program _____________________________________________________________________________________________________________ PIP ................................................... 6, 11, 30 Pressure Profile ..... 8, 11, 19, 24, 25, 26, 28, 29 Pressure Reference (Atmospheric / Gastric) Control ...................................................... 23 Purpose of This Manual .................................. 6 R Set Limits Button .......................................... 23 Setup Menu ................................................... 26 Setup Table Window..................................... 22 Setup Units .................................................... 27 Smart Mouse Submenu ........................... 30, 31 Swallows Data Panel..................................... 32 Range Dialog Box ......................................... 23 Removing Pulldown List Elements .............. 38 Report & Analysis................. 15, 26, 27, 36, 43 Report Window ................................. 21, 36, 37 Report Window and Controls ....................... 36 Report Window Organization ....................... 36 Running The Program ..................................... 9 T S UES ................................................................. 6 Using An Existing Pulldown ........................ 38 Using Measurement Frames ......................... 33 Save Analysis ................................................ 25 Save Data Log ............................................... 25 Save Selected Data ........................................ 25 Save Settings ........................................... 22, 26 Saving an Analysis ........................................ 15 SC, Simultaneous Contractions ................ 6, 16 Set / Detailed / Restore Thermal Compensation ................................................................... 31 TDCC .............................................................. 6 Thermal Compensation ........................... 30, 31 Three Second Nadir TSN ............................................................. 6 Trace Display Channel Control ...................... 6 U V View Menu.................................................... 26 Z Zoom Controls .............................................. 35 This document contains proprietary information. Source: Given Imaging Copyright 2013, Given Imaging. All rights Reserved ManoView ESO Analysis Program _____________________________________________________________________________________________________________ Contacting Given Imaging On the Web: www.givenimaging.com USA & Headquarters of the Americas Germany & European Headquarters Authorized Representative in the EU Given Imaging, Inc. 3950 Shackleford Road, Suite 500 Duluth, GA 30096, USA Phone: 770-662-00870 Toll-Free: 1-800-GIVENGI Fax: 770-662-0510 USA: [email protected] Latin America: [email protected] Given Imaging GmbH Borsteler Chaussee 47 Hamburg 22453 Germany Phone: +49 40 513 3000 Fax: +49 40 4606 9611 [email protected] Canada France Given Imaging, Inc. - Canadian Office 2425 Matheson Blvd. E., 8th Floor Mississauga, ON L4W 5K4 Canada Phone: 905 361 2830 Toll-Free: 1866 98 GIVEN Fax: 1 800 786 1967 [email protected] Given Imaging France S.A.S. 22, Rue Guynemer 78600 Maison-Laffitte Paris, France Phone: +33 (0) 1 34 93 80 00 Fax: +33 (0) 1 34 93 80 11 [email protected] Australia & New Zealand Asia Given Imaging Pty Limited Unit 6A, The Park 5 Talavera Road North Ryde, NSW 2113, Australia Phone: +61 2 9889 3944 Fax: +61 2 9889 3955 [email protected] Given Imaging (Asia) Company Limited 27/F. Unit A, Cheuk Nang Plaza 250 Hennessy Road, Wanchai Hong Kong Phone: +852 2989 0888 Fax: +852 2989 0899 [email protected] Japan Given Imaging K.K. 2F KDX Kojimachi Bldg. 3-3 Kojimachi, Chiyoda-ku Tokyo 102-0083 Japan Phone: + 81-3-5214-0588 [email protected] This document contains proprietary information. Source: Given Imaging Copyright 2013, Given Imaging. All rights Reserved