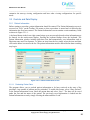
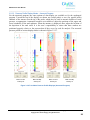
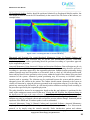
1
TM ManoScan User Manual _____________________________________________________________________________________________________________ User Manual Modular Cart System A120, A200, A300, and A400 DOC-1963-03 February 2013 This document contains proprietary information. Source: Given Imaging Copyright 2013, Given Imaging. All rights Reserved 1 TM ManoScan User Manual _____________________________________________________________________________________________________________ COPYRIGHT Copyright © 2013 Given Imaging Ltd. TRADEMARKS GIVEN, GIVEN & Design, PILLCAM, PILLCAM & Logo, PILLCAM EXPRESS, AGILE, RAPID, RAPID ACCESS, BRAVO, BRAVO PH SYSTEM, DIGITRAPPER, MANOSCAN, MANOSHIELD, MANOVIEW, ACCUTRAC, ACCUVIEW, and POLYGRAF ID are Trademarks and/or Registered Trademarks of Given Imaging Ltd., its subsidiaries and/or affiliates in the United States and/or other countries. All other company or product names are the trademarks or registered trademarks of their respective holders. All rights not expressly granted are reserved. U.S. Patent: 7,476,204 Rx Only Given Imaging GmbH Given Imaging 3950 Shackleford Road, Suite 500 Duluth GA 30096 [email protected] Borsteler Chaussee 47 D-22453 Hamburg, Germany [email protected] This document contains proprietary information. Source: Given Imaging Copyright 2013, Given Imaging. All rights Reserved 2 TM ManoScan User Manual _____________________________________________________________________________________________________________ Table of Contents 1. 2. INTRODUCTION ..................................................................................................................................................... 5 1.1 AUDIENCE ................................................................................................................................................................... 5 1.2 PURPOSE OF THE MANUAL .............................................................................................................................................. 5 DESCRIPTION, CLEANING, AND SAFETY ................................................................................................................. 6 2.1 OVERVIEW................................................................................................................................................................... 6 2.2 SYSTEM COMPONENTS................................................................................................................................................... 7 2.3 INDICATIONS OF USE ..................................................................................................................................................... 8 2.4 CONTRAINDICATIONS OF USE .......................................................................................................................................... 8 2.5 ADVERSE EVENTS .......................................................................................................................................................... 8 2.6 INSTALLATION AND CONNECTIONS.................................................................................................................................... 9 2.7 WARNINGS ................................................................................................................................................................ 11 2.8 SAFETY & PRECAUTIONS .............................................................................................................................................. 12 2.9 CATHETER CLEANING AND HIGH LEVEL DISINFECTION INSTRUCTIONS .................................................................................... 14 2.10 CATHETER CARE PRECAUTIONS: ..................................................................................................................................... 14 3. USING THE SYSTEM ............................................................................................................................................. 17 3.1 SETUP....................................................................................................................................................................... 17 3.1.1 Cleaning and Disinfecting ........................................................................................................................ 17 3.1.2 Starting the Program ............................................................................................................................... 17 3.1.3 Calibration ............................................................................................................................................... 17 3.1.4 Calibration Utilities .................................................................................................................................. 18 3.1.5 Probe Setup.............................................................................................................................................. 19 3.1.6 Protocol Setup.......................................................................................................................................... 20 3.1.7 Saving and Loading Settings (User preferences)...................................................................................... 20 3.2 CONTROLS AND DATA DISPLAY ...................................................................................................................................... 21 3.2.1 Patient Information ................................................................................................................................. 21 3.2.2 Real-Time Data Display............................................................................................................................ 22 3.2.3 Trace Mode Channel Selection................................................................................................................. 28 3.2.4 Video Recording Specific Controls ............................................................................................................ 29 3.3 PERFORMING A PROCEDURE ......................................................................................................................................... 29 3.3.1 Using the Protocol Function ..................................................................................................................... 31 3.3.2 Marking Catheter Position ....................................................................................................................... 33 3.3.3 Swallows and Other Events (esophageal) ................................................................................................ 33 3.3.4 Balloon Fill and Other Annotations (Anorectal) ....................................................................................... 34 3.3.5 Technique and Catheter Precautions ....................................................................................................... 34 3.3.6 Saving a Data File .................................................................................................................................... 35 3.4 AFTER A PROCEDURE ................................................................................................................................................... 35 3.4.1 Cleanup Steps .......................................................................................................................................... 35 3.4.2 Reviewing Recorded Data ........................................................................................................................ 36 3.5 OTHER TOOLS AND CONTROLS ...................................................................................................................................... 36 This document contains proprietary information. Source: Given Imaging Copyright 2013, Given Imaging. All rights Reserved 3 TM ManoScan User Manual _____________________________________________________________________________________________________________ 4. 3.5.1 Analyzing Data using the Smart Mouse Function .................................................................................... 36 3.5.2 Save Selected ........................................................................................................................................... 37 3.5.3 Simulation Mode...................................................................................................................................... 37 MAINTENANCE, SERVICE, TROUBLESHOOTING AND REFERENCE INFORMATION ................................................ 38 4.1 MAINTENANCE AND REPLACEMENT ................................................................................................................................ 38 4.2 TRANSPORTATION, STORAGE, AND OPERATING RANGES ..................................................................................................... 38 4.3 MANOSCAN 4.4 ELECTROMAGNETIC COMPATIBILITY (EMC) ..................................................................................................................... 39 4.5 ELECTRONIC AND PRESSURE INTERFACES ......................................................................................................................... 42 TM SYSTEM CART POWER ISOLATION STATION ................................................................................................. 38 ManoScan TM System PC ........................................................................................................................... 42 4.5.2 ManoScan TM System Modules ................................................................................................................. 44 4.5.3 The ManoScan 4.5.1 TM module front panel interfaces ..................................................................................... 45 4.6 DEFINITION OF SYMBOLS .............................................................................................................................................. 47 4.7 TECHNICAL CONNECTIVITY AND MAINTENANCE ................................................................................................................ 49 4.8 MANOSCAN 4.9 TROUBLESHOOTING ..................................................................................................................................................... 51 TM SYSTEM TECHNICAL SPECIFICATIONS .......................................................................................................... 50 4.9.1 Calibration Errors ..................................................................................................................................... 51 4.9.2 Protocol Flow Logic .................................................................................................................................. 51 4.9.3 Loss of power ........................................................................................................................................... 51 4.9.4 HRM Catheter Calibration Error............................................................................................................... 52 4.9.5 Pressure stops building in calibration chamber (does not reach 300 mmHg) and pump continues to run 52 4.9.6 Error installing HRM catheter: Access Code Invalid ................................................................................. 53 4.9.7 Start button in calibration window is grayed out .................................................................................... 53 4.9.8 Esophageal Pressure with Impedance (EAZ) catheter presentations ...................................................... 53 4.9.9 3D Anorectal (AAD) catheter presentations ............................................................................................ 54 4.9.10 ManoScan TM Software Presentations ...................................................................................................... 55 TM ESO and AR Analysis Software Error Messages ................................................................. 55 4.9.11 ManoView 4.9.12 Blue screen when starting Computer ....................................................................................................... 56 5. SPARE PARTS....................................................................................................................................................... 57 6. CONTACTING GIVEN IMAGING ............................................................................................................................ 58 This document contains proprietary information. Source: Given Imaging Copyright 2013, Given Imaging. All rights Reserved 4 TM ManoScan User Manual _____________________________________________________________________________________________________________ 1. Introduction The ManoScanTM modular system is a high resolution manometry (HRM) system used for gastrointestinal (GI) manometry. The base system includes a manometric catheter probe, a ManoScan HRM module (A120 module), and software for data acquisition and analysis. Various probe configurations are available depending on the application (esophageal / anorectal manometry), size (regular/small), and catheter diameter. The probes measure circumferential pressure using solid state sensors. ManoScanTM 3D module supports 3D catheters and probes for esophageal and anorectal studies. The 3D catheters and probes measure circumferential pressure using solid state sensors. When used in combination with the ManoScan HRM module and software, this module enables 3D imaging of the esophageal and anorectal anatomy. ManoScanTM Z module adds impedance measurement capabilities to the ManoScan system. This module supports the use of esophageal manometric catheters with impedance rings and provides additional clinical data from the same clinical procedure. ManoScanTM V module adds video acquisition capabilities to the ManoScan system. The video input from a camera or fluoroscopy system can be synced with the manometry readings to produce a more comprehensive study of the entire anatomy involved in the mechanism of swallowing. The ManoScanTM modular system allows users to purchase a high resolution manometry system in the configuration that best meets their clinical needs. In this manual, the term ManoScanTM is used hereafter to refer to any configuration of the ManoScan modular system. 1.1 Audience A thorough understanding of the technical principles, clinical applications and risks associated with the ManoScanTM System is necessary before using this product. Read the entire manual before using the system for the first time. Make sure that only trained personnel, familiar with all of the ManoScanTM System operating procedures, use the system. Manometric catheter placement requires skill and experience in esophageal and anorectal catheter intubations and insertions. Use of the system is not recommended if the clinician lacks the required experience and proficiency. 1.2 Purpose of the manual The purpose of this manual is to provide instruction on usage, system setup, troubleshooting, and maintenance operations related to all the ManoScanTM system configurations. This document contains proprietary information. Source: Given Imaging Copyright 2013, Given Imaging. All rights Reserved 5 TM ManoScan User Manual _____________________________________________________________________________________________________________ 2. Description, Cleaning, and Safety 2.1 Overview Various configurations of probes are available. The specifications of the probes are listed in Table 2-1. Table 2-1 Specification of High Resolution Manometry (HRM) and 3D Manometry Catheters: Diameter 36 Spacing between sensors 10mm ManoScan ESO Catheter with Extended Tip (EAN) 36 10mm 4.2mm ManoScanTM ESO Catheter, SD Small (EPS) 36 7.5mm 2.75mm ManoScanTM ESO Catheter, SD Regular (EAS) 36 10mm 2.75mm Pressure: 36 Impedance: 18 channels and 19 rings Pressure : 10mm Impedance: 20mm 4.2mm ManoScanTM ESO 3D Catheter (EAY) 128 (Including 32 HRM Sensors and 96 3D Sensors) Proximal to Distal: 10mm (Between HRM Sensors); 7.5mm (Between 3D Sensors) Circumferential (within 3D sensor area): 1.5mm 4.2mm ManoScanTM AR Catheter, Small (APN) 8 (including 1 balloon sensor) 6mm 4.2mm ManoScanTM AR Catheter, Regular (AAN) 12 (including 2 balloon sensors) 6mm 4.2mm 257 (including 1 balloon reference sensor) Proximal to Distal: 4mm Circumferential: 2mm 10.5mm Probe Type Number of Sensors ManoScanTM ESO Catheter (EAN) 4.2mm TM ManoScan TM ManoScan ESO Z Catheter (EAZ) TM AR 3D Probe (AAD) The system is supplied as either an integrated cart system (basic ManoScanTM), a portable system integrated with a laptop PC or as a stand-alone module that connects to a host PC. The ManoScanTM cart system includes an A120 Module, with options of accompanying A200 Module and/or A400 Module, or ManoScanTM A120 with options of accompanying A200 Module and/or A300 Module and/or A400 Module, together with a computer with software program for control of the system. All power to the integrated cart system is supplied through an IEC 60601-1 compliant isolation station that is mounted in the cart. This document contains proprietary information. Source: Given Imaging Copyright 2013, Given Imaging. All rights Reserved 6 TM ManoScan User Manual _____________________________________________________________________________________________________________ The A120 module configuration includes an electronic control box which serves as the interface for acquiring data from the probe and provides the logic for controlling the system. The A200 module configuration includes an electronic control box which serves as the interface for acquiring impedance data from the probe and provides a means for direct communication with the host computer. The A120 module configuration expands on this configuration by providing support for the A300 module expansion. The A300 module configuration consists of an A300 electronic control box which serves as the interface for acquiring data from the probe and requires an A120 control box to provide the logic for controlling the system. The A400 module configuration includes an electronic control box which consists of a video capture card and electronic circuitry to provide for communication with the host computer. The software acquires and synchronizes, as required; the data from each of the control modules. All power to the modules is supplied and regulated through an IEC 60601-1 compliant medical grade power supply that is incorporated within each of the independent modules. 2.2 System Components WARNING: To avoid risk of electric shock, this equipment must only be connected to a mains supply with protective earth. A complete ManoScanTM modular cart system consists of the following items: Manometric Catheter Probe A120 Module Computer External computer peripherals (keyboard, mouse, etc.) Touch screen display monitor Calibration chamber Power isolation station Software All components are integrated into the supplied cart for easy mobility. A complete ManoScanTM modular system consists of the following items: Manometric Catheter Probe A120 Module Calibration chamber Software In the Modular System configuration the modules will interface with an external Personal Computer (PC) supplied by the user / customer. The user / customer shall ensure that the PC is in compliance with the governing safety standards and meets medical grade power isolation requirements. This document contains proprietary information. Source: Given Imaging Copyright 2013, Given Imaging. All rights Reserved 7 TM ManoScan User Manual _____________________________________________________________________________________________________________ The ManoScanTM Z configuration will include an A200 module, a motility / pressure catheter with impedance, and software. This configuration can be easily added to either the modular cart system or the modular system as desired by the customer. The ManoScanTM 3D configuration will include an A300 module, a high definition motility / pressure catheter and software. This configuration can be easily added to either the modular cart system or the modular system. The ManoScanTM V configuration will include an A400 module, a motility / pressure catheter, and software. This configuration can be easily added to either the modular cart system or the modular system as desired by the customer. 2.3 Indications of Use The ManoScanTM system obtains a high-resolution and / or three dimensional mapping of pressure levels within the tubular organs of the human gastrointestinal tract and optionally, pressure with impedance levels within the tubular organs of the human upper gastrointestinal tract. Specifically, this includes the pharynx, esophagus, proximal gut (stomach/duodenum), anus and rectum. It is used in a medical clinical setting to acquire the pressure and impedance levels and store the corresponding data for visualization and analysis. The real time data as well as the analysis information can then be viewed by a physician for diagnostic and analytical purposes. 2.4 Contraindications of Use The use of the ManoScanTM system for pharyngeal/esophageal motility study and proximal gut (gastric/duodenal) manometry is contraindicated for the following: a) patients with an inability to tolerate nasal intubation, b) patients with significant bleeding disorders for whom nasal intubation is contraindicated, and c) patients with a known esophageal obstruction preventing passage of the instrument. The use of the ManoScanTM system for anorectal manometry is contraindicated for patients with known anal stricture/obstruction preventing insertion of the instrument. 2.5 Adverse Events Potential adverse events associated with the use of this system and catheter insertion into the nasal passage may include: discomfort, nasal pain, minor bleeding, runny nose, throat discomfort, irregular heartbeat with dizziness, and perforation. In rare instances, the catheter may be misdirected into the trachea causing coughing or choking, the catheter may curl during intubation and catheter position may move during the procedure. Potential adverse events associated with the use of this system and catheter insertion into the anorectum may include: discomfort, pain, minor bleeding, irregular heartbeat with dizziness, and perforation. In rare instances, the catheter may curl during insertion and catheter position may move during the procedure. Medical, endoscopic, or surgical intervention may be necessary to address any of these complications, should they occur. The system is not compatible for use in an MRI magnetic field. This document contains proprietary information. Source: Given Imaging Copyright 2013, Given Imaging. All rights Reserved 8 TM ManoScan User Manual _____________________________________________________________________________________________________________ 2.6 Installation and Connections Initial ManoScanTM system installation is provided by trained and qualified Given Imaging personnel or product distribution representatives. For portable systems, training includes instructions on disassembly and setup. Software installation instructions are provided on the software installation cases. ManoScan (A120 module): Connections are provided on the front panel of the A120 for the high resolution probes. The probe connections are color coded and keyed to prevent inadvertent swapping of the two connections. The red dots on the catheter connectors are to be facing upwards at the 12 o‟clockposition.The main power to the system is supplied via the power cord located at the rear of the module. A Universal Serial Bus (USB) port is provided on the rear of the module for interfacing with the PC. Power is turned on and off via the power switch, located on the front, left side of the unit. The module, as a USB peripheral device, should be turned on before powering up the computer. Hose ports (“luer fittings”) are provided on the rear of the A120 module which enables connections to the calibration chamber assembly. When using the A120 module along with the A300 module and 3D Anorectal probe, follow the diagram in Figure 3.1.1-2. ManoScan Z (A200 module): The A200 Module adds an additional connector to support the impedance signal input from the high resolution manometry with impedance catheter. The red dot on theimpedanceconnectoristobefacingupwardsatthe12o‟clockposition.Themainpower to the system is supplied via the power cord located at the rear of the module. A Universal Serial Bus (USB) port is provided on the rear of the module for interfacing with the PC. Power is turned on and off via the power switch, located on the front, left side of the unit. The module, as a USB peripheral device, should be turned on before powering up the computer. ManoScan 3D (A300 module): The A300 Module has two connectors to support the three dimensional pressure signals from the 3D probes. The probe connections are color coded and keyed to prevent inadvertent swapping of the two connections. The red dots on the catheter connectors are tobefacingupwardsatthe12o‟clockposition.Theadditionalhoseportisforthe AR 3D catheter balloon sensor as connected to an external pressure reference sensor, housed in the A120 module. Power is supplied to the A300 module by the A120 module which is turned on and off via the power switch located on the front left side of the A120 unit. The main power to the system is supplied via the power cord located at the rear of the A120 module. A Universal Serial Bus (USB) port is provided on the rear of the A120 module for interfacing with the PC. The 3D pressure signal is relayed via the two hard wired cables from the A300 to the color coded connectors on the rear of the A120 module. This document contains proprietary information. Source: Given Imaging Copyright 2013, Given Imaging. All rights Reserved 9 TM ManoScan User Manual _____________________________________________________________________________________________________________ TM Figure 3.1.1-1: Connections and Interface Features of the ManoScan Modules, from bottom to the TM TM TM top: ManoScan A120 Module, ManoScan Z A200 Module, ManoScan 3D A300 Module and the TM ManoScan V A400 Module. When using the A120 module along with the A300 module and 3D Anorectal probe, follow the special Air Hose Connections diagram in Figure 3.1.1-2: Connect White Luers with White Jumper To: Colored Luers on 3D Anal Rectal Calibration Chamber Secure all “T” Joints To: Colored Luers on MVS Calibration Chamber Figure 3.1.1-2: Air Hose Connections on A120/A300 Combination, when using the 3D Anorectal Probe. This document contains proprietary information. Source: Given Imaging Copyright 2013, Given Imaging. All rights Reserved 10 TM ManoScan User Manual _____________________________________________________________________________________________________________ ManoScan V (A400 module): The A400 module should be connected to the computer and power turned on before switching on the computer. The connections from A400 module to the computer is made using the custom extender cable supplied with the system. A400 module provides for three types of video input connectors, any one of which can be used at a time to feed video data (from an external video source such as fluoroscopy or endoscopy equipment). The three types of connectors and the corresponding input video format supported by them are: a) DVI: Supports color, monochrome, or gray scale analog component video. The video input can be of non-standard high resolution and frequency (typically, from fluoroscopy equipment) b) BNC: Supports monochrome or gray scale analog video. The video must be of standard television specifications: PAL or NTSC. c) S-Video: Supports monochrome or gray scale analog composite video. The video must be of standard television specifications: PAL or NTSC (typically, from endoscopy equipment) ManoScanTM V can also be used to acquire video from USB based devices (e.g. webcams). The A400 module is not required for such acquisition, if the USB input is directly connected to the computer, the appropriate video input device can be selected within the software. 2.7 Warnings 1. Ensure all personnel responsible for operating the ManoScanTM system are properly trained prior to use. 2. Please follow the on-screen instructions and those in Section 3.3 to calibrate probe and verify its proper function before each clinical use. 3. All accessory equipment connected to the analog and digital interfaces must be certified to the respective IEC standards (i.e. IEC 60950 for data processing equipment and IEC 60601-1 for medical equipment.) Furthermore all configurations shall comply with the system standard IEC 60601-1-1. Any person that connects additional equipment to the signal input part or signal output part configures a medical system, and is therefore, responsible that the system complies with the requirements of the system standard IEC 60601-1-1. If in doubt, consult the technical services department or your local representative. 4. When the disposable sheath is used, it must be secured to the probe to prevent accidental aspiration. The clinician must ensure both the catheter and the sheath are removed from the patient upon extubation. While not likely, it is possible for the sheath to slip off of the catheter during removal. 5. The disposable sheath should not be used for proximal gut studies or pressure with impedance studies. 6. DO NOT immerse the probe in liquids beyond the “Do Not Immerse” label on the probe. Immersion of the connectors orventtubelocatedatthe“Y”,neartheproximalendoftheprobe, can damage or destroy the probe. 7. This system contains a type BF applied part. It is not suitable for use in the presence of a flammable anaesthetic mixture with air or with oxygen or nitrous oxide. This document contains proprietary information. Source: Given Imaging Copyright 2013, Given Imaging. All rights Reserved 11 TM ManoScan User Manual _____________________________________________________________________________________________________________ 2.8 Safety & Precautions 1. The ManoScanTM probe must be calibrated prior to each use. 2. TAKE CARE to handle the manometric catheter probe and ManoShieldTM in such a way as to avoid even minor nicks and cuts. The probe can be damaged by excessive gripping, bending, or pulling. Hold the catheter with the same force you would use to hold a fragile object. 3. The probe should never be bent in a radius less than 2.0 cm nor pulled with a force greater than 1 N. (equivalent to 0.1 kg, or 0.2 lb.). Tight bending can also occur during clinical data collection if the probe becomes doubled back on itself. This condition is readily recognized via the real-time display and rectified by withdrawing the catheter (See 3.3.5). Failures of the probe due to excessive force or tight bending are not covered under warranty. 4. DO NOT use any probe that has cuts or openings in the probe body. 5. DO NOT disconnect the probe from the module by pulling on either the cable or the probe. Grasp the probe only by its connectors when making connections. 6. DO NOT keep the catheter in a detergent or disinfection solution for prolonged periods. The catheter should remain in such solutions no more than 125% of the time recommended by the disinfection manufacture to complete the disinfection process. Prolonged disinfection soakings may permanently discolor the outer covering and make it tacky to the touch. 7. DO NOT manipulate the probe using any endoscopic instruments. Such devices have great potential for rupturing the outer catheter sleeve. 8. DO NOT damage or scratch the external gold impedance sensor rings as found in the ManoScanTM ESO Z impedance catheter. 9. DO handle the probe gently and assure that no objects are inadvertently placed on it and that it is not pulled on or bent sharply during cleaning. 10. DO store the probe in a contamination-free and protected manner (e.g. using the provided storage case) not coiled tighter than a 15 cm. (6 in.) diameter. 11. The clinical procedure must be performed in accordance with an established protocol as prescribed by the responsible physician. 12. The anatomical depictions relative to the pressure signals provided in the software are rough approximations. If the anatomical depictions are utilized, the user is responsible for their proper positioning relative to the data. 13. Although electro-cautery & defibrillation equipment is unlikely to be used during manometry, be advised that such use near the probe may damage the probe and/or electronic circuits. 14. The motility probe and system are temperature compensated, but not compensated for thermal shock. A transient response of approximately one minute duration may be evident when a motility probe first experiences body temperature. When giving a patient liquid to swallow, minor thermal shock will be avoided by offering tepid (near body temperature) liquids. 15. To avoid excessive calibration shift and possible damage to the probe, DO NOT manually apply pressure greater than 100 mmHg. When determining whether probe sensors are operating, observe the output signal while applying light pressure (< 100 mmHg). DO NOT apply pressure This document contains proprietary information. Source: Given Imaging Copyright 2013, Given Imaging. All rights Reserved 12 TM ManoScan User Manual _____________________________________________________________________________________________________________ with a fingernail or sharp object, which may create high localized stress. When applying uniform pressures such as via an air pressure chamber, do not apply pressures greater than 300 mm Hg. 16. Regular and Small Diameter Esophageal Catheters: To avoid applying clamping pressure on a sensor element that could permanently damage it, assure that these esophageal catheters are inserted to the labeled depth of 42 cm (no more than 45 cm) into the calibration chamber. 17. 3D Esophageal Catheter: To avoid applying clamping pressure on a sensor element that could permanently damage it, assure that the 3D esophageal catheters are inserted to a minimum depth of 52cm (no more than 55 cm) into the calibration chamber. 18. High resolution anorectal probes: To avoid applying clamping pressure on a sensor element that could permanently damage it, assure that the anorectal catheters are inserted into the calibration chamber to just below the balloon fill tubes. 19. Avoid severe buckling/bending of all catheters (no more than a 5cm radius). 20. Cleaning of the cart, modules, catheter case and tray, and calibration chamber (external) may be accomplished using the referenced above process (note 11). 21. If a disposable sheath is used: the probe should be cleaned and high level disinfected prior to each subsequent use. Reference the Catheter Cleaning and High Level Disinfection Instructions for use included with each catheter or probe. 22. The calibration tube, seal knob, seal ring, and any other reusable calibration accessories should be cleaned a minimum of once per month in a laboratory dishwasher with water temperature not exceeding 180o F (82o C) – see Figure 3.1.1-1 and Figure 3.1.1-2. The clear tube should be dried internally with a clean non-scratching cloth to prevent water spotting. 23. If the calibration chamber is contaminated via introduction of a non-disinfected probe or other means, the tube and seal knob, should be disinfected using the same guidelines as described above for the probe. The seal grommet, typically white in color or translucent (see Figure 3.1.1-1 and Figure 3.1.1-2), should be replaced. Although the probe does not come into contact with the calibration housing during normal use, it is recommended that the calibration housing be disinfected using topical spray should inadvertent contamination be suspected. Care must be taken to minimize the amount of spray introduced so as to keep the clear pressure tubing dry. Do not soak or clean the calibration tube gasket and seal knob grommet with any Cidex product. The deterioration of the gasket material is likely when in contact with these disinfecting solutions. Heated water not exceeding 180°F and a mild soap solution should be sufficient. 24. Unauthorized software must not be added to the system. This document contains proprietary information. Source: Given Imaging Copyright 2013, Given Imaging. All rights Reserved 13 TM ManoScan User Manual _____________________________________________________________________________________________________________ 2.9 Catheter Cleaning and High Level Disinfection Instructions The Centers for Disease Control (CDC) recommends the use of a probe cover or condom to reduce the level of microbial contamination when a probe cover is available [1]. It is also recommended that all catheters and probes require cleaning and high level disinfection to be performed after each use or as otherwise permissible by region/country/institution guidelines and/or standards where the product is being used. [1] Centers for Disease Control (CDC), Guideline for Disinfection and Sterilization in Healthcare Facilities, 2008, William A. Rutala, Ph.D., M.P.H., David J. Weber, M.D., M.P.H., and the Healthcare Infection Control Practices Advisory Committee (HICPAC). The following information is supplied as a guide for cleaning and high level disinfecting Given Imaging motility catheters and probes taken from the Catheter Cleaning and High Level Disinfection Instructions provided with each catheter. 2.10 Catheter Care Precautions: 1. Given Imaging DOES NOT perform disinfection of gastrointestinal probes prior to shipment. Proper disinfection of a probe is the responsibility of the clinician conducting the procedure. The following recommendations are intended to aid in the cleaning or disinfection of a Given Imaging probe without causing damage: 2. DO NOT: use ultrasonic or other agitation while washing the probe; autoclave; use ionizing radiation; use hydrogen peroxide or glycerin containing products to clean or disinfect the probe. 3. DO NOT clean the probe with strongly alkaline cleaning agents such as Parson‟s Soap or strongly oxidizing agents such as peracetic acid or Hydrogen Peroxide. Disinfectants such as Endo-Spor, Sporox and the Steris Washer use Hydrogen Peroxide as a primary agent in their formulation and will damage the probe. 4. DO NOT use synthetic detergents or petroleum-based soaps as these may be absorbed by the silicone and subsequently leached out in prolonged use. 5. DO NOT use silicone fluid or grease to lubricate the passage of the probe through the nares or anus as these materials may swell and weaken the tubing and consequently compromise the integrity of the outer section of the probe. 6. DO NOT immerse the probe beyond the“DoNotImmerse”demarcationlineneartheproximal end of the probe (the end with the electrical connectors and vent orifice). Doing so can damage or destroy the probe. 7. DO NOT pull on the outer sleeve of the catheter probe while cleaning. This can cause bunching of the outer sleeve and potentially damage the probe. 8. DO inspect for tears or damage in the exterior of the catheter. The inspection should be done before immersion of the catheter in reprocessing solutions to minimize further damage of the catheter to parts not designed for fluid exposure. 9. DO Reference the Catheter Cleaning and High Level Disinfection Instructions provided with each catheter. This document contains proprietary information. Source: Given Imaging Copyright 2013, Given Imaging. All rights Reserved 14 TM ManoScan User Manual _____________________________________________________________________________________________________________ 10. DO Reference the ManoShieldTM Instructions for Use. 11. The ruled tubing and “Y” connector section of the probe may be cleaned with an Antiseptic Towelette or Germicidal Disposable Cloth. Adheretothemanufacturer‟sguidelineswhenusing Antiseptic or Germicidal towelette or cloth. Given Imaging recommends the following cleaning cloths and/or towelettes: 11.1 PDI, Sani-Cloth® Plus, germicidal disposable cloth 11.2 Benzalkonium antiseptic (BZK) towelettes 11.3 PDI, Super Sani-Cloth® Plus, Germicidal Wipes 11.4 Accel PREVentionTM surface disinfectant (applied to sterile wipe, cloth, or gauze) This document contains proprietary information. Source: Given Imaging Copyright 2013, Given Imaging. All rights Reserved 15 TM ManoScan User Manual _____________________________________________________________________________________________________________ Seal Grommet* Seal Knob* Tube Seal Collar Calibration Chamber Housing Calibration Tube* Figure 3.1.1-1: ManoScan TM AR 3D Calibration Chamber Disassembly for cleaning Seal Grommet* Seal Knob* Calibration Chamber Housing Tube Seal Collar Remove Tube: Loosed approx. 1 turn. Pull tube down. Calibration Tube* Reinstall Tube: Slide tube upward in Housing. (If tube does not seat firmly, remove Seal Collar and thread Tube through internal o-ring and replace Collar) Tighten Collar. Test Collar tightness by pulling down lightly on Tube. Tube should not move. Figure 3.1.1-2 ManoScan TM Calibration Chamber Disassembly for Cleaning This document contains proprietary information. Source: Given Imaging Copyright 2013, Given Imaging. All rights Reserved 16 TM ManoScan User Manual _____________________________________________________________________________________________________________ 3. Using the System 3.1 Setup 3.1.1 Cleaning and Disinfecting The catheter is required to be disinfected per approved HLD process (See Section 2.9 for instructions and precautions) prior to each procedure. 3.1.1.1 With ManoShield™ Disposable Sheath Due to sheath length limitations it is not recommended for use in proximal gut manometry (gastric/duodenal). Install and remove per instructions provided with each type of sheath. Ensure all the air between the catheter and the sheath has been properly removed with the squeegee to avoid excessively high pressures in the study at the distal portion of the catheter. 3.1.2 Starting the Program The ManoScanTM software1 willopenviathe“ManoScanAcquisition”executable file, or the program shortcut on the operating system desktop. The current connected catheter can then be selected in the catheter selection window, for more information see section 3.1.5. 3.1.3 Calibration The catheter must be calibrated prior to each clinical procedure. The system must be powered on and running for at least five minutes before calibration is attempted. Place the catheter in the Calibration Enclosure to a depth (42-45cm for the Normal Esophageal catheter, 52-55 for the 3D esophageal catheter, or 15 cm for the anorectal catheter). Assure that the probe is at the correct depth before sealing. [Warning: Catheter can be damaged if the seal knob is tightened directly over a sensor element]. Tighten the Seal Knob (see Figure 3.1.1-2) finger tight. Assure that the probe is properly positioned and click the “Calibration…” button on the toolbar shown in Figure 3.1.3-1. The removable top seal knob, on the pressure calibration chamber, must have the step extension to enable proper gasket compression if both the regular and small diameter catheters are to be pressure calibrated on the same system. The calibration chamber for the esophageal high resolution catheters, including the pressure with impedance, 3D esophageal, and small diameter esophageal, as well as regular and small high resolution anorectal is different from the calibration chamber used for the 3D anorectal probe. If both types of catheters are being used with the same system setup, care should be taken to use the appropriate seal grommet with the appropriate chamber. For systems using both pressure calibration chambers as mentioned above, the intended use catheter must be in the appropriate chamber and the provided plug must be inserted into the catheter insertion opening of the unoccupied chamber to ensure proper pressure calibration. Do Not use a catheter/probe to plug the not in use pressure calibration chamber. 1 ManoScanTM is the trademark name of the ManoScanTM system software. This document contains proprietary information. Source: Given Imaging Copyright 2013, Given Imaging. All rights Reserved 17 TM ManoScan User Manual _____________________________________________________________________________________________________________ For systems using both HRM and 3D type catheters in the same system setup, prior to calibration or system setup, ensure that the catheter[s] that are not currently in use are not plugged into the modules. For Systems upgrading to the 3D esophageal catheter, the calibration tube must be replaced to allow for the extra length of the 3D catheter, such that it can be inserted to a depth of 52-55 cm. The replacement tube will be provided with the purchase of the upgrade. Figure 3.1.3-1 Toolbar Pressing“Calibration…”will bring up the Calibration Dialogue.Tostartcalibration,clickthe“Start” button on the Calibration Screen The pump will turn on and the pressure display on the Calibration screen will show the output from the reference sensors which independently measure the pressure in the chamber. Once the maximum calibration pressure has been reached, the pump will turn off and the chamber will return to atmospheric pressure as indicated by the sound of leaking air which is expected. After an 8 second wait,Calibrationisfinishedandyoucanclickthe“OK”buttontocompletetheprocess. Pressingthe“Abort”buttonduringCalibration will stop the calibration process (system will not be calibrated) and the Calibration screen will remain open so that the process may be restarted. Pressing the “Cancel” button will close the Calibration Screen without calibrating the system. The calibrationstatusoftheprobe(“Calibrated”or“Uncalibrated”)isshowninthestatusdisplaynearthe top of the screen. 3.1.4 Calibration Utilities Calibration utilities may be accessed via the Tools menu or Calibration dialog box. 3.1.4.1 Calibrate In Vivo This control supports calibration of the probe relative to the elevated temperatures and aqueous environment of the body. Before performing the In Vivo Calibration, the probe must first be pressure calibrated (see Section 3.1.3). A shallow basin of water set at 36-38 0C is prepared by simply mixing hot and cold water and using a body thermometer. The water should be thoroughly mixed for thermal uniformity and the catheter should be in a pressure-free state (e.g. lying on a flat surface) both outside and inside the basin at the appropriate times. Follow the on-screen instructions to complete this process. In Vivo calibration should be performed at least once a week. Important Notes on In Vivo Calibration 1. Probe must be at room temperature at the beginning of the procedure. If the probe has been handled or immersed in warm water, it should be left in room ambient temperature for at least 5 minutes before In Vivo Calibration. 2. Probe should have no applied pressure prior to immersion and after immersion. Assure the probe is lying flat with no kinks or external objects touching it. 3. Assure that water is well mixed for thermal uniformity. 4. Do not immerse probe until instructed to do so. This will lead to erroneous calibration. This document contains proprietary information. Source: Given Imaging Copyright 2013, Given Imaging. All rights Reserved 18 TM ManoScan User Manual _____________________________________________________________________________________________________________ 5. Do not use more than 4 cm water depth to avoid water pressure induced errors. 6. Do not apply protective ManoShieldTM sheaths for or during in vivo calibration, with the exception of the AR 3D catheter which will have the sheath applied during in vivo calibration. 7. For the 3D esophageal catheter: for best results, after inserting the catheter in the warm water, allowthecathetertostabilizeforapproximatelyoneminutepriortopressing“Next” 3.1.4.2 Apply In Vivo Compensation Apply In-Vivo Compensation applies the thermal compensation established during Calibrate In-Vivo. This should generally be applied whenever the catheter is in the body, and removed whenever the catheter is out of the body, for accurate viewing of the real-time data. The compensation is saved with all recorded data however and automatically applied when the data is later reviewed, so there is no effect on the recorded data whether the compensation is turned on or off during data acquisition. When using the automatic protocol function (see 3.1.6) In Vivo Compensation is automatically applied and removed at the appropriate times. 3.1.4.3 Tune System Tune System identifies characteristics of a particular catheter so that its performance may be optimized. This process may be undertaken if the pressure calibration is not successful or if instructed to do so by Given Imaging personnel. The catheter should be placed in the calibration tube in the same way as when performing a normal pressure calibration (see 3.1.3). Select Tune System and you will see some changes in the real-time display as the system goes through this process of approximately 90 second duration. The probe should then be calibrated immediately following the tuning process. Once tuning is performed, the system keeps track of the proper tuning and other parameters for each catheter (see 3.1.5.1). 3.1.4.4 Mask / Interpolate Mask / Interpolate allows the system to ignore or “mask” the data of one or more pressure and/or impedance sensors. The adjacent sensor data are used to linearly interpolate across the masked sensor anditsdataarenotseenonscreenorinthestoredfile.Thiscreatesa“virtualchannel”andthesystem otherwise behaves as normal. This function is useful to eliminate data from a non-functioning sensor in one or more non-essential locations. The location of the masked pressure channel is indicated by the following symbol in the Pressure Profile display: The location of the masked impedance channel is indicated by the same symbol, but colored purple. 3.1.5 Probe Setup The Select Probe screen will display during startup when more than one probe is installed on the system. You must assure that the probe serial number - as indicated on the body of the probematches the selected probe in the computer program. If the probe is changed between procedures, the new probe must be selected using the Select Probe Screen via the Setup menu. This document contains proprietary information. Source: Given Imaging Copyright 2013, Given Imaging. All rights Reserved 19 TM ManoScan User Manual _____________________________________________________________________________________________________________ 3.1.5.1 Select Probe The ManoScanTM system has the ability to support an unlimited number of probes. Each of the installed probes will be listed on the Select Probe screen (Setup menu) along with the following information for each: a. Probe Number (According to the order installed) b. Probe Serial Number c. Number of Probe “Uses to Date” To select a probe, double click the probe line, or highlight the desired probe and click on the Select button. 3.1.5.2 Install/Uninstall Probe The operator can install or uninstall a probe from either the Setup menu or the Select Probe screen. The Install/Uninstall Probe screen will be displayed showing all currently installed probes along with the following information: a. Probe Number b. Probe Serial Number c. Number of uses to date d. Probe Service Code The operator can choose to uninstall a probe by selecting the appropriate probe, or install a new probe by clicking Install. NOTE: Uninstalling a probe will remove the probe installation parameters from the ManoScan TM system. The probe can only be reinstalled after receiving a new access code from Given Imaging. After clicking on the Install button beside a blank probe number, you will be prompted to enter the Probe Serial Number and a Key Code. The Key Code will be provided by your sales representative or Given Imaging. For further installation instructions, please contact Given Imaging. 3.1.6 Protocol Setup The protocols provide a display of instructions to the operator, automatically open relevant windows within the program, and mark the data at appropriate measurement times. The desired protocol may beselectedviathe“Protocol…”controlintheSetupmenu.Agivenprotocolmaybeselectedasthe defaultviaselectingitandthenusingthe“SaveSettings”functiondescribedin 3.1.7. The protocol function is described in 3.3.1. 3.1.7 Saving and Loading Settings (User preferences) The settings of the current display may be saved and later reloaded so that the program will display the data in the current configuration. Among the parameters that are remembered and reloaded are: maximum and minimum scale values, time base settings, current protocol, display modes, channels selected and channel mode (Free Selection v. Landmark Reference), and channel position unit selection.Youmaysavetheseunderadesirednamevia“Save Settings…”intheSetup menu. The settings are reloaded and the program immediately assumes the corresponding display configurationusing“LoadSettings…”.Ifthecurrentconfigurationissavedas“Default”(thefullfile name becomes “Default.cft”), the program will start in this state the next time. This allows you to This document contains proprietary information. Source: Given Imaging Copyright 2013, Given Imaging. All rights Reserved 20 TM ManoScan User Manual _____________________________________________________________________________________________________________ customize the start-up viewing configuration and have other viewing configurations for specific needs. 3.2 Controls and Data Display 3.2.1 Patient Information Before starting a procedure, patient information should be entered. The Patient Information screen is accessedvia“New”on the Toolbar, File menu or when a procedure is started and via Edit after the information has first been entered. The Patient Information screen contains certain mandatory fields as shown in Figure 3.2.1-1. A keyboard button in the lower right corner brings up an on-screen keyboard so that information may be entered via the touch-screen display. Pressing the keyboard button closes the keyboard. The Patient Information window includes pull-down lists that automatically save information such as Physician name and Test Operator. To delete an item from the list, simply select the item and then click on the delete icon next to the list. The patient information must be entered before data recording may begin. Figure 3.2.1-1 Patient Information Screen 3.2.1.1 Preloading Patient Data The program allows you to preload patient information to be later retrieved at the start of the procedure.Anynumberofpatientsmaybepreloaded.Toenablethisfeature,select“ShowPreload” in the Patient Information screen. Enter the patient data and select “Save”. The data will be saved under the first and last name of the patient. The previously saved information is loaded into the PatientInformationscreenbysimplyselectingthenameandthen“Load”. This document contains proprietary information. Source: Given Imaging Copyright 2013, Given Imaging. All rights Reserved 21 TM ManoScan User Manual _____________________________________________________________________________________________________________ 3.2.2 Real-Time Data Display Real-time pressures (and impedance, if available) are viewed on two different display areas: the Main Display, which shows the pressure or pressure-impedance history; and the Profile Display, which shows the current pressure or pressure-impedance distribution (see Figure 3.2.2-1). Esophageal Anorectal Main Display in Contour mode, Pressure Profile in Color Map mode Main Display in Contour mode, Pressure Profile in Line Trace mode Main Display in Contour mode, Pressure Profile in Line Trace mode Main Display in Contour mode, Pressure Profile in Color Map mode Figure 3.2.2-1 Pressure Display Areas Shown in Various Modes (esophageal and anorectal programs) This document contains proprietary information. Source: Given Imaging Copyright 2013, Given Imaging. All rights Reserved 22 TM ManoScan User Manual _____________________________________________________________________________________________________________ 3.2.2.1 Main Display Modes The ManoScanTM system offers the unique capability of viewing data from all high-resolution sensor channels simultaneously as a contour map in real time as seen on the left of Figure 3.2.2-2 or as line tracings selectable for any location along the sensors as seen on the right. Figure 3.2.2-2 Main Display in Contour (left) and Line Trace (right) Modes Toswitchbetweenthetwodifferentmodes,clickthe“DisplayMode”buttontothelowerleft.While in Line Trace Mode, the locations for display of line traces can be chosen from among the full 36 channels available by manipulation of the pointers (12 or 8 channels available for anorectal manometry system) in the profile display as described in Section 3.2.2.2. Atany pointduringviewing,the “Scroll/Review”buttonwillhold thedisplaywhilestillrecording data (when recording is turned on). Click the “Scroll/Review” button again to return to real-time display. The“WatchWindow”buttonbringsupasmallfloatingwindowthatshowsthecontourmapdisplay. This can be used to view the complete contour map while the Main Display is in line trace mode (Figure 3.2.2-3). The window may be positioned anywhere on screen by dragging its top and resized by dragging its lower right corner. Figure 3.2.2-3 Main Display Area with Watch Window On (esophageal data shown) This document contains proprietary information. Source: Given Imaging Copyright 2013, Given Imaging. All rights Reserved 23 TM ManoScan User Manual _____________________________________________________________________________________________________________ If a pressure-impedance probe is used, the user has the option to display/hide impedance data on main displaybytoggling“Show Z / Hide Z”buttonlocatedonthelowerleftsideoftheapplication.The impedance data is superimposed and synchronized in time with the pressure data. An example of pressure-impedance contour plot is shown in Figure 3.2.2-4. The impedance traces have the similar layoutasthatofpressuretracesandcanbeviewedbytoggling“DisplayMode”button. Figure 3.2.2-4 Contour plot of pressure impedance data displayed in Main Display If 3D type catheters are being used, ESO 3D or AR 3D, a 3D view button will be available in the bottom left corner of the screen. When toggled, it will cycle through different 3D visualization modes, allowing for detailed real time 3D visualization. The view will cycle through configurations of the 3D window shown in Figure 3.2.2-5. Figure 3.2.2-5 3D View Window showing 3D Visualizations available in ManoScan TM This document contains proprietary information. Source: Given Imaging Copyright 2013, Given Imaging. All rights Reserved 24 TM ManoScan User Manual _____________________________________________________________________________________________________________ 3.2.2.2 Pressure Profile Display Modes – Esophageal Program The Pressure Profile display normally shows the current real-time pressure values, which can be viewed as a smooth curve or as a color map. Toggle between thetwobyclickingthe“Mode”button under the pressure profile. An approximate anatomical map is shown by clicking the “Anatom.” button after the UES and LES markers have been adjusted. This feature projects an anatomical depiction based on the positions of the landmark indicators that the user positions by examination of the on-screen data. The various possible configurations of the pressure profile are shown in Figure 3.2.2-6 and Figure 3.2.2-7. The position indicators for the Upper Esophageal Sphincter (UES), Lower Esophageal Sphincter (LES), and Pressure Inversion Point (PIP) and upper and lower margins of the LES can be adjusted by dragging their markers on the Pressure Profile display. This is most useful when the Main Display is in contour mode where horizontal lines facilitate localization of the anatomical landmarks. After adjusting the position of the LES, UES, and PIP markers, their respective positions are noted as annotations on the main display relative to their position from nares based on the current Catheter Position setting. It is the user‟s responsibility to assure that these markers are positioned properly relative to the pressure data if they are to be used for analysis. Mode: Line Trace Mode: Color Map Mode: Line Trace Mode: Color Map Anatomy: Off Anatomy: Off Anatomy: On Anatomy: On Figure 3.2.2-6 Available Pressure Profile Displays (esophageal program) This document contains proprietary information. Source: Given Imaging Copyright 2013, Given Imaging. All rights Reserved 25 TM ManoScan User Manual _____________________________________________________________________________________________________________ 3.2.2.3 Pressure Profile Display Modes – Anorectal Program For the anorectal program, the same options of data display are available as for the esophageal program. Toward the top of the display are shown one (small probe) or two (for regular probe) channels of the sensors near the tip of the probe, which may be used to measure balloon or rectal pressure, as appropriate. Anatomical markers are available to adjust the positions of the upper and lower boundaries of the anal sphincter. When the anatomy is displayed, these adjust the location of the depiction of the anal canal. It is the user‟s responsibility to assure that these markers are positioned properly relative to the pressure data if they are to be used for analysis. The anorectal pressure profile in various display modes is shown in Figure 3.2.2-7. Mode: Line Trace Mode: Color Map Mode: Line Trace Mode: Color Map Anatomy: Off Anatomy: Off Anatomy: On Anatomy: On Figure 3.2.2-7 Available Pressure Profile Displays (Anorectal Program) This document contains proprietary information. Source: Given Imaging Copyright 2013, Given Imaging. All rights Reserved 26 TM ManoScan User Manual _____________________________________________________________________________________________________________ 3.2.2.4 Pressure-Impedance Profile Display – Esophageal Program In addition to the profile features discussed in Section 3.2.2.2 above, an impedance trace and a bolus depiction of impedance data is also displayed in this mode. An example of peristaltic wave contraction and bolus movement as viewed in pressure-impedance profile view is shown in Figure 3.2.2-8. Figure 3.2.2-8: Bolus movement in a normal swallow as viewed in pressure-impedance profile display 3.2.2.5 Display Pressure Reference The display pressure reference is available for the esophageal program and is set using the control at the lower left of the main display. The value is set according to the current 30 second average of the desired reference (atmospheric, gastric or esophageal) at the time the control box is closed. This reference is for display purposes only and does not affect the recorded data. By selecting the “Gastric” control below the pressure profile, the Gastric and Esophageal position pointers are displayed. These may be moved vertically to select the position at which the gastric and esophageal reference pressures are taken. The baseline pressures are calculated from a 30 second average of the data relative to the current time.2 The current values of the Atmospheric, Gastric, and Esophageal pressures relative to the selected reference pressure are also shown in the lower left region. 2 When reviewing previously saved patient data files in a static mode, the 30 second average is taken relative to the time associated with the current pressure profile view. In that case, the pressure profile displays the data associated with the last record in the file or to the red vertical line obtained by clicking on the main display when Smart Mouse is active. This document contains proprietary information. Source: Given Imaging Copyright 2013, Given Imaging. All rights Reserved 27 TM ManoScan User Manual _____________________________________________________________________________________________________________ 3.2.2.6 Scale Controls The scales of the various displays can be changed by clicking on the appropriate button as listed in Table 3-1. Use the slider to set the new scale value and then click outside of the slider to hide it (Figure 3.2.2-9). By selecting “All”fortheLineTracescalecontrol,alltracesarescaledaccordingly. Table 3-1 Location of Scale Controls Control Location Line Trace Limits Left of each channel Time Base Lower left of main display Pressure/Impedance Profile Limits Below Profile Display Contour Limits Below Color Map Figure 3.2.2-9 Scale Adjustment Slider (Line Trace Limits) 3.2.3 Trace Mode Channel Selection Trace Channel Selection may be done by either manipulating the markers on the pressure profile plot, or selecting the channels on the Trace Display Channel Control screen via the Channels button. 3.2.3.1 Channels Button Esophageal Program: Press the Channels tool bar button to display the Trace Display Channel Control dialog. You can then select channels to be displayed in either Free Selection mode or the Landmark Reference mode by simply clicking the corresponding button. To setup the way the channels are displayed in either mode, select that mode and then select Setup. For Free Selection setup, all available sensor channels will appear and you may simply check which ones you wish to be displayed. For Landmark Reference mode (esophageal program only) you may select multiple channels at specified distances from the LES and UES. Anorectal Program: Press the Channels tool bar button to setup the way the trace channels are displayed. Simply check which ones you wish to be displayed including the balloon/rectal pressure sensor channels and these will be displayed in the Pressure Profile. 3.2.3.2 Manipulating Channels via the Pressure Profile The channels for trace display may be selected by graphically manipulating the channel pointers in the pressure profile display. When the main display is in contour mode, vertical movement of a channel in the Pressure Profile causes a horizontal guideline to appear in the main display to assist in positioning the channel location relative to the contour data. In Free Selection mode, move the chevron shaped pointers up and down to select the position of a given channel. This document contains proprietary information. Source: Given Imaging Copyright 2013, Given Imaging. All rights Reserved 28 TM ManoScan User Manual _____________________________________________________________________________________________________________ In Landmark Reference mode (esophageal program only), the channels are held in fixed position relative to the LES and UES as set in the Channels control. When the LES or UES pointers are moved in the pressure profile, the channels move with them, thus the channels at fixed distance from the anatomical landmarks are easily found by positioning the landmark pointers with the main display in contour mode. 3.2.4 Video Recording Specific Controls The video recording specific controls are only available for ManoScanTM V system. ManoScanTM V allows multiple video inputs to be connected, any one of which can be selected from the Video→DeviceoptionavailableunderSetupMenu.Otheroptions(say,tochangevideodisplaysize) may be available from the Setup→Video control, depending on the video device connected. The videowindowcanbeopenedbyclickingthe„Video‟buttonlocatedbelowtheMainDisplay.Zoom icons can be used to change the size of the video display. The user may set the region of interest on the display by either dragging the borders of the video window or by using zoom controls, followed by clicking the Crop icon . The cropped out region will not be recorded upon the starting of data recording. The “Uncrop” button may be used if readjustment of the region of interest is to be done. It is advisable to crop out as much of irrelevant portion of video window as possible. This will ensure that the software captures the video data at the highest possible frame rate. Video recording can be switched On/Off using the icon, but only after the pressure data recording has started. Blue markers at the top of the Main Display indicate that video has been recorded at corresponding time instances. Once the recording is started, the region of interest can only be changed aftertherecordedvideodataiscleared(byclickingSetup→Video). 3.3 Performing a Procedure Procedures may be performed by simply following the guided Protocol instructions and corresponding user interface buttons, which open the appropriate control boxes automatically. The Standard Esophageal Motility (Std Esoph Motility) protocol must be used to enable certain automatic features of the data analysis program for esophageal motility study. Esophageal Motility: Data collection may be via the Standard EM protocol or via the Free Measurement protocol. Trans-nasal intubation should be performed according to a procedure approved by the responsible physician. Trans-oral intubation is not recommended. Standard patient positioning during catheter trans-nasal intubation may have the patient in a sitting position in close proximity to the system, within the length of the catheter being used and connected to the system. Alternative patient positioning may be necessary to facilitate catheter intubation such as standing. The clinician may be positioned between the system and the patient to adequately intubate the patient. The catheter should remain connected to the system to visually aid intubation by using the pressures presented in the acquisition software. For the study, the patient may remain in a seated position, placed in a supine (15 to 30 degree angle) position or in a lay flat position according to the procedure specified by the responsible physician. Impedance data collection can be disabled prior to study execution and if impedance data collection is enabled, impedance data visual presentation can be turned off and on during esophageal motility studies. This document contains proprietary information. Source: Given Imaging Copyright 2013, Given Imaging. All rights Reserved 29 TM ManoScan User Manual _____________________________________________________________________________________________________________ 3D Esophageal Studies: Studies should be performed identically to Esophageal Motility studies, but care should be taken to locate the LES immediately in the center of the 3D section of the catheter, see example below: Figure 3.2.4-1: Locating the LES in an ESO 3D Study Pharyngeal and Proximal Gut (gastric/duodenal) Manometry Using 36 Channel Catheter and Associated Software: Data collection may be via the Free Measurement protocol. Trans-nasal intubation, patient and catheter positioning should be performed according to a procedure approved by the responsible physician. Anorectal Manometry Using Anorectal Catheter and Associated Software: Data collection may be via the Standard Anorectal Manometry protocol. Probe introduction and positioning should be performed according to a procedure approved by the responsible physician. Standard patient positioning during catheter insertion may have the patient on a flat surface such as a bed, in a left lateral position with knees and hip flexed in close proximity to the system, within the length of the catheter being used and connected to the system. Alternative patient positioning may be necessary to facilitate catheter insertion such as squatting. The clinician may be positioned between the system and the patient to adequately insert the catheter in the patient. The catheter should remain connected to the system to visually aid insertion by using the pressures presented in the acquisition software. For the study, the patient may remain on the flat surface, in a left lateral position with knees and hip flexed according to the procedure specified by the responsible physician. The probe should be inserted to an appropriate depth so that the anal sphincter is positioned in the center of the contiguous sensor section of the array. If using the AR 3D probe, the alignment bump on the handle must be kept at the same reference angle to the patient throughout the procedure. Care must be taken not to allow the catheter to excessively bend or move during this procedure. Balloon inflation may only be performed with air and not liquid to prevent catheter damage. Instructed patient expulsion of the HRM and 3D catheter probes is not recommended. Anorectal Manometry Using 36 Channel Catheter and Associated Software: Anorectal Manometry may be performed using the 36-channel system. Data collection may be via the Free Measurement protocol, or by simply using the controls manually. Probe introduction, patient and catheter This document contains proprietary information. Source: Given Imaging Copyright 2013, Given Imaging. All rights Reserved 30 TM ManoScan User Manual _____________________________________________________________________________________________________________ positioning should be performed according to a procedure approved by the responsible physician. The probe should be inserted to a depth of 10-15 cm. Care must be taken not to allow the catheter to excessively bend during this procedure (see 2.8,item3).Atthephysician‟soption,asmallballoon catheter may be introduced alongside the manometric probe such that balloon inflation is detected in the distal pressure sensors. 3.3.1 Using the Protocol Function The protocol function provides a display of instructions to the operator and automatically opens relevant windows within the program. It also marks specific time periods, called measurement frames, in the record during which relevant data are being collected. These frames are necessary for subsequent automatic data analysis and report generation and are not provided during manual data collection (they may be added later however using the ManoViewTM analysis program). Simply press the blue-bordered button in the upper right area of the screen and follow the on-screen instructions to step through the protocol sequence. You may navigate backward and forward through theprotocolusingthe“GoTo”button.Therearecurrently two standard protocols available. In the descriptions below, the term Frame isusedasashorthandfor“MeasurementFrame”. 3.3.1.1 Standard EM Protocol The Standard Esophageal Motility protocol follows the sequence below. a. Start. Press the blue bordered “Start” button and follow the on-screen instructions to Enter Patient Information, perform Calibration, intubate patient, and record catheter position. b. Landmark ID and Sphincter Pressure Measurement Frame. After patient acclimation, press “Start” to begin the measurement frame. The measurement frame will close automatically after the specified duration (typically 20-30 seconds). c. Swallow Frames. Press “Start” to begin the first of 10 swallow measurements. During this period, a measurement frame will be drawn for each swallow event. Provide the physician recommended amount (typically 10 ml) of room temperature water or other liquid such as saline solution for ESO Z studies or food and ask the patient to swallow shortly after the start of the measurement frame. Press “End”aftertheswallowis completeorallowtheframeto auto-close after the specified duration (typically 20-30 seconds). d. End. After 10 swallows, additional swallows may be completed as described above or you may press “Finish” to end the swallow sequence. After finishing, press End to clear the display, save the record, and allow for a new patient. 3.3.1.2 Free Measurement Protocol This protocol allows the operator to perform general testing according to a physician-approved procedure. The protocol facilitates the entry of patient data, calibration, recording, and subsequent closing/saving of the data file. It does not prompt for specific measurement activities. This document contains proprietary information. Source: Given Imaging Copyright 2013, Given Imaging. All rights Reserved 31 TM ManoScan User Manual _____________________________________________________________________________________________________________ 3.3.1.3 Standard Anorectal Manometry Protocol The Standard Anorectal Manometry protocol follows the sequence below. a. Start. Press the blue bordered “Start” button and follow the on-screen instructions to Enter Patient Information, perform Calibration, and intubate patient. b. Resting Pressure Frame(s). Afterpatientacclimation,press“Start”tobeginthemeasurement frame. The measurement frame will close automatically after the specified duration (typically 20-30 seconds). c. Squeeze Frame(s). Press “Start” to begin the squeeze measurement. The patient is then normally instructed to squeeze. Press “End” after the maneuver is complete, or allow the frame to auto-close after the specified duration (typically 20-30 seconds). Additional squeeze measurementsmaybemadebypressingthe“Start”button,ormovetothenextmeasurement typebypressingthe“Finish”button. d. Push (Bear Down) Frame(s). Press“Start”tobeginthepush (bear down) measurement. The patient is normally instructed to push or bear down as in defecation. Press “End” after the maneuver is complete, or allow the frame to auto-close after the specified duration (typically 20-30 seconds). Additional push (bear down) measurements may be made by pressing the “Start”button,ormovetothenextmeasurementtypebypressingthe“Finish”button. e. Balloon Inflation Frame(s). The user is prompted to indicate the next fill volume using the balloonvolumecontrolsonthelowerrightofthedisplayscreenandpress“Set”.Press“Start” to begin the balloon inflation measurement and inflate the balloon to the desired volume using air only, do not fill with liquids. Press the Sensation, Urge, or Discomfort annotation buttons asperpatientresponsetotheinflation.Press“End”afterthemaneuveris complete or allow the frame to auto-close after the specified duration (typically 20-30 seconds). Additional measurements may be made by repeating the process above for setting the fill volume, pressingthe“Start”button,andinflatingtheballoon.Tomove to the next measurement type, pressthe“Finish”button. f. Optional Maneuvers. This function is available to the clinician that would like to record maneuvers or measurements in addition to those listed above; for example, party balloon inflation. Use the “<<Other”annotationcontrolbuttontodocumenttheoptionalmaneuvers. This optional step may be skipped and the data collection concludedbypressing“End”. g. End.Removetheprobewithouttouchingthesensors.Press“End”toterminatedatarecording, clear the display, save the recorded study and allow for a new patient. This document contains proprietary information. Source: Given Imaging Copyright 2013, Given Imaging. All rights Reserved 32 TM ManoScan User Manual _____________________________________________________________________________________________________________ 3.3.2 Marking Catheter Position When conducting an esophageal manometry procedure, the operator should be sure to always update the catheter position with correct distance from nares (nostril entrance) as marked on the ruled section of the catheter probe3. This is done using the Catheter Position control shown in Figure 3.3.2-1. The arrows above and below increment or decrement the position by 0.5 cm. A few moments after changing the position an annotation will appear on the main display at the time the catheter position last changed. When using the Protocol function (Standard EM protocol) the control will automatically display the approximate catheter position when the up or down arrows are first contacted after entering the patient information. This reduces the amount of time required to enter the actual position. Figure 3.3.2-1 Catheter Position Control (esophageal program) 3.3.3 Swallows and Other Events (esophageal) You can quickly mark the occurrence of Wet Swallows, Dry Swallows, and Gag by pressing the annotation buttons on the right side of the screen (Figure 3.3.3-1) Figure 3.3.3-1 Annotation Controls Clicking the “Other” button allows you to record the occurrence of other events by entering their name into the dialog box that appears (Figure 3.3.3-2). A pull down list function allows you to reuse annotations so that they do not need to be typed in each time. Figure 3.3.3-2 “Other” Annotation Control 3 For Anorectal studies, there is no need to enter the catheter position. This document contains proprietary information. Source: Given Imaging Copyright 2013, Given Imaging. All rights Reserved 33 TM ManoScan User Manual _____________________________________________________________________________________________________________ 3.3.4 Balloon Fill and Other Annotations (Anorectal) In order to annotate the record with the balloon volume in anorectal studies, select the desired volume using the up/down arrows in the control shown in Figure 3.3.4-1 and press the “Set” button. Additional annotations are provided by simply pressing the indicated buttons for “Sensation”, “Urge”,and“Discomfort”.Youmayalsoinputanygeneralannotationyou like and save previously enteredannotationsusingthe“<<Other”functiondescribedintheprevioussection. Figure 3.3.4-1 Annotation Controls 3.3.5 Technique and Catheter Precautions The following points should be observed when handling the catheter probe during clinical data collection: 1. Zero the Channels. The catheter pressure channels may be zeroed one last time immediately beforepatientintubation.Thisisaccomplishedbypressingthe“ZeroChannels”button in the Calibrate dialog box, while the catheter is in a pressure-neutral state such as hanging freely in the air. 2. Handle the probe with the lightest possible pressure. The probe should always be handled by applying the lightest possible pressure. During patient intubation, the real-time display should be monitored and the pressures applied by the operator should be kept below 50 mmHg and never exceed 100 mmHg (the actual pressures at the sensor can be considerably higher since they involve much higher localized values than those indicated). This will help assure more stable readings during the study. 3. Assure the probe does not become doubled back. Care must be taken to assure the catheter is not doubled back on itself while in the body. This condition can be observed as a symmetric signature in the pressure profile and main displays as shown in Figure 3.3.5-1. If this occurs, the probe should be withdrawn immediately to the point that the condition no longer exists. Prolonged periods in the doubled-back state can lead to premature failure of the probe (see Section 2.8 for precautions). 4. Provide a pressure-neutral reading immediately after extubation. A brief period (at least 1 second) should be provided in which the probe is in a pressure-free state (e.g. simply held in air by the ruled section without touching the sensor section). This pressure-neutral condition, at or near body temperature, will allow for more precise thermal compensation during subsequent data analysis. This document contains proprietary information. Source: Given Imaging Copyright 2013, Given Imaging. All rights Reserved 34 TM ManoScan User Manual _____________________________________________________________________________________________________________ Figure 3.3.5-1 Pressure signature of doubled-back catheter condition 3.3.6 Saving a Data File Before closing or ending a Procedure, the operator must specify the file to which recorded data will be saved. To do so, press“End”toendtheprocedureandallowforanewpatientasinstructed in the standard Protocols or select “Close/SaveCurrent”fromthe Filemenuor“Close”from thetoolbar. EnterthenameoftheDatafileandclick“OK”. The operator may either use the default file name shown or overwrite it with another name. The default consists of any combination of patient name, patient ID number, physician name, and date as specifiedinthe“PatientFileNaming”controlundertheSetup menu. The default may be changed via this control. Portions or all of the data record may be subsequently saved in additional formats (see 3.5.2) The file extension for a ManoScanTM study is „.mvs‟ or „.mvsar‟ for a ManoScanTM AR study. If video recording has been performed at the same time, an additional file with the „.mvd‟extensionis created in the same folder. The folder location of the .mvs / .mvsar and the .mvd files must be the same for the user to be able to perform video file review later. 3.4 After a Procedure 3.4.1 Cleanup Steps After the procedure is finished the catheter should be disconnected, cleaned and high level disinfected. If the disposable sheath is used it should be appropriately disposed of in accordance with applicable biological waste protocols. Be sure to turn off data recording after the procedure has ended. The software can be shut down by selecting “Exit” from the File menu. If the data had not already been saved, the program will prompt you to save the file before exiting. This document contains proprietary information. Source: Given Imaging Copyright 2013, Given Imaging. All rights Reserved 35 TM ManoScan User Manual _____________________________________________________________________________________________________________ 3.4.2 Reviewing Recorded Data Apreviouslysaveddatafilecanbeloadedandreplayedbyselecting“ReviewPatientFile”fromthe File menu. The data may be played back via the Replay option or viewed as a static (non-moving) record. After finding the desired file, select Open to display the data. The display pressure reference (atmospheric, gastric, or esophageal) is set using the controls described in 3.2.2.3 (the default is atmospheric). 3.4.2.1 Replay The Emulation / Replay function allows the data file to be reviewed in “movie” fashion. Here the program emulates how these data would appear if it were being acquired in a clinical procedure. Speed of the replay may be adjusted to multiples or fractions of normal speed. 3.4.2.2 Static File Review The static File Review function immediately loads the entire patient record and allows it to be viewed using the scroll bar at the bottom of the main display. The pressure profile is frozen at the state of the last record in the file unless the Smart Mouse tool (left click-see 3.5.1.2) is used, in which case the pressure profile shows the data consistent with the red vertical guide line. All data viewing functions are available in Static File Review. 3.5 Other Tools and Controls 3.5.1 Analyzing Data using the Smart Mouse Function The Smart Mouse function provides on-screen tools for examining patient data. It is activated via the main toolbar or the Tools menu. The Smart Mouse data display is inherently more accurate than the vertical dashed lines showing time spacing. The Smart Mouse values should always be used in obtaining precision data. 3.5.1.1 Data Point Evaluation Pressure and position data at any point in the contour display are found by simply passing the cursor over the point when Smart Mouse is active. Data point evaluation is also applicable to the 3D visualization window. 3.5.1.2 Data Record Evaluation (vertical time line) By left clicking on the main display a red marker is anchored on the display showing the pressure and position data at the point. 3.5.1.3 Data Across Records (diagonal drag and delta time lines) By left clicking on the main display and dragging between two points of interest, data from two records are displayed. In the trace display mode, the time between the two points selected is displayed and a vertical line is drawn at each end of the drag line. This is helpful for example in measuring the time between a swallow wave features seen on two separate channels. In Contour display mode, the pressure, time and position at the start and endpoints of the drag line are displayed and the differences in these variables as well as the velocity (e.g. for wave velocity measurement) and maximum, minimum, and mean pressures within the enclosed areas are displayed. This document contains proprietary information. Source: Given Imaging Copyright 2013, Given Imaging. All rights Reserved 36 TM ManoScan User Manual _____________________________________________________________________________________________________________ 3.5.1.4 Data Across 3D Records By left clicking on the 3D Lay-Flat Visualization display and dragging between two points of interest, time dependent data across multiple sensors is displayed. The pressure and position at the start and endpoints of the drag line are displayed; the differences in these variables as well as maximum, minimum, and mean pressures within the enclosed areas are displayed. 3.5.2 Save Selected In addition to the normal saving of the recorded data, a selected portion may be saved for subsequent review and analysis. This may be accomplished both during initial data acquisition and subsequent review of saved patient files. The desired data are selected by drawing a rectangular area in the Main Display while in Contour mode using the smart mouse diagonal drag function (see 3.5.1.3). If no data is selected, the data displayed on the main screen is saved. You may then choose Save Selected, under the File menu and select from one of the following three available data file formats. 1. Text file. The range of data are saved as a tab delimited text table where the rows are the data records for each sample time, the first column contains the sample times, and the subsequent columns contain the pressure values (mmHg) for each sensor in the range selected from distal to proximal and pressure values of the two reference sensors. If the impedance data is also recorded, it is saved after the after the last pressure data column. The files are saved with a “.txt”extension. 2. 3D data points file. The range of data is saved as the time, sensor number, and pressure (mmHg) for each sample. These data may then be opened using commercial 3D plotting programs (e.g. to generate 3D mesh plots). The filesaresavedwitha“.p3d”extension. 3. Patient examination file. The data for the time duration of the diagonal drag area are saved in a format that may be subsequently viewed in the ManoViewTM software (either data acquisition or analysis). The files are saved in the applicable program with an “.mvs” or “.mvsar”extension. 3.5.3 Simulation Mode A simulator is provided that allows the replay of patient data in an interactive fashion for demonstration and tutorial purposes. This is accessed via the Tools menu under Simulation Mode. The simulation control allows for selection of Background and Event data. The Background plays in a loop (i.e. it restarts automatically after ending), while the Event plays only once per command. If a Background file is playing when an event is commanded, the Event (if selected) will begin at the end of the current Background, and the Background will resume after the end of the Event. By using one respiratory cycle as the Background, and a swallow sequence as the Event, highresolution pressure “movies” of esophageal motility may be shown with “swallow on command” functionality. You may create simulations by using the Save Selected function (see 3.5.2) and saving selected data in ManoScanTM format in the “Emulation” folder. The file extensions must be subsequentlychangedfrom“*.mvs”and“*.mvsar”to“*.emb”forBackgroundfilesand“*.eme”for Event files. This document contains proprietary information. Source: Given Imaging Copyright 2013, Given Imaging. All rights Reserved 37 TM ManoScan User Manual _____________________________________________________________________________________________________________ 4. Maintenance, Service, Troubleshooting and Reference Information 4.1 Maintenance and Replacement No scheduled maintenance is required for the ManoScanTM system. The modules and catheters of the ManoScanTM system do not include end user serviceable components and may pose a hazard during any attempts to troubleshoot or repair. WARNING: The ManoScanTM system shall only be serviced by Given Imaging trained service personnel. WARNING: No modification of this system or its components is allowed. The ManoScanTM System, excluding the high-resolution catheters, is warranted to be free from defects in material and workmanship under normal use for 2 years from the date of shipment. The high resolution manometry catheter probes are limited use devices warranted to be free from defects in material and workmanship under normal use for 2 years or 200 uses, whichever comes first, from the date of initial shipment. The seal grommets \ O-rings \ gaskets of the Calibration Chambers may be subject to wear after prolonged use. Replacement parts are provided with the system and are available from your regional sales representative or Given Imaging Support Representative. 4.2 Transportation, Storage, and Operating Ranges The ManoScanTM system must be transported and stored in conditions that fall within the following Temperature: Transportation/Storage: -40°C to +65°C Catheters Operating: +10°C to +40°C Modules Operating: +10°C to +35°C Relative Humidity: Transportation/Storage: 10 to 93% RH Operating: 20 to 80% RH Altitude: Transportation/Storage: -15.2m to 10668m (-50ft to 35,000ft) Operating: -15.2m to 3048m (-50ft to 10,000ft) 4.3 ManoScanTM System Cart Power Isolation Station WARNING: To avoid risk of electric shock, this equipment must only be connected to a mains supply with protective earth. Do not position the system in a way that would make it difficult to disconnect the system from the mains power supply. The ManoScanTM System Cart power isolation station specifications: Power: Input Voltage: 600 VA 115 (120) / 230 (240) VAC @50 / 60 Hz This document contains proprietary information. Source: Given Imaging Copyright 2013, Given Imaging. All rights Reserved 38 TM ManoScan User Manual _____________________________________________________________________________________________________________ Input Current: Input Voltage Configuration: Input Connector: Fuses: 5.2 Amps / 2.6 Amps 115 or 230 VAC One IEC 320 with dual fuse block 6.3 Amps, 230 VAC Output Voltage: Output Current: Output Voltage Selections: Outlet Connectors: 115 (120) / 230 (240) VAC; IEC 320 (15 Amp) 5.2 Amps / 2.6 Amps 115 or 230 VAC Six IEC 320 (15 Amp) connectors 4.4 Electromagnetic Compatibility (EMC) Guidanceandmanufacturer‟sdeclaration– electronic emissions The ManoScanTM system is intended for use in the electromagnetic environment specified below. The customer or the user of the ManoScanTM system should assure that it is used in such environment. Emissions Test Compliance Conducted Emissions Group 1; Class A – EN55011:2007 - 0.15 MHz – 30.00 MHz Radiated Emissions Group 1; Class A – EN55011:2007 – 30.0 MHZ – 1000 MHz Power Line Harmonics EN61000-3-2:2006 – Up to 40th Harmonic Power Line Flicker EN61000-3-3:1995 / A2:2005 – Less than or equal to 4% Maximum Relative Voltage Change; Value of D(T) less than or equal to 3% for more than 200 ms Guidance The ManoScanTM system is suitable for use in all establishments other than domestic and those directly connected to the public low-voltage power supply net-work that supplies buildings used for domestic purposes. Guidance and manufacturer‟sdeclaration– electromagnetic immunity The ManoScanTM system is intended for use in the electromagnetic environment specified below. The customer or the user of the ManoScanTM system should assure that it is used in such environment. Immunity Test Compliance Guidance Electrostatic Discharge Immunity IEC 61000-4-2: 1995 / A1 1998 / A2:2000 – Air discharge up to +/- 8kV; Contact discharge up to +/- 6kV Floors should be wood, concrete or ceramic tile. If floors are covered with synthetic material, the relative humidity should be at least 30 %. This document contains proprietary information. Source: Given Imaging Copyright 2013, Given Imaging. All rights Reserved 39 TM ManoScan User Manual _____________________________________________________________________________________________________________ Guidance and manufacturer‟sdeclaration– electromagnetic immunity The ManoScanTM system is intended for use in the electromagnetic environment specified below. The customer or the user of the ManoScanTM system should assure that it is used in such environment. Immunity Test Compliance Guidance RF Radiated Fields Immunity IEC 61000-4-3:2006 – Radiation Field Strength of 3V/m from 80-2500 MHz (80% AM @ 1 kHz) Portable and mobile RF communications equipment should be used no closer to any part of the ManoScanTM system, including cables, than the recommended separation distance calculated from the equation applicable to the frequency of the transmitter. See Note 1 below table. Interference may occur in the vicinity of equipment marked with the following symbol: Electrical Fast Transient Immunity IEC 61000-4-4:2004 + Corrigendum 1: 2006; Level I; Power line pulses of +/- 2kV direct; I/O line pulses of +/- 1 kV Lightning Surge Immunity IEC 61000-4-5:2005; Power line surges of +/- 2kV common; +/- 1kV differential mode RF Common Mode Immunity IEC 61000-46:2003/A1:2004/A2:2006; Level I; 150 kHz – 80 MHz @ 3 Vrms; 1 kHz 80% amplitude modulated Power Frequency Magnetic Field Immunity IEC 61000-4-8: 1993 / A1:2000; Level I; Helmholtz coil @ 50 Hz and 60 Hz to 3 amps (rms) per meter Mains power quality should be that of a typical commercial or hospital environment. Portable and mobile RF communications equipment should be used no closer to any part of the ManoScanTM system, including cables, than the recommended separation distance calculated from the equation applicable to the frequency of the transmitter. See Note 1 below table. Interference may occur in the vicinity of equipment marked with the following symbol: Power frequency magnetic fields should be at levels characteristic of a typical location in a typical commercial or hospital environment. This document contains proprietary information. Source: Given Imaging Copyright 2013, Given Imaging. All rights Reserved 40 TM ManoScan User Manual _____________________________________________________________________________________________________________ Guidance and manufacturer‟sdeclaration– electromagnetic immunity The ManoScanTM system is intended for use in the electromagnetic environment specified below. The customer or the user of the ManoScanTM system should assure that it is used in such environment. Immunity Test Compliance Guidance Voltage Dips and Short Interruptions IEC 61000-4-11:2004; Level I; Voltage Dips of >95%, 30% and 60%; Interruptions of >95% Mains power quality should be that of a typical commercial or hospital environment. If the user of the ManoScanTM system requires continued operation during power mains interruptions, it is recommended that the ManoScanTM system be powered from an uninterruptible power supply or a battery. Note 1: Recommended Separation Distances a. b. c. 0.15 – 80 MHz: D=3.5√P 80 – 800 MHz: D=1.2√P .8 – 2.5 GHz: D=2.3√P Where P is the maximum output power rating of the transmitter in watts (W) according to the transmitter manufacture and D is the recommended separation distance in meter (m). This equipment has been tested and found to comply with the limits for medical devices to the EN 60601-1-2. These limits are designed to provide reasonable protection against harmful interference in a typical medical installation. However, there is no guarantee that interference will not occur in a particular installation. This equipment generates, uses, and can radiate radio frequency energy and, if not installed and used in accordance with the instructions, may cause harmful interference to other devices in the vicinity. If this equipment does cause harmful interference to other devices, which can be determined by turning the equipment off and on, the user is encouraged to try to correct the interference by one or more of the following measures: - Reorient or relocate the receiving device. - Increase the separation between the equipment. - Connect the equipment into an outlet on a circuit different from that to which the other device(s) are connected. - Consult the manufacturer or field service technician for help. This document contains proprietary information. Source: Given Imaging Copyright 2013, Given Imaging. All rights Reserved 41 TM ManoScan User Manual _____________________________________________________________________________________________________________ 4.5 Electronic and Pressure Interfaces 4.5.1 ManoScanTM System PC Typical interfaces to the ManoScanTM System PC are shown in the Figures below. The connector layout may vary depending on the PC model. Please consult the provided PC documentation for specific connector layouts. If the device is connected to a general network during procedure it should have isolation. PC Power Requirements: Power Supply Wattage 240W AC Input Voltage Range 90-264VAC AC Input Current (low AC / high AC range) 4.0A / 2.0A AC Input Frequency (low AC / high AC range) 47Hz / 63Hz PC - Back Panel Connectors BACK PANEL CONNECTORS 1 Mouse Connector 7 Keyboard Connector 2 Serial Connector 8 Display Port Connector 3 Link Integrity Light 9 VGA Connector 4 Network Connector 10 USB Connectors (6) 5 Network Activity Light 11 Line-in/Microphone Connector 6 Line-out Connector Figure 4.5.1-1: ManoScanTM System Computer Interfaces This document contains proprietary information. Source: Given Imaging Copyright 2013, Given Imaging. All rights Reserved 42 TM ManoScan User Manual _____________________________________________________________________________________________________________ BACK PANEL CONNECTORS 1 Parallel Connector 6 Line-in/Microphone Connector 2 Link Integrity Light 7 USB Connectors (6) 3 Network Connector 8 VGA Connector 4 Network Activity Light 9 Serial Connector 5 Line-out Connector Figure 4.5.1-2: ManoScan TM System Computer Interfaces This document contains proprietary information. Source: Given Imaging Copyright 2013, Given Imaging. All rights Reserved 43 TM ManoScan User Manual _____________________________________________________________________________________________________________ 4.5.2 ManoScanTM System Modules The electronic interfaces to the modules are shown in the Figures below. WARNING: To avoid risk of electric shock, this equipment must only be connected to a mains supply with protective earth. Do not position the system in a way that would make it difficult to disconnect the system from the mains power supply. Module Power Requirements: A100\A120 and A200 modules - 90-230 Volts AC, 50/60 Hz, 40 VA Max A300 module is powered by the A120 module. A400 module – 12v, 5A, 65w Max Figure 4.5.2-1 Electronic Interfaces to the A100 Module USB Type B, data connection to PC Main Power Receptacle (IEC 60320 - C6) Figure 4.5.2-2 Electronic Interfaces to the A120 Module Figure 4.5.2-3 Electronic Interfaces to the A200 Module This document contains proprietary information. Source: Given Imaging Copyright 2013, Given Imaging. All rights Reserved 44 TM ManoScan User Manual _____________________________________________________________________________________________________________ Figure 4.5.2-4 Electronic Interfaces to the A300 Module DC Power Connector LED Figure 4.5.2-5 Electronic Interfaces to the A400 Module 4.5.3 The ManoScanTM module front panel interfaces Figure 4.5.3-1 ManoScanTM Module to HRM Catheter with device name, part number and serial number formats. This document contains proprietary information. Source: Given Imaging Copyright 2013, Given Imaging. All rights Reserved 45 TM ManoScan User Manual _____________________________________________________________________________________________________________ System or Modular Enhancement Electronics Modality Software Catheters ManoScan™ A120 (Base pressure module) HRM: ESO ManoScan™ESO, ManoView™ESO ManoScanTM ESO (EAN) ManoScanTM ESO SD, Regular (EAS) ManoScanTM ESO SD, Small (EPS) HRM: AR ManoScan™AR, ManoView™AR ManoScanTM AR, Regular (AAN) ManoScanTM AR, Small (APN) ManoScan™Z A200 (Impedance module) HRM: ESO Z ManoScan™ESO, ManoView™ESO ManoScanTM ESO Z (EAZ) ManoScan™3D A300 (3D module) ESO 3D ManoScan™ESO, ManoView™ESO ManoScanTM ESO 3D (EAY) AR 3D ManoScan™AR, ManoView™AR ManoScanTM AR 3D (AAD) Augments all modalities ManoScan™ESO, ManoView™ESO (all) ManoScan™V A400 (Video module) ManoScan™AR, ManoView™AR Figure 4.5.3-2: ManoScanTM System Modular Enhancements This document contains proprietary information. Source: Given Imaging Copyright 2013, Given Imaging. All rights Reserved 46 TM ManoScan User Manual _____________________________________________________________________________________________________________ 4.6 Definition of Symbols The symbols used in this manual and on the ManoScanTM system are defined in Table 4-1. Table 4-1 Symbols Used with the ManoScan Symbol TM System Definition Alternating Current Attention, see instructions for use Authorized representative in the European community Batch code By prescription only CE marking Consult instructions for use Refer to instruction manual/ booklet Date of manufacture Do not reuse Fragile Keep dry Lot number/ batch code This document contains proprietary information. Source: Given Imaging Copyright 2013, Given Imaging. All rights Reserved 47 TM ManoScan User Manual _____________________________________________________________________________________________________________ Symbol Definition Manufacturer Non-sterile Power control Reference number \ re-order number \ catalog number Serial number Temperature limitation Type BF applied part USB Data Connection Use by date This document contains proprietary information. Source: Given Imaging Copyright 2013, Given Imaging. All rights Reserved 48 TM ManoScan User Manual _____________________________________________________________________________________________________________ 4.7 Technical Connectivity and Maintenance USER ACCOUNTS INTRANET CONNECTIVITY TM Windows User Accounts: The ManoScan computer ships with a default administrative User Account “ManoScan”. If separate User Accounts are desired, they may be created (However, see important info on Read/Write capability below). Intranet Connectivity: The ManoScanTM computer does not need Intranet connectivity to perform procedures and analyze data properly. If desired, the computer may be connected to an Intranet without voiding the Given Imaging equipment warranty. Read / Write capability: If User Accounts are created and denied administrative privileges, ensure that each User Account has FULL READ/WRITE ACCESS to the folder where our software resides, C:\Program Files\SSI. The ManoScanTM and ManoViewTM software requires read/write capabilities to this folder to function properly. Saving Patients to Network Drives: If desired, patients may be saved to network drives with no issues. However, it is important to note that SSI’s software still reads/writes data to the local machine during report generation. INTERNET CONNECTIVITY Internet Connectivity: The ManoScanTM computer does not need Internet connectivity to perform procedures and analyze data properly. If desired, the computer may be connected to the Internet without voiding the Given Imaging equipment warranty. Website Restrictions: If Internet connectivity is permitted only to connect to certain websites, ensure the following websites are viewable: DATA BACKUP & PREVENTATIVE MAINTENANCE Patient Files & Custom Software Configurations: It is highly recommended that each facility back up their patients and custom software configurations on a regular basis to a network archive drive and/or external media such as CD, ZIP drive, tape, etc. The entire SSI folder (C:\Program Files\SSI) can be archived, as it contains all patient files, custom configurations, and program executables in its lower folder hierarchies. Disk Cleanup (Once a month): This utility looks for old temporary files that can be removed and are taking up space. (Start>All Programs>Accessories>System Tools>Disk Cleanup) Disk Defragmenter (Once a month): This utility reorganizes the files on the hard drive in a more efficient way, so accessing them is quicker. (Start>All Programs>Accessories>System Tools>Disk Defragmenter) Virus Scan Software: If Virus Protection Software is desired, it may be installed to the ManoScanTM computer without voiding the Given Imaging equipment warranty. However, this software must be procured and maintained by each facility. Given Imaging claims no responsibility for these software installations. o Scan Times: If Virus Protection is desired and installed, ensure that Virus Definition updates and full system scans DO NOT occur during ManoScanTM procedures. www.Givenimaging.com: Website o www.logmein123.com: Remote Assistance tool (Optional, See specifics below) Given Imaging REMOTE ASSISTANCE Remote Assistance: LogMeIn Rescue is the web-based remote assistance tool used by Given Imaging to aid in troubleshooting and technical support. The ability to utilize this tool is not required to perform procedures and analyze data properly. HIPAA Compliance: LogMeIn Rescue satisfies all requirements of HIPAA. The document “Meeting HIPAA Compliance Rules with LogMeIn Rescue” is available upon request. VPN client software: Specific facility VPNs are not supported by Given Imaging for troubleshooting or technical support remote assistance as LogMeIn Rescue provides a secure, encrypted, easy-to-use, and HIPAAcompliant user experience. THIRD PARTY SOFTWARE PROGRAMS o Other 3rd Party Software: Some 3rd Party software programs may void SSI’s equipment warranty. Please consult Given Imaging Technical Support before installation of 3rd Party software. This document contains proprietary information. Source: Given Imaging Copyright 2013, Given Imaging. All rights Reserved 49 TM ManoScan User Manual _____________________________________________________________________________________________________________ 4.8 ManoScanTM System Technical Specifications HARDWARE Workstation: Data Acquisition Modules: TM A120 ManoScan High-Resolution Manometry, TM A200 ManoScan ESO Z High-Resolution Manometry A300 ManoScanTM 3D High-Definition Manometry TM A400 ManoScan V High-Resolution Video Manometry Portable cart - With adjustable shelves and large lockable wheels (5” min. dia.) and additional storage drawer: Microsoft Windows platform PC: Wi-Fi, LAN, and color printer (600dpi min.) Flat panel color monitor with touch screen (17” min.) and articulating monitor arm (keyboard and mouse control available as well) Power: Data acquisition and power conditioning unit rated at 90 to 230 VAC, 50/60 Hz, 40 VA Max Patient isolation transformer with available expansion power ports rated at 100-120 / 220-240 VAC, 50/60 Hz, 600 VA maximum Workstation footprint: 29” wide, 27” deep, 39” high to table top- add 15” min to 24” max for overall height with adjustable 17” monitor Workstation weight: approximately 310 to 325 pounds Recommended Computer Requirements: Minimum: Intel® Pentium® IV 2.8 GHz; Intel® CoreTM 2 DUO or Better Recommended Minimum: 1GB RAM; 2GB Recommended 1GB available hard disk; 40GB or Greater Recommended for ManoScanTM V Use CD-ROM Drive Minimum 24 bit color 1024x768 video adaptor USB 2.0 support Microsoft® Windows® XP SP3 – 32 bit only Microsoft® Windows® 7 – 32 and 64 bit Minimum Microsoft® Word 2003, recommended Word 2007 or Word 2010 with Microsoft® Save as PDF Add-in Adobe® Reader® Catheters / Probes: Reusable solid state tactile pressure sensing technology Standard Diameter – 12 pressure sensitive segments circumferentially distributed on ~4.2mm diameter ESO Catheter: esophageal Regular or Extended Tip – 36 channels, 432 pressure points, 10mm on center spacing ESO Z Catheter: esophageal + Impedance – 36 channels, 432 pressure points, 10mm on center spacing; 18 channels of impedance, 20 mm on center spacing AR Catheter, Regular: anorectal – 12 channels, 144 pressure points, 6mm on center spacing AR Catheter, Small: anorectal – 8 channels, 96 pressure points, 6mm on center spacing Catheter / Probe Accessories: ManoShield TM ESO latex free disposable sanitary sheath ManoShield TM ESO SD latex free disposable sanitary sheath ManoShield TM AR latex free disposable sanitary sheath ManoShield TM AR 3D latex free disposable sanitary sheath Anorectal balloons latex free, 150cc, 400cc & 600cc Performance: Frequency response: Capability >100Hz; system response limited by catheter scan rate shown below: Minimum Scan rate: 37Hz Regular EM, 66Hz Regular AR, 77Hz Small AR, 10Hz AR 3D, 20Hz ESO 3D Output resolution: 0.1mmHg Sensor channel uniformity: 1σ ≤ 1 mmHg at 0-50 mmHg; 1σ ≤ 2 mmHg at 51-300 mmHg Sensor non-linearity calibration residual: +/- 2 mmHg (0-100 mmHg), 2% of reading (100-300 mmHg) [mean] SOFTWARE Esophageal – ManoScanTM ESO Acquisition and ManoViewTM ESO Analysis Anorectal – ManoScanTM AR Acquisition and ManoViewTM AR Analysis Small Diameter – 36 channels with 16 pressure sensitive segments circumferentially distributed on ~2.75mm diameter – 576 total points ESO Catheter, SD Regular: Small diameter esophageal – 10mm on center spacing ESO Catheter, SD Small: Small diameter esophageal – 7.5mm on center spacing 3D Sensing ESO 3D Catheter: 3D esophageal – 128 individual pressure sensing channels; 12 3D sensing rings evenly aligned axially in the LES region, each consisting of 8 sensors circumferentially distributed along the radius, giving 96 individual sensing points at 7.5mm on center spacing and ~1.6mm (~45 deg.) spacing between adjacent radial sensors; 32 Standard Diameter sensors at 10mm on center spacing, giving 384 additional pressure points covering the remainder of the esophagus; ~4.2mm diameter. AR 3D Probe: 3D anorectal – 256 individual pressure sensing channels; 16 3D sensing rings evenly aligned axially, each consisting of 16 sensors circumferentially distributed along the radius; 4mm spacing between adjacent sensor rings, ~2mm (~22.5 deg.) spacing between adjacent radial sensors; ~10.75mm Diameter; sensing length ~7cm. Temporal display: High-resolution contour with instant switching to conventional line traces. Real-time display: Pressure profile and color bar modes superimposed on anatomy of esophagus or anorectum. Real Time 3D Display: Free Rotating real time 3Dimensional cylindrical pressure display with instant switching to Vector Volume and 2D Views. Interface: Clinical procedure controls touch-screen compatible. All controls keyboard and mouse compatible. Patient data review: Replay (”movie”) and static (scrollthrough) file review modes. Analysis tools available in each mode. In-procedure support: Split screen (allows review of data from earlier in recording while procedure is ongoing). Analysis tools: Built-in functions provide quantitative measures of pressures, velocities, and event periods. Graphical tools facilitate localization of sphincters and PIP. Automated and manual analysis modes with userconfigurable and on-the-fly report formatting. o Chicago Classification Scheme Support o 3D Only: Asymmetry calculations and plots. Operator support: Automated clinical protocol that steps technician through setup, calibration, and data collection (manual mode also available for investigational or other special uses). Training support: Emulation mode supports use of all system features using actual patient data for training purposes. Educational support: Simulation mode provides graphic high resolution playback of normal and pathological motility with anatomical background. This document contains proprietary information. Source: Given Imaging Copyright 2013, Given Imaging. All rights Reserved 50 TM ManoScan User Manual _____________________________________________________________________________________________________________ 4.9 Troubleshooting 4.9.1 Calibration Errors During the calibration process, the software will check for the following error conditions. If any are found, an appropriate error message will be displayed, with a "Restart Calibration" button. Error Message Error Condition "Calibration error. Check that catheter is properly sealed in calibration chamber and that all hoses are secure; then restart calibration". The chamber does not reach 300 mmHg after 30 seconds, based on reference sensor readings. "Calibration error. Check that the pump is off, the bleed port is clear, all hoses are straight, and then restart calibration". The chamber does not depressurize to within 2 mmHg of the initial reference sensor value within 30 seconds after the pump is stopped. "Calibration Error - reference sensor. Restart Calibration. If error persists consult the manufacturer" Difference between the two reference sensor readings at zero nominal pressure is greater than 2 mmHg or more than 3%, whichever is greater. "Calibration Error - probe element baseline. Restart Calibration. If error persists Consult Factory" Baseline non-repeatability is > 2 mmHg (initial and final ambient pressures) "Calibration Error - probe element cal curve. Restart Calibration. If error persists Consult Factory" Error between reading and cal curve is > 2 mmHg or > 5 % of reading, whichever is greater. 4.9.2 Protocol Flow Logic The protocol will always start at the beginning. Therefore, if the initial steps in a procedure such as entering Patient Information and Probe Calibration are performed manually, the protocol may be out of sync with the actual state of the clinical procedure. This may be corrected by moving to the correct stepintheprotocolviathe“GoTo>>”button. 4.9.3 Loss of power If there is a loss of electrical power, first assure that the line source (e.g. wall receptacle) is providing proper voltage. If proper power is confirmed to be entering the ManoScanTM system, contact Given Imaging or your local representative for further instructions. This document contains proprietary information. Source: Given Imaging Copyright 2013, Given Imaging. All rights Reserved 51 TM ManoScan User Manual _____________________________________________________________________________________________________________ 4.9.4 HRM Catheter Calibration Error 1. Verify the pressure data acquisition A120 module is powered on, USB connected and communicating. 2. Verify the catheter serial number selected in the software matches the catheter serial number connected to the module. 3. Ensure the intended use catheter is the only catheter connected. Do not have a catheter connected to the A120 and the A300 modules at the same time. 4. Verify catheter is correctly inserted and completely sealed in the pressure calibration chamber (ensure no sensors are pinched in pressure calibration chamber gasket) a. Esophageal catheter insertion to the > CAL < mark on the ruled tubing b. Anorectal catheter insertion, balloon fill tube is almost touching the top of the chamber twist knob. 5. If a ManoShieldTM is used, verify that ManoShieldTM is applied correctly and has been applied for less than 20 minutes. Refer to esophageal ManoShieldTM Instruction card. a. A properly applied ManoShieldTM may be applying constrictive pressure on the sensor(s) identified in the calibration error message, make an additional attempt to pressure calibrate the catheter by pressing Start again in the Calibration window. 6. If different sensors fail each time, tune catheter (calibration-utilities-tune system) and try again. a. Whenever a tuning is performed, the catheter should be hanging in the calibration chamber with no pressure exerted on the sensors. 7. Should the inability to successfully pressure calibrate the catheter persists, please contact your regional support representative. 4.9.5 Pressure stops building in calibration chamber (does not reach 300 mmHg) and pump continues to run 1. Make sure Calibration Chamber Catheter Seal knob (p\n 4256) for the ESO Calibration Chamber and (p\n 2036) for AR 3D Calibration Chamber is tight around catheter to create good catheter seal (give slight tug on catheter to see if it moves easily). Seal knobs should be finger tight in order not to damage the catheter. 2. If two calibration chambers are connected to the A120 module, make sure the unused one is sealed with the appropriate plug (p\n 150091) for the ESO Calibration Chamber and (p\n 150092) for the AR 3D Calibration Chamber. 3. Make sure Calibration Chamber Clamp Nut (p\n 1452) for ESO Calibration Chamber and (p\n 4280) for AR 3D Calibration Chamber is tight around calibration chamber tube (p\n 1455) to create a good seal. 4. Take off Calibration Chamber Seal knob and inspect small diameter gasket (p\n: 1283) for ESO Calibration Chamber and (p\n 4278) for AR 3D Calibration Chamber. Flip the This document contains proprietary information. Source: Given Imaging Copyright 2013, Given Imaging. All rights Reserved 52 TM ManoScan User Manual _____________________________________________________________________________________________________________ gasket upside down to potentially enable a complete seal. Replace the gasket if damaged. Refer to Spare Parts Section. 5. Only for AAN / APN catheters: Make sure AR balloon fill locations are capped. 6. Make sure all hoses connecting the calibration chambers to the A120 module are tight and the gaskets are making a good seal. 7. If pressure still doesn‟t reach 300mmHg, power cycle the system (modules and computer) and make sure that modules are USB connected and powered on before the computer is done booting up, otherwise synchronization /communication issues may exist between the modules and the computer. Attempt calibration again. 8. Should the inability to successfully pressure calibrate the catheter persists, please contact your regional support representative. 4.9.6 Error installing HRM catheter: Access Code Invalid 1. Re-enter the catheter serial numberandKeyCodeandpress“Install”. 2. Should the inability to successfully install the catheter persists, please contact your regional support representative. 4.9.7 Start button in calibration window is grayed out 1. The pressure reference sensors offset and gain values, in the respective Acquisition software installation GLOBAL.CFG file, need to be adjusted. 2. Please contact your regional support representative. 4.9.8 Esophageal Pressure with Impedance (EAZ) catheter presentations 4.9.8.1 No Impedance Signal on all channels 1. Ensure the A200 is powered on and the impedance connector is attached. 2. Open the ManoScan Acquisition software and ensure an EAZ catheter is selected and the“Yes”buttontodisplaybothpressureandimpedanceischosen. 3. USBcommunication“data”lightontheA200moduleisON(orflickering). 4. If the USB communication “data”lightontheA200module is OFF the computer is not detecting A200. a. Close the ManoScan Acquisition software. b. Unplug, and then plug back in the A200 module USB cable. Open the software and check for the impedance signal. c. Or, power cycle both computer and modules, making sure to turn on modules before computer. Open the software and check for the impedance signal. 5. Verify presence of Z signal by placing the catheter in a basin with tap water or saline solution after a successful pressure calibration and prior to patient intubation. This document contains proprietary information. Source: Given Imaging Copyright 2013, Given Imaging. All rights Reserved 53 TM ManoScan User Manual _____________________________________________________________________________________________________________ 6. Note: The impedance data will not appear if ManoShieldTM is used and \ orifthe“No” button to display pressure only is chosen after an EAZ catheter selection. 7. Should the inability to successfully display an impedance signal persist, please contact your regional support representative. 4.9.8.2 No Impedance Signal on some channels 1. Not all channels show an impedance signal (purple color) when placing the catheter in a basin full of saline solution. 2. Should the inability to successfully display an impedance signal persist, please contact your regional support representative. 4.9.9 3D Anorectal (AAD) catheter presentations 4.9.9.1 Pressure doesn’t build to 300 mmHg 1. The AR 3D and standard HRM catheter pressure calibration chamber, orange and green connectorhosingmustbesecurelyTconnected,„plumbed‟togetherandattachedtothe A120 module. The AR 3D pressure calibration chamber will not work by itself. 2. Make sure both pressure calibration chamber knobs are tight around the catheter and the plug and the balloon fill hoses are securely connected between the probe and the modules. Check the 3 way stop cock to ensure the syringe connection point is closed off and there is free passage of pressure between the probe and module. 3. Ensure the ManoShieldTM AR 3D collar is snapped in place on the probe to make a good seal with the AR 3D pressure calibration chamber. Refer to the ManoShieldTM AR 3D instruction card. 4. If pressure still doesn‟t reach 300mmHg, power cycle the system (modules and computer) and make sure that modules are USB connected and powered on before the computer is done booting up, otherwise synchronization /communication issues may exist between the modules and the computer. Attempt calibration again. 5. Should the inability to successfully pressure calibrate the catheter persists, please contact your regional support representative. 4.9.9.2 AR 3D Catheter does not calibrate 1. If different sensors fail on multiple calibration attempts, Verify there are no twists or wrinkles in sheath and re-Tune the probe. 2. If all sensors in a row or column fail, verify that the cables linking the A300 and the A120 are very tight; this requires a flat head screw driver. 3. If“ElementBerror”messageisdisplayed(Balloon sensor calibration error). a. Refer to the ManoShieldTM AR 3D instruction card. b. Make sure stopcock is in correct position. c. Add 1 cc of air to balloon to enable balloon compression during pressurization. This document contains proprietary information. Source: Given Imaging Copyright 2013, Given Imaging. All rights Reserved 54 TM ManoScan User Manual _____________________________________________________________________________________________________________ d. Take note of balloon pressure profile during calibration, if it builds then plummets well before the pressure drops on the body of the catheter, there is an air leak between the balloon luer connection on the catheter and the A120 module. e. Tighten the luer connection on the distal tip of the probe; be careful not to introduce twists in the sheath. f. No onscreen response from balloon sensor, remove purple luer connection from back of A120, attach luer syringe, lightly depress plunger and look for an increase in the balloon pressure signal on screen. If pressure increases then replace luer connection with a new one. 4. Should the inability to successfully pressure calibrate the catheter persists, please contact your regional support representative. 4.9.10 ManoScanTM Software Presentations 4.9.10.1 Display is not scrolling and/or tuning is stuck at 0% 1. Close acquisition program, power cycle A120 for at least 10 seconds and then wait another 10 seconds after turning on A120 before launching software. 2. Make sure another catheter is not plugged into the A120 while the AR 3D catheter is connected to the A300 module. 3. Should the issue persist, please contact your regional support representative. 4.9.10.2 ManoScanTM opens in Simulation Mode 1. Verify USB cable connections between modules and PC with corresponding device driver detection in the Windows OS Device Manager. 2. Verify Windows user account is an Administrator account (Default ManoScanTM PC user login is an Admin account). Or ensure user account logins have read \ write capability enabled to the C:\Program Files\SSI folder or there may be issues writing to program file directory and saving studies. 3. Should the issue persist, please contact your regional support representative. 4.9.11 ManoViewTM ESO and AR Analysis Software Error Messages 4.9.11.1 “Invalid class string” Error Message when generating report 1. Verify Microsoft® Office Word is installed on PC. ManoViewTM ESO and AR Analysis Software require Microsoft® Office Word to generate reports. 2. Microsoft® Office Word software must be registered; trial versions and viewers are not supported. 4.9.11.2 “Server threw an exception” Error Message when generating report 1. Ensure Microsoft® Office Word is not open and running in the background; if it is, close it via the Task Manager (Task Manager> Processes> Winword.exe, End process). 2. Ensure Microsoft® Office Word can launch without errors or messages (a new Word document page is displayed). This document contains proprietary information. Source: Given Imaging Copyright 2013, Given Imaging. All rights Reserved 55 TM ManoScan User Manual _____________________________________________________________________________________________________________ 3. Ifthereisapanethatsays“word hasrecoveredthefollowingdocument”itwillhangup report generation, close that pane, then close the report template and reopen Microsoft® Office Word to ensure it no longer presents. 4. Delete any “@report.rtf” files. They may be found in the C:\Program Files\SSI\ ManoView Temp folders. 5. Ensure all the report templates launch without errors. 6. Report templates can be found in the C:\Program Files\SSI\ ManoView Setup folders. 7. Should the issue persist, please contact your regional support representative. 4.9.11.3 “Exception Occurred” Error Message when generating report. 1. Verify Microsoft® Office Word is installed on PC. ManoViewTM ESO and AR Analysis Software require Microsoft® Office Word to generate reports. 2. Close application and re-open it by running the executable as administrator (right-click onthe.exefileandselect“Runasadministrator”). 3. Should the issue persist, please contact your regional support representative. 4.9.11.4 “External Exception EEFFACE” Error Message when analyzing manometry study. 1. Please contact your regional support representative. 4.9.12 Blue screen when starting Computer 1. Contactyourfacility‟sITand\ or biomed department. 2. Shut down PC and turn on PC again. 3. Boot back up in Safe Mode. 4. Run maintenance tasks on PC drives such as Check Disk and Defragment. 5. Remove \ uninstall any added non-Given supplied hardware and software. 6. Save studies and reports on an external drive to avoid losing data. 7. Should the issue persist, please contact your regional support representative. This document contains proprietary information. Source: Given Imaging Copyright 2013, Given Imaging. All rights Reserved 56 TM ManoScan User Manual _____________________________________________________________________________________________________________ 5. Spare Parts Material No. Material Description 1283 Seal, Probe, MVS (ESO \ AR) 1284 Seal, Cal, Tube, MVS (ESO \ AR \ AR 3D) 4278 Probe Gasket Cal Rigid AR (AR 3D) Material Picture This document contains proprietary information. Source: Given Imaging Copyright 2013, Given Imaging. All rights Reserved 57 TM ManoScan User Manual _____________________________________________________________________________________________________________ 6. Contacting Given Imaging On the Web: www.givenimaging.com USA & Headquarters of the Americas Germany & European Headquarters Authorized Representative in the EU Given Imaging, Inc. 3950 Shackleford Road, Suite 500 Duluth, GA 30096, USA Phone: 770-662-00870 Toll-Free: 1-800-GIVENGI Fax: 770-662-0510 USA: [email protected] Latin America: [email protected] Given Imaging GmbH Borsteler Chaussee 47 Hamburg 22453 Germany Phone: +49 40 513 3000 Fax: +49 40 4606 9611 [email protected] Canada France Given Imaging, Inc. - Canadian Office 2425 Matheson Blvd. E., 8th Floor Mississauga, ON L4W 5K4 Canada Phone: 905 361 2830 Toll-Free: 1866 98 GIVEN Fax: 1 800 786 1967 [email protected] Given Imaging France S.A.S. 22, Rue Guynemer 78600 Maison-Laffitte Paris, France Phone: +33 (0) 1 34 93 80 00 Fax: +33 (0) 1 34 93 80 11 [email protected] Australia & New Zealand Asia Given Imaging Pty Limited Unit 6A, The Park 5 Talavera Road North Ryde, NSW 2113, Australia Phone: +61 2 9889 3944 Fax: +61 2 9889 3955 [email protected] Given Imaging (Asia) Company Limited 27/F. Unit A, Cheuk Nang Plaza 250 Hennessy Road, Wanchai Hong Kong Phone: +852 2989 0888 Fax: +852 2989 0899 [email protected] Japan Given Imaging K.K. 2F KDX Kojimachi Bldg. 3-3 Kojimachi, Chiyoda-ku Tokyo 102-0083 Japan Phone: + 81-3-5214-0588 [email protected] This document contains proprietary information. Source: Given Imaging Copyright 2013, Given Imaging. All rights Reserved 58