1
Landscape Design and Integration
Sybase Unwired Platform 2.2
DOCUMENT ID: DC01856-01-0220-04
LAST REVISED: May 2013
Copyright © 2013 by Sybase, Inc. All rights reserved.
This publication pertains to Sybase software and to any subsequent release until otherwise indicated in new editions or
technical notes. Information in this document is subject to change without notice. The software described herein is furnished
under a license agreement, and it may be used or copied only in accordance with the terms of that agreement.
Upgrades are provided only at regularly scheduled software release dates. No part of this publication may be reproduced,
transmitted, or translated in any form or by any means, electronic, mechanical, manual, optical, or otherwise, without the prior
written permission of Sybase, Inc.
Sybase trademarks can be viewed at the Sybase trademarks page at http://www.sybase.com/detail?id=1011207. Sybase and
the marks listed are trademarks of Sybase, Inc. ® indicates registration in the United States of America.
SAP and other SAP products and services mentioned herein as well as their respective logos are trademarks or registered
trademarks of SAP AG in Germany and in several other countries all over the world.
Java and all Java-based marks are trademarks or registered trademarks of Oracle and/or its affiliates in the U.S. and other
countries.
Unicode and the Unicode Logo are registered trademarks of Unicode, Inc.
All other company and product names mentioned may be trademarks of the respective companies with which they are
associated.
Use, duplication, or disclosure by the government is subject to the restrictions set forth in subparagraph (c)(1)(ii) of DFARS
52.227-7013 for the DOD and as set forth in FAR 52.227-19(a)-(d) for civilian agencies.
Sybase, Inc., One Sybase Drive, Dublin, CA 94568.
Contents
Sybase Unwired Platform System Life Cycle ......................1
Stage 1: Assess .....................................................................3
Host Platform Requirements ...........................................3
General Runtime Host Requirements ....................3
Data Tier Failover Cluster Host Requirements ......4
Unwired Server Cluster Host Requirements ..........4
®
SAP Ecosystem Interoperability Requirements ...........5
SAP SLD Interoperability Requirements ................5
SAP License Audit Requirements ..........................6
Network Communications Requirements .......................6
Unwired Platform Port Accommodation .................7
Requirements for Load Balancers .........................7
EIS Requirements ...........................................................9
EIS Driver Requirements .......................................9
SAP External Libraries Requirements ...................9
Authentication and Authorization Security
Requirements ...........................................................10
Intrusion Detection and Protection Requirements .......10
Stage 2: Design ....................................................................13
Understanding Landscape Options ..............................13
Single-Server Installations ...................................13
Cluster Installations .............................................14
Enhanced Load Balancing ...................................15
Designing the Landscape .............................................19
Choosing Licenses .......................................................20
Assessing License Needs ....................................20
Mapping Environment to Product Editions and
License Types .................................................23
Purchasing Licenses Before Installing .................24
License Validation ................................................25
Stage 3: Implement ..............................................................27
Landscape Design and Integration
iii
Contents
Completing Installation Worksheets .............................27
Performing the Installation ............................................27
Completing New and Upgrade Installations ..................28
Upgrade: Uninstalling Advantage Database
Server ..............................................................28
Upgrade: Restoring Customized Settings in
Sybase Control Center Configuration Files .....29
Enabling the Sample Database in a Production
Installation .......................................................30
SAP Solution Manager ........................................31
Sybase Control Center Postinstallation
Checklist ..........................................................32
Security Postinstallation Checklist .......................32
EIS Driver and SSO Postinstallation Checklist ....33
Adding Relay Servers or Reverse Proxies ....................37
Using Sybase Hosted Relay Service for Testing
.........................................................................37
Installing Relay Server for Production
Environments ...................................................39
Common Requirements of Reverse Proxies ........65
Using Apache Reverse Proxy for HTTP Clients
.........................................................................67
The Agentry Server in SAP Mobile Platform Clustered
Environments ...........................................................71
SAP Mobile Platform Clustering: Configuring
Agentry Applications ........................................72
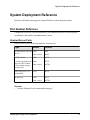
System Deployment Reference ..........................................75
Port Number Reference ................................................75
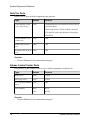
Unwired Server Ports ...........................................75
Data Tier Ports .....................................................76
Sybase Control Center Ports ...............................76
Relay Server Ports ...............................................77
Reserved Ports ....................................................77
Other Ports ..........................................................78
Installation Directories ..................................................78
iv
Sybase Unwired Platform
Contents
Service Reference ........................................................81
Unwired Server Services .....................................81
Data Tier Services ...............................................82
Starting Required Services ...........................................82
Starting and Stopping Unwired Server .........................83
Index ..................................................................................85
Landscape Design and Integration
v
Contents
vi
Sybase Unwired Platform
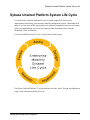
Sybase Unwired Platform System Life Cycle
Sybase Unwired Platform System Life Cycle
Use the Sybase® Unwired Platform life cycle to define required IT processes for
implementing and altering your enterprise mobility management system. Understand each
phase so you can successfully deploy and evolve platform components into your ecosystem.
Sybase recommends that you review the contents of this document before using the
Installation Guide for Runtime.
For Unwired Platform, the life cycle is represented by these stages:
For Sybase Unwired Platform 2.2, this document covers the Assess, Design, and Implement
stages of the enterprise mobility life cycle.
Landscape Design and Integration
1
Sybase Unwired Platform System Life Cycle
2
Sybase Unwired Platform
Stage 1: Assess
Stage 1: Assess
The objective of this stage is to conduct a preliminary analysis of your existing IT ecosystem.
Define the mobility goals and required functions and operation of the intended mobile
applications and runtime system.
Ecosystem assessments should include:
•
•
•
•
•
Physical plant resources (power, rack space, cable drops, and so on)
Network design and configuration
Access control and authentication (information security) mechanisms
Availability of suitable host systems
Availability of EIS resources
From the assessment, gather requirements that will help you make design-phase decisions.
Host Platform Requirements
Provision host systems to meet Unwired Platform Runtime host requirements.
All Unwired Platform Runtime hosts must meet the requirements specified in Supported
Hardware and Software for:
•
•
Minimum host resources (CPU, RAM, and local storage space)
Operating system (including edition, version, and service pack)
See also
• SAP® Ecosystem Interoperability Requirements on page 5
• Network Communications Requirements on page 6
• EIS Requirements on page 9
• Authentication and Authorization Security Requirements on page 10
• Intrusion Detection and Protection Requirements on page 10
General Runtime Host Requirements
Guidelines to follow when provisioning hosts for the Unwired Platform Runtime components
(Unwired Server and data tier servers) in single-host or clustered landscape designs.
See Supported Hardware and Software for basic hardware and operating system
requirements. This topic supplements that basic information.
Note: In addition to the resource and OS requirements specified in Supported Hardware and
Software, the target server cannot include an instance of Sybase Control Center that has been
installed for another Sybase product.
Landscape Design and Integration
3
Stage 1: Assess
The following must be identical for all Unwired Platform hosts:
•
•
•
•
Product edition and license type
Processor (32-bit or 64-bit) – you can install the Sybase Unwired Platform Enterprise
Server Edition only on 64-bit operating systems. You can install the Personal
Development Server and Enterprise Development Server Editions on either 32-bit or 64bit operating systems.
Operating system – edition, version, and service pack, as well as any intermediate patches
or updates
Unwired Platform software version – including any support package or patch-level
updates
See also
• Data Tier Failover Cluster Host Requirements on page 4
• Unwired Server Cluster Host Requirements on page 4
Data Tier Failover Cluster Host Requirements
Guidelines for requisitioning and setting up the hosts for data tiers in a Microsoft Failover
Cluster.
In addition to the general Runtime host requirements:
•
•
•
•
All data tier hosts in the cluster must have identical host resources (CPU, RAM, local
storage, network and host bus adapters, and so on).
Host processor architecture must use the same word size (32-bit or 64-bit) as the Unwired
Server hosts.
All data tier hosts must have the appropriate Microsoft Failover Cluster software enabled.
Follow current Microsoft guidelines for networks, hosts, and storage devices used in a
failover cluster.
See also
• General Runtime Host Requirements on page 3
• Unwired Server Cluster Host Requirements on page 4
Unwired Server Cluster Host Requirements
Guidelines for requisitioning and setting up the hosts for Unwired Server instances in a cluster.
In addition to the general Runtime host requirements:
•
•
4
Hosts in the Unwired Server cluster need not have identical system resources, but they
should have similar processing capabilities, and use the same operating system.
Host processor architecture must use the same word size (32-bit or 64-bit) as the data tier
hosts
Sybase Unwired Platform
Stage 1: Assess
See also
• General Runtime Host Requirements on page 3
• Data Tier Failover Cluster Host Requirements on page 4
SAP® Ecosystem Interoperability Requirements
To share information and services in an SAP landscape, define the degree to which the
information and services are to be shared with Unwired Platform. This is a very useful
architectural requirement, especially in a complex or extended enterprise.
For SAP Change and Transport System (CTS) requirements, see Supported LoadRunner
Versions, CTS Requirements.
See also
• Host Platform Requirements on page 3
• Network Communications Requirements on page 6
• EIS Requirements on page 9
• Authentication and Authorization Security Requirements on page 10
• Intrusion Detection and Protection Requirements on page 10
SAP SLD Interoperability Requirements
For SAP environments that use Solution Manager for runtime root-cause analysis, configure a
destination System Landscape Directory (SLD) server. This configuration allows Unwired
Platform to deliver runtime information to a common SAP SLD repository, keeping
information about your SAP and Unwired Platform mobility infrastructure complete and
current.
To use Unwired Platform data with an SLD:
•
•
•
•
Determine Unwired Server cluster and data tier strategy – you can configure SLD in a
cluster of two: the primary and secondary servers perform different activities, and the
cluster database aggregates and holds data. Depending on your schedule and your cluster
design, this might place demands on your cluster database.
Install dependencies – the installed version of SLD is for SAP NetWeaver 7.0 (2004s)
SPS07 or higher. The SLD to which you register must be the latest Common Information
Model version (currently 1.6.30).
Set up the SLD – verify that the SLD is available to Unwired Server and configured to
receive data. For more information, see the Post-Installation Guide and the User Manual
for your SAP NetWeaver version on SDN: http://www.sdn.sap.com/irj/sdn/nw-sld.
Set connection properties – collect and deliver to the platform administrator. Determine
the connection values to the SLD server, including its host name, protocol (HTTP or
HTTPS), port, and the SLD user account.
Landscape Design and Integration
5
Stage 1: Assess
•
Encrypt any dependent certificates – if SLD is configured to use HTTPS, ensure that the
SLD server certificate is signed by a known certificate authority. Otherwise, you must
manually import the certificate into the Unwired Server (primary node only) certificate
truststore. See Truststore and Keystore Properties in the Security guide.
See SAP SLD Server Overview in System Administration.
See also
• SAP License Audit Requirements on page 6
SAP License Audit Requirements
For SAP applications like OData SDK Applications, administrators can generate an XML file
that contains usage audit data that is then sent to the SAP License Audit. The XML file, which
is compatible with the License Audit infrastructure, includes counts of users using the
applications currently deployed to Unwired Server.
To use Unwired Platform data with SAP License Audit determine how the data is used.
Review the contents of SAP License Audit and Application Data Overview in System
Administration to see how data is extracted and delivered to SAP.
See also
• SAP SLD Interoperability Requirements on page 5
Network Communications Requirements
Network and host provisioning must accommodate Unwired Platform internal
communications.
When Unwired Platform runtime components are installed on more than one host, they
depend on network connections for some inter-process communication. Configure the local
network to allow all communications between Unwired Platform runtime components.
When all Unwired Platform runtime components are installed on a single host, they depend on
regular IP communication on the primary network interface of the host.
See also
• Host Platform Requirements on page 3
• SAP® Ecosystem Interoperability Requirements on page 5
• EIS Requirements on page 9
• Authentication and Authorization Security Requirements on page 10
• Intrusion Detection and Protection Requirements on page 10
6
Sybase Unwired Platform
Stage 1: Assess
Unwired Platform Port Accommodation
Infrastructure provisioning must accommodate all ports required by Unwired Platform
runtime components.
To accommodate Unwired Platform ports, you may need to:
•
•
•
Configure personal firewalls or host-based intrusion protection (HIPS) to allow access to
component ports. See Handling Intrusion Detection/Prevention Software in the Security
guide.
Configure Unwired Platform servers to change port number assignments.
• You can change default port assignments for Unwired Platform server components and
Sybase Control Center during installation.
• You cannot change assignments of Unwired Platform reserved ports. For a complete
list, see Reserved Ports.
Note: If there is a conflict for port 2480 or 2481, Unwired Server will not start, and you
cannot use Sybase Control Center to change those Unwired Server ports. You must
temporarily stop the service that uses the conflicting port, then start Unwired Server so you
can change the port assignment from Sybase Control Center.
Reserve ephemeral ports on Unwired Platform hosts to prevent other processes from using
them.
Note: Even if the installer does not detect a conflict, the Windows operating system may
later use additional ports in the 1024 – 65535 range. In that event, you may encounter
intermittent problems starting Unwired Platform services.
See the Microsoft operating system documentation to learn how to reserve ephemeral
ports.
See also
• Requirements for Load Balancers on page 7
• Unwired Server Ports on page 75
• Data Tier Ports on page 76
• Sybase Control Center Ports on page 76
• Relay Server Ports on page 77
• Reserved Ports on page 77
• Other Ports on page 78
Requirements for Load Balancers
Client and DCN guidelines for deploying a third-party load balancer that is connected directly
to Unwired Server ports.
Note: Sybase does not recommend or endorse any specific third-party load balancer
appliance, device, or software.
Landscape Design and Integration
7
Stage 1: Assess
See also
• Unwired Platform Port Accommodation on page 7
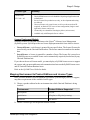
Requirements for Client Load Balancing
Client guidelines for deploying a third-party load balancer that is connected directly to
Unwired Server client ports.
The load balancer must:
•
•
•
•
Balance connections at the TCP/IP level.
Perform all load balancing on client connections to the Unwired Server cluster,
independent of any other network device.
Connect directly to the client ports of each Unwired Server in the cluster.
Support client request routing (that is, back-end server affinity) for nonpersistent HTTP
connections, for these way the load balancer dispatches requests, based on the HTTP
header or cookie:
Load Balancer Dispatches...
HTTP Header (or Cookie)
All client requests to Relay Servers
ias-rs-sessionid
Replication based synchronization (RBS) client requests directly ml-session-id
to Sybase Unwired Platform
Other client requests directly to Sybase Unwired Platform
X-SUP-SESSID (cookie)
•
•
•
For REST API applications, see also Reference topic in Developer Guide: REST API
Applications, especially the HTTP Headers and Cookies subtopic.
Map reverse proxy ports to Unwired Server ports.
If both new version clients (Sybase Unwired Platform 2.2.0 and later) and old version
clients (Sybase Unwired Platform 2.1.x and earlier) are supported, set up Relay Servers
between Unwired Server and load balancers and route client requests based on ias-rssessionid.
If both replication based synchronization (RBS) clients and other types of clients are
supported, set up Relay Servers between Unwired Server and load balancers and route
client requests based on ias-rs-sessionid.
Note: To allow header inspection, the load balancer must be a transport-layer security (TLS)
endpoint on HTTPS connections from mobile clients.
Requirements for DCN Load Balancing
DCN guidelines for deploying a third-party load balancer that is connected directly to
Unwired Server DCN ports.
The load balancer must:
8
Sybase Unwired Platform
Stage 1: Assess
•
•
•
Balance connections at the TCP/IP level.
Perform all load balancing on EIS connections to the Unwired Server cluster, independent
of any other network device.
Connect directly to the DCN port of each Unwired Server in the cluster.
EIS Requirements
You may need to provision some enterprise information system (EIS) resources to enable
Unwired Platform to use data services provided by the EIS.
See also
• Host Platform Requirements on page 3
• SAP® Ecosystem Interoperability Requirements on page 5
• Network Communications Requirements on page 6
• Authentication and Authorization Security Requirements on page 10
• Intrusion Detection and Protection Requirements on page 10
EIS Driver Requirements
Unwired Platform includes drivers for Sybase databases, such as Adaptive Server® and SQL
Anywhere®, and Web services. For nonSybase data sources, such as DB2, Oracle, or
Microsoft SQL Server, you must install the appropriate drivers.
Depending on the type of enterprise information system (EIS) connection, you may need to
copy some driver and library files to the Unwired Server installation directories.
In an Unwired Server cluster, each host must have the appropriate drivers installed.
See Supported Hardware and Software for the most current supported versions of different
EISes, and different versions of drivers for the same EIS.
See also
• SAP External Libraries Requirements on page 9
SAP External Libraries Requirements
Understand the requirements for external files you can optionally download from SAP and
install into Unwired Platform to enable communication with an SAP EIS.
•
•
SAP Cryptographic Libraries – required by Unwired Platform to enable Secure
Network Communications (SNC) between Unwired Server or Sybase Unwired
WorkSpace and the SAP EIS.
SAPCAR utility – required to extract files from the SAP cryptographic library.
Landscape Design and Integration
9
Stage 1: Assess
See also
• EIS Driver Requirements on page 9
Authentication and Authorization Security Requirements
If you do not effectively define security requirements in advance, you cannot evaluate the
resulting system for success or failure prior to implementation. The features that currently
exist determine how Unwired Platform security is affected by your infrastructure.
•
•
Roles and distribution of assignments – you can map roles at various levels: domain,
security configuration, application, and package. To prevent mapping collisions, identify
the roles that need to exist, and how to map them.
Security provider strategy – identify the existing built-in security providers, and the ones
you can create using the CSI API. The security providers you configure in Unwired
Platform pass authentication and authorization information to the provider used in your
environment. Identifying the providers simplifies the implementation of a security
configuration by the platform administrator after installation. If you are using SSO with a
security provider, you may also need to prepare libraries and other back-end components.
See the postinstallation requirements documented in Stage 3: Implement.
See also
• Host Platform Requirements on page 3
• SAP® Ecosystem Interoperability Requirements on page 5
• Network Communications Requirements on page 6
• EIS Requirements on page 9
• Intrusion Detection and Protection Requirements on page 10
Intrusion Detection and Protection Requirements
To accommodate Unwired Platform internal communications, you may need to reconfigure
hardware or software intrusion detection/prevention systems.
•
•
•
10
Configure "personal firewall" applications, or host-based intrusion prevention software
(HIPS) to allow all communications between Unwired Platform server components.
To prevent required internal component communication ports from being blocked,
configure an intrusion prevention system (IPS), or intrusion detection and prevention
system (IDPS) appliances to allow connections to the ports Unwired Platform uses.
When you install any new intrusion detection/prevention system on an Unwired Platform
server host, or on a local network that services an Sybase Unwired Platform server host,
configure that new system to accommodate all Unwired Platform internal
communications.
Sybase Unwired Platform
Stage 1: Assess
See also
• Host Platform Requirements on page 3
• SAP® Ecosystem Interoperability Requirements on page 5
• Network Communications Requirements on page 6
• EIS Requirements on page 9
• Authentication and Authorization Security Requirements on page 10
Landscape Design and Integration
11
Stage 1: Assess
12
Sybase Unwired Platform
Stage 2: Design
Stage 2: Design
In the design stage, you create the landscapes, process diagrams (beyond the scope of this
document), perform license selection, and prepare supporting documentation (including
installation worksheets). The design stage uses the requirements identified during the
assessment stage.
Each requirement produces a set of one or more design elements which are intended to
describe the software in sufficient detail allow any IT member to perform the installation.
Understanding Landscape Options
Gathering information about all installable options for Unwired Platform provides the
required foundation for making implementation decisions for your installation environment.
Single-Server Installations
In a single-server installation, one Unwired Server node and a data tier are installed during a
single installation procedure, executed on a single host.
A single-server Unwired Platform Runtime system is simpler, less expensive to deploy, and
generally easier to maintain. However, it also has significant limitations:
•
•
•
It cannot be scaled by adding or subtracting servers, to adapt to changes in system load or
performance requirements.
It cannot take advantage of conventional load-balancing and failover mechanisms to
provide a greater level of system availability.
The only way you can increase overall system performance is by upgrading the host
system resources (CPU, RAM, and so on).
Note: You cannot upgrade a nonclustered Unwired Platform system to a clustered system.
You must redeploy the Unwired Platform system, using cluster installation options on suitable
hosts.
Plan carefully when you choose between clustered and nonclustered designs. If you can
foresee any future requirement for a clustered system, such as a service level agreement (SLA)
that would require scalability, or higher system availability, consider initially deploying a
clustered Unwired Platform system.
Landscape Design and Integration
13
Stage 2: Design
Cluster Installations
In a cluster installation, data tiers, Unwired Server nodes that are installed as application
server nodes, and (optional) Unwired Server scale-out nodes, are installed by separate
installation procedures, typically on separate hosts.
There are two main advantages of a clustered Unwired Platform system:
•
•
It can be scaled by adding or subtracting servers (nodes in a cluster), to adapt to changes in
system load or performance requirements.
Redundant cluster nodes allow conventional load-balancing and failover mechanisms to
provide a greater level of system availability.
In a typical clustered system, Unwired Server instances do not share host system resources
with data tier servers.
Choose a clustered system design to meet requirements for scalability, higher availability, and
overall higher system performance.
Unwired Server Load-Balancing Clusters
The Unwired Server cluster enables load balancing to improve system availability and
performance.
An Unwired Server cluster consists of two or more Unwired Servers that:
•
•
•
Service the same set of client devices, users, and mobile applications
Rely on the same set of enterprise information systems to provide back-end data services
Rely on the same data tier resources to provide runtime data services
Because they share common data tier resources, all Unwired Servers in the cluster have access
to the same cached data from the EIS, messaging data for clients, cluster and server
configuration data, and system log data.
The common data tier lets you easily scale the Unwired Server cluster, adding or removing
nodes at any time.
With a load balancer, such as Relay Server, or a third-party load balancer appliance:
•
•
Unwired Servers in the cluster can share workloads, improving performance and
efficiency
Clients have a common point of access, independent of any particular Unwired Server in
the cluster
Data Tier Failover Clusters
The data tier failover cluster provides high availability and fault tolerance.
Note: The data tier cluster relies on cluster services provided by a Windows Server operating
system (such as Microsoft Cluster Service, or Failover Clustering).
A data tier cluster consists of:
14
Sybase Unwired Platform
Stage 2: Design
•
•
Two data tier hosts, each managed by a Windows-based failover cluster service
At least one fault-tolerant storage device, which provides the shared cluster storage for
database files and transaction logs
Each data tier host is a redundant node in the failover cluster—one active, and one standby (or
passive). Host system performance is more critical for the data tier servers, because each host
must assume the entire load imposed by the Unwired Server cluster.
To deploy the data tier in a failover cluster:
•
•
•
•
All data tier server software must be installed on a local drive, on each data tier host. The
data tier software cannot be installed on shared cluster storage, or on any storage resource
that can be managed independent of the data tier host.
All data tier database files and transaction logs must be located on a shared-cluster storage
device, such as a SAN device that is assigned the appropriate RAID level.
Each data tier host must be physically connected, by a host bus adapter, to the shared
cluster storage device. Each volume that houses a database file system must be accessed as
a local disk, on each data tier host.
All data tier services must be configured as cluster resources, managed in the context of a
common cluster instance.
To a Unwired Server, data tier hosts in a failover cluster appear to be a single, logical data tier
entity.
Note: Follow current Microsoft guidelines for networks, hosts, and storage devices used in a
failover cluster.
Enhanced Load Balancing
A cluster of two or more Unwired Server nodes provides some degree of load balancing, but
load balancing can also be applied to both client connections and EIS connections, to improve
performance and efficiently use resources in the Unwired Server cluster.
There are two load-balancing mechanisms you can use with the Unwired Server cluster:
•
•
Relay Server – an Sybase software product that acts as a reverse proxy server for client
devices communicating with Unwired Server.
Load balancer appliance – a third-party product, such as an L4 network switch, can be used
for both client and EIS connections.
Note: You cannot use Relay Server on EIS connections.
Client Load Balancing
Client load balancing improves capacity and performance of the Unwired Server cluster when
it is servicing mobile client requests.
With load balancing on client connections:
Landscape Design and Integration
15
Stage 2: Design
•
•
Unwired Servers in the cluster can share the client workload, improving the efficiency of
services to client devices.
Clients have a common point of access, independent of any particular Unwired Server
instance.
There are two types of client load balancing to consider:
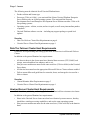
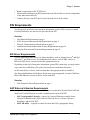
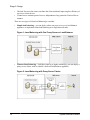
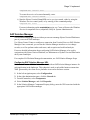
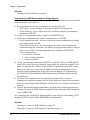
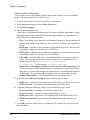
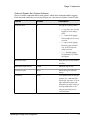
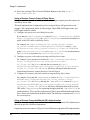
•
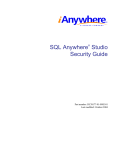
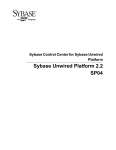
Simple load balancing – you can deploy either one proxy server, or a load balancer
appliance, to implement client load balancing on a single network node.
Figure 1: Load Balancing with One Proxy Server or Load Balancer
•
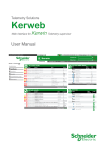
Clustered load balancing – for higher capacity or higher availability, you can deploy a
proxy server cluster, with or without a front-end load balancer appliance.
Figure 2: Load Balancing with Proxy Server Cluster
16
Sybase Unwired Platform
Stage 2: Design
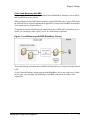
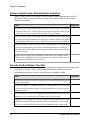
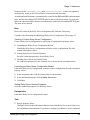
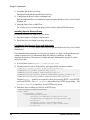
Client Load Balancing with BES
You can apply load balancing to connections between BlackBerry Enterprise Server (BES)
and Unwired Servers in a cluster.
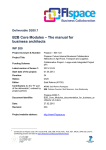
When you deploy an Unwired Platform system to support BlackBerry device users, BES treats
the Unwired Server as a back-end enterprise application. Connections from BES are treated as
client connections by Unwired Server.
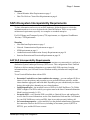
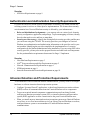
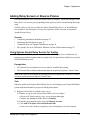
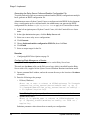
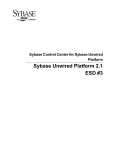
To implement client load balancing on connections between BES and Unwired Servers in a
cluster, you can deploy either a proxy server, or a load balancer appliance.
Figure 3: Load Balancing with BES (BlackBerry Clients)
The load-balancing mechanism between BES and Unwired Server is deployed on the internal
LAN.
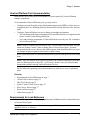
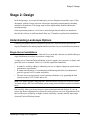
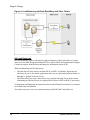
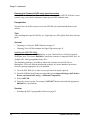
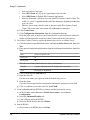
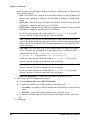
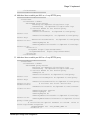
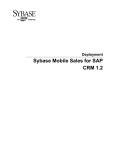
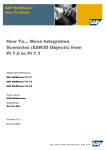
If your Unwired Platform system supports both BlackBerry device users and users of other
device types, you can apply load balancing to both BES connections and other client
connections.
Landscape Design and Integration
17
Stage 2: Design
Figure 4: Load Balancing with Both BlackBerry and Other Clients
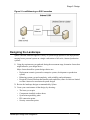
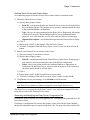
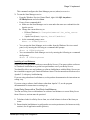
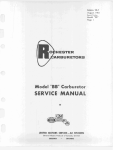
EIS Load Balancing
EIS load balancing improves the capacity and performance of the Unwired Server cluster
when it services data change notification (DCN) or Sybase SAP® Data Orchestration Engine
Connector requests from the back-end enterprise information system (EIS).
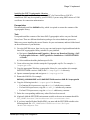
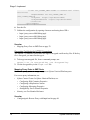
With load balancing on EIS connections:
•
•
Unwired Servers in the cluster can share DCN or DOE-C workloads, improving the
efficiency of service for mobile applications that rely on replication synchronization (or
data that is “pushed” from the server).
The EIS need not rely on a connection to any particular Unwired Server in the cluster,
eliminating the Unwired Server as a single point of failure in DCN or DOE-C processing.
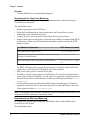
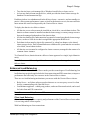
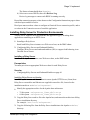
To implement load balancing on connections between the EIS and Unwired Server, you must
use a third-party load balancer.
You cannot use proxy server on connections between the EIS and Unwired Server.
18
Sybase Unwired Platform
Stage 2: Design
Figure 5: Load Balancing on EIS Connection
Designing the Landscape
Sybase Unwired Platform supports a variety of system design options to suit deployments
ranging from a personal system on a single workstation to full-scale, clustered production
systems.
1. Using the requirements you gathered during the assessment stage, determine factors that
might influence your design choice.
Major factors that affect system design choices are:
• Deployment scenario (personal or enterprise system, development or production
system)
• Balancing system cost and complexity, with scalability and performance
• Required Unwired Platform functionality and capabilities, some of which are limited
to either clustered or nonclustered system designs
2. Review the landscape designs recommended by Sybase.
3. Create your own instance of that design, by choosing:
•
•
•
•
•
The hosts you require
Components installed on those hosts
System interoperability paths
EIS connection points
Security connection points
Landscape Design and Integration
19
Stage 2: Design
Choosing Licenses
Before installing Unwired Platform, determine your license type.
For evaluation versions of Unwired Platform, you do not need a license to perform a singleserver installation (all components installed to a single host). For all other installations, the
appropriate license must be loaded and available on all hosts before you can run the installer.
1. Assessing License Needs
Identify your environment type, and the license model you need to support. These criteria
help you choose the license type so you can purchase licenses.
2. Mapping Environment to Product Editions and License Types
Once you have identified your environment type and the system design you need to
support, map those requirements to the available license types.
3. Purchasing Licenses Before Installing
Once you have identified your product edition and license type, you can proceed with
purchasing the licenses.
4. License Validation
Attributes in a license file define the number of Unwired Server instances that are allowed
to run concurrently, the number of mobile clients that can connect to the Unwired Server,
and the license expiration date.
Assessing License Needs
Identify your environment type, and the license model you need to support. These criteria help
you choose the license type so you can purchase licenses.
Two attributes of each Unwired Platform server license determine your license requirements:
•
•
Product edition – addresses the Unwired Platform system design options and your
intended use.
License type – addresses other license terms, such as per-seat (workstation) or per-core
(server) allowances, and number of mobile devices, users, or applications supported.
See also
• Mapping Environment to Product Editions and License Types on page 23
Environments and Product Editions
You can deploy Unwired Platform to different environments. Sybase Mobile SDK
(development) and Unwired Platform Runtime components are licensed separately. The type
20
Sybase Unwired Platform
Stage 2: Design
of environment targeted helps you to determine the appropriate product edition and license
type.
•
•
•
Development is a preproduction environment where applications are developed on a single
host, using a Personal Development Server license. A simple load-balancing cluster may
be necessary, using an Enterprise Development Server license, if application performance
is to be tested. For this environment, purchase a Sybase Mobile SDK license for each
developer workstation.
Qualification is another preproduction environment that is used to test applications and
runtime properties. If your budget allows, qualification environments should replicate
production environments as closely as possible. A Microsoft Failover Cluster is used, with
Unwired Platform installed using an Enterprise Development Server license. Any
developer workstation involved requires its own Sybase Mobile SDK license.
Production is a live runtime environment that uses a Microsoft Failover Cluster, with
Unwired Platform installed using an Enterprise Server license. For this environment, you
require Unwired Platform Runtime that can be licensed according to the number of CPU
cores, clients, and developer workstations used. If any developer workstations are
involved, each requires its own Sybase Mobile SDK license.
Server Product Editions
Unwired Platform Runtime components are licensed according to the product edition.
All Unwired Platform Runtime editions include Unwired Server and data tier components.
Do not use Unwired Platform Runtime licensed under development-specific product editions
(Personal Development Server and Enterprise Development Server) in a production system.
Product Edition
Summary
Personal Development Server
•
PE Code = PD
•
•
Enterprise Development Server
•
PE Code = ED
•
•
•
Landscape Design and Integration
Allows use in development systems and testing systems
only; not for use in production systems.
Requires all Unwired Platform server components to be
installed on the same, single-user host with Sybase Mobile SDK.
Allows a maximum of five mobile client devices.
Allows use in development systems and testing systems
only; not for use in production systems.
Allows each installable component to be located on a
separate host.
Allows clustered systems.
Allows a maximum of 20 mobile client devices.
21
Stage 2: Design
Product Edition
Summary
Enterprise Server
•
PE Code = EE
•
•
•
•
License type determines allowed use (production only, or
development and testing only).
Allows each installable component to be located on a
separate host.
Allows clustered systems.
Requires separate license for mobile client devices (production).
Allows unlimited mobile client devices (development and
testing).
Note: You can install the Sybase Unwired Platform Enterprise Server Edition only on 64-bit
operating systems. You can install the Personal Development Server and Enterprise
Development Server Editions on either 32-bit or 64-bit operating systems.
License Types
Each license type is associated with one or more Unwired Platform product editions.
License Type
Summary
Standalone seat license •
LT Code = SS
•
Unwired Platform Runtime components must be installed on same host
as Sybase Mobile SDK.
Available only with Personal Development Server Edition.
Development and test
license
•
LT Code = DT
•
Servers licensed for development and testing use only; no production
use allowed.
No limit on CPU/cores or host configuration (single or multiple hosts,
clusters, and so on)
Available with Enterprise Development Server and Enterprise Server
Editions.
•
CPU/core license
•
LT Code = CP
•
•
22
Servers licensed by CPU/cores, for production use only; no development and testing use allowed.
No limit on host configuration (single or multiple hosts, clusters, and so
on).
Available only with Enterprise Server Edition.
Sybase Unwired Platform
Stage 2: Design
License Type
Summary
OEM license
•
LT Code = AS
•
•
•
•
Unwired Platform servers to be bundled with packaged applications and
redistributed.
Servers licensed for production use only; no development and testing
use allowed.
Unserved license only, same license on all server hosts (no host ID
required), no limit on CPU/cores or host configuration (single or multiple hosts, clusters, and so on).
Clients only are counted for licensing/royalties (various terms).
Available only with Enterprise Server edition.
License Deployment Models
Software licenses for Unwired Platform use the Sybase® Software Asset Management
(SySAM) system. SySAM provides two license deployment models from which to choose.
•
•
Unserved license – each license is granted for one specific host. The license file must be
stored locally, on the Unwired Platform host. The license cannot be transferred to another
host.
Served license – a license is granted for a number of hosts. The license file is stored on a
SySAM license server, and the license can be automatically acquired (checked out) by any
Unwired Platform host.
If you choose the served license model, you must deploy a SySAM license server to support
the system, and you must enable network communications between the SySAM license server
and all Unwired Platform Runtime hosts.
Refer to the SySAM Users Guide for details.
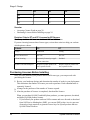
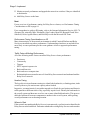
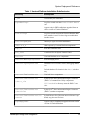
Mapping Environment to Product Editions and License Types
Once you have identified your environment type and the system design you need to support,
map those requirements to the available license types.
1. Choose a product edition for the environment into which Unwired Platform is being
installed:
Environment
Product Editions Supported
Development
ED, PD
Qualification
ED (pilot) or EE (pilot/QA testing)
Production
EE and ED
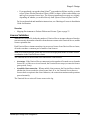
2. Choose a license type for the product edition selected:
Landscape Design and Integration
23
Stage 2: Design
SS
PD
DT
CP
X
ED
X
EE
X
X
See also
• Assessing License Needs on page 20
• Purchasing Licenses Before Installing on page 24
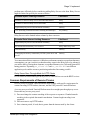
Decision Criteria: DT and CP Licenses for EE Servers
The Enterprise Server Edition is available with DT and CP licenses.
If you are choosing between these license types, review these criteria to help you evaluate
which option to choose.
Criteria
CP
DT
Usage
Production
Testing
Server license base
Per core
Per core
Client licensing
Separately licensed, per application connection
Included
Sybase Unwired WorkSpace
Requires separate product edition, separate license
Requires separate product edition, separate license
Purchasing Licenses Before Installing
Once you have identified your product edition and license type, you can proceed with
purchasing the licenses.
1. Review your landscape design, and determine the number of nodes in your deployment.
This determines the number of licenses you need to purchase. Each redundant node is
separately licensed.
2. Arrange for the purchase of the number of licenses requred.
3. After the purchase of licenses is completed, download the licenses.
When you purchase SySAM 2-enabled Sybase products, you must generate, download,
and deploy SySAM product licenses.
• If you ordered your product under an SAP® contract and were directed to download
from SAP Service Marketplace (SMP), you can use SMP at http://service.sap.com/
licensekeys (login required) to generate license keys for Sybase products that use
SySAM 2-based licenses.
24
Sybase Unwired Platform
Stage 2: Design
•
If you purchased your product from Sybase® or an authorized Sybase reseller, go to the
secure Sybase Product Download Center (SPDC) at https://sybase.subscribenet.com
and log in to generate license keys. The license generation process may vary slightly,
depending on whether you ordered directly from Sybase or from a Sybase reseller.
For license download and installation instructions, see Obtaining a License in Installation
Guide for Runtime.
See also
• Mapping Environment to Product Editions and License Types on page 23
License Validation
Attributes in a license file define the number of Unwired Server instances that are allowed to
run concurrently, the number of mobile clients that can connect to the Unwired Server, and the
license expiration date.
Each Unwired Server instance must have its own server license. In an Unwired Server cluster,
all nodes can share a common pool of mobile client licenses.
Note: In a clustered design, choose the served license deployment model to enable license
coordination in the Unwired Server cluster.
The Unwired Server checks both server and mobile client licenses.
•
•
At startup – If the Unwired Server cannot retrieve the number of licensed servers from the
license file, or if the server is not licensed, the Unwired Server stops (or enters the license
grace period, if any).
At mobile client connection – When a mobile client connects, the Unwired Server checks
whether the client exceeds the client license limit. If so, the Unwired Server throws a
license check exception to the client. Otherwise, the connection continues and operations
proceed normally.
The Unwired Server writes all license errors to the log.
Landscape Design and Integration
25
Stage 2: Design
26
Sybase Unwired Platform
Stage 3: Implement
Stage 3: Implement
The implementation stage uses the documentation produced by the design stage. IT personnel
use any documentation, for example, completed worksheets design documents, or diagrams,
as the concrete guidelines for executing and phasing the installation.
Completing Installation Worksheets
To streamline installation tasks, use the installation worksheet specific to your deployment
scenario.
You may want to start using the worksheets during the design and planning stage. They might
then be completed by the person performing the actual installation according to the design
documentation you deliver.
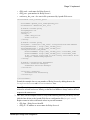
Complete the worksheet for your chosen scenario. Obtain the Excel workbook file with the
scenario worksheets by clicking: ../misc/SUP22_Worksheets.zip.
See also
• Performing the Installation on page 27
• Completing New and Upgrade Installations on page 28
• Adding Relay Servers or Reverse Proxies on page 37
• The Agentry Server in SAP Mobile Platform Clustered Environments on page 71
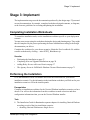
Performing the Installation
Go to the Installation Guide for Runtime and locate the instructions for your chosen
installation scenario. Use the information in the installation worksheet you filled out for your
installation scenario to fill in the installer panels.
Prerequisites
Complete an installation worksheet for the Unwired Platform installation scenario you have
chosen. You will use the information from this worksheet to make selections and enter
configuration information when you run the Unwired Platform installer.
Task
1. The Installation Guide for Runtime has separate chapters for installing Unwired Platform
according to each of the four installation scenarios:
• Installing Unwired Platform on a Single Server
Landscape Design and Integration
27
Stage 3: Implement
• Installing Unwired Platform in a Simple Load-Balancing Cluster
• Installing Unwired Platform with a Standard Microsoft Failover Cluster
• Installing Unwired Platform with a Microsoft Failover Cluster with Shared Hosts
2. After you complete the installation instructions for your Unwired Platform installation
scenario in the Installation Guide for Runtime, return to this document to complete any
postinstallation tasks.
The Installation Guide for Runtime directs you to Completing New and Upgrade
Installations on page 28
See also
• Completing Installation Worksheets on page 27
• Completing New and Upgrade Installations on page 28
• Adding Relay Servers or Reverse Proxies on page 37
• The Agentry Server in SAP Mobile Platform Clustered Environments on page 71
Completing New and Upgrade Installations
After completing a new or upgrade installation, perform any postinstallation tasks needed to
make your Unwired Platform system fully functional.
See also
• Completing Installation Worksheets on page 27
• Performing the Installation on page 27
• Adding Relay Servers or Reverse Proxies on page 37
• The Agentry Server in SAP Mobile Platform Clustered Environments on page 71
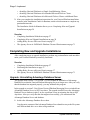
Upgrade: Uninstalling Advantage Database Server
The upgrade from version 2.1 to version 2.2 leaves behind an installation of Advantage
Database Server that the Unwired Platform Messaging Server no longer uses. After you verify
that the database has migrated properly, you may uninstall this program.
In the upgrade to version 2.2, the Sybase Unwired Platform Messaging Server switched from
Advantage Database Server to SQL Anywhere. The upgrade installer leaves the Advantage
Database Server database in place, in case a problem occurs in migrating the data to SQL
Anywhere. After you verify that the data migrated successfully, you can uninstall the
Advantage Database Server and database.
1. Archive the Advantage Database Server data.
Copy the entire contents of the Advantage Database Server data directory to the file system
on a different hard drive or to other storage medium.
28
Sybase Unwired Platform
Stage 3: Implement
On a single-server installation, the Advantage Database Server data is in SUP_HOME
\Servers\MessagingServer\Data\OBR.
• In a cluster installation:
• When the default data path used, Advantage Database Server data is under
SUP_HOME\Data\Messaging\OBR.
• When separate database file locations are specified, Advantage Database Server
data is under shared_data_path\Messaging\OBR, where
shared_data_path is the location you specified for the shared data path in your 2.1.x
or earlier installation.
• For Microsoft Failover Clusters, when separate database file locations are not
specified, the Advantage Database Server data is under shared_data_folder
\Messaging\OBR, where shared_data_folder is the location of the data folder
on the share disk set up for the Microsoft cluster.
2. Uninstall the Advantage Database Server.
a) Open the Windows Control Panel option to remove programs (for example, Add or
Remove Programs or Programs and Features).
b) Remove or uninstall Advantage Database Server for Windows... (name ending
varies).
•
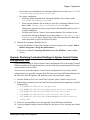
Upgrade: Restoring Customized Settings in Sybase Control Center
Configuration Files
If you modified settings in Sybase Control Center configuration files in an existing Unwired
Platform installation, the upgrade installer overwrites them and you must manually restore the
customizations in the new files.
Unless you are certain that Sybase Control Center configuration files used only default
settings before you upgraded, compare those files from your Unwired Platform backup with
the same files after the upgrade, and manually restore any customized settings.
1. From the Windows Services Control Panel, stop the Sybase Control Center service.
2. In the backup you made of your Unwired Platform installation before upgrading, locate the
following files:
• SUP_HOME\SCC-XX\bin\scc.properties
• SUP_HOME\SCC-XX\services\Messaging\service-config.xml
• SUP_HOME\SCC-XX\services\RMI\service-config.xml
• SUP_HOME\SCC-XX\services\SCC\service-config.xml
• SUP_HOME\SCC-XX\services\EmbeddedWebContainer\serviceconfig.xml
3. Locate the corresponding files in the upgraded Unwired Platform installation.
4. Copy any changed settings from the backup files into the new files, replacing any default
values.
Landscape Design and Integration
29
Stage 3: Implement
•
•
Do not overwrite an entire Sybase Control Center configuration file with the
corresponding file from the backup. You must manually and individually update
specific settings in the new files.
If you modified the MaxFormContentSize value before upgrading, its location
has changed. Before upgrading, the setting was:
-Dorg.eclipse.jetty.server.Request.maxFormContentSize
in the SUP_HOME\SCC-XX\bin\scc.properties file.
After upgrading, the setting is:
jetty.maxFormContentSize
in the SUP_HOME\SCC-XX\services\EmbeddedWebContainer
\service-config.xml file.
a) Open each file from the upgraded Unwired Platform installation side-by-side with the
corresponding file from the Unwired Platform backup.
b) Manually copy any changed settings from the backup file into the new file.
c) Save the updated new file.
5. From Windows Services, restart the Sybase Control Center service.
Enabling the Sample Database in a Production Installation
The Unwired Platform installer creates a Windows service (Sybase Unwired SampleDB) that
enables the sample database (sampledb) if you install with a Personal or Enterprise
Development license. If you have installed with an Enterprise Server (production) license and
want the sample database to be accessible, you must run a script.
Development systems are typically kept separate from production systems. The sample
database is provided for developers to use in a development system. The Enterprise Server
license is for production systems, so the Unwired Platform installer does not create the
Windows service that enables the sample database when you install Unwired Platform with an
Enterprise Server license.
If you want the sample database to be available after you have installed with an Enterprise
Server license, you can run a script to create the Windows service that enables the sample
database server.
1. Verify that the sample database service does not already exist on the Unwired Server
installation.
Open the Windows Services control panel and look for Sybase Unwired SampleDB.
2. If Sybase Unwired SampleDB does not exist:
a) In the file system where the Unwired Server is installed, go to the SUP_HOME
\Servers\UnwiredServer\bin directory, where SUP_HOME is the Unwired
Platform installation directory, down to the UnwiredPlatform folder.
b) Run the sampledb.bat script.
To create the service to start automatically, enter:
30
Sybase Unwired Platform
Stage 3: Implement
sampledb.bat install auto
To create the service to be started manually, enter:
sampledb.bat install manual
c) Start the Sybase Unwired SampleDB service you just created, either by using the
Windows Services control panel, or by entering, at the command prompt:
sampledb.bat start
For more information on the sampledb.bat script, see Create or Remove the Windows
Service for sampledb Server (sampledb) Utility in System Administration.
SAP Solution Manager
SAP Solution Manager provides tools that you can use to manage Sybase Unwired Platform as
part of your overall SAP landscape.
Use Sybase Control Center to configure a connection from Unwired Server to SAP Solution
Manager. Once connected, you can use the Solution Manager interface to view change
records, as well as perform end-to-end traces, and exception and workload analysis.
For more detailed information about configuring SAP Solution Manager to be used in
conjunction with Sybase Unwired Platform, see Maintenance of Sybase Unwired Platform in
the System Landscape.
For complete SAP Solution Manager documentation, see SAP Solution Manager Setup.
Configuring SAP Solution Manager URL
Define and maintain a URL definition associated with an SAP Solution Manager instance for
each application in the landscape. This endpoint is used to upload the business transaction
XML generated by the client device platforms in an end-to-end trace session.
1. In the left navigation pane, select Configuration.
2. In the right administration pane, click the General tab.
3. From the menu bar, select Components.
4. Select Solution Manager and click Properties.
5. In the Solution Manager Component Property dialog, enter the URL associated with the
appropriate SAP Solution manager.
Landscape Design and Integration
31
Stage 3: Implement
Sybase Control Center Postinstallation Checklist
Sybase Control Center is the remote Unwired Platform runtime administration tool. By
default, the installer configures Sybase Control Center automatically for the Unwired
Platform environment.
Task
Complete?
To avoid security exceptions when launching Sybase Control Center, set up browser
security certificates. See Setting Up Browser Certificates for Sybase Control Center
Connections in Sybase Control Center for Sybase Unwired Platform.
Log in to Sybase Control Center using the default supAdmin role with the password
you configured during installation. See Logging in to Sybase Control Center with an
Installer-Defined Password in Sybase Control Center for Sybase Unwired Platform.
Confirm that all server nodes are visible in the left navigation pane. You must manually
register any missing nodes, so they can be administered remotely. See Adding or
Updating Unwired Server Registration Properties in Sybase Control Center for Sybase
Unwired Platform.
Replace the PreConfiguredUserLoginModule with a new security provider for the
admin security configuration on the default domain. See Making "Admin" Security
Configuration Production-Ready in Security.
Security Postinstallation Checklist
Configuring security after installing runtime components is dependent upon the successful
completion of Sybase Control Center postinstallation tasks. Perform the security
postinstallation tasks once Sybase Control Center is functionally stable.
Task
Complete?
Secure the infrastructure of data tier components. See Securing the Data Infrastructure
in the Security guide.
Prepare the runtime environment according to your backup and recovery strategy, and
secure the identified backup artifacts. See Backup and Recovery in the System Administration guide.
Secure the data tier databases by changing default passwords and encrypted data in the
database file. See Securing Data Tier Databases in the Security guide.
(Upgrade) Create and map an SUP Push User logical role for each security configuration used to authorize incoming push notifications. See Mapping DCN or Push Roles
to a User Name Defined In PreconfiguredUserLoginModule in the Security guide.
32
Sybase Unwired Platform
Stage 3: Implement
Once these are complete, perform any other necessary security administration tasks. See
Securing Data in Motion Quick Start and Securing Access Quick Start in Security.
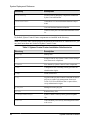
EIS Driver and SSO Postinstallation Checklist
Because EIS drivers are used in both preproduction and production environments, their setup
is time-sensitive. Before connecting to data sources from Unwired Platform, ensure that these
drivers are installed and configured correctly.
Task
Completed?
Download and install all required drivers and libraries for your EIS type.
Configure the driver in both Sybase Control Center and Sybase Unwired WorkSpace Mobile Business Object Development. See Data Source Connections in System Administration, and Creating a Data Source Connection Profile in Sybase Unwired WorkSpace - Mobile Business Object Development.
If you are configuring a driver to use SSO, also install libraries, required security
artifacts, and ensure the correct driver properties and values are configured. Remaining
SSO tasks can be completed as part of routine security administration. See Single Signon (SSO) Quick Start in the Security guide.
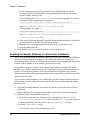
Preparing to Connect to JDBC Databases
To enable Unwired Server connections to Oracle, DB2, and Microsoft SQL Server databases,
download the appropriate JDBC driver and install it on each Unwired Server host.
1. Download the JDBC driver.
JDBC driver
URL
Oracle
http://www.oracle.com/technology/software/tech/java/sqlj_jdbc/index.html
DB2
http://www-306.ibm.com/software/data/db2/express/download.html
SQL Server
http://msdn.microsoft.com/en-us/data/aa937724.aspx
2. Install the JDBC driver.
a) Copy JDBC driver files to the SUP_HOME\Servers\UnwiredServer\lib
\3rdparty\ directory.
b) Restart Unwired Server.
c) Repeat these steps on each node in the Unwired Server cluster.
See also
• Preparing to Connect to SAP using Java Connectors on page 34
• Preparing Your SAP Environment for Single Sign-on on page 36
Landscape Design and Integration
33
Stage 3: Implement
Preparing to Connect to SAP using Java Connectors
Unwired Server can use Java Connectors (JCo) to connect to the SAP EIS. With the correct
security setup, you can also implement single sign-on (SSO) authentication.
Prerequisites
You must have an SAP account to access the SAP Web site and download libraries and
utilities.
Task
After installing the required SAP files, see Single Sign-on (SSO) Quick Start in the Security
guide.
See also
• Preparing to Connect to JDBC Databases on page 33
• Preparing Your SAP Environment for Single Sign-on on page 36
Installing the SAPCAR Utility
Unzip and install the latest SAPCAR utility on your Unwired Server or Sybase Unwired
WorkSpace host. You can use SAPCAR to extract the contents of compressed SAP files, for
example, RFC and cryptographic library files.
The installation package is available to authorized customers on the SAP Service
Marketplace. There are different distribution packages for various hardware processors.
Select the package appropriate for your platform.
1. Go to the SAP Web site at http://service.sap.com/swdc (login required).
2. From the SAP Download Center, navigate and log in to Support Packages and Patches >
Browse our Download Catalog > Additional Components.
3. Select SAPCAR.
4. Select the current version, for example, SAPCAR 7.20, then download the appropriate
SAPCAR for your platform.
See also
• Installing the SAP Cryptographic Libraries on page 35
34
Sybase Unwired Platform
Stage 3: Implement
Installing the SAP Cryptographic Libraries
Configure Secure Network Communications (SNC) for Unwired Server SAP JCo
connections. SNC may be required by your SAP EIS, if you are using SSO2 tokens or X.509
certificates for connection authentication.
Prerequisites
Download and install the SAPCAR utility, which is required to extract the contents of the
cryptographic library.
Task
Unzip and install the contents of the latest SAP Cryptographic archive on your Unwired
Server host. There are different distribution packages for various hardware processors.
Make sure you are installing the correct libraries for your environment, and into folders based
on the architecture of your machine.
1. Go to the SAP Web site at http://service.sap.com/swdc (requires login) and download the
latest SAP cryptographic library suitable for your platform.
a) Navigate to Installations and Upgrades > Browse our Download Catalog > SAP
Cryptographic Software > SAPCryptolib for Installation > SAPCRYPTOLIB
<version>.
b) Select and download the platform-specific file.
2. Create a directory into which to unzip the Cryptographic zip file. For example: C:
\sapcryptolib.
3. Copy the appropriate Windows cryptographic library for your machine (for example,
SAPCRYPTOLIB<version>.SAR) to the C:\sapcryptolib directory.
4. Open a command prompt and navigate to C:\sapcryptolib.
5. Extract the SAR file. For example:
SAPCAR_4-20002092.EXE -xvf C:\SAPCRYPTOLIB<version>.SAR -R C:\sapcryptolib
6. Copy the following into the C:\sapcryptolib directory:
•
•
•
For Itanium 64-bit processors, copy the ntia64 subdirectory contents.
For Intel 64-bit processors, copy the nt-x86_64 subdirectory contents.
For Intel 32-bit processors, copy the ntintel subdirectory contents.
7. Delete the corresponding subdirectory when files have been moved.
8. (Optional) Add the SECUDIR environment variable to the user environment batch file:
SUP_HOME\Servers\UnwiredServer\bin\usersetenv.bat.
9. If you have installed Sybase Mobile SDK, you must add the SECUDIR variable to the
following batch file: SUP_HOME\MobileSDK<version>\Eclipse
\MobileWorkSpace.bat.
Landscape Design and Integration
35
Stage 3: Implement
See also
• Installing the SAPCAR Utility on page 34
Preparing Your SAP Environment for Single Sign-on
Verify that the SAP enterprise information system (EIS) is configured correctly to accept SSO
connections from Unwired Server.
1. Set all parameters for the type of credentials accepted by the server:
• SSO2 token – verify everything is set properly with the SSO2 transaction.
• X.509 certificate – set up, import, and verify certificates using the Trust Manager
(transaction STRUST).
2. Use the ICM configuration utility to enable the ICM HTTPS port.
3. Set the type of authentication to enable communication over HTTPS.
• Server authentication only – the server expects the client to authenticate itself using
basic authentication, not SSL
• Client authentication only – the server requires the client to send authentication
information using SSL certificates. The ABAP stack supports both options. Configure
the server to use SSL with client authentication by setting the ICM/HTTPS/
verify_client parameter:
• 0 – do not use certificates.
• 1 – allow certificates (default).
• 2 – require certificates.
4. Use the Trust Manager (transaction STRUST) for each PSE (SSL server PSE and SSL
client PSE) to make the server's digitally signed public-key certificates available. Use a
public key-infrastructure (PKI) to get the certificates signed and into the SAP system.
There are no SSO access restrictions for MBO data that span multiple SAP servers.
See SAP product documentation at http://help.sap.com/saphelp_aii710/helpdata/en/
49/23501ebf5a1902e10000000a42189c/frameset.htm for information about the SAP
Trust Manager.
5. To enable secure communication, Unwired Server and the SAP server that it
communicates with must exchange valid CA X.509 certificates. Deploy these certificates,
which are used during the SSL handshake with the SAP server, into the Unwired Server
truststore.
6. The user identification (distinguished name), specified in the certificate must map to a
valid user ID in the AS ABAP, which is maintained by the transaction SM30 using table
view (VUSREXTID).
See Configuring the AS ABAP for Supporting SSL at http://help.sap.com/saphelp_aii710/
helpdata/en/49/23501ebf5a1902e10000000a42189c/frameset.htm
See also
• Preparing to Connect to JDBC Databases on page 33
• Preparing to Connect to SAP using Java Connectors on page 34
36
Sybase Unwired Platform
Stage 3: Implement
Adding Relay Servers or Reverse Proxies
Once the installation of the Unwired Platform cluster is complete, install and configure either
Relay Server or a reverse proxy, depending on the option you have selected during the design
stage.
For Relay Server, you can use either the Sybase Hosted Relay Service or installed Relay
Server binaries. For third-party reverse proxy solutions, Sybase currently recommends
Apache Reverse Proxy.
See also
• Completing Installation Worksheets on page 27
• Performing the Installation on page 27
• Completing New and Upgrade Installations on page 28
• The Agentry Server in SAP Mobile Platform Clustered Environments on page 71
Using Sybase Hosted Relay Service for Testing
The Sybase Hosted Relay Service is an alternative to local Relay Server installation, for
temporary use with development and test systems only. It is particularly suitable for a personal
Unwired Platform system.
Prerequisites
•
•
All Unwired Servers and data tier servers must be installed and running.
The Unwired Server cluster and its nodes must be registered in Sybase Control Center.
Note: If the cluster or server name does not appear in the navigation pane, on the SCC console,
you must register them with Sybase Control Center.
Task
Subscribe online to the Sybase Hosted Relay Service, and configure your Unwired Platform
system with the information you provide during subscription.
1. Register Unwired Server with the relay service.
a) Register or log in to the Sybase Hosted Relay Service at https://
relayserver03.sybase.com/ias_relay_server/account/index.php.
Complete any mandatory fields, then click Submit.
b) From the navigation bar on the left, click Manage Account.
c) Click Add New Sybase Unwired Platform Farm.
Create one or more farms as required by your development or test environment.
Landscape Design and Integration
37
Stage 3: Implement
•
•
•
•
Select at least one farm type.
Select DCN farm only if you are registering a scale-out node.
Select MBS farm for Hybrid Web Container applications.
Enter the farm name, which serves as the farm ID in Sybase Control Center. The
suffix RBS or MBS is appended to the end of the farm name, depending on the farm
type you select.
• Enter the server name, which is used as the server node ID in Sybase Control
Center. The server name can contain only alphanumeric characters.
d) Click Create Farm.
e) Click Configuration Instructions from the confirmation message.
Keep this page open, or make a copy of these details so you have them available for
further configuration tasks in Sybase Control Center and on the client devices.
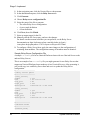
2. Use Sybase Control Center to register the hosted relay service as a Relay Server.
a) Click the Sybase Unwired Platform cluster, and open the Relay Servers tab, then click
New.
b) Enter general configuration information from the configuration instructions, then click
Next.
Host
relayserver.sybase.com
HTTP port
80
HTTPS port
443
c) Enter the server farm (Unwired Server cluster) information.
Farm ID
Copy the farm name from the configuration instructions
Type
Messaging or Replication
d) Click +, then click the farm ID field.
e) Enter the node ID.
Use the server name you registered with the hosted relay service.
f) Enter the token.
Copy the token string from the configuration instructions and paste it in the field.
g) Click + to add the server node to the list, then Finish.
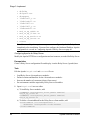
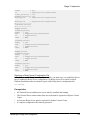
3. Create outbound enablers (RSOEs) to connect with the hosted relay service.
a) In the left pane, under Servers > <Mobile Server name>, select Server
Configuration.
b) Select the Outbound Enabler tab.
c) Click + New to create the RSOEs.
d) Select the RSOE details, then click Finish.
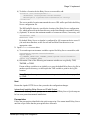
4. Start all RSOEs.
a) Select some or all RSOEs, then click Start.
38
Sybase Unwired Platform
Stage 3: Implement
The Status column should show Running.
b) Select one or more RSOEs, then click Retrieve Log.
Review log messages to ensure each RSOE is running correctly.
Record the connection property values shown on the Configuration Instructions page to share
with developers and device users.
Developers must use those values to configure an Unwired Server connection profile, and to
set values in the Connection screen of a mobile application.
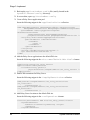
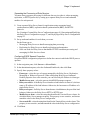
Installing Relay Server for Production Environments
A Relay Server supports most environments and application types, including those
applications connecting as an HTTP client.
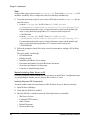
1. Installing a Relay Server
Install each Relay Server instance on a Web server host, on the DMZ subnet.
2. Configuring Relay Servers and Outbound Enablers
Configure Relay Servers and outbound enablers (OEs) to support load balancing in an
Unwired Server cluster.
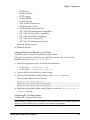
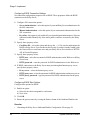
Installing a Relay Server
Install each Relay Server instance on a Web server host, on the DMZ subnet.
Prerequisites
You must provision an appropriate Web server host for each Relay Server.
See also
• Configuring Relay Servers and Outbound Enablers on page 46
Installing Relay Server on Apache
Install Relay Server executables and libraries on an Apache HTTP Server (Linux) host.
Relay Server executables and libraries are supplied in an archive file, located on the
installation media at: modules\relayserver\.
1. Identify the appropriate archive for the Apache host architecture.
•
•
32-bit system – relayserver_linux_x86.tar.gz
64-bit system – relayserver_linux_x64.tar.gz
2. Copy the Relay Server archive file to the Apache host, and extract the archive into a Relay
Server installation directory.
For example: /usr/local/relayserver/
3. Copy the following files from the Relay Server installation to the Apache modules/
directory:
Landscape Design and Integration
39
Stage 3: Implement
•
•
•
•
•
•
•
•
•
•
•
•
•
dbfhide
dblgen12.res
dbsupport
libdbicu12_r.so
libdbicudt12.so
libdblib12.so
libdblib12_r.so
libdbtasks12.so
mod_rs_ap_admin.so
mod_rs_ap_client.so
mod_rs_ap_monitor.so
mod_rs_ap_server.so
rshost
Note: Because of Apache requirements, you cannot configure Apache for Relay Server
immediately after installation. You must first configure the Outbound Enablers. Apache
configuration is covered in Configuring Apache for Relay Server on page 40.
Configuring Apache for Relay Server
Modify the Apache HTTP Server configuration and environment, as needed for Relay Server.
Prerequisites
Create a Relay Server configuration file and deploy it on the Relay Server (Apache) host.
Task
Edit the Apache httpd.conf and envvars files to:
•
•
•
•
Load Relay Server client and server modules
Define locations and handlers for the client and server modules
Increase the number of concurrent clients (if necessary)
Set environment variables required by Relay Server executables
1. Open httpd.conf in a text editor.
a) To load Relay Server modules, add:
LoadModule iarelayserver_client_module modules/
mod_rs_ap_client.so
LoadModule iarelayserver_server_module modules/
mod_rs_ap_server.so
a) To define a LocationMatch for the Relay Server client module, add:
<LocationMatch /cli/iarelayserver/* >
SetHandler iarelayserver-client-handler
</LocationMatch>
40
Sybase Unwired Platform
Stage 3: Implement
b) To define a Location for the Relay Server server module, add:
<Location /srv/iarelayserver/* >
SetHandler iarelayserver-server-handler
RSConfigFile "/apache-install/modules/rs.config"
</Location>
The server module Location must match the server URL suffix specified in the Relay
Server configuration file.
The RSConfigFile directive specifies the location of the Relay Server configuration
file, which must reside in the same directory as the State Manager executable (rshost).
c) (Optional) To increase the maximum number of concurrent clients, if necessary, add.
ServerLimit 1000
MaxClient 1000
By default, Relay Server on Apache is configured for 100 concurrent device users. If
you need more than that, set the ServerLimit and MaxClient directives to an
appropriate value.
2. Open envvars in a text editor.
a) To set and export environment variables required for Relay Server executables, add:
path="$path:/apache-install/modules"
export $path
LD_LIBRARY_PATH="$LD_LIBRARY_PATH:/apache-install/modules"
export $LD_LIBRARY_PATH
b) Determine if one of the following environment variables are set globally: TMP,
TMPDIR, or TEMP.
If none of those variables is set globally, or to save the default Relay Server log file in
another specific directory, set and export the TMP variable to point to the log file
location.
Note: The Apache user process must have write permission in the directory specified
by $TMP.
Next
Restart the Apache HTTP Server after you make the configuration changes.
Interactively Installing Relay Server on IIS with Scripts
(Recommended) Use quick setup scripts to interactively install Relay Server. Quick setup can
be less error-prone than manual installations.
Prerequisites
Follow the prerequisites identified in the quick setup script. You cannot install Relay Server
until the script verifies that the prerequisites have been met.
Landscape Design and Integration
41
Stage 3: Implement
Task
Output of this setup script is saved to rs-setup.log. The existing rs-setup.log, IIS
metabase, and Relay Server configuration files are backed up automatically.
1. Locate the quick setup script for your version of IIS, and review the readme.txt file for
your IIS version.
• Launch rs-setup.bat for IIS 6 from SUP_HOME\Servers
\SQLAnywhere12\MobiLink\relayserver\IIS\QuickSetup_IIS6.
For information about this script, see http://infocenter.sybase.com/help/index.jsp?
topic=/com.sybase.help.sqlanywhere.12.0.1/relayserver/ml-relayservers-5692444.html.
• Launch rs-setup.bat for IIS 7 from SUP_HOME\Servers
\SQLAnywhere12\MobiLink\relayserver\IIS\QuickSetup_IIS7.
For information about this script, see http://infocenter.sybase.com/help/index.jsp?
topic=/com.sybase.help.sqlanywhere.12.0.1/relayserver/ml-relayservers-5692444a.html
2. Follow the prompts to install files in the correct location and to configure IIS for Relay
Server use.
The script guides you through:
• IIS customization
• Backup creation
• Installation and Relay Server startup
• Generation and launch of a Quick Reference document
• Generation and launch of a status page
• Launch of a SimpleTestApp client
Manually Installing Relay Server on IIS
Perform prerequisites, then install Relay Server binaries on an IIS host. Configuration steps
vary, depending on whether you are using an IIS version 6 or 7 host.
Installing Required IIS Components
You must enable certain roles and features in IIS for Relay Server to function correctly.
1. Open IIS Server Manager.
2. Verify that the IIS Role is enabled.
3. Once the IIS Role is enabled, ensure the following features are installed:
•
•
•
•
•
42
Web Server Service
Common HTTP Features
Static Content
Default Document
Directory Browsing
Sybase Unwired Platform
Stage 3: Implement
•
•
•
•
•
•
•
•
•
•
•
•
•
HTTP Errors
ISAPI Extensions
HTTP Logging
Request Monitor
Request Filtering
Static Content Compression
IIS Management Console
IIS Management Scripts and Tool
(IIS 7 only) IIS 6 Management Compatibility
(IIS 7 only) IIS 6 Metabase Compatibility
(IIS 7 only) IIS 6 WMI Compatibility
(IIS 7 only) IIS 6 Scripting Tools
(IIS 7 only) IIS 6 Management Console
Install any missing features.
4. Restart the IIS host.
Installing Relay Server Binaries on an IIS Host
Install Relay Server executables and libraries on an IIS host.
Relay Server executables and libraries are supplied in an archive file, located on the
installation media at: modules\relayserver\
1. Identify the appropriate archive for the IIS host architecture.
•
•
32-bit system — relayserver.zip
64-bit system — relayserver_x64.zip
2. Copy the Relay Server archive file to the IIS host.
3. Extract all files and folders from the archive to the wwwroot\ directory.
The following subdirectories are created:
wwwroot\ias_relay_server\
wwwroot\ias_relay_server\Client\
wwwroot\ias_relay_server\Server\
4. Modify the system Path variable on the IIS host to include the ias_relay_server
\Server\ directory.
Configuring IIS 7 for Relay Server
Configure IIS 7 to host a Relay Server.
Note: This task configures IIS for anonymous access to Relay Server. Configure appropriate
security for IIS and Relay Server, based on your business requirements.
Landscape Design and Integration
43
Stage 3: Implement
1. Back up the applicationHost.config file (usually located in the
System32\inetsrv\config\ directory).
2. In a text editor, open applicationHost.config.
3. Create a Relay Server application pool.
Insert the following snippet in the <applicationPools> collection:
<add name="RelayServer" queueLength="65535" autoStart="true"
managedRuntimeVersion="" managedPipelineMode="Integrated">
<processModel identityType="LocalSystem"
idleTimeout="00:00:00"
maxProcesses="20" pingingEnabled="false"
pingInterval="00:00:30" pingResponseTime="00:01:30" />
<recycling disallowOverlappingRotation="true">
<periodicRestart time="00:00:00">
<schedule>
<clear />
</schedule>
</periodicRestart>
</recycling>
<failure rapidFailProtection="false" />
<cpu resetInterval="00:00:00" />
</add>
4. Add the Relay Server application to the default Web site.
Insert the following snippet in the <site name="Default Web Site"> element:
<application path="/ias_relay_Server"
applicationPool="RelayServer">
<virtualDirectory path="/"
physicalPath="C:\Inetpub\wwwroot\ias_relay_server" />
</application>
5. Enable Web extensions for Relay Server.
Insert the following snippet in the <isapiCgiRestriction> collection.
<add path="C:\Inetpub\wwwroot\ias_relay_server\Client
\rs_client.dll"
allowed="true" />
<add path="C:\Inetpub\wwwroot\ias_relay_server\Server
\rs_server.dll"
allowed="true" />
6. Add Relay Server locations to the default Web site.
Insert the following snippet in the <configuration> element.
<location path="Default Web Site/ias_relay_server/client">
<system.webServer>
<handlers accessPolicy="Execute, Script">
</handlers>
</system.webServer>
44
Sybase Unwired Platform
Stage 3: Implement
</location>
<location path="Default Web Site/ias_relay_server/server">
<system.webServer>
<handlers accessPolicy="Execute, Script">
</handlers>
</system.webServer>
</location>
<location path="Default Web Site/ias_relay_server">
<system.webServer>
<security>
<authentication>
<anonymousAuthentication userName="" />
</authentication>
<requestFiltering>
<requestLimits
maxAllowedContentLength="2147483647" />
</requestFiltering>
</security>
</system.webServer>
</location>
7. Save your changes.
8. Open a Web browser, and confirm that http://localhost:80 loads the default page
correctly.
Configuring IIS 6 for Relay Server
Use the IIS Manager Console to configure IIS 6 for Relay Server.
1. Start the IIS Manager Console.
2. Create a Relay Server application pool.
a) Right-click Application Pools and create a new application pool.
b) Right-click the newly created application pool and select Properties to edit its
properties.
c) Open the Performance tab, and deselect Shutdown Worker Processes After Being
Idle.
d) Open the Recycling tab, and deselect Recycle Worker Processes (In Minutes).
3. Enable Web extensions for Relay Server.
a) Right-click the newly created Web site, ias_relay_server, and select
Properties to edit its properties.
b) Open the Directory tab.
c) Set execute permissions to Scripts And Executables.
d) Click Create under Application Settings.
e) Select the Relay Server application pool you created.
Landscape Design and Integration
45
Stage 3: Implement
f) Under Web Service Extensions, select Add New Web Service Extensions, enter
Extension Name and Request Files, and select Set Extension Status to Allowed, to
allow both rs_server.dll and rs_client.dll to be run as ISAPI.
4. Configure IIS for Unwired Platform Runtime device clients to communicate with Relay
Server:
a) Navigate to \Inetpub\AdminScripts.
b) Run the following console command:
cscript adsutil.vbs set w3svc/1/uploadreadaheadsize 0
iisreset
If you do not perform this configuration step, you see:
Could not connect to the Server. Session did not complete.
5. Enable anonymous access, using an appropriate user name and password for an
administrative group, or using build-user IUSR_%computername% for directory
security.
Grant permission for the user to access the IIS metabase:
C:\Windows\Microsoft.Net\Framework\<Version>
\aspnet_regiis.exe -ga IUSR_%computername%
Configuring Relay Servers and Outbound Enablers
Configure Relay Servers and outbound enablers (OEs) to support load balancing in an
Unwired Server cluster.
Prerequisites
•
•
All Unwired Servers and data tier servers must be installed and running.
The Unwired Server cluster and its nodes must be registered in Sybase Control Center.
Note: If the cluster or server name do not appear in the navigation pane, on the SCC console,
you must register them with Sybase Control Center.
46
Sybase Unwired Platform
Stage 3: Implement
Task
The diagram above illustrates an Unwired Platform Runtime cluster with two Unwired Server
nodes, using two Relay Servers, with Apache acting as a load balancer. This document focuses
on this configuration, while providing information on what to do differently to set up different
configurations, for example:
•
•
More than two Relay Servers
Hardware load balancer in place of Apache
See also
• Installing a Relay Server on page 39
Configuring Unwired Server to use Relay Server
Choose a method for configuring Unwired Server to use Relay Server, then generate a Relay
Server configuration file. Copy the file to the Relay Server host, and distribute the same
configuration file to multiple Relay Server nodes.
This task applies only to a Relay Server installed on the LAN. It does not apply to the Sybase
Hosted Relay Server.
Note: If you are creating a custom Relay Server configuration, go to Creating a Custom Relay
Server Configuration on page 49.
If you are using a quick configuration, continue with Creating a Quick Configuration on page
48.
Landscape Design and Integration
47
Stage 3: Implement
Creating a Quick Configuration
Create a Relay Server configuration primarily with system defaults, and create outbound
enabler (OE) processes for each Unwired Server.
1. In the navigation pane, click the Unwired Server cluster name.
2. In the administration pane, click the Relay Servers tab.
3. Click Quick Configure.
4. Specify these property values:
Values vary for load balanced environments. If you do not configure load balancer values,
outbound enablers bypass the load balancer and high availability is compromised if a
direct Relay Server connection fails.
•
•
•
•
•
•
Host – if the Relay Server farm has a load balancer in front of it, the host name or IP
address of the load balancer. Otherwise, the host name or IP address of a single Relay
Server.
HTTP port – if the Relay Server farm has a load balancer in front of it, the port of the
load balancer. Otherwise, the Relay Server HTTP port.
HTTPS port – if the Relay Server farm has a load balancer in front of it, the port of the
load balancer. Otherwise, the Relay Server HTTPS port.
URL suffix – the URL suffix used by the Outbound Enabler to connect to a Relay
Server. The value you set depends on whether Relay Server is installed on IIS or
Apache hosts. For IIS, use /ias_relay_server/server/
rs_server.dll . For Apache use/srv/iarelayserver/.
Replication or Messaging or Web Service (for scale-out nodes) farm token – the
security token used by the Outbound Enabler to authenticate its connection with the
Relay Server. Assign a token string (up to 2048 characters); one token can be shared by
all farm types. The replication and messaging farm token values can be the same.
(Optional) Description – a user-defined description of the Relay Server.
5. (Optional) Select Advanced settings and specify these property values:
•
•
HTTP user – user name for OE authentication on the Web server (Relay Server host).
HTTP password – password for OE authentication on the Web server.
6. (Optional) Configure connection values to required Internet proxy servers:
•
•
•
•
Proxy server host – host name of the Internet proxy server.
Proxy server port – connection port on the Internet proxy server.
HTTP proxy user – user name for OE authentication on the Internet proxy server.
HTTP proxy password – password for OE authentication on the Internet proxy
server.
7. Click OK to generate a Relay Server configuration file, and the OE processes for each
Unwired Server.
48
Sybase Unwired Platform
Stage 3: Implement
Properties in the [backend_farm] and [backend_server] sections are populated
automatically, based on the Unwired Server cluster name and host name.
An outbound enabler instance is automatically created for the RBS and MBS synchronization
ports, and for each enabled HTTP/HTTPS port for the Unwired Server host. For scale-out
nodes, an outbound enabler instance is automatically created for each enabled HTTP/S port.
The ports are not started.
Next
Review the values in the Relay Server configuration file, and edit if necessary.
Continue with Generating and Modifying Relay Server Configuration File on page 51.
Creating a Custom Relay Server Configuration
Create a Relay Server configuration by specifying all configuration property values.
1. Launching the Relay Server Configuration Wizard
Launch the Relay Server Configuration wizard to create a configuration file with
customized property values.
2. Setting Relay Server General Properties
Set basic connection properties for the Relay Server.
3. Defining Server Farms and Cluster Nodes
Set connection properties for the Unwired Server cluster and its constituent nodes.
Launching the Relay Server Configuration Wizard
Launch the Relay Server Configuration wizard to create a configuration file with customized
property values.
1. In the navigation pane, click the Unwired Server cluster name.
2. In the administration pane, click the Relay Servers tab.
3. Click New.
Setting Relay Server General Properties
Set basic connection properties for the Relay Server.
Prerequisites
Launch the Relay Server configuration wizard.
Task
1. Specify property values.
Configure values for the load balancer that is in front of the Relay Server farm. Values vary
for load balanced environments. If you do not configure load balancer values, outbound
Landscape Design and Integration
49
Stage 3: Implement
enablers bypass the load balancer and high availability is compromised if a direct Relay
Server connection fails.
• Host – if the Relay Server farm has a load balancer in front of it, the host name or IP
address of the load balancer. Otherwise, the host name or IP address of a single Relay
Server.
• HTTP port – if the Relay Server farm has a load balancer in front of it, the port of the
load balancer. Otherwise, the Relay Server HTTP port.
• HTTPS port – if the Relay Server farm has a load balancer in front of it, the port of the
load balancer. Otherwise, the Relay Server HTTPS port.
For IIS, the value identifies the relative path for rs_client.dll. If your IIS
directory structure is different, modify this value accordingly.
•
Note: If Relay Server uses HTTPS and certificates, clients other than those using
replication-based synchronization may not be able to connect: messaging applications
support only HTTP, and Hybrid Web Container applications for iOS support HTTPS,
but not certificates.
URL suffix – the URL suffix used by the Outbound Enabler to connect to a Relay
Server. The value you set depends on whether Relay Server is installed on IIS or
Apache hosts. For IIS, use /ias_relay_server/server/
rs_server.dll . For Apache use/srv/iarelayserver/.
For IIS, the value identifies the relative path for rs_client.dll. If your IIS
directory structure is different, modify this value accordingly.
Note: For IIS, the value identifies the relative path for rs_client.dll. If your IIS
directory structure is different, modify this value accordingly.
For IIS, the value identifies the relative path for rs_client.dll. If your IIS
directory structure is different, modify this value accordingly.
• (Optional) Description – a user-defined description of the Relay Server.
2. Add or remove HTTP credentials as required:
a) Select Configure relay server HTTP credentials.
b) To add new credentials, specify these property values and click +:
•
User name – user name for RSOE authentication on the Web server (Relay Server
host).
• Password – password for RSOE authentication on the Web server.
c) To remove credentials from the list, select the corresponding user name, then click
X.
3. Click Next.
50
Sybase Unwired Platform
Stage 3: Implement
Defining Server Farms and Cluster Nodes
Set connection properties for the Unwired Server cluster and its constituent nodes.
1. Define the Unwired Server cluster.
a) Specify these property values:
• Farm ID – a string that identifies the Unwired Server cluster for which the Relay
Server manages requests. This property is case-sensitive, and must match the value
in the Outbound Enabler configuration.
• Type – the type of request managed by the Relay Server: Replication, Messaging
or Webservice protocol. When configuring Relay Server Outbound Enabler
properties for a scale-out node, you can select only the Webservice farm type.
• (Optional) Description – user-defined description for the Unwired Server cluster.
b) Click +.
c) Repeat steps 1 and 2 to add multiple Unwired Server clusters.
d) To delete a configured Unwired Server cluster, select it in the list, then click the X
button.
2. Identify each Unwired Server instance in the cluster.
a) Select an existing Unwired Server cluster.
b) Specify these property values:
• Node ID – a string that identifies the Unwired Server in the cluster. This property is
case-sensitive, and it must match the value in the RSOE configuration.
• Token – the security token used by the Outbound Enabler to authenticate its
connection with the Relay Server. Assign a token string (up to 2048 characters);
one token can be shared by all farm types.
c) Click +.
d) Repeat steps 1 and 2 to add Unwired Server cluster nodes.
e) To delete a configured Unwired Server node, select it in the list and click X.
3. Click Next to review your settings, or click Finish to exit the wizard.
Note: After you exit the wizard, generate the Relay Server configuration file, and copy it to
each Relay Server instance to update configuration for multiple Relay Servers.
The Relay Server is registered with Sybase Control Center, and can be managed from the
Relay Servers tab for the Unwired Server cluster.
Generating and Modifying the Relay Server Configuration File
Generate all or part of a Relay Server configuration file. Then transfer the generated file to all
Relay Server hosts.
Generating a configuration file extracts the property values stored in the cluster database
during the configuration process, and writes them to a file. You may still need to edit this file.
Landscape Design and Integration
51
Stage 3: Implement
1.
2.
3.
4.
5.
6.
7.
8.
9.
In the navigation pane, click the Unwired Server cluster name.
In the administration pane, click the Relay Servers tab.
Click Generate.
Choose Relay server configuration file.
Select the parts of the file to generate:
• The entire Relay Server configuration
• A server node definition
• A farm definition
Click Next, then click Finish.
Select an output target for the file.
Manually edit the file if necessary, and save the changes.
For details on other manual edits that you can perform, see the Relay Server
documentation at http://infocenter.sybase.com/help/index.jsp?topic=/
com.sybase.help.sqlanywhere.12.0.1/relayserver/relayserver12.html.
To configure a Relay Server farm, apply the same changes to the configurations of
remaining farm members. The configuration among all members must be identical.
Sample Relay Server Configuration File
A sample rs.config file for an Unwired Platform cluster with two Unwired Server nodes
and two Relay Servers.
This is an example of an rs.config file you might generate for two Relay Servers that
support an Unwired Platform cluster made up of two Unwired Servers. After generating it,
you would copy it to each Relay Server host and use it to update the Relay Server
configuration.
#-------------------# Relay server peers
#-------------------[relay_server]
enable
= yes
host
= 10.172.155.150
http_port
= 80
https_port
= 443
description
= Machine #1 in RS farm
[relay_server]
enable
host
http_port
https_port
description
=
=
=
=
=
yes
10.172.148.40
5011
443
Machine #2 in RS farm
#--------------# Backend farms
#--------------[backend_farm]
52
Sybase Unwired Platform
Stage 3: Implement
enable
=
id
=
client_security =
backend_security=
description
=
yes
supqa-serv012.obqastress2
off
off
supqa-serv012.obqastress2
description
= supqa-serv012.obqastress2
#----------------# Backend servers
#----------------#supqa-serv01
[backend_server]
enable
= yes
farm
= supqa-serv012.obqastress2
id
= supqa-serv01
token
= MBS
[backend_server]
enable
= yes
farm
= supqa-serv012.obqastress2
id
= supqa-serv011
token
= MBS
#supqa-serv02
[backend_server]
enable
= yes
farm
= supqa-serv012.obqastress2
id
= supqa-serv02
token
= MBS
[backend_server]
enable
= yes
farm
= supqa-serv012.obqastress2
id
= supqa-serv021
token
= MBS
Deploying a Relay Server Configuration File
After you generate a Relay Server configuration file, you must copy it to each Relay Server
host, to update the Relay Server configuration. All Relay Servers in a cluster Unwired
Platform installation must use identical copies of the Relay Server configuration file,
rs.config.
Prerequisites
•
•
•
•
All Unwired Servers and data tier servers must be installed and running.
The Unwired Server cluster and at least one node must be registered in Sybase Control
Center.
At least one Relay Server must be registered in Sybase Control Center .
A complete configuration file must be generated.
Landscape Design and Integration
53
Stage 3: Implement
Task
1. Edit the generated configuration file, if necessary to refine property values in the generated
Relay Server configuration file.
For complete reference details on Relay Server configuration properties, see http://
infocenter.sybase.com/help/topic/com.sybase.help.sqlanywhere.12.0.1/relayserver/mlrelayserver-config-file.html.
2. Place the new rs.config in the same directory as rshost.exe.
3. To update an existing Relay Server with the new configuration, run:
rshost –u –f Path\rs.config
For example, on IIS, using the default configuration file location, the command is:
rshost –u –f C:\RelayServer\SQLAnywhere12\MobiLink\relayserver
\IIS\Bin64\Server\rs.config
Configuring the Outbound Enablers
Set up one or more outbound enablers (OEs) for each Unwired Server, connecting to the load
balancer, as identified in a Relay Server configuration.
Prerequisites
•
•
At least one Relay Server must be registered in Sybase Control Center.
A complete configuration must be defined.
Task
1. Separating the Processing of Data Services
You must always separate processing for different data services (that is, either messaging,
replication, or HTTPS protocols) by setting up a separate Relay Servers and outbound
enablers for each protocol.
2. Configuring RSOE General Properties
Set general RSOE configuration properties to define the context in which the RSOE
process operates.
3. Configuring RSOE Connection Settings
Set connection configuration properties for an RSOE. These properties define the RSOE
connection to the Relay Server.
4. Configuring RSOE Start Options
Configure start options for RSOE.
5. Generating the Relay Server Outbound Enabler Configuration File
To quickly and easily replicate a common outbound enabler (RSOE) configuration to
multiple hosts, generate an RSOE configuration file.
54
Sybase Unwired Platform
Stage 3: Implement
Separating the Processing of Data Services
You must always separate processing for different data services (that is, either messaging,
replication, or HTTPS protocols) by setting up a separate Relay Servers and outbound
enablers for each protocol.
1. Create separate Relay Server farms for applications using messaging-based
synchronization (MBS), replication-based synchronization (RBS), and HTTPS
protocols.
See Creating a Custom Relay Server Configuration on page 49, Generating and Modifying
the Relay Server Configuration on page 51, and Deploying a Relay Server Configuration
on page 53.
2. Set up outbound enablers for each farm you create.
Set the Farm type to:
• Messaging Relay Servers to handle messaging data processing.
• Replication for Relay Servers to handle replication synchronization.
• Scale-out Node for Relay Servers that handle HTTPS- based data processing and
messaging for Web Services clients.
Configuring RSOE General Properties
Set general RSOE configuration properties to define the context in which the RSOE process
operates.
1. In the navigation pane, click Servers > <ServerNode>.
2. In the administration pane, select the Outbound Enabler tab, then click New.
3. Specify these property values:
• Farm type – select the type of request managed by the Relay Server: Replication,
Messaging or Webservice protocol. When configuring Relay Server Outbound
Enabler properties for a scale-out node, you can select only the Webservice farm type.
• Mobile Server port – select the port on which RSOE manages requests.
• Relay server host – if the Relay Server farm has a load balancer in front of it, the host
name or IP address of the load balancer. Otherwise, the host name or IP address of a
single Relay Server.
• Relay server port – for Relay Server farms that use a load balancer, the port of the load
balancer. Otherwise, the Relay Server HTTP or HTTPS port.
• Mobile Server farm – select the string that identifies the Unwired Server cluster, for
which the Relay Server manages requests. This property is case-sensitive, and it must
match the value in the Relay Server configuration.
• Server node ID – select the string that identifies the Unwired Server in the cluster. This
property is case-sensitive, and must match the value in the Relay Server configuration.
4. Click Next.
Landscape Design and Integration
55
Stage 3: Implement
Configuring RSOE Connection Settings
Set connection configuration properties for an RSOE. These properties define the RSOE
connection to the Relay Server.
1. Configure SSL connection options:
• Server Authentication – select this option if you want Relay Server authentication for
the SSL connection.
• Mutual Authentication – select this option if you want mutual authentication for the
SSL connection.
• Key Alias – this option is only enabled if you selected mutual authentication. Select an
outbound enabled identify key alias whose public certificate is trusted by the Relay
Server.
2. Specify these property values:
• Certificate file – select this option and choose the .CRT file used to authenticate the
RSOE to Relay Server. You can choose this file only if you have already loaded it into
the Unwired Server certificate store and your Relay Server Port selection is HTTPS:
443 in General Properties.
3. Specify these property values:
•
HTTP user – select the user name for RSOE authentication on the Web server (Relay
Server host).
• HTTP password – enter the password for RSOE authentication on the Web server.
4. If RSOE connections to the Relay Server must pass through an Internet proxy server,
specify these property values:
•
•
•
Proxy server – select the Internet proxy server.
HTTP proxy user – select the user name for RSOE authentication on the proxy server.
HTTP proxy password – type the password for RSOE authentication on the proxy
server.
Configuring RSOE Start Options
Configure start options for RSOE.
1. Enable an option:
a) Select the box that corresponds to each name.
b) Set a value.
2. Click OK.
3. Ensure the process starts by viewing the Status column of the Outbound Enablers tab.
See also
• Generating the Relay Server Outbound Enabler Configuration File on page 58
56
Sybase Unwired Platform
Stage 3: Implement
Outbound Enabler Start Options Reference
Review available outbound enabler start options, which affect outbound enabler logging.
Each outbound enabler has its own log file that you can retrieve in Sybase Control Center.
Option
Default
Description
Verbosity level
0
Sets log file verbosity values:
•
•
•
•
0 – log errors only. Use this
logging level for deployment.
1 – session-level logging.
This is a higher level view of
a session.
2 – request-level logging.
Provides a more detailed
view of HTTP requests
within a session.
3 - 5 – detailed logging.
Used primarily by Technical Support.
Reconnect delay
5
Delay before retry after connection fails.
Maximum output file size
10KB
Maximum log file size.
Truncate log file
None
Delete the log file at RSOE
startup.
Advanced
None
User-defined value for start parameters. See Outbound Enabler in SQL Anywhere 12.0.1 at
http://infocenter.sybase.com/
help/index.jsp?topic=/com.sybase.help.sqlanywhere.12.0.1/
relayserver/ml-relayservers-6039420.html .
Landscape Design and Integration
57
Stage 3: Implement
Generating the Relay Server Outbound Enabler Configuration File
To quickly and easily replicate a common outbound enabler (RSOE) configuration to multiple
hosts, generate an RSOE configuration file.
Administrators can use Sybase Control Center to configure an initial RSOE for development.
Once a configuration proves valid and stable, the administrator can generate the RSOE
configuration file, then use regRelayServer.bat to apply it to Unwired Server hosts.
1. In the left navigation pane of Sybase Control Center, click the Unwired Server cluster
name.
2. In the right administration pane, click the Relay Servers tab.
3. Select one or more relay server configurations.
4. Click Generate.
5. Choose Outbound enabler configuration XML file, then click Next.
6. Click Finish.
7. Select an output target for the file.
See also
• Configuring RSOE Start Options on page 56
Configuring State Manager as a Service
Set up the State Manager process to run as a service on the Relay Server host.
This task uses the dbsvc utility on the Web server host, which is installed from the Relay
Server archive file, supplied on the Sybase Unwired Platform Runtime installation media.
1. Open a command shell window, and set the current directory to the location of the dbsvc
executable.
2. Enter the following at the prompt.
•
•
IIS host (Windows)
dbsvc -as -s auto -t rshost -w SUPRelayServer "C:\Inetpub
\wwwroot\ias_relay_server\Server\rshost.exe" -q -qc -f
"C:\Inetpub\wwwroot\ias_relay_server\Server\rs.config" o "C:\Sybase\logs\rs.log"
Note: The log file path you specify with -o must exist, before you invoke dbsvc.
Apache host (Linux)
dbsvc -y -a apache_user -t rshost -w SUPRelayServer -q qc -f /apache_install/modules/rs.config -os 100K -ot /
tmp/rs.log
Substitute parameter values shown here to match your configuration.
58
Sybase Unwired Platform
Stage 3: Implement
This command configures the State Manager process (rshost) as a service.
3. To start the State Manager service:
•
•
•
•
From the Windows Services Control Panel, right-click SQL Anywhere SUPRelayServer and select Start.
From a Linux command shell:
a. Make sure the State Manager service runs under the same user credentials as the
Apache service.
b. Change the current directory to:
• IIS host (Windows) C:\Inetpubs\wwwroot\ias_relay_server
\Server
• Apache host (Linux) /apache_install/modules/
c. At the command prompt, enter:
dbsvc -u SUPRelayServer
You can stop the State Manager service either from the Windows Services control
panel, or by entering the following at a command shell prompt:
dbsvc -x SUPRelayServer
You can uninstall the State Manager service by entering the following at a command
shell prompt:
dbsvc -d SUPRelayServer
Installing a Load Balancer
(Applies only to deployments with two or more Relay Servers.) You can use either a software
or a hardware load balancer to get the best performance out of your Relay Servers.
You should be able to use any hardware or software load balancer with the Relay Servers you
have installed to support your Unwired Platform cluster. This document describes how to use
Apache 2.2, with proxy load balancing.
If you are using a hardware load balancer, see the product documentation for instructions on
setting it up.
If you are using a software load balancer other than Apache 2.2, see the program
documentation for instructions on setting it up.
Using Relay Server with a Third-Party Load Balancer
You can use Relay Server with hardware or software load balancers to create Relay Server
farms. However, sessions must be persisted.
1. To balance loads for a Relay Server farm, use a load balancer in front of the farm you
create.
2. Ensure that the load balancer is configured to use session persistence (also known as sticky
sessions) for all application traffic (packets).
Landscape Design and Integration
59
Stage 3: Implement
The load balancer must persist with the same Unwired Server and Relay Server connection
properties throughout the life cycle of the communication session.
Configuring Apache 2.2 as a Load Balancer
To use Apache 2.2 and later as a software load balancer, edit the Apache configuration file to
enable mod_proxy and mod_proxy_balancer and set up the load-balancing features.
Prerequisites
Review the relevant Apache reference documentation:
•
•
mod_proxy – http://httpd.apache.org/docs/2.2/mod/mod_proxy.html
mod_proxy_balancer – http://httpd.apache.org/docs/2.2/mod/
mod_proxy_balancer.html
Task
1. Install Apache 2.2 or later on a server in your DMZ.
2. Secure the server.
Do not enable proxying until your server is secure.
3. Enable mod_proxy, mod_proxy_balancer.
Uncomment the following lines in the Apache Web Server configuration file
(httpd.conf):
# mod_proxy - core module for proxying:
LoadModule proxy_module modules/mod_proxy.so
# mod_proxy_balancer implements clustering and load balancing:
LoadModule proxy_balancer_module modules/mod_proxy_balancer.so
4. On Linux, build Apache with these modules enabled.
5. Enable additional modules as needed.
Uncomment the lines for any additional modules for which you need the functionality. See
the Apache documentation at http://httpd.apache.org/docs/2.2/mod/.
6. On Windows, use the template below to set up load balancing between your Relay Servers.
Add the lines below to the Apache Web Server configuration file (httpd.conf).
Replace terms in italics with actual values in your environment:
• Apache_port – Apache server port number.
• Apache_srvr_name – Apache server name.
• host_id – virtual host ID.
• host_port – virtual host port number.
• RS_farm – Relay Server farm ID.
• RS#_IP – IP address or server name for Relay Server #.
60
Sybase Unwired Platform
Stage 3: Implement
•
•
•
RS#_node – node name for Relay Server #.
RS#_port – port number for Relay Server #.
webserver_doc_root – doc root in file system used by Apache Web server.
<VirtualHost host_id:host_port>
ServerName Apache_srvr_name:Apache_port
DocumentRoot webserver_doc_root
# Enable forward proxy
ProxyRequests On
ProxyVia On
<Proxy *>
Order deny,allow
Allow from all
</Proxy>
# Enable reverse proxy
ProxyPass / balancer://RS_farm/ stickysession=X-SUP-SESSID
ProxyPassReverse / http://RS1_IP:RS1_port/
ProxyPassReverse / http://RS2_IP:RS2_port
<Proxy balancer://RS_farm>
BalancerMember http://RS1_IP:RS1_port/ route=RS1_node
BalancerMember http://RS2_IP:RS2_port/ route=RS2_node
# Set counting algorithm to more evenly distribute work:
ProxySet lbmethod=byrequests
</Proxy>
# Enable load balancer management
<Location /balancer-manager>
SetHandler balancer-manager
</Location>
<Directory "htdocs">
AllowOverride AuthConfig
</Directory>
</VirtualHost>
Extend the example above to any number of Relay Servers by adding them to the
ProxyPassReverse and BalancerMember lists.
Note: The stickysession parameter is required to support client request routing, also
referred to as back-end server affinity, so that the load balancer always sends a device's
request to the same server.
7. On Linux, use the template below to set up load balancing between your Relay Servers.
Add the lines below to the Apache Web Server configuration file (httpd.conf).
Replace terms in italics with actual values in your environment:
• RS_farm – Relay Server farm ID.
• RS#_IP – IP address or server name for Relay Server #.
Landscape Design and Integration
61
Stage 3: Implement
•
•
•
RS#_node – node name for Relay Server #.
RS#_port – port number for Relay Server #.
RS1#_srvr – server name for Relay Server #.
# Enable forward proxy
ProxyRequests On
ProxyVia On
<Proxy *>
Order deny,allow
Allow from all
</Proxy>
<Proxy balancer://mycluster>
BalancerMember http://RS1_IP:RS1_port/ route=RS1_node
loadfactor=5 route=RS1_srvr
BalancerMember http://RS2_IP:RS2_port/ route=RS2_node
loadfactor=5 route=RS2_srvr
# Set counting algorithm to more evenly distribute work:
ProxySet lbmethod=byrequests
</Proxy>
# Enable reverse proxy
ProxyPass / balancer://RS_farm/ stickysession=X-SUP-SESSID
ProxyPassReverse / http://RS1_IP:RS1_port
ProxyPassReverse / http://RS2_IP:RS2_port
# Enable load balancer management
<Location /balancer-manager>
SetHandler balancer-manager
Order Deny,Allow
Allow from all
</Location>
Configuring Apache as a Load Balancer for the EIS Back End
When you use Apache as a load balancer for the EIS back end, some of the configuration file
settings are different from those for Apache as a load balancer on the front end.
1. If the load balancer connects to SAP Data Orchestration Engine – DOE to load balancer to
Unwired Platform cluster to device – use the settings below.
Add the lines below to the Apache Web Server configuration file (httpd.conf).
Replace terms in italics with actual values in your environment:
• DOE_cluster – DOE cluster ID
• US#_IP – IP address for Unwired Server #
• US#_node – node name for Unwired Server #
• US#_port – port number for Unwired Server #
ProxyPass / balancer://DOE_cluster/ stickysession=X-SUP-SESSID
ProxyPassReverse / http://US1_srvr:US1_port/doe/publish
ProxyPassReverse / http://US2_srvr:US2_port/doe/publish
<Proxy balancer://DOE_cluster>
BalancerMember http://US1_srvr:US1_port/doe/publish
62
Sybase Unwired Platform
Stage 3: Implement
route=US1_node
BalancerMember http://US2_srvr:US2_port/doe/publish
route=US2_node
Extend the example above to any number of Unwired Servers by adding them to the
ProxyPassReverse and BalancerMember lists.
2. If the load balancer connects to SAP MobileGateway – MobileGateway to load balancer to
Unwired Platform cluster to device – use the settings below in place of the corresponding
settings in Configuring Apache 2.2 as a Load Balancer on page 60.
Add the lines below to the Apache Web Server configuration file (httpd.conf).
Replace terms in italics with actual values in your environment:
• DOE_cluster – DOE cluster ID.
• US#_IP – IP address for Unwired Server #.
• US#_node – node name for Unwired Server #.
• US#_port – port number for Unwired Server #.
Note: The only difference in the settings below, relative to the settings for DOE, is the
omission of "/doe/publish" in the references to Unwired Server instances.
ProxyPass / balancer://DOE_cluster/ stickysession=X-SUP-SESSID
ProxyPassReverse / http://US1_srvr:US1_port
ProxyPassReverse / http://US2_srvr:US2_port
<Proxy balancer://DOE_cluster>
BalancerMember http://US1_srvr:US1_port route=US1_node
BalancerMember http://US2_srvr:US2_port route=US2_node
Extend the example above to any number of Unwired Servers by adding them to the
ProxyPassReverse and BalancerMember lists.
Tips for Tuning Your Relay Server Configuration on IIS
Increase performance of Relay Servers hosted by IIS Web server.
Tuning your Relay Server configuration is a complex, iterative process that is beyond the
scope of this document to cover in detail. This topic provides some basic tips to get you started
on IIS. For instructions on implementing these tips, see the Microsoft documentation for your
version of IIS.
1. Use a separate application pool for ias_relay_server\client and ias_relay_server\server.
2. For the ias_relay_server\client application pool:
a) Disable the request queue limit.
b) Increase the Web garden size to 4 times the number of CPU cores.
3. For the ias_relay_server\server application pool, set the Web garden size to 1.
4. Use a 64-bit Windows OS to get past the 32-bit limits nonpaged pool memory and virtual
address space.
Landscape Design and Integration
63
Stage 3: Implement
5. Monitor network performance and upgrade the network or switches if they are identified
as bottlenecks.
6. Add Relay Servers to the farm.
Next
For an overview of performance tuning for Relay Server clusters, see Performance Tuning
Considerations on IIS on page 64.
For a comprehensive guide to IIS tuning, refer to the Internet Information Services (IIS) 7.0
Resource Kit, written by Mike Volodarsky, Olga Londer, Brett Hill, Bernard Cheah, Steve
Schofield, Carlos Aguilar Mares, and Kurt Meyer with the Microsoft IIS Team.
Performance Tuning Considerations on IIS
Many characteristics of the network environment in which Unwired Platform and Relay
Servers are installed can reduce performance. Understanding what these are and which are
most likely to cause problems provides some guidance in how to approach performance
tuning.
Traffic Factors Affecting Performance
All of the following traffic factors can affect Relay Server cluster performance:
•
•
•
•
•
•
•
Persistency
Concurrency
Timeout
HTTP request/response size
Back-end farm size
Back-end server compute time
Relationship between transfer rates of client-Relay Server network and outbound enablerRelay Server network
Iterative Tuning
The key objective in performance tuning is to identify the bottlenecks, or limiting points, in the
overall system so you can increase capacity where needed.
In practice, you must iteratively test with a targeted set of loads for your business and factor in
traffic patterns at different times of day, especially at peak levels. Identify the bottlenecks in
the overall system and then tune to relieve one or more identified bottlenecks. This process
shifts the bottleneck from one component to another in the overall system, while gaining
overall performance on each tuning iteration.
Where to Start
If the network surrounding the Relay Servers is not saturated, your first iteration identifies the
Relay Servers as the bottleneck. Determine whether the existing Relay Servers can be tuned to
64
Sybase Unwired Platform
Stage 3: Implement
perform more efficiently before considering adding Relay Servers to the farm. Relay Servers
might be limited in speed by the resources below.
Potential Speed Limiting Resource
Likelihood
Network I/O between Relay Servers and outbound enablers
Likely
Network I/O between Relay Servers and clients
Likely
Application pool process (IIS) and thread availability
Unlikely
CPU (including overhead on context switching and interrupts)
Very unlikely
Relay Servers can be limited in data volume by these resources.
Potential Data Volume Limiting Resource
Likelihood
Application pool process (IIS) and thread availability
Likely
Pre-allocated shared memory of a fixed size
Likely under heavy load
Virtual memory
Unlikely
Nonpaged pool memory consumed by HTTPS system driver and
kernel
Unlikely
You can monitor all these resources via Windows performance monitor except shared memory
consumption; you can view this in a shared memory report in the Relay Server log whenever
you archive the log. Tuning these elements, except shared memory size, falls under general IIS
tuning practices. Separating rs_client.dll and rs_server.dll into different
application pools enables resource partitioning and makes fine-tuning possible.
Relay Server Pass-Through Mode for HTTP Clients
HTTP clients can connect through a Relay Server to Unwired Server to use the REST services.
Common Requirements of Reverse Proxies
Reverse proxies used with Unwired Platform must comply with specific requirements for
content encoding, HTTP headers, timeouts, and the URL passed to Unwired Platform.
A reverse proxy used with Unwired Platform must be a straight pass-though proxy server.
Ensure that any reverse proxy used:
1. Does not change the content encoding of the requests or responses. Chunked transfer
encoding is the required data transfer mechanism. Content-length encoding is not
supported.
2. Does not remove any HTTP headers.
3. Sets a timeout period, if used, that is greater than the timeout used by the clients.
Landscape Design and Integration
65
Stage 3: Implement
4. Passes the resulting URL to Unwired Platform Runtime in the form, http://
Host_Name:Port_No.
Using a Reverse Proxy in Front of Relay Server
Configure a dedicated port for the Relay Server port, configure separate ports and contexts for
each Relay Server farm.
This task implements the configuration policies using an Object API application as the
example. The configuration details for Hybrid apps, Odata SDK, DOE applications, and
REST applications are similar.
1. Configure one port to serve each Relay Server port.
If you map an /smp/relayserver context of http://reverseProxy:8080 to
http://relayServer:80, the /smp/relayserver context must be added as a
prefix of the URL suffix of the Relay Server.
For example, set /smp/relayserver/ias_relay_server/client/
rs_client.dll as ConnectionProperties.UrlSuffix, and set /smp/
relayserver/ias_relay_server/client/rs_client.dll/RBSFarm
as the ConnectionProfile.StreamParams.Url_Suffix for synchronization.
The FarmId is set separately for ConnectionProperties.
2. Configure two ports, with each port serving one Relay Server farm.
For example, if you map the root context of http://reverseProxy:5001 to
http://relayserver:80/ias_relay_server/client/
rs_client.dll/MBSFarm, and map the root context of http://
reverseProxy:2480 to http://relayserver:80/ias_relay_server/
client/rs_client.dll/RBSFarm, the Object API application then can set
connection properties to connect directly to Unwired Server.
3. Configure two contexts, with each context serving one Relay Server farm.
For example, if you map the /smp/message context of http://reverseProxy:
8080 to http://relayserver:80/ias_relay_server/client/
rs_client.dll/MBSFarm, and map the /smp/mobilink context of http://
reverseProxy:8080 to http://relayserver:80/ias_relay_server/
client/rs_client.dll/RBSFarm, the Object API application needs to set the
URL suffix (/smp/message for registering the application and /smp/mobilink for
synchronization). This is just like connecting to Sybase Unwired Platform through a Relay
Server that is not installed at the default location. The difference is that there no FarmId
for a reverse proxy.
Using a Reverse Proxy with Mutual SSL Authentication
Configure the reverse proxy to connect to Unwired Server using mutual SSL authentication,
then set up specific certificate requirements.
If applications need to connect to Sybase Unwired Platform using mutual SSL authentication:
66
Sybase Unwired Platform
Stage 3: Implement
1. Configure the reverse proxy to connect the mutual SSL port of Unwired Server.
2. Configure the reverse proxy to trust the Unwired Server certificate.
3. Configure the reverse proxy to use an impersonator client certificate to connect Unwired
Platform. The client certificate must be mapped to the "SUP Impersonator" role for all
security configurations.
4. Configure the reverse proxy to require a client certificate.
5. Configure the reverse proxy with all trusted CA certificates of Unwired Platform, in order
to accept all client certificates which can be accepted by Unwired Platform.
6. Configure the reverse proxy to forward the client certificate as a SSL_CLIENT_CERT
HTTP header to the Unwired Server, in order for the server to retrieve and authenticate
it.
Below is a sample configuration of an Apache reverse proxy. It maps the root context of port
8082 to https://sup-serve:8002 (the default mutual SSL port).
Listen 8082
<VirtualHost *:8082>
ServerName proxy-server
# activate HTTPS on the reverse proxy
SSLEngine on
SSLCertificateFile "C:/Apache2.2/conf/proxy-server.crt"
SSLCertificateKeyFile "C:/Apache2.2/conf/proxy-server.key"
SSLCertificateChainFile "C:/Apache2.2/conf/proxy-server-ca.crt"
# activate the client certificate authentication
SSLCACertificateFile "C:/Apache2.2/conf/trusted-client-ca.crt"
SSLVerifyClient require
SSLVerifyDepth 10
SSLProxyEngine On
SSLProxyCACertificateFile C:/Apache2.2/conf/sup-server-ca.crt
SSLProxyMachineCertificateFile C:/Apache2.2/conf/proxyclient.pem
# initialize the special headers to a blank value to avoid http
header forgeries
RequestHeader set SSL_CLIENT_CERT ""
<Location />
4.add SSL_CLIENT_CERT header to forward real client
certificate
RequestHeader set SSL_CLIENT_CERT "%{SSL_CLIENT_CERT}s"
ProxyPass https://sup-server:8002/
ProxyPassReverse https://sup-server:8002/
</Location>
</VirtualHost>
Using Apache Reverse Proxy for HTTP Clients
For organizations with HTTP clients designed to consume Unwired Server services via scaleout nodes, you can optionally implement an Apache Reverse Proxy instead of a Relay Server
in your production environment.
For an example of how to implement an Apache Reverse Proxy, see:
Landscape Design and Integration
67
Stage 3: Implement
1. Installing Apache Reverse Proxy
Download and install the Apache Reverse Proxy.
2. Configuring the Reverse Proxy with httpd.conf
Edit the httpd.conf file to load modules required prepare the Reverse Proxy for Unwired
Platform use.
3. Mapping Proxy Ports to SMP Ports
For reverse proxy, you must map proxy ports to Sybase Unwired Platform ports.
Installing Apache Reverse Proxy
Download and install the Apache Reverse Proxy.
1. Download Apache 2.2 from a reliable source.
2. Install the proxy according to package instructions.
Configuring the Reverse Proxy with httpd.conf
Edit the httpd.conf file to load modules required prepare the Reverse Proxy for Unwired
Platform use.
For information about running a reverse proxy in Apache, see http://www.apachetutor.org/
admin/reverseproxies. For information about SSL and proxy modules, see http://
httpd.apache.org/docs/2.2/mod/mod_ssl.html and http://httpd.apache.org/docs/2.2/mod/
mod_proxy.html.
1. In a text editor, open Apache2.2\conf\httpd.conf .
2. Uncomment these lines to load headers, and required SSL and proxy modules.
LoadModule
LoadModule
LoadModule
LoadModule
LoadModule
headers_module modules/mod_headers.so
ssl_module modules/mod_ssl.so
proxy_module modules/mod_proxy.so
proxy_connect_module modules/mod_proxy_connect.so
proxy_http_module modules/mod_proxy_http.so
The three proxy_* modules are required by three proxy modes: HTTP, 1-way HTTPS,
and 2-way HTTPS. The ssl_module is required by both HTTPS proxy modes. The
headers_module is required by 2-way HTTPS proxy mode.
3. Add these lines to enable port 8080 as an HTTP proxy.
##############################
Listen 8080
<VirtualHost *:8080>
ServerName proxy-server
ErrorLog "C:/Apache2.2/logs/error.log"
TransferLog "C:/Apache2.2/logs/access.log"
<Location/>
ProxyPass http://sup-server:8000/
ProxyPassReverse http://sup-server:8000/
</Location>
68
Sybase Unwired Platform
Stage 3: Implement
</VirtualHost>
##############################
4. Add these lines to enable port 8081 as a 1-way HTTPS proxy.
##############################
Listen 8081
<VirtualHost *:8081>
ServerName proxy-server
ErrorLog "C:/Apache2.2/logs/error.log"
TransferLog "C:/Apache2.2/logs/access.log"
# activate HTTPS on the reverse proxy
SSLEngine on
SSLCertificateFile "C:/Apache2.2/conf/proxyserver.crt"
SSLCertificateKeyFile "C:/Apache2.2/conf/proxyserver.key"
SSLCertificateChainFile "C:/Apache2.2/conf/proxyserver-ca.crt"
SSLProxyEngine On
SSLProxyCACertificateFile C:/Apache2.2/conf/supserver-ca.crt
<Location />
ProxyPass https://sup-server:8001/
ProxyPassReverse https://sup-server:8001/
</Location>
</VirtualHost>
5. Add these lines to enable port 8082 as a 2-way HTTPS proxy.
##############################
Listen 8082
<VirtualHost *:8082>
ServerName proxy-server
ErrorLog "C:/Apache2.2/logs/error.log"
TransferLog "C:/Apache2.2/logs/access.log"
# activate HTTPS on the reverse proxy
SSLEngine on
SSLCertificateFile "C:/Apache2.2/conf/proxyserver.crt"
SSLCertificateKeyFile "C:/Apache2.2/conf/proxyserver.key"
SSLCertificateChainFile "C:/Apache2.2/conf/proxyserver-ca.crt"
# activate the client certificate
authentication
SSLCACertificateFile "C:/Apache2.2/conf/trustedclient-ca.crt"
SSLVerifyClient require
SSLVerifyDepth 10
SSLProxyEngine On
SSLProxyCACertificateFile C:/Apache2.2/conf/supserver-ca.crt
SSLProxyMachineCertificateFile C:/Apache2.2/conf/
proxy-client.pem
# initialize the special headers to a blank value to
avoid http header forgeries
RequestHeader set SSL_CLIENT_CERT ""
<Location />
Landscape Design and Integration
69
Stage 3: Implement
certificate
# add
SSL_CLIENT_CERT header to forward real client
RequestHeader set SSL_CLIENT_CERT "%
{SSL_CLIENT_CERT}s"
ProxyPass https://sup-server:8002/
ProxyPassReverse https://sup-server:8002/
</Location>
</VirtualHost>
##############################
6. Save the file.
7. Validate the configuration by opening a browser and testing these URLs.
•
•
•
https://proxy-server:8080/debug/app1
https://proxy-server:8081/debug/app1
https://proxy-server:8082/debug/app1
See also
• Mapping Proxy Ports to SMP Ports on page 70
Decrypting Certificates for HTTPS Connections
The Apache 2.2 Windows version does not support encrypted certificate key files. If the key
file is encrypted, you must first decrypt it.
1. To decrypt an encrypted file, from a command prompt, run:
openssl rsa -in encrypted.key -out decrypted.key
2. Use the decrypted key in the httpd.conf file.
Mapping Proxy Ports to SMP Ports
For reverse proxy, you must map proxy ports to Sybase Unwired Platform ports.
For reverse proxy information, see:
•
•
Sybase Control Center for Sybase Unwired Platform, see:
• Configuring Web Container Properties
• Configuring a Replication Listener
• Configuring Messaging Properties
• Setting Relay Server General Properties
Security, see Port Number Reference
See also
• Configuring the Reverse Proxy with httpd.conf on page 68
70
Sybase Unwired Platform
Stage 3: Implement
The Agentry Server in SAP Mobile Platform Clustered
Environments
The Agentry Server runs in the standard SAP Mobile Platform clustered environment. The
following items are important to note concerning the configuration of the Agentry Server and
the network environment when running in the SAP Mobile Platform clustered environment:
•
•
The network environment must include a load balancer that sits logically between the
Agentry Clients and the Agentry Servers within the SAP Mobile Platform nodes within the
cluster. The configuration of this load balancer is separate and different from the load
balancer for other archetypes within SAP Mobile Platform in that Agentry client-server
communications do are not routed through the relay server.
As a part of the communications security between the Agentry Clients and Agentry Server
there is an encryption key which includes a public and private key pairing. For each
Agentry Server this key pairing is unique by default. The result of this behavior is that an
Agentry Client is tied to a given Agentry Server after its initial transmit. Attempting to
connect with another Agentry Server with a different encryption key will result in an error
and will not complete successfully. For this reason, the utility AgentryKeyUtility is
provided with each Agentry Server installation and is used to export the encryption key
from on Agentry Server instance and to then import this key into all other Agentry Server
instances within a cluster.
For information on using the AgentryKeyUtility see the procedure SAP Mobile
Platform Clustering: Configuring Agentry Applications. For additional guidance on
configuring a load balancer, read on.
Load Balancer and SAP Mobile Platform Cluster with Agentry Applications
The load balancer configuration for Agentry applications operating within the SAP Mobile
Platform cluster is a typical configuration. The instructions provided for other archetypes
within the SAP Mobile Platform are not applicable to Agentry applications.
The configuration of the load balancer should meet the following criteria:
•
•
•
The load balancer should sit logically within the network between the Agentry Clients and
the SAP Mobile Platform cluster.
The Agentry Clients should all connect to the IP address and port of the load balancer.
The load balancer should redirect traffic from Agentry Clients to the Agentry Servers
running within the SAP Mobile Platform cluster directly. This traffic must not be routed
through the relay server provided with SAP Mobile Platform, which is used for other
archetypes within the platform.
There are no additional requirements beyond those of a standard load balancer
implementation. The client-server communications for Agentry applications use standard
TCP/IP communications as a part of the ANGEL connect type for transmit configurations.
Landscape Design and Integration
71
Stage 3: Implement
See also
• Completing Installation Worksheets on page 27
• Performing the Installation on page 27
• Completing New and Upgrade Installations on page 28
• Adding Relay Servers or Reverse Proxies on page 37
SAP Mobile Platform Clustering: Configuring Agentry Applications
Prerequisites
The following items must be addressed prior to performing this procedure:
•
•
It is assumed that each node in the SAP Mobile Platform cluster has been installed and
configured.
Review information on the Agentry Server utility: AgentryKeyUtility.
Task
This procedure provides the steps specific to Agentry applications to configure such
applications, specifically the Agentry Server and network environment, to run in the SAP
Mobile Platform clustered environment.
This procedure describes the steps necessary to migrate the Agentry Server’s encryption keys
for client-server communications.
1. Stop the Agentry Server application for all nodes in the cluster using the SAP Control
Center.
2. In the primary node installation location of the SAP Mobile Platform, navigate to the
directory: C:\SAP\MobilePlatform\Servers\AgentryServer
3. Execute the command agentryKeyUtility -export=fileName where
fileName is the name of the key file to be created.
4. Copy the file created to the directory C:\SAP\MobilePlatform\Servers
\AgentryServer of the next node in the cluster.
5. Execute the command agentryKeyUtility -import=fileName where
fileName is the name of the key file created in the earlier step in this procedure.
6. Start the Agentry Server application for all nodes in the cluster using the SAP Control
Center.
7. Deploy the application to the nodes of the cluster per documented procedures.
The encryption key has been migrated to all nodes in the cluster, allowing the Agentry Clients
to connect with any of the Agentry Servers.
72
Sybase Unwired Platform
Stage 3: Implement
Next
Deploy the mobile application to the nodes in the cluster per the documented procedures.
Configure the network load balancer to direct client-server communications appropriately to
the Agentry Servers within the cluster. Test the application thoroughly according to standard
testing procedures.
Landscape Design and Integration
73
Stage 3: Implement
74
Sybase Unwired Platform
System Deployment Reference
System Deployment Reference
Reference information that supports Unwired Platform system deployment tasks.
Port Number Reference
Components of Sybase Unwired Platform rely on communication ports for inter-process
coordination, data transfer, and administrative access.
Unwired Server Ports
Unwired Server ports, default assignments, and protocols.
Type
Default
Protocol
Administration, Unwired
Server
2000
IIOP
2001 (secure)
IIOPS
HTTP listeners
5001
HTTP
(used for application con- 8000
nections, REST/OData
8001 (secure)
APIs, and data change
notifications)
HTTP
Messaging service administration
5100
HTTP
Replication
2480
HTTP
2481 (secure)
HTTPS
HTTPS
See also
• Unwired Platform Port Accommodation on page 7
Landscape Design and Integration
75
System Deployment Reference
Data Tier Ports
Data tier server ports, default assignments, and protocols.
Type
Default
Protocol
Cache database (CDB)
server, client access
5200
Command sequence on connection to Unwired Server
replication engine
Tabular Data Stream™ (TDS) on JDBC connection
TCP and UDP, when using Windows Filtering Platform (WFP)
Cluster database server,
client access
5300
TDS
Monitor DB, client access
5400
TDS
domainlog DB, client ac- 5400
cess
TDS
See also
• Unwired Platform Port Accommodation on page 7
Sybase Control Center Ports
Ports used by Sybase Control Center services, default assignments, and protocols.
Type
Default
Protocol
RMI service
9999
TCP/IP
Messaging service
2100
TCP/IP
SCC repository database
server
3638
TDS
Web container
8282
HTTP
8283
HTTPS
See also
• Unwired Platform Port Accommodation on page 7
76
Sybase Unwired Platform
System Deployment Reference
Sybase Control Center Port Assignments
Port assignments for Sybase Control Center services are defined in XML configuration files.
Sybase Control Center service configuration files are named service-config.xml, and
located in subdirectories under the SCC_HOME\SCC-X_X\services\ directory.
SCC Service
Configuration File Location
Messaging service
...\services\Messaging\
RMI service
...\services\RMI\
SCC repository database server
...\services\SccSADataserver\
Web container
...\services\EmbeddedWebContainer\
To change the port assigned to an Sybase Control Center service, edit the serviceconfig.xml file for that service.
Relay Server Ports
By default, Relay Server uses standard, IANA-assigned ports for HTTP (80) and HTTPS
(443).
See also
• Unwired Platform Port Accommodation on page 7
Reserved Ports
Ports reserved for internal use by Unwired Platform components.
Type
Number
Protocol
Reserved
4343
TDS
Reserved
5011
HTTP
Reserved
6001
HTTP for SAP Introscope Agent
Reserved
8002
HTTPS
Do not use these reserved ports.
See also
• Unwired Platform Port Accommodation on page 7
Landscape Design and Integration
77
System Deployment Reference
Other Ports
Significant ports that are not directly associated with an Unwired Platform server component.
SySAM License Server
If you deploy Unwired Platform with the served license model, all Unwired Platform hosts
must have network access to the license server port, on the SySAM license server host.
Type
Default
SySAM license server
27000
Protocol
Sample Database Server
Both Personal Development Server and Enterprise Development Server Editions include a
sample database, which is installed on the Unwired Server host, for tutorials and simple
testing.
Type
Default
Protocol
Sample database
5500
TDS
The Enterprise Server Edition includes a sample database, but it is not enabled. To enable the
sample database installed with Enterprise Server Edition, see Create or Remove the Windows
Service for sampledb Server (sampledb) Utility in System Administration.
See also
• Unwired Platform Port Accommodation on page 7
Installation Directories
To ensure a successful installation, review the Sybase Unwired Platform server component
installation directories.
•
•
The following tables show the high-level directories created in a single-node installation
(all Unwired Platform server components installed on a single host).
In a multi-node or cluster installation, some of these directories are present only on a
particular type of host.
By default, Unwired Platform server components are installed in the C:\Sybase
\UnwiredPlatform directory. In this guide, SUP_HOME represents the Unwired
Platform installation directory, down to the UnwiredPlatform folder.
78
Sybase Unwired Platform
System Deployment Reference
Table 1. Unwired Platform Installation Subdirectories
Directory
Description
_jvm
JVM used by the uninstaller.
supXXebflogs
Log files created each time installebf.bat is
run.
Appears only in EBF installations upgraded from an
earlier version of Unwired Platform.
InstallLogs
Log files created each time the Unwired Platform Runtime installer is used. Use these logs to troubleshoot
installer issues.
IntroscopeAgent
Introscope Agent for 64-bit Installations.
JDKx.x.x_x
JDK required by Unwired Platform components.
sapjco
SAP Java Connector files.
scc_cert
Certificate files for Sybase Control Center.
Servers
Unwired Platform server components.
Servers\MessagingServer
SAP messaging server.
Servers\SQLAnywherexx
Database server for cache, cluster, and logging databases.
Default database file location is the data\ subdirectory.
Servers\UnwiredServer
Unwired Server components.
Servers\UnwiredServer
\doe-c_clu
Sybase SAP® Data Orchestration Engine Connector
(DOE-C) Command Line Utility components.
CLU.bat in bin directory starts the DOE-C console.
Servers\UnwiredServer
\doecSvlet
Sybase SAP® Data Orchestration Engine Connector
(DOE-C) runtime components.
Servers\UnwiredServer\licenses
SySAM license files. When an unserved license is updated, copy the new files here.
supXXupgrade
Appears only in installations upgraded from an earlier
version of Unwired Platform.
Landscape Design and Integration
79
System Deployment Reference
Directory
Description
ThirdParty
License terms of third-party components included in
Sybase Unwired Platform.
Uninstallers
Uninstallers for Unwired Platform Runtime components.
Unwired Platform Runtime uninstaller.
Util
Utilities used by the Unwired Platform Runtime installer.
By default, Sybase Control Center components are installed in the directory.
Note: If you have other Sybase products installed on the same host as Unwired Server, you
may have more than one version of Sybase Control Center.
Table 2. Sybase Control Center Installation Subdirectories
80
Directory
Description
backup
Backup files.
bin
Scripts to start or stop Sybase Control Center management framework components.
common
Files shared by Sybase Control Center components.
conf
Configuration files, including security providers for
administration logins.
ldap
LDAP-related files.
log
Log files used by Sybase Control Center and its console
plug-ins to capture only management framework
events. No Unwired Platform data is captured here,
except administration logins.
plugins
Managed resource plug-ins.
rtlib
Runtime library files.
sccRepoPwdChange
Sybase Control Center repository password update
files.
server
Class and library files used by the management framework server.
Sybase Unwired Platform
System Deployment Reference
Directory
Description
services
Class and library files for Sybase Control Center services.
shared
Shared class and library files.
templates
Sybase Control Center service or plug-in template files.
Service Reference
Services are installed on each Unwired Platform server host to support managing and
coordinating component processes.
Unwired Server Services
Services installed on an Unwired Server host.
Note: Some services may not be installed on an Unwired Server host, depending on the
Unwired Platform product option, the deployment scenario and system design, and the
licensed product edition.
Service
Description
Sybase Unwired Server
Top-level Unwired Server process. Coordinates other
processes that handle interactions with EIS services,
supports messaging and synchronization service to
mobile clients, and provides Unwired Platform system
management facilities.
Sybase Control Center X.X
Includes processes for managing, monitoring, and controlling distributed Unwired Platform server resources,
and a Web app server for remote SCC console access.
Sybase Unwired SampleDB (optional)
Database server for sample database, enabled during
installation only with Evaluation license, and with Personal Development Server and Enterprise Development Server licensed product editions.
To enable with Enterprise Server Edition after installation, see Create or Remove the Windows Service for
sampledb Server (sampledb) Utility in System Administration.
Landscape Design and Integration
81
System Deployment Reference
Data Tier Services
Services installed on a data tier host.
Note: Some services may not be installed on a data tier host, depending on the Unwired
Platform product option, the deployment scenario and system design, and the licensed product
edition.
Service
Description
Sybase Unwired CacheDB
Database server that manages the cache database, used
primarily to support mobile clients that depend on occasional synchronization of local data stores.
Sybase Unwired ClusterDB
Database server that manages the cluster database,
which supports Unwired Server runtime management
and operational processes.
Sybase Unwired LogDataDB
Database server that manages the Unwired Server logging databases (system logging and domain logging).
When the data tier is installed in a single-node system:
•
•
The Sybase Unwired ClusterDB and Sybase Unwired LogDataDB services are not
installed.
The Sybase Unwired CacheDB service manages the cache database, cluster database, and
logging databases.
Starting Required Services
Before beginning development, you must start required Unwired Platform services.
Prerequisites
Ensure the required services are installed on the same host.
Task
By starting required services, you start the servers and dependent services. For a complete list
of Unwired Platform services, see System Administration > System Reference > Unwired
Platform Windows Services.
1. Click the Start Unwired Platform Services desktop shortcut to start Unwired Server and
the dependent services.
2. Use the Services Control Panel to verify that the Windows service named Sybase Control
Center X.X is started. If it has not, start it by selecting the service and clicking Start.
82
Sybase Unwired Platform
System Deployment Reference
Starting and Stopping Unwired Server
You can start and stop Unwired Server in different ways, depending on the use context.
Review this table to understand which method you should use.
Method
Use When
Services Started or Stopped
Sybase Control Center Un- Stopping or starting remote Unwired Unwired Server service only
wired Server list
Server nodes
Desktop shortcut
Stopping or starting Unwired Server All runtime services installed on
locally
that host
Windows Services panel
Stopping or starting Unwired Server Any combination of individual
locally
services that require stopping
Note: You cannot start a Scale-out node from Sybase Control Center. If you stop a Scale-out
node, you must start it manually.
Landscape Design and Integration
83
System Deployment Reference
84
Sybase Unwired Platform
Index
Index
A
Advantage Database Server
uninstalling after upgrade 28
Apache
Relay Server configuration 51
Apache Reverse Proxy
configuring with httpd.conf 68
decrypting certificates for HTTPS connections
70
installing 68
preparing for HTTP clients 67
B
BlackBerry Enterprise Server
connection to Unwired Server 17
C
clustered systems 14
data tier clusters 14
load balancing 15
Unwired Server clusters 14
communication ports 75
conflict 7
data tier 76
Relay Server 77
reserved 77
Sybase Control Center 76, 77
SySAM license server 78
Unwired Server 75
configuration
SCC services 77
configuration files
Relay Server 47, 53
Relay Server sample 52
connections
hosted relay service 37
preparing 9
D
data tier
cluster host provisioning 4
Landscape Design and Integration
communication ports 6, 7
in cluster 14
installation directories 78
ports reference 76
services 82
databases
JDBC drivers 33
DB2 JDBC drivers 33
designing the landscape 19
E
enterprise information system (EIS) driver
postinstallation checklist 33
enterprise mobility system life cycle
stage 1: assess 3
stage 2: design 13
stage 3: implement 27
F
failover clusters
data tier hosts 4
shared storage resource 14
H
host systems
provisioning data tier 4
provisioning resources 3
provisioning Unwired Server 4
Unwired Platform host requirements 3
host-base intrusion prevention software (HIPS) 6
hosted relay service 37
I
IIS
Relay Server configuration 51
implementation
completing worksheets first 27
installation
beginning 27
completing 28
directories 78
85
Index
intrusion detection/prevention software 6
IT infrastructure 13
J
JDBC drivers 33
L
landscape options 13
clustered systems 14
enhanced load balancing 15
single-server installation 13
license options 20
assessing needs 20
deployment models 23
DT vs. CP licenses type with Enterprise Server
edition 24
environments and product editions 20
license types 22
license validation 25
mapping environment to product editions and
license types 23
product editions 21
purchasing before installing 24
license types 22
licenses
deployment models 23
product editions 21
types 22
validation 25
load balancing 15
client connections 15
client connections with BES 17
client guidelines 8
DCN guidelines 8
EIS connections 18
guidelines 7
M
multinode design
server host requirements 3, 4
N
network communication 6
ports 75
nonclustered systems 13
86
O
OE
See outbound enabler
Oracle JDBC drivers 33
outbound enabler 39
configuring 54–56
generate configuration file 58
logging options 57
startup options 56, 57
See also Relay Server Outbound Enabler
P
personal firewalls 6
ports, communication 75
conflict 7
data tier 76
Relay Server 77
reserved 77
Sybase Control Center 76, 77
SySAM license server 78
Unwired Server 75
preparing the SAP server
SAP single sign-on 36
product editions 21
R
reference 75
Relay Server
applying configuration 53
communication ports 77
configuring Apache 40
configuring Apache as load balancer 60
configuring Apache as load balancer for EIS
back end 62
configuring IIS 6 45
configuring IIS 7 43
generate RSOE configuration 58
installing on IIS 43
load balancer 59
outbound enablers 54
State Manager process 58
Sybase Hosted Relay Server 37
Web-hosted relay service 37
Relay Server installation 37
choosing a deployment option 46
Sybase Unwired Platform
Index
configuring Apache as load balancer 60
configuring Apache as load balancer for EIS
back end 62
configuring outbound enabler connection
settings 56
configuring outbound enabler general
properties 55
configuring outbound enabler start options 56
configuring outbound enablers 54
configuring State Manager as a service 58
configuring Unwired Server to use Relay
Server 47
custom configuration 49
defining server farms and cluster nodes 51
deploying a Relay Server configuration file
53
generating outbound enabler configuration file
58
generating Relay Server configuration file 51
installing a load balancer 59
launching Relay Server configuration wizard
49
modifying Relay Server configuration file 51
on Apache 39
on IIS manually 42
on IIS with scripts 41
outbound enabler start options reference 57
pass-through mode for HTTP clients 65
performance tuning considerations 64
performance tuning tips on IIS 63
production environment 39
quick configuration 48
sample Relay Server configuration file 52
separating MBS and RBS processing 55
setting Relay Server general properties 49
tasks 39
with third-party load balancer 59
Relay Server Outbound Enabler
configuring 54–56
generate configuration file 58
logging options 57
startup options 56, 57
reserved ports 77
reverse proxy
common requirements 65
installation 37
used in front of Relay Server 66
used with mutual SSL authentication 66
rs.config file 52
Landscape Design and Integration
RSOE
See Relay Server Outbound Enabler
S
sample database
enabling in a production system 30
sampledb
enabling in a production system 30
SAP
configuring Unwired Platform components for
35
SAP single sign-on
preparing the SAP server 36
SAP Solution Manager 31
security postinstallation checklist 32
server hosts
provisioning resources 3
servers
Unwired Platform host requirements 3, 4
services
data tier 82
Unwired Server 81
shared data folder 14
single sign-on (SSO) postinstallation checklist 33
single-server installation
landscape option 13
SQL Server JDBC drivers 33
Sybase Control Center
installation directories 78
ports assigned to services 76, 77
postinstallation checklist 32
services 76, 77
Sybase Hosted Relay Service 37
Sybase Unwired Platform
licenses 21
product editions 21
Sybase Unwired SampleDB service
creating in a production system 30
SySAM license server
communication ports 78
system design
clustered systems 14
nonclustered systems 13
system requirements 3
authentication and authorization 10
client load balancing 8
data tier host 4
DCN load balancing 8
87
Index
enterprise information iystem (EIS) data
services 9
enterprise information system (EIS) drivers 9
failover cluster 4
general runtime host 3
host platform 3
intrusion detection and protection 10
load balancer 7
Microsoft Failover Cluster 4
network communications 6
port accommodation 7
SAP Ecosystem Interoperability 5
SAP external libraries 9
SAP Landscape Directory (SLD)
interoperability 5
SAP license audit requirements 6
security 10
Unwired Server cluster 4
U
uninstalling
Advantage Database Server 28
Unwired Platform
communication ports 6, 7
configuring components for 34
enabling connection environment for 34
license deployment models 23
license types 22
licenses 22
reserved ports 77
88
server host requirements 3, 4
server installation directories 78
Unwired Server
communication ports 6, 7
installation directories 78
ports 75
services 81
Unwired Server cluster 14
host provisioning 4
load balancing 15
upgrade
completing 28
postupgrade, restore Sybase Control Center
customized settings 29
V
validating licenses 25
W
worksheets
downloading 27
filling in before installing 27
X
X.509
installing libraries 34, 35
Sybase Unwired Platform