1
YAWL Engine
User Manual
Beta – 8 Release
YAWL Engine User Manual / YAWL_Engine_User_Man_v1.7.doc
Document Control
Date
Author
Version
Change
25 Aug 2004
30 Aug 2004
4 Feb 2005
4 Feb 2005
Sean Kneipp
Sean Kneipp
Guy Redding
Lachlan Aldred
0.1
1.0
1.1
1.2
12/04/2005
Lachlan Aldred
1.3
22/12/2005
Michael Adams
1.7
30/08/2006
Michael Adams
1.8
Initial Draft
Final Draft
Added YAWL XForms details
Updated Issues & 3rd-Party
Software Acknowledgements
Updated troubleshooting
section.
Updated for Beta 7 Version.
Document version brought in
line with Release Version
Minor updates for Beta 8
YAWL Engine User Manual – Beta 8 / YAWL_Engine_User_Man_v1.8.doc
ii
Contents
Document Control.............................................................................................ii
Getting Started ..................................................................................................1
Overview.....................................................................................................1
Launching the YAWL Engine .....................................................................1
The YAWL Workspace ...............................................................................2
Key YAWL Pages .................................................................................2
YAWL Administration......................................................................................3
Loading a YAWL specification ...................................................................3
Launching a YAWL Specification ...............................................................4
Unloading a YAWL Specification ...............................................................5
Data Elements of a Case....................................................................................6
Data Perspective..........................................................................................6
Providing Data for the Case Using a Form...................................................6
Providing Data for the Case Using XML .....................................................7
How to Input the Data Using XML ........................................................8
Work Items .......................................................................................................9
Viewing Available Work.............................................................................9
Checking Out Available Work.....................................................................9
Saving Detailed Information for a Work Item ............................................10
Submitting a Work Item ............................................................................12
Creating a New Instance of a Work Item ...................................................12
Suspending a Work Item ...........................................................................13
Managing Users ..............................................................................................14
Managing Roles ..............................................................................................15
Creating Charts and Tables..............................................................................16
Step 1: .......................................................................................................17
Step 2: .......................................................................................................17
Step 3: .......................................................................................................19
Known Issues ..................................................................................................21
Engine (yawl.war) .................................................................................21
Worklist (worklist.war) ....................................................................21
Web Service Invoker (wsInvoker.war)...............................................21
YAWL XForms Processor (YAWLXForms.war) .....................................21
Troubleshooting ..............................................................................................22
Third–Party Software Acknowledgements.......................................................23
Acknowledgements .........................................................................................26
YAWL Engine User Manual – Beta 8 / YAWL_Engine_User_Man_v1.8.doc
iii
Getting Started
Overview
Before you jump straight into the YAWL Engine and start testing your favourite
workflows, you will need to make sure that the Tomcat web-service has been
started. YAWL is a browser-based web application that requires a server jsp
environment, such as Apache Tomcat.
For full instructions on starting the Tomcat service, or obtaining the Apache
Tomcat software, please consult the YAWL Installation Manual.
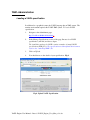
Launching the YAWL Engine
1.
Open up your web browser.
2.
Type the following address into the address line and press enter (see Fig.2.):
http://localhost:8080/worklist .
Fig.2. Navigate to the YAWL Log In webpage
3.
The YAWL Log In screen will be displayed
4.
Log in with the following details (case sensitive):
UserID:
admin
Password:
YAWL
YAWL Engine User Manual – Beta 8 / YAWL_Engine_User_Man_v1.8.doc
1
The YAWL Workspace
Key YAWL Pages
Fig.3. YAWL Workspace
Key YAWL Pages
The separate pages of the browser-based application, representing the different
functions of the YAWL Engine:
•
YAWL Home
•
Administrate
•
Workflow Specifications
•
Available Work
•
Checked Out Work
•
Logout
YAWL Engine User Manual – Beta 8 / YAWL_Engine_User_Man_v1.8.doc
2
YAWL Administration
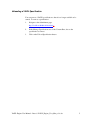
Loading a YAWL specification
In additional to a graphical syntax, the YAWL language has an XML syntax. The
runtime environment requires this YAWL XML syntax. To load a YAWL
specification:
1.
Navigate to the Administrate page:
http://localhost:8080/worklist/admin .
2.
In the Manage Specifications section of the page, Browse for a YAWL
specification (.xml file) and choose Open.
The installation package for YAWL contains a number of sample YAWL
specifications (XML files). The specification used throughout this document
refers to the “makeTrip3.XML” file.
3.
Click on Upload.
4.
You should now see the details of your specification. Fig.4.
Fig.4. Upload YAWL Specification
YAWL Engine User Manual – Beta 8 / YAWL_Engine_User_Man_v1.8.doc
3
Launching a YAWL Specification
In order to kick-off the workflow specification, you need to ‘launch a case’. To
launch a YAWL specification that has already been uploaded into the YAWL
Engine:
1.
Navigate to the Workflow Specifications page:
http://localhost:8080/worklist/viewSpecifications .
2.
In the Active YAWL Specifications section of the page, choose the
specification to launch.
3.
Click on the Launch Case button. Fig.5.
Fig.5. Launching the Case
4.
Then in the following Launch Case section of the page, click on the Start
Case button. Fig.6.
Depending on the specification loaded, you may be required to launch the
case with specific information for data elements. For more information on
providing data throughout the case, consult the Data Elements of a Case
section of this manual.
Fig.6. Starting the Case
5.
You will then see a confirmation screen to indicate that a case has been
launched with a specific identification number.
YAWL Engine User Manual – Beta 8 / YAWL_Engine_User_Man_v1.8.doc
4
Unloading a YAWL Specification
You can remove a YAWL specification so that it is no longer available to be
started. To remove a specification:
1.
Navigate to the Administrate page:
http://localhost:8080/worklist/admin .
2.
In the Manage Specifications area of the Content Pane, choose the
specification to remove.
3.
Click on the Unload Specification button.
YAWL Engine User Manual – Beta 8 / YAWL_Engine_User_Man_v1.8.doc
5
Data Elements of a Case
Data Perspective
Although the initial focus of YAWL was on control flow, it has been extended to
offer full support for the data perspective. It is possible to define data elements
and use them for conditional routing, for the creation of multiple instances, for
exchanging information with the environment, etc. Most of the existing workflow
management systems use a propriety language for dealing with data. YAWL is
one of the few languages that completely relies on XML-based standards like
XPath and XQuery.
Providing Data for the Case Using a Form
During certain activities of a YAWL Case, you may be required to provide some
information for data elements that have been established in the XML
specification. Requests for data can occur when “Launching a Case” or when
editing “Checked Out Work” items.
Fig.8. depicts a request for data form for multiple data elements, while performing
an edit of a “Checked Out Work” item. The red star next to a field indicates that
input is required for that field. The form submits data back to YAWL only when
all data in the forms is valid.
Fig.8. Request for Data using a Form
YAWL Engine User Manual – Beta 8 / YAWL_Engine_User_Man_v1.8.doc
6
Providing Data for the Case Using XML
It is also always possible to enter data using XML. This method of user input is
useful if data input using a form has failed for any reason. Fig. 9 is the XML
input page. To get to this page click the link for the work item ID on the
Checked Out Work Items page (Fig. 12) instead of selecting the radio button for
a Work Item and clicking the Edit Work Item button.
Fig. 9 Request for Data using XML
YAWL Engine User Manual – Beta 8 / YAWL_Engine_User_Man_v1.8.doc
7
How to Input the Data Using XML
The structure of the request for data follows the XML format of opening and
closing “tags”. The data is entered between the open and close tags that refer to
that data element.
In the “makeTrip3.xml” specification, the example below (Fig. 10.) depicts a
request to enter the name of the customer going on a trip, for the customer data
element.
1. Firstly the data tag is opened.
2. Then the Data Type tag (or comments tag) is opened to let the user
know the details of the data required.
3. The Data Type tag is requesting a string variable from the user and
the information required is Mandatory. The tag is closed.
4. Then the customer tag is opened, referring to the data element to store
the information.
5. The user then enters the customer name within the customer tags.
6. Finally the data tag is closed.
The Data Type tag
• Open
• Data Type
• Mandatory?
• Close
<data>
The data tags
• Open
• Close
<!--Data Type: xs:string
Is Mandatory:
true-->
<customer>Mr John Smith</customer>
</data>
“My data”
Fig. 10. Inputting the Data
YAWL Engine User Manual – Beta 8 / YAWL_Engine_User_Man_v1.8.doc
8
Work Items
Viewing Available Work
Alternate user accesses to the YAWL Engine can be created through the
Administrator. To create a new user access:
1. Navigate to the Available Work page:
http://localhost:8080/worklist/availableWork .
2. All available work items will be listed, according to the specification
loaded. Work items can be related back to a specific instance of a case,
through their case number. Fig.11.
Fig. 11. Available Work Items
Checking Out Available Work
When a person is ready to start working on an available work item, the item is
“Checked Out”.
1. Navigate to the Available Work page:
http://localhost:8080/worklist/availableWork .
2. Click on the radar button next to the work item and click the button
“Check Out”
YAWL Engine User Manual – Beta 8 / YAWL_Engine_User_Man_v1.8.doc
9
Saving Detailed Information for a Work Item
While a person is working on an item that has been “Checked Out”, specific
details may be required to be saved against that item.
Information saved against a work item can be used to launch other YAWL cases
or provide data for other interfacing systems. For more information on providing
data in work items, consult the Data Elements of a Case section of this manual.
1. Navigate to the Checked Out Work page:
http://localhost:8080/worklist/checkedOut .
2. Click on the radar button next to the work item and click the button “Edit
Work Item” Fig.12.
Fig. 12. Checked Out Work Items
3. Enter any required data using a form for the data elements that have been
requested, in the Work Item Output section of the page and click Save
Work Item. Fig.13.
4. Alternatively, click on the link for the Work Item ID to enter any required
data for the requested data elements using XML. Fig. 14.
YAWL Engine User Manual – Beta 8 / YAWL_Engine_User_Man_v1.8.doc
10
Fig 13. Work Item Edit Page Using a Form
Fig. 14. Work Item Edit Page Using XML
YAWL Engine User Manual – Beta 8 / YAWL_Engine_User_Man_v1.8.doc
11
Submitting a Work Item
Once a work item has been completed, it must be submitted for the token to be
advanced in the workflow.
1. Navigate to the Checked Out Work page:
http://localhost:8080/worklist/checkedOut .
2. Click on the radar button next to the work item and click the button “Edit
Work Item” Fig.12.
3. Enter any required data for the data elements that have been requested in
the Work Item Output section of the page. Fig.13, 14.
4. Click on the Submit Work Item button.
Creating a New Instance of a Work Item
If the specification supports it, new instances of a work item can be created as an
item is “checked out”, reflecting multiple instance tasks in the workflow.
The current example specification, “makeTrip3.xml” does not contain any
multiple instance tasks, so instructions below refer to the specification
“MakeMusic.XML”.
1. Navigate to the Available Work page:
http://localhost:8080/worklist/availableWork .
2. Check Out a work item that supports multiple instance creation.
The “MakeMusic.XML” specification contains a multiple instance task on
the work item “Write a Song”.
5. Navigate to the Checked Out Work page:
http://localhost:8080/worklist/checkedOut .
3. Click on the radar button next to the work item and click the button “Add
New Instance” Fig.12.
4. Enter any required data for the data elements that have been requested and
click on Create Instance. Fig.15.
YAWL Engine User Manual – Beta 8 / YAWL_Engine_User_Man_v1.8.doc
12
Fig.15. Creating a New Instance of a Work Item
Your new instance of the Work Item will be now be listed as Available Work.
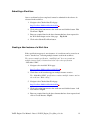
Suspending a Work Item
Work items that have been “checked out” to a person, can be returned to the
available work items. All data that has been saved for that work item remains
intact.
5. Navigate to the Checked Out Work page:
http://localhost:8080/worklist/checkedOut .
6. Click on the radar button next to the work item and click the button
“Suspend Task” Fig.12.
YAWL Engine User Manual – Beta 8 / YAWL_Engine_User_Man_v1.8.doc
13
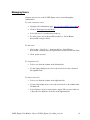
Managing Users
Alternate user accesses to the YAWL Engine can be created through the
Administrator.
To create a new user access:
•
Navigate to the Administrate page: http://localhost:8080/worklist/admin .
•
Click on “Edit Organisational Model”.
•
Select “Resources” from the menu on the top.
•
To delete a user, choose the user ID from the box “Select Human
ResourceID” and press delete.
To add a user:
•
Choose the “—New User—“ item from the box “Select Human
ResourceID” and then enter all required details for this user into the fields.
•
Click “update resource”.
To assign user roles.
•
Select a role from the column on the left hand side.
•
Use the right-pointing arrow to move the selected role to the column on
the right hand side.
To remove user roles:
•
Select a role from the column on the right hand side.
•
Use the left-pointing arrow to move the selected role to the column on the
left hand side.
•
Select Updates roles by resource when complete. The resource is then set
to have the roles which are on the list on the right hand side.
YAWL Engine User Manual – Beta 8 / YAWL_Engine_User_Man_v1.8.doc
14
Figure 16: Managing Users
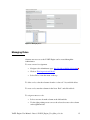
Managing Roles
Alternate user accesses to the YAWL Engine can be created through the
Administrator.
To create a new role assignment:
•
Navigate to the Administrate page: http://localhost:8080/worklist/admin .
•
Click on “Edit Organisational Model”
•
Select “Roles” from the menu on the top.
To delete a role, select the rolename from the “select role” list, and click delete.
To create a role, enter the rolename in the list at “Role” and click add role.
To assign resources to roles:
•
Select a resource from the column on the left hand side.
•
Use the right-pointing arrow to move the selected resource to the column
on the right hand side.
YAWL Engine User Manual – Beta 8 / YAWL_Engine_User_Man_v1.8.doc
15
To remove resource assignments to roles:
•
Select a resource from the column on the right hand side.
•
Use the left-pointing arrow to move the selected resource to the column on
the left hand side.
To record the update in the system, press “Updates Resources by Role”. The role
is then allocated to the resources which are on the list on the right-hand side.
Figure 17: Managing Roles
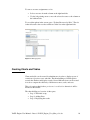
Creating Charts and Tables
Charts and tables can be created by administrators in order to display reports of
executions of previous cases and tasks. The chart building tool builds queries
towards the database and displays results. Several different views can be created
in order to compare the efficiency of different resources, tasks, and cases.
This tool requires that database persistence is switched on otherwise it will be
marked as unavailable.
The chart building tool consists of three parts.
• Step 1: The initial set up
• Step 2: Adding filters
• Step 3: Displaying the results
YAWL Engine User Manual – Beta 8 / YAWL_Engine_User_Man_v1.8.doc
16
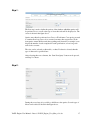
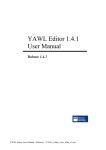
Step 1:
The first step is used to define the portion of the database which the queries will
be performed over, as well as the type of view the result will be displayed as. The
screen is shown in the figure above.
Queries may either be performed over Cases or Work-items. Case queries are used
to examine how long cases took to execute, how many has executed etc. Workitem queries return similar results but regarding tasks instead. For example, it can
display the number of tasks completed in each specification, or how long each
tasks took to execute.
The view can be selected as either table, or chart. If a chart is selected, then the
type of chart can be specified later.
After selecting these two elements, the “Start New Query” button can be pressed,
and Step 2 is shown.
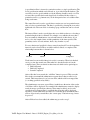
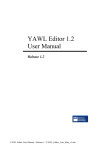
Step 2:
During the second step it is possible to add filters to the queries. Several types of
filters can be added as shown in the Figure above.
YAWL Engine User Manual – Beta 8 / YAWL_Engine_User_Man_v1.8.doc
17
A specification filter is inserted to restrict the results to a single specification. The
list of specifications which can be filtered on, is provided from the database. The
case filter is used to specify which case id the filtering should be made over. The
resource filter specifies that results should only be returned if they relate to a
particular resource (e.g. human user). Work-item queries have one addition filter,
being a task name.
The status filter can be used to specify that a certain case was in a particular state,
after or before a particular time. The time is specified by selecting the icon on the
right hand side of the text field. A calendar pops up, and the time can be selected
here.
The interval filter is used to specify that only cases which took more or less then a
particular length of time is returned. For example, cases which took more than 7
days are returned. Administrators can select the interval of their choice, if it is
more or less, the length of time, and the granularity of the time specified. The
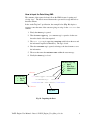
granularity can be seconds, minutes, hours, days, months or years.
For cases the interval specified is always started-completed. For work-items three
intervals can be selected. These are either enabled, started, or completed. The
relationship between these is shown below:
Enabled
Started
Completed
Work items become enabled when it is ready for execution. When it is checked
out, it goes into the started state. Then when it is checked back in it is in the
completed state. There are therefore three intervals which can be queried upon.
• Enabled-Started
• Enabled-Completed
• Started-Completed
After a filter has been created, the “add filter” button is pressed. This stores the
filter in the system until the administrator requests that a chart or table is to be
created. There must always be at least one filter, which could be an empty filter
(i.e. nothing specified on any fields).
The administrator can create several filters, in which case the union of the results
of all filters will be displayed. For example if the administrator wanted to display
results from two specifications, then two filters must be added, one for each
specification. If an empty filter is specified, then all results will be displayed
regardless of what other filters are added. To restart the query mechanism and to
remove all previously created filters, the “create query” button from step 1 must
be pressed.
After all filters have been added, the admin may proceed to step 3.
YAWL Engine User Manual – Beta 8 / YAWL_Engine_User_Man_v1.8.doc
18
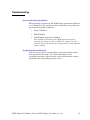
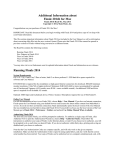
Step 3:
In step 3, the developer specifies what elements should be viewed as part of the
result set. Depending on whether a chart or table was selected as a view in step 1,
different screens are shown.
Chart:
The chart screen lets administrators create results as a bar chart or a pie chart.
Results can be grouped based on specifications, resources, or case ids (or task id
in case of a work-item query). It the case id (or task id) is chosen, then no
grouping is made. The value selected here is the value for the x-axis of a barchart.
Then a display value can be selected, which is either an interval or a count. This is
the y-axis in the bar chart.
If a grouping is selected, then the average of these is calculated and displayed.
Finally the granularity for displaying the intervals can be selected.
When the chart is ready for display, the “Create Chart” button is pressed. This
causes the screen to be updated with the display of the chart.
(NOTE: if the proper chart is not shown, press the refresh button and it should be
updated).
Table:
When creating table, the principles are the same, except that all elements to be
displayed are ticked off on the screen. Different elements are shown depending on
if it is a work-item query or a case query. Groupings can be made, in which case
the developer can not show items which do not have aggregate functions. If
grouping is made by specification, then only the count and intervals can be shown.
YAWL Engine User Manual – Beta 8 / YAWL_Engine_User_Man_v1.8.doc
19
If no grouping is selected, all elements except count are available, but no average
is calculated.
When the table is ready to be created, the “Create Table” button can be pressed.
This will create the table, and display a link to the table in the top of the screen.
YAWL Engine User Manual – Beta 8 / YAWL_Engine_User_Man_v1.8.doc
20
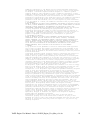
Known Issues
Engine (yawl.war)
Worklist (worklist.war)
•
The engine does not support the allocation of tasks to separate resources.
i.e., the traditional resource perspective of workflow is not yet supported.
Web Service Invoker (wsInvoker.war)
•
The web service invoker does not support sending call back addresses to an
asynchronous web service.
•
The web service invoker component is not able to invoke web services with
complex data types as their parameters.
YAWL XForms Processor (YAWLXForms.war)
•
Currently forms cannot be generated for schemas that contain enumerated
types.
YAWL Engine User Manual – Beta 8 / YAWL_Engine_User_Man_v1.8.doc
21
Troubleshooting
Error in Uploading a Specification
When uploading a specification, the YAWL Engine performs three different
sets of validation for the specification. Please check that your specification
passes the following three validations:
•
Schema Validation
•
XML Validation
•
YAWL Engine Application Validation.
This validation is particular to the YAWL application and can
represent inconsistencies in the workflow, for example, if a task is
defined in the specification but doesn’t appear between the input and
output condition.
Specification with an identical id.
This error occurs when you are uploading a specification that has already
been uploaded into the engine. If you have made changes to the
specification and want to upload a newer version, then unload the existing
specification before uploading the newer version.
YAWL Engine User Manual – Beta 8 / YAWL_Engine_User_Man_v1.8.doc
22
Third–Party Software Acknowledgements
(a) Software developed by the JDOM Project (http://www.jdom.org/),
JDOM Beta 9, Copyright © 2000-2003 Jason Hunter & Brett McLaughlin. All
rights reserved. This software is subject to the terms of the licence available at
http://www.jdom.org/.
(b) Software developed by the Apache Software Foundation
(http://www.apache.org/) (Xerces2 Java Parser 2.6.0 Release)
(http://xml.apache.org/xerces2-j/index.html), Copyright © 1999-2003 The Apache
Software Foundation. All rights reserved. This software is subject to the terms of
the licence available at http://xml.apache.org/.
Web Services Invocation Framework 2.0.- Release (http://ws.apache.org/wsif/),
Copyright © 1999-2003 The Apache Software Foundation. All rights reserved.
This software is subject to the terms of the licence available at
http://xml.apache.org.
(c) The Saxon version 7 XLST Processor from Michael Kay
(http://saxon.sourceforge.net/). This software is subject to the Mozilla Public
License Version 1.0 and may not be used except in compliance with that License
(a copy is available at http://www.mozilla.org/MPL/). The source code version of
this software is available under the terms of that License.
(d) Chiba XForms processor version 0.9.9, available at
http://sourceforge.net/projects/chiba/
(e) XSD and EMF (source available at http://www.eclipse.org/xsd)
XSD and EMF are made available under the Common Public License:
Common Public License Version 1.0
THE ACCOMPANYING PROGRAM IS PROVIDED UNDER THE TERMS OF THIS COMMON PUBLIC LICENSE
("AGREEMENT"). ANY USE, REPRODUCTION OR DISTRIBUTION OF THE PROGRAM CONSTITUTES
RECIPIENT'S ACCEPTANCE OF THIS AGREEMENT.
1. DEFINITIONS
"Contribution" means:
a) in the case of the initial Contributor, the initial code and documentation
distributed under this Agreement, and
b) in the case of each subsequent Contributor:
i) changes to the Program, and
ii) additions to the Program;
where such changes and/or additions to the Program originate from and are
distributed by that particular Contributor. A Contribution 'originates' from a
Contributor if it was added to the Program by such Contributor itself or anyone
acting on such Contributor's behalf. Contributions do not include additions to the
Program which: (i) are separate modules of software distributed in conjunction
with the Program under their own license agreement, and (ii) are not derivative
works of the Program.
"Contributor" means any person or entity that distributes the Program.
YAWL Engine User Manual – Beta 8 / YAWL_Engine_User_Man_v1.8.doc
23
"Licensed Patents " mean patent claims licensable by a Contributor which are
necessarily infringed by the use or sale of its Contribution alone or when
combined with the Program.
"Program" means the Contributions distributed in accordance with this Agreement.
"Recipient" means anyone who receives the Program under this Agreement, including
all Contributors.
2. GRANT OF RIGHTS
a) Subject to the terms of this Agreement, each Contributor hereby grants
Recipient a non-exclusive, worldwide, royalty-free copyright license to reproduce,
prepare derivative works of, publicly display, publicly perform, distribute and
sublicense the Contribution of such Contributor, if any, and such derivative
works, in source code and object code form.
b) Subject to the terms of this Agreement, each Contributor hereby grants
Recipient a non-exclusive, worldwide, royalty-free patent license under Licensed
Patents to make, use, sell, offer to sell, import and otherwise transfer the
Contribution of such Contributor, if any, in source code and object code form.
This patent license shall apply to the combination of the Contribution and the
Program if, at the time the Contribution is added by the Contributor, such
addition of the Contribution causes such combination to be covered by the Licensed
Patents. The patent license shall not apply to any other combinations which
include the Contribution. No hardware per se is licensed hereunder.
c) Recipient understands that although each Contributor grants the licenses to its
Contributions set forth herein, no assurances are provided by any Contributor that
the Program does not infringe the patent or other intellectual property rights of
any other entity. Each Contributor disclaims any liability to Recipient for claims
brought by any other entity based on infringement of intellectual property rights
or otherwise. As a condition to exercising the rights and licenses granted
hereunder, each Recipient hereby assumes sole responsibility to secure any other
intellectual property rights needed, if any. For example, if a third party patent
license is required to allow Recipient to distribute the Program, it is
Recipient's responsibility to acquire that license before distributing the
Program.
d) Each Contributor represents that to its knowledge it has sufficient copyright
rights in its Contribution, if any, to grant the copyright license set forth in
this Agreement.
3. REQUIREMENTS
A Contributor may choose to distribute the Program in object code form under its
own license agreement, provided that:
a) it complies with the terms and conditions of this Agreement; and
b) its license agreement:
i) effectively disclaims on behalf of all Contributors all warranties and
conditions, express and implied, including warranties or conditions of title and
non-infringement, and implied warranties or conditions of merchantability and
fitness for a particular purpose;
ii) effectively excludes on behalf of all Contributors all liability for damages,
including direct, indirect, special, incidental and consequential damages, such as
lost profits;
iii) states that any provisions which differ from this Agreement are offered by
that Contributor alone and not by any other party; and
iv) states that source code for the Program is available from such Contributor,
and informs licensees how to obtain it in a reasonable manner on or through a
medium customarily used for software exchange.
When the Program is made available in source code form:
a) it must be made available under this Agreement; and
b) a copy of this Agreement must be included with each copy of the Program.
Contributors may not remove or alter any copyright notices contained within the
Program.
Each Contributor must identify itself as the originator of its Contribution, if
any, in a manner that reasonably allows subsequent Recipients to identify the
originator of the Contribution.
4. COMMERCIAL DISTRIBUTION
Commercial distributors of software may accept certain responsibilities with
respect to end users, business partners and the like. While this license is
intended to facilitate the commercial use of the Program, the Contributor who
includes the Program in a commercial product offering should do so in a manner
which does not create potential liability for other Contributors. Therefore, if a
Contributor includes the Program in a commercial product offering, such
Contributor ("Commercial Contributor") hereby agrees to defend and indemnify every
other Contributor ("Indemnified Contributor") against any losses, damages and
costs (collectively "Losses") arising from claims, lawsuits and other legal
actions brought by a third party against the Indemnified Contributor to the extent
caused by the acts or omissions of such Commercial Contributor in connection with
its distribution of the Program in a commercial product offering. The obligations
in this section do not apply to any claims or Losses relating to any actual or
alleged intellectual property infringement. In order to qualify, an Indemnified
Contributor must: a) promptly notify the Commercial Contributor in writing of such
claim, and b) allow the Commercial Contributor to control, and cooperate with the
YAWL Engine User Manual – Beta 8 / YAWL_Engine_User_Man_v1.8.doc
24
Commercial Contributor in, the defense and any related settlement negotiations.
The Indemnified Contributor may participate in any such claim at its own expense.
For example, a Contributor might include the Program in a commercial product
offering, Product X. That Contributor is then a Commercial Contributor. If that
Commercial Contributor then makes performance claims, or offers warranties related
to Product X, those performance claims and warranties are such Commercial
Contributor's responsibility alone. Under this section, the Commercial Contributor
would have to defend claims against the other Contributors related to those
performance claims and warranties, and if a court requires any other Contributor
to pay any damages as a result, the Commercial Contributor must pay those damages.
5. NO WARRANTY
EXCEPT AS EXPRESSLY SET FORTH IN THIS AGREEMENT, THE PROGRAM IS PROVIDED ON AN "AS
IS" BASIS, WITHOUT WARRANTIES OR CONDITIONS OF ANY KIND, EITHER EXPRESS OR IMPLIED
INCLUDING, WITHOUT LIMITATION, ANY WARRANTIES OR CONDITIONS OF TITLE, NONINFRINGEMENT, MERCHANTABILITY OR FITNESS FOR A PARTICULAR PURPOSE. Each Recipient
is solely responsible for determining the appropriateness of using and
distributing the Program and assumes all risks associated with its exercise of
rights under this Agreement, including but not limited to the risks and costs of
program errors, compliance with applicable laws, damage to or loss of data,
programs or equipment, and unavailability or interruption of operations.
6. DISCLAIMER OF LIABILITY
EXCEPT AS EXPRESSLY SET FORTH IN THIS AGREEMENT, NEITHER RECIPIENT NOR ANY
CONTRIBUTORS SHALL HAVE ANY LIABILITY FOR ANY DIRECT, INDIRECT, INCIDENTAL,
SPECIAL, EXEMPLARY, OR CONSEQUENTIAL DAMAGES (INCLUDING WITHOUT LIMITATION LOST
PROFITS), HOWEVER CAUSED AND ON ANY THEORY OF LIABILITY, WHETHER IN CONTRACT,
STRICT LIABILITY, OR TORT (INCLUDING NEGLIGENCE OR OTHERWISE) ARISING IN ANY WAY
OUT OF THE USE OR DISTRIBUTION OF THE PROGRAM OR THE EXERCISE OF ANY RIGHTS
GRANTED HEREUNDER, EVEN IF ADVISED OF THE POSSIBILITY OF SUCH DAMAGES.
7. GENERAL
If any provision of this Agreement is invalid or unenforceable under applicable
law, it shall not affect the validity or enforceability of the remainder of the
terms of this Agreement, and without further action by the parties hereto, such
provision shall be reformed to the minimum extent necessary to make such provision
valid and enforceable.
If Recipient institutes patent litigation against a Contributor with respect to a
patent applicable to software (including a cross-claim or counterclaim in a
lawsuit), then any patent licenses granted by that Contributor to such Recipient
under this Agreement shall terminate as of the date such litigation is filed. In
addition, if Recipient institutes patent litigation against any entity (including
a cross-claim or counterclaim in a lawsuit) alleging that the Program itself
(excluding combinations of the Program with other software or hardware) infringes
such Recipient's patent(s), then such Recipient's rights granted under Section
2(b) shall terminate as of the date such litigation is filed.
All Recipient's rights under this Agreement shall terminate if it fails to comply
with any of the material terms or conditions of this Agreement and does not cure
such failure in a reasonable period of time after becoming aware of such
noncompliance. If all Recipient's rights under this Agreement terminate, Recipient
agrees to cease use and distribution of the Program as soon as reasonably
practicable. However, Recipient's obligations under this Agreement and any
licenses granted by Recipient relating to the Program shall continue and survive.
Everyone is permitted to copy and distribute copies of this Agreement, but in
order to avoid inconsistency the Agreement is copyrighted and may only be modified
in the following manner. The Agreement Steward reserves the right to publish new
versions (including revisions) of this Agreement from time to time. No one other
than the Agreement Steward has the right to modify this Agreement. IBM is the
initial Agreement Steward. IBM may assign the responsibility to serve as the
Agreement Steward to a suitable separate entity. Each new version of the Agreement
will be given a distinguishing version number. The Program (including
Contributions) may always be distributed subject to the version of the Agreement
under which it was received. In addition, after a new version of the Agreement is
published, Contributor may elect to distribute the Program (including its
Contributions) under the new version. Except as expressly stated in Sections 2(a)
and 2(b) above, Recipient receives no rights or licenses to the intellectual
property of any Contributor under this Agreement, whether expressly, by
implication, estoppel or otherwise. All rights in the Program not expressly
granted under this Agreement are reserved.
This Agreement is governed by the laws of the State of New York and the
intellectual property laws of the United States of America. No party to this
Agreement will bring a legal action under this Agreement more than one year after
the cause of action arose. Each party waives its rights to a jury trial in any
resulting litigation.
YAWL Engine User Manual – Beta 8 / YAWL_Engine_User_Man_v1.8.doc
25
Acknowledgements
This documentation includes feedback from Lachlan Aldred and Marlon Dumas,
Queensland University of Technology.
YAWL Engine User Manual – Beta 8 / YAWL_Engine_User_Man_v1.8.doc
26