1
TM
User manual
Rev. 1.6
Index
1.
DEVICE INFORMATION ....................................................................................................................... 6
1.1 Overview.......................................................................................................................................... 6
1.2 Safety ............................................................................................................................................... 6
1.3 Battery replacement ...................................................................................................................... 8
1.4 End-of-life disposal of the device................................................................................................. 8
2.
PRODUCT DESCRIPTION....................................................................................................................10
2.1 Front panel .....................................................................................................................................10
2.2 Rear panel ......................................................................................................................................11
2.3 Power adapter ...............................................................................................................................12
2.4 Label ...............................................................................................................................................13
3.
PRODUCT INSTALLATION..................................................................................................................14
3.1 Package contents...........................................................................................................................14
3.2 Preliminary tasks ...........................................................................................................................14
3.3 System settings ..............................................................................................................................14
3.4 How to correctly position the sensor ..........................................................................................16
4.
BASIC USE OF RSTONE™ ...................................................................................................................17
4.1 Browsing the menu items .............................................................................................................17
4.2 Programming and executing a measurement .............................................................................20
4.3 View the measurement data ........................................................................................................21
4.4 Exceeding the risk concentration level .......................................................................................22
4.5 Clearing the non-volatile memory of RStone™ ...........................................................................22
5.
ADVANCED USE OF THE DEVICE .......................................................................................................23
5.1 Introduction ...................................................................................................................................23
5.2 How to install the control software ............................................................................................24
5.3 Installation of RKey™ .....................................................................................................................26
5.4 Controlling RStone™ by means of the control software ............................................................26
5.4.1 Connection of RKey™ .............................................................................................................27
5.4.2 Remote connection to RStone™ ............................................................................................27
5.4.3 How to program a measurement of user-defined duration ...............................................28
5.4.4 Downloading measurement data from RStone™ ..................................................................28
5.4.5 Creating a measurement report ...........................................................................................29
5.4.6 Clearing the non-volatile memory of RStone™ ....................................................................29
5.4.7 Getting Help ...........................................................................................................................29
5.4.8 Quitting EasyRadon ................................................................................................................29
6.
CARE AND MAINTENANCE .................................................................................................................30
7.
RSTONE™ TECHNICAL SPECIFICATIONS ...........................................................................................31
7.1 General ...........................................................................................................................................31
7.2 Radon concentration measurement.............................................................................................31
7.3 Other environmental measurements ...........................................................................................31
7.4 Radio wireless interface ...............................................................................................................31
7.5 Rechargeable battery....................................................................................................................31
8.
RKEY™ TECHNICAL SPECIFICATIONS ................................................................................................32
8.1 General ...........................................................................................................................................32
8.2 Radio wireless interface ...............................................................................................................32
8.3 USB interface .................................................................................................................................32
9.
REGULATORY FRAMEWORK ..............................................................................................................32
10.
WARRANTY ....................................................................................................................................33
10.1 General .........................................................................................................................................33
10.2 Calibration....................................................................................................................................33
10.3 Non-warranty service ..................................................................................................................33
Page intentionally left blank
1.
DEVICE INFORMATION
1.1 Overview
RStone™ is a sensor that measures the concentration of Radon in the environment in which it is
located. It is designed to be used in different environments, where the Radon gas can accumulate
more easily. The instrument is not suitable for measurements in the soil or fluids. Radon is an
odorless, colorless and tasteless gas naturally present in soil and water, which penetrates into
houses and workplaces through the building materials (from which it may also be released), whose
accumulation can be harmful to health. Radon is part of the process of radioactive decay of
Uranium. The World Health Organization (WHO) has determined that Radon is the second leading
cause of lung cancer after cigarette smoking and it has recently lowered the concentration level
associated with health risk from 1000 Bq/m3 (Becquerel per cubic meter) to 100 Bq/m3. Should the
measured concentration of Radon be equal to or greater than the recommended level of 100
Bq/m3, it would be advisable to undertake Radon mitigation counteractions in order to reduce its
concentration to safety levels. More information concerning Radon can be obtained from:
http://www.who.int/ionizing_radiation/env/Radon/en/
A continuous measurement of Radon concentration in a period of time which ranges from a few
hours to a week can provide a descriptive indication of changes in short-term concentration (for
example, to assess changes attributable to the usage of a room or to quickly identify areas in
which Radon concentration is higher).
A continuous measurement of Radon concentration of one month or more permits to describe
more accurately the average concentration of Radon to which people who live in that area are
subject (commonly known as "dose") and therefore the level of risk to which they are subject.
RStone™ allows carrying out both short- and long-term measurements of Radon concentration. In
addition, through RKey™, it can be controlled from a PC via a wireless connection. RKey™ gives
RStone™ additional features such as more flexible measurement scheduling and the generation of
customized measurement reports. RKey™ is included in the RStone™ Plus or Pro packages, but it
can also be purchased as a separate accessory for RStone™ Basic.
1.2 Safety
Please read carefully the information contained in this manual before installing and using the
devices. Always follow the most basic safety precautions in the installation and use of the devices,
including the following, which are valid for both RStone™ and RKey™:
ALL THE PARTS OF THE PACKAGING (BOXES, CARTONS, PLASTIC BAGS, ETC…) ARE A
CHOKING HAZARD TO CHILDREN. DO NOT KEEP THESE MATERIALS TO THE REACH OF
CHILDREN.
IN PARTICULAR, RKEY™ IS A DANGER OF INGESTION FOR CHILDREN. KEEP RKEY™
OUT OF REACH OF CHILDREN.
RStone™, RKey™, the power supply, cables, accessories and packaging must
ALWAYS be kept out of reach of the children;
the device must be installed and/or used only indoor;
DO NOT use the device if the power supply cord is damaged, refer to your place of
purchase;
6
DO NOT use the device if the case is damaged, refer to your place of purchase;
the device MUST NOT be installed and/or used in environments where temperature might
be below 5°C or exceeding 40°C;
the device MUST NOT be installed and/or used outdoor;
the device MUST NOT be installed and/or used in wardrobes, behind curtains, or near
doors, windows or fans;
the device MUST NOT be left, placed, installed and/or used near heat sources, in the direct
sunlight or installed and/or used near water or other fluids, such as bath tubs, showers,
swimming pools, wash basins, water-closets, bathroom fittings, washing machines,
dishwashers;
the sensor must not be immersed in water or any other liquid, DO NOT attempt to retrieve a
sensor that has fallen into a liquid, RISK OF ELECTRIC SHOCK!
the device MUST NOT be installed and/or used in environments near flammable gas and/or
explosives, or where an explosive atmosphere might arise;
in order to avoid condensation in the inner parts of the device, the device should be kept
enclosed in a sealed plastic bag when moving it from a cold to a warm place, then wait at
least 24 hours before removing the device from the bag;
the device MUST NOT be installed and/or used in dirty or dusty environments or places
where it might get hit or damaged;
RStone™ is capable of detecting the presence of Radon in the immediate vicinity, thus the
presence of Radon gas in adjacent rooms is not to be excluded;
the presence of strong static or high frequency electric fields such as those emitted by
televisions, radios, computers, cell phones and cordless phones, electrostatic discharges or
other electrical and electronic equipment might cause the device to malfunction;
the use of an external power supply other than that provided, is EXPRESSLY
PROHIBITED: this could damage the device and cause malfunction, severe electric shock
and fire;
it is EXPLICITLY PROHIBITED to cut, modify, tamper or otherwise damage the power
cord, there is a severe RISK OF ELECTRIC SHOCK.
RStone™ is a Class II electrical insulation device. It is designed to operate safely without
a protective earth (PE) conductor.
RKey™ is a Class III electrical insulation devices, since it is powered by a safety extralow voltage (SELV) level.
ANY DAMAGE OR INJURY CAUSED BY NOT COMPLYING WITH THE SAFETY
PRECAUTIONS ARE NOT COVERED BY WARRANTY. RSENS SRL SHALL NOT BE LIABLE
FOR ANY DAMAGE OR INJURY TO HUMANS, ANIMALS AND THINGS.
ANY DAMAGE OR INJURY CAUSED BY TAMPERING OR MODIFICATION OF THE DEVICE
BY THE PURCHASER OR ANY OTHER PERSON NOT AUTHORIZED BY RSENS SRL ARE
NOT COVERED BY WARRANTY.
7
CAUTION! RISK OF ELECTRIC SHOCK!
DO NOT OPEN THE DEVICE, DO NOT TAMPER WITH THE DEVICE OR WITH THE POWER
CORDS! NO USER-SERVICEABLE PARTS INSIDE! DO NOT INSERT ANY OBJECT IN THE
DEVICE VENTS.
1.3 Battery replacement
RStone™ contains a rechargeable lithium ion battery that allows extended operation in the
absence of power line availability. In order to maximize the useful life of the battery it is
recommended, when possible, to let the battery fully discharge before recharging it. The charge
should always be complete. The rechargeable battery is subject to normal wear, thus as such it is
not covered by warranty. If the operating time of the device after a full battery charge should
decrease significantly, it is advisable to contact the service center to have the battery replaced with
a fresh one.
THE BATTERY MUST BE REPLACED ONLY BY RSENS TECHNICAL PERSONNEL!
Any attempt to replace the battery by the user or unauthorized personnel could result in
damage, fire or explosion. RSens srl will not be liable in any way for any damage, explosion,
or fire resulting from the replacement internal battery by the user or any other unauthorized
personnel.
The technical specifications of the battery are reported in paragraph 7.5.
1.4 End-of-life disposal of the device
Information to the user about European Directives 2002/95/EC, 2002/96/EC and 2003/108/EC,
concerning the reduction of hazardous substances in electrical and electronic equipment
and waste disposal
The symbol of the crossed trash can on the equipment or its packaging means that the product at
the end of its useful life must be collected separately from other waste.
8
The user should, therefore, take the product to an appropriate recycling center for waste electrical
and electronic equipment, or hand it to the dealer when buying a new equivalent product, on a oneto-one basis .
The separate collection for the deliver of the equipment to recycling, to treatment and
environmentally compatible disposal helps avoid possible negative effects on the environment and
health and promotes the reuse and / or recycling of materials that make up the equipment.
Illegal dumping of the product by the user involves the application of administrative sanctions
provided for law.
9
2.
PRODUCT DESCRIPTION
2.1 Front panel
1
1
6
5
2
4
3
3
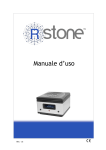
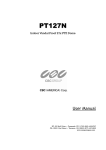
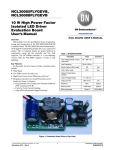
Figure 1. Front view of RStone™
1.
2.
3.
4.
5.
6.
Vents
“MENU” push button
Vents
Red LED
“ENTER” push button
Liquid crystal display
10
2.2 Rear panel
7
8
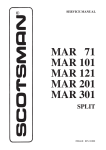
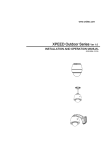
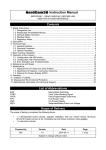
Figure 2. Rear view of RStone™
7. On/off rocker switch
8. Power supply jack (10V DC)
11
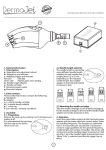
2.3 Power adapter
9
10
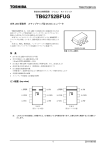
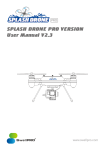
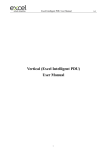
Figure 3. View of the power adapter
9. Power supply plug (10V DC)
10. Mains inlet (100-240 V AC – 50/60Hz)
12
2.4 Label
11
18
12
13
17
16
15
14
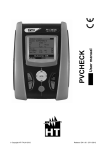
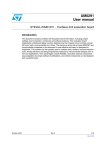
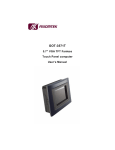
Figure 4. RStone™ label
11. Model and serial number of the device
12. Production year
13. The device must be used in indoor environments only
14. The device must be collected separately from other waste, see paragraph 1.3
15. The device complies to the EU safety standards and requirements
16. The device is provided with double electrical insulation (Class II) and is designed to
operately safely without protective earth
17. Environmental and technical operating specifications. Technical specifications of the
power adapter, see paragraph 2.3. Please refer to Chapters 7 and 8. An explanation of
the label items follows:
Temperature range: it is the ambient temperature range within which the device
can be stored and used;
Humidity range: it is the ambient relative humidity range within which the device
can be stored and used;
Radio: the operating parameters of the RStone™ onboard wireless-device: this
interface operates at a typical frequency of 2433 MHz with a maximum radiated
power equal to 0 dBm. This interface communicates with RKey™;
Power adapter: technical specifications of the external power adapter, see
paragraph 2.3. Mains input range (from 100 to 240 V with frequency in the range
50 to 60 Hz and maximum input current 0.8 A) and the output characteristics
(yields 10 V DC, 2 A max) are reported;
18. Rated DC voltage and current at input power supply jack 8
13
3.
PRODUCT INSTALLATION
3.1 Package contents
First of all make sure that all these items are inside the package:
RStone™
Power adapter
Power cord
Quick start guide
Certificate of Warranty
R&TTE Declaration of Conformity
RKey™ (only RStone™ Plus and RStone™ Pro)
3.2 Preliminary tasks
If the product has been kept at a temperature below 0°C it is recommended to let it acclimate in the
environment in which you intend to use it for 24 hours inside its original packaging, before
removing it from the box.
Thoroughly inspect RStone™, RKey™ (if applicable), the external power supply and power
cords. Should any of these items be damaged do not proceed with the installation, do not
turn the device on and contact your dealer.
If no damage is found, please follow these steps for proper installation of the product, by referring
to Figures 1, 2 and 3 (for the use of RKey™ see Chapter 5):
Make sure that the on/off rocker switch 7 of RStone™ is in the “O” position (i.e. off).
Plug the power cord into the mains inlet 10 of the power adapter.
Plug the power supply plug 9 into the power supply jack 8 of RStone™.
Plug the power cord to an appropriate mains outlet.
WARNING! PLUG THE POWER CORD TO A NORMAL DOMESTIC MAINS OUTLET
RATED AT 230V - 50Hz IN THE E.U. OR RATED AT 120V - 60Hz IN THE UNITED
STATES.
The power supply operates properly with an input voltage between 100V AC and
240V AC with a frequency between 50Hz and 60Hz.
WARNING! CONNECTION TO A MAINS OUTLET OF RATINGS DIFFERENT FROM
THOSE STATED ABOVE MAY CAUSE FATAL DAMAGE TO THE SYSTEM, FIRE OR
EXPLOSION.
RStone™ internal battery is now charging, if it is not fully charged. A drained battery can take up to
10 hours of time to fully charge.
3.3 System settings
For a precise identification of the time of beginning and end of a measurement, RStone™ is
provided with an internal clock powered by a small backup battery that keeps the date and time
14
information updated even when the system is off, when the rechargeable battery is low and the
mains supply is not available.
It is possible to set the language of the messages shown by display 6.
To set the language, the date and the time, the internal rechargeable battery must be charged or
there must be the external power supply connected to an available mains outlet.
Please follow this procedure:
Turn on RStone™ by setting the on/off rocker switch 7 to the “I” (i.e. on) position.
The display shows a welcome screen. Hour is 00:00
Press button 2 – “MENU” until the display reads “SETUP”
Press button 5 – “ENTER”
Press button 2 – “MENU” until the display reads “SET LANGUAGE”
The display reads: “SET LANGUAGE”
Press button 5 – “ENTER”
The display reads “ENGLISH”
Press button 2 – “MENU” until the display shows the desired language.
Press button 5 – “ENTER” to confirm your choice
The display reads “SET LANGUAGE”
Press button 2 – “MENU” until the display reads “SET TIME”
Press button 5 – “ENTER”
The display reads “SET HOUR”
Press button 5 – “ENTER”
The display reads “HH:00”
Press button 2 – “MENU” to increase the hours until the correct is displayed (from 00 to 23)
Press button 5 –“ENTER” to confirm
The display reads “SET HOUR”
Press button 2 – “MENU” until the display reads “SET MINUTE”
Press button 5 – “ENTER” to confirm
The display reads “MM:00”
15
Press button 2 – “MENU” to increase the minutes until the correct value is displayed (from
00 to 59)
Press button 5 –“ENTER” to confirm
The display shows “SET MINUTE”
Press button 2 – “MENU” until the display reads “BACK”
Press button 5 –“ENTER”
The display reads “SET TIME”
Press button 2 –“MENU” fino until the display reads “SET DATE”
Set day, month and year in a similar fashion.
Eventually press button 2 – “MENU” until the stand by screen is displayed
The display should now read the correct date and time
It is now possible to place RStone™ in the desired environment to be monitored. The instrument
can operate properly both when it is powered via the external power supply and when it is operated
by battery power. In the latter case, the sensor body can be operated in places where there is no
power line availability.
3.4 How to correctly position the sensor
The sensor allows to measure the concentration of Radon in the environment where it is placed.
To obtain an accurate measurement it is recommend that you follow these simple guidelines.
Approximately a sensor allows to measure the concentration of Radon in a closed environment of
about 50 m2. If the environment is larger, then it is advisable to make multiple measurements by
placing the sensor in different areas of the environment.
The sensor body must be positioned in a flat, stable place, raised at least 50 cm above the floor.
The sensor body has the vents 1 and 3, which - for the proper operation of the instrument - must
not be blocked. It 'is therefore advisable not to place the sensor body behind curtains, doors or
windows or in a place whose conformation may hinder or obstruct the vents or alter the flow of air
within the instrument. It is therefore recommended to maintain a minimum distance of 25cm
between the sensor body and the walls and 50cm between the sensor and doors, windows,
radiators, stoves, air conditioners.
Due to the layout of a building, the concentration of Radon varies from room to room. Because
Radon escapes from the soil and from the building materials themselves, the sensor should be
placed in a basement or a cellar where possible, but also in rooms at different floors, when
possible, in order to obtain a measurement which is descriptive of the maximum concentration of
Radon in the environment. It is recommended that measurements of Radon concentration be
carried out even in those environments where people spend most of their time, such as bedrooms.
It is indeed important to quantitatively assess the radiation dose received from exposure to Radon.
In general it is advisable to take measurements while keeping closed the doors and windows of the
environment in which the measurement is taking place. If the environment is provided with a
ventilation system, keep it in the normal operating condition.
16
4.
BASIC USE OF RSTONE™
This chapter explains the basic tasks to take a measurement and then to view the results. For
advanced use of the device, see the Chapter "5. Advanced use of the device".
4.1 Browsing the menu items
RStone™ is provided with an user interface consisting of a backlit display 6, a red LED 4, the
pushbutton “MENU” 2 and the pushbutton “ENTER” 5, as shown in Figure 1.
It is useful to become familiar with the simple menu system of RStone™, and learn how to browse
the single menu items
RStone™ is provided with two groups of menu items:
the device programming menu group;
the measurement menu group.
The device programming menu group is the one which is enabled at the device power up and it is
useful to configure the device (date, time, units of measure, recall of previous measurement
results). It also allows the user to set and start a measurement. This group of menus is not active
during a measurement. When the system is in the programming mode, the LED 4 blinks slowly at a
frequency of about one flash every second.
The measurement menu group is active during measurements and allows the user to check at any
time the status of the current measurement and preview the data currently available. It also allows
the user to stop a measure that is currently in progress. During a measurement, the red LED 4
blinks very slowly at a frequency of about one blink every 5 seconds. At the end of a measurement,
the system returns to the programming status and the device programming menu group is active.
Each of the two menu groups features a variety of menu items. Figures 6 and 7 give the complete
structures of the two menu groups.
Referring to such structures, the following rules hold:
by pressing the button 2 – “MENU” the user moves VERTICALLY between two adjacent
menu items
by pressing the button 5 – “ENTER” the user moves HORIZONTALLY between two
adjacent menu items, the rightmost of the two being a submenu of the left one
This is sketched in Figure 5.
17
MENU
ENTER
Figure 5. Browsing the menu items
Figure 6 shows how to browse the menu items.
MENU
START MEASURE
ENTER
START NOW
MENU
SET DURATION
ENTER
ENTER
MENU
MENU
BACK
MEAS ENDS IN 1H
ENTER
MENU
MEAS ENDS IN 12H
ENTER
MENU
Figure 6. Browsing the menu items
For example, if the current menu item is "SET DURATION", by pressing the button 2- MENU one
goes to the next item ("BACK”), whereas by pressing the button 5 - ENTER one goes to the menu
item "MEAS ENDS IN 1H" .
If the current menu item is “BACK”, by pressing the button 2 – MENU one goes back to the first
item of the same menu level (following the dashed line) , by pressing button 5 - “ENTER” one goes
back to the parent menu items, (following the dash-dot line, not shown in the following menu
structures to avoid impairing their readability).
In the previous example, if the current menu item is “BACK”, by pressing button 2 – MENU one
goes back to the menu item “START NOW”; instead pressing button 5 – ENTER one goes back to
“START MEASURE” of the parent menu item level.
18
DEVICE PROGRAMMING MENU
ITEMS
STAND-BY
START MEASURE
START NOW
CONFIRM START
MEASUREMENT
To measurement menu
items
SET DURATION
MEAS ENDS IN 1H
BACK
MEAS ENDS IN 12H
BACK
MEAS ENDS IN 1D
SHOW MEASURE
LATEST MEASUREMENT
INFORMATION
MEAS ENDS IN 7D
MEASURING
MEAS ENDS IN 30D
AVERAGE TOT
BACK
PEAK VALUE
T %RH BAR
BACK
WIRELESS ON
SETUP
WIRELESS
CONFIRM CLEAR
MEMORY CLEAR
WIRELESS OFF
CLEAR MEMORY
BACK
BACK
SET LANGUAGE
SET TIME
SET HOUR
SET MINUTE
MENU: Increase value
ENTER: Save value
MENU: Increase value
ENTER: Save value
BACK
ITALIANO
BACK
SET DATE
SET DAY
BACK
SET MONTH
SET YEAR
MENU: Increase value
ENTER: Save value
MENU: Increase value
ENTER: Save value
MENU: Increase value
ENTER: Save value
BACK
Figure 7. Device programming menu items
19
ENGLISH
MEASUREMENT
MEASUREMENT MENU ITEMS
LATEST MEASUREMENT
INFORMATION
MEASURING
AVERAGE TOT
PEAK VALUE
T %RH BAR
STOP MEASURE
CONFIRM END
STAND-BY
To device
programming
menu items
Figure 8. Measurement menu items
4.2 Programming and executing a measurement
RStone™ allows the user to issue a measurement having the following fixed durations:
indefinite – terminated by the user
1 hour
12 hours
24 hours
7 days
30 days
It is recommended to refer to the sketch of the menu structures shown in Figures 6 and 7.
How to program a measurement having indefinite duration
To make a measurement having indefinite duration, being in the programming mode and in standby, reach the menu item START MEASURE > START NOW > CONFIRM START then press
button 5 – ENTER.
RStone™ is now performing a measurement and the display shows the measurement menu.
To end the ongoing measurement, refer to the measurement menu shown in Figure 7 in order to
reach the menu item STOP MEASURE > CONFIRM END then press button 5 – ENTER. The
display now shows the device programming menu items and RStone™ is in stand-by.
20
How to program a measurement having fixed duration (1 hour, 12 hours, 24 hours,
7 days, 30 days)
To make a measurement having fixed duration –referring to the device programming menu in
Figure 6- reach the menu item START MEASURE > SET DURATION > MEASURE ENDS IN 1H
(or the desired duration) > CONFIRM START then press button 5 - ENTER.
RStone™ is now performing a measurement and the display shows the measurement menu.
To end the ongoing measurement, refer to the measurement menu shown in Figure 7 in order to
reach the menu item STOP MEASURE > CONFIRM END then press button 5 – ENTER. The
display now shows the device programming menu.
The display now shows the device programming menu and RStone™ is in stand-by.
4.3 View the measurement data
The system is capable of displaying the data provided by the latest measurement completed or the
provisional data obtained from a measurement in progress. In both cases the quantities that can be
displayed are as follows:
21
Menu item: “MEASURING”. Concentration during the latest 60 minutes of measurement:
the instrument upgrades every hour the Radon concentration value. This value represents
the most recent concentration value measured by the instrument, in Bq/m3.
Menu item: “AVERAGE TOT”. Overall average concentration: it represents the average
value of Radon concentration since the beginning of the measurement.
Menu item: “PEAK VALUE”. Peak value of the concentration from the beginning of the
measurement: it represents the highest value of Radon gas concentration recorded by the
instrument since the beginning of the measurement.
Menu item: “T %RH BAR”. Temperature, relative humidity and barometric pressure: these
parameters are updated once every hour and provide key information used by the
instrument for the computation of the concentration of Radon gas in the environment. The
temperature is measured in degrees centigrade (Celsius), the relative humidity is
expressed as a percentage and the barometric pressure is in bar.
Menu item: “LATEST MEASUREMENT INFORMATION”. Timing and measurement
sequential numbering: the system is provided with an internal non-volatile memory that
allows all the measurements to be saved. Each of them is assigned a sequential number
and each of them keeps track of the time of beginning and end of the measurement.
RStone™ is able to show the sequential number and the start time of the latest measure
completed or in progress. Referring to Figure 9: nn measurement sequential number;
hh:mm hours and minutes of the beginning of measurement nn, dd/mm/yyyy day when
such measurement began.
MEAS N nn
hh:mm dd/mm/yyyy
Figure 9. Menu item displaying the latest measurement information
How to display the data of the most recent completed measurement
This is possible only when the instrument is NOT currently carrying on a measurement: the
enabled menu items are those of the device programming group, sketched in Figure 7.
Reach the menu item SHOW MEASURE, then press button 5 – ENTER to gain access to the list of
the parameters that can be displayed. Browse such list by using button 2 – MENU then select the
parameter to be displayed by pressing button 5 – ENTER.
Example: to display the average overall concentration reach the menu items SHOW MEASURE >
AVERAGE TOT, then press button 5 – ENTER.
The information thus obtained are those of the latest completed measurement.
To preview the data of an ongoing measurement
This is possible only while the instrument is carrying on a measurement: thus the enabled menu is
the measurement menu sketched in Figure 8.
Press button 2 – MENU until the display shows the parameter of interest.
The information thus obtained pertains to the currently ongoing measurement.
4.4 Exceeding the risk concentration level
If, during a measurement, the system detects a level of Radon gas concentration greater than 200
Bq/m3 the display backlight will flash until either button 2 or 5 are pressed. When one of these
buttons is pressed, the sensor returns to the measurement mode.
Exposure to high Radon concentrations is extremely harmful to health. If it is found the
presence of Radon concentrations above the alarm threshold it is recommended to limit the
stay in that environment to the minimum necessary, air it regularly and ask the competent
authorities to take action as appropriate in this condition in order to find possible solutions
for the problem. It is strongly recommended in this case that a more detailed analysis is
carried out in order to determine the annual average concentration of Radon and then
evaluate possible counteractions.
4.5 Clearing the non-volatile memory of RStone™
WARNING! THIS CAUSES THE LOSS OF ALL DATA OF ALL MEASUREMENTS STORED IN
RSTONE™!
This is possible only when the system is in its programming state. Referring to the device
programming menu sketched in Figure 7, reach the following item:
SETUP > CLEAR MEMORY > CONFIRM CLEAR, then press button 5 – ENTER to definitely erase
ALL the memory content.
22
5.
ADVANCED USE OF THE DEVICE
5.1 Introduction
RStone™ has some advanced operating modes that allow a better exploitation of device
capabilities.
The sensor body has its own internal proprietary wireless radio interface which allows the user to
manage configuration and measurement functions by using a personal computer equipped with
the application software EasyRadon or RadonPro.
To exploit such wireless communication capability, it is necessary to use RKey™, which is a USB
device that provides the sensor body RStone™ with a wireless access point . RKey™ is standard
with RStone™ Plus and RStone™ Pro, while it can be purchased separately in the case of
RStone™ Basic. A single RKey™ can control up to 10 RStone™s by means of RadonPro and one
RStone™ only by means of EasyRadon. Anyway, the distance of wireless communication between
RStone™ and RKey™ can reach 50m in the open space.
The advanced features provided by the use of RStone™ in conjunction with RKey™ and
EasyRadon or RadonPro are :
capability of programming a measurement of user-defined duration;
capability of accessing all the measurements stored in the non-volatile memory of
RStone™;
capability of printing a report on performed measurements. Moreover, RadonPro allows
also measurement data to be exported as CSV (comma-separated values) files, so that
they can be edited by means of any spreadsheet;
RadonPro allows controlling a sensor network made of up to 10 RStone™ devices. Thus it
is possible to manage multiple RStone™ sensors to create a map of Radon concentration
in wide environments.
To use the instrument in remote control mode the wireless radio interface of RStone™ must be
enabled. This is possible only when the device is in programming mode, so refer to the
programming menu, shown in Figure 7.
To enable the wireless interface in RStone™ reach the following menu item:
SETUP > WIRELESS > WIRELESS ON then press button 5 – ENTER.
Now RStone™ tries to connect to a RKey™ within communication range. After the connection has
been established and for all the time the connection is maintained, RStone™ can ONLY be
controlled remotely via a PC and RKey™ by means of EasyRadon or RadonPro. Although
RadonPro offers more functionalities with respect to EasyRadon, both softwares basically share
the same user interface. Therefore, in the following paragraphs the phrase “Control Software” will
be used to identify either EasyRadon or RadonPro without distinction. In those cases where one of
them is explicitly referred to, that software will be referenced by means of its own name.
23
5.2 How to install the control software
To install the control software, first of all download it from www.rsens.it. In order to let it work
properly, it is recommended to install the software prior to connecting RKey™ to the computer for
the first time. The control software requires a personal computer with the following minimum
requirements:
Pentium® processor or similar, clock frequency 1 GHz or higher
At least 512 MBytes of RAM
At least 1 GByte of free space on the hard disk
Windows XP Service Pack 3 operating system or later
To make the Control Software work properly, it is necessary to install Microsoft® .NET Framework
version 4.0. Should that software not be already installed on the PC, the install procedure will ask
for the installation and will proceed to complete it.
In order to install the control software, open the folder where it has been downloaded and double click “Setup.exe” to begin the installation procedure. Figure 10 shows the startup screen of the
installation procedure. Only the procedure for EasyRadon is displayed, since the one for RadonPro
is the same.
Figure 10. Startup screen of the installation procedure for the control software
Click “Next” to proceed with the installation. Figure 11 shows the following screen.
24
Figure 11. Choice of the installation folder
Although it is recommended to keep the default settings, it is possible to customize the target
installation folder. To do this click “Browse” and then select the desired folder from the displayed
list.
Then, choose whether the software is to be installed for the current user or for all the user
accounts of the PC. Then click “Next”. Figure 12 shows the following screen.
25
Figure 12. Installation confirmation
By clicking “Next” the system will install the control software and all the required drivers onto the
PC. The process might last several minutes. At the end of the installation process, a link to the
control software will be created on the Desktop and an entry will be placed in the Start menu.
5.3 Installation of RKey™
The installation procedure of the control software will also install the USB drivers for RKey™. This
makes the installation of RKey™ easy. Please make sure that the control software has been
correctly installed before RKey™ is plugged for the first time into a USB port of the PC. This will
avoid potential installation issues. After installing the control software, plug RKey™ into a free USB
port of the PC. The computer will recognize the connected device and then it will copy the driver
files into the correct folder. This might take several minutes. After the installation of RKey™ has
been completed, the user is notified that RKey™ has been correctly installed.
5.4 Controlling RStone™ by means of the control software
The first time the control software is launched, the user is required to enter the 11-character serial
number of the RKey™ device that will be used. By inserting a wrong serial number it will not be
possible to use the software.
It is possible to change the RKey™ to be used with the software at any time, simply by entering the
new RKey™ serial number in the “Registration” item of the “Help” menu.
The control software has been designed in order to ensure the utmost ease of control of RStone™
using your PC. Figure 13 shows a screenshot of the main window. First, you can configure the
control software for what concerns the language and, in the case of RadonPro, the working
directory.
26
Figure 13. Control software main window. EasyRadon is shown.
Setting the language
First set the language, click on the menu item "View" and then "Settings". Select the language by
clicking on "Italian" or "English".
Setting the working directory (RadonPro only)
By clicking on the menu item "View" and then "Settings", the user can specify the folder where
RadonPro measurement reports are to be saved in CSV format.
In order to remotely control one or more RStone™s, RKey™ must be connected first.
5.4.1 Connection of RKey™
The connection of RKey™ to a computer USB port must be done before launching the control
software. After the software has been launched, it will automatically connect to RKey™. A
message in the bottom side of the control software main window confirms the succesful connection
of RKey™ and the virtual COM-port number assigned to the device.
Should such message not appear, it is suggested to close the control software, unplug RKey™
then repeat the connection procedure outlined before.
5.4.2 Remote connection to RStone™
After making sure that the connection between the control software and RKey™ has been
established, to remotely control RStone™ it is necessary to enable its wireless radio interface. To
do this, follow the procedure outlined in Section 5.1. After activating the wireless interface, the first
responding RStone™ within communication range is detected automatically by the control
27
software. Up to 10 RStone™s can be connected to RadonPro. To connect more than one
RStone™ with RadonPro, click “Find new RStone™” in the “File” dropdown menu. EasyRadon
allows only one RStone™ to be controlled. In the case EasyRadon is used and multiple RStone™s
are within communication range, the software will connect to the first one responding. A list of
discovered devices is shown in the left window called "Connected device". Note that in the case of
RadonPro this list is updated automatically when one or more RStone™s are connected or
disconnected. If, within that list, the user clicks on one of the devices listed (that is, connected) , its
status is shown in the window called "Device Status".
The "Device Status" window shows the following information: name of the selected device, signal
strength of the wireless link between the device selected and RKey™, date and time set in the
device. When RStone™ is performing a measurement, each value of Radon concentration
collected is associated with the time instant when such value was collected. It is thus
recommended to keep the PC system date/time up to date.
5.4.3 How to program a measurement of user-defined duration
In the case of RadonPro, in order to program a measurement having a user-defined duration, the
user must first click on the RStone™ device to be programmed within those in the list of devices
found in the "Connected device" window. Notice that the serial number of the RStone™ is
displayed alongside the device name, so that it can be precisely identified among the other
RStone™s listed. Instead, in the case of EasyRadon, only one RStone™ is listed therefore it is not
necessary to click on the name of the device.
Then, in the "Measurement settings" window, use the dropdown menu below the text "Select
duration" to set the duration of the measurement.
Now, by clicking on the button "Start measure" the user-defined measurement will be programmed
in RStone™. The measurement starts immediately. After doing this, the user can quit the control
software (see Section 5.4.8) and disconnect RKey™ since the programmed information and timing
are stored in RStone™.
5.4.4 Downloading measurement data from RStone™
After carrying out the procedure for connecting RStone™ devices to the control software,
according to the procedure outlined in Section 5.4.2, the list of the currently connected devices is
shown in the "Connected device" window on the left. By clicking on a connected device from the
list, the window labeled "Measurement Results" shows the list of measurements carried out and
stored in the non-volatile memory of the selected RStone™ device. These are available for
download. For each measurement stored into the non-volatile memory of RStone™ the following
information are reported: sequential numbering, date and time of the beginning of the
measurement, date and time of its end and its total duration. Click on the measurement you want
to download on the PC, then click the "Acquire" button.
Of course, in the case of EasyRadon it will not be necessary to click on the selected device name
to display measurement information since only one RStone™ will be listed.
The download time is strongly dependent on the measurement duration. Typically, it takes
approximately 1 s to download the data of 6 hours of measurement.
While data are being downloaded, they are represented in a graph in the center of the main
window of the control software. The plot represents time-courses of quantities measured by the
instrument. By means of the “Plot preferences” checkboxes it is possible to configure the graph
28
choosing the measured quantities to be displayed. Available quantities are: Radon concentration
(Bq/m3), average Radon concentration (Bq/m3), Temperature (°C), Relative Humidity (%RH) and
Pressure (mbar). Relative Humidity and Pressure are not available in EasyRadon. Moreover,
measurement uncertainty for Radon concentration can be displayed both for EasyRadon and
RadonPro.
A table on the left side of this chart is populated with data as they are downloaded. Each row of
this table refers to measurement data representative of 60 minutes of time. For each measurement
point, the collection time (column "Time"), the day (column "Date"), and the available measured
quantities are reported. With RadonPro, such table can be selected, copied (Ctrl+C) and then
pasted (Ctrl+V) into any spreadsheet. This allows the user to access measurement data and
postprocess them (if necessary). Moreover, RadonPro saves table data into a CSV file stored into
the working directory specified in Section 5.4.
Notice that downloading a measurement does not remove it from RStone™ non-volatile memory.
5.4.5 Creating a measurement report
It is possible to create a measurement report and print it. In order to do this, the measurement data
of interest must be preliminarly downloaded according to the procedure outlined in Section 5.4.4.
When the data downloading process is finished, select the menu “File” and then “Print Report” to
print a measurement report of the selected measurement. Such report includes the same plot as
displayed in the control software and measurment time information such as duration and
measurement start- and stop- time. In addition, environmental quantities as measured by the
instruments are reported. RadonPro is capable of including optional operator and customer
information in the report: after clicking “Print Report”, the user is requested to specify whether
operator and customer information are to be included in the report. The generated report will
include such information as requested.
5.4.6 Clearing the non-volatile memory of RStone™
WARNING! This procedure will erase ALL the data of ALL MEASUREMENTS from the nonvolatile memory of RStone™. After this procedure it will no longer be possible to retrieve
such data!
To erase the memory of RStone™, connect the device as described in Section 5.4.2. Select the
device from the list of devices found by clicking on the device of interest. After the list of stored
measurement appears in the "Measurement Results" window, click on the "Reset" button. As a
proof of deletion, the list of the measurements should now be empty.
5.4.7 Getting Help
To download the latest version of this guide, click on the “ Help" drop-down menu , then "Help" and
then "Online Help", or simply press Ctrl+H.
5.4.8 Quitting EasyRadon
To quit EasyRadon simply access the "File" drop-down menu then "Close". The same effect occurs
with the key combination Alt+F4.
29
6.
CARE AND MAINTENANCE
The product is equipped with vents (1 and 3, Figure 1), which must be kept free from dust in order
to get an accurate measurement of the concentration of Radon gas in the environment. Prevent an
excess of dust from depositing onto the sensor body. To clean RStone™ gently weep its body with
a clean soft dry cloth approximately once a week. Do not use chemicals, which could damage the
device and potentially cause fire or explosion. Do not use either liquid or a wet cloth, because the
liquid might leak inside the device and potentially cause damage, fire, explosion. Do not touch a
wet device, because there is a risk of electric shock.
Always follow the most basic safety rules and follow the instructions given in Section "1.2
Safety".
If the device is to be transported or stored for a long time, it is recommended to enclose it within its
original packaging, using a plastic bag for each item. Prevent the device from suffering shocks,
falls, or exposure to excessive heat or cold or excessive moisture. Refer to Section 7.1. A device
that has been kept, stored or transported at temperatures below 0°C prior to use must be allowed
to acclimate to room temperature for at least 24 hours in its own sealed bag, in order to avoid
condensation.
30
7.
RSTONE™ TECHNICAL SPECIFICATIONS
7.1 General
External supply voltage input
RStone™ voltage input
Temperature (storage and working)
Relative humidity (storage and working)
Battery Life
Storage capacity
Dimensions
Weight
100-240 VAC, 50-60 Hz, 0.8 A
10 V, 1400 mA
0°C – 40°C
0% RH – 95% RH
15 days typ.
100 measurements of 1 year each
16x16x11 cm
1.8 kg
7.2 Radon concentration measurement
Measuring range
Sensitivity
Uncertainty
Blank count rate (null Radon concentration)
Update rate
Alert threshold
0 Bq/m3 … 5 MBq/m3
5 count/h @ 100 Bq/m3
20% after 4h @ 150 Bq/m3 or after 1h @
500Bq/m3 (coverage factor k=1)
0.05 count/h (1.2 Bq/m3)
60 minutes
200 Bq/m3 (ref. Eur. Recomm. 90/143/Euratom)
7.3 Other environmental measurements
Temperature full-scale range
Temperature resolution
Temperature accuracy
Pressure full-scale range
Pressure resolution
Pressure accuracy
Relative humidity full-scale range
Relative humidity resolution
Relative umidity accuracy
-40°C … +125°C
0.04°C
± 0.3°C typ.
50 kPa … 115 kPa
0.15 kPa typ.
± 1 kPa typ.
0% RH … 100% RH
0.7% RH
± 2% RH typ.
7.4 Radio wireless interface
Frequency
Data rate
Channel bandwidth
Maximum output power
Modulation
2433 MHz nominal
250 kbaud max.
200 kHz
0 dBm
MSK
7.5 Rechargeable battery
Type
Voltage
Capacity
Charge mode
Charge current
Charge time
31
Rechargeable Li-Ion
7.2 V
10 Ah
CC-CV
1100 mA max.
10 h typ.
8. RKEY™ TECHNICAL SPECIFICATIONS
8.1 General
Supply voltage
Current
Temperature (storage and working)
Relative humidity (storage and working)
Size
Weight
5 V, USB-supplied
60 mA
0°C – 40°C
0% RH – 95% RH
6.5x2.3x1.5 cm excluding the USB prong
12 g
8.2 Radio wireless interface
Frequency
Data rate
Channel bandwidth
Maximum output power
Modulation technique
2433 MHz nominal
250 kbaud max.
200 kHz
0 dBm
MSK
8.3 USB interface
USB 2.0, compatible with USB 1.1.
9.
REGULATORY FRAMEWORK
RStone™ and RKey™ comply with the requirements of the European Directive 1999/5/CE
(R&TTE) and have passed the conformity test as per the following harmonized standards. Refer to
the R&TTE Declaration of Conformity
EN 61010 – 1 (RStone™)
EN 60950 -1 (RKey™)
EN 301 489 - 17
EN 301 489 - 1
EN 300 328
EN 61326
RSens srl disclaims any responsibility for any typographical errors included in this manual, and reserves the
right to make changes to their products in order to improve their functional performance.
Windows® is a registered trademark of Microsoft Corporation in the United States and other countries.
Pentium® is a trademark of Intel Corporation in the U.S. and/or other countries.
32
10. WARRANTY
10.1 General
a)
b)
c)
d)
This instrument and its accessories are warranted by RSens srl against defects in materials
and workmanship for a period of one year from the date of original purchase from RSens.
During the warranty period, RSens will repair, or at its option, replace an instrument found to
have such defect, at no charge to the customer. THERE ARE NO WARRANTIES,
EXPRESSED OR IMPLIED, INCLUDING WITHOUT LIMITATION, ANY IMPLIED
WARRANTY OF MERCHANTABILITY OF FITNESS, WHICH EXTEND BEYOND THE
DESCRIPTION ON THE FACE HEREOF. THIS EXPRESSED WARRANTY EXCLUDES
COVERAGE OF AND DOES NOT PROVIDE RELIEF FOR INCIDENTAL OR
CONSEQUENTIAL DAMAGES OF ANY KIND OR NATURE, INCLUDING BUT NOT
LIMITED TO LOSS OF USE, LOSS OF SALES OR INCONVENIENCE. THE EXCLUSIVE
REMEDY OF THE PURCHASER IS LIMITED TO REPAIR, RECALIBRATION, OR
REPLACEMENT OF THE INSTRUMENT AT THE OPTION OF RSENS.
This warranty does not apply if the product, as determined by RSens, is defective due to either
failure to follow RSens’s installation and use instructions, abuse, misuse, or modification or
service performed by someone other than a RSens authorized repair and calibration facility.
Misuse and abuse include, but are not limited to, subjecting the instrument to environmental
conditions outside the specified limits or allowing the instrument to become contaminated by
radioactive materials.
In order to obtain warranty repair service, the instrument must be returned, freight prepaid, to
the facility cited in 10.3b below. The purchase date, vendor invoice, or customer purchase
order should be included, along with a statement of the problem. Instruments will be returned
transportation prepaid to the operative facility cited in 10.3b below.
Because the original manufacturer’s warranty applies, the following items are specifically
excluded from this warranty: photomultiplier, photodetectors, Geiger-Mueller and proportional
tubes; batteries; ancillary devices, including, but not limited to, printers, computers, display
devices, etc.; and other components as may be specified in this manual.
10.2 Calibration
a)
b)
This instrument is warranted to be calibrated at the time of shipment. If a question arises and
RSens determines that the initial calibration is in error, the instrument will be re-calibrated by
RSens at no charge. RSens is not responsible for calibrations performed by independent
laboratories, nor any calibration fees incurred prior to or subsequent to RSens warranty
service.
The return policy is as stated in 10.1c above.
10.3 Non-warranty service
a)
a)
Repairs and/or replacements not covered by this warranty may be performed by RSens or a
factory authorized service location. Estimates of repair charges may be requested.
The cost of transportation into and out of the service location will be the responsibility of the
customer. The instrument should be shipped to:
RSens srl
Via Vignolese, 905/b
41125 Modena (MO) – ITALY
phone (+39) 059-2056262 | fax (+39) 059-2056262
33
®
© Copyright RSens. All rights reserved.