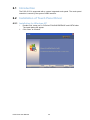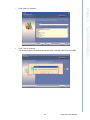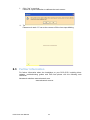
1
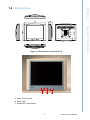
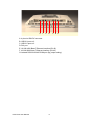
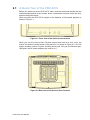
User Manual
POC-S176
Point-of-Care Terminal
Instructions for the User
The document combines text and illustrations, providing a comprehensive overview
of the system. The information is presented as sequential steps of action, allowing
the user to learn directly how to use the device.
The text provides explanations and instructs the user step-by-step in the practical
use of the product, with short, clear instructions in easy-to-follow sequence.
Definitions
Warning! A WARNING statement provides important information about a potentially hazardous situation which, if not avoided, could result in death or
serious injury.
Caution! A CAUTION statement provides important information about a potentially hazardous situation which, if not avoided, may result in minor or
moderate injury to the user or patient or in damage to the equipment or
other property.
Note!
A NOTE provides additional information intended to avoid inconveniences during operation.
POC-S176 User Manual
Part No. 2008017600-01
Edition 1
Printed in Taiwan
February 2009
ii
Safety Instructions
Strictly follow these Instructions for Use, please read these safety instructions carefully.
Remind to keep this User's Manual for later reference, and any use of the product
requires full understanding and strict observation of all portions of these instructions.
Observe all WARNINGS and CAUTIONS as rendered throughout this manual and on
labels on the equipment.
Repair of the device may also only be carried out by trained service personnel.
Advantech recommends that a service contract be obtained with Advantech Service
and that all repairs also be carried out by them. Otherwise the correct functioning of
the device may be compromised.
Warning! Because of the danger of electric shock, never remove the cover of a
device while it is in operation or connected to a power outlet.
If one of the following situations arises, have the equipment checked by service personnel:
a. The power cord or plug is damaged.
b. Liquid has penetrated the equipment.
c. The equipment has been exposed to moisture.
d. The equipment does not work well, or you cannot get it to work according to the
user's manual.
e. The equipment has been dropped and damaged.
f.
The equipment has obvious signs of breakage.
Disconnect this equipment from any AC outlet before cleaning. Use a damp cloth. Do
not use liquid or spray detergents for cleaning and keep this equipment away from
humidity.
Caution! To avoid short-circuits and otherwise damaging the device, do not allow
fluids to come in contact with the device. If fluids are accidentally spilled
on the equipment, remove the affected unit from service as soon as possible and contact service personnel to verify that patient safety is not
compromised.
Put this equipment on a reliable surface during installation. Dropping it or letting it fall
may cause damage. For plug-in equipment, the power outlet socket must be located
near the equipment and must be easily accessible.
Caution! To prevent overheating, it is recommended to install the unit in an
upright position. Do not lie it flat on a table and do not cover the openings or place the device in direct sunlight or near radiant heaters.
iii
POC-S176 User Manual
Make sure the voltage of the power source is correct before connecting the equipment to the power outlet. Position the power cord so that people cannot step on it. Do
not place anything over the power cord. If the equipment is not used for a long time,
disconnect it from the power source to avoid damage by transient over voltage.
Caution! Do not leave this equipment in an uncontrolled environment where the
storage temperature is below -20°C (-4°F) or above 60°C (140°F). This
may damage the equipment.
If your computer clock is unable to keep accurate time or the BIOS configuration
resets to default, please check the battery.
Caution! Do not replace the battery yourself. Please contact a qualified technician
or your retailer.
The computer is provided with a battery-powered real-time clock circuit.
There is a danger of explosion if battery is incorrectly replaced. Replace
only with same or equivalent type recommended by the manufacturer.
Discard used batteries according to the manufacturer’s instructions.
Improper installation of VESA mounting can result in serious personal injury! VESA
mount installation should be completed by a professional technician, please contact
the service technician or your retailer if you need this service. The detailed installation procedure is specified in Appendix A.
CLASSIFICATION:
! Supply Class I adapter
! No applied parts
! IPX1
! Continuous operation
! Not AP or APG category
Warning! This device is not suitable for use in the presence of flammable anesthetic mixtures with air, oxygen, nitrous oxide, or as a life support system.
Maintenance: To properly maintain and clean the surfaces, use only the approved
products or clean with a dry applicator.
Caution! When servicing the device, always use replacement parts that meet
Advantech standards. Advantech Medical cannot warrant or endorse
the safe performance of third-party replacement parts for use with our
medical device.
Make sure users do not come in contact with SIP/SOPs and the patient at the same
time.
POC-S176 User Manual
iv
When connecting electrical devices, the operator is responsible for ensuring that the
resulting system meets the requirements set forth by the following standards:
EN 60601-1 (IEC 60601-1)
Medical electrical equipment
Part 1: General requirements for safety
EN 60601-1-1 (IEC 60601-1-1)
Medical electrical equipment
Part 1-1: General requirements for safety
Collateral standard: Safety requirements for Medical electrical systems
EN 60601-1-2 (IEC 60601-1-2)
Medical electrical equipment
Part 1-2: General requirements for safety
Collateral standard: Electromagnetic compatibility; Requirements and tests
Accessory equipment connected to the analog and digital interfaces must be in compliance with the respective nationally harmonized IEC standards (i.e. IEC 60950 for
data processing equipment, IEC 60065 for video equipment, IEC 61010-1 for laboratory equipment, and IEC 60601-1 for medical equipment). Furthermore all configuration should comply with the system standard IEC 60601-1-1. Anyone who connects
additional equipment to the signal input or signal output is configuring a medical system, and is therefore responsible that the system complies with the requirements set
forth in standard IEC 60601-1-1. The unit is for exclusive interconnection with IEC
60601-1 certified equipment in the patient environment and IEC 60XXX certified
equipment outside of the patient environment. If in doubt, consult the technical services department or your local representative.
v
POC-S176 User Manual
FCC Class B
This equipment has been tested and found to comply with the limits for a Class B digital device, pursuant to Part 15 of the FCC Rules.
These limits are designed to provide reasonable protection against harmful interference when the equipment is operated in a residential environment. This equipment
generates, uses, and can radiate radio frequency energy. If not installed and used in
accordance with this user's manual, it may cause harmful interference to radio communications.
Note that even when this equipment is installed and used in accordance with this
user's manual, there is still no guarantee that interference will not occur. If this equipment is believed to be causing harmful interference to radio or television reception,
this can be determined by turning the equipment on and off. If interference is occurring, the user is encouraged to try to correct the interference by one or more of the
following measures:
! Reorient or relocate the receiving antenna.
! Increase the separation between the equipment and the receiver.
! Connect the equipment to a power outlet on a circuit different from that to which
the receiver is connected.
! Consult the dealer or an experienced radio/TV technician for help.
Warning! Any changes or modifications made to the equipment which are not
expressly approved by the relevant standards authority could void your
authority to operate the equipment.
List of Accessories
Before installing your Point-of-Care Terminal, ensure that the following materials
have been received:
! POC-S176 series Point-of-Care Terminal
! Accessories for POC-S176
– CD-ROM disc-"Drivers, User's manual and Utilities"
– Mounting kits and packet of screws
– External DC adapter (Manufacturer: SINPRO Model no.: MPU100-107)
Warning! No user serviceable parts inside, refer servicing to qualified personnel.
Only the accessories indicated on the list of accessories above have
been tested and approved to be used with the device. Accordingly
It is strongly recommended that only these accessories be used in conjunction with the specific device. Otherwise the correct functioning of the
device may be compromised.
POC-S176 User Manual
vi
Additional Information and Assistance
Contact your distributor, sales representative, or Advantech's customer service center for technical support if you need additional assistance. Please have the following
information ready before you call:
! Product name and serial number
! Description of your peripheral attachments
! Description of your software (operating system, version, application software,
etc.)
! A complete description of the problem
! The exact wording of any error messages
! This equipment is a source of electromagnetic waves. Before use please make
sure that there are not EMI sensitive devices in its surrounding which may otherwise malfunction.
Manufacturer
Advantech Co., Ltd.
No.1, Alley 20, Lane 26, Reuiguang Road Neihu District, Taipei,
Taiwan 114, R.O.C.
TEL: (02) 2792-7818
Distributed in Europe by:
Advantech Europe GmbH Kolberger Straße 7
D-40599 Düsseldorf, Germany
Tel: 49-211-97477350
Fax: 49-211-97477300
Visit the Advantech websites at www.advantech.com or www.advantech.com.tw if
you need more information.
vii
POC-S176 User Manual
POC-S176 User Manual
viii
Contents
Chapter
1
General Information ............................1
1.1
1.2
Introduction ............................................................................................... 2
Specifications ............................................................................................ 2
Table 1.1: Touchscreen Specification ......................................... 4
LCD Specifications.................................................................................... 4
Dimensions ............................................................................................... 5
Figure 1.1 Dimensions of the POC-S176 .................................... 5
1.3
1.4
Chapter
2
System Setup .......................................7
2.1
A Quick Tour of the POC-S176................................................................. 8
Figure 2.1 Front view of the Point-of-care terminal...................... 8
Figure 2.2 Rear view of the Point-of-Care Terminal .................... 8
Installation Procedures.............................................................................. 9
2.2.1 Connecting the Power Cord.......................................................... 9
2.2.2 Switching on the Power ................................................................ 9
Figure 2.3 Connecting the power cord......................................... 9
Running the BIOS Setup Program .......................................................... 10
Installing System Software...................................................................... 10
Installing the Drivers................................................................................ 11
Figure 2.4 File directory "Drivers and Utilities" CD-ROM........... 11
2.2
2.3
2.4
2.5
Chapter
3
Chipset and Graphics Setup ............13
3.1
Introduction ............................................................................................. 14
3.1.1 Chipset........................................................................................ 14
3.1.2 Display Memory .......................................................................... 14
3.1.3 DVI Transmitter........................................................................... 14
3.1.4 Display Types ............................................................................. 14
Installation of Chipset Driver ................................................................... 15
3.2.1 Installation for Windows XP ........................................................ 16
3.2
Chapter
Chapter
Chapter
4
Audio Interface ..................................21
4.1
4.2
4.3
Introduction ............................................................................................. 22
Installation of Audio Driver ...................................................................... 22
4.2.1 Installation for Windows 2000/XP ............................................... 23
Further Information.................................................................................. 24
5
PCI Express Ethernet Interface ........25
5.1
5.2
5.3
Introduction ............................................................................................. 26
Installation of the Ethernet Driver............................................................ 26
5.2.1 Installation for Windows XP ........................................................ 26
Further Information.................................................................................. 27
6
Touch Panel Interface .......................29
6.1
6.2
Introduction ............................................................................................. 30
Installation of Touch Panel Driver ........................................................... 30
ix
POC-S176 User Manual
6.3
6.2.1 Installation for Windows XP ........................................................ 30
Further Information ................................................................................. 34
7
Utilities and Hot Fixes ...................... 35
7.1
7.2
Introduction ............................................................................................. 36
Wake up by External USB Device at S3 Resume (Wake up) ................. 36
7.2.1 Installation for Windows XP ........................................................ 36
8
Operation Information ...................... 37
8.1
8.2
8.3
8.4
8.5
Plug in the Power Adapter ...................................................................... 38
Thermal................................................................................................... 38
Disconnect the power ............................................................................. 38
Point-of-Care Terminal Cleaning and Disinfecting.................................. 39
General Safety Guide ............................................................................. 40
Appendix A
Description of Connectors............... 41
A.1
Description of Connectors....................................................................... 42
Figure A.1 Top Side Global View of POC-S176 Motherboard indicates all connectors’ location. .................................. 42
Figure A.2 Bottom Side Global View of POC-S176 Motherboard
indicates all connectors’ location.............................. 43
Appendix B
Windows Display Hot Key Function 45
B.1
Windows Display Hot Key Function ........................................................ 46
Chapter
Chapter
POC-S176 User Manual
x
Chapter
1
1
General Information
Sections include:
! Introduction
! Specifications
! LCD Specifications
! Dimensions
1.1 Introduction
The POC-S176 is an Intel® CoreTM Duo / Intel® Core 2 Duo Mobility processorbased computer that is designed to serve as a Point-of-Care terminal (POC.) It is a
PC-based system with 17" color TFT LCD display, Single DVI-I Port, Dual on-board
10/100/1000 PCI-E Ethernet controller, Single COM port, Quad USB 2.0 port and a
24-bit stereo audio controller. With a built-in 2.5” HDD drive, the POC-S176 is as slim
and user-friendly as a notebook computer and generates low audible noise. For system integrators, this silent, compact, mobile and highly integrated multimedia system
lets you easily build a Point-of-Care Terminal into your applications. The low audible
noise of POC-S176 makes it an ideal and safe Point-of-Care solution for patients and
hospital practitioners.
The POC-S176 is specially designed to resist spills and water damage, and ensures
dust resistance with its protected LCD, sealed ports, like a closed system. The high
contrast ratio (500:1) of POC-S176 makes it a perfect image terminal for PACS and
DICOM applications. The POC-S176 is a reliable solution to your application's processing requirements.
1.2 Specifications
General
! Dimensions (W x H x D): 436.5 x 376.5 x 91.5 mm (17.18" x 14.82" x 3.60")
! Weight: 8 kg (17.6 lb)
! Power Supply:
– DC model: 100 watts max External DC Adapter- (Manufacturer: SINPRO
Inc. Model no.: MPU100-107) used within POC-S176XXXXXXXX
– Input voltage: 100-240 VAC, 47-63 Hz, 1.25-0.5 A
– Output voltage: +18 VDC, 5.55 A max
! Disk drive housing: Space for one 2.5" SATA HDD
! Entire system:
– IPX1 water resistant rating
Hardware
! CPU: Intel® Core Duo® / Core 2 Duo® processor low voltage 1.66/1.5 GHz
(uFC BGA479)
! BIOS: Award 512 KB Flash BIOS, supports Plug & Play, APM
! Chipset: 945 GME GMCH, (ICH7M)
! Front side bus: FSB 533/667 MHz
! RAM: 200-pin DDR2 SODIMM slots x 2, supports unbuffered 533/667 MHz
DDR2-SDRAM (Non ECC), maximum capacity to 4 GB “For the memorymapped I/O (MMIO) space reserved, the 32-bit operating systems limit the total
available memory to 3.12 GB to avoid potential driver compatibility issues.”
! IDE interface: ATA/100 x 1. Supports one IDE device.
! SATA interface: SATA x 2. Supports one SATA device.
! Serial ports: RS-232 port x 1, all compatible with 16C550 UARTs. COM1 has
optical isolation; COM1 supports +5V by jumper selection.
! Universal serial bus (USB) port: USB 2.0 port x 6 (4 external, 2 internal)
! Expansion slot: Mini PCI/33MHz slot x 1, Mini PCI-E(2.5Gb/s) slot x 1
! Watchdog timer: supports Super I/O embedding watchdog function. Automatically generates system reset when the system stops due to a program error.
! CMOS battery (BIOS): 3.0 V @ 195 mA lithium battery
POC-S176 User Manual
2
Ethernet interface
! Chipset: RTL8111B PCI express high performance Gigabit Ethernet controller
! Ethernet interface: Gigabit Ethernet port x 2, fully integrated Gigabit Ethernet
Media Access Control (MAC) and Physical Layer (PHY) functions, and each
provides a standard IEEE 803.3 Ethernet interface for 10/100/1000 Mbps application
Optional modules
! Memory: 512 MB/1GB/2GB, DDR2-533/667 MHz SODIMM
! HDD: 2.5", SATA HDD
! Mini PCI WLAN module: 802.11 a/b/g WLAN
! Mini PCI-E WLAN module: 802.11 b/g/n WLAN
Environment
! Temperature: 0 ~ 40° C
! Relative humidity:
– 10 °C to 40 °C / 20% RH to 90% RH operating
– -20 °C to 50 °C/ 10% RH to 95% RH Storage (Non-condensing)
! Shock: 20 G, half sine, 11 msec duration
! Vibration: 0.047 double amplitude displacement (5~32 Hz) 2G Peak (32 -500
Hz)
! Power MTBF: 100,000 hrs
! Altitude: Operational: 6,000 feet; Shipping: 40,000 feet
! Certifications:
– EMC: CE, FCC approved
– Safety: UL60601-1 and EN60601-1 approved
This device bears the CE label in accordance with the provisions of the EMC Directive 89/336/EMC and the Low Voltage Directive 73/23/EEC.
3
POC-S176 User Manual
General Information
Audio function
! Chipset: Realtek ALC888, compliant with Intel HDA
! Audio controller: 24-bit codec, full-duplex stereo codec
! Audio interface: Microphone-in, Line-out
Chapter 1
Display interface
! SDVO interface: Chrontel 7307C Single channel DVI transmitter to support
External Single display
! Display resolution: Supports 24-bit digital output (DVI-I port) resolutions up to
1600 x 1200 at 60 Hz
! Graphic chipset: Intel® Graphics Media Accelerator 950 engine
! Shared memory: Dynamic Video Memory Technology (DVMT) 3.0 to dynamically allocate up to 224 MB of system memory for graphics usage.
! Display type: Simultaneously supports CRT
Touchscreen (optional)
Table 1.1: Touchscreen Specification
Type
Analog Resistive
Resolution
Continuous
Light Transmission
75%
Controller
RS-232 interface (uses COM3)
Power Consumption
+5V@200 Ma
Software Driver
Supports Windows 2000,Windows XP
Durability (touches in a lifetime)
30 million
Note!
The Point-of-Care Terminal with the optionally installed touchscreen will
share COM3. Once the touchscreen is installed, COM3 cannot be used
for other purposes.
Cleaning/Disinfecting
During normal use of the POC-S176 may become soiled and should, therefore, be
cleaned regularly. Agents: Green tinctured soap and Enzymatic detergents
Steps:
1. Wipe the POC-S176 with a clean cloth that has been moistened in the cleaning
solution.
2. Prepare agent per manufacturer’s instructions or hospital protocol.
3. Wipe thoroughly with a clean cloth
Caution! Do not immerse or rinse the POC-S176 and its peripherals. If you accidentally spill liquid on the device, disconnect the unit from the power
source. Contact your Biomed unit regarding the continued safety of the
unit before placing it back in operation.
Do not spray cleaning agent on the chassis.
Do not use disinfectants that contain phenol. Do not autoclave or clean
the POC-S176 or its peripherals with strong aromatic, chlorinated,
ketone, ether, or Esther solvents, sharp tools or abrasives. Never
immerse electrical connectors in water or other liquids.
1.3 LCD Specifications
!
!
!
!
!
Display type: 17" TFT LCD.
Resolution: 1280 x 1024
Colors: 16.7 M (8-bit/color)
Dot size (mm): 0.264 x 0.264
Viewing angle: 140°/130°
!
!
!
!
Luminance: 300 cd/m2
Contrast ratio: 500: 1
LCD MTBF: 50,000 hours
Backlight lifetime: 50,000 hours
POC-S176 User Manual
4
Chapter 1
1.4 Dimensions
A
B
C
A. Audio Control Button
B. Power Light
C. Brightness Control Button
5
POC-S176 User Manual
General Information
Figure 1.1 Dimensions of the POC-S176
G
F
E
D
C B A
A. 4-pin mini-DIN DC connector
B. USB 2.0 ports x 2
C. USB 2.0 ports x 2
D. DVI port
E. 10/100/1000 Base-T Ethernet interface (RJ-45)
F. 10/100/1000 Base-T Ethernet interface (RJ-45)
G. Isolated RS-232/422/485 COM port (By jumper setting)
POC-S176 User Manual
6
Chapter
2
2
System Setup
Sections include:
! A Quick Tour of the POC-S176
! Installation Procedures
! Running the BIOS Setup Program
! Installing System Software
! Installing the Drivers
2.1 A Quick Tour of the POC-S176
Before you start to set up the POC-S176, take a moment to become familiar with the
locations and purposes of the controls, drives, connections and ports, which are illustrated in the figures below.
When you place the POC-S176 upright on the desktop, its front panel appears as
shown in Figure 2.1.
Figure 2.1 Front view of the Point-of-care terminal
When you turn the Point-of-Care Terminal around and look at its rear cover, the
sunken I/O section is at the bottom of the panel PC, as shown in Figure 2-2. (The I/O
section includes various I/O ports, including serial ports, DVI port, the Ethernet port,
USB ports, the DC power adapter jack, and so on.)
Figure 2.2 Rear view of the Point-of-Care Terminal
POC-S176 User Manual
8
2.2.1 Connecting the Power Cord
Warning! The POC-S176 is supplied by a 100 Watt power supply and a special
adapter as depicted in the model above.
If a medical adaptor is connected to the POC-S176, the customer must
ensure legal and regulatory compliance and that the device meets the
law and standards compliance requirements of this hardware.
2.2.2 Switching on the Power
Switch on the power switch on the back I/O.
Figure 2.3 Connecting the power cord
9
POC-S176 User Manual
System Setup
The POC-S176 could only be powered by a DC power adapter (SINPRO Model No.
MPU100-107). Be sure to always handle the power cords by holding the plug ends
only.
Follow these procedures in order:
1. Connect the female end of the power adapter to the DC jack of the panel PC.
(See Figure 2.3.)
2. Connect the female end of the power cord to the DC power adapter.
3. Connect the 3-pin male plug of the power cord to an electrical outlet.
Chapter 2
2.2 Installation Procedures
2.3 Running the BIOS Setup Program
Your POC-S176 has more than likely been properly set up and configured by your
dealer prior to delivery. You may still find it necessary to use the BIOS (Basic InputOutput System) setup program to change system configuration information, such as
the current date and time or your type of hard drive. The setup program is stored in
read-only memory. It can be accessed either when you turn on or reset the panel PC,
by pressing the "Crtl+Alt+Del" key on your keyboard immediately after powering on
the computer.
The settings you specify with the setup program are recorded in a special area of
memory called CMOS RAM. This memory is backed up by a battery so that it will not
be erased when you turn off or reset the system. Whenever you turn on the power,
the system reads the settings stored in CMOS RAM and compares them to the
equipment check conducted during the power on self-test (POST). If an error occurs,
an error message will be displayed on screen, and you will be prompted to run the
setup program.
2.4 Installing System Software
Recent releases of operating systems from major vendors include setup programs
which load automatically and guide you through hard disk preparation and operating
system installation. The guidelines below will help you determine the steps necessary
to install your operating system on the panel PC hard drive.
Note!
Some distributors and system integrators may have already preinstalled system software prior to shipment of your panel PC.
If required, insert your operating system's installation or setup diskette into the external diskette drive until the release button pops out.
The BIOS supports system boot-up directly from the CD-ROM drive. You may also
insert your system installation CD-ROM disk into your external CD-ROM drive.
Power on or reset the system by pressing the "Ctrl+Alt+Del" keys simultaneously.
The Point-of-Care Terminal will automatically load the operating system from the diskette or CD-ROM.
If you are presented with the opening screen of a setup or installation program, follow
the instructions on screen. The setup program will guide you through preparation of
your hard drive, and installation of the operating system.
POC-S176 User Manual
10
Figure 2.4 File directory "Drivers and Utilities" CD-ROM
Note!
The drivers and utilities used for the POC-S176 panel PCs are subject
to change without notice. If in doubt, check Advantech's website or contact our application engineers for the latest information regarding drivers
and utilities.
11
POC-S176 User Manual
System Setup
After installing your system software, you will be able to set up the Chipset, Graphics,
Ethernet, audio and touchscreen functions from your own external CD-ROM drive. All
the drivers except the CD-ROM drive driver are stored in a CD-ROM disc entitled
"Drivers and Utilities."
The standard procedures for installing the Chipset, Graphics, Audio and Ethernet
drivers are described in Chapters 3, 4, 5, and 6 respectively.
The various drivers and utilities in the CD-ROM disc have their own text files which
help users install the drivers and understand their functions. These files are a very
useful supplement to the information in this manual.
For your reference, the directory of drivers on the "Drivers and Utilities" CD-ROM is:
Chapter 2
2.5 Installing the Drivers
POC-S176 User Manual
12
Chapter
3
3
Chipset and Graphics
Setup
Sections include:
! Introduction
! Installation of Chipset Driver
3.1 Introduction
The POC-S176 has an onboard display interface. The specifications and features are
described in the following section:
3.1.1 Chipset
The POC-S176 uses Mobile Intel® 945GME Express chipset for its graphic controller. It supports SDVO device, and CRT monitors. The Mobile Intel® 945GM Express
Chipsets are designed for use with Intel’s next generation mobile platform, Intel®
Centrino® Duo processor technology.
The Mobile Intel 945 Express Chipset Family come with the Generation 3.5 Intel Integrated Graphics Engine, and the Intel® Graphics Media Accelerator 950 (Intel® GMA
950), providing enhanced graphics support over the previous generation Graphics
and Memory Controller Hubs (GMCH’s).
3.1.2 Display Memory
Dynamic Video Memory Technology (DVMT) 3.0 dynamically allocates up to 224 MB
of system memory for graphics usage.
3.1.3 DVI Transmitter
The POC-S176 uses Chrontel CH7307C for driving its DVI Ports. The CH7307C is a
Display Controller device, which accepts digital graphics input signal, encodes and
transmits data through a DVI link (DFP can also be supported). The device accepts
one channel of RGB data over three pairs of serial data ports.
The DVI processor includes a low jitter PLL for generation of the high frequency serialized clock, and all circuitry required to encode, serialize and transmit the data. The
CH7307C is able to drive a DVI display at a pixel rate of up to 165 MHz, supporting
UXGA (1600 x 1200) resolution displays.
3.1.4 Display Types
POC-S176 supports Single DVI-I jack for single monitor.
The DVI-I Jack support both DVI Digital I/F and CRT RGB signal.
Analog CRT DAC interface supports max DAC frequency up to 400 MHz, 24-bit
RAMDAC, DDC2B compliant, and resolution up to QXGA 2048 x 1536.
POC-S176 User Manual
14
Complete the following steps to install the Chipset driver. Follow the procedures in
the flow chart that apply to the operating system that you are using within your POCS176.
Note!
The CD-ROM drive is designated as “D” throughout this chapter.
Note!
<Enter> means pressing the “Enter” key on the keyboard.
Note!
Before you install the graphic driver of POC-S176, please ensure you
have installed the “Intel Chipset Software Installation Utility”. You can
find this driver in the Utility CD-ROM.
Note!
The resolution of window display will be fixed at 640 x 480 before you
install the Graphics driver. Depending on your monitor’s native resolution, the black area might be different.
15
POC-S176 User Manual
Chipset and Graphics Setup
Important! The following windows illustrations are examples only. You must follow
the flow chart instructions and pay attention to the instructions which
appear on your screen.
Chapter 3
3.2 Installation of Chipset Driver
3.2.1 Installation for Windows XP
Step 1-1: Double Click “setup.exe” in D:\Driver\CHIPSET\XP folder. The Install dialog will appear.
Step 1-2: Click 'Next' to continue.
Step 1-3: Read the License Agreement and click “Yes” to proceed.
POC-S176 User Manual
16
17
POC-S176 User Manual
Chipset and Graphics Setup
Step 1-5: When the 'Setup COMPLETE' message appears click 'Finish' to restart
your computer.
Chapter 3
Step 1-4: Read the file information screen and click “Next” to proceed.
Step 2-1: Double Click “setup.exe” in D:\Driver\GRAPHICS\XP folder. The Install
dialog will appear.
Step 2-2. Click 'Next' to continue.
Step 2-3. Read the License Agreement and click “Yes” to proceed.
POC-S176 User Manual
18
19
POC-S176 User Manual
Chipset and Graphics Setup
Step 2-5. When the 'Click Next to continue' message appears click 'Next' to proceed.
Chapter 3
Step 2-4. Read the file information screen and click “Next” to proceed.
Step 2-6. When the 'Setup Is Complete' message appears click 'Finish' to restart
your computer.
POC-S176 User Manual
20
Chapter
4
4
Audio Interface
Sections include:
! Introduction
! Installation of Audio Driver
! Further Information
4.1 Introduction
The POC-S176's onboard audio interface provides high-quality stereo sound by
using the ALC888 audio controller from Realtek. The ALC888 series are high performance 7.1+2 channel High Definition Audio Codecs providing ten DAC channels that
simultaneously support 7.1 sound playback, plus 2 channels of independent stereo
sound output (multiple streaming) through the front panel stereo outputs.
All analog jacks are input and output capable, and headphone amplifiers are also
integrated at each analog output. All analog I/Os can be re-tasked according to
user’s definitions, or automatically switched depending on the connected device
type.
4.2 Installation of Audio Driver
Before installing the audio driver, please take note of the procedures detailed below.
You must know which operating system you are using in your POC-S176, and then
refer to the corresponding installation flow chart. Just follow the steps in the flow
chart. You can quickly and successfully complete the installation, even if you are not
familiar with instructions for Windows.
This setup program will install the audio driver and Realtek utility into your system.
Important! The following windows illustrations are examples only. You must follow
the flow chart instructions and pay attention to the instructions which
appear on your screen.
Note!
The CD-ROM drive is designated as “D” throughout this chapter.
Note!
<Enter> means pressing the “Enter” key on the keyboard.
POC-S176 User Manual
22
1.
2.
Double Click “setup.exe” in D:\Driver\AUDIO\XP folder. The Install dialog will
appear.
Click “Next” to continue.
The install program will install the driver and utility. It will spend a period of time
processing.
Chapter 4
4.2.1 Installation for Windows 2000/XP
Audio Interface
3.
When the 'InstallShield Wizard Complete' message appears click 'Finish' to
restart your computer.
23
POC-S176 User Manual
4.3 Further Information
For further information about the audio interface installation on your POC-S176,
including driver updates, troubleshooting guides and FAQ lists please visit the following web resources:
Realtek website: www.realtek.com.tw
Advantech websites: www.advantech.com
www.advantech.com.tw
POC-S176 User Manual
24
Chapter
5
5
PCI Express Ethernet
Interface
Sections include:
! Introduction
! Installation of Ethernet Driver
! Further Information
5.1 Introduction
The POC-S176 is equipped with the high performance PCIe Ethernet chipset Realtek
RTL8111B which is fully compliant with IEEE 802.3 10/100/1000 Mbps standards.
The Ethernet port provides a standard RJ-45 jack.
5.2 Installation of the Ethernet Driver
5.2.1 Installation for Windows XP
1.
2.
Double Click “Setup.exe” in the D:\Driver\ETHERNET\XP folder. The Install dialog will appear.
Click “Next” to continue.
POC-S176 User Manual
26
4.
When the ‘InstallShield Wizard Complete’ message appears click “Finish” to finish the install program.
5.3 Further Information
For further information about the installation on your POC-S176, including driver
updates, troubleshooting guides and FAQ lists please visit the following web
resources:
Realtek website: www.realtek.com.tw
Advantech websites: www.advantech.com
www.advantech.com.tw
27
POC-S176 User Manual
PCI Express Ethernet Interface
Click “Install” to continue.
The install program will install the driver. It will spend a period of time processing.
Chapter 5
3.
POC-S176 User Manual
28
Chapter
6
6
Touch Panel Interface
Sections include:
! Introduction
! Installation of Touch Panel
Driver
! Further Information
6.1 Introduction
The POC-S176 is supported with a system integrated touch panel. The touch panel
controller is control by the system COM3 interface.
6.2 Installation of Touch Panel Driver
6.2.1 Installation for Windows XP
1.
2.
Double Click “setup.exe” in D:\Driver\TOUCHSCREEN\XP and VISTA folder.
The Install dialog will appear.
Click “Next” to continue.
POC-S176 User Manual
30
4.
Click “Next” to continue.
Please select “None” for Do 4 point calibration, the driver install program will do
this 4 point calibration when the install completes.
31
POC-S176 User Manual
Touch Panel Interface
Click “Next” to continue.
Because POC-S176’s touch controller is controlled by COM3, please do not
select the “Install PS/2 interface driver”.
Chapter 6
3.
5.
Click “Next” to continue. Please select “Support Multi-Monitor System”.
6.
Click “Next” to continue.
If you want to change the driver destination folder, you can click the “Browse”
button to change the folder.
POC-S176 User Manual
32
Click “Next” to continue.
8.
Click “Yes” to continue.
The install program will search the touchscreen controller, and find it on COM3.
Chapter 6
7.
POC-S176 User Manual
Touch Panel Interface
33
9.
Click “Yes” to continue.
Please do 4 point calibration to calibrate the touch screen.
10. Touch 'X' once at each of the 4 corners on the panel.
Please touch each “X” icon at the corners until the icon stops blinking.
6.3 Further Information
For further information about the installation on your POC-S176, including driver
updates, troubleshooting guides and FAQ lists please visit the following web
resources:
Advantech websites: www.advantech.com
www.advantech.com.tw
POC-S176 User Manual
34
Chapter
7
7
Utilities and Hot Fixes
Sections include:
! Introduction
! Wake up by External USB
Device at S3 Resume (Wake up)
7.1 Introduction
The POC-S176 system needs a specific utility or hot fix to support special functions.
7.2 Wake up by External USB Device at S3 Resume
(Wake up)
POC-S176 support three different sleep (suspend) modes, they are:
1. S1: Power On Suspend, system will stop the clock, turn off the LCD backlight,
but keep all power on. The user can press any key (mouse or keyboard) to wake
up the system.
2. S3: Suspend to RAM, system will stop the clock, turn off most power, not including memory power. All necessary information will be saved in memory. In this
sleep mode, the system needs a Hot fix to wake up by USB mouse or keyboard.
3. S4: Suspend to Disk (Hibernation), system will stop the clock, turn off most
power, include the memory power. All necessary information will be saved to
Hard Disk. In this sleep mode, the user needs to press the power button to wake
up the system.
7.2.1 Installation for Windows XP
1.
2.
3.
Double click “USBRG.REG” in the D:\Driver\USB\XP folder
Click “Yes” to install this registry information.
Click “OK” to close the successful installation information window.
POC-S176 User Manual
36
Chapter
8
8
Operation Information
Sections include:
! Plug in the Power Adapter
! Thermal
! Disconnect the Power
! Point-of-Care Terminal Cleaning and Disinfecting
! General Safety Guide
8.1 Plug in the Power Adapter
Always leave space around your power adapter. Do not use this equipment in a location where airflow around the power adapter or computer is confined. Always disconnect the power adapter before opening the computer to perform procedures such as
installing memory or removing the hard disk.
Warning! Use only the power adapter that came with your POC-S176 system.
Adapters for other electronic devices may look similar, but they may
damage your computer.
8.2 Thermal
When using your POC-S176 system, it is normal for the rear metal heatsink to get
warm. The rear metal heatsink of the POC-S176 case functions as a cooling surface
that transfers heat from inside the computer to the cooler air outside. Do not block
this heatsink by any soft material.
Warning! Do not place your POC-S176 system on a pillow or other soft material
when it is on, as the material may block the airflow and cause the computer to overheat. Never place anything on the system case before turning off the computer.
Never turn on your computer unless all of its internal and external parts
are in place. Operating the computer when it is open or missing parts
can be dangerous and can damage your computer.
8.3 Disconnect the power
The only way to disconnect power completely is to unplug the power cord. Make sure
at least one end of the power cord is within easy reach so that you can unplug the
computer when you need to.
Warning! Your AC cord came equipped with a three-wire grounding plug (a plug
that has a third grounding pin). This plug will fit only a grounded AC outlet. If you are unable to insert the plug into an outlet because the outlet is
not grounded, contact a licensed electrician to replace the outlet with a
properly grounded outlet. Do not defeat the purpose of the grounding
plug.
Warning! Never push objects of any kind into this product through the openings in
the case. Doing so may be dangerous and result in fire or a dangerous
electric shock.
POC-S176 User Manual
38
During normal use of the POC (Point-of-Care Terminal) the device may become dirty
and should be regularly cleaned.
Cleaning agent list: chemical disinfectants which have been tested on the POC
No
Cleaning Agents
1
Cidex
2
Isopropyl alcohol
3
Green tinctured soap
4
Windex
5
Alcohol
6
Alcohol 70%
7
Chloride 1000PPM
8
Incidin plus
9
Incidin liquid
10
Mikrozid liquid
Caution!
– Do not immerse or rinse the POC or its peripherals. If you accidentally spill liquid on the device, disconnect the unit from the
power source. Contact your Biomed Department regarding the
continued safety of the unit before placing it back in operation.
– Do not spray cleaning agent on the chassis.
– Do not use disinfectants that contain phenol. Do not autoclave
or clean the POC or its peripherals with strong aromatic, chlorinated, ketone, ether, or Esther solvents, sharp tools or abrasives. Never immerse electrical connectors in water or other
liquids.
39
POC-S176 User Manual
Operation Information
Steps:
1. Prepare cleaning agent per manufacturer’s instructions or hospital protocol.
2. Wipe the POC with a clean cloth that has been moistened in the cleaning solution.
3. Wipe thoroughly with a clean cloth.
Chapter 8
8.4 Point-of-Care Terminal Cleaning and
Disinfecting
8.5 General Safety Guide
For your own safety and that of your equipment, always take the following precautions.
Disconnect the power plug (by pulling the plug, not the cord) if any of the following
conditions exists:
You want to remove any parts
! The power cord or plug becomes frayed or otherwise damaged
! You spill something into the case
! Your computer has been dropped or the case has been otherwise damaged
! You suspect that your computer needs service or repair
! You want to clean the case
POC-S176 User Manual
40
Appendix
A
Description of
Connectors
A
A.1 Description of Connectors
Figure A.1 Top Side Global View of POC-S176 Motherboard indicates all
connectors’ location.
POC-S176 User Manual
42
Appendix A Description of Connectors
Figure A.2 Bottom Side Global View of POC-S176 Motherboard indicates all
connectors’ location.
43
POC-S176 User Manual
No.
Description
No.
Description
1
CPU FAN (Reserved)
18
SATA Power Connector 2
2
DDR 2 S.O. DIMM Socket Connector* 2
19
System FAN (Reserved)
3
Touch Enable Volume Up/Down
Switch Connector
20
Mini PCI-E Socket
4
Inverter Connecter
21
Mini PCI Socket
5
COM1 Jack
22
BIOS Socket
6
RJ-45 Jack (LAN 0)
23
Touchscreen I/F Connector
7
RJ-45 Jack (LAN 1)
24
Internal Audio Connector
(Line, HP Out& Line, MIC In &
Speaker Out)
8
DVI Connector
25
Battery Connector
9
USB connector
26
Reset Switch
10
USB connector
27
RTC Battery Socket
11
DC-in Power Connector
28
LVDS power selection
12
Power Button LED Connector
29
LVDS connectors
13
PATA Connector
30
USB Header
14
USB Card Reader
31
COM4 Header
15
SATA Power Connector 0
32
GPIO Header
16
SATA Connector Channel 0
33
COM Port Pin 9 configuration
17
SATA Connector Channel 2
34
COM1 RS232/422/485 Selection
Jumper (Default: RS232)
35
Clear CMOS button
POC-S176 User Manual
44
Appendix
B
B
Windows Display Hot
Key Function
B.1 Windows Display Hot Key Function
If user want to switch the display content to a different display device, such as:
1) Internal LCD Panel (Notebook)
2) External CRT Monitor (Monitor)
3) External DVI Monitor (Digital Display)
The user can press the Hot keys below to switch the display device.
Hot Key
Display Device
Ctrl+Alt+F1
External CRT Monitor
Ctrl+Alt+F3
Internal LCD Panel
Ctrl+Alt+F4
External DVI Monitor
The display content will be switched to the dedicated display device indicated.
POC-S176 User Manual
46
Appendix B Windows Display Hot Key Function
POC-S176 User Manual
47
www.advantech.com
Please verify specifications before quoting. This guide is intended for reference
purposes only.
All product specifications are subject to change without notice.
No part of this publication may be reproduced in any form or by any means,
electronic, photocopying, recording or otherwise, without prior written permission of the publisher.
All brand and product names are trademarks or registered trademarks of their
respective companies.
© Advantech Co., Ltd. 2009