1
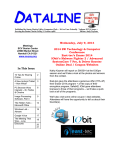
PACC TALK
December 2014
Official Newsletter of the Pittsburgh Area Computer Club
MEETING SCHEDULE
Sunday, December 21, 2014
11:00 -11:25 am Sign In, Pay Dues, Greet visitors, Purchase 50/50
ROOM # 311 tickets (Optional), Setup Computers,
Connect to Internet , Prep for Meetings
11:00 - 11:25 pm PACC BOD Meeting
ROOM # 301
11:35 - 12:00 pm Windows New Users
12:00 - 12:30 pm General Meeting, Raffle.
ROOM # 301
12:35 - 2:30pm
ROOM # 301
2:35 - 3:30 pm
ROOM # 301
2:05 - 3:30 pm
ROOM # 311
1:00 - 3:30 pm
ROOM # 311
3:30 - 4:00 pm
X-plore
Air Droid,
Orbot
More programs and utilities …...
….. And more….
(pg. 1)
(pg. 2)
Hardware SIG
Users Helping Users - guests included
Linux SIG, Members Helping Members,
Computer troubleshooting, Info Exchange
Pack Up Equipment, Doors Close
ANDROID SIG
What is inside....
X-plore
X-plore
Air Droid, Orbot ..
PAGE # 1
PAGE # 2
A New Android Tablet — Now What?
……….. by Phil Sorrentino
PAGE # 3
Windows 8 Tablet - A tablet for all reasons
………... by Phil Sorrentino
PAGE # 4
Image Processing Software, Part 2
………… by Dick Maybach
PAGE # 5
Helium Backup, a review
PAGE # 6
Dual-pane tree view
Root access (on rooted devices), also allowing changes to read-only
files
Disk Map - see which files consume most space on your disk
FTP, FTPS, LAN (SMB/Samba) servers
Cloud storage access: Google Drive™, Dropbox, Box.net,
Mega.co.nz 1), OneDrive, Webdav, Yandex, MediaFire, SugarSync, Dump Truck, Copy.com
SSH File Transfer (SFTP) and SSH Shell 2)
Application manager
WiFi file sharing 2)
Access from a PC web browser 2)
Picasa image albums
SQLite database explorer (files with .db extension)
Seamless work with Zip (as with normal folder)
Favorite folders displayable in root
Built-in viewers for images, video, audio, text
Hex viewer
Fast Image viewer with zoom and slide to previous/next images in
folder
Thumbnails for
images
and
video as well as
for various file
types
(depending on
associated application)
…..……. by Frank Ramsey
Interesting Internet Finds June 2014
………… by Steve Costello
PAGE # 8
Interesting Internet Finds July 2014
……….... by Steve Costello
PAGE # 9
Interesting Internet Finds August 2014
……….... by Steve Costello
PAGE # 9
OTG Cable/Adapter (On-the-Go)
……….. by Frank Ramsey
PAGE # 10
From the President’s ..and …... Editors Desk
PAGE # 10
(Continued on page 2)
1
Orbot
(Continued from page 1)
Ability to clear default application handlers
Multi-selection - always available, yet not disturbing
Search files in folders (also in archives or in search results)
View APK files as ZIP
Share - send files by Bluetooth, email, or whatever that device supports
Configurable buttons and key shortcuts
Hide folders that you don't want to see
Marked features are paid - donation need to be sent through Google Play
Store: 1) donation of any value 2) donation of value at least 3 beers
(may be also combination of 2+1 beers, or cake+coffee)”
Get it here: http://www.lonelycatgames.com/?app=xplore
“Orbot is a free proxy app that empowers other apps to
use the internet more securely. Orbot uses Tor to encrypt your Internet traffic and then hides it by bouncing
through a series of computers around the world. Tor is
free software and an open network that helps you defend against a form of network surveillance that threatens personal freedom and privacy, confidential business activities and
relationships, and state security known as traffic analysis.
Orbot is the only app that creates a truly
private internet connection. As the New
York Times writes, “when a communication
arrives from Tor, you can never know where
or whom it’s from.” Tor won the 2012 Electronic Frontier Foundation (EFF) Pioneer
Award.
the end of the story
Air Droid
“AirDroid allows you to access and manage your Android phone or
tablet from Windows, Mac or the web, wirelessly, for free.
Better focused
Calls, SMS, and the app notifications you allowed, mirrored to the large
computer screen you are focusing on.
Better equipped
Type with full physical keyboard and control with a mouse. Transfer
things faster without looking for a cable. Better equipments, better life.
Better connected
Control your Android from computer and use any apps on computer,
like WhatsApp, WeChat, and Line. (root required for some devices)
Things you can do with AirDroid from computer
(Feature availability may vary by client platforms - Windows, Mac or
Web)
- SMS: send and receive individual or group messages.
- Files: transfer files between Android and computer from any network.
- Notification Mirror: Mirror phone notifications from any allowed apps
to computer.
- AirMirror (beta): Complete control of Android, and use any apps, like
WhatsApp, WeChat and Line. (requires root, AirDroid Windows & Mac
only)
- Contacts: View and edit all the contacts.
- Photos: Transfer photos between Android and computer.
- Music & Videos: Play and manage music & videos on Android and
transfer them between Android and computer.
- Ringtones: Set music as ringtone and export ringtones.
- Screenshot: View the real time screen of Android devices, take static
screenshots. (requires root)
- Apps: Import and export .apk files.
- Camera: See through the lens of both front and back cameras.
- URL: Push url to Android and open it with default web browser.
- Clipboard: Share clipboard content between Android and computer”.
https://play.google.com/store/apps/details?id=com.sand.airdroid
ACCEPT NO SUBSTITUTES: Orbot is the safest way to use the Internet
on Android. Period. Orbot bounces your encrypted traffic several times
through computers around the world, instead of connecting you directly like VPNs and proxies. This process takes a little longer, but the
strongest privacy and identity protection available is worth the wait.
PRIVATE WEB SURFING: Use with Orweb, the most anonymous way to
access any website, even if it’s normally blocked, monitored, or on the
hidden web. Get Orweb: https://goo.gl/s3mLa
PRIVATE CHAT MESSAGING: Use Gibberbot with Orbot to chat confidentially with anyone, anywhere for free. Get Gibberbot: https://
goo.gl/O3FfS
PRIVACY FOR APPS: Any installed app can use Tor if it has a proxy feature, using the settings found here: https://goo.gl/2OA1y Use Orbot
with Twitter, or try private web searching with DuckDuckGo: https://
goo.gl/lgh1p
PRIVACY FOR EVERYONE: Tor can help you confidentially research a
competitor, get around the Facebook block at school, or circumvent a
firewall to watch sports at work.
PRIVACY MADE EASY: Check out our fun, interactive
walkthrough: https://guardianproject.info/howto/browsefreely
IT’S OFFICIAL: This is the official version of the Tor onion routing service
for Android.
***Expert Root Mode***
UNIVERSAL MODE: Orbot can be configured to transparently proxy all
of your Internet traffic through Tor. You can also choose which specific
apps you want to use through Tor.
***We Love Feedback***
ABOUT US: Guardian Project is a
group of developers that make secure mobile apps and open-source
code for a better tomorrow.
OUR WEBSITE: https://
GuardianProject.info
ON TWITTER: https://twitter.com/
guardianproject
OPEN-SOURCE: Orbot is free software. Take a look at our source code, or join the community to make it
better: https://gitweb.torproject.org/orbot.git
ABOUT TOR: https://TorProject.org
MESSAGE US: Are we missing your favorite feature? Found an annoying
bug? We’d love to hear from you! Send us an
email: [email protected] ….. “
2
the end of the story
A New Android Tablet — Now What?
Settings Icons
Buy the way, tablets have multiple screens (usually an odd number), with the middle screen being
the home screen. If you have 5
screens then screen number 3 is
the home screen. There may be an
indicator on each of the screens (typically on the bottom) that indicates which screen is currently being shown. Now that the Settings
icon is available, tap it and it will allow you to make changes to the
tablet’s settings. The settings are organized in groups such as Wireless
& Networks, Device, Personal, Accounts, and System. Under Wireless
& Networks, tap “Wi-Fi” and you will see the network you are currently using (and others, if you have used them in the past). Under
Device, among others, there is “Sound” and “Display”. Tap “Sound”
and you can change the “Sound Profiles” and/or the Sound levels
(depending on your version of Android). Tap “Display” and you can
change the Brightness of the display. Just tap Brightness and then set
the slider to the brightness level of your choice. This is also the place
to change the Font size if it is too small. (Font size=Large, seems to be
a good choice.) The “Sleep” setting sets the time of inactivity allowed
before the screen goes off. A short time like 1 minute is good if you
are actively using the tablet, but a longer time (maybe 5 minutes) is
nice to have when you are learning and it takes some time to determine your next step. The longer time keeps the display from turning
off, just when you are about to take your next step. Under “System”,
tap “About tablet”, which shows a lot of technical information, but the
one important item here is the version of the Android Operating System. “Android version” gives you the currently loaded Android version, such as 4.2.2. (Don’t worry about the third digit.) Versions 4.1,
4.2, and 4.3 are commonly called “Jelly Bean”. Version 4.4 is the
latest and goes by the name “Kit Kat.” Under “System” you can also
set the Date and Time, or let the tablet “Use network provided time.”
By Phil Sorrentino, Staff Writer,
The Computer Club, Inc., Sun City Center, FL
May 2014 issue, The Journal
www.scccomputerclub.org/
philsorr (at) yahoo.com
You just got a new Android tablet. (Isn’t the look of a brand new tablet wonderful, it is so shiny and lacking finger prints.) But fingerprints
are a good thing, since they are a byproduct of using the touch enabled
screen; so the more finger prints, the more use. If the fingerprints
eventually become annoying, you can always clean them with a soft
micro-fiber cloth.) Now, if the tablet is brand new, when you turn it on
it will probably take you through a few set up steps. These steps are
usually also explained in a brief Quick Start Guide that is included in
the package. For more detailed information and instruction go to the
manufacturer’s website and look for a “Support” or “Documents”
page for your specific tablet model and download the User Manual, if
there is one. If the tablet is not brand new, maybe a hand-me-up from
one of your kids or grandchildren, you may also want to get a User
Manual and change some of these general settings.
Typically the first things to set up are very basic, such as Language
and Time Zone. After these, the most important thing to do is to get
the tablet onto the internet. All tablets have Wi-Fi circuitry, so if you
have Wi-Fi at home, you are set. (If you don’t have Wi-Fi at home, the
tablet will still be useful for watching videos, showing pictures, playing games, and listening to music. And you can always use one of the
many free public Wi-Fi hot spots at locations like a Library or Starbucks.) Once you are in a Wi-Fi area, all you need to do is key in the
password or passphrase for the network if it is protected. (Hopefully,
that makes sense to you because you have protected your home network with WEP, WPA2 or WPA2 security.) Once you have connected
to Wi-Fi, you will be able to go to the “Google Play Store”, where you
can download all those useful Apps and games. If your tablet is new, it
will probably instruct you to either setup a Google account, or it will
ask you to log-in to your Google account. Having a Google account
allows you to synchronize files and certain Apps so that you have the
same information available to your tablet and your home computer.
Once you have found out the Android version and possibly made
some changes to the Sound, Display, Date & Time, or Wi-Fi, you can
go back to the home screen by tapping the Back button. That’s the
arrow at the bottom of the screen that starts off to the right and turns
back on itself to go to the left. Now you can go to the “Google Play
Store” and get all the Apps you think you will want to try out and/or
use. The Play Store icon looks like a Shopping Bag with a triangle in
the middle of blue and red.
After your Google account is set up, there are a few operational things
that you might like to modify. None of these are absolutely necessary,
but I find setting them to my preferences is helpful. Most of these
things will be found in “Settings”, so the first thing is to find the
“Settings” icon and place it on a Home Screen (if it is not there already). The Settings icon may be found in the “All Apps” collection.
The “All Apps” collection is accessed by an icon, typically at the top
of the screen that looks like a small rectangular collection of smaller
squares, possibly four, or six, or nine.
Google Play Store Icon
This icon is typically on the home screen, which is
probably a good place for it. This way it will always
be available when you want to shop the Play Store. To
go to the Play Store, tap the icon and you will be transported to the Google Store. This is the place to get all
those popular Apps like Facebook, Pandora, Netflix, Skype, Angry
Birds, Candy Crush, Yahoo Mail, Solitaire, Kindle reader, Words
with Friends, Google Earth, Tetris, Google Translate, Barcode Scanner, Hulu+, Flashlight, Chrome, YouTube, IMDB, Google Drive,
ColorNote, Evernote, Firefox, Sound Hound, and many, many more.
(Over 1 million, many of which may be the subject of future articles.)
One last thing to do is change the way the tablet can be accessed. Out
of the box, the tablet only needs a swipe to enable it. To make it more
secure, go to “Settings” and then “Personal” and then change the
“Screen lock” to Pattern or PIN or Password; your choice. Make sure
you don’t forget the Pattern or PIN or password after it is set. With
these few changes to your “out of the box” tablet, I’m sure you will
begin to enjoy your shiny new tablet.
All Apps Icon
Tap this icon and an alphabetical listing of all the
Apps on your tablet will be shown. The “Settings”
icon typically looks like a square with three lines and
dots within the square, or a gear. There are probably
multiple screens of Apps so you may have to flick the
screen to the left to uncover all the Apps. When you
find the “Settings” icon, “tap and hold” the icon and it will be selected. When you release it, it will then be placed on a screen. Now you
can access the Settings by tapping the Settings icon whenever you
want to review or change a setting.
3
the end of the story
the end of the story
sizes are useful. Tiles that don’t reveal any data can be relegated to
Small or Medium size, leaving more screen room for information.
Tiles can be grouped and the groups can be named. With a group of
only a few tiles, you can get a really good idea of what is happening in
the world, at a glance. Live Tiles for Email, News, Finance, Weather,
and a Calendar, will give you a pretty good summary. When you want
more detailed information, just touch the appropriate tile.
Windows 8 Tablet - A tablet for all reasons
By Phil Sorrentino, Staff Writer,
The Computer Club, Inc., Sun City Center, FL
www.scccomputerclub.org/
philsorr (at) yahoo.com
One nice thing about a Windows 8 tablet is that it is a full network
participant, showing up in the Network folder in Windows Explorer,
with ease. Yes, you have to set it up just like any other computer you
want on your network, but once that is done, it can share files, folders,
and printers just like any other network participant. You can easily
watch movies that reside on one of your other networked computers,
on the tablet. You can play music that resides on another networked
computer, on the tablet. You can access any information that has been
shared on your network, easily and efficiently. Everything you know
about networking applies to the tablet. Anything you do, on the network, can be done on your tablet. Most of these things can also be
done with Android tablets, but in my experience, it was much more
difficult with the Android Apps that I used. And, when things did
work, you had an entirely different User Interface with which to become familiar. Most of the App provided User Interface’s were very
different from the well known Windows (File) Explorer.
Well, maybe not “all” reasons, but it certainly has some very good
points in its favor. I have used an iPad, an Android tablet, and now
finally a Windows 8 tablet. And let me tell you they are all great tablets and any one would be a good addition to ones computing inventory. But, as similar as they are, they are all very different in the details,
and, in my opinion, that is where the ownership decision lies. I must
admit that most of my experience has been with Android tablets and
smartphones, so my tendency has been towards the Android
“ecosystem.” Yes, the literature considers these different varieties,
“ecosystems”, and right now there are three major ecosystems out
there, Apple’s iOS, Google’s Android, and Microsoft’s Windows 8.
(Blackberry would have also been considered a few years ago, but
they seem to have been eclipsed by the other three, but that might
change in the future.)
Tablets, of all types, are great devices for “consuming data.” They are
not the best choice for creating data, though they can be used to create
short documents and review most any document. Can you imagine
writing your memoirs on a tablet? (I wouldn’t even want to write this
article on a tablet.) Tablets are very good at checking your email,
checking on your stocks, sharing pictures and videos, listening to music, social interactions, finding a nearby restaurant, getting driving
directions, keeping a calendar, accessing your cloud storage, and many
more very specific activities. But they are not so good for writing
lengthy documents, writing and sending lengthy emails with attachments, managing your stock portfolio, managing a large picture or
document database, ripping your CD music, editing pictures, creating
elaborate spreadsheets, and many more generally complex computing
activities.
Apps really make the tablet useful. And in this area, the lack of Windows 8 Apps is probably the biggest detractor. Currently, in the battle
for the largest number of Apps, both Apple and Google boast over 1
Million. Microsoft on the other hand can list only about 100,000, so
they are really way behind in this area. (However, some tasks, like
moving your camera pictures to your home computer, that require an
Apple or Android App to accomplish can be accomplished with Windows Explorer, which is an integral part of Windows 8.) Many, of
what I’ll call “basic Apps,” are available. There are multiple Apps for
email, news, finance, weather, cloud storage, maps, calendars, search,
picture and video viewing, music playing, social interaction, reading,
and internet browsing. But, when I looked for my favorite picture
viewer, it wasn’t available; however the Photo Viewer that comes with
the tablet works quite well. Although many of the basic Apps are
available, there is certainly nowhere near the selection that is available
with Apple and Android. So, if a large number of Apps is important to
your decision, then the Windows 8 tablets are probably not ready for
prime time. But, if taking advantage of the storehouse of knowledge
that you have acquired, using Windows 8 and previous Windows Operating systems, is important to you then a Windows 8 tablet might be
the right choice.
The latest addition to my tablet collection is an 8” Dell, Windows 8
tablet. Those of us who are familiar with Windows 8 will feel right at
home in front of this tablet. Yes, there are differences in the User Interface between Windows 8 on a non-touchscreen computer and on a
tablet because you don’t use a mouse, you use only your fingers. But
all the Windows 8 functionality is right there in front of you.
(Although on an 8” screen, some of the buttons are very small and
may be difficult to actuate with a large finger.) Windows 8, as any
user will tell you, has two distinct modes of operation, Desktop (like
Windows 7) and Tiles (on the Start Screen). Those who are only familiar with Windows 7, may look at the Tile mode as unnecessary and
maybe even unusual, but it is my feeling that the Tile mode really
shines on a tablet. So, why didn’t Microsoft develop two different
Operating Systems, each optimized for the specific target hardware,
computer or tablet? The answer to that is way above my pay grade,
but, maybe having to maintain multiple OSs in synchronism is more
difficult than combining the functionality into one OS. Only the gurus
at Microsoft know the reasons and only time will tell if it was a good
decision, but I’m betting that it will be a winner. The reason being;
simply, Microsoft enjoys a strong corporate presence.
Windows 8 tablets are certainly late to the party, but once they are
available at reasonable prices, and the Apps store gets a good bit larger, they just might be a really good tablet choice.
The Tile mode seems to be a good default for a tablet, even if it is not
a good starting point for a Laptop. (For a laptop it would probably
make more sense for it to start in the Desktop mode.) The tiles in Windows 8 are like the icons on an Android or Apple tablet. The Tiles are
rectangular and re-sizeable. The sizes for many Tiles are Small, Medium, Wide, and Large. Because many of the Tiles are “live,” meaning
that changing data is being displayed on the tile, the Wide and Large
the end of the story
4
8-bit TIFF. Hopefully, this butchering will stop with the next version
of GIMP.) The next button to the left outputs a JPEG, TIFF, or PNG
file directly. I frequently skip GIMP altogether as RawTherapee can
often do all the processing I need. RawTherapee is a non-destructive
editor; that is, it makes no changes to the image file. Instead, it creates
a separate script file that specifies the processing to be done when the
raw image is developed. The processing occurs in the order the program deems optimal. As a result, the order in which you perform your
editing is unimportant.
Image Processing Software, Part 2
By Dick Maybach, Member,
Brookdale Computer Users’ Group, NJ
March 2014 issue, BUG Bytes
www.bcug.com / n2nd (@) att.net
In the first article (February 2014 newsletter available at
www.bcug.com) we discussed photo retouching using GIMP (GNU
Image Processing Program). However, GIMP does not develop raw
files; for that you need a program such as RawTherapee. Why would
you want to bother with this extra step? In the picture inside a church,
the frame on the left is the JPEG image as produced by my camera,
while the one on the right is the same image, but I used RawTherapee
to process it from a raw file. (I have my camera set up to save every
picture as both a JPEG and a raw image and decide what processing to
use after I see the results.) This example shows one advantage of
working with a raw images. In the JPEG, the roof is essentially black
with no visible detail, while in the processed raw image, the details are
visible. This is not a simple exposure compensation, as you can see by
noting that the highlights in the two images (for example as seen
through the open door on the right) have about the same brightness.
This is much different than with a program such as GIMP, which
changes the image directly in sync with what you do. In the latter case,
the order of the editing steps is quite important. RawTherapee requires
some persistence to master, partly because it has no help file. Expect
to spend some time reading the manual and searching the Web for
examples before you become comfortable with it. Finally, although it
should run on a 32-bit operating system without difficulty, a 64-bit
one is recommended.
RawTherapee has a unique ability to correct for lens distortion. When
your camera saves an image in raw format, the file includes a JPEG
thumbnail in which the lens distortion has been corrected (providing
that if your camera has a removable lens, it's compatible with the camera). The program uses the thumbnail to correct any distortion in the
raw image. All other programs that incorporate automatic distortion
correction, including Photoshop, use databases, and these don't cover
all combinations of cameras and lenses. Indeed, RawTherapee can use
the same Adobe camera and lens profiles used by Photoshop, but it is
a non-trivial process to adapt them.
While adjusting the brightness, I also compensated for the perspective
distortion resulting from the wide-angle lens. As a result, the image on
the right is much closer to what your eye would see. (The changes
here are modest, in an attempt to keep the result realistic. You can
easily go off the rails and produce results that belong in a comic strip.)
The improvement is possible because the camera records 12 bits per
pixel per color, while a JPEG image has only 8. In other words, the
raw image has 16 times the dynamic range of the JPEG one. In photo
terms, this means that the raw image has two to three more f-stops of
range that a corresponding JPEG.
Lightzone (http://www.lightzoneproject.org/ for Linux, OS X, and
Windows) is a raw developer with a much different approach. For one,
you can specify only a portion of the image for a particular processing
step, while RawTherapee always works on the entire image. It can
also show you which portions of the image have similar luminosities,
which is frequently helpful. The screen-shot below shows an image
being edited in LightZone. In the right-hand panel, the icons below the
thumbnail bring up windows, a new one each time you click on an
icon. Each window is one application of an editing tool, which can
apply to the whole image or just a portion. If you delete a window, the
changes you made using that step are also discarded. When you develop the image, the processing is done in the same order as the tool windows, so unlike RawTherapee, their order can be important. You can
reorder the processing by drag-and-drop moving of the tool windows.
You can also change the way in which the effects of each tool are
combined in the final image. The left-hand panel shows the editing
history. Here, I've adjusted the white balance, applied the relight tool
(which lightened the shadows and darkened the highlights) and further
The screen-shot below shows an image being processed by RawTherapee (http://rawtherapee.com/ for Linux, OS X, and Windows). The
panel on the right shows the tools availalbe, and these are grouped
with tabs. The color adjustment tab has been selected and the white
balance tool within it. From left to right the tabs are exposure, detail,
color, transform, raw processing, and metadata. Histograms for luminance, and the three primary colors are visible at the top of this panel.
The left panel shows the history of the changes, and the center one the
current state of the image. If you look carefully, you will see a button
on the bottom, just to the left of the orange "Ready" button. Clicking
this develops the image and sends it to GIMP as a 16-bit TIFF file.
(As I noted in the previous article, the current version of GIMP is
capable of only 8-bit processing, so it immediately converts the file to
(Continued on page 6)
5
(Continued from page 5)
Helium Backup, a review
lightened the shadows. Then I used the color selector to select the very
bright areas (the window and the sun-lit highlights on the table) and
reduced the luminosity of only those regions. Finally, I rotated the
image. All this takes longer to describe than to do. The screen-shot
By Frank Ramsey, Editor, ACPCUG,
Akron Canton PC Users Group, Ohio
www.acpcug.org
aframsey (at) yahoo.com
The Helium of this review is a backup program for Android phones
and tablets.
It's available in the Google Play store, both free and paid editions.
Before continuing we must digress and discuss what does backup
mean and what is included in a backup?
An android device can have multiple objects to backup. Phone history,
phone contacts, SMS messages, system settings, customizations (WiFi networks, etc.), applications and application data.
There are at least two types of applications: system, those that are
installed on the device when it's purchased and those installed after the
device is first turned on. Complicating the process is each application
has application data (high scores for games, user ID and passwords for
banking, etc.) that should be backed up for a restore to be complete.
shows a region selected based on its luminosity, but I could have
based it on color, or just by drawing an outline.
Like RAWTherapee, LightZone has several pre-defined styles, and
often applying one of these is the only thing you need do to obtain a
satisfactory result. Unlike RawTherapee and UFRaw, LightZone has
no provisions for correcting distortions. (If you look carefully at the
window frame and the bookcase, you can see some curvature, which
results from my particular lens, a wide-range zoom. Better lenses have
less distortion and some cameras correct for it in their raw images.)
Now some will remind me that when you first sign onto the Android
device with your Google account you are offered the choice to backup
and/or restore the device to the Google account. Yes, you can have the
device backed up to your Google account. And Google does a great
job of restoring settings like contacts and Wi-Fi networks.
If you've never used the device before Google can also install all nonsystem, non-private applications from every device that is backed up
to the Google clouds. Unlike iTunes, you are not asked to select a
backup to use. You get all the apps, no application data associated
with each. Assuming you don't want every app you've ever purchased
on the new device, Google backup is not a great option at least for
new devices. All this points to the need for a 3rd party backup utility;
perhaps two or more depending on the capabilities of the backup utility.
To get the best results from LightZone you must start from a raw image, as JPEG has discarded much of the photo's dynamic range. Since
the program can't correct lens distortion, you would pass the developed image file to GIMP in TIFF format (to avoid degrading it with
JPEG compression). There, you would correct he image in GIMP,
perhaps by comparing it to a JPEG version of a photo as processed by
your camera.
The combination of GIMP, RawTherapee, and LightZone will provide
the tools to do almost all your image processing. I've introduced these
because they have good reputations and I'm familiar with them. However, an Internet search using “image processing software” will reveal
dozens of alternatives, both free and commercial.
The first question you have to answer when you decide to backup a
device “is to be backed up "rooted"? Rooting is the term used to indicate any privilege restrictions imposed by Google or the device manufacturer has been removed. It’s basically running with administrator
privilege on Windows devices. Unless the device is rooted, you are
running as a user with no way of performing privileged tasks such as
backing up application data.
References
Rooting is not for everyone. Root exploits areas not available for every device. You can brick (make the device unusable) a device. There
are very few reasons to root your device, other than to say you've rooted it and watch the puzzled looks on the faces of those who don’t
know what this means. Basically DON'T ROOT your device.
Montabone: Beginning Digital Image processing Using Free
Tools for Photographers – provides a good overview of the
tools I've discussed, although the book is less helpful than it
could be as all the example images are in black and white.
http://www.cambridgeincolour.com/ – contains many very valuable tutorials on photography and image processing. If you
check only one photo Web site, this should be the one.
Make a search for "RawTherapee 4 User Manual" to find a very
good manual (hosted on Google Books). This is essential as
the program has no help feature
http://sunburntandinneedofashave.blogspot.com/2010/03/
lightzone-beginners-tutorial-well-sort.html – will get you
started with LightZone, although the program does have
very good help.
. help.although the program does have very good hel. very good
help features.
Having said this, one exploit that rooting brings is the ability to backup application data. There are many backup tools that backup application data when the device is rooted, including My Backup, Titanium
and others. Most cost $5 or so. Some provide free editions. However
if you've taken the risk to root the device spend the money and pay for
a quality backup tool for it!
For non-rooted devices, there are many free and paid highly-rated
backup tools. There is only one backup tool for non-rooted devices
that also backs up application data. Helium. Period.
the end of the story
6
the end of the story
(Continued on page 7)
Android part Helium. In fact, the backups made by Helium are stored
in a folder called Carbon on the Android device. Once you launched,
the Carbon shortcut title of the application is Helium.
(Continued from page 6)
Now that we’ve covered backups
and the types, let’s look at Helium.
Once you’ve started Carbon, you get the Helium desktop
Helium is from ClockworkMod. It’s
unique in that there is a desktop
component also required, at least to
start the backup process. This is how
the developers get around the nonroot device application data backup
dilemma.
If your device is connected by USB and the
device is running Helium, once the connection is made, the desktop will show the success Check.
To install Helium, search for it in
Google Play and install it. Then
Open it. You’ll get the screen as
shown at the right. Click OK.
.
You are
requested
to
connect
your Android to your PC or MAC.
During the connection process, the device will
show a connection message. Click “Always
allow this computer” and then OK. If you’d
rather be prompted every time, don’t click the
“Always …”; just click OK.
You can now disconnect the Android device
from the PC/MAC. You have successfully enabled all Helium features on the Android device.
Typically, you must go through activation
process the first time Helium is started on the
Android device following boot.
Fire up your PC or MAC and go to the
link shown at the right for the desktop
application and drivers.
Download the appropriate Helium Desktop and install it.
From now on, we
will be referring to
Helium on the
Android device.
If you are running Windows, click on the
Android Windows Drivers and scroll
through to select the manufacturer of your device. Download the drivers and
either install (if the download is
an .exe) or open (if the download is a .zip) and follow the
instructions in the .zip file to
complete the installs.
Notice the activated Helium screen
shows 0 apps selected and the App
Data Only box is
checked.
Plug in a USB cable into your
phone and and plug in the USB
cable to the PC/MAC and the
phone. The phone should be
recognized.
To select all applications to backup, press
the Select All dialog box. Icons for the apps
to be backed up will be displayed and the
apps will be counted.
To select individual applications, swipe up in the Helium Premium
window. A list of applications and system settings to backup is displayed.
Once the required drivers are installed, Helium will ask you to enable
USB debugging on the device. Press OK to go to developer Options
and select USB debugging. If you are warned, click OK to continue.
Now Helium will say mount the device in Photo sharing mode and
takes you to the location to select this.
Finally, you are ready to run the Helium desktop. Click on the Carbon
shortcut on the desktop.
Yes, I know, the desktop portion of the tool is called Carbon and the
FOR SALE
HD external USB 2.0, 400 GB Western Digital, $30
HD external USB 2.0, 2 Terabyte, Western Digital, $60
Contact Vishnu 724-553-8051
[email protected]
7
the end of the story
(Continued on page 8)
Another is to copy the resulting backup to another device. If the backup is stored in the storage of the Android device, the storage location
is a folder called Carbon. All that’s required is copying the Carbon
folder to another location, either using an OTG (On-the-Go) cable and
USB flash drive or connecting the device to a PC/MAC and dragging
the folder from the device to the PC/MAC.
(Continued from page 7)
You are ready to continue. NOTE: if the App Data Only box is
checked, you will backup ONLY the application data for each application and not the actual applications. While this does make for smaller
and faster backups, restoring is a pain as you must first get the app
installed before you can restore the apps application data. Read my
article on restoring my phone from scratch and make your own decision.
If you are using Helium to switch devices, back up the old device.
Copy the Carbon folder to external storage. Turn off the old device. I
suggest actually wiping the old device after you’ve verified all the
stuff you want has been successfully moved.
To start the Backup, click the Backup button next to the Icons for the
applications.
Install Helium and activate it with the desktop on the new device.
Copy the Carbon folder from external storage to the new device. Then
use the Restore tab in Helium to restore your applications and application data.
Select where to put the backup. I’ve only used the Internal Storage
option and not tried the Add Cloud or Schedule Backup.
You will be given the chance to encrypt the backup by specifying a
password. I suggest NOT using a password. The dialog is displayed
very quickly, so if you want to specify a password, make it quick!
A final note. There are a few applications
that do not allow Helium to backup application data. You can find these by scrolling down in the backup window to the
BACKUP DISALLOWED group.
Once you select the location, the backup
starts. Various dialogs are displayed showing the app currently being backed up and
the backup progress. Eventually you get a
successful backup message. Click OK to
return to the Helium main screen.
For these applications, Helium will backup and restore the application but cannot
backup or restore the application data.
This is the choice of the application developer, not a problem with Helium.
Now that you have the backup, your device
is protected.
Typically, applications that do not allow
application data backup store their information in the Cloud and require you to
login by a userid and password. Therefore
the application data is stored in the Cloud
and retrieved by the application when you
authenticate it.
To restore from Helium, open the Helium
desktop, activate it with the desktop if
prompted, then click on the RESTORE and
SYNC tab. Select the location of the backup. The backups available are displayed.
The list of applications backed up shows
the Not Installed apps first, then the installed ones.
the end of the story
Select the app for
restore and click
the restore button.
Interesting Internet Finds
Steve Costello, Boca Raton Computer Society
[email protected]
http://ctublog.sefcug.com/
After the restore
completes, you will get a restore success
message.
In the course of going through the more than 300 RSS feeds, I often
run across things that I think might be of interest to other user group
members.
If you selected multiple apps to restore, you
may get various dialogs asking you to confirm the installation of each app. Follow the
install of each app, press the Done button, if
prompted. DO NOT press the Open button
as restores will stop.
The following are some items I found interesting during the month of
June 2014.
How can I manage a lot of scanned documents?
http://askleo.com/how-can-i-manage-a-lot-of-scanned-documents/
Reboot the device to active the new applications and data. And enjoy.
Leo Notenboom explains how he manages a lot of scanned documents. Check this post out to get an idea of how to handle your own
collection of scanned documents.
That’s the story of Helium, an Android backup and restore tool that
can backup application data without requiring “rooting” of the device.
How to Record Screencast Videos on Android
http://www.labnol.org/software/record-android-screencast/4929/
You may wonder how to protect the backup you just made, especially if the backup
is on the Android device of interest.There
are a couple of ways. One is to store the
backup in the Cloud, Dropbox, or other
backup destinations.
Have an Android and thinking about recording screencasts with it? If
so, you should read this post first.
8
the end of the story
(Continued on page 9)
(Continued from page 8)
How to Make a YouTube Video Easily
http://www.aha-now.com/how-to-make-a-youtube-video/
Picasa Tip: Picture Sort Order, Folder Sort Order
http://picasageeks.com/2014/07/picasa-tip-picture-sort-order-foldersort-order/
Another interesting post, this time about how to easily make a YouTube
video. This post explains how you can create your own YouTube video
without a lot of specialized equipment and lighting.
Jim and Chris Guld explain how to sort pictures and folders in Picasa.
You can find more Picasa tips like this in their free weekly articles at
http://picasageeks.com/ and check out http://geeksontour.tv/ for non
Picasa related tutorials.
Is Your PC Updating Correctly? Are You Sure?
http://www.techsupportalert.com/content/your-pc-updating-correctly-are
-you-sure.htm
How to Train Google Now to Show You Better Cards.
http://www.greenbot.com/article/2449596/how-to-train-google-now-to
-show-you-better-cards.html
You're updating your Windows PC all the time. Are you sure the updates are actually being done? Gizmo's Freeware tells you how to check
in this post. I think this is something you should do periodically. In fact,
the post reminded me to check my Windows machines. They all
checked out, giving me some peace of mind.
Have an Android and use Google Now? This post from Greenbot,
shows you how to train Google Now so you get better cards over time.
How to Start System Restore When You Can No Longer Log Into
Windows
http://www.7tutorials.com/how-start-system-restore-when-you-can-nolonger-log-windows
Going Paperless Quick Tip: Clipping Email with the Evernote Web
Clipper
http://www.jamierubin.net/2014/06/17/going-paperless-quick-tipclipping-email-with-the-evernote-web-clipper/
If you should no longer be able to log into Windows, this post will tell
you how to start System Restore anyway. Keep this handy, because it
is likely you will have the problem sooner or later.
In this Going Paperless tip, Jamie shows how to clip your email into
Evernote using the Web Clipper. I found the tip useful, and thought you
might also if you use Evernote and email.
What Is RSS and How Can It Improve Your Life?
http://www.makeuseof.com/tag/what-is-rss-and-how-can-it-improveyour-life/
6 Tips to Help You Go Paperless On Android
http://www.makeuseof.com/tag/6-tips-go-paperless-android/
This MakeUseOf post explains ways to be paperless on your Android,
by scanning receipts and documents, using a notekeeping app, printing
to PDF, and more.
If you have been reading this column or the Interesting Internet Finds
posts for a while, you know that I get these kinds of things from RSS
feeds. Check out this MakeUseOf post to learn about RSS feeds, then
check out some for yourself. I guarantee you will find lots of useful
things for yourself.
**********
Most Fridays, more interesting finds will be posted on the Computers,
Technology, and User Groups Blog:
**********
http://ctublog.sefcug.com/tag/interesting-internet-finds/
Most Fridays, more interesting finds will be posted on the Computers,
Technology, and User Groups Blog:
The posts are under Creative Commons licensing.
http://ctublog.sefcug.com/tag/interesting-internet-finds/
the end of the story
The posts are under Creative Commons licensing.
Interesting Internet Finds
the end of the story
Steve Costello, Boca Raton Computer Society
[email protected]
http://ctublog.sefcug.com/
Interesting Internet Finds
Steve Costello, Boca Raton Computer Society
[email protected]
http://ctublog.sefcug.com/
In the course of going through the more than 300 RSS feeds, I often run
across things that I think might be of interest to other user group members.
The following are some items I found interesting during the month of
July 2014.
In the course of going through the more than 300 RSS feeds, I often
run across things that I think might be of interest to other user group
members.
What’s New in Android 5.0 L?
http://www.maketecheasier.com/whats-new-in-android-5-0-l/
The following are some items I found interesting during the month of
August 2014.
Have you been hearing about the new Android 5.0-L? Been wondering
what it is all about? If so check out this post from MakeTechEasier.
What is Google+?
http://geeksontour.tv/2014/07/what-is-google/
Can I Make Phone Calls from Within Gmail?
http://www.askdavetaylor.com/can-make-phone-calls-within-gmail/
Chris explains what Google+ is, and why they use it.
Dave Taylor explains how to make phone call for free with your Gmail
account.
(Continued on page 10)
9
From the Presidents,
……. Editor’s desk
The 5 Best Apps for Your Stylus-Sporting Android Tablet
http://www.greenbot.com/article/2459936/the-5-best-apps-for-yourstylus-sporting-android-tablet.html
If you have an Android tablet that supports using a stylus, you should
have some apps to make the most use of it. Greenbot lists five of what
they call the best apps in this post. I currently use one of them, and am
going to try two more of the ones shown.
Required reading: Always good reading available here …….
A New Android Tablet — Now What?
……….. by Phil Sorrentino
Windows 8 Tablet - A tablet for all reasons
………... by Phil Sorrentino
Image Processing Software, Part 2
………… by Dick Maybach
Helium Backup, a review
…..……. by Frank Ramsey
Interesting Internet Finds June 2014
………… by Steve Costello
Interesting Internet Finds July 2014
……….... by Steve Costello
Interesting Internet Finds August 2014
……….... by Steve Costello
OTG Cable/Adapter (On-the-Go)
……….. by Frank Ramsey
Why Are Most Programs Still 32-bit on a 64-bit Version of Windows?
http://www.howtogeek.com/194119/why-are-most-programs-still-32bit-on-a-64-bit-version-of-windows/
Do you have a 64 bit version of Windows? Do you wonder why most
of your programs are still 32 bit? HowToGeek has some answers for
you in this post.
Going Paperless: Add Reminders to Scanned Documents for Quick
Action Items
http://www.jamierubin.net/2014/08/19/going-paperless-add-remindersto-scanned-documents-for-quick-action-items/
For the Evernote users out there, Jamie Rubin explains how and why
to add reminders to your scanned documents for quick action items.
PAGE # 3
PAGE # 4
PAGE # 5
PAGE # 6
PAGE # 8
PAGE # 9
PAGE # 9
PAGE # 10
PJK
How to Disable Autoplay For Facebook Videos
http://www.cnet.com/how-to/how-to-disable-autoplay-for-facebookvideos/
We will have a BYO (Bring Your Own), for those who do not remember: Bring what you like and let others taste it! If they do not
like it, you still do! It will not be wasted!
The PACC will also contribute, as usually!
PJK
I find it annoying to have videos autoplay in Facebook, and it just uses
up data. Following the directions in this tip I have disabled the autoplay for my desktop and Android, it has iPhone instructions too.
How to Create Your Own Personalized Domain Email Address
http://www.online-tech-tips.com/computer-tips/how-to-create-yourown-personalized-domain-email-address-for-free/
Please confirm your e-mail address, so the PACC TALK notification can go out
to let you know, the newsletter is at the PACC web site ready to download.
Thank you, PJK .
IMPORTANT NOTICE: The PACC web site is working. You are again able to
get your copy of PACC TALK there. If you have a problem with viewing it with
Adobe Reader, use another PDF reader, such as Nitro. to view the PACC TALK.
This one is self explanatory.
PACC Web Site: http://pacc.apcug.org/
**********
Most Fridays, more interesting finds will be posted on the Computers,
Technology, and User Groups Blog:
These are available from a number of sources including eBay for
prices ranging from under a $1 to
$5 or more.
http://ctublog.sefcug.com/tag/interesting-internet-finds/
The posts are under Creative Commons licensing.
You plug the flash drive into the Type A female connection and plug
the USB micro male into the Android device.
the end of the story
Typically the Android device
will recognize the flash drive
and eventually it will show up
in File Manager. I say eventually because the flash drive
must be scanned by the Android device. Depending on
the size of the flash drive and
the speed of the Android device, it may take a little time
for the USB drive to show up.
Be patient.
OTG Cable/Adapter (On-the-Go)
By Frank Ramsey, Editor, Akron Canton PCUG, Ohio
www.acpcug.org aframsey (at) yahoo.com
How do you accomplish the transfer of files between a mobile device
and your PC?
There are a number of methods, including connecting the device to a
PC/MAC via a USB cable, use an application to connect over Wi-Fi
and others.
An additional method would be to transfer files to a USB Flash drive.
Since few Android devices have a full- size USB Type A port, how do
you connect a flash?
Now you can copy files
to/from the flash drive.
Enter the OTG Cable. A typical OTB cable is shown above. One end is
the USB Type A female, the other end typically USB micro male.
10
the end of the story
MEMBERSHIP APPLICATION FOR PACC:
(Please print in CAPS)
NAME.................................................................DATE................................
ADDRESS....................................................COMPANY.............................
CITY...............................................STATE.............ZIP+4...........................
PHONE...................................E-MAIL........................................................
OCCUPATION.............................................................................................
INTERESTS.................................................................................................
RECOMMENDED BY PACC MEMBER......................................................
Dues: $25 per year.
Make your check out to: PACC and send it with your application to:
Treasurer, PACC, 216 Cashmere Court, Cranberry Twp. , PA, 16066
cut here.....................................................................................cut here
PACC HELP LINE
Help is available to PACC members on various computer topics by contacting one of
those listed below. It is recommended that the initial contact with any of these experts
should be made via the PACC WEB SITE. In this way others can benefit from the
questions and responses. Be courteous and call only during the listed times.
NAME
COMPUTER AREA
PHONE TIME
Agrawala, Vishnu
Hardware
Cutrara, Phil
Geoworks
766-0274
Fisher, Bill
Cobol, Word Perfect
367-8996
7 - 9:00 pm
Konecny, P.
Windows, DOS 6.2x, MS IE,, Hardware
795-6075
8 - 9:00 pm
724-553-8051 3 - 6:00 pm
If you would like to become PACC HELP LINE volunteer inform the editor by sending email to: [email protected]
FOR SALE
——————————
HD external USB 2.0, 400 GB
Western Digital, $30
HD external USB 2.0, 2 TB,
Western Digital, $60
Contact Vishnu 724-553-8051
[email protected]
Classified ads. Buy, Sell, Trade. Members
may place free ads (up to 5 lines).
For commercial ads send a inquiry to:
[email protected]
ATTENTION:
AS OF JANUARY 2012 THE DUES FOR PACC MEMBERSHIP ARE DUE AT THE SAME TIME FOR ALL
OF THE MEMBERS. THIS IS TO ELIMINATE ANY
CONFUSION ARISING FROM ELECTRONIC DELIVERY OF PACC TALK. ANY OTHER TIME
PERIOD WILL BE PRORATED, IF ONE INSISTS.
Reprint Policy.
Permission to reprint articles from PACC TALK
is given to school, personal computer club, and
nonprofit organization publications, provided that:
(a) PACC Inc. receives a copy of the publication; (b)
credit is given to PACC TALK as the source; (c) the
original author is given full credit; and (d) the article
author has not expressly copyrighted the article.
Recognition is one means of compensating our
valued contributors. Arrangements can be made to
receive copy on magnetic media; for details, contact
the editor.
11
PITTSBURGH AREA COMPUTER CLUB
P. O. Box 557
PITTSBURGH PA 15146
E-mail: [email protected]
NEXT PACC MEETING
IS ON December 21, 2014
P A C C 1975 - 2014
IN ITS FORTIETH YEAR
PACC TALK
OFFICIAL NEWSLETTER OF THE PITTSBURGH AREA COMPUTER CLUB
P.O. BOX 557, PITTSBURGH PA 15146
RESPONSIBLE FOR TYPOGRAPHICAL ERRORS OR WRITERS ACCURACY
NOT
NEXT MEETING: December 21, 2014
The Pittsburgh Area Computer Club (PACC) holds its meetings the THIRD Sunday of each
month. The next meeting will be in room 311 at Point Park University, Wood St. and Blvd.
of the Allies. The doors open at 11:00 am and close at 4:30 pm. Bring your PC!
Treas. - Vishnu Agrawala
Exec VP – Bill Fisher
Pres. – P J. Konecny
655-2883
724-553-8051
367-8996
795-6075
MAL 3 - Anil Rodrigues
MAL 2 - Pat Barron
MAL 1 - Tim Prepelka
724-553-8051
Windows - P. J. Konecny
795-6075
521-4096
795-6075
FOR SOME YEARS THE PACC TALK WAS AVAILABLE IN DIGITAL FORMAT. Therefore, as of January 12, 2012, the membership dues are payable in the first month of the
calendar year.
Renew your Memberships !!! Send a check or money order for $25 made out to ‘PACC’
and addressed to Treasurer, PACC, 216 Cashmere Court, Cranberry Twp. , PA, 16066.
Classified ads. Buy, Sell, Trade. Members may place free ads (up to 5 lines). Articles
should be prepared in plain ASCII text. WITHOUT formatting. Deadline for articles is the
25th of the month. Send them to P.J. Konecny, P.O. Box 557, Monroeville, PA 15146.
PACC homepage can be found at: http://pacc.apcug.org
PACC OFFICERS AND VIPs
VP Prog. - Rich Springer
341-0252
Editor - Pavel J. Konecny
VP Edu. - Homer James
Hardware-Vishnu Agrawala
795-6075
PACC SIG LEADERS
MS Publisher - P. J. Konecny
12