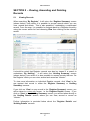
1
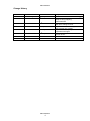
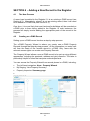
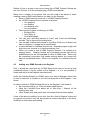
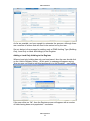
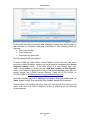
UNCLASSIFIED Government Property Unit The Register of Surplus Public Sector Land User Guide UNCLASSIFIED 1 UNCLASSIFIED Contents Page SECTION 1 - BACKGROUND......................................................................... 5 1.1 The Register of Surplus Public Sector Land ............................................. 5 1.2 Access .......................................................................................................... 6 SECTION 2 – MY E-PIMS ............................................................................... 7 2.1 My e-PIMS Overview .................................................................................... 7 2.2 Settings – By Register ................................................................................. 7 SECTION 3 – SEARCHING THE REGISTER ................................................. 9 3.1 Search Facilities .......................................................................................... 9 3.2 Search – By Register ................................................................................... 9 3.3 Search Criteria ........................................................................................... 10 3.4 Search Type ............................................................................................... 13 3.5 Search Results ........................................................................................... 14 SECTION 4 – ADDING A NEW RECORD TO THE REGISTER ................... 16 4.1 The New Process ....................................................................................... 16 4.2 Creating an e-PIMS Record ....................................................................... 16 4.3 Adding an e-PIMS Record to the Register ............................................... 17 4.4 The Register Process ................................................................................ 26 4.5 Email Notification ...................................................................................... 26 SECTION 5 – VIEWING, AMENDING AND DELETING RECORDS ............ 27 5.1 Viewing Records ........................................................................................ 27 5.2 Amending Records .................................................................................... 32 5.3 Deleting Records ....................................................................................... 33 5.4 Change History .......................................................................................... 34 SECTION 6 – MIGRATED RECORDS .......................................................... 35 6.1 Migration Process...................................................................................... 35 6.2 Assistance.................................................................................................. 35 UNCLASSIFIED 2 UNCLASSIFIED SECTION 7 – OTHER INFORMATION ......................................................... 36 7.1 Register - Position Report ......................................................................... 36 7.2 Register Report .......................................................................................... 37 7.3 Email Notifications .................................................................................... 37 7.4 Frequently Asked Questions .................................................................... 38 SECTION 8 – BENEFITS FOR USERS ........................................................ 39 8.1 All Information in One Place ..................................................................... 39 8.2 Viewing e-PIMS Property Records............................................................ 39 APPENDIX 1 - AUTOMATED EMAIL NOTIFICATIONS ............................... 41 APPENDIX 2 - ALL NEW RECORDS NOTIFICATION ................................. 42 APPENDIX 3 - FAQS .................................................................................... 43 UNCLASSIFIED 3 UNCLASSIFIED Change History Version 1.0 1.1 Author Adam Flanigan Chris Statham Date 04th May 2005 4th October 2005 1.2 D. McClare 12th March 2009 1.3 Kirk Howe 20th April 2011 1.4 D McClare 29th July 2013 1.5 D McClare 29th September 2015 UNCLASSIFIED 4 Purpose First Edition Updated to reflect release dated 30th Sept covering mapping enhancements Updated to reflect new screens and EP name change to HCA. Updated to reflect the integration of the Register into e-PIMS Updated to reflect policy and operational changes Updated Background Information and screen shots UNCLASSIFIED SECTION 1 - Background 1.1 The Register of Surplus Public Sector Land The Government Property Unit (GPU), which is part of the Cabinet Office, maintains The Register of Surplus Public Sector Land (The Register) on behalf of HM Government in collaboration with other government departments, their sponsored bodies and other public sector organisations. The Register provides a single reference point for all participating public sector organisations on the available supply of surplus land across Central Government. The capability exists for e-PIMS users from any public sector organisation to add their records to the Register, however the mandation to use the Register only applies to freehold and leasehold properties with more than 99 years extant that are part of the Central Government estate. The 2015 Spending Review announcement identified that the Government needs to do more to release public assets into more productive economic use. Part of the plans included an ambitious new process for land disposals from 2015-16, with a target for Central Government and associated bodies to deliver at least £5 billion of land and property sales between 2015 and 2020, to support growth and drive efficiency. A Strategic Land and Property Review is being managed by Government Property Unit with input from DCLG and Homes and Communities Agency (HCA) to progress this process. The review will support and challenge departments in identifying where further public sector land can be declared surplus and sold to support economic growth. This and other policies, such as housing. Ministerial oversight of this programme sit within PEX(ER) Cabinet Committee. A wide cross-section of government bodies add information to the Register, including the Ministry of Defence, Department of Health, Highways England and Coal Authority. Once the disposing body has provided details of the site for inclusion on the Register, there is a 40 working day window for public sector agencies and departments to identify new uses for this land. If the sites can be used beneficially elsewhere in the public sector, they may be transferred at market value and then be brought back into beneficial use. After the 40 working day window has expired, the disposing body can advertise the site on the open market. It should be noted that the 40 working day window has been extended to allow an additional ten working days for sites to be assessed for their potential for the Free Schools programme by the Department for Education (DfE). This is in line with the recommendation agreed at the October 2012 meeting of PEX(ER) Cabinet Committee. The extension does not apply to other users of the Register. Any queries regarding registration and time limitations should be addressed to the e-PIMS Service Delivery Team via 07795 665526 or 077699 17884 or [email protected]. UNCLASSIFIED 5 UNCLASSIFIED One of the main groups of bodies that adds sites to the Register is NHS organisations. By a Direction dated 23 July 2007 (Gateway Ref: 8544), NHS trusts and the former PCTs were required to place surplus property on the Register. Subsequently NHS foundation trusts had it confirmed that the requirement also applied to them (based on a DAO letter issued by HM Treasury on 8 October 2008). Further guidance was issued in 2013 in a letter (Gateway Approval Ref: 18839) which provides details of how each NHS organisation can add sites to the Register. GPU has agreed to assist Trusts in this regard to minimise the resource burden. Since 2011 the Register of Surplus Public Sector Land has been integrated into the core e-PIMS database. This integration makes it easier to search for and identify all types of public sector land and property, including any declared surplus. It also makes adding existing e-PIMS records to the Register easier. 1.2 Access The Register is available at: https://www.ePIMS.ogc.gov.uk In order to gain access to the Register, users must be registered as e-PIMS users. UNCLASSIFIED 6 UNCLASSIFIED SECTION 2 – My e-PIMS 2.1 My e-PIMS Overview Section 11 of the accompanying e-PIMS User Manual provides full details about ‘My e-PIMS’, which holds information about your account activity and allows you to customise your settings. It can be accessed via the left hand navigation menu in e-PIMS. Dependent on your user rights, ‘My e-PIMS’ consists of seven areas: 2.2 Holdings: displays Holdings associated with your user account; Settings: customises the search, display, task and default options; Staging Area: displays Property, Holdings, Buildings and Occupations held as Staging Records; SLA Validation: summarises any data errors relating to the e-PIMS Service Level Agreement; Data Validation: summarises any data errors; Saved Reports: provides a shortcut to your saved reports in e-PIMS reporting; and Register – Position; provides key metrics about the Register of Surplus Public Sector Land. Settings – By Register Under the Settings area, you can customise the Default Search Type under ‘Search Options’ to show only those records that are ‘On the Register’, i.e. within or outside the 40 Working Day Window. To do this, you should select By Register from the drop-down filter and save that setting by clicking on the Save button in the top right hand corner of the screen, as shown below. After selecting and saving the By Register filter, you will only be able to view records that are ‘On the Register’, i.e. within or outside the 40 / 50 Working UNCLASSIFIED 7 UNCLASSIFIED Day Window. Such records will always be set as ‘Non-Core – Surplus’ in terms of the Core/Non-Core status of that record. If you are primarily a user who will be mainly using e-PIMS to add records to the Register, then we recommend that you do not change your Default Search Type to By Register as it needs to be set to By Holding. You can still search by different types without changing the Default Search Type. This is covered in Section 3. Sections 3 & 4 of the accompanying e-PIMS User Manual provides full details about the data structure within e-PIMS. UNCLASSIFIED 8 UNCLASSIFIED SECTION 3 – Searching the Register 3.1 Search Facilities All search facilities in e-PIMS, including the Register, are accessed via the left hand navigation. Clicking Search will expand the menu displaying all the available search facilities. Search – By Register 3.2 In order to search for records that are ‘On the Register’, i.e. within or outside the 40/50 Working Day Window, it is necessary to carry out a Property Search. It should be noted that in e-PIMS language, the term property is used to mean both land and/or buildings. A Property Search can be carried out using one or a combination of the filters under any of the following: The basic search filters; The advanced search filters; and The Register search filters. The default search screen in e-PIMS is shown below. UNCLASSIFIED 9 UNCLASSIFIED When the Register was integrated into e-PIMS, a set of additional filters were added that apply to current Register records. These Register Filters allow users to search using most of the same criteria that existed previously – see below. 3.3 Search Criteria To search for a Register record, search criteria must be entered in at least one of the search fields or by selecting or defining a specific location using the ‘Add a Map Filter’. All search fields are non-case sensitive; this is a common feature on all search fields throughout e-PIMS. Section 13 of the accompanying e-PIMS User Manual provides details about the basic property and advanced search capabilities. It also provides details about how to ‘Add a Map Filter’. This will enable you to select the search geography from a selection of pre-built filters or to define one yourself. It should be noted that the Advanced Search capabilities have been enhanced recently. This means that it is also now possible to carry out a UNCLASSIFIED 10 UNCLASSIFIED search by the Core/Non-Core Status of a record. This allows users to search for all records, including Register records, by their status. All current Register records will have their Core/Non-Core status set to ‘NonCore – Surplus’. Records that have been ‘On the Register’ but that have since had their Core/Non-Core status set to anything other than ‘Non-Core – Surplus’ will not show as being ‘On the Register’. There is the ability to display the search results either in a textual format or on a map. To do this, you need to place a tick in the ‘Results on a Map’ checkbox at the bottom of the e-PIMS search screen as shown below. The search results will be displayed on the map rather than as a textual list. Labels will not be displayed until a scale of less than 1:5,000,000 has been reached. Polygons are displayed from a scale of less than 1:15,000. Seed points and polygons are colour coded to represent “the parcel of interest”, “40/50 working days expired” and within “40/50 working days”. By default, any Register search will be carried out of only current Register records. If a user wishes to undertake a search to include records that were previously ‘On the Register’, then this will need to be done by carrying out a By Holding search. Further details of how to do this are included in Section 3.5. The remainder of this section outlines the search capabilities under the Register Filters. All of the searches will be carried out of current records if undertaken using a By Register search. Legacy Land ID For those records that were previously recorded on the Register before integration and have been migrated into e-PIMS, it is possible to search by what was the Land ID in the Register before integration. This is termed the ‘Legacy Land ID’ in the Register search filters. UNCLASSIFIED 11 UNCLASSIFIED Available Between Allows the user to search for records added before, on or after a specific date. Status Select either ‘Within 40 Working Days’ or ‘40 Working Days Expired’. Classification Select either ‘Greenfield’, ‘Brownfield’ or ‘Not Known’. Greenfield is land that is undeveloped and/ or unused apart from for agricultural purposes. Brownfield is land that has been (partly) developed. Expiry Status Select either ‘Not on the Market’, ‘On the Market’, ‘Under Offer, ‘Sold’ or ‘No Longer Surplus’. You can multi-select fields under this search filter. ‘Not on the Market’ is where the site is not available on the open market. This includes records that are Within 40/50 Working Days as well as ones where the 40/50 Day Window has expired. ‘On the Market’ is where the site is available on the open market after the 40 Day Window has expired. ‘Under Offer’ is where an offer has been made for the land, but the land has not been sold. ‘Sold’ is used where the site is no longer surplus as it has been sold. In such circumstances, the site will be removed from the Register and will have become an historic record that is only available under a ‘By Holding’ search. ‘No Longer Surplus’ is where the original owner has retained the site. In such circumstances, the Core/Non-Core field will have been changed from ‘NonCore – Surplus’. In such circumstances, the site will be removed from the Register but will remain a current e-PIMS record that is available under a ‘By Holding’ search. Proposed Use Select either ‘Employment’, ‘Housing’, ‘Mixed with Housing’, ‘Mixed without Housing’, ’Open Space’, ‘Other’ or ‘None’. You can multi-select fields under this search filter. UNCLASSIFIED 12 UNCLASSIFIED ‘Employment’ is where the site will be used for offices and/ or industry. ‘Housing’ is where the site will be used for new housing. ‘Mixed with Housing’ is where the site will be used for a mixture of housing and other uses. ‘Mixed without Housing’ is where the site will be used for a mixture of uses besides housing. ‘Open Space’ is where the site will be used for formal or informal open space. ‘Other’ is where the site will be used for a purpose different to those listed. ‘None’ is where it has not yet been decided what the site is to be used for. 3.4 Search Type It is possible to carry out a search By Register or By Holding. It is possible to do either by two methods. As outlined in Section 2.2, it is possible to set the Default Search Type to either. If you do this, then it is possible to override the default search filter using the Search drop-down filter on the Property Search as shown below. It should be noted that there are other search options under the drop-down filter, including ‘All Property’, about which more information is provided in Section 7. So, for example, if you have your Default Search Type set to By Holding then you can do a Register search by changing the Search drop-down filter to By Register. After doing each search, we recommend that you use the Reset button to clear the previous search. In the above example, if you had carried out a By Register search by changing the drop-down filter and then clicked on the Reset button, then the Search drop-down filter would ‘refresh’ as By Holding as that is the Default Search Type. If you want to do a search for all sites that have ever been on The Register, then you need to do a By Holding search and multi-select all options under the Expiry Status field in Register Filters. You will need to also set the search to cover both current and historic records. UNCLASSIFIED 13 UNCLASSIFIED 3.5 Search Results Dependent on whether you undertake a search By Register or By Holding, the search results screen will display different fields as they have been tailored to show the most relevant results. After completing a By Register search, the user will be taken to the Register summary screen displaying all the results matching the search criteria, as shown below. The results will display summary information about the Register records returned by the search criteria. If you search By Holding, after completing a search, the user will be taken to the Holding summary screen displaying all the results matching the search criteria, as shown below. The results will display summary information about UNCLASSIFIED 14 UNCLASSIFIED each of the e-PIMS holding records based on the search criteria. Where the record has been added to the Register, it will be shown with a ‘Y’ in the column headed with an ‘i’ where the ‘hover/flyout’ is headed ‘Is the Holding on the Register of Surplus Land Y/N?’. Those with an ‘N’ in this column are not ‘On the Register’. So, for example, if you undertake a By Holding search using the Core/NonCore field under Advanced Search filters and select ‘Non-Core – Surplus’ from the drop-down list, then you will return all records classified as ‘Non-Core – Surplus’ including those that are ‘On the Register’. If no results match the search criteria using either a search By Register or By Holding, then the message ‘No results returned – Please change the search criteria’ will be shown. To see more data on a particular Register record, the user can click on View under either the Register Summary or Holding Summary screens. This will then open a new window displaying more information on that record (see Section 5 - ‘Viewing, Amending and Deleting Records). UNCLASSIFIED 15 UNCLASSIFIED SECTION 4 – Adding a New Record to the Register 4.1 The New Process A record can be added to the Register if it is an existing e-PIMS record (see Section 4.3). Alternatively, where it is not an existing record, then it will need to be added to e-PIMS first (see Section 4.2). Over time, it is more likely that most land and/or buildings will be recorded on e-PIMS prior to them being added to the Register. In such instances, the process will simply involve adding the appropriate parts of the record to the Register. 4.2 Creating an e-PIMS Record Setting up an e-PIMS record involves a step-by-step process. The e-PIMS Property Wizard is where you create new e-PIMS Property Records through that step-by-step process. All the information you enter here will form the basis of the records stored in e-PIMS. Only users with the relevant access rights can create new Property Records. The Property Wizard allows a new e-PIMS record to be set-up using different approaches, including the postcode, address and grid reference. The latter is particularly helpful for sites that comprise undeveloped land. You can access the Property Wizard from several places in e-PIMS, including: The left hand navigation: New > Property Wizard. My Staging: View Property Summary. Property Inspector: Summary page. Property Wizard screen UNCLASSIFIED 16 UNCLASSIFIED Details of how to create a new record using the e-PIMS Property Wizard are set out in Section 3 of the accompanying e-PIMS User Manual. Below are a number of key points that you will need to be aware of when creating a new e-PIMS record before you add it to the Register: Each e-PIMS record is known as a ‘e-PIMS Property Record’; An e-PIMS Property Record consists of at least: o one property; o one holding; o one building; and o one occupation; There are three types of holding in e-PIMS: o Building Only; o Land Only; or o Land & Buildings; You can only add land parcels to ‘Land’ and ‘Land and Buildings’ records. This is done at the holding level; You can add multiple land parcels to a holding. Each one of these must have a reference, a usage and a classification; A parcel defines an individual land record. Depending upon usage, this may have one, several or no land boundaries; and When you create a new e-PIMS Property Record, it is created as a staging record. Staging records are incomplete records that are not published and so are not available to other e-PIMS users. There may be incomplete information that needs entering before the record can assume a published status. When it is complete, it is ‘published’ by the user. 4.3 Adding an e-PIMS Record to the Register First, it should be noted that an e-PIMS Record will need to be set-up and ‘published’ before it can be added to the Register, i.e. it is not possible to create and add it to the Register simultaneously. Under the ‘Holding Details’ in e-PIMS, there is an ‘Add to Register’ button that is used to add one, a number or all of the land parcels to the Register – see below. In order to add an e-PIMS Holding Record to the Register, it will need to: Be a current holding, i.e. it has not been made historic; Have the Core/Non-Core status set to ‘Non-Core – Surplus’ at the holding level; and Have at least one land parcel with a boundary that has been added; If one of the above conditions is not met, then the ‘Add to Register’ button will be greyed out and the user will be required to ensure that each of the three conditions is met before proceeding. UNCLASSIFIED 17 UNCLASSIFIED As far as possible, we have sought to automate the process, although there are a number of actions that will need to be carried out by the user. Set out below is the process for adding each e-PIMS Holding Type (Building Only, Land Only or Land & Buildings) to the Register. Adding a Land Only Holding to the Register Where a land only holding has only one land parcel, then the user should click on the ‘Add to Register’ button. At this point, a message will appear saying “Are you sure you wish to add this land parcel(s) to the Register” – see below. If the user clicks on ‘OK’, then the Register screen will appear with a number of fields having been auto-populated – see below. UNCLASSIFIED 18 UNCLASSIFIED At this point, the user will need to add a Register contact (see below) and it is also possible to complete additional information in the following fields as required: Title Folio Number; Comments; and Proposed Use After Sale. All of the above fields are optional. In order to add the ‘case officer’ to the Register record, the user can either select an existing Register contact from the drop-down list against the ‘Select Register Contact’ button. If the case officer is a new contact, then their name can be added by clicking on the ’Add New Contact to the Register’ button. If the name of the person is not on the list that appears, then the user should contact the e-PIMS Service Delivery Team via 07795 665526 or 077699 17884 or [email protected]. Once the required amount of additional information has been added and the ‘Save’ button clicked, then the 40/50 Day Window period will commence. Where a land only holding has more than one land parcel, then the user will notice that when the ‘Add to Register’ button is clicked then the following screen appears: UNCLASSIFIED 19 UNCLASSIFIED At this point, the user must select which of the land parcels are to be added to the Register. If all land parcels are to be added, then the user will need to either click on the ‘Select All’ button or tick the box under the Select column against each land parcel before clicking the ‘Add to Register’ button. From this point onwards, the process is as described above. However, if only some of the land parcels need to be added to the Register, then the user will need to select those parcels by ticking the box alongside each of those land parcels. Once this has been done, then the user should click on the ‘Add to Register’ button and those parcels will be moved as one record onto the Register. After selecting the appropriate land parcels, the following message will appear on the screen. This is simply to confirm that the user is, in effect, creating a new holding to add part of the original e-PIMS property record to the Register. The user should click “OK” to continue. UNCLASSIFIED 20 UNCLASSIFIED At this point, the system will create a new holding as not all of the land parcels are being added to the Register. This will be done automatically. From this point onwards that e-PIMS Property Record will always have two holdings (assuming that there was one in the first place) or one more than the number of holdings that existed before. This process will allow the ‘Core/Non-Core’ status of those land parcels that are not being added to the Register to be changed from ‘Non-Core – Surplus’ in future if need be. Adding a Land & Buildings Holding to the Register The process of adding a land & buildings holding to the Register is the same as above in terms of the land parcels. However, the user also needs to either add one or a number of buildings to the Register at the same time. Where there is only one building, then the user will select the building along with one, a number or all of the land parcels that are to be added to the Register – see below: UNCLASSIFIED 21 UNCLASSIFIED After selecting the appropriate land parcels and the building, the following message will appear on the screen. This is simply to confirm that the user is, in effect, creating a new holding to add part of the original e-PIMS property record to the Register. The user should click “OK” to continue. Where there are multiple buildings, then the user will select one, a number or all of the buildings to be added to the Register along with one, a number or all of the land parcels – see below: UNCLASSIFIED 22 UNCLASSIFIED The same message will appear as above since the user is, in effect, creating a new holding to add part of the original e-PIMS property record to the Register. The user should click “OK” to continue. When a user adds the only or all buildings to the Register but not all land parcels, then the system automatically reclassifies the non-Register holding as a land only holding. Adding a Building Only Holding to the Register It is not possible to add ‘Building Only’ holdings to the Register. In order to add an e-PIMS Property Record that is recorded as a ‘Building Only’ holding to the Register at this point, a land parcel will need to be added to it and its holding status changed to a ‘Land & Buildings’ record before it is added to the Register. The process is set out below. First, before making any changes, the user will note that the ‘Add to Register’ button is greyed out. When the user hovers over it, a pop-up message will appear confirming that the user needs to change the holding type from ‘Building Only’ to ‘Land & Buildings’ – see below: UNCLASSIFIED 23 UNCLASSIFIED The user needs to make this change, as shown below, and click on the ‘Save’ button in the top right hand side of the screen. It may be that the user will also need to change the Core/Non-Core status of the holding to ‘Non-Core – Surplus’ at this point as well. If so, this change must also be saved. Once this has been done, the user will get a message stating that ‘Your changes have been saved!’ and the ‘Add Parcels’ button will appear adjacent to the Land Parcels heading – see below. UNCLASSIFIED 24 UNCLASSIFIED The process of adding land parcels is a two-stage one. First, the user will need to provide details in three fields for each land parcel that is added. Once the information has been completed for each land parcel the user will need to click on the ‘Add’ button – see below. This process is repeated for each land parcel until they have all been added. Secondly, the user will need to add a boundary for each land parcel by clicking on the ‘Add Boundary’ button that appears adjacent to the Land Parcels heading – see below. UNCLASSIFIED 25 UNCLASSIFIED The user will be taken to the e-PIMS GIS Portal Wizard to add the land parcel boundary. Section 4 of the accompanying e-PIMS User Manual provides details about this functionality. After adding the land parcel boundaries, the ‘Add to Register’ button will be enabled and the user should then proceed as if the holding type was a ‘Land & Buildings’ holding – see above. 4.4 The Register Process The Register process remains unchanged. Once the record has been added to the Register, a period of 40 / 50 working days will begin in which all users of the Register will be able to view the Register record. After the 40 / 50 working day period expires, your site will appear on the public-facing version of the Find Government Property website (https://www.epims.ogc.gov.uk/FMSGS/) unless you have marked your sites as being public data exempt. These public data exempt flags should only be used in exceptional circumstances and not as a general rule. Decisions to use sensitivity flags will need to be defended by the originating department/body and a valid reason provided if requested. 4.5 Email Notification After adding a record to the Register, the Register contact will receive an automatic email notification confirming that the user has added a record to the Register and reminding the user to update the expiry status of the record once the 40 working day period has expired (see ‘Section 5 – Viewing, Amending and Deleting Records’). The email will also contain the Register Property/Holding Reference (a unique ID made up from the e-PIMS Property Reference and the relevant Holding Number for that record) and a hyperlink to the page displaying the land record (See Appendix 1). UNCLASSIFIED 26 UNCLASSIFIED SECTION 5 – Viewing, Amending and Deleting Records 5.1 Viewing Records When searching “By Register”, it will return the ‘Register Summary’ screen (shown below), from where it is possible to access records which you can view, amend and delete. This is also possible if undertaking a map-based search. From the map, it is possible to navigate back to a Register record by using the mouse action list and choosing View then clicking on the relevant record. It should be noted that Register records can also be viewed if a search is undertaken “By Holding”. It will return the ‘Holding Summary’ screen (shown below), from which it is also possible to access records that are ‘On the Register’ which you can view, amend and record as “Historic”. To view more information on individual Register records, click ‘View’ in the row against that record in either the ‘Register Summary’ or ‘Holding Summary’ screens. If you click on ‘View’ on any record in the ‘Register Summary’ screen, you will be taken to a view only screen, i.e. the ‘Register Details’ screen. If you click on ‘View’ in the ‘Holding Summary’ screen, you will be taken directly to the ‘Holding Details’ screen, where you can view, amend or record as “Historic”. Further information is provided below about the ‘Register Details’ and ‘Holding Details’ screens. UNCLASSIFIED 27 UNCLASSIFIED The Register Details Screen The ‘Register Details’ screen contains similar information to the screen that existed before integration – see below. The screen shows key information relating to the site. It includes information about the land parcel(s) that make(s) up the Register site and allows the user to view the site on a map by clicking on the ‘Display Map’ button. More information about this functionality is set out below. The screen also shows key information about the associated e-PIMS property record. Under this part of the screen, it is possible to download the ‘Expression of Interest’ form that users should complete and return to the named Register contact for that record should they wish to express interest in that site during the 40 / 50 Day Window. This process remains the same as before integration. The screen also shows the Register disclaimer. As stated above, it is not possible to amend details of the record under this screen. To do so, you need to click on the ‘View Holding’ button at the top right hand side of the screen. UNCLASSIFIED 28 UNCLASSIFIED The map screen will also show any other ‘Land Only’ and ‘Land & Buildings’ records that are held on e-PIMS. This includes those that are ‘On the Register’ and those that are not. It is possible to use the navigation buttons and the mouse wheel to move around the map screen and to view the Register site in context. So, from this screen, you can zoom out and see all other land parcels. This will assist in UNCLASSIFIED 29 UNCLASSIFIED ensuring duplicate records are not created and help when defining abutting parcels. There is also a legend that displays the different types of land in different colours and shades to assist in interpreting the results. The Holding Details Screen If you click on ‘View’ in the ‘Holding Summary’ screen or you click on ‘View Holding’ in the ‘Register Details’ screen, you will be taken to the ‘Holding Details’ screen – see below. This screen allows you to view, amend or record as “Historic”. The ‘Holding Details’ screen displays information under three main headings: Holding; UNCLASSIFIED 30 UNCLASSIFIED Register; and Change History. Depending on the user’s rights, it is possible to amend details under both the Holding and Register headings, although certain fields have their amend rights limited during the 40 Day Window. It should be noted that details of land parcels always appear under Holding heading on this screen, where the site is ‘On the Register’ or not. The fields under the Register heading only appear after a site has been added to the Register and are then always visible, even when the site has been removed from the Register. If the ‘Amend’ button does not appear against a specific record, then the user does not have permission to amend that record. For more information on user rights, see ‘Section 1 – Background’. Holding Section 3 of the accompanying e-PIMS User Manual sets out how to amend information in the Holding and other (Property, Building and Occupation) inspector screens in e-PIMS. Register Set out below are details of how to amend the fields under the Register heading. It should be noted that the fields under the Register heading are hidden and the down arrow key () will need to be clicked to expand this section of the screen. After a site has been added to the Register, then the fields under this heading will become ‘active’. Once a site is added to the Register, certain fields will be auto-populated. These are the following: Status; Date Entered; Calculated Expiry Date; and Legacy Land ID (for migrated records only). Once a site has been added to the Register and during the 40 / 50 Day Window, the user can complete or amend the following fields as required: Title Folio Number; Comments; and Proposed Use After Sale. However, none of the above fields are mandatory, although users are encouraged to add relevant information where available. UNCLASSIFIED 31 UNCLASSIFIED During the 40 / 50 Day Window, it is not possible to record information under the following fields: Expiry Status; and Expiry Comments. However, these fields become active once the 40 / 50 Day Window has expired. Users should note that after the 40 / 50 working day period expires, your site will appear on the public-facing version of the Find Government Property website (https://www.epims.ogc.gov.uk/FMSGS/) unless you have marked your sites as being public data exempt. These public data exempt flags should only be used in exceptional circumstances and not as a general rule. Decisions to use sensitivity flags will need to be defended by the originating department/body and a valid reason provided if requested. The system has been designed such that certain combinations of fields under ‘Expiry Status’ and ‘Core/Non-Core’ fields are not possible. For example, it is not possible to set the ‘Expiry Status’ as ‘No Longer Surplus’ if the Core/NonCore’ field is set to ‘Non-Core – Surplus’. 5.2 Amending Records Depending on the user’s rights, it may be possible to amend records. To amend a Register record, click the ’Amend’ button and the screen will refresh, and the user will be able to amend certain fields and include information in others dependent on the stage in the Register process – see below. After amending the required details, click ‘Save’ and the record will be updated. UNCLASSIFIED 32 UNCLASSIFIED 5.3 Making Records “Historic” Records cannot be removed from the Register during the 40 / 50 Day Window. If a user attempts to do this, a message will appear that confirms this, as shown below: After the 40 Day Window has expired, it is possible for the user from the owning department/property centre to remove a record from the Register by two methods. The first method is where the site is sold. In such instances, when the user sets the Expiry Status to ‘Sold’, then the Register record will be made historic. At the same time, the associated ePIMS Holding record will also be made historic with the ‘Reason Made Historic’ also being set to Sold. It should be noted that you will be required to add the ‘Date of Exit’ and the ‘Disposal Proceeds’ when you mark a site as sold. This information is used by GPU’s National Property Controls (NPCs) team in reporting savings to the Efficiency Reform Group. The second method is where the ‘Expiry Status’ of a Register record is set to ‘No Longer Surplus’ under the Register heading. In such instances, then the site will need to be removed from the Register. To do this, the ‘Core/NonCore’ status of that record will need to be changed from ‘Non-Core – Surplus’, otherwise, it will not be possible to remove the record from the Register. Similarly, if the user changes the ‘Core/Non-Core’ status of the record from ‘Non-Core – Surplus’ under the Holding heading, then the ‘Expiry Status’ of UNCLASSIFIED 33 UNCLASSIFIED that record will automatically be changed to ‘No Longer Surplus’ under the Register heading. If such a site is declared as ‘Non-Core – Surplus’ again in future, then it will need to be added to the Register again. This process is the same as before integration. 5.4 Change History Each time a record is amended, the change is recorded and displayed at the bottom of the ‘Holding Details’ screen under the heading ‘Change History’ – see below. As well as the changes actually made, other information recorded includes the date the record was last changed and the user who made the changes. UNCLASSIFIED 34 UNCLASSIFIED SECTION 6 – Migrated Records 6.1 Migration Process As part of the integration process in 2011, we migrated all existing Register records at that time into e-PIMS. Where the existing Register record matched an existing e-PIMS Property record, then a link was created. Where no such match exists, then a new ePIMS property record was created. The inclusion of the Legacy Land ID in the Register Filters is to assist users in finding those records that were on the Register before integration. 6.2 Assistance If users identify any issues with individual records, then they should contact either the e-PIMS Service Delivery Team via 07795 665526 or 077699 17884 or [email protected]. UNCLASSIFIED 35 UNCLASSIFIED SECTION 7 – Other Information 7.1 Register - Position Report All Register users now have the ability to view and create a Register – Position report. It provides a summary of the amount of land and land & buildings that are recorded on the Register by a number of key metrics. To do this, users need to click on the ‘My e-PIMS’ button on the left hand navigation menu and select the Register – Position option as shown below. On doing so, the following screen will appear: UNCLASSIFIED 36 UNCLASSIFIED The default option is that users are shown the most recent Register – Position report that has been created. Users can also select other reports which are available from the drop-down list under the Position Selection button. The default option here is the Most Recent 5 reports which are available to view on the screen or to print. In addition, users can create a new Register – Position report that will be available to all users. This is done by clicking on the Create New Position button. 7.2 Register Report Under the ‘Reporting’ functionality, which is available via the left hand navigation menu, there is a Register report. It contains, by default, those holdings which are on the Register. It will also show whether those holdings also have active vacant space recorded against them. Users may choose to include holdings that have been on the Register by ticking the ‘Include all past and present Register records’ box. 7.3 Email Notifications Every 24 hours an automatic email is sent out containing information regarding all records that have been added to the Register in the previous 24 hours; only users on the ‘Register Distribution List’ will receive this email (see Appendix 2). It is possible for Super Users (see Section 1 – Background) to view and maintain the contact list via the Central Contacts Database which is available under Tools in the ePIMS left hand navigation. If you need to add, amend or remove contacts from the notification process, then you will need to contact the If users identify any issues with individual UNCLASSIFIED 37 UNCLASSIFIED records, then they should contact either the e-PIMS Service Delivery Team via 07795 665526 or 077699 17884 or [email protected]. 7.4 Frequently Asked Questions A number of FAQs are included at Appendix 3. UNCLASSIFIED 38 UNCLASSIFIED SECTION 8 – Benefits for Users 8.1 All Information in One Place As set out in Section 1, the key reasons for the integration of the Register into e-PIMS were to make it easier to search for and identify all types of land and property, including that declared surplus, and to enable users to analyse related data in a seamless environment. It also made adding existing e-PIMS records to the Register easier. Government departments and their sponsored bodies now have the capability to view all of their land and/or property in one place from the point of acquisition, during their operational phase and through to disposal. 8.2 Viewing e-PIMS Property Records All former Register users have high-level viewing rights to all non-sensitive records held on the system through e-PIMS Property Lite. e-PIMS Property Lite was developed for the Welsh Assembly Government users to add and edit property records when they are not in a position to complete all mandatory fields in the full Property Inspector version of e-PIMS. It is also extensively used by Scottish Government and a number of local authorities and their local public sector partners. In order to be able to view records for all sectors in e-PIMS Property Lite, users should first go to the ‘My e-PIMS Settings’ screen and tick the ‘Enable Sector Filter’ button (if it is not already enabled) as shown below: Having done this, to search for records in Lite view, users need to go to the ePIMS Search screen and change the drop-down filter under ‘Search’ to ‘All Property’ – see below: UNCLASSIFIED 39 UNCLASSIFIED A search can then be carried out using one or a combination of the filters under any of the following: The basic search filters; and The advanced search filters. Section 13 of the accompanying e-PIMS User Manual provides details about the basic property and advanced search capabilities. It also provides details about how to ‘Add a Map Filter’. This will enable you to select the search geography from a selection of pre-built filters or define one yourself. UNCLASSIFIED 40 UNCLASSIFIED Appendix 1 - Automated email notifications After adding a new record, the following automatic email notification will be sent to the user or Register contact: Dear [User/Register Contact] You have added a new site(s) to the Register of Surplus Public Sector Land. It is recommended that, after the 40 working days expires, you update your site record to indicate when the site is on the market or under offer as appropriate as during the disposal process. The site will remain on the Register until you delete it as being no longer surplus or sold. (n.b. these updates can only be done after the 40 working days has expired). You are reminded that, once the 40 working day period expires, your site will appear on the public-facing version of the Find Government Property website (https://www.epims.ogc.gov.uk/FMSGS/) unless you have marked your sites as being public data exempt. These public data exempt flags should only be used in exceptional circumstances and not as a general rule. Decisions to use sensitivity flags will need to be defended by the originating department/body and a valid reason provided if requested. If you have any queries regarding the above, please e-mail :[email protected] in the first instance. The following e-PIMS references were created. Click on the hyperlink to display the land record. Register Property/Holding: 1658/1 https://www.epimstest.ogc.gov.uk/epimsnet/InspectorLink.aspx?object=Holding&record_id=41 700 Register Property/Holding: 1659/1 https://www.epimstest.ogc.gov.uk/epimsnet/InspectorLink.aspx?object=Holding&record_id=41 701 UNCLASSIFIED 41 UNCLASSIFIED Appendix 2 - All New Records Notification Every 24 hours, those on the notification list will be sent an automatic email notification of all new records that have been input on to the system. An example is given below: Dear [User] A new site(s) has been added to the Register of Surplus Public Sector Land. Brief details of the site are outlined below. The 40-working day period for expressions of interest begins from the date indicated below. Click on the link under each site to access more information using e-PIMS (user name and password required). If you require assistance, please do not hesitate to e-mail [email protected] The Cabinet Office maintains The Register of Surplus Public Sector Land on behalf of HM Government and in collaboration with other government departments, their sponsored bodies and other public sector organisations, such as NHS Trusts. For information about the Register of Surplus Public Sector Land contact [email protected] -------------------------------------------------------------------------------Register Property/Holding: 828232/3 Description: Town: MARKET HARBOROUGH County: LEICESTERSHIRE Local Authority: Not Set Area (Ha): 3.607 Originating Body: HMT - RESIDUAL ESTATE Date added to Register: 10/05/2011 40 days expires: 06/07/2011 https://www.epimstest.ogc.gov.uk/epimsnet/InspectorLink.aspx?object=Register&record_id=4 1741 UNCLASSIFIED 42 UNCLASSIFIED Appendix 3 - FAQs Q1. Why can’t I login into the Register homepage? A1. The Register has been integrated into e-PIMS. Therefore, you will be automatically redirected to either the GSI or Internet version of the e-PIMS homepage. If you are not redirected or account login does not work, then you should contact either the e-PIMS Service Delivery Team via 07795 665526 or 077699 17884 or [email protected]. Q2. Why won’t the login screen load when I try and access e-PIMS? A2i. Ensure that the address is typed correctly. A2ii. If you do not have access to the GSI network, then you will not be able to access the GSI version of e-PIMS only the internet version. Ensure that you are trying to access the correct version of the system. Q3. Why can’t I login? A3i. Ensure you are registered. A3ii. Is the caps lock on? The username field is not case sensitive, but the password field is. A3iii. If you have copied and pasted the login details from your registration email, ensure that you DO NOT copy a space after the password as this will be denied. This is the most common cause of login failure. Q4. Why doesn’t the ‘back’ button in Internet explorer work when I use ePIMS? A4. Certain Microsoft security service packs disable the ‘back’ button from working, which may prevent it from being used on the Register. A short-term solution to this problem is as follows: Click ‘Start’ – ‘Settings’ – ‘Control Panel’ – ‘Add or Remove Programs’ – click ‘Add/ Remove Windows components’ on the left hand side – disable (untick) ‘Internet Explorer Enhanced Security Configuration’ Q5. How do I add an existing e-PIMS record to the Register? A5. You need to follow the process set out in Section 4.3 of the Register manual. Q6. What do I do if I want to add a site to the Register and it is not on ePIMS? A6. First, you will need to create an e-PIMS record as set out in Section 4.2 of the Register manual. Q7. What do I do if I have mistakenly added a site to the Register? A7. You will need to contact either the e-PIMS Service Delivery Team via 07795 665526 or 077699 17884 or [email protected]. UNCLASSIFIED 43 UNCLASSIFIED Q9. How do I search for all records that have been on the Register? A9. If you want to do a search for all sites that have ever been on The Register, then you need to do a By Holding search and multi-select all options under the Expiry Status field in Register Filters. You will need to also set the search to cover both current and historic records. Q10. Who do I contact if have issues with the Register? A10. If you have technical issues, then you should contact the e-PIMS Service Delivery Team via 07795 665526 or 077699 17884 or [email protected]. UNCLASSIFIED 44