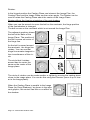
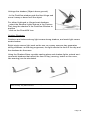
1
Andromeda
Shadow
Filter
Copyright © 1998
Andromeda Software Inc.
ii
Licensing and Copyright Agreement
Copyright ©1997-98 by Andromeda Software Inc. All rights reserved. Except as permitted under
copyright law, no part of the program or this user manual may be reproduced or distributed in any form
or by any means without the prior written permission of Andromeda Software Inc. The program, and this
manual, are licensed only for individual use on a single computer.
Limitations on Warranty and Liability
Neither Andromeda Software Inc, nor its distributors and dealers, make any warranties or
representations, either expressed or implied, as to the software and documentation, including without
limitation, the condition of software and implied warranties of its merchantability or fitness for a
particular purpose. Andromeda Software Inc. shall not be liable for any lost profits or for any direct,
indirect, incidental, consequential or other damages suffered by licensee or others resulting from the
use of the program or arising out of any breach or warranty.
Trademarks
Series 1 Photography Filters, Series 2 Three D Filter, Series 3 Screens Filter, Series 4 Techtures Filter,
Andromeda Shadow Filter, Andromeda Velociraptor Filter. Andromeda Series and Suite Filters are
trademarks of Andromeda Software Inc. Adobe Photoshop is a trademark of Adobe Systems Inc. All
other products are trademarks of their respective companies.
Andromeda Shadow Filter Filter developed by:
Dave Dyer, Steve Gray, Donn Gladstone, Barry Burns, LouAnn Barbeau, Sumeet Pasricha,
UI Design: Barry Burns, Donn GLadstone
Technical Completion: LouAnn Barbeau.
Quality Assurance: Guy McCool, Lou Ann Barbeau, Third Eye Consultancy
Documentation: Louann Barbeau, Guy McCool, Barry Burns, Sumeet Pasricha.
Sales Support: Jane Narramore, Elie Soriano, Florine Pasricha
©1997-98
Andromeda Software Inc.
699 Hampshire Rd, Suite 109
Thousand Oaks, CA 91361
USA.
Tel No. (805) 379 4109
Fax No. (805) 379 5253
iii
Table of Contents
For Installation, see “Installation Guide on Andromeda Shadow Filter Product CD
1.0 Starting & Troubleshooting
1.1 Starting ... User Services in the Filter
Live Helper Panel
QuickReview & QuickGuide Card
Shadow Sessions
Preset Effects Library
1.2 Troubleshooting
Installation Issues
Before entering the Filter ...
Check the selection of Object
Inside the Filter ...
Preset Effect does not work
Cannot see the Shadow!
Shadow appears cutoff?
1
1
1
1
1
2
4
4
4
4
4
6
6
6
2. 0 The User Interface Annotated
2.1 The Ambience
2.2 Novice Controls
2.3 Expert Control s
2.4 Preset Effects Browser
2.5 The 3 Main Features
Casting Plane
Shadow Lights
Camera
2.6 Feature Positioning Presets
2. 7 Feature Controls
2.7.1 Casting Plane Controls
Elevator
Tilter
Rotater
Get Hinge
2.7.2 Shadow Light Controls
Opacity (Light/Dark) Slider
Trackball
Light Size(Sharp/Blur) Slider
Multiple Shadow Lights
Light Share Slider
Light Shape Selection
2.7.3 Camera Controls
Trackball
2.8 Filter Windows
2.8.1 FastView Window
Dragging in FastView window
2.8.2 Render Window
7
7
9
10
11
12
12
12
12
12
13
13
13
14
15
16
17
17
17
18
18
20
20
20
20
21
21
21
21
iv
2.8.3 3D Proxy Window
2.8.4 Spinners and Zoom Slider
2.8.5 Swap Window Arrows
2.9 Histograms
2.9.1 Input Histogram
2.9.2
Object Histogram
2.9.3
Shadow Histogram
2.10 Selecting Colors for Shadow Lights
22
22
22
23
23
23
23
24
3. 0 Filter Capability
3.1 Shadowing Capability
3.1.1 Perspective Shadow
3.1.2 Transparent Shadow
3.1.3 Opaque Shadow
3.1.4 Projected Drop Shadow
3.1.5 Cast Shadow
Object on Ground
Object Above Ground
3.1.6 Outdoor Shadow
3.1.7 Indoor Shadow
3.1.8 Backlights, Footlights, Multiple Lights
3.2 Perspective capability
3.3 Stereo 3D Capability
25
25
25
26
27
27
28
28
29
30
31
33
36
38
END OF MANUAL
THE FOLLOWING SHADOW TUTORIAL SESSIONS IN PDF FORMAT ARE
AVAILABLE AS A SEPERATE DOWNLOADABLE FILE AT ANDROMEDA.COM
4.0 Shadow Sessions - for the Left Brain
4.1 Using, Adjusting, Loading/Saving Presets
4.2 Perspective Capability with the Camera
4.3 Simple Drop Shadow
4.4 Projected Drop Shadow
4.5 Making Selections for Opaque
&Transparent Shadows
4.6 Removing anti-aliased pixels
on gray and color backgrounds
4.7 Using the Casting Plane
- Hinging & Tilting Shadows
4.8 Using the Casting Plane
- Rotating and Floating Shadows
5.0 Shadow Sessions - for the Right Brain
5.1 Outdoor Shadows Session
5.2 Indoor Shadows Session
5.3 Tips
5.3.1 Spot, Partial and Combination Shadow
5.3.2 Rendering Shadows over Irregular 60
Surfaces
6.0 Special Output Capability
6.1 Compositing a Shadow from an implied object
6.2 Colorizing Input Image & Shadow Background
39
39
41
43
44
45
47
49
51
55
55
57
59
59
61
61
62
ANDROMEDA SHADOW FILTER
USER MANUAL
1.0 Starting and Troubleshooting
The Filter is the most advanced shadowing plug-in available. Its uniqueness is in
using 3D geometry to cast realistic shadows. There are several user services
that will help you start your orientation to this true 3D shadowing plug-in.
Troubleshooting section has a list of items that you could check when inside the
Filter to determine possible cause of a problem.
1.1 Starting User Services in the Filter
1. Live Helper Panel
Familiarize yourself with User Interface using the Helper Panel. This is not a
separate window or a read me file but a live helper text: as you pass the cursor
over any UI item (buttons, windows, controls etc.), text in the Helper Panel
explains the item.
2. QuickReview and QuickGuide Card
This card accompanies the User Manual.
QuickReview is an overview with images showing the filters shadowing capability. It will take a few minutes to read and it is highly recommended.
QuickGuide to Making a Shadow has two quick hands-on recipe oriented techniques for making shadows. Going through these two recipes with a simple
image will quickly orient you to the feel of the shadowing filter.
3. Shadow Sessions
These are procedural and creative hands on shadow making sessions contributed by Andromeda technical support staff. The sessions exercise the important features that you will be using to make shadows.
Page 1. Andromeda Shadow Filter
4. Preset Effects Library
Presets are instant shadow effects created by an Andromeda artist. Using
Presets will make your shadowing work more productive.
Step 1. To orient yourself, start (in the host application) by preparing a simple
“Input Image” with an “Object” to shadow.
A simple image would be a black and white image such as lower case letter “a”
on a white background. Place the lower case letter “a” in the center of the image
canvas.
Now select the white background. The “Object” to be shadowed is the lower
case letter “a”. It is now inversely selected.
You are ready to call the Shadow Filter
Step 2. With the simple Input Image open in the host application, call the
Andromeda Shadow Filter.
Step 3. Your filter opens with the last Preset effect selected, and the final
settings saved as the filter was last exited. (Ignore this for now).
Click on the Reset button. This resets the
controls to a standard drop shadow. Go
directly to the Presets Browser by clicking
on the frame of the large rectangular frieze
(shown above) located in the top left of the UI.
Step 4. Click on the selection category based on
selection made in host application. (In the simple
image recommended above, the white background
was selected, therefore select category “Selected”).
Then select a subcategory based on a feature (i.e. casting plane). The subcategory reflects the feature emphasized when creating the Preset.
Page 2
We recommend “moreLights” (emphasizes the
Shadow Lights feature) to begin your orientation.
Use the arrows to scroll through the Presets in each
subcategory. (A description of each Preset will appear
in the text window as the cursor passes over each
Preset window).
Step 6. Choosing a Preset. Since factory set Presets were built with our images,
for best results with your image there are two options:
a. Make your Input Image similar to a Preset:
Browse through the Andromeda Preset Library. Decide on a Preset that has a
shadow effect you want. Exit the Filter. Prep your Input Image in the host application. For an exact and instant effect on your image, make the object approx.
size but same position as the object in the Preset. See “Using Presets” in
Sessions for Left Brain, Section 5.
b. Select a Preset that is similar to your Input Image:
Your Image
Choose this
Not this one
Choose a Preset with an
object that has same position as the object in your
Input Image.
Once you have the effect on your image, adjust the shadow. See Shadow
Session: Using, Adjusting Presets”
Step 5. Select the Preset you want to use by clicking on its picture and click the
to exit the Presets Browser and return to the filter UI.
Page 3. Andromeda Shadow Filter
1.1 Troubleshooting
Installation Issues
The Filter is available for PowerMac OS 7.6.1 or higher and Windows 95/NT.
The product sent to you was for one of the two platforms.
The product is on a CD-ROM. (After installation the CD-ROM need not be in the
CD drive).
For Installation instructions see the Readme file on the product CD. For problems with installation, call Andromeda Technical Support at 805 379 4109 or go
on-line to site andromeda.com and request answers to your questions from [email protected].
A frequent installation problem is inability to see the installed filter in your host
application. This is probably due to installing the filter in the wrong folder
(MacOS) or directory (Windows 95/NT). Use the Finder (MacOS) or Windows file
search mechanisms to make sure that the filter is among other third party Adobe
Photoshop compatible filters (such as from MetaTools, Xaos or Alien Skin).
Before entering the Filter
1. Check the selection of object to be shadowed.
You have an “object” in your input image that you want shadowed. The filter
requires that the silhouette of this object be identifiable. To do this make sure
that:
a. you isolate the object onto a white background
or
b. place the object on Photoshop (4.0 or higher) layer
or
c. select the background, so that the object is inversely selected
d. preserve transparency is unchecked (OFF) in the Layers Palette (Adobe
Photoshop 4.0™)
Page 4
If you are using a selection tool, here are some selection
Tips (for Photoshop™ users):
Inside selection
The ability to create accurate selections in
Photoshop directly impacts the effectiveness of
the shadow filter in rendering higher quality
shadows.
Like most Photoshop users you probably use
An anti-aliased or
both a feathered edge and/or anti- aliasing, unless of
feathered selection.
course you are working with type in small point sizes.
making feathered selections, can cause some loss of detail at the edge.
Adjusting anti-aliased or feathered Selections before calling the
Andromeda Shadow Filter will improve shadow quality by
eliminating stray pixels.
How to adjust for better shadows
Inside selection
To cut out stray pixels inside a selection of an
object you want to shadow, try modifying the borders by one or two pixels:
Choose Select /Modify/ Contract.
For inverted selections:
Choose: Select/Modify/Expand.
The same selection as above after a 1
pixel modification.
For some color based selections such as Magic Wand or Color Range, which
can leave extra pixels both inside and outside the selection area, first use
smoothing: Choose Select/Modify/ Smooth and then contraction.
In most cases use low pixel values 1-2 for a sample radius.
1 or 2 pixels may not be enough for some low resolution images since the relationship between physical distance and pixel distance varies depending on the
resolution of the image.
For more information on selections see:
- “selecting an Object to Shadow” in the QuickGuide card
- shadow Session: “Making Selections for Transparent and Opaque shadows”
Page 5. Andromeda Shadow Filter
2. Inside the Filter
* If you made an active selection, make sure that the Inverse Selection button in
the Filter reflects the correct Direct or Inverse Selection. For example, if the
shadow appears inversed, then click on this button to reverse it.
* If you made an active selection, then make sure that the Protect Selection button is:
- ON (the button shows moving/marching ants) when you need the Input Image
protected from the shadow
- OFF if you are going to use the Camera
3. Preset Effects. Preset does not work with your Image.
Check the following to apply Preset effects correctly:
- you selected the correct category (Selected, Unselected, Layers) based on
selection made in the host application
- is the same (approx.) size within the Image canvas
- is the same (approx.) position within the Image canvas
See “Preset Effects Library” in this section and Shadow Session: “Using,
Adjusting Presets”
4. Cannot see the Shadow?
Check the following:
- the Output Mode is set to Input Only. Set it to Input + Shadow or Shadow only
- if a Preset was used and you cannot see the shadow, the object in your Input
Image is not in the same position as the object in the Preset. See “Preset Effects
Library” in this section for Tips
- if you cannot see the shadow at all, click on the Get Hinge control to ensure
that there is a shadow (you will see a cast shadow). Or select the Standard
Preset from the Drop Down Menu below the gold Preset Access Pad (you will
see a Drop Shadow). Then adjust the shadow
- if you are generating a backlit, footlight or multiple shadows that require
extreme light and casting plane positions, use Presets. However make sure that
your object size and position is same as Preset. Using a Preset is a good starting point for further manipulation
5. Shadow appears cutoff?
- The Camera probably cannot see it. Move the Camera up in the 3D Proxy
Window for approx. positioning. Use Camera Presets for more accurate
positioning
Page 6
2.0 User Interface Annotated
2.1 The Ambience
The Shadow Filter opens with the main User Interface shown on the next page.
Immediately you should notice a large pulsating gold frame. This is the Presets
Access Pad. Its size and prominence is an invitation to click it and enter into
Presets Browser UI where you can see a library of Preset shadow effects created by Andromeda artists.
We recommend that you start your shadow work using Presets whenever possible. When you select a Preset and exit the Presets Browser, the Filter controls
get set to render the selected Preset effect. There may be some adjustments
that you may still need to make for your image. However, using Presets is a
good starting point for further shadow manipulation.
The Filter has three main Features that you will be manipulating to make shadows: Casting Plane, Shadow Lights and Camera.
Page 7. Andromeda Shadow Filter
The Filter has the following distinct User Interface areas:
Novice or Expert Controls. Clicking on the heavier ball accesses Expert
Controls. Expert adds more controls specifically for Shadow lights and access to
Histograms for Input, Object and Shadow images.
Presets Access Frame: We recommend that you use Presets often. The selection of Andromeda provided presets is large and comprehensive. An important
Shadow Session: “Using, Adjusting Presets” is a must read.
Output Mode Buttons: Sets the output rendering mode to: Input only or Input +
Shadow (middle button) or Shadow only.
Feature Pad: Contains the activation buttons to bring up Feature controls for the
three main Features: Casting Plane, Shadow Lights, Camera. There is also a
activation button for accessing Histograms for Input image, Object (that will cast
a shadow) and the Shadow.
Controls Field : An area for Feature Controls specific to Feature you activated
in the Feature Pad.
Filter Windows: Multiple Windows provide a look into the working of the Filter, a
Fast View window, a Render Window and a 3D Proxy Window.
Helper: When you move the cursor over different areas of the UI, this panel
refreshes itself to describe the UI object under the cursor.
Shadow Filter UI Ambience
Presets Browser UI
(click on Presets Frame in Main UI)
Helper
Panel
watch it
as you
move the
cursor
Output
Modes
Top:
Input only
Middle:
& Shadow
Bottom:
Shadow
only.
Controls
Field:
All Feature
controls
appear here
Fast View,
Render &
Proxy
Windows
Features
Pad. Top:
Camera &
Shadow
Lights
Bottom:
Casting
Plane.
Page 8
2.2 Novice Controls
The Filter opens with lighter ball (on the Scale, top left) indicating Novice
Controls. Novice Controls are an abbreviated set of filters controls.
Starting in Novice Controls gives you access to necessary controls for manipulating the Filters three main features: Casting plane, Shadow Lights and Camera
to generate a shadow.
About Info.
(Version
Prefs
Credits)
Novice Controls
(click on the smaller ball on the
scale)
Expert Controls
(see next page )
Preset Effects
Access (opens
the Presets
Browser. Center
Frame shows last
Preset selected)
Fast View
Window
Render
(Preview)
Window
Proxy Zoom
3D Proxy
Window
Invert
or
Inverse Selection
(made in
host)
Select
Preset
(by name)
from Drop
Down Menu
Save
(current state of
Filter)
Works with
Exchange
Page 9.. Andromeda Shadow Filter
Reset (Filter
controls are set
to Standard
Drop Shadow)
See “Features Pad”
and “Feature Controls”
Undo
(select from
several levels of
numbered
Undo’s)
Cancel (exit Filter.
do not save
settings)
OK/High Res.
Render & save
state of all
settings)
2.3 Expert Controls
Click on the heavier ball (on the Scale) for more controls on the main UI. Expert
Controls provide access to additional technology for advanced manipulation of
shadows.
Expert Controls allow for Swapable Windows (exchange window positions for
larger views), more “dragging” options by dragging in the Proxy Window, access
to additional Shadow Lights, and access to Histograms for Input, Object and
Shadow images.
Composite
button.
(on in Shadow only
Output Mode.
Composite shadow
with Input Image. See
Section 6.0)
Protect
Selection
(turn ON if a
active selection
must be
protected
in Input Image)
Mono (default) or
Stereo
output.
Stereo may be seen
on screen or on
paper w/3D Glasses
(supplied)
Outline or Grid
on Input Image
Plane
(for better perspective viewing,
will not output)
Outline or Grid on
Shadow Casting
Plane
(for better perspective viewing, will not
output)
Expert Controls
(click on the larger
weight ball)
are additional
controls indicated on this page
Exchange
current state with
previous Save
state of the filter
Swap Windows
Upper arrow to Swap Render
Window for larger and better
rendering. Lower arrow to Swap
3D Proxy Window for easier dragging. (see Filter Windows)
Save (new)
or Replace
Presets
in MacOS or
Windows
Directory
Expert Controls adds additional Features and
Controls.See “Feature Controls ”
2.4 Preset Browser
Click on the gold “Presets Effects Access” frieze on the Main UI to access the
Preset Browser.
It is highly recommended that you start here. First select a category based on
the type of selection you made on the object (that will cast a shadow) in the host
program. Then select a subcategory of Presets based on Feature.
Using a Preset is a good starting point for further shadow work. Please note that
the selection type, position and size of the object in your Input image should be
similar to the position of the object shown in the Preset, for the Preset effect to
be exactly the same on the object in your image.
Shadow
Filter
Main UI is
behind the
Browser
Scroll Preset
Browser.
Preset Effects
You can scroll and select from several
Preset Effects relevant to your shadowing needs.
Designed by Andromeda, these effects
were created by manipulating the
Features in this Filter: Casting Plane,
Lights and Camera.
Show smaller
or larger
Preset images
Substitute your
image to show
Preset effect
Page 11. Andromeda Shadow Filter
Preset Selection Categories
“Andromeda” library of Presets are Andromeda
designed and installed.
“Library” is your Preset library.
Left choose how the Object that is to cast a shadow
was selected in the host program.
Right browse a effect category that emphasizes
Shadow filter feature
Active Preset
Window
Identifies your
current Preset
selection
Load a (saved)
Preset.
Navigate to
saved presets
folder
Cancel (exit Filter.
do not save settings)
OK/High Res.
Render & save
state of all
settings).
2.5 The 3 Features: CASTING PLANE, SHADOW LIGHTS AND CAMERA
You can activate a Feature by clicking on its icon in the Features Pad on the
extreme right of the Main UI.
With Expert Controls the Feature Pad also shows the icon for Histograms.
Clicking on this icon shows Histograms for Input Image, Object and Shadow
Images.
Camera Feature.
Change Perspective by
Panning Camera around the
Input and Shadow Image
Shadow Feature.
Natural Drop or Cast Shadows
with realistic soft edges
generated by upto 4 shadow
lights
Casting Plane Feature.
Shadows are imposed upon a
plane that can be hinged to
the or floating
Histogram Feature. (Expert
Controls only)
Manipulate Histograms for
Input Image, Object and
Shadow.
Novice Controls
Expert Controls
2.6 Feature Positioning Presets
Shadow Lights, Camera, Casting Plane are all movable in the space surrounding
your Input Image. To make positioning easier, each Feature has several positioning Presets shown below.
Selecting a Feature Preset immediately moves that feature into selected position. As an example, select the Casting Plane, then the Camera feature, setting
both to Standard Position. Then select the Shadow Lights feature and try the
various presets to get a visual of how shadow moves as Light position changes.
(The Andromeda library of shadow effects seen in the Preset Browser are a
combination of Feature Preset positions shown below).
Shadow Lights
Presets
Standard Position
HIGH TOP
HIGH RIGHT
HIGH BOTTOM
HIGH LEFT
LOW TOP
LOW TOP-RIGHT
LOW RIGHT
LOW BOTTOM-RIGHT
LOW BOTTOM
LOW BOTTOM-LEFT
LOW LEFT
LOW TOP-LEFT
Camera Presets
Reset, Rotation and Zoom
Standard Position
HIGH TOP
HIGH RIGHT
HIGH BOTTOM
HIGH LEFT
LOW TOP
LOW TOP-RIGHT
LOW RIGHT
LOW BOTTOM-RIGHT
LOW BOTTOM
LOW BOTTOM-LEFT
LOW LEFT
LOW TOP-LEFT
Casting Plane
Presets
Standard Position
TILT OR JOINT
30 DEGREE TILT
45 DEGREE TILT
60 DEGREE TILT
90 DEGREE TILT
JOINT AT TOP
JOINT AT RIGHT
JOINT AT BOTTOM
JOINT AT LEFT
PLANE CLOSE
PLANE MIDDLE
PLANE FAR-AWAY
Histogram
Presets
Reset
TRIM INPUT
INVERT OUTPUT
TRANSPARENT
NORMAL
OPAQUE
Page 12
2.7 Feature Controls
When a Feature is selected, approaching its control, the arrow cursor will
change to a special cursor and the Control(s) will turn from green to red to show
that is is active.
2.7.1 Casting Plane
With the Casting Plane feature activated in the Features Pad, the
Casting Plane controls appear in the
control field immediately to the left.
These control the 3 basic movements
From left to top right:
Elevator (UP-DOWN), Rotator (ROTATIONAL), Tilter (CHANGE ANGLE). On
the top right is the Get Hinge (visibly HINGE CASTING PLANE TO IMAGE
PLANE).
Elevator: The Elevator changes the distance of the Casting Plane from the
Image Plane. As the Casting Plane comes closer to the Image
Plane, the Render Window (middle graphic)
shows the shadow becoming
sharper.
Move the cursor near the
Elevator, it will change into a
Hand icon, (with the hot point in
center or top of thumb), the
Elevator shaft and the Casting
Plane will turn red. Click down
and move the Casting Plane
away or towards the stationary Image Plane.
For controllable incremental movement
press down on the CTRL key to activate the Governor Motion.
The geometry and location of the Casting Plane and the Image Plane is better
visualized when you see the 3D Proxy Window. The plane shown with a grid is
the Casting Plane. The plane with the letter “a” is the Image Plane.
Page 13. Andromeda Shadow Filter
Tilter:
The Casting Plane (with grids) has three distinct positions relative to the Image
Plane (with letter “a”), shown below:
Parallel
Hinged
Unhinged
Variations from the above offer unlimited positioning of the Casting Plane.
In the Hinged position, the Casting Plane can intersect the Image Plane at any
point or line on the Image Plane and the angle of the Casting Plane can be
opened from 0 to 360 degrees.
The angle between the Image Plane and the Casting Plane is controlled by the
Tilter. Moving the ball with the wrench cursor changes the angle. The Tilter
affects cast shadows, as shown below when the angle is decreased.
When there is a tilt between the
two planes, geometry students
will remember that there will be
an intersection of the two
planes. The Proxy Window (last
column) shows the intersecting
Casting Plane (with grids) and
the Image Plane.
They will also remember that the
intersection defines a line. This
line is shown in the FastView
Window (middle column) as a
blue “Hinge” line.
As you change the angle between the planes, Hinge position does not change.
(Similar to opening a hinged door, where the door represents the Casting
Plane).
Page 14
Rotator:
In the hinged position the Casting Plane can intersect the Image Plan, the
Casting Plane and the Image Plane are then at an angle. The Rotator can be
used to rotate the Casting Plane about the center of the Image Plane.
Rotator affects the hinging orientation of the cast shadow.
When you use the wrench to move the ball on the racetrack, the hinge position
of the cast shadow is changed.
The ball moves on the racetrack which is set around the Image Plan.
The adjacent graphics shows
the ball at the base of the
Image Plane. The position of
the ball is same as center of
the hinge line.
As the ball is moved around
the racetrack, the hinge line
rotates. You can see that
hinge line remains tangent to
the circumference of the circle.
The circle that it rotates
around has its center the
same as the center of the
Image plane.
The circle of rotation can be made smaller or tighter by moving the casting plane
closer to the image plane. You can do this using the Elevator (move it up or closer to the Image plane).
When the Casting Plane is parallel to the Image
Plane (for Drop Shadows), as shown in the adjacent graphic, this control has little or no effect on
the shadow.
Page 15 .Andromeda Shadow Filter
Get Hinge:
To hinge the Casting Plane to the Image Plane, click on this control.
In this drop shadow, the
Casting Plane is parallel to
the Image Plane. It is not
hinged.
An easy technique to
generate a cast shadow
from a drop shadow would
be to click on the Get
Hinge control.
Clicking on Get
Hinge, hinges the
Casting Plane at
approx. 60 degrees near
the center of the Image
Plane.
This is an easy first step to
generate a Cast Shadow.
The next step is to move
the cursor to the FastView
window and use the
Grabber Cursor to move
the Hinge line to the base
of the object for a cast
shadow.
Page 16
2.7.2 Shadow Light Controls
With the Shadow Light feature activated in the Features Pad, the controls appear in the Control Field immediately to the left. Expert Mode
adds more controls to the Novice controls set:
Novice Controls:
-opacity Slider
(Light/Dark Slider)
-trackball
- shadow Light Size
(Sharp/Blur Slider)
Expert Controls:
- opacity Slider
(Light/Dark Slider)
-trackball
- Multiple Shadow
Lights
- Shadow Light Size
(Sharp/Blur Slider)
Expert Controls:
(toggle between
Multiple Lights and Trackball controls)
- select up to 4 Shadow Lights
-select Round or Square Light for each
Opacity (Light/Dark) Slider
25%
The overall darkness of the shadow can be adjusted with this slidapprox
er.For Drop Shadows, lighter shadows are recommended (constrain gray values to less than 30%).
For Cast Shadows, the darkness of the shadow may need to be
increased for more intense outdoor noon shadows.
For special effect shadows such as backlit, footlight shadows the shadows may
need to be darker still.
Trackball
Consists of 6 buttons, UP (U), DOWN (D), LEFT (L),
RIGHT (R), IN (I), OUT (O).
Page 17. Andromeda Shadow Filter
The direction indicated by the selected arrow is the direction of shadow movement. The moving shadow is shown in real time in the FastView Window.
With the U, D, L, R buttons the shadow effects do not grow or shrink proportionately, this is because the cause of the shadows, the Shadow Lights, are moving
in 3D space (in the opposite direction to the shadow). For these trackball buttons, use the Governor (press down the CTRL key) for more controlled incremental movements.
The Shadow Lights that cause the shadows are always pointed at center of the
image. Selecting the Standard Position Presets puts the light directly overhead
towards the center of your image canvas (creating a closely fitted Drop Shadow).
With the I and O button, the Shadow Lights move In and Out. This is a more linear movement and should be frequently used for dramatic large projected shadow effects. When the light gets closer (I button) the shadow becomes large.
When the the light gets further away (O button) the shadow gets smaller.
Shadow Light Size (Sharp/Blur) Slider
This slider adjusts the size of the light source. When the slider is at the top
of its range, a very small point light source is being simulated and the
shadow that is produced will be very distinct with sharply defined edges.
When the arrow is placed at the bottom of the slider range, a very large
light source is simulated by the filter and the resulting shadow is very fuzzy
with soft, cloudy edges.
Multiple Shadow Lights
You can turn ON up to 4 Shadow Lights. In the graphic above, with four Shadow
Lights ON the filter generates multiple shadows as seen in the far right Render
Window.
Page 18
With Multiple Shadow Lights ON, you must select an ON Shadow Light to adjust
its shadow. The selected ON Shadow Lights shadow is the only one displayed in
the FastView window and the controls will manipulate only that shadow.
How to turn ON, turn OFF and select a specific ON Shadow Light so that you
can adjust only its shadow (and not disturb the other shadows).
The Filter will always have one Shadow Light
ON.
To turn on another Shadow Light, approach
it with the arrow cursor, it will change to a
Match Light cursor. Click on the OFF light
with the Match to light it and it will highlight
(green) showing a lit flame.
Two Shadow Lights are now ON. But one
Shadow Light (pointed to by the cursor) is
selected. The FastView Window & Shadow
Light controls will show & manipulate its
shadow only.
Though the FastView Window and Shadow Light controls will show and manipulate the shadow of the selected (highlighted, green) ON Shadow Light, the
Render Window will render shadows of all ON lights.
To work on the shadow of another ON
Shadow Light, that is not selected (not highlighted) approach it and the cursor turns to a
Select Hand cursor. Click to select this ON
Shadow Light.
Note that other Shadow Light remains ON (it has a flame) but it is not highlighted
(green).
To turn off an ON Shadow Light, first select
it, highlighting it. Approach it, the cursor
turns to a Snuffer, click down to turn it OFF.
Page 19. Andromeda Shadow Filter
Light Share (Intensity) Slider
This slider appears at the bottom of the bank of
four Shadow Light icons when more than one
Shadow Light is ON.
When more than one Shadow Light is ON, each light contributes a share
towards the final shadow, and this slider controls how much the selected ON
light contributes towards the shadow. Move the slider towards the left to make a
lighter shadow, to the right to make a darker shadow.
Light Shape:Round/Square Icons
The round shape is the best match for most common light sources (the sun, light
bulbs, spotlights ...), but square lights are also encountered. The round light is
on by default. In practice, the difference in shape is very subtle.
2.7.3 Camera Controls
With the Camera feature activated in the Features Pad, the controls
Trackball appears in the control field immediately to the left. Other than
dragging in FastView or 3D Proxy Window this is the only Camera Control.
To operate the Camera, there should be no active selection in your Input Image.
If there is, the Protect Selection in the Filter UI should be off.
The Camera is always pointed to the center of the image
Panning the camera (using the U,L,D,R,I,O, buttons) in front
of an object changes the viewpoint of the object. The camera then shows a transformed object with a perspective.
If you generated a shadow, the shadow will also be
transformed to perspective shadow.
Page 20
2.8 Filter Windows
FastView
Spinners
Zoom
Swap
Render
3D Proxy
2.8.1 FastView Window
Contains a rough rendering of the current output. It is always up to date, but with
some limitations. It only shows the effect of the selected light, and it renders the
Shadow Light source with hard edged shadows.
Dragging in FastView Window
With the Shadow Light feature
window to a
direction.
selected, the arrow cursor changes in this
cursor, click down with this cursor and drag the Shadow in any
With the Camera feature
selected, the arrow cursor changes in this win-
dow to a
cursor, click down with this cursor and drag the image canvas (as if
it were paper) in any direction.
With the Casting Plane feature
selected and a blue Hinge line in view in
the window, the arrow cursor changes in this window to a
cursor, click down
with this cursor, grab the blue Hinge line and drag it up or down.
2.8.2 Render Window
Contains an accurate representation of the final output of the filter, with all light
sources rendered and realistic soft edged shadows.
Page 21. Andromeda Shadow Filter
It can take a awhile to update; and while a new output image is being calculated,
it is overlaid by a progress bar. You never need to wait for the update to be complete, unless you want to see the picture.
There is no interaction in this window.
2.8.3 3D Proxy Window
Contains a schematic 3-d line drawing of the 3 main Features: Casting Plane,
Camera and Shadow Lights. To complete the scene an Image Plane (with letter
‘a’) is also shown. In Expert mode, the entire structure can be rotated and turned
for different perspectives by using the
in the white space.
In Expert mode, each feature drawing is mouse sensitive when the Feature is
selected. On selecting a Feature (Casting Plane or Shadow Light or Camera),
the line drawing of the Feature in the window turns green. When you approach
the Feature, it is identified by a red box
around it. You can click down with
the special cursor and move it. Its movement will be in 3d space.
You can drag the Casting Plane, Camera and Shadow Lights Features in this
window. Dragging in this Window should be for approximate 3D positioning only.
For more accurate positioning use the Feature Presets. A Zoom slider next to
this window allows you to enlarge the entire structure for better viewing.
Remember to switch to Expert Mode to enable dragging in Proxy Window.
2.8.4 Spinners and Zoom Slider
They rotate and enlarge the image canvas. The generated shadow is not affected. The final shadow output is rendered honoring any rotation or enlargement.
Reset rotation, zoom and Camera
Reset rotation and zoom
Reset to 0 degrees
Rotate to 90 degrees clockwise
Rotate to 180 degrees
Rotate to 90 degrees anticlockwise
Next to the clockwise spinner is a drop down to
reset and rotate the image canvas.
If you need to reset your original Input
Image (to original aspect ratio and orientation) select: Reset rotation, zoom and
camera.
2.8.5 Swap Window Arrows
Using these arrows you can relocate windows temporarily to get a larger view
offered by the center larger window.
Page 22
2.9 Histograms: ADVANCED IMAGE AND SHADOW MANIPULATION
Most users will never need to use Histograms, or Levels, since the settings are
built into the presets. However, experts may want to go beyond the default settings to achieve certain effects.
There are three Histograms: Input, Object, and Shadow. If you are familiar with
the Photoshop Levels Dialog, then you already know how to use them. They
allow you to control the brightness, contrast, transparency, and inversion of the
elements that produce your final Shadow Filter output. To work with Histograms,
make sure you are in Expert Mode (the right ball of the scale), and click on the
Histogram button
in the Feature Pad.
2.9.1 The Input Histogram controls the levels of the input image.
If the final output is “Image and Shadow”, then the input image is part of the output, and its appearance may be controlled. Changing Input Levels does not
affect the shadow.
2.9.2 The Object Histogram controls the levels of the object which casts the
shadow.
Although this may be the same as the input image, this histogram allows you to
manipulate its shadow casting properties, while the Input Histogram allows you
to manipulate its appearance. If there is a selection being used to cast the shadow, the Object Histogram will affect the edges of the selection, which is usually a
soft edge.
2.9.3 The Shadow Histogram controls the appearance of the actual shadow.
The three histograms may be adjusted in two ways: The three input and two
output triangles may be dragged left or right with the mouse, or one of the
Histogram presets may be selected by clicking on the down arrow under the
histogram button at the lower right of the UI. The triangles work the same as in
the Photoshop Levels dialog: the two outside triangles control the range, and the
middle one controls the gamma.
Page 23 .Andromeda Shadow Filter
Selecting an item from the histogram drop down is the easiest way to manipulate
the levels. It only affects the histogram currently being displayed, and no other
settings. (The browse mode presets, on the other hand, affect all settings,
including histograms.) There are six identical settings in each of the three histogram drop downs:
Reset:
Causes both the Input and Output Levels to get reset to their default positions.
Remember that you need to Reset each of the three Histograms independently.
Trim Input:
Cuts down the range (outside triangles) on the Input Histogram. This causes
fuzzy edges to become sharp. This is useful if you are using a selection with
anti-aliased edges to cast a shadow, and you want sharp edges. You may trim
either the Object Histogram (which casts the shadow) or the Shadow Histogram
(the shadow itself).
Invert Output:
Reverses the Output Levels (black becomes white and white becomes black).
This actually causes the two triangles to cross by moving the right one all the
way to the left and the left one all the way to the right. Normally, you would use
the “Invert Object” button (in the middle left part of the UI) rather than selecting
this item if you want to invert the object or selection casting the shadow.
Transparent:
Adjusts the Gamma (middle triangle) of the Input Levels to make the object very
faint.
Normal:
Adjusts the Gamma (middle triangle) of the Input Levels to its default position.
Opaque:
This adjusts the Gamma (middle triangle) of the Input Levels to make the object
very dark.
2.10 Selecting Shadow Colors
The Andromeda Shadow Filter allows the user to select a color for each of the
four Shadow lights. This is accomplished by clicking on the Artist’s Palette while
the Shadow Lights button is selected. The Color Picker then allows you to select
colors for producing colored shadows.
Page 24
3.0 Filter Capability
3.1 Shadowing Capability
The Filter is the most advanced shadowing plug-in available. Its uniqueness is in
using 3D geometry to cast realistic shadows. A shadow from an Object in your
Input Image is imposed on a Casting Plane that can be oriented in 3D space
behind or in front of the Input Image.
Shadow itself is result of the Object obstructing light that is in the front or behind
it. In the Andromeda Shadow Filter up to 4 lights can be oriented in the space
surrounding the Input Image.
The Shadows therefore are not fake perspective blurs as in other products, but
realistic soft shadows resulting from a setting that simulates natural light
conditions.
Perspective Shadows
Your Input image as you see it in the host application is a 2D flat image.
The Camera feature in the Filter can be used to transform the Input + Shadow
image so that it appears as if it is being viewed at an angle. The Input image can
then be output with a changed perspective. Since your Input image had no
dimensional depth, the transformation cannot dimensionally change or extrude
an object in the Input image. All objects will continue to be flat even with the
changed perspective.
(Top) Perspective change using the Camera of two
objects on a flat white background.
(Right) Same two objects this time each on a separate
layer, panning the Camera on each layer separately you
have two perspectives on the same image!
Page 25. Andromeda Shadow Filter
To exercise the Perspective Shadowing capability, you would expect to do the
following (for more advanced shadowing see Shadowing Sessions):
Before you call the Shadow Filter, in the host application:
- isolate an object in your Input Image
- paste it into center on a white background or on a layer
Call the Andromeda Shadow Filter:
- select the Input + Shadow Output Mode
- click on Standard Preset in the drop down below the gold Presets Browser Pad
- pan the camera to change perspective
- when you see what you like in the Render Window of the Filter, click on the
Check/OK icon
The result is a high quality anti-aliased perspective of the object & shadow.
Transparent Shadows
Transparent Shadows are for specific images where you would expect light to
pass through the object. The shadow then would not be opaque but transparent
and show features of the object in the shadow.
To exercise Transparent shadowing capability you
would expect to do the following (for more advanced
shadowing see Shadowing Sessions):
Before you call the Shadow Filter, in the host application:
- isolate an object in your Input Image
- paste it into a white background layer
Call the Andromeda Shadow Filter:
- select the Input Image + Shadow mode
- from the Preset Browser, click on Unselected category
and then Parallel Drop preset
- drag the Shadow in the Fast View Window to desired
position
- click on the Check/OK icon. The result is a high quality
transparent shadow of the object
Page 26
Opaque Shadows
Opaque Shadows are created from the silhouette of a Object in your input
image. Unlike Transparent Shadowing, the Filter requires that you select the
Object. Since the shadow is opaque there are NO object features visible in the
shadow.
To generate Opaque shadows you would expect to do
the followingbefore you call the Shadow Filter, in the
host application:
- isolate an object in your Input Image
- paste it in the center into a white background layer or
on separate (Photoshop 4.0™) layer
- select the background, no selection necessary if it is
on a transparent layer
Call the Andromeda Shadow Filter
- select the Input Image + Shadow mode
- from the Preset Browser, select Selected or Layer
category and then a preset such as Studio90Blur
- select the Shadow Lights feature in the Feature Pad,
drag the shadow in the Fast View Window to position
- click on the Check/OK icon. The result is a high quality transparent shadow of
the object.
Projected Drop Shadows
The Shadow Filter imposes shadows on a movable shadow casting plane. If you
have worked with other competitive Drop Shadow plug-in, most if not all impose
the shadow at a fixed distance from the Object casting the shadow. The Shadow
Filter has much more flexibility. With its movable casting plane, you can generate large or smaller projected drop shadows by simply moving the casting plane
further or closer away respectively. Just as you would expect with natural
shadows.
To exercise the Projected Drop Shadowing capability you would expect to do the
following (for more advanced shadowing see Shadowing Sessions):
Page 27. Andromeda Shadow Filter
Before you call the Shadow Filter, in the host application:
- isolate an object in your Input Image
- paste it in the center into a white background layer or
on separate (Photoshop 4.0™) layer
- for opaque shadows select the background (if it is on a
layer no selection necessary). For transparent shadows the object must be on a
flat white background image
Call the Andromeda Shadow Filter
- select the Input Image + Shadow mode
- from the Preset Browser, if object was selected or on a
layer, choose either the Selected or Layer category and
then a preset such as RtWallFarDark . If the object was
unselected choose he Unselected category
- select the Shadow Lights feature in the Feature Pad,
drag the shadow in the FastView Window to position
- select the Casting Plane feature in the Feature Pad,
use the Elevator to move the Casting Plane Up and
closer towards the Image Plane (and watch the shadow
become larger) or use the Elevator to move the Casting
Plane Down and further away from the Image Plane
(and watch the shadow become smaller)
- click on the Check/OK icon. The result is a high quality
projected shadow of the object
Cast Shadows
Object is on the ground:
When you see your shadow outdoors it is cast on the
ground. To cast a ground shadow of an object using the
Filter, you need to “Hinge” its casting plane to the base
of the object. The Filter will impose the shadow on the
casting plane with the shadow starting at the hinge.
The adjacent graphics show soft shadows starting at the
base making the object appear on the ground. This is
the traditional cast shadow.
Page 28
Cast Shadows (Cont.)
Object above ground:
Since the casting plane is movable, it can
be unhinged from the base of the object so
that shadows are below and not attached
to the base of the object. As seen in the
adjacent graphic the object then appears
above ground.
To exercise the Cast shadowing capability you would expect to do the following
(for more advanced shadowing see Shadowing Sessions); before you call the
Shadow Filter, in the host application:
- isolate an object in your Input Image
- select the background if you want the Filter to impose the shadow on the background
- or paste it in the center into a white background layer or on separate
(Photoshop 4.0™) layer
- for opaque shadows select the background (if it is on a layer no selection necessary); for transparent shadows the object must be on a flat white background
or background layer
Call the Andromeda Shadow Filter:
- select the Input Image + Shadow mode
- select the Casting Plane feature in the Feature Pad
- click on Get Hinge control icon
- In the FastView Window you should, see a blue Hinge Line, move the cursor to
the window and use the Hinge Grabber icon to: Hinge the shadow (object on
ground)
In the FastView Window, grab the blue Hinge and
move it to the base of the object
Page 29. Andromeda Shadow Filter
Unhinge the shadow (Object above ground):
- In the FastView window grab the blue Hinge and
move it away or down from the object
For either Unhinged or Hinged cast shadows:
select the Shadow Lights feature in the Feature
Pad, drag the shadow in the FastView Window to
position
- click on the Check/OK icon
Outdoor Shadows
Outdoors and indoors strong light means strong shadow, and weak light means
weak shadow.
Bright single source light such as the sun on a warm summer day generates
strong shadows. as the day progresses, the light reflects the time of the day and
the shadows do the same.
Using the Shadow filters movable casting plane and shadow lights, natural environmental shadows that reflect the time of day (morning, twelve on the noon,
late evening) can be simulated.
Left to right: Morning long shadow, near noon stronger- dark shadow, twelve noon exactly -small strong
shadow, evening- long diffused shadow.
Page 30
To exercise the Outdoor Shadowing capability you would expect to do the
following (for more advanced shadowing see Shadowing Sessions):
Before you call the Shadow Filter, in the host application:
- isolate an object in your Input Image
- select the background if you want the Filter to impose the shadow on the
background
- or paste it in the center into a white background layer or on separate
(Photoshop 4.0™) layer
Call the Andromeda Shadow Filter:
- select the Input Image + Shadow mode
- select the Casting Plane feature in the Feature Pad
- click on Get Hinge control icon
- in the FastView Window you should see a blue Hinge Line, move the cursor to
the window and use the Hinge Grabber icon to Hinge the shadow to the base of
the Object
- select the Shadow Lights feature in the Feature Pad, drag the shadow in the
FastView Window (decide on direction of rising sun and/or setting sun)
(For early morning bright day shadow): drag it to be long and somewhat
diffused
(For twelve on the Noon): drag it to be tight around the base of the
object and sharp
(For late afternoon or evening): drag it in the opposite direction to be
long and diffused
- use the Sharp/Blur and Light/Dark sliders to fine tune the shadow
-click OK for high quality high resolution rendering
Indoor Shadows
In the Shadow filter, simulating natural
shadows created by artificial light within
the interior space of a room is best shown
by moving the filters shadow lights closer
to an object and imposing a dramatic
shadow on a “wall” (casting plane). This
is similar to what you would see if you
held a point light source such as a candle
in front of an object
Page 31. Andromeda Shadow Filter
Shadow lights in the filter may be moved closer
to the object, making the shadow larger. In a simple drop shadow (try the Preset ParallelDropBlur)
the lights are in front pointed at the center of your
image canvas and not at an angle. As you move
them closer or away, the shadows grow proportionally larger or smaller respectively.
Since the filters shadow lights are in 3D space,
they may be at an angle to the object. Therefore
when you move them the shadows may not grow
proportionally. However, shadows are true and
are due to the overall positioning geometry of the
lights, casting plane and the object. The filter will provide you with many more
dramatic shadow rendering options.
To exercise the Indoor shadowing capability you would expect to do the following (for more advanced shadowing see Shadowing Sessions):
Before you call the Shadow Filter, in the host application:
- isolate an object in your Input Image
- select the background if you want the Filter to impose the shadow on the background
- or paste it in the center into a white background layer or on separate
(Photoshop 4.0™) layer
Call the Andromeda Shadow Filter:
- select the Input Image + Shadow mode
- from the Preset Browser, if object was selected or on a layer, choose either the
Selected or Layer category and then a preset under MoreLights such as
BkWallight, Ltwall CloseBlur, RtWallFarDark . If the object was unselected
choose the equivalent in Unselected category
- select the Shadow Lights feature in the Feature Pad, drag the shadow in the
FastView Window to position
- If it grows while dragging, stop dragging, and use the Trackball to get control:
to move the lights closer, click on the inside IN arrow, the shadows will grow
bigger; to move the lights further away, click on the inside OUT arrow to make
the shadow smaller
Page 32
- use the dragging in the FastView Window and Trackball inner arrows to position and size and create the drama you need for a indoor shadow
- Click OK for high quality high resolution rendering
Backlights, Footlights and Multiple shadow lights
Movable (four) Shadow Lights feature unique to this filter make these effects
possible. There are several Presets in the Andromeda Library that should be
used as a starting point to generate these effects.
Backlights
Shadows generated by backlighting are
cast in front of the object.
To exercise the Backlight Shadowing capability you would expect to do the following (for more advanced shadowing see Shadowing Sessions):
Before you call the Shadow Filter, in the host application:
- isolate an object in your Input Image
- paste on a white background, slightly to the side and up so that there is foreground room for the shadow. (You could also use the object on its original background or paste it onto a layer)
- select the background
Call the Andromeda Shadow Filter:
- select the Input Image + Shadow mode
- from the Preset Browser, if object was selected or on a layer, choose either the
Selected or Layer category and then a preset Backlight (under MoreLight). If the
object was unselected choose the equivalent Unselected category
- the preset sets the Shadow Light behind the object and the Casting Plane
hinged to the Input Image Plane. Select the Casting Plane Feature, in the
FastView Window use the cursor (changes to Hinge Grabber icon) and hinge the
shadow to the base of the object
Page 33. Andromeda Shadow Filter
- select the Shadow Lights feature, in the FastView window use the triangular
cursor to drag the shadow to position. (Gradual and intermittent adjustments
such as moving the hinge and dragging the shadow are better than rapid movements when working with features that work in 3D space)
- click OK for high quality high resolution rendering
Footlights
Footlight shadows tend to run up
the length of the casting plane.
They are generated by a low
major shadow light source such
firelight or footlight (photoflood) in
front of the object. This kind of
light is impossible during the day
and implies darkened environment whether indoors or outdoors.
To exercise the Footlight Shadowing capability you would expect to do the following (for more advanced shadowing see Shadowing Sessions):
Before you call the Shadow Filter, in the host application:
- isolate an object in your Input Image
- paste on a white background. You could also use the object on its original
background or paste it onto a layer
- select the background
Call the Andromeda Shadow Filter:
- select the Input Image + Shadow mode
- from the Preset Browser, if object was selected or on a layer, choose either the
Selected or Layer category and then a preset Footlight (under MoreLight) . If the
object was unselected choose the equivalent Unselected category
- the preset sets the Shadow Light at the foot of the object
- the shadow should appear to run up the length of a wall behind. To achieve this
effect select the Casting Plane Feature, in the FastView Window, use the cursor
(changes to Hinge Grabber icon) and hinge the shadow just near the base of the
object
- click OK for high quality high resolution rendering
Page 34
Multiple Lights
The Shadow filter has four movable Shadow Lights. All Lights can be selectively
turned on or off. Each ON Shadow Light generates a shadow, multiple ON shadow lights generate multiple shadows. Multiple shadows may or may not overlap
depending upon the position of Shadow Lights in 3D space in front of the object.
These shadows imply an indoor lighting environment.
The adjacent graphic shows this filters
unique capability to generate multiple
shadows. Four Shadow Lights are ON.
Each light can be adjusted for its intensity
relative to other lights, distance, size and
position. With these controls you can create a natural mix of shadows. In the
graphic above, the larger shadows were
due to some lights being closer than others to the object. An even more natural mix was created by missing less intense
more diffused larger area shadows with more intense, sharper shadows.
To generate multiple shadows you would expect to do the following;
Before you call the Shadow Filter, in the host application:
- isolate an object in your Input Image
- paste on a white background. You could also use the object on its original
background or paste it onto a layer
- select the background
Call the Andromeda Shadow Filter:
- select the Input Image + Shadow mode
- from the Preset Browser, if the object was selected or on a layer, choose either
the Selected or Layer category and then the preset ParallelDrop (under
MoreLight). If the object was unselected choose the equivalent
unselected category
- the preset generates a standard drop shadow. Select the Shadow Lights feature, turn on Expert Mode, and select the multiple lights icon to the left of the
Feature Pad
Page 35. Andromeda Shadow Filter
- Turn ON 2 or more Shadow Lights. (See Multiple
Lights if you need to know more about turning Lights
on and off)
- in the FastView Window you see the shadow associated with currently selected light. Drag the shadow into
position. If you need to change the size of the shadow,
select the Trackball icon adjacent to Multiple Lights
icon. Use the inner arrows to move the lights closer or
further away making the shadow bigger or smaller
- select the next light and repeating the above two
steps, customize your shadow for each light
Multiple shadows may also be cast shadows. However all shadows are
cast on the same plane. In other words to mix cast and drop shadows use
multiple object copies on layers and then use the filter with different settings on each copy.
3.2 Perspective Capability
When the top button in the Output Mode Pad is
selected, only your input image contributes to the
output Image.
There is no shadow, only a (possibly transformed)
copy of the input image. This mode is useful for
generating perspectives of your input image using
the Camera feature in this filter. (In this mode, all
the controls which manipulate the shadow are disabled, to remind you that they will not have any
visible effect).
Your Input image as you see it in the host application is a 2D flat image.
The Camera feature in the Filter can be used to
transform the Input image so that it appears as if it
is being viewed at an angle. The Input image can
then be output with a changed perspective.
Page 36. Andromeda Shadow Filter
Since your input image had no dimensional depth, the transformation cannot
dimensionally change or extrude a object in Input image. All objects will continue
to be flat even with the changed perspective.
To exercise the Perspective only capability, you would expect to do the following
(for more advanced work see Shadowing Sessions);
Before you call the Shadow Filter, in the host application:
- isolate an object in your Input Image
- paste it into center on a white background or on a layer
Call the Andromeda Shadow Filter:
- select the Input only Output Mode
- select the Camera feature. Use the Trackball outer arrows to pan the camera.
Panning the Camera to the left brings your viewpoint closer to the left side of
your Input image. The FastView Window shows what your image looks like (perspective) when viewed from this angle
- use the Trackball smaller inner arrow to move the Camera closer to the image
and the larger inner arrow (pointing towards you) to move the Camera further
away
- optionally, move the cursor to the FastView Window (changes to a triangular
icon) and click to ‘shift’ the image canvas back to the center of the Window
- when you see what you like in the Render Window of the Filter, click on the
Check/OK icon
The result is a high quality anti-aliased transformed Input image.
Page 37. Andromeda Shadow Filter
3.3 Stereo 3D Capability
The Stereo mode switch toggles between normal and
stereo mode views. In stereo mode, you need red/green
stereo glasses to view the image.
Stereo
Switch
Stereo
Separation
Inside the Filter:
Stereo mode is a visual aid; sometimes the position of Casting Plane in relation
to the Image Plane, the Camera and Lights are easier to visualize if you don’t
have to imagine depth!
For Output:
Stereo mode works on RGB and CMYK images. It does not work for gray scale
images because RGB separation is necessary. Convert your gray scale image to
RGB and then Output in any of the three Output Modes: Input Only, Input +
Shadow, Shadow only.
In Stereo mode, there is an additional slider, Stereo Separation Slider which
controls the separation of the two “eyes” of the camera. Move the slider UP to
move the eyes closer together, or DOWN to move them farther apart. You
should adjust this control to help you fuse the red/green pictures into a stereo
picture.
Page 38