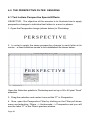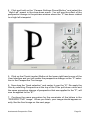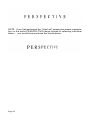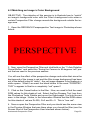
1
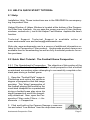
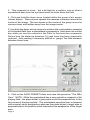
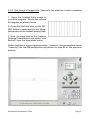
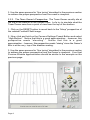
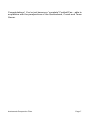
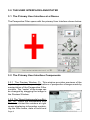
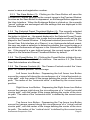
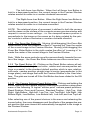
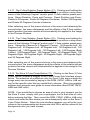
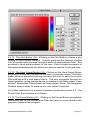
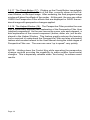
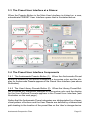
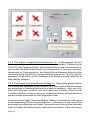
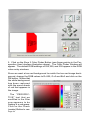
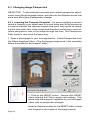
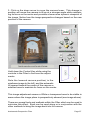
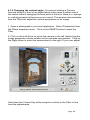
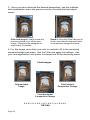
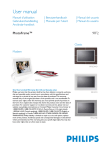
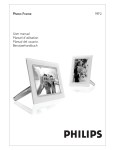
PERSPECTIVE
FILTER
USER’S MANUAL
Copyright © 2001
Andromeda Software Inc.
Andromeda Perspective Filter
Page i
Licensing and Copyright Agreement
Copyright ©2001 by Andromeda Software Inc. All rights reserved. Except as
permitted under copyright law, no part of the program or this user manual may be
reproduced or distributed in any form or by any means without the prior written
permission of Andromeda Software Inc. The program, and this manual, are
licensed only for individual use on a single computer.
Limitations on Warranty and Liability
Neither Andromeda Software Inc, or its distributors and dealers, make any
warranties or representations, either expressed or implied, as to the software and
documentation, including without limitation, the condition of software and implied
warranties of its merchantability or fitness for a particular purpose. Andromeda
Software Inc. shall not be liable for any lost profits or for any direct, indirect,
incidental, consequential or other damages suffered by licensee or others
resulting from the use of the program or arising out of any breach or warranty.
Trademarks
Series 1 Photography Filters, Series 2 Three-D Filter, Series Three-D Luxe Filter,
Series 3 Screens Filter, Series 4 Techtures Filter, Andromeda Shadow Filter,
Andromeda Velociraptor Filter, Andromeda Varifocus Filter, Andromeda Cutline
Filter, Andromeda Measurement Filter, Andromeda Lens Doc Filter, Andromeda
PhotoTiler Plug-in, Andromeda Series and Suite Filters are trademarks of
Andromeda Software Inc. Adobe Photoshop is a trademark of Adobe Systems
Inc. All other products are trademarks of their respective companies.
Andromeda Perspective Filter developed by:
Dave Dyer, Donn Gladstone, Lou Ann Barbeau, Sumeet Pasricha.
UI Design: Lou Ann Barbeau
Technical Completion: Lou Ann Barbeau.
Quality Assurance: Third Eye Consultancy, Guy McCool
Documentation: Guy McCool
Sales Support: Jane Narramore, Linda Dunham, Lee Soriano, Jason Zazzi,
Chrystal Garland
Images: Adobe Photoshop, Corel Draw
©2001
Andromeda Software Inc.
699 Hampshire Rd, Suite 109
Thousand Oaks, CA 91361
USA.
Tel No. (805) 379 4109
Fax No. (805) 379 5253
Page ii
Table of Contents
1.0 INTRODUCTION . . . . . . . . . . . . . . . . . . . . . . . . . . . . . . . . . . 1
2.0 HELP & QUICKSTART TUTORIAL . . . . . . . . . . . . . . . . . . . .3
2.1 Help . . . . . . . . . . . . . . . . . . . . . . . . . . . . . . . . . . . . . .3
2.2 Quick Start Tutorial: The Football Game
Perspective . . . . . . . . . . . . . . . . . . . . . . . . . . . . 3
2.2.1 The Quarterback’s Perspective . . . . . . . . . 3
2.2.2 The Coach’s Perspective . . . . . . . . . . . . . .5
2.2.3 The Team Owner’s Perspective . . . . . . . . .6
3.0 THE USER INTERFACES ANNOTATED . . . . . . . . . . . . . . . .8
3.1 The Primary User Interface at a Glance . . . . . . . . .8
3.2 The Primary User Interface Components . . . . . . . 8
3.3 The Preset User Interface at a Glance . . . . . . . . . 15
3.4 The Preset User Interface Components . . . . . . . 15
4.0 THE PERSPECTIVE FILTER SESSIONS. . . . . . . . . . . . . . 20
4.1 Text Letters Perspective Special Effects . . . . . . 20
4.2 Matching an Image’s Color Background. . . . . . . 23
4.3 Changing Image Perspective . . . . . . . . . . . . . . . . 26
4.3.1 Lowering the Cameras Viewpoint . . . . . . 26
4.3.2 Changing the Vertical Angle. . . . . . . . . . . 29
Andromeda Perspective Filter
Page iiii
INTRODUCTION 1.0
The Perspective Filter is a Photoshop compatible “plug-in” that provides
the capability for the user to change the current view or “perspective” of an
image to any point in three dimensional space through the utilization of a
user friendly interface.
The user can move the perspective to standard
“anchor points” in space (such as high bottom,
low right, etc. or rotational movements such as
90 degrees clockwise) by selecting an anchor
point from preset pull-down menus. Subsequent fine-tuning of the desired perspective
point can be accomplished through an array of
three dimensional movement buttons.
A newly created final perspective viewpoint can
be saved as a user defined preset for later use.
This enhances productivity since the cumulative efforts of a Perspective Filter session can
later be retrieved automatically with just a one
click selection...eliminating redundant design
work.
Image 1: This image illustrates
a simple display of a normal perspective with no rotation in either the X, Y or Z axes.
Image 1 shows a traditional view of a simple
object.
Image 2 illustrates the perspective change
made by selecting a “high top” preset in the
user interface.
Design options include a grid feature that enhances the actual perspective movement of
the image during design manipulation, an intermediate SAVE and RESTORE button that
provides the user with the capability to quickly
save intermediate design positions and a background color modifier that creates color selection for the area outside the input image’s perimeter.
Andromeda Perspective Filter
Image 2: This image shows the
changes to perspective that
have been applied by the “high
top” preset in the Perspective
Filter. This has been achieved
by a slight rotation of the image
about its “X” axis and has the
same effect as the viewpoint or
“camera” being moved upward
above the image.
Page 1
Additionally, there is a preset preview window that shows a “thumbnail” of
the currently selected preset that can be re-applied during a design session.
As an enhancement to perspective manipulation, the Perspective Filter
provides a “zoom” capability.
Page 2
2.0 HELP & QUICK START TUTORIAL
2.1 Help
Installation Help: These instructions are in the README file accompanying the product files.
Helper Window: A Helper Window is located at the bottom of the Perspective Filter User Interface. As you pass the cursor over any UI item (buttons,
windows, controls etc.), text in the Helper Text Window explains the item’s
function.
Technical Support: Technical Support is available online at
www.andromeda.com and [email protected].
Web site: www.andromeda.com is a source of additional information related to the Perspective Filter product. Andromeda product demos are
available free for downloading as well as fully functional products for online purchase.
2.2 Quick Start Tutorial: The Football Game Perspective
2.2.1 The Quarterback’s Perspective: The objective of this section of the
tutorial is to illustrate the degree of limited visual perspective that a football
quarterback encounters when attempting to successfully complete a forward pass during a football game.
1. Open the “Football Field” image in
Photoshop and notice the optimum
degree of perspective that this image
provides. This “blimp” perspective of
the football playing field would be the
most ideal viewpoint for a quarterback
during a football pass play since his
depth perspective would be dramatically enhanced. Now, open the Perspective Filter under Filters --> Andromeda --> Perspective.
2. Click and hold on the Camera Settings Preset Button and select “Low Bottom” from the drop-down menu.
Andromeda Perspective Filter
Page 3
3. This viewpoint is close....but a bit high for a realistic view of what a
quarterback sees from his eye-level when he looks down the field.
4. Click and hold the down arrow located within the group of six arrows
(shown below). These arrows operate the cameras movement around the
center of the image. The two arrows in the center of the group move the
camera closer and farther away from the image center.
5. Use both the down and up arrows to achieve the most realistic viewpoint
of the football field from a quarterback’s perspective. Hold down the control
key while you use the controls in the Filter to fine tune the movements
Notice how the distance between 10 yard lines has been drastically
reduced....thus making it extremely difficult to “gauge” the field distance
between those lines.
6. Click on the SAVE PRESET folder and save this preset as “The QB’s
View”. NOTE: While the quarterback has a very restrictive viewpoint of his
playing field , the place kicker’s goal posts would be perpendicular to the
far corners of the playing field. The quarterback operates from a viewpoint
with minimal visual perspective whereas the place-kicker’s target area is
perpendicular to his position which maximizes his perspective of the target
area.
Page 4
2.2.2 The Coach’s Perspective: Now let’s see what the coach’s viewpoint
looks like from the sidelines.
1. Open the Football Field image in
your host program. Rotate the canvas
90 degrees as shown below.
2. Open the filter and click on the RESET button to revert back to the “blimp”
perspective of the football playing field.
3. Now, click and hold on the Camera
Settings Preset Button and select “Low
Bottom” from the drop-down menu.
Notice that this is a good approximation....however, this perspective needs
“lowering” like the QB perspective adjustment in step #5 of the previous
section.
Andromeda Perspective Filter
Page 5
3. Use the same process for “fine tuning” described in the previous section
to achieve the proper perspective from the coach’s viewpoint.
2.2.3. The Team Owner’s Perspective: The Team Owner usually sits at
the top of the stadium in the Owner’s Box. Let’s try to simulate what the
Team Owner sees from a point of view from the top of the stadium.
1. Click on the RESET button to revert back to the “blimp” perspective of
the rotated Football Ffield image.
2. Now, click and hold on the Camera Settings Preset Button and select
“High Bottom”. Notice that this is a good approximation....however, this
perspective needs “elevating”.
Notice that this is a good
approximation....however, this perspective needs “raising” since the Owner’s
Box is at the very top of the stadium seating.
3. Use the same process for “fine tuning” described in the previous section
to achieve the proper perspective from the Owner’s viewpoint. Your final
Preview Window approximation should be similar to the example on the
previous page.
Page 6
Congratulations! You’ve just become a “complete” Football Fan....able to
empathize with the perspectives of the Quarterback, Coach and Team
Owner.
Andromeda Perspective Filter
Page 7
3.0 THE USER INTERFACES ANNOTATED
3.1 The Primary User Interface at a Glance
The Perspective Filter opens with the primary User Interface shown below:
3.2 The Primary User Interface Components
3.2.1 The Preview Window (1): This window provides previews of the
Input Image and subsequent applications of perspective changes made by
manipulation of the Perspective Filter
controls. The “center” of the image can
be changed by dragging the image in
the Preview Window.
3.2.2 The “About Andromeda Icon Button” (2): When the Andromeda Icon
Button is clicked the window at right
opens displaying information containing the filter name, date of build and
Page 8
owner’s name and registration number.
3.2.3 The Save Button (3): Clicking on the Save Button will save the
Perspective Camera settings for the current image in the Preview Window.
As soon as the Save Button is depressed, an Exchange Button appears on
the User Interface. When the Exchange Button is clicked on, the currently
“saved” settings are exchanged with the settings that are displayed in the
Preview Window.
3.2.4 The Selected Preset Thumbnail Button (4): The currently selected
preset will be displayed in the Selected Preset Thumbnail Button. When
the button is clicked on....the preset displayed in the Selected Preset Thumbnail Button will be applied to the image and immediate results will be displayed in the Preview Window. If the preset selected (see section 3.3 The
Preset User Sub-interface at a Glance), is an Andromeda defined preset,
the user can make a selection to determine whether the current image or a
pre-defined Andromeda will appear in the Selected Preset Thumbnail Button. If the preset is a user defined preset, the current image will be displayed in the Selected Preset Thumbnail Button by default.
3.2.5 The Preset Button (5): Clicking the Preset Button initiates the appearance of the Preset User Sub-interface. See section 3.3 (The Preset
User Sub-interface at a Glance).
3.2.6 The Camera Controls (6): The Camera Controls control the “viewpoint” or “camera position” for the image.
Left Arrow Icon Button: Depressing the Left Arrow Icon Button
moves the camera left along the circumference of a “virtual horizontal circular path”, with the center of the image defining the center of the circular
path. The radius of the “horizontal circle” is defined by the current zoom
position.
Right Arrow Icon Button: Depressing the Right Arrow Icon Button
moves the camera right along the circumference of a “virtual horizontal
circular path”, with the center of the image defining the center of the circular path. The radius of the “horizontal circle” is defined by the current zoom
position.
Top Arrow Icon Button: Depressing the Top Arrow Icon Button
moves the camera upward along the circumference of a “virtual vertical
circular path”, with the center of the image defining the center of the circular path. The radius of the “vertical circle” is defined by the current zoom
Andromeda Perspective Filter
Page 9
position. Note: When the camera passes over the top of the image, it
immediately turns back to remain focused on the center of the back of the
image.
Bottom Arrow Icon Button: Depressing the Bottom Arrow Icon
Button moves the camera downward along the circumference of a “virtual
vertical circular path”, with the center of the image defining the center of
the circular path.
The radius of the “vertical circle” is defined by the current zoom position.
Inner Top Arrow Icon Button: Depressing the Inner Top Arrow Icon
Button moves the camera (zooms) inward towards the center of the image.
The radius path “angle” is determined by the current settings of the outer
Arrow Icon Buttons that display the camera position in 3D space before the
Inner Top Arrow Icon Button is depressed.
Inner Bottom Arrow Icon Button: Depressing the Inner Bottom Arrow Icon Button moves the camera (zooms) outward from the center of the
image. The radius path “angle” is determined by the current settings of the
outer Arrow Icon Buttons that display the camera position in 3D space before the Inner Bottom Arrow Icon Button is depressed.
NOTE: The combined functions of the 6 camera control buttons can be
visualized by imagining a hollow sphere with a transparent glass surface
which determines where the camera can travel in 3D space.
The camera is always focused at the exact center of the sphere (in the
filter...it is your image center). The outer 4 camera control buttons determine the location on the surface of the sphere where the camera(viewpoint)
is currently located.
The inner two camera control buttons determine the length of the radius of
the sphere. (Imagine that this sphere contracts and expands in size as the
inner two camera control buttons are manipulated).
Remember, the camera is always focused on the center of the sphere (center
of your image) and that the camera can only be moved over the surface of
the virtual sphere. Contractions and expansions of the virtual sphere surface are controlled by the zoom buttons.
3.2.7 The Spinner Controls (7): The Right and Left Arrow Icon Buttons
determine rotational movement of the image about its center.
Page 10
The Left Arrow Icon Button: When the Left Arrow Icon Button is
held in a depressed position, the current image in the Preview Window
rotates around its center in a counter-clockwise movement.
The Right Arrow Icon Button: When the Right Arrow Icon Button is
held in a depressed position, the current image in the Preview Window
rotates around its center in a clockwise movement.
NOTE: The rotational plane of movement is defined to both the camera
and the viewer as the surface of the computer screen preview window with
respect to current zoom settings....i.e. the viewpoint/camera position is
perpedicular to the image on the screen as it is being rotated by the spinner controls in either a clockwise or counter-clockwise direction.
3.2.8 The Zoom Bar Slider (8): Moving (click/dragging) the Zoom Bar
Slider Button to the left creates the effect of “zooming out” from the center
of the current image in the Preview Window. Moving (click/dragging) the
Zoom Bar Slider Button to the right creates the effect of “zooming in” towards the center of the current image in the Preview Window.
Note: While the arrow controls move the camera directly towards the center of the image....the Zoom Bar Slider behaves more like a zoom lens.
3.2.9 The Reset Button (9): Clicking on the Reset Button returns all settings in the filter (including current zoom, rotation and camera position settings or presets) to the standard default position which is zero rotation,
mid-zoom, camera position straight view at center (perpendicular to the
image plane), and image flush with the Preview Window in the User Interface. The grids are turned off if the Grid Button has been clicked to the ON
position.
3.2.10 The Camera Settings Preset Button (10): Clicking and holding the
mouse button on the Camera Setting Preset Button produces a drop-down
menu of the following 14 logical “anchor point” camera preset positions:
Reset Rotation, Zoom and Camera; Standard Position; High Top; High
Right; High Bottom; High Left; Low Top; Low Top-Right; Low Right; Low
Bottom-Right; Low Bottom; Low Bottom-Left; Low Left; and Low Top-Left.
After selecting one of the preset choices in the menu and releasing the
mouse button, the menu disappears and the effects of the perspective preset position that was chosen will automatically be applied to the image in
the Preview Window.
Andromeda Perspective Filter
Page 11
3.2.11 The Z-Axis Rotation Preset Button (11): Clicking and holding the
mouse button on the Z-Axis Rotation Preset Button produces a drop-down
menu of the following 6 logical “anchor point” Z-Axis rotation preset positions: Reset Rotation, Zoom and Camera; Reset Rotation and Zoom;
Rotate to 0 Degrees; Rotate 90 Degrees Clockwise; Rotate 180 Degrees;
and Rotate 90 Degrees Counter-clockwise.
After selecting one of the preset choices in the menu and releasing the
mouse button, the menu disappears and the effects of the Z-Axis rotation
preset position that was chosen will automatically be applied to the image
in the Preview Window.
3.2.12 The Y-Axis Rotation Preset Button (12): Clicking and holding the
mouse button on the Y-Axis Rotation Preset Button produces a drop-down
menu of the following 18 logical “anchor point” Y-Axis rotation preset positions: Swing the Camera to 0 Degrees (Center); 20 Degrees Left; 40
Degrees Left; 60 Degrees Left; 80 Degrees Left; 100 Degrees Left; 120
Degrees Left; 140 Degrees Left; 160 Degrees Left; 180 Degrees (Back
Center); 160 Degrees Right; 140 Degrees Right; 120 Degrees Right; 100
Degrees Right; 80 Degrees Right; 60 Degrees Right; 40 Degrees Right;
and 20 Degrees Right.
After selecting one of the preset choices in the menu and releasing the
mouse button, the menu disappears and the effects of the rotation preset
position that was chosen will automatically be applied to the image in the
Preview Window.
3.2.13 The Zone 2 Color Picker Button (13): Clicking on the Zone 2 Color
Picker Button initiates a display of the Color Picker Sub-Interface shown
below. The selection of a different color for Zone 2 (the area outside the
image area) can be made by keying in the RGB, CMYK, HSB or LAB values for the specific color that you would like to choose. (See your graphics
software host program user guide for more information about RGB, CMYK,
HSB and LAB color).
NOTE: If you would like to choose an area of color in your image to use for
the Zone 2 color, simply click your eyedropper tool in that area of color
before entering the filter. Then record the RGB, CMYK, HSB or LAB color
values and enter the filter where you can subsequently click on the Zone 2
Color Picker Button. When the sub-interface appears you will enter your
values in the corresponding text boxes and click OK to set the values to the
background color you have chosen.
Page 12
3.2.14 The Grid Button (14): Clicking on the Grid Button creates a grid
overlay on the Preview Window. The grid partitions the Preview Window
into 36 equally sized squares through a series of perpendicular lines. This
provides a visual enhancement for the user. Even a slight movement of
the camera/viewpoint will become more obvious relative to the grid lines.
3.2.15 The Save Preset Button (15): Clicking on the Save Preset Button
produces a navigation window on the user’s computer screen. The Navigation Window provides features that allow the user to save the current
filter settings with a new preset name. The user navigates through the
folder hierarchy on the storage device or desktop to the folder where “userdefined” Perspective Filter presets are being stored. Note: The Navigation
Window also provides for creation of a new folder if required.
For further explanation of retrieval of presets, please see section 3.3: The
Preset User Sub-interface at a Glance.
3.2.16 The Cancel Button (16): Clicking on the Cancel Button immediately
terminates use of the Perspective Filter and returns control back to the
graphics software host program.
Andromeda Perspective Filter
Page 13
3.2.17 The Check Button (17): Clicking on the Check Button immediately
initiates “rendering” of the effects of the filter, currently shown in the Preview Window, on the input image. After rendering, the host program image
window will show the effects of the render. At this point, the user can either
UNDO the Perspective Filter effects that are displayed or SAVE the rendered image with perspective changes applied.
3.2.18 The Helper Window (18): The Perspective Filter provides the user
with a dynamically adjusted text explanation of the Perspective Filter User
Interface components. As the user moves the cursor over each element, a
brief explanation of the current component (button, slider, etc.) will be displayed in the Helper Window. This feature greatly reduces the learning
curve required to understand the Perspective Filter and also eliminates
tedious and constant referral to the User Manual during the initial stages of
Perspective Filter use. The user can come “up to speed” very quickly.
NOTE: Holding down the Control Key while operating the perspective
change controls provides the capability to make smaller incremental
changes. This is especially valuable when “fine tuning” to achieve exact
results.
Page 14
3.3 The Preset User Interface at a Glance:
When the Presets Button in the Main User Interface is clicked on, a new,
subordinate PRESET User Interface opens that is illustrated below:
3.4 The Preset User Interface Components
3.4.1 The Andromeda Presets Button (1): When the Andromeda Preset
Button is clicked on, the button changes to a turquoise color and the display for Andromeda Presets appears in the Preset User Interface (see above
illustration).
3.4.2 The User Library Presets Button (2): When the Library Preset Button is clicked on, the button changes to a turquoise color and the display
for the User Defined Presets appears in the Preset User Interface (see
illustration on the next page).
Notice that the Andromeda Preset categories are distinguished by a hierarchical pattern of buttons and the User Presets are defined by a hierarchical
path leading to the location of the preset files on the User’s storage device.
Andromeda Perspective Filter
Page 15
3.4.3 The Preset Category Selection Buttons (3): In the example, the Full
Canvas set of categories has been selected as the default. Clicking on the
Floors Preset Category Button will automatically list the Andromeda Presets on the left side of the Preset User Interface in 2 columns of graphic
thumbnails for Floor positions: the Ceiling Preset Category Button will list
the Andromeda Presets for Ceiling positions and so on. Notice that the
presence of red letters in the Category Icon Button indicate selection of
that specific category.
3.4.4 The Preset Thumbnail Button Gallery (4): Descriptive preset thumbnail buttons are displayed in two columns of 3 rows (notice that when there
are more than 6 thumbnail buttons for a specific category....they are “hidden” until they are “scrolled” into view (see next section). Each Preset
Thumbnail Button contains a preview of what that preset will look like on a
generic image presented by the Perspective Filter.
A preset in the Preset Thumbnail Button Gallery is selected by clicking on
its corresponding Preset Thumbnail Button. Conversion of the color of the
perimeter line enclosing the Preset Thumbnai from black to blue indicates
that the Preset Thumbnail button has become enabled. (This conversion
Page 16
happens automatically when the mouse cursor is passed over a Preset
Thumbnail Button in the gallery.
Conversion of the color of the descriptive text below the Preset Thumbnail
and the perimeter line enclosing the Preset Thumbnail from blue to red
indicates that the Preset Thumbnail button has been selected. The selected Preset Thumbnail will instantly appear in the Preset Selection Preview Window (see item #6).
This process occurs after the User has clicked on a specific Preset Thumbnail Button in the gallery.
3.4.5 The Preset Thumbnail Gallery Scroll Buttons (5): When there are
more than 6 presets in a category, numbers 7 and up are hidden from view
when that category of Preset Thumbnail Buttons are first displayed. In
order to bring the remaining preset thumbnails into view, the User must
click on the downward pointing arrow. This process will hide the top two
presets and bring the next two thumbnail presets back into the gallery view
in the bottom row.
Clicking on the upward pointing arrow will bring the last two presets, hidden by the previous downward arrow click, back into view in the top row of
the Thumbnail Preset Gallery.
3.4.6 The Preset Selection Preview Window (6): The currently selected
Preset Thumbnail is displayed in the Preset Selection Preview Window
and the description of the preset will appear below.
3.4.7 The Small Thumbnail Selection Button (7): When the Small Thumbnail Selection Button is clicked on, the thumbnails in the Preset Thumbnail
Gallery are reduced in size. When there are more than 6 presets in a
category, selection of this gallery mode will provide a view of a larger number of the presets in the category at one glance.
Since most categories usually won’t contain more than 15 presets, selecting this gallery viewing mode will allow the User to view preset thumbnails
for the entire category at once.
3.4.8 The Large Thumbnail Selection Button (8): When the Large Thumbnail Selection Button is clicked on, the thumbnails in the Preset Thumbnail
Gallery are increased in size. The larger thumbnails provide the User with
a more detailed view of the characteristics of the presets in a specific category.
Andromeda Perspective Filter
Page 17
3.4.9 The Input Image Thumbnail Selection Button (9): When this button
is clicked on, each preset in the currently selected preset category will be
applied to the input image that was open when the User entered the Preset
User Interface and corresponding thumbnails will be displayed in the Preset Thumbnail Gallery for the selected category.
3.4.10 The Andromeda Image Thumbnail Selection Button (10): When
this button is clicked on, each preset in the currently selected preset category will be applied to a standard “Andromeda provided” image and corresponding thumbnails will be displayed in the Preset Thumbnail Gallery
for the selected category.
3.4.11 The Preset Text Description Window (11): This window displays
descriptive text for each Andromeda Preset. For user defined presets, the
User can either create a new description or modify an existing description
for the preset by clicking on the Preset Thumbnail. A text window will appear for creating or editing text. After closing the window, the new text will
be displayed in the Preset Text Description Window whenever the preset is
selected.
3.4.12 The Helper Window (12): The Perspective Filter provides the user
with a dynamically adjusted text explanation of the Perspective Filter Preset User Interface components. As the user moves the cursor over each
element, a brief explanation of the current component (button, slider, etc.)
will be displayed in the Helper Window. This feature greatly reduces the
learning curve required to understand the Perspective Filter and also eliminates tedious and constant referral to the User Manual during the initial
stages of Perspective Filter use. The user can come “up to speed” very
quickly.
3.4.13 The Retrieve Preset Button (13): Clicking on the Retrieve Preset
Button produces a navigation window on the user’s computer screen. The
Navigation Window provides features that provide the user with the capability to retrieve presets from a previously stored location.
The user navigates through the folder hierarchy on the storage device or
desktop to the folder where “user-defined” Perspective Filter presets have
been previously stored. When a preset is “opened” it immediately appears
as a Preset Thumbnail in the Preset Thumbnail Gallery. The hierarchical
location of the user defined preset will also appear at the top right of the
Preset User Interface under the User Library Presets Button. Refer to
section 3.4.2 The User Library Presets Button (2) for more information.
Page 18
3.4.14 The Cancel Button (14): Clicking on the Cancel Button immediately
terminates use of the Preset User Interface and returns control back to the
Primary User Interface. The status of the Primary User Interface settings
will be unchanged from the point that the Preset User Interface was entered.
3.2.15 The Check Button (15): Clicking on the Check Button immediately
returns control back to the Primary User Interface. Any preset that has
been applied will automatically appear in the Preview Window and in the
Selected Preset Thumbnail Button.
Andromeda Perspective Filter
Page 19
4.0 THE PERSPECTIVE FILTER SESSIONS
4.1 Text Letters Perspective Special Effects
OBJECTIVE: The objective of this session is to illustrate how to apply
perspective changes to individual text letters in a word or phrase.
1. Open the Perspective Image (shown below) in Photoshop.
2. In order to apply the same perspective change to each letter at its
center....a fixed selection needs to be established as shown below:
Open the Selection palette in Photoshop and set up a 56 x 64 pixel “fixed”
selection.
3. Drag the selection and center it around the “P” in Perspective.
4. Now, open the Perspective Filter by clicking on the Filter pull-down
menu and selecting Filters --> Andromeda --> Perspective and you will
see the letter “P” in the Filter’s preview window.
Page 20
4. Click and hold on the “Camera Settings Preset Button” and select the
“High Left” preset in the drop-down menu. You will see the effect of the
perspective change in the preview window where the “P” has been rotated
to a high left viewpoint.
5. Click on the Check (render) Button at the lower right hand corner of the
User Interface and you will render the perspective change on the “P” selection in the Perspective Text image.
6. Now drag the “fixed selection” and center it over the “E”. Re-apply the
filter by selecting Perspective at the top of the Filter pull-down menu and
the same procedure change of perspective that was applied to the “P”, will
now be applied to the “E”.
7. Continue the same procedure for the remainder of the letters in the
“PERSPECTIVE” image. When you finish, your image should appear exactly like the final image on the next page.
Andromeda Perspective Filter
Page 21
NOTE: If you had performed the “High Left” perspective preset manipulation on the entire PERSPECTIVE image instead of selecting individual
letters.....you would have produced the results below.
Page 22
4.2 Matching an Image’s Color Background
OBJECTIVE: The objective of this session is to illustrate how to “match”
an image’s background color with the Filter’s background color when a
certain Perspective Filter change reveals the background outside the image area.
1. Open the RED BACK Perspespective Text image in Photoshop shown
below:
2. Now, open the Perspective Filter and click/hold on the “Y-Axis Rotation
Preset Button” and select the “Swing the Camera to 80 degrees Left” preset that we used in the previous session.
You will see the effect of the perspective change and notice that since the
background of the image is red and the filter image background has been
set to the default value of “white”...the red image appears to be floating in a
white space. What if we want the black letters in the word “PERSPECTIVE” to appear to float in a completely “red” space?
3. Click on the Cancel button in the filter. Now, we need to find the exact
RGB values for this shade of red. Select the Eye Dropper Tool Icon from
the Photoshop Tools Palette and move the Eyedropper Tool into the red
area in the image. Notice, in the Information Window that the RGB values
for this shade of red are R=255, G=0 and B = 0. This is “true red”.
4. Now re-open the Perspective Filter and you should see the same view
in the Preview Window that was there when you closed the filter (see the
Screen Shot of the Perspective User Interface shown below)..
Andromeda Perspective Filter
Page 23
5. Click on the Zone 2 Color Picker Button (see finger pointer in the Perspective User Interface illustration above). The Color Picker Window will
appear. The default RGB setttings of 255,255, and 255 appear in the RGB
value entry windows.
Since we want a true red background to match the true red image background, change the RGB values to R=255, G=0 and B=0 and click on the
OK button. Notice that
the white background
has been replaced
with the same shade
of red that appears in
the image.
The “PERSPECTIVE” text that we
modified in the filter
now appears to be
floating in a red space.
Click on the Check
(render) Button to renPage 24
der the output. Compare the effects of this output with the output before
the transition.
Andromeda Perspective Filter
Page 25
4.3 Changing Image Perspective
OBJECTIVE: To demonstrate horizontal and vertical perspective adjustments using the photograph below; and discuss the different issues that
arise from each type of perspective change.
4.3.1 Lowering the Cameras Viewpoint - If a person holding a camera
which is focused on an object were to crouch down and tilt the camera up
in order to maintain the cameras original focal point, they would be changing the horizontal view of the image and therefore would see a more extreme perspective view of the image through the lens. The Perspective
Filter works in very much the same way.
1. Open a photograph in your host application. Select Perspective from
the Filters dropdown Menu. (The Arches.jpg image used in the examples
below is provided in the Images Folder.)
2. Click on the RESET button. Always click RESET
when entering the Filter to apply new settings. This
resets sets the image as it appears in your host application with no perspective changes.
Note the Camera location for the RESET button is level
and focused on the center of the image canvas.
Page 26
3. Click on the down arrow to move the camera lower. This change in
position will cause the camera to tilt up at a stronger angle while maintaining its focus on the center and provides a lower more dynamic viewpoint of
the image. Notice how the image perspective changes based on the new
position of the camera.
Hold down the Control Key while using the
controls in the Filter to fine tune the adjustments.
Note the lowered camera position( in the
wireframe image to the left), and the automatic
tilt upward toward the center of the canvas or
selected area to maintain its focus on the center.
This image adjustment causes a White or transparent area to be visible in
areas where the image plane is perspectively skewed (see image above).
There are several tools and methods within the Filter which can be used to
minimize this effect. Each can be used alone or in conjunction with the
other methods to bring the image back into full canvas.
Andromeda Perspective Filter
Page 27
4. Once you have achieved the perspective that you want, use the
methods below as needed to reposition and enhance your new
perspective view:
Click and drag the image inside the
preview window to re-center your
image. Distribute the background
area evenly if possible.
Use the apply background
procedure in Session 4.2 to apply
the background color using the
color picker in the Filter.
Zoom in using the Zoom Bar tool to
further minimize the exposed white
or transparent background area.
Touch-up the background areas in
your host application after you exit
the Filter if necessary.
5. Exit the filter. Click on the check-mark icon to exit with your current
settings.
A NOTE about Layers: If you are working on a transparent layer, the
background color will not apply, and instead the Filter will maintain the
layers transparent background.
Page 28
4.3.2 Changing the vertical angle - If a person holding a Camera
focused directly in front of an object takes a few steps to either side of
the center without changing the focal point of the lens, there is a change
in vertical perspective that occurs as a result. This session demonstrates
how the Filter can adjust the vertical perspective of an image.
1. Open a photograph in your host application. Select Perspective from
the Filters dropdown menu. Click on the RESET button to reset the
Filter.
2. Click on the Left Arrow to move the camera to the left. Notice that the
image perspective skews relative to the cameras new position. Click on
the Right Arrow to move the camera back to the right if you over adjust.
Hold down the Control Key while using the controls in the Filter to fine
tune the adjustments.
Page 29
3. Once you have achieved the desired perspective, use the methods
discussed below and in the previous section to make the final adjustments.
Click and drag the image inside the
preview window to re-center your
image. Distribute the background
area evenly if possible.
Zoom in using the Zoom Bar tool to
further minimize the exposed white
or transparent background area.
4. For this image, more than one color is needed to fill in the remaining
exposed background areas. Exit the Filter and apply the settings. Use
your host application color picker to sample and fill the remaining areas.
Final Images
Final Vertical
Perspective Change
Original Input
Image
Final Horizontal
Perspective Change
THE END
Page 30