Transcript
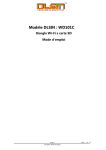
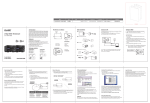
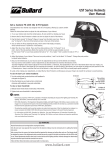
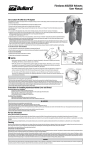
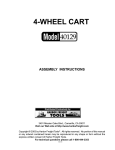
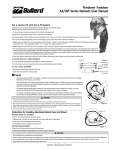
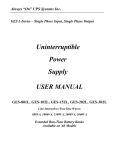
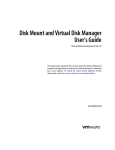
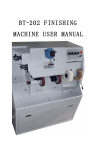
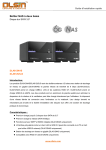
WD201L / WD202L
This new product is specifically designed for Travel outdoor
needs, from transforms any external hard drive your share
content from any place and any device. Ease the storage
burden on your smart phone or tablet. Stream and share
content with house and office on their mobile devices.
Patented design of tool-free and HDD easy to install definitely
offers a convenient and economical way for your storage.
Support WiFi 2T2R up to 300Mbps transfer rate
Allow 16 people simultaneous connection
Support HDD format FAT32 / ExFAT / NTFS / HFS+
Support SMB / WebDAV / Media Server / FTP protocol
Support 4TB or above capacity for single HDD
Support 6 pcs USB Storage System (via USB Hub)
WD201L
Micro USB2.0 cable x 1
User manual x 1
DLSIN
2014-04-16
Appearance
Instruction
WD201L
First time to connections and setting
You can connect and set up through your PC, Android devices,
Apple iPhone, and iPAD
- PC windows setting/Wired connection
Connect the WD201L/WD202L to your existing DHCP router and
WD201L/WD202L will get IP address from the router automatically.
4
WD202L
A.Firstly, double click & open your network/Internet. you will see a
media device named as [Wi-Cool-xxxx], right click the icon and
choose property content.
B.You will see an IP address on the Devices webpage, click the
IP address and then web browser will open the setting page.
D.Please key in user ID and password, then, you are able to
enter main page. (Default User ID: admin / PS: admin)
- The advice of Android
- Device of Apple iPhone, iPAD
If you are using Android tablet or cell phone, you can find our APP
[Wi-Cool] through Google Play store. It’s free to download, after
download to your tablet or cell phone; you can connect with
WD201L/WD202L dongle through WIFI.
When you use the Apple tablet or phone, you must search for
[wi-cool] APP through Apple APP Store, firstly. Our APP is
downloadable for free and install, and you are able to contact
WD201L/WD202L through WIFI.
The original SSI ID is: wi-cool-XXXX. Password: None. Then, you
are able to enter setting up page as follows.
The default SSI ID is: wi-cool-XXXX. Password: None, you are
able to enter the setting Program as follows.
A.Click and open the installed Wi-cool APP.
B.At this time you will see the following screen, WD201L/WD202L
is appearing on the screen, the name is: wi-cool-XXXX, and
there is the right green wireless symbol.
C.Long press the wi-cool-XXXX, then the window will be popped
up as follows, please enter the administrator user name and
password. Then press OK to enter the APP page.
D.Click the [Setting] (Settings) to enter setup options page.
A.Click and open the installed Wi-cool APP.
B.At this time you will see the following screen, WD201L/WD202L
is appearing on the screen, and the name is: wi-cool-XXXX.
C.Click WD201L/WD202L device, key in the default user name:
admin, password: admin.
D.Click the [Setting], you are able to enter the setup options page,
you have to key in User Name: admin, Password: admin again.
1. RESET - Press 5sec to reset to factory setting
2. Micro - USB 5V Power input
3. USB2.0 - Connecting to USB stoage
4. Power & WiFi LED indicator
5. LAN - Connecting to existing IP Router
WD202L
Micro USB2.0 cable x 1
User manual x 1
4
- Wireless connection through PC
WD201L
WD202L
When you use wireless, you can connect WD201L/WD202L through
WIFI directly, our SSI ID: wi-cool-xxx, pass word: NON
It’s able to open the browser, key in 192.168.99.1, then, you
will see the main screen, after key in user ID and pass word,
you are able to enter it. (Default User ID: admin / PS: admin)
User Quick Guide
Setting Options Description
Basic Setting
The working example under PC environment, description and setting
as follows (Android and Apple device and configuration option are
similar, but there is a little streamlined.
Click Basic Setting option, you will see content page as follows.
Setup Menu
When you enter the settings screen, you will see bellowed five
options, there are: Device Information, Basic Setting, Advanced
Setting, Maintenance & Tools, Account Management, Attached disks.
Device Information
On this page, you can view WD201L/WD202L current setting
condition environment; including the firmware version, device name,
the wireless network status.
Remote login function introduction
User can login in WD201L/WD202L device at home upload &
download data through Browser. Please use browser to link website:
http://www.mydisk.biz
Key in Host Name & Press the OK button, Key in user ID & password:
Then, you can open WD201L/WD202L storage data through remote
internet.
A.Device Name: Set your device name, this name will be displayed
on the network. We recommend that you change your personal
name and reset in order to facilitate identification.
B.Management Account/Password: Setting the administrator's
username & password.
C.Wireless Name/Password SSID: Setting the name & password
of the Wi-Fi wireless network.
D.Internet Port: Setting Router's connection at your home, there
are three options you can choose; Choosing as Power on
Detection automatic identification or Ethernet wired connection
or Wireless connection.
E.Internet Connection Setup & Test: WD201L/WD202L Internet
Iis already connection to the Internet.
Key in Host Name & Press the OK button, Key in user ID & password:
Then, you can open WD201L/WD202L storage data through remote
internet.
Advanced Setting
Click Basic Setting option, you will see content page as follows.
A.IP Address/Netmask: Setting IP of WD201L/WD202L.
B.Operation Mode: Setting the WD201L/WD202L there are two
Router/Repeater mode, open/close the DHCP function.
C.Region: Please follow your country location to choose and set
the WIFI mode.
D.Wireless Mode/Channel: Setting up a wireless Wi-Fi speed &
channel operation mode.
E.Broadcast SSID:Enable or disable the broadcast of the wifi SSID
F.Green AP: Automatically adjust the wi-fi power & save the energy.
G.Dynamic DNS: Dynamic DNS service function setting.
H.Setting enable or disable: DLNA Media Server, iTunes Server,
PPPoE Relay, Auto Power Off, Date & Time, UI Theme.
I.Allow Acess from Internet: Connect WD201L/WD202L at home
through Remote Network setting
Maintenance & Tools
You can also remote connection through the iOS/Android App to
search Host.
Click Maintenance & Tools, you will see page as follows
A.Format Disks: Format the disks which connect to the WD201L/202L
B.Upgrade the WD201L/WD202L firmware.
C.Revert the WD201L/WD202L firmware to factory setting.
Account Management
Click Account Management, you can create 16 different accounts
for your friends and families.
Attached Disks
Click Attached Disks, you will see bellowed page, you can
remove the WD201L/WD202L disk connection safely.
Legal Disclaimer
For potential loss of data, especially due to inappropriate handling,
the company assumes no liability.
All named products and descriptions are trademarks and/or registered
rademarks of the respective manufacturers and are accepted as
protected. As a continuing policy of product improvement at the
company, the design and specifications are subject to change without
prior notice. National product specifications may vary.