1
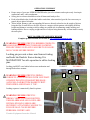
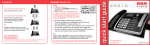
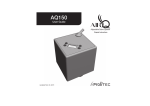
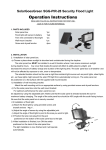
INNOVATIVE SPORTING PRODUCTS SPIDER WINGER PLEASE READ & UNDERSTAND THIS OWNERS MANUAL PRIOR TO OPERATION FAILURE TO FOLLOW SETUP & LOADING INSTRUCTIONS AND SAFETY PRECAUTIONS CAN RESULTS IN SERIOUS INJURY OR DEATH. Only individuals aged 18 years and older should operate this product. PRODUCT REGISTRATION AND WARRANTY: Products must be registered at www.thunderequipment.com within 30 days of purchase to ensure updated product information, information on future product upgrades, and proper warranty registration. FOR PRODUCT QUESTIONS OR CONCERNS CONTACT: Thunder Equipment division of Wilson Retrievers, Inc. 53 Coulter Road · Greenville, PA · 16125 Ph: 724-944-2429 · [email protected] Thunder Equipment Launcher Manual Page 1 OPERATION SUMMARY Proper setup of your new SPIDER WINGER takes just a few minutes and requires only 6 main pin connections and 2 cable attachments. Safety pins on releases should be used at all times until ready to fire. Each colored basket has 4 individual rubber cords that, when stretched, provide force necessary to propel objects placed in basket. Throw height, distance, and corresponding fall area are directly related to size & weight of objects being thrown. Overall fall area for all 4 objects is a unique circular pattern with slightly different heights and distances creating a solid scenting area which aids in enhancing canine marking and hunting abilities. Due to varying weight and size of objects being thrown they will not land in exactly the same place. HOW TO OPERATE YOUR NEW WINGER Complete product manual also located at www.thunderequipment.com WARNING! NEVER STRETCH RUBBER CORDS TO LOAD POSITION WITHOUT RELEASE LOCKING PINS SECURELY IN PLACE. FAILURE TO FOLLOW MAY CAUSE SEVERE INJURY. Locking pin prevents release arm from activating and locks bird baskets from releasing. It is MANDATORY for safe operation to utilize locking pins. Locking pin MUST cross behind release arm mechanism and through both release mounts. CORRECT INCORRECT 4 WARNING! NEVER STRETCH FIRING CORDS TO LOAD POSITION WITH ANY PART OF BODY IN PATH OF BASKET RELEASE. ALWAYS LOAD BOTTOM BASKET FIRST THEN SIDES AND FINALLY TOP. Loading sequence is numerically listed in picture. 2 3 1 WARNING! NEVER STRETCH FIRING CORDS TO LOAD POSITION UNLESS ARM AND LEG LOCKS ARE INSTALLED AND CABLES ARE SECURELY ATTACHED. FAILURE TO FOLLOW MAY CAUSE SEVERE PERSONAL INJURY AND Thunder Equipment Launcher Manual Page 2 MECHANICAL DAMAGE. Top arms are supported by locking pins and cables. Both are MANDATORY for safe and effective operation. WARNING! ALWAYS LOAD OBJECTS INTO POUCHES BEFORE STRETCHING FIRING CORDS. Once firing cords have been stretched / loaded NEVER place any objects or any part of body in or near basket. PARTS DEFINITIONS CABLE ASSEMBLY TOP ARMS BOTTOM ARMS FIRING CORDS MAIN FRAME BOTTOM BASKET LEGS RELEASES CORD CONNECTIONS SETUP WARNING! All bird throwing devices are potentially dangerous. Once loaded they contain extreme force! Proper caution should be observed at all times. Setup and loading procedures should be followed exactly to eliminate potentially dangerous situations. 1. Locate cord connections on bottom of main frame. Facing toward user the winger will throw in the opposite direction. Thunder Equipment Launcher Manual Page 3 2. Fold out bottom arm and slide attachment pin nearest main frame. 3. Attach leg to bottom arm 4. Repeat #2 & # 3 for other leg. Step #2 Step #3 5. Verify winger now looks like picture on right. 6. Fold out top arm and attach cable assembly. WARNING! INSPECT CABLE ASSEMBLY FOR ANY SIGNS OF WEAR. CONTACT THUNDER EQUIPMENT IMMEDIATELY IF ANY QUESTIONS OR CONCERNS. NEVER OPERATE SPIDER WITH DAMGED OR WORN CABLES. Step #6 Step #7 7. Install attachment pin to arm nearest main frame. NOTE: Force may need to be applied to arm in order to align attachment pin. This is normal and should not be adjusted. 8. Repeat Steps # 6 & #7 for other top arm. 9. Verify SPIDER looks like picture on right. CONGRATULATIONS!! Your SPIDER is now setup and ready to be loaded Thunder Equipment Launcher Manual Page 4 LOADING WARNING! NEVER STRETCH RUBBER CORDS TO LOAD POSITION WITHOUT RELEASE LOCKING PIN/S SECURLY IN PLACE. FAILURE TO FOLLOW MAY CAUSE SEVERE INJURY. WARNING! ALWAYS LOAD OBJECTS INTO POUCHES BEFORE STRETCHING FIRING CORDS. 1. If desired, install .209 primer into firing hole and rotate holder into position. WARNING! NEVER LOAD PRIMERS ONCE BASKETS ARE ATTACHED 2. Locate basket locking ring on back of blue pouch. Install ring into release mechanism by sliding over firing arm and depressing arm to lock. 3. Install locking pin. 4. Repeat steps #1 & #2 for other baskets Step #2 Step #3 5. Load objects to be thrown into baskets. Ensure that objects are centered in basket to prevent substandard throws and misfires. 6. Attach electronics to bottom arms using Velcro or bolts (not included). Wires are color coded to match baskets. WARNING! INSPECT AND REPLACE WORN RUBBER TUBING. DAMAGED, FRAYED, OR OLD TUBING PRESENTS A SIGNIFICANT SAFETY RISK. 7. ALWAYS STRETCH FIRING CORDS STARTING WITH ONES CLOSEST TO MAIN FRAME AND WORKING OUT FOR EACH BASKET. Beginning with the bottom basket stretch cords closest to main frame to cord connections on legs following color coding. NOTE THE PICTURE BELOW: Cords must be stretched so that they do not cross the shot area of the basket or another cord. Failure to follow will result in poor throw because cords will entangle. Firing cords must be outside shot path. Note they do not cross front cords. Thunder Equipment Launcher Manual Page 5 8. Load front firing cords on same basket. Connect to color coded hooks 9. Carefully remove firing pin for that basket. WARNING! NEVER PUT ANY PART OF BODY OR STAND IN FRONT OF LOADED BASKET TO REMOVE PIN. ALWAYS REMOVE FIRING PIN FROM BEHIND. ONCE PIN IS REMOVED SYSTEM CAN FIRE CAUSING SEVER INJURY! 10. Repeat Steps #7 through #9 for remaining baskets. WARNING! ALWAYS ENSURE TO REMOVE RED BASKET FIRING PIN LAST. CONGRATULATIONS!! Your SPIDER is now loaded and ready to fire. FIRING The SPIDER throws 4 marks in a cylindrical fall area which closely imitates the normal fall area for thrown birds. This unique application creates a scented area which helps to assist dogs learning to stay and hunt in the area of the fall. The variability in throw height and distance is directly related to the weight and type of object placed in each basket. Some throws are a little higher and some a little longer. From the running line they create a unique and beneficial marking line and scent area. 1. Color coded baskets and wires dictate which baskets can be thrown 2. Although not required it is advisable to throw the right and left baskets first. This can help clear the way for the remaining birds and lessens the probability of anything hitting during launch. SAFETY PRECAUTIONS: 1. NEVER STRETCH RUBBER CORDS TO LOAD POSITION WITHOUT RELEASE LOCKING 2. 3. 4. 5. 6. 7. 8. PINS SECURELY IN PLACE. FAILURE TO FOLLOW MAY CAUSE SEVERE INJURY. NEVER STRETCH RUBBER CORDS TO LOAD POSITION WITH ANY PART OF BODY IN PATH OF BASKET RELEASE. ALWAYS LOAD BOTTOM BASKET FIRST THEN SIDES AND FINALLY TOP. ALWAYS LOAD OBJECTS INTO POUCHES BEFORE STRETCHING FIRING CORDS. SETUP AND LOADING PROCEDURES SHOULD BE FOLLOWED EXACTLY TO ELIMINATE PORENTIALLY DANGEROUS SITUATIONS. INSPECT CABLE ASSEMBLY FOR ANY SIGNS OF WEAR. CONTACT THUNDER EQUIPMENT IMMEDIATELY IF ANY QUESTIONS OR CONCERNS. NEVER OPERATE SPIDER WITH DAMGED OR WORN CABLES. INSPECT AND REPLACE WORN RUBBER TUBING. DAMAGED, FRAYED, OR OLD TUBING PRESENTS A SIGNIFICANT SAFETY RISK. NEVER STRETCH RUBBER CORDS TO LOAD POSITION WITHOUT RELEASE LOCKING PIN/S SECURLY IN PLACE. FAILURE TO FOLLOW MAY CAUSE SEVERE INJURY. ALWAYS LOAD OBJECTS INTO POUCHES BEFORE STRETCHING FIRING CORDS. Thunder Equipment Launcher Manual Page 6 9. NEVER LOAD PRIMERS ONCE BASKETS ARE ATTACHED 10. NEVER PUT ANY PART OF BODY OR STAND IN FRONT OF LOADED BASKET TO REMOVE PIN. ALWAYS REMOVE FIRING PIN FROM BEHIND. ONCE PIN IS REMOVED SYSTEM CAN FIRE CAUSING SEVER INJURY! 11. ALWAYS ENSURE TO REMOVE RED BASKET FIRING PIN LAST. 12. INDIVIDUALS AGED 18 YEARS AND OLDER SHOULD ONLY OPERATE THIS PRODUCT. WARNING! Failure to comply with applicable safety precautions could cause property damage, injury or death. Thunder Equipment accepts no liability for personal injury, property damage, or death sustained while handling same or damage caused during the operation or transportation of this machine. FACTORY WARRANTY: Registration and/or proof of purchase (sales receipt) are required for warranty claims. Your Thunder Equipment SPIDER is covered by a Six (6) month Limited Warranty on parts and labor. The warranty does not cover physical abuse or damage and is limited to original purchaser (not transferable). The warranty does not cover external component damage and is VOID if the SPIDER has been tampered with in any way or unauthorized service work has been performed. The limited warranty does not cover return shipping costs. WARRANTY REGISTRATION: Warranty can be registered online and is essential to tracking warranty claims and extended warranty SERVICE SUPPORT In the event that your Thunder Equipment product requires service, call and inform us that you wish to return your item for repair. Warranty repairs require proof of original purchase receipt. Completion of the online repair form will expedite repairs. Visit our website at www.thunderequipment.com for details on return address. On the outside of the box, in large legible lettering, write “RETURN FOR REPAIR”. We recommend UPS Ground Service for return shipping. Thunder Equipment Launcher Manual Page 7