1
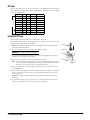
HPL lamps
Euro.
American
Use the HPL lamp only in Source Four and Source Four PAR fixtures manufactured
and sold by Electronic Theatre Controls, Inc. Do not use lamps other than the HPL in
Source Four PAR fixtures.
Lamp code
Watts Volts
Color temp Ave rated life
HPL 375/115
375
115
3,250ºK
HPL 375/115X
375
115
3,050ºK
1,000 hour
HPL 550/77
550
77
3,250ºK
300 hour
300 hour
HPL 550/77X
550
77
3,050ºK
2,000 hour
HPL 575/115
575
115
3,250ºK
300 hour
HPL 575/115X
575
115
3,050ºK
2,000 hour
HPL 575/120
575
120
3,250ºK
300 hour
HPL 575/230
575
230
3,200ºK
400 hour
HPL 575/240
575
240
3,200ºK
400 hour
Installing the HPL lamp
Always replace the lamp if it becomes damaged or deformed.
Verify that the HPL lamp you use is suitable for the voltage at your facility. 115, 120,
230, and 240 volt HPL lamps are available.
Caution! Operating lamps above their rated voltage reduces lamp life and can
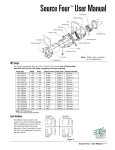
HPL lamp
cause premature lamp failure.
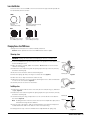
1. Disconnect the unit from power before installing the lamp.
Lamp brackets
WARNING! Let lamp cool before changing.
2. Loosen the knurled bolt on the back of the lamp housing and pull the housing
straight out from the back of the fixture.
3. Remove the HPL lamp from its box, holding it by the base.
Note: To avoid premature lamp failure, do not touch the lamp glass with your fin-
gers. If you touch the lamp during installation, clean it carefully with rubbing alcohol and a clean, lint-free cloth before operation.
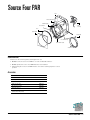
4. Line up the flat sides of the lamp base with the brackets on either side of the
socket (Figure 1).
5. Push down on the lamp base until the lamp is firmly seated. Make sure that the
lamp is fully seated, with the bottom of the lamp heat sink flush to the lamp
housing casting.
Caution! Improperly installed lamps cause premature lamp failure and socket
problems.
6. To reinstall the lamp housing, center it on the reflector and the bolt hole, then
tighten the knurled bolt to secure the lamp housing in place.
2 • Source Four PAR
Knurled bolt
Lamp housing
Figure 1