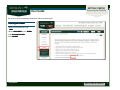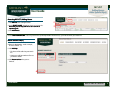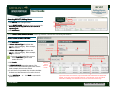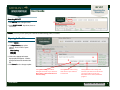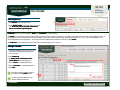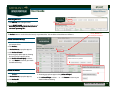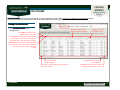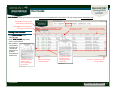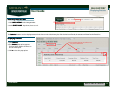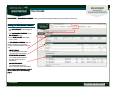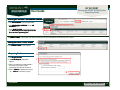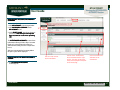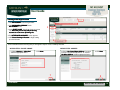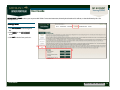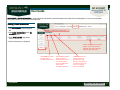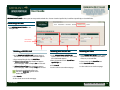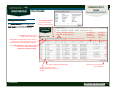
1
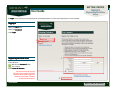
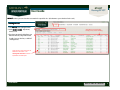
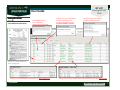
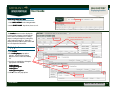
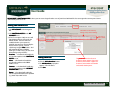
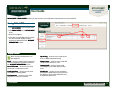
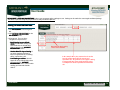
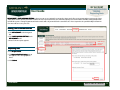
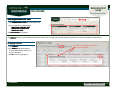
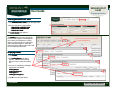
TABLE OF
CONTENTS
User Guide
The Keeneland Portfolio is the perfect tool to help our sales
customers maximize all of the valuable information available
about horses sold and cataloged at Keeneland. In addition, this
tool allows sales clients the freedom to make updates to their
contact information and much more, including:
• Manage and update your personal account information
• Assign roles for your team based on individual user accounts
• Research tool to review historical sales information
GETTING STARTED
Accessing the Portfolio
Logging In
Registering for Online Access
2
3
3
MY LIST
Viewing MY LIST
Viewing MY LIST Links
Adding Horses
Add a Specific Hip(s)
Select Using Search Criteria
Exporting the Watch List
Adding a Comment
Delete Selected Horses
Delete All Horses
6
7
8
9
10
10
CATALOG UPDATES
Viewing CATALOG UPDATES
11
SALES HISTORY
Viewing SALES HISTORY
Displaying Statistics
Displaying Leaders
12
13
14
Ver20140905
4
5
• Ability to create a "short list" of horses for each sale
• Establish alerts for horses on your "short list"
• Ability to research if horses on your "short list" have sold in
any previous Keeneland sale
• Access to current and historical account and sale information
This User Guide explains each screen within the portfolio, and
provides step-by-step instructions for its use. Click on any topic
below to jump to that page.
MY ACCOUNT
DASHBOARD SUMMARY
Viewing DASHBOARD SUMMARY
Viewing CREDIT STATUS Section
Requesting Credit
Viewing ACTIVE BUYER ACCOUNTS Section
Creating a New Buyer Account
Viewing PURCHASED HORSES Section
ACCOUNT INFORMATION
Viewing ACCOUNT INFORMATION
PORTFOLIO ACCESS
Viewing PORTFOLIO ACCESS
Adding a New User
EMAIL ALERTS
Viewing EMAIL ALERTS
CATALOG SUBSCRIPTIONS
Viewing CATALOG SUBSCRIPTIONS
PAVILION SEATING
Viewing PAVILION SEATING
Requesting Seats
FORMS
Viewing FORMS
CLAIM TO PROCEEDS
Viewing CLAIM TO PROCEEDS
15
16
16
17
18
20
RESEARCH PAST SALES
Researching Past Sales
Searching a Specific Sale
Searching for a Specific Hip
Searching All Sales
Viewing Search Results
Displaying Statistics
Displaying Leaders
28
28
28
28
29
30
31
21
22
22
23
24
25
25
26
27
Back to TABLE OF CONTENTS
1
GETTING STARTED
User Guide
Accessing the Portfolio
You can access the Keeneland Buyers Portfolio from the Keeneland website.
Accessing the Portfolio
1
1. On the Keeneland website, click
SALES.
SALES
2. On the SALES MENU,
MENU click on BUYERS.
BUYERS
3. Click Keeneland Portfolio.
4. Click GO HERE.
2
3
4
Ver20140905
Back to TABLE OF CONTENTS
2
GETTING STARTED
User Guide
Logging In
Registering for Online
Access
The Login screen is where you can log in if you are a returning customer, or create a new login if you are a new customer.
Logging In
1. Enter your User name.
2. Enter your Password.
Password
3. Click Login.
Login
2
3
1
1
Registering for Online Access
1. Fill in all boxes.
Note that the Password will be
case sensitive.
2. Click Create An Account.
Account
The Password must be at least 6
characters, must contain 1 lowercase
character, must contain 1 uppercase
character, must contain 1 number,
and cannot contain spaces.
Ver20140905
2
Back to TABLE OF CONTENTS
3
MY LIST
User Guide
Viewing MY LIST
MY LIST is where you can select horses to watch for a specified sale. (Also known as your “short list” for the sale.)
Viewing MY LIST
1. Click MY LIST on the Navigation Bar.
2. In the SELECT A SALE drop-down,
choose a sale.
3. If you have previously added horses to
watch for this sale, they will be listed.
1
2
Information can be sorted by
clicking on any column heading.
3
To add a horse to the list, see MY LIST
/ Adding Horses.
Green items on this list are links to
additional information. See
Viewing MY LIST Links for further
explanation and examples.
Ver20140905
Back to TABLE OF CONTENTS
4
MY LIST
User Guide
Viewing MY LIST Links
MY LIST has several links to
view additional information.
Clicking View in the Vet
column displays any
Veterinarian Announcements.
Viewing MY LIST
Links
Clicking an item in the Grade column
displays a comment you have
previously entered for this horse.
See MY LIST /Adding a Comment .
Clicking a Consignor will display the
consignor’s contact information.
Clicking a Hip number displays the
horse’s catalog page.
Clicking a Sire name will display all horses by this sire in the selected sale.
Ver20140905
Clicking a Dam name will display all horses sold by Keeneland by this dam across all sales.
Back to TABLE OF CONTENTS
5
MY LIST
User Guide
Adding Horses
Add a Specific Hip(s)
1
Accessing MY LIST / Adding Horses
1. Click MY LIST on the Navigation Bar.
2
2. In the SELECT A SALE drop-down, choose a current sale.
Note that you can only add horses to a current or
upcoming sale.
3
3. Click Add Horses.
Horses
Use the ADD A SPECIFIC HIP section if you know the specific Hip Number of the horse(s) you want to add to your watch list.
ADD A SPECIFIC HIP(S)
4. Enter the Hip Number. In this example,
we have entered “14”.
5. Click Add Hip.
Hip
• The horse will be added to your watch
list.
• Continue to add hip numbers of horses
you want to watch.
4
5
6. Click Return to List when you are
finished.
6
Ver20140905
Back to TABLE OF CONTENTS
6
MY LIST
User Guide
Adding Horses
Select Using Search
Criteria
1
Accessing MY LIST / Adding Horses
1. Click MY LIST on the Navigation Bar.
2
2. In the SELECT A SALE drop-down, choose a current sale.
Note that you can only add horses to a current or
upcoming sale.
sale .
3
3. Click Add Horses.
Horses
Use the SELECT USING SEARCH CRITERIA section if you want to search for horses to add to your watch list.
SELECT USING SEARCH CRITERIA
4. Click Add Filter.
Filter
5. A Please Select or Type drop-down box
appears. Select a category. In this example,
Sex was selected.
6. A Please Select or Type drop-down box
appears. Select a category. In this example,
Filly was selected.
Click here to
remove filter.
8
If you wish to add another filter, you can
choose Add Filter again to create
another filter line.
7. Click Search.
8. A SEARCH RESULTS pop-up box appears. This
contains a list of horses that met your search criteria.
In this example, 58 horses were found.
10
Click this
box to
select all
horses.
4
5
6
7
11
Information can be sorted by
clicking on any column heading.
9
9. To add a horse to your watch list, select the checkbox
for that horse. More that one horse can be selected.
10. Click Add To List – or– click Back to return to the
previous screen.
Ver20140905
If you want to filter this list further, type in the blank boxes underneath the appropriate
heading. As you type, the list will begin filtering. In this example, “song” was entered
under the Sire heading which filtered the list for sire names that include “song” .
Back to TABLE OF CONTENTS
7
MY LIST
User Guide
Exporting the
Watch List
1
Accessing MY LIST
2
1. Click MY LIST on the Navigation Bar.
2. In the SELECT A SALE drop-down, choose a
current sale.
EXPORT... is where you can export your watch list to a Mini-Catalog, a PDF, or a CSV file.
Exporting the Watch List
3. Click on Export...
4. The Export Horses pop-up box
appears. There are three export
choices:
MiniMini- Catalog
PDF (All)
CSV (All)
3
4
5. Click on the appropriate button.
6
A pop-up box will appear. Click the
appropriate button to download the
file.
5
6. Click Cancel to close the pop-up box.
Clicking Mini-Catalog will create a
catalog of the horses on your watch list.
Note: There is a limit of 425 horses for
this mini-catalog.
Ver20140905
Clicking PDF will create a listing
of all horses on your watch list
in PDF format.
Clicking CSV will create a listing of all
horses on your watch list in CSV format.
This may be useful to import into
Microsoft® Excel or other spreadsheet
programs.
.
Back to TABLE OF CONTENTS
8
MY LIST
User Guide
Adding a
Comment
1
Accessing MY LIST
2
1. Click MY LIST on the Navigation Bar.
2. In the SELECT A SALE drop-down, choose a current
sale. Note that you can only add comments to
horses in a current or upcoming sale.
sale .
Comments is where you can add both a Grade and a Comment to a selected horse.
The Grade is any text value (up to 5 characters) that you want to assign to the horse selected. For example, you might want to use A, B, or C to grade the horse as A
being the horses you are most interested in and C being the horses you are the least interested. Or you may want to use 1, 2, 3, etc. or Best, Good, Maybe. This
Grade designation is entirely up to you. The Grade you enter will appear in the watch list under the heading Grade.
Grade
The Comment is a free text field where you may enter a comment for the horse selected.
Adding a Comment
3. Select the checkbox next to one horse. (You
cannot add a comment to more than one
horse at a time.)
4. Click Comments.
Comments
4
5. An Update Grade and Comments For
Selected Horse pop-up box appears.
6. Enter a Grade (see explanation above).
6
7. Enter a Comment (see explanation above).
8. Click Save.
Save
To view an existing comment, click on
the link listed in the Grade column.
5
3
7
8
To edit a comment, follow the same
steps for Adding a Comment.
Ver20140905
Back to TABLE OF CONTENTS
9
MY LIST
User Guide
Delete Selected Horses
Delete All Horses
1
Accessing MY LIST
2
1. Click MY LIST on the Navigation Bar.
2. In the SELECT A SALE drop-down, choose a sale.
Note that you can only delete horses from a
current or upcoming sale.
Clicking Refresh will
refresh your watch list.
The Delete button is used to delete the horse(s) in your watch list. You can delete selected horses or all horses.
Delete Selected Horse(s)
3. Check the checkbox next to the horse(s)
you want to delete.
4. Click Delete...
4
5. A Delete Horses pop-up box appears..
6. Click Delete Selected.
Selected
5
7. A warning pop-up box appears showing
the horses you are about to delete.
8. Click Delete Selected Hip(s) to delete –
or– click Return to return to your watch
list without deleting.
3
6
7
Delete All Horses
4. Click Delete...
5. A Delete Horses pop-up box appears..
6. Click Delete All.
All
Ver20140905
7. A warning pop-up box appears asking Delete All Hips?
8
8. Click Delete All Hips to delete – or– click Return to return to your
watch list without deleting.
Back to TABLE OF CONTENTS
10
CATALOG
UPDATES
User Guide
Viewing Catalog
Updates
CATALOG UPDATES is where you can view updates for new racing activity since the catalog only for horses that are on your watch list. Updates
include races for the horse entered in the sale and races of foals with the same first or second dam.
Viewing CATALOG UPDATES
1
1. Click CATALOG UPDATES on the
Navigation Bar.
Information can be sorted by
clicking on any column heading.
Entering text in a white
box will filter the list.
Clicking PDF will create a listing of
catalog updates in PDF format.
Clicking CSV will create a listing of catalog updates
in CSV format. This may be useful to import into
Microsoft® Excel or other spreadsheet programs.
The Refresh button will refresh the Catalog Updates
listed. Any filtering or sorting will be removed and
the list will return to it’s original order by Hip
number.
Use these to navigate
through the pages.
Click the Hip number to view pedigree of the horse
with this hip number.
Ver20140905
Use these to control number of
records displayed.
Click View to view an Equineline report of all
catalog updates for the hip number horse.
Back to TABLE OF CONTENTS
11
SALES HISTORY
User Guide
Viewing SALES
HISTORY
SALES HISTORY is where you view the sales history for horses on your watch list for a selected sale. This sales history is for Keeneland sales only.
Clicking CSV will create a listing
of sales history in CSV format.
1
Clicking PDF will create a listing of
sales history in PDF format.
Viewing SALES HISTORY
1. Click SALES HISTORY on the
Navigation Bar.
2
Entering text in a white
box will filter the list.
Information can be sorted by
clicking on any column heading.
3
2. In the SELECT A SALE drop-down,
choose a sale. be listed.
3. Horses that are
on your watch
list for the sale
selected and
have been in a
previous
Keeneland sale
will be listed.
Click the Current Hip
number to view
current catalog page
for this horse.
Ver20140905
Use these to navigate
through the pages.
Click the Hip number
to view the horse’s
catalog page for this
previous sale.
Use these to control number of
records displayed.
Back to TABLE OF CONTENTS
12
SALES HISTORY
User Guide
Displaying Statistics
1
Accessing SALES HISTORY
2
1. Click SALES HISTORY on the Navigation Bar.
2. In the SELECT A SALE drop-down, choose a sale.
The Statistics button is used to display statistics for the horses in the Sales History list. If the list has been filtered, the statistics will show for the filtered list.
Displaying Statistics
3. Click Statistics.
Statistics
3
4. The Statistics pop-up box appears.
This box shows statistics for horses in
the Sales History list.
5. Click x to close this pop-up box.
Ver20140905
4
If the list has been filtered, the statistics are
only for the filtered list.
5
Back to TABLE OF CONTENTS
13
SALES HISTORY
User Guide
Displaying Leaders
1
Accessing SALES HISTORY
2
1. Click SALES HISTORY on the Navigation Bar.
2. In the SELECT A SALE drop-down, choose a sale.
The Leaders button is used to display the
leaders in four categories based upon the
horses in this Sales History list: Leading
Buyers, Leading Consignors, Leading Sires,
and Leading Covering Sires. If the Sales
History list has been filtered, the leaders will
be based upon the filtered list.
Displaying Leaders
3
If the list has been filtered, the leaders are
only for the filtered list.
4
5
6
3. Click Leaders
4. The Leading Buyers pop-up box
appears. This box shows Leading
Buyers for horses in the Sales History
list.
6
5
5. Four lists are available by clicking the
appropriate radio button:
Leading Buyers
Leading Consignors
Leading Sires
Leading Covering Sires
6. Click x to close this pop-up box.
Ver20140905
6
5
5 to control number of
Use these
records displayed.
6
Back to TABLE OF CONTENTS
14
MY ACCOUNT
User Guide
Viewing the
DASHBOARD SUMMARY
MY ACCOUNT–
ACCOUNT – DASHBOARD SUMMARY is where you will find summary activity for your account for a specific sale.
1
Viewing the DASHBOARD SUMMARY
1. Click MY ACCOUNT on the Navigation
Bar.
2. Click DASHBOARD SUMMARY on the
MY ACCOUNT menu.
3. In the SELECT A SALE drop-down,
choose a sale.
3
2
The DASHBOARD SUMMARY appears
for the selected sale. It has three
sections associated with the selected
sale:
• CREDIT STATUS
See Viewing the Credit Status
Section for more information.
• ACTIVE BUYER ACCOUNTS
See Viewing the Active Buyer
Accounts Section for more
information.
• PURCHASED HORSES
See Viewing the Purchased
Horses Section for more information.
More detailed information for each of
these sections are in the following
pages.
Ver20140905
Back to TABLE OF CONTENTS
15
MY ACCOUNT
User Guide
Viewing the CREDIT STATUS Section
Requesting Credit
Accessing MY ACCOUNT / DASHBOARD SUMMARY
1
1. Click MY ACCOUNT on the Navigation Bar.
3
2. Click DASHBOARD SUMMARY on the MY
ACCOUNT menu.
2
3. In the SELECT A SALE drop-down, choose a
sale. Note that you can only request credit
for a current or upcoming sale.
sale .
4
The CREDIT STATUS section shows information about your current credit with Keeneland for the sale selected.
Viewing the CREDIT STATUS Section
4
4. The CREDIT STATUS section appears.
5
Requesting Credit
5. Click Request Credit.
6. The Credit Request pop-up box
appears.
6
7
7. Choose an option. Based upon what is
chosen here, you may see more
questions that need to be answered.
8. Choose Submit to submit your request
- or – Cancel to cancel the request.
Ver20140905
8
Back to TABLE OF CONTENTS
16
MY ACCOUNT
User Guide
Viewing the ACTIVE BUYER
ACCOUNTS Section
1
Accessing MY ACCOUNT/DASHBOARD
SUMMARY
3
1. Click MY ACCOUNT on the Navigation Bar.
2. Click DASHBOARD SUMMARY on the
MY ACCOUNT menu.
3. In the SELECT A SALE drop-down, choose a
current sale. Note that you can only add
buyer accounts to a current or upcoming
sale.
2
4
The ACTIVE BUYER ACCOUNTS section shows
information about your active buyer accounts
for the sale selected. Buyer Accounts are
different names that you can use to purchase
horses.
All buyer accounts with sales activity within
the past 3 years will be displayed.
Viewing the ACTIVE BUYER ACCOUNTS
Section
4. The ACTIVE BUYER ACCOUNTS
section appears.
Ver20140905
Click on a buyer account
name to edit details.
Click this link to view summary
names associated with the buyer
account. Summary names are the
entity names displayed to the public
on the results page.
Click on this link to view
statement for the
selected sale.
Back to TABLE OF CONTENTS
17
MY ACCOUNT
User Guide
Creating a New Buyer
Account
Page 1 of 2
1
Creating a New Buyer Account
1. Click MY ACCOUNT on the Navigation Bar.
3
2. Click DASHBOARD SUMMARY on the
MY ACCOUNT menu.
3. In the SELECT A SALE drop-down, choose a current
sale. Note that you can only add purchasing
accounts to a current or upcoming sale.
sale .
2
4
4. The ACTIVE BUYER ACCOUNTS section appears.
5. Click Create New Buyer Account to begin setting
up a new account.
5
The Account Wizard starts and will guide you through the steps to create a new Buyer Account.
WIZARD STEP1: CHOOSE A NAME
6. Choose Business or Individual
and fill in appropriate boxes.
WIZARD STEP2: ADDRESS
8. Choose Use Central Name Address if you wish
to use the account default address - or - Choose
Use Other Address and fill in appropriate boxes.
7. Click Next.
Next
6
8
7
Ver20140905
9. Click Next.
Next
9
Back to TABLE OF CONTENTS
18
MY ACCOUNT
User Guide
Creating a New Buyer
Account
Page 2 of 2
WIZARD STEP4: EMAIL
WIZARD STEP3: PHONE
10. Click Add a Phone.
Phone Choose
Phone Type from drop-down box
and fill in appropriate boxes.
11. Click Continue.
Continue Repeat
to add more phone
numbers if desired.
12. Click
Next.
Next
10
13. Click Add an Email.
Email Choose
E- mail Type from drop-down box
and fill in appropriate boxes.
14. Click Continue.
Continue
Repeat to add more
emails if desired.
15. Click
Next.
Next
13
6
14
11
12
WIZARD STEP5: AGENTS
16. Click Add an Agent. In the Select
Agent drop-down, either select an existing
agent or New Agent to enter a new agent
name. Fill in appropriate boxes.
15
WIZARD STEP6: SUMMARY NAMES
17. Click Add.
Add
Repeat to add
more agents if
desired.
18. Click
Next.
Next
19. If you wish to add a
Summary Name, click Add a
Summary Name.
Name Fill in the
name field.
20. Click
Add.
Add
21. Click
Save.
Save
Click OK.
OK
You are
finished!
16
20
17
Ver20140905
18
19
21
Back to TABLE OF CONTENTS
19
MY ACCOUNT
User Guide
Viewing the PURCHASED
HORSES Section
Accessing MY ACCOUNT/DASHBOARD
SUMMARY
1
3
1. Click MY ACCOUNT on the Navigation Bar.
2. Click DASHBOARD SUMMARY on the
MY ACCOUNT menu.
2
3. In the SELECT A SALE drop-down, choose a
current sale..
The PURCHASED HORSES section shows
horses that were purchased during the sale
selected.
Information can be sorted by
clicking on any column heading.
Viewing PURCHASED HORSES
4
4. The PURCHASED HORSES section
appears.
Click on a hip number to
view the pedigree.
Clicking PDF will create a listing Clicking CSV will create a listing of purchased horses
of purchased horses in PDF
in CSV format. This may be useful to import into
format.
Microsoft® Excel or other spreadsheet programs..
Ver20140905
Back to TABLE OF CONTENTS
20
MY ACCOUNT
User Guide
Viewing ACCOUNT
INFORMATION
MY ACCOUNT–
ACCOUNT –ACCOUNT INFORMATION is where you will find your Central Account Information. Your Central Account is the primary account associated
with all of your buyer accounts.
1
Viewing ACCOUNT INFORMATION
1. Click MY ACCOUNT on the Navigation
Bar.
2. Click ACCOUNT INFORMATION on the
MY ACCOUNT menu.
Your CENTRAL ACCOUNT INFORMATION
appears. It has three sections:
• The MAILING ADDRESS section shows
mailing addresses associated with your
central account. The default address is
designated by the selected radio button.
This default address will be use for
statements. Mailing addresses will be
used when you complete your catalog
subscription.
2
Click here to edit or
delete an address.
Click here to add a new address.
Click here to add a new phone number.
Click here to edit or
delete phone numbers.
Click here to add a new email address.
Click here to edit or
delete an email
address.
• The PHONE NUMBERS section shows
phone numbers associated with your
central account. The default phone
number is designated by the selected
radio button.
• The EMAIL section shows email
addresses associated with your central
account. The default email address is
designated by the selected radio button.
Email addresses will be used when you
specify email alerts to be sent.
Ver20140905
Back to TABLE OF CONTENTS
21
MY ACCOUNT
User Guide
Viewing Portfolio Access
Adding a New User
MY ACCOUNT–
ACCOUNT –PORTFOLIO ACCESS is where you can create a login for other users of your Keeneland Portfolio. You can assign who can view your account
and what they have access to.
1
Viewing PORTFOLIO ACCESS
1. Click MY ACCOUNT on the Navigation
Bar.
Information can be sorted by
clicking on any column heading.
2. Click PORTFOLIO ACCESS on the MY
ACCOUNT menu.
3. A list of users appear. Only one user will
have Admin privileges, denoted in the
Admin column. This user name was
established when you requested a
portfolio account or was assigned by the
Keeneland sales system. You can
edit/change using the Edit button. And
will automatically have all Admin
privileges. For other users, you can select
what privileges they will have:
Accounts – a checkmark will enable the
user to make updates on the PORTFOLIO
ACCESS screen.
Alerts – a checkmark will enable the
user to make updates on the EMAIL
ALERTS screen.
Contacts – a checkmark will enable the
user to make updates on the ACCOUNT
INFORMATION screen.
3
2
4
Click here to
edit or delete
a user.
5
6
Adding a New User
4. Click the Add a New User button.
5. The Add New User pop-up box
appears. Fill in the boxes.
The password must be at least 6
characters, must contain 1 lowercase
character, must contain 1 uppercase
character, must contain one number
and cannot contain spaces.
6. Click Save.
Save
Export – a checkmark will enable the
user to export information in the portfolio
(e.g. watch list) to PDF or CSV.
Ver20140905
Back to TABLE OF CONTENTS
22
MY ACCOUNT
User Guide
Viewing EMAIL
ALERTS
MY ACCOUNT–
ACCOUNT –EMAIL ALERTS is where you can select to receive notifications related to horses on your watch list.
1
Viewing EMAIL ALERTS
1. Click MY ACCOUNT on the Navigation Bar.
4
2. Click EMAIL ALERTS on the MY ACCOUNT
menu.
3
3. A list of users appear.
4. Select the corresponding alerts for each of
the email accounts displayed. Email
accounts are maintained in the ACCOUNT
INFORMATION section.
2
Display Columns
Alerts are only relevant to horses on
your watch list
Email–
Email the user’s email accounts associated
with the central name (previously added on
the ACCOUNT INFORMATION screen)
Horse Taken Out–
Out check to receive email
when a horse is taken out of a sale
Catalog Updates–
Updates check to receive email
when there is a catalog update
Vet Comments–
Comments check to receive email
when there is a new vet comment
Ver20140905
Hip In Ring–
Ring check to receive email when a
horse is 10 hips away from the ring
Hammer Price–
Price check to receive email with
sale price when the horse is sold
Summary Info–
Info check to receive email
identifying the person who purchased the
horse
Van Release–
Release check to receive email when
paperwork is completed to release your horse
for shipping. This is only pertinent to horses
that you have purchased.
Back to TABLE OF CONTENTS
23
MY ACCOUNT
User Guide
Viewing CATALOG
SUBSCRIPTIONS
MY ACCOUNT–
ACCOUNT –CATALOG SUBSCRIPTIONS is where you can manage where catalogs are sent. Catalogs can be emailed or sent using the traditional postage.
You will be required to designate your preferences each year after the April sale.
1
Viewing CATALOG SUBSCRIPTIONS
1. Click MY ACCOUNT on the Navigation
Bar.
2. Click CATALOG SUBSCRIPTIONS on the
MY ACCOUNT menu.
3
3. A list appears. There are three
categories to set preferences:
• Email Catalog (to your default
email):
email) choose which catalogs you
want emailed to the default email
address entered in the ACCOUNT
INFORMATION section.
• I Do Not Want The Paper Catalog:
Catalog If
you don’t anticipate purchasing
horses at a particular sale, no catalog
will be sent for those sales.
• Send Catalog to address : this will
appear for every mailing address that
was entered in the ACCOUNT
INFORMATION section. Choose which
catalogs you want mailed to this
address.
Ver20140905
2
Note: Only the April catalog
can be sent to a PO Box.
In the example above, the customer has selected to
have the catalog emailed for the January and
September sale. They will not receive a paper catalog
in January and April. Paper catalogs will be sent to
1732 Maple Lane for the September and November
sale.
Back to TABLE OF CONTENTS
24
MY ACCOUNT
User Guide
Viewing SALES PAVILION
SEATING
Requesting Seats
MY ACCOUNT–
ACCOUNT –SALES PAVILION SEATING is where you can reserve seating for a current sale. Buyers and sellers receive priority when reserving seats. Every
effort will be made to provide you with the number of seats requested, however, the demand frequently exceeds the number available, making it impossible
to fulfill all requests. Seating assignments will not be made until a day or two before the start of the sale. Please stop in the sales pavilion lobby to determine
if we were able to reserve your seats.
1
Viewing SALES PAVILION SEATING
1. Click MY ACCOUNT on the Navigation
Bar.
2. Click SALES PAVILION SEATING on the
MY ACCOUNT menu.
3. A list of current requests appears.
Requesting Seats
3
4
2
Click here to
remove a
request.
5
Seats.
4. Click Request Seats
5. The Request Pavilion Seating pop-up
box appears. Fill in the appropriate
boxes.
6. Click Submit.
Submit
6
Ver20140905
Back to TABLE OF CONTENTS
25
MY ACCOUNT
User Guide
Viewing FORMS
MY ACCOUNT–
ACCOUNT –FORMS is where you can print a PDF of Wire Transaction Instructions, Kentucky Residents Resale Certificate, or Standard Kentucky Sales Tax
Exemption Form.
1
Viewing FORMS
1. Click MY ACCOUNT on the Navigation
Bar.
2. Click FORMS on the MY ACCOUNT
menu.
3. Click PDF for the the form you desire.
2
3
Ver20140905
Back to TABLE OF CONTENTS
26
MY ACCOUNT
User Guide
Viewing CLAIM TO
PROCEEDS
MY ACCOUNT–
ACCOUNT –CLAIM TO PROCEEDS is used to administer liens that have been filed with the Keeneland Sales Accounting offices. Liens are associated with
horses where monies are due to your Central Account.
1
Viewing CLAIM TO PROCEEDS
1. Click MY ACCOUNT on the Navigation
Bar.
3
2. Click CLAIM TO PROCEEDS on the MY
ACCOUNT menu.
4
3. In the SELECT A SALE drop-down,
choose a current sale..
4. A list of claims to proceeds appears.
All liens associated with a horse will
display. If more than one line is
displayed, other parties have also
filed a lien against the horse.
2
Clicking PDF will create a
listing of claims to
proceeds in PDF format.
Ver20140905
Clicking CSV will create a
listing of claims to
proceeds in CSV format.
This may be useful to
import into Microsoft®
Excel or other
spreadsheet programs.
The Refresh button will
refresh the claims to
proceeds listed. Any
filtering or sorting will be
removed and the list will
return to it’s original
order by hip number.
Back to TABLE OF CONTENTS
27
RESEARCH PAST SALES
User Guide
Searching a SPECIFIC SALE
Searching for a SPECIFIC HIP
Searching ALL SALES
RESEARCH PAST SALES is where you can view past Keeneland sales. You can Search a Specific Sale, Search for a Specific Hip, or Search All Sales.
Researching Past Sales
1
1. Click RESEARCH PAST SALES on the
Navigation Bar.
2
Click here to
remove filter.
3
6
2
2
4
Searching a SPECIFIC SALE
2. In the SEARCH A SPECIFIC SALE section, choose a
current sale.. The number of records found appears.
3. If you want to filter the list, click Add Filter.
Filter
4. A Please Select or Type drop-down box appears.
Select a category. In this example, Sex was selected.
5. A Please Select or Type drop-down box appears.
Select a category. In this example, Filly was selected.
5
4
3
Searching for a SPECIFIC HIP
4
3
Searching ALL SALES
2. In the SEARCH FOR A SPECIFIC HIP
section, choose a current sale.. The number
of records found appears.
2. In the SEARCH ALL SALES section, choose
if you want to search by the horse Name,
Dam, Sire, or Second Dam.
3. Enter a hip number in the Search for a
specific hip box.
3. Enter a name in the Search for box.
4. Click Search.
Search.
See the results screen on the next page.
4. Click Search All Sales.
See the results screen on the next page.
If you wish to add another filter, you
can choose Add Filter again to create
another filter line.
6. Click Search.
Search.
See the results screen on the next page.
Ver20140905
Back to TABLE OF CONTENTS
28
RESEARCH PAST
SALES
User Guide
Viewing SEARCH RESULTS
The SEARCH RESULTS screen is where you
view the horses selected on the RESEARCH
PAST SALES screen (see previous page).
Clicking PDF will create a listing of
search results in PDF format.
Viewing SEARCH RESULTS
Clicking See More/Less will
allow you to choose the
columns you wish to view.
Statistics and Leaders buttons are
explained in the following pages.
Jumps back to previous screen.
Clicking CSV will create a listing of search results in
CSV format. This may be useful to import into
Microsoft® Excel or other spreadsheet programs.
Information can
be sorted by
clicking on any
column heading.
Entering text
in a white
box will filter
the list.
Clicking Mini-Catalog will create a catalog of the
search results. Note: There is a limit
of 425 horses for this mini-catalog.
Use these to navigate through the pages.
Click the hip number to view
pedigree of the horse with this hip
number.
Ver20140905
Use these to control number of
records displayed.
Back to TABLE OF CONTENTS
29
RESEARCH PAST
SALES
User Guide
Displaying Statistics
1
Accessing RESEARCH PAST SALES
1. Click RESEARCH PAST SALES on the Navigation Bar.
2. Use one of the three search methods:
• SEARCH FOR A SPECIFIC SALE
• SEARCH FOR A SPECIFIC HIP
• SEARCH ALL SALES
The Search Results page appears.
2
The Statistics button is used to display statistics for the horses in the Search Results list. If the list has been filtered, the statistics will show for the filtered list.
Displaying Statistics
3
3. Click Statistics.
Statistics
If the list has been filtered, the statistics are
only for the filtered list.
4. The Statistics pop-up box appears.
This box shows statistics for horses in
the Sales History list.
5. Click x to close this pop-up box.
Ver20140905
4
5
Back to TABLE OF CONTENTS
30
RESEARCH PAST
SALES
User Guide
Displaying Leaders
1
Accessing RESEARCH PAST SALES
1. Click RESEARCH PAST SALES on the Navigation Bar.
2. Use one of the three search methods:
• SEARCH FOR A SPECIFIC SALE
• SEARCH FOR A SPECIFIC HIP
• SEARCH ALL SALES
2
The Search Results page appears.
The Leaders button is used to display the
leaders in four categories based upon the
horses in this Sales History list: Leading
Buyers, Leading Consignors, Leading Sires,
and Leading Covering Sires. If the Sales
History list has been filtered, the leaders will
be based upon the filtered list.
Displaying Leaders
3. Click Leaders.
4. The Leading Buyers pop-up box
appears. This box shows Leading
Buyers for horses in the Sales History
list.
3
If the list has been filtered, the leaders are
only for the filtered list.
6
4
5
6
5
6
5
5. Four lists are available by clicking the
appropriate radio button:
Leading Buyers
Leading Consignors
Leading Sires
Leading Covering Sires
5
6
6. Click x to close this pop-up box.
Ver20140905
Back to TABLE OF CONTENTS
31