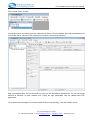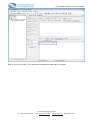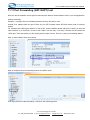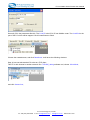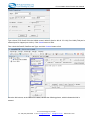
1
E-Lins H685m Series Router User Manual H685m Series Router User Manual E-Lins Technology Co., Ltd ADDRESS: 1007A, MinTai Bld., Minkang Road, Minzhi Street, Bao'an District, ShenZhen, 518000, China PHONE: +86 (755) 33231620 WEB: http://www.szelins.com E‐Lins Technology Co.,Limited Tel: +86 (755) 33231620 E‐mail: [email protected] sales@e‐lins.com www.szelins.com E-Lins H685m Series Router User Manual Content 0 PREPARATION JOB BEFORE CONFIGURATION ··················································· 4 0.1 LEARN YOUR ROUTER VERSION AND FEATURE ···························································· 4 0.2 PREPARE SIM CARD AND WORKING CONDITION ·························································· 5 1 PROLOGUE ····································································································· 5 1.1 VERSION ······································································································ 5 1.2 REFERENCED DOCUMENTS ·················································································· 5 1.3 NOTICE ········································································································ 5 2 INTRODUCTION ······························································································ 6 2.1 BRIEF ·········································································································· 6 2.2 SPECIFICATION································································································ 6 3 GETTING STARTED ·························································································· 7 3.1 PANEL INTRODUCTION ······················································································· 7 3.2 THE PORT & LED STATE ···················································································· 7 3.3 CONNECT TO PRODUCTS ····················································································· 8 3.4 INSERT SIM CARD ··························································································· 8 3.5 LOGIN WEB ··································································································· 9 3.6 CONNECTION CONFIGURATION ············································································· 9 3.7 LOGIN WEB CONFIGURATION ············································································· 10 3.8 WEB CONFIGURATION ······················································································ 11 4 MAIN CONFIGURATION ·················································································· 12 4.1 ROUTER FUNCTION CONFIGURATION ······································································ 12 4.1.1 Select working mode (For H685m with WiFi only) ···································· 12 4.1.2 WAN configuration ············································································ 12 4.1.3 Module Modem Network Mode Info Configuration···································· 17 4.2 CONFIG VPN ································································································ 18 4.2.1 Configure Router as IPSec client·························································· 19 4.2.2 Configure Router as IPSec Server ························································ 20 4.2.3 Configure Router as PPTP Server ························································ 22 4.2.4 Configure Router as PPTP client ·························································· 23 4.2.5 Change login address and password····················································· 24 4.2.6 Change login address ········································································ 24 4.2.7 Change login password ······································································ 24 4.3 PRODUCTION WEB UPGRADE ············································································· 25 4.4 FACTORY DEFAULT ·························································································· 26 4.4.1 Reset via WEB ················································································· 26 4.4.2 Reset via “reset” button ······································································ 26 5 WIFI SETTING (FOR VERSION WITH WIFI ONLY) ··············································· 27 6 NETWORK SETTING ······················································································· 29 6.1 DHCP ········································································································ 29 6.2 DNS & DDNS······························································································· 30 6.3 STATIC ROUTING ···························································································· 31 6.4 MAC / IP BINDING ··························································································· 31 7 FIREWALL SETTING························································································ 33 7.1 OPTIONS ······································································································ 33 E‐Lins Technology Co.,Limited Tel: +86 (755) 33231620 E‐mail: [email protected] sales@e‐lins.com www.szelins.com E-Lins H685m Series Router User Manual 7.2 TIMESCHEDULE ····························································································· 33 7.3 PORT MANAGE ······························································································ 34 7.4 PORT MAP (PORT FORWARDING) ·········································································· 35 8 DTU SETTING (SERIAL TO CELLULAR GATEWAY)·············································· 37 8.1 CONFIGURE DTU AS SERVER SIDE········································································· 38 8.2 CONFIGURE DTU AS CLIENT SIDE ········································································· 39 9 OTHER SETTING····························································································· 39 9.1 TIME SETTING ······························································································· 39 9.2 WEB PORT SETTING ························································································· 40 9.3 SYS LOG SETTING ··························································································· 40 9.4 REBOOT TIME SETTING ····················································································· 42 9.5 FIRMWARE UPGRADE ······················································································· 43 9.6 PARAMETERS BACKUP AND RESTORE ····································································· 43 9.7 LAN SETTING ······························································································· 44 9.8 CUSTOMIZED DIALUP (DIALUP VIA REQUEST)···························································· 45 9.8 SERVICE – CENTRE “HEART-BEAT PACK” ································································· 45 10 ADDENDA ····································································································· 46 10.1 TERMINOLOGY ····························································································· 46 10.2 FAQ ········································································································· 46 11 TYPICAL SETTING & TEST ············································································· 48 11.1 DMZ FEATURE ····························································································· 48 11.2 STATIC ROUTING SETTING ················································································ 48 11.3 PPTP SETTING SAMPLE ···················································································· 49 11.4 IPSEC SETTING SAMPLE ··················································································· 59 11.5 SIGNAL STRENGTH CHECK ··············································································· 61 11.6 KEEP ALIVE FEATURE ······················································································ 62 11.7 MODEM IMEI CHECK ····················································································· 64 11.8 PIN CODE ··································································································· 65 11.9 DTU FEATURE (SERIAL TO CELLULAR GATEWAY FEATURE) TEST SAMPLE ·························· 65 11.10 REMOTE/SYSLOG TOOL RECORDS THE SYS LOG ······················································ 71 11.11 PORT FORWARDING (NAT, NAPT) TEST ······························································· 72 12 FAQ·············································································································· 78 12.1 WAN IP ADDRESS SHOWS “DIALING” ALWAYS. ························································ 78 12.2 CAN NOT POWER ON ······················································································· 79 12.3 LOG SHOWS “NO NETWORK PROTOCOLS RUNNING” ·················································· 79 12.4 DNS IS WRONG AFTER DIALUP ··········································································· 80 12.5 ROUTER IS DIALUP TO ONLINE, BUT CANNOT GET INTERNET. ········································· 81 12.6 DDNS NOT WORKING ····················································································· 82 12.7 PORT FORWARDING NOT WORKING ······································································· 83 12.8 SERIAL DTU POINT-TO-POINT SOLUTION NOT WORKING ·············································· 83 12.9 DNS MANUAL INPUT NOT WORK ········································································· 83 E‐Lins Technology Co.,Limited Tel: +86 (755) 33231620 E‐mail: [email protected] sales@e‐lins.com www.szelins.com E-Lins H685m Series Router User Manual Chapter 0 0 Preparation job before configuration 0.1 Learn your router version and feature 1) H685m series contains different version and option feature. Please learn it before using it. H685m series defines the model as follows, 2) Find the modem type info at the back cover of the router. This will be used while do configuration. For example: E‐Lins Technology Co.,Limited Tel: +86 (755) 33231620 E‐mail: [email protected] sales@e‐lins.com www.szelins.com E-Lins H685m Series Router User Manual 0.2 Prepare SIM Card and working condition 1) For GSM/GPRS/EDGE/HSDPA/HSUPA/HSPA/HSPA+/4G LTE networks or TD-SCDMA networks, please get a SIM card with data business. 2) For CDMA2000 EVDO/CDMA1x networks, please get a UIM card with data business or inform us before order if the network uses non-ruim (nam-flashing). 3) Make sure the sim card or uim card is with enough data business and balance. 4) Make sure the signal is good enough where you test or install the router. Weak signal will make the router no work. If you find your signal strength is not good, please contact us for high gain antenna. Chapter 1 1 Prologue This document is just suit for the following products; it helps you quickly to used cellular Router function and resolves some common questions. 1.1 Version Version 3.95 Date 2012-7-12 Description updated Author Jason.Zou 1.2 Referenced Documents H685m_Datasheet_Eng.pdf 1.3 Notice The copyright of the document belongs to E-Lins Technology Co., Limited. Copying of this document and modifying it and the use or communication of the contents thereof, is forbidden without express. Authority, Offenders are liable to the legal sanction. E‐Lins Technology Co.,Limited Tel: +86 (755) 33231620 E‐mail: [email protected] sales@e‐lins.com www.szelins.com E-Lins H685m Series Router User Manual Chapter2 2 Introduction 2.1 Brief 3G Series Router is easy to install, reducing the Reliance on the end customer and enables direct access to your remote LAN devices for control and monitoring purposes, it enables companies to remotely access equipment at mobile, remote networks and isolated sites. 3G Series Router is a dedicated ideal data transmission channel for industrial applications. It can be operated at GPRS or CDMA 1x or EDGE or HSDPA or HSUPA or EVDO network by selecting a different radio module 2.2 Specification Please follow the related specification datasheet E‐Lins Technology Co.,Limited Tel: +86 (755) 33231620 E‐mail: [email protected] sales@e‐lins.com www.szelins.com E-Lins H685m Series Router User Manual Chapter3 3 Getting Started 3.1 Panel introduction Power supply interface: DC5V-27V power supply (9V or 12V suggested), Please the fixed necessary power supply of connection product is ensured voltage and the current parameter of power supply if customer exchanges with other power supply. Special attention: If customer has changed the power supply, sometimes can because of twinkling the current ability and leads to Router product reboot inadequately Ethernet interface: Can recognize voluntarily crosses or the straight networking winding thread, and consult 100M voluntarily and 10M's network speed merit ability Antenna interface: standard SMA antenna interface Notes: please install the sim card and antenna before plug the power adapter. Wrong operation will defeat the router or the sim card. 3.2 The Port & LED State 3.2.1 Port UART: DB9 transparent transmission port. Support RS232/RS485/TTL (Please confirm which one you need before order). PWR: Power input interface. DV5~27V, 2.5mm. E‐Lins Technology Co.,Limited Tel: +86 (755) 33231620 E‐mail: [email protected] sales@e‐lins.com www.szelins.com E-Lins H685m Series Router User Manual SIM: SIM Card Slot. Push the yellow button beside sim card slot to take out the sim card tray, put the sim card well and insert it. USB: mini USB port to be USB modem. LAN: RJ45 Ethernet lan port. RST: for reset to factory default WiFi: Optional for WiFi external antenna. 3.2.2 The system work LED state explanation Instruction Marks SYS System running Led Long light-on when booting, blink after booting LAN LAN port Led Fast wink when LAN transfers data VPN VPN Led Light-on when VPN is linked CELL Network data Led Blink after booting or transfers data WIFI WiFi Led Fast wink when WiFi module is on Link Cell online LED Light-on once the router is online 3.3 Connect to products Please connect antenna and RJ45 cable with our products, 3.4 Insert SIM Card Insert SIM card to the SIM Card Slot of the router. Import Notes: When the router is power on, never insert or take out the sim card, which will cause router damaged. E‐Lins Technology Co.,Limited Tel: +86 (755) 33231620 E‐mail: [email protected] sales@e‐lins.com www.szelins.com E-Lins H685m Series Router User Manual 3.5 Login Web 3G Cellular Routers contains WEB SERVER, CONSOLE, TELNET and other configuration mode. It is suitable for different users for configuration operation in local or remote. And the web server is easiest to be used, so we advice your to used this configuration mode. 3.6 Connection configuration Step 1: Ensure that the computer is on the same network address range as the Router and make it as your computer’s default gateway and DNS server. Consult your operating software user manual to determine how to change the IP address on the Ethernet port of the computer and the default gateway address. In the example below the IP address of the PC has been set to 192.168.0.2 -192.168.0.253 and the default gateway is the default address of the cellular Router (192.168.0.254) and Primary DNS as 192.168.0.254 For Windows XP the sequence is: START >>Control Panel >> Network Connections >>Right-Click on Local Area Connection >> Properties >> Internet Protocol Change the computer’s IP address, default gateway and DNS server and then click OK. It may take a minute or two for the computer to be allocated the new IP address. In some cases, a reboot may be required Step 2: To test that there is connectivity between the computer and the Axon, you can ping the Axon using the ping command at the command prompt. To get to the command prompt in Windows XP, use: START>>RUN>>cmd The ping command is entered as follows: If successful you should see some ping statistics like the following example: E‐Lins Technology Co.,Limited Tel: +86 (755) 33231620 E‐mail: [email protected] sales@e‐lins.com www.szelins.com E-Lins H685m Series Router User Manual 1) If having appeared with command: "Request timed out." That indicate PC and 3G cellular Router are not in the same net section. Please run “IPCONFIG/ALL” under the command model. Please check the two IP are in the same set. If they are, but still ping successfully, it is possibly wrong in PC ARP. Recommend run “ARP –D” first. Attention: If appears former error in setting more than one 3G cellular Router, because the same default IP but different MAR, then it must run “PING” after “ARP –D”. 2) It indicates that no real connect between PC and H685m 3G cellular Routers when come out “Destination host unreachable”. Please check or change the cable after setting the 10M Half model of the Ethernet card. 3) If still PING blocks up, please whether or not can lead to by PING between your PC and other PC, and checks up if PC has the software such as fire wall at the same time. If still PING blocks up, please whether or not can lead to by PING between your PC and other PC, and checks up if PC has the software such as fire wall at the same time. 3.7 Login WEB configuration Open IE on your PC, type the default URL address http://192.168.0.254:10000 E‐Lins Technology Co.,Limited Tel: +86 (755) 33231620 E‐mail: [email protected] sales@e‐lins.com www.szelins.com E-Lins H685m Series Router User Manual The H685m 3G cellular Router is configured using a web browser as the interface. To log-on to the web server, enter the IP address of the 3G cellular Router in the browser address window. The default address is 192.168.0.254:10000. A log-on screen should display. For 3G series cellular Router, Username: admin Password: 888888 3.8 WEB configuration If Login successful, the browser should display the following web page, Firmware Version: shows the version of the software firmware System time: router’s working lasting time. Once the router re‐powers, it will count from zero LAN IP address: it’s the local LAN IP address of the router WAN IP Address: it shows the IP address assigned from the ISP once the router is online DNS: it shows the assigned DNS from the ISP once the router is online VPN Setting Status: once you config the VPN feature, and there is VPN connection, here indicated the info. E‐Lins Technology Co.,Limited Tel: +86 (755) 33231620 E‐mail: [email protected] sales@e‐lins.com www.szelins.com E-Lins H685m Series Router User Manual Chapter4 4 Main configuration 4.1 Router function configuration If you need to dial-up an internet network, you can configure Router as following steps 4.1.1 Select working mode (For H685m with WiFi only) Notes: Skip this step if your router has no such option. It Includes Routing Mode, Transparent Bridge, and Gateway Mode. We advice to used Gateway mode, default is Gateway mode. (1) Gateway Mode: If you want H685m router to connect the internet directly. Select Gateway mode. 4.1.2 WAN configuration Before this configuration, please get the APN info parameters from your network provider. APN info -Username: Password: Dial number(service code): APN code: Example 1: for network provider “China Mobile”, the APN info is as follows. Username: wap E‐Lins Technology Co.,Limited Tel: +86 (755) 33231620 E‐mail: [email protected] sales@e‐lins.com www.szelins.com E-Lins H685m Series Router User Manual Password: wap Dial number (service code): *99***1# APN code: CMNET Example 2: for network provider “China Telecom”, the APN info is as follows. Username: card Password: card Dial number (service code): #777 APN code: blank (means no APN code) Example 3: for network provider “China Unicom”, the APN info is as follows. Username: none (keep blank) Password: none (keep blank) Dial number (service code): *99# APN code: UNINET The following table is china common setting from different ISP. Please get your own parameters from your network provider. Dial-up ISP Number China mobile *99***1# China unicom *99# China telecom #777 Username password APN wap wap CMNET UNINET CARD CARD At the router menu, Click”PORT -- WAN -- WAN Setting” According to different ISP, WAN configuration include PPP(modem), PPPoE, Static IP, DHCP Mode, PPP(modem) mode: config the router works as 2G/3G/4G working mode. We usually choose”PPP(modem)” for this product. Find the modem type at the back cover of the router. It marks some characters like “Modem Type D” and “WAN Config Select: WAN1 COM0”, and also characters like “GPRS version” or “WCDMA version” or “EVDO version”, for example E‐Lins Technology Co.,Limited Tel: +86 (755) 33231620 E‐mail: [email protected] sales@e‐lins.com www.szelins.com E-Lins H685m Series Router User Manual This will be used while do configuration. Warmly reminding: the H685m router has two WAN ports, configure the right one, and please close the other one, otherwise will make the router no work. For example, if the label marks “WAN1+COM0”, then please just configure the WAN1, and at WAN2, please choose “Close” at “WAN Setting” and save it. Otherwise the router will no work. For example, one H685m router back cover marks “Modem Type D Configure WAN1+COM0”, then please configure it as follows, And here is the default value for different version of router. The router supports different modem module. It will be installed with different modem models. Different modem requires different configuration for the WAN port. Please refer to the following table. Version Modem Type GPRS Version Router GPRS modem 3G WCDMA or 4G LTE version Router Modem Type A MC8781 WAN1+ COM2 Modem Type B MC8785 WAN1+COM0 Modem Type C MC8790 WAN1+COM3 Modem Type C1 MC8790v WAN1+COM4 Modem Type D EM770 WAN1+COM0 Modem Type E U6300 WAN1+COM2 Modem Type F MC8700 WAN1+COM2 Modem Type G Modem Exact Name WAN Port + COM port WAN1+COM0 EM770w WAN1+COM0 E‐Lins Technology Co.,Limited Tel: +86 (755) 33231620 E‐mail: [email protected] sales@e‐lins.com www.szelins.com E-Lins H685m Series Router User Manual EVDO Version Router TD-SCDMA Version Router Modem Type H EM820w WAN1+COM0 Modem Type I MF210v WAN1+COM0 Modem Type J F3307 WAN1+COM0 Modem Type K EM770u WAN1+COM0 Modem Type L AD3812 WAN1+COM3 Modem Type M F3507 WAN1+COM0 Modem Type N F5521 WAN1+COM0 Modem Type O F3607 WAN1+COM0 Modem Type P EM730 WAN1+COM0 Modem Type Q MC7710 WAN1+COM3 EVDO Type A MC2716 WAN1+COM0 EVDO Type B EM660 WAN1+COM0 EVDO Type C MC5725 WAN1+COM0 TD-SCDMA Type A MU301 WAN1+COM0 TD-SCDMA Type B M305 WAN1+COM0 TD-SCDMA Type C LC5740 WAN1+COM0 Notes: the modem type name will be put on the cover of the router or informed by sales. Please find if the modem name (Modem A, B, C, D, E) before configuration. For example, if the modem is Modem Type E, then you should configure WAN1 COM2 port. H685m contains four versions: A. GPRS version B. WCDMA version C. CDMA2000 EVDO version D. TD-SCDMA version Please choose your right version of the following manual. For normal use, please just set the following parameters, and keep others as default when we send the router. a. Username (some network provide has no this value, please keep it as blank) b. Password (some network provide has no this value, please keep it as blank) c. pincode (If your sim card has pin code, please input here; if none, please keep it as blank) d. Dial number (it’s service number or service code, please get this from network provider. Normally 2G is *99***1#, and 3G is *99#) e. APN (Please get this from ISP provider and fill in it) f. Network select. (Select the right one with your router) NULL: no select GPRS: for GPRS or EDGE router CDMA/EVDO: for CDMA or EVDO router E‐Lins Technology Co.,Limited Tel: +86 (755) 33231620 E‐mail: [email protected] sales@e‐lins.com www.szelins.com E-Lins H685m Series Router User Manual WCDMA: for WCDMA/UMTS/HSDPA/HSUPA/HSPA/HSPA+ router TD: for TD-SCDMA router g. Get DNS from ISP (Choose yes) h. use compress (normally please choose No) i. LCP AUTH: This parameter is from your ISP provider or sim card provider. If you don’t know, you can keep blank as default or select “None” or “AUTO” to try first. But better to confirm with your ISP provider or sim card provider. i. Modem Info: default keeps it as blank. But for modem type J, M, N, O, please input “CMD AT+CFUN=1 ATI ATI CSQ AT+CSQ”, otherwise it will not dialup to internet. j. Connection Interval: Here we suggest input 110 if you don’t know your network signal is not good enough. If signal is good, you can input 90. Keep all others as default when we send the router because wrong setting may make the router no work. Here set an example of China Unicom WCDMA network as follows, After finishing the configuration, click “Save Button”, then Click “Reboot Button”. E‐Lins Technology Co.,Limited Tel: +86 (755) 33231620 E‐mail: [email protected] sales@e‐lins.com www.szelins.com E-Lins H685m Series Router User Manual Recommend to re-power on the router after saving. Once the router is online, it will get WAN IP at System Info page. See the following example. Notes: (Only for TD‐SCDMA version router) if the router’s module is TD‐SCDMA Type A or TD‐SCDMA Type B, the parameter d. APN, and the parameter e. Network select will be different from other modem type. e. Network select: must select NULL d. APN: must with the format of the following parameters. CMNET is the real APN, you can choose the right one with your Network Provider. For other modem type, just fill in the APN parameter directly. After finishing the configuration, click “Save Button”, then Click “Reboot Button”. 4.1.3 Module Modem Network Mode Info Configuration The H685m series router is built-in module inside already. Here to set the module working mode. Notes: This feature is for manual compulsive operation for the module. For normal use, please keep the parameters as default because the module is already “AUTO mode”. 4.1.3.1. At “WAN Port configuration page”, fill in related parameter at “Modem Info” E‐Lins Technology Co.,Limited Tel: +86 (755) 33231620 E‐mail: [email protected] sales@e‐lins.com www.szelins.com E-Lins H685m Series Router User Manual 4.1.3.2. Save, then reboot the router Notes: 1) If don’t config “modem info”, the default is “auto mode”. Normally we recommend customers to set “3G/UMTS mode preferred”. 2) If you cannot confirm if the modem mode is changed by sometime, please input related info to set the modem into “AUTO Mode” at “Modem Info”, otherwise, the router may not work properly. Here list the setting for most common using module, please check the mark on the product cover what module inside. WCDMA Type with Modem Type D, G, H, H1, K, P Manual set network Modem Info Command Auto CMD AT+CFUN=1 Network at^syscfg=2,2,3fffffff,1,2 Only UMTS/3G CMD AT+CFUN=1 Network at^syscfg=14,0,3fffffff,1,2 UMTS/3G preferred CMD AT+CFUN=1 Network at^syscfg=2,2,3fffffff,1,2 Only GSM/2G CMD AT+CFUN=1 Network at^syscfg=13,0,3fffffff,1,2 GSM/2G preferred CMD AT+CFUN=1 Network at^syscfg=2,1,3fffffff,1,2 Manual set network Only UMTS/3G UMTS/3G preferred Only GSM/2G GSM/2G preferred WCDMA Type with Modem Type E Modem Info Command CMD AT+CFUN=1 Network at+mododr=1 CMD AT+CFUN=1 Network at+mododr=2 CMD AT+CFUN=1 Network at+mododr=3 CMD AT+CFUN=1 Network at+mododr=4 WCDMA Type with Modem Type A, B, C, C1, F Manual set network Modem info Auto CMD AT+CFUN=1 Network at!selrat=00 Only UMTS/3G CMD AT+CFUN=1 Network at!selrat=01 UMTS/3G preferred CMD AT+CFUN=1 Network at!selrat=03 Only GSM/2G CMD AT+CFUN=1 Network at!selrat=02 GSM/2G preferred CMD AT+CFUN=1 Network at!selrat=04 WCDMA Type with Modem Type J, M, N, O Manual set network Modem info Auto CMD AT+CFUN=1 Only GSM CMD AT+CFUN=1 Network AT+CFUN=5 Only UMTS/3G CMD AT+CFUN=1 Network AT+CFUN=6 4.2 Config VPN For select this function, you Can configure Router as client and server, how to configure VPN in details? E‐Lins Technology Co.,Limited Tel: +86 (755) 33231620 E‐mail: [email protected] sales@e‐lins.com www.szelins.com E-Lins H685m Series Router User Manual 4.2.1 Configure Router as IPSec client (1) Config 3G Router as client, if connect Router with other equipment Select ”Client” option and click ”Add VPN Setting ” button, then display client web as below User name (local ID): local ID is the name of this connection, which is from the VPN server (host name is default, it must be the same with VPN server configuration) Local LAN Select: choose input IP Address: input local IP address range, for example the client router IP is 192.168.0.254, so here we put 192.168.0.0 Subnet Mask: 255.255.255.0 Remote LAN Select: choose input E‐Lins Technology Co.,Limited Tel: +86 (755) 33231620 E‐mail: [email protected] sales@e‐lins.com www.szelins.com E-Lins H685m Series Router User Manual IP Address: input remote IP address range, for example the VPN server router IP is 192.168.10.254, so here we put 192.168.10.0 For the sever IP (remote IP), you can fill in the server IP address or server’s DDNS. Subnet Mask: 255.255.255.0 password: the same with in the server, this is unique with the user name from the VPN server router. Dynamic IP: Dynamic IP means opposite maybe Dial-up connection, so no input IP Address. After configuration, save it and re-power on the router. Then the router will connect the VPN by IPSec. Then you can find at “VPN—IPSEC status” the similar following pictures, which means the IPSec VPN is connected successfully. 4.2.2 Configure Router as IPSec Server Notes: this is not recommended. We recommend use CISCO VPN Server Router as a VPN server. Configure 3g Router parameters as below. Choose “Server”, and click “Add VPN Setting” button to enter. E‐Lins Technology Co.,Limited Tel: +86 (755) 33231620 E‐mail: [email protected] sales@e‐lins.com www.szelins.com E-Lins H685m Series Router User Manual Click “Advance” button if you need set the advance configuration. Click “Save/Apply” button to make it activate. E‐Lins Technology Co.,Limited Tel: +86 (755) 33231620 E‐mail: [email protected] sales@e‐lins.com www.szelins.com E-Lins H685m Series Router User Manual 4.2.3 Configure Router as PPTP Server 4.2.3.1 Follow the picture below, at “VPN -- PPTP” click Enable PPTP, and fill in Beginning IP and Ending IP, which will be assigned to PPTP client. The Beginning IP and Ending IP range must be the same range with the router. For example, the router’s IP is 192.168.100.1, then you can put Beginning IP as 192.168.100.80 and Ending IP as 192.168.100.90 After setting, please re-power on the router. 4.2.3.2 Follow the picture below, at “VPN –PPTP User” Click “Add” button, E‐Lins Technology Co.,Limited Tel: +86 (755) 33231620 E‐mail: [email protected] sales@e‐lins.com www.szelins.com E-Lins H685m Series Router User Manual Fill in User name, Password and Confirm password, click Apply button to save. It will show the following if the user creating is successful. 4.2.4 Configure Router as PPTP client PORT—WAN Fill in the following: pptp_Username: it’s from the PPTP server pptp_Password: it’s from the PPTP server pptp_Server: fill in PPTP Server’s WAN IP or Domain. (The WAN IP is the obtained public IP from 3G/GSM networks. Must be public IP or Privacy Network’s IP ) E‐Lins Technology Co.,Limited Tel: +86 (755) 33231620 E‐mail: [email protected] sales@e‐lins.com www.szelins.com E-Lins H685m Series Router User Manual Then click SAVE button, and re-power on the router, then it will connect the PPTP Server after to be online. 4.2.5 Change login address and password 4.2.6 Change login address LAN (edit): Local Area Network parameter LAN IP address the default parameter is 192.168.0.254:10000 Subnet Mask: the default parameter is 255.255.255.0 Click ”edit” in LAN (edit) tab, Change local IP address. If you succeed change the login Address is 192.168.100.254:10000, the other PC must be change local IP address, and its gateway must the same with Router IP 4.2.7 Change login password Click ”Password” in left menu, and type a new password to change login password E‐Lins Technology Co.,Limited Tel: +86 (755) 33231620 E‐mail: [email protected] sales@e‐lins.com www.szelins.com E-Lins H685m Series Router User Manual 4.3 Production WEB upgrade Router supplies product upgrade function for users. It have two different upgrade mode, and we suggest used WEB page mode. Click “services” in left menu, and select “Upgrade” as following 4.3.1 Service—Upgrade—click “浏览” to select the updating file (for example “uploadvpn.bin‐3g‐2011‐7.3new”), click “Upgrade” button to start. Notes: Never touch the router or the PC while the updating is going (the PC display will not show the status of updating). It will just show the following picture after finishing. E‐Lins Technology Co.,Limited Tel: +86 (755) 33231620 E‐mail: [email protected] sales@e‐lins.com www.szelins.com E-Lins H685m Series Router User Manual 4.3.2 4.3.3 Power off the router, then re‐power on to make the router work. Close all WAN port. If your router has WAN1 and WAN2, please close both of them. If your router has WAN1, WAN2, WAN3 and WAN4, please close all of them. Don’t forget to save after closing each WAN port. 4.3.4 Click “SERVICE—Reset” Reset the router. Then re-power on and config the router 4.4 Factory default Router supplies factory default function for user setting. It has two different modes, web reposition mode and reposition jack mode. 4.4.1 Reset via WEB Click ”services” in left menu, and select ”Factory default”. When you choose “reset factory default”, the system will display as below picture, click ”confirm”, the Router setting will be lost and reset to factory default. Default username: Default password: Default IP address: Default Subnet Mask: admin 888888 192.168.0.254 255.255.255.0 4.4.2 Reset via “reset” button Use a shark tool to press the “R_RST” or “RST” button about 10 sec, it will restore the system parameter to factory default. For example, when you forget the web manage password of Router, you can do like this. E‐Lins Technology Co.,Limited Tel: +86 (755) 33231620 E‐mail: [email protected] sales@e‐lins.com www.szelins.com E-Lins H685m Series Router User Manual Chapter 5 5 WiFi Setting (For version with WiFi only) WiFi Setting Click “PORT – 802.11G Setting”, and set as follows picture showing Set the parameters as above. a. Config Operation mode as “AP”; b. Config SSID as you want, for example, “E-Lins Router” c. You can set the Encryption mode for “psk, psk2” or “wep” or “None”; and set “key” as the WiFi Access Password; d. hidden: to hidden the SSID broadcasting. Usually we don’t select this option. e. isolate: usually we select this option When activate “Encryption mode”, please input the password in key1, key2, key3, and key4. Normally we input in “key 1”. E‐Lins Technology Co.,Limited Tel: +86 (755) 33231620 E‐mail: [email protected] sales@e‐lins.com www.szelins.com E-Lins H685m Series Router User Manual After all setting for WiFi, from our computer, we can find the SSID we configed. After connection, you can check the wireless status like above. “star-81” is connected. E‐Lins Technology Co.,Limited Tel: +86 (755) 33231620 E‐mail: [email protected] sales@e‐lins.com www.szelins.com E-Lins H685m Series Router User Manual Chapter6 6 NETWORK SETTING 6.1 DHCP DHCP Server: select it E‐Lins Technology Co.,Limited Tel: +86 (755) 33231620 E‐mail: [email protected] sales@e‐lins.com www.szelins.com E-Lins H685m Series Router User Manual 6.2 DNS & DDNS DNS Server: input the right DNS Server. Normally it will automatically be filled once the router is online. However some ISP will not provide the DNS automatically, then please input here manually. Notes: If you want to manually input DNS server, after fill in the parameter, please also fill in the “Host Name” with whatever characters, for example, E‐Lins Technology Co.,Limited Tel: +86 (755) 33231620 E‐mail: [email protected] sales@e‐lins.com www.szelins.com E-Lins H685m Series Router User Manual DDNS Setting: DDNS Server: choose the correct sever Host Name: input the host name, for example “server1.dyndns.org” User name: input the user name Password: input the password Enable: If you use DDNS feature, please click “Yes” 6.3 Static Routing 6.4 Mac / IP binding Enable: click to activate E‐Lins Technology Co.,Limited Tel: +86 (755) 33231620 E‐mail: [email protected] sales@e‐lins.com www.szelins.com E-Lins H685m Series Router User Manual E‐Lins Technology Co.,Limited Tel: +86 (755) 33231620 E‐mail: [email protected] sales@e‐lins.com www.szelins.com E-Lins H685m Series Router User Manual Chapter 7 7 Firewall Setting 7.1 Options 7.2 TimeSchedule Here we can set schedule time for router work. Examples as follows, E‐Lins Technology Co.,Limited Tel: +86 (755) 33231620 E‐mail: [email protected] sales@e‐lins.com www.szelins.com E-Lins H685m Series Router User Manual After setting the schedule, at Port‐WAN Setting, users can select the related schedule. Click Save button to save it after selection. 7.3 Port Manage E‐Lins Technology Co.,Limited Tel: +86 (755) 33231620 E‐mail: [email protected] sales@e‐lins.com www.szelins.com E-Lins H685m Series Router User Manual 7.4 Port Map (Port Forwarding) Click “Add button” to add new. Fill the parameters (Very Important). Port Range: external port range (keep the 2nd as blank if just single port) e.g. 10001-10005 Range of Mapping Port: internal port range (keep the 2nd as blank if just single port) e.g. 10001-10005 Server: If your sim card of the router get a fix public IP, you can input the public IP here. If your sim card of the router gets a dynamic public IP, please DO NOT input. Mapping server: the device IP of internal network e.g. 192.168.0.100 For example, if you get an IP camera. The IP camera web access port is 80. And IP camera local IP from the router is 192.168.0.153, and the router public IP is 114.56.41.1, then the setting is as follows. E‐Lins Technology Co.,Limited Tel: +86 (755) 33231620 E‐mail: [email protected] sales@e‐lins.com www.szelins.com E-Lins H685m Series Router User Manual Then do not forget to click “Apply Button” to save it. Better suggest re-power on the router. Then you can try at your IE browser, type http:// 114.56.41.1:10001 to visit the IP camera by remotely. If you don’t know the port of the IP camera, please set as follows, Then do not forget to click “Apply Button” to save it. Better suggest re-power on the router. Then you can try at your IE browser, type http:// 114.56.41.1:9999 to visit the IP camera by remotely. E‐Lins Technology Co.,Limited Tel: +86 (755) 33231620 E‐mail: [email protected] sales@e‐lins.com www.szelins.com E-Lins H685m Series Router User Manual Chapter 8 8 DTU Setting (Serial to Cellular Gateway) Notes: this feature is for H685m series with DTU feature only. Please skip this if your H685m router is without this feature. There are two kinds of applications. One is point-to-point. The other is multi-point-to-centre. Point-to-point mode: One H685m as server, one H685m as client. Multi-point-to-centre mode: Centre H685m as server, multi-point H685m as client. The setting for both applications is the same. E‐Lins Technology Co.,Limited Tel: +86 (755) 33231620 E‐mail: [email protected] sales@e‐lins.com www.szelins.com E-Lins H685m Series Router User Manual 8.1 Configure DTU as server side 1. 2. 3. 4. 5. 6. 7. 8. Tick “start”, Baudrate: select the correct one to match the connected device. Parity: select right one. Databits: select the right one Local port: fill in the right one Server addr: keep blank Server port: keep blank Other parameters: all keep as default. If blank please keep blank. Configure the Port Forwarding feature for H685m. Step 1) Step 2) Click Apply Button to start the setting. It will show the following picture. Fill in the related parameters. E‐Lins Technology Co.,Limited Tel: +86 (755) 33231620 E‐mail: [email protected] sales@e‐lins.com www.szelins.com E-Lins H685m Series Router User Manual 8.2 Configure DTU as Client side 1. 2. 3. 4. 5. 6. 7. 8. Tick “start”, Baudrate: select the correct one to match the connected device. Parity: select right one. Databits: select the right one Local port: keep blank Server addr: fill in the right one (Be public IP or domain name if the server has DDNS) Server port: fill in the right one Other parameters: all keep as default. If blank please keep blank. For details of DTU setting, please contact us for further support. Chapter 9 9 Other Setting 9.1 Time Setting Click “Server--Time” There are two options. A. System Time Here please set the correct right time. And router will be the time server. All the PC/Device connected to the router will get updated time from the router. E‐Lins Technology Co.,Limited Tel: +86 (755) 33231620 E‐mail: [email protected] sales@e‐lins.com www.szelins.com E-Lins H685m Series Router User Manual B. Time Server Click “Enable”, and fill in the correct Hostname/Address, and choose the Time Zone. Then click “Apply” button. At this mode, the router will get the updated time from the internet time server. 9.2 Web Port Setting Click “Firewall--Options” At “Webserver port” : fill in the port you want. Then click “Apply” button. 9.3 Sys Log Setting A. Local Sys log settings: Router—Log Default display lines is 20. You can input 1200 maximum to show more info. E‐Lins Technology Co.,Limited Tel: +86 (755) 33231620 E‐mail: [email protected] sales@e‐lins.com www.szelins.com E-Lins H685m Series Router User Manual B. Download the log file into a TXT file. Users can click “log.txt” to export the sys log into a file named “log.txt”. If it is no working while left click “log.txt”, please right click and “Save as…” to save it. C. Remote Server setting. Click “Firewall--Options” E‐Lins Technology Co.,Limited Tel: +86 (755) 33231620 E‐mail: [email protected] sales@e‐lins.com www.szelins.com E-Lins H685m Series Router User Manual At “The log server address”, fill in the server’s IP address. This feature normally requires a syslog tool at the server side. With this feature, the sys log will be record to the server syslog tool. Please see example at chapter “” 9.4 Reboot Time Setting The H685m router has the following feature to keep alive: 1) built-in watch dog (automatically, no need set) 2) LCP check during dialing and connected (automatically, no need set) 3) DNS check (need manually set this feature) 4) Reboot automatically (need manually set this feature) Why need use “reboot” feature? Each machine/device’s performance will be weaker and weaker after it power on. Then in order to keep the router keep the good performance as long as it can, it will automatically reboot to refresh the working. The setting is as follows, Click “Firewall--Options” At “The reboot time (hour)”, fill in the hour number. The value can be 1~23. Recommend value is 12~23. For example we set is as 12. A. the router will reboot automatically after every 12 hours to keep the stability performance if we don’t set the E‐Lins Technology Co.,Limited Tel: +86 (755) 33231620 E‐mail: [email protected] sales@e‐lins.com www.szelins.com E-Lins H685m Series Router User Manual timing server feature. B. the router will reboot automatically every 12:00 to keep the stability performance if we set the timing server feature. 9.5 Firmware upgrade 9.5.1 At internet browser, please enter into the router by http://192.168.0.254:10000 9.5.2 Service—Upgrade—click “浏览” to select the updating file “uploadvpn.bin-3g-2011-7.3new”, click “Upgrade” button to start. 9.5.3 Never touch the router or the PC while the updating is going (the PC display will not show the status of updating). It will just show the following picture after finishing. 9.5.4 Power off the router, then re-power on the router. 9.5.5 Reset the router (please refer chapter 4.4) 9.5.6 Re-config the router to make the router work. 9.6 Parameters Backup and Restore 9.6.1 Backup Service—Backup/Restore—click “backup.vpn” to save it. E‐Lins Technology Co.,Limited Tel: +86 (755) 33231620 E‐mail: [email protected] sales@e‐lins.com www.szelins.com E-Lins H685m Series Router User Manual 9.6.2 Restore Service—Backup/Restore—click and select the backup file. Then click “Restore” button to restore it. 9.7 LAN Setting With LAN Setting, you can modify the router’s IP Address, Subnet Mask and MAC address. Step 1) “Router—PORT--LAN”, click “LAN (edit)” After changed, please click “Apply” button and reboot the router. E‐Lins Technology Co.,Limited Tel: +86 (755) 33231620 E‐mail: [email protected] sales@e‐lins.com www.szelins.com E-Lins H685m Series Router User Manual 9.8 Customized dialup (Dialup via request) At WAN port, please choose “Yes” at “Whether to use require dial”, and fill in the Idel time you want the router to disconnect after the time. For example, you want the router dialup once there is data transfer, and 300 seconds to disconnect from the network. Fill in 300 at “Idle time” 9.8 Service – Centre “heart-beat pack” H685m web—SERVICE—Centre, Center IP: fill in the centre’s IP or domain name. Center Port: fill in the centre’s port SN, Key, Name: fill in the content and the H685m router will send the full character to centre. For example, we fill like the following, SN: 1 Key: 2 Name: 3a H685m will send 123a to center. If we just fill the SN and keep Key & Name blank, H685m will just send SN’s content to centre. For example, SN: 12 E‐Lins Technology Co.,Limited Tel: +86 (755) 33231620 E‐mail: [email protected] sales@e‐lins.com www.szelins.com E-Lins H685m Series Router User Manual Key: keep as blank Name: keep as blank H685m will send 12 to center. Protocol: keep as default Module port: keep as default At command: keep as default Interval Time (second): fill in the interval time. For example, we fill in number 30. H685m will send the heart‐beat pack to centre every 30 seconds. Chapter 10 10 Addenda 10.1 Terminology Internet A network of computer networks which operates world-wide using a common set of communications protocols. GPRS Short for General Packet Radio Service, a standard for Cellular communications which runs at speeds up to 115 kbps SIM Subscriber Identity Module – a small rectangular piece of plastic with a layer of copper. It is provided as part of a mobile telephone service. ISP: Internet Service Provider DDNS: Dynamic Domain Name Server 10.2 FAQ Recover Router Configuration 1. Enter the “web” page, choose the “default and reboot” then can recover the default parameters. 2. Hardware recovers: Power off, shortcut between the RS232 point 2 and point 3, product can be recovered the default parameters in 40’s after power on. E‐Lins Technology Co.,Limited Tel: +86 (755) 33231620 E‐mail: [email protected] sales@e‐lins.com www.szelins.com E-Lins H685m Series Router User Manual 1. 2. 3. 4. Factory Default Default serial port parameters: 115200, 8, N, 1. Default IP & Web port: 192.168.0.254:10000 Default user and password in TELNET: guest Default super password in CONSOLE: router Trouble Shooting Ethernet work abnormally: 1. Please run “ARP –D” if ping abnormally. 2. Please set up Ethernet interface in 10M, half model if Ethernet connection unstable. 3. Invalid in new IP cause by forgetting save the change in time, please sign in default IP and save the change after enter a new IP. 1) 2) 3) 4) 5) 6) Others Please check the following items in “status” of the “appear” menu. The character string of the card number is beginning for “898603, it shows the CDMA UIM card had been inserted. The value of the signal strength is between 15-31. It is better more than 20; please connect the local China Unicom for the weak signal less than 15. Confirm owing fee, you can get the information of “Please check data network or your outlay” in terminator. It shows the system can’t build the connection with GPRS/CDMA cause by the weak signal or owing fee. Please check if set in a model of “short connect, invalid detail automatic”. Please download the data of product by using “debug ppp all” command in terminator, then contact with our technocrat. Cannot Power on 1) check the power supplier adapter is okay. You can try another power adapter. 2) Check the power interface is right connected to the router Cannot dialup 1) check the sim card is right inserted 2) check if the sim card has enough balance with data business 3) check if the signal is good enough in the area 4) check if the configuration is right. 5) check the APN or string is right configured. Check the connection interval value is between 90~120s from our experience. E‐Lins Technology Co.,Limited Tel: +86 (755) 33231620 E‐mail: [email protected] sales@e‐lins.com www.szelins.com E-Lins H685m Series Router User Manual Chapter 11 11 Typical Setting & Test 11.1 DMZ feature If you need DMZ feature, you can use NAT/NAPT instead. Step 1. FIREWALL—Port Map Step 2. Open all port 1~65535 as follows, Mapping Server fill in 192.168.110.1, and click Apply button. 11.2 Static Routing Setting Step 1. NETWORK—Static Routing E‐Lins Technology Co.,Limited Tel: +86 (755) 33231620 E‐mail: [email protected] sales@e‐lins.com www.szelins.com E-Lins H685m Series Router User Manual Step 2. Click Add button, Destination IP Address: Fill in the next stage’s IP Range Subnet Mask: Fill in subnet mask. Default Gateway: Fill in router’s gateway IP. It will show the following if creating is successful. 11.3 PPTP setting sample Notes: before using PPTP, please make sure the H685m router can be online. H685m router cannot work in PPTP if cannot be online. Also please make sure the PPTP client can also get online, otherwise it will not connect the PPTP server. Normally, we recommend users take CISCO VPN Server as server VPN, and take our H685m router as client. However, we take H685m router as VPN Sever and VPN Client both for example. A. PPTP Server side setup. Step 1) VPN—PPTP User Step 2) Fill in User name, Password and Confirm password, click Apply button to save. E‐Lins Technology Co.,Limited Tel: +86 (755) 33231620 E‐mail: [email protected] sales@e‐lins.com www.szelins.com E-Lins H685m Series Router User Manual Step 3) It will show the following if the user creating is successful. Step 4) VPN—PPTP, click Enable PPTP, and fill in Beginning IP and Ending IP, which will be assigned to PPTP client. The Beginning IP and Ending IP range must be the same range with the router. For example, the router’s IP is 192.168.0.254, then you can put Beginning IP as 192.168.0.110 and Ending IP as 192.168.0.200 After setting, please do not forget click “Apply” button and re-power on the router. B. PPTP Client side setup. There are two types. Users can take PC VPN dialup as client. Also we can take H685m router as client. We test it one by one. Users can make your own choice. B1. PC VPN dialup as VPN client. Step 1) Get the PPTP server’s WAN IP. Here we get the H685m PPTP server WAN IP is 113.115.216.52, at the PC, try to ping it and check if it’s through. If cannot through, please check if your ISP block the IP, or the PPTP server get some problem. E‐Lins Technology Co.,Limited Tel: +86 (755) 33231620 E‐mail: [email protected] sales@e‐lins.com www.szelins.com E-Lins H685m Series Router User Manual Step 2) Set up the VPN dialing at the PC, click “Start—Control Panel”, enter , Step 3) click “Create a new connection”, Step 4) Click “Next” button, E‐Lins Technology Co.,Limited Tel: +86 (755) 33231620 E‐mail: [email protected] sales@e‐lins.com www.szelins.com E-Lins H685m Series Router User Manual Step 5) Choose “Connect to the network at my workplace”, and “Next” button, Step 6) Choose “Virtual Private Network connection”, and “Next” button, E‐Lins Technology Co.,Limited Tel: +86 (755) 33231620 E‐mail: [email protected] sales@e‐lins.com www.szelins.com E-Lins H685m Series Router User Manual Step 7) Input the “Company Name”. Here we put “H685m PPTP Test” for test, click “Next” button, Step 8) If the client PC is connected to internet (or your private network) already, please choose “Do not dial the initial connection”. If the client PC is not connected to internet (or your private network), please choose “Automatically dial this initial connection” and select the right connection. Here our test client PC is with DSL connection already, so we just choose “Do not dial the initial connection”, and click “Next” button, E‐Lins Technology Co.,Limited Tel: +86 (755) 33231620 E‐mail: [email protected] sales@e‐lins.com www.szelins.com E-Lins H685m Series Router User Manual Step 9) input the PPTP server’s WAN IP, and click “Next” button, Step 10) You can choose “Add a shortcut to this connection to my desktop”, and click “Next” button, E‐Lins Technology Co.,Limited Tel: +86 (755) 33231620 E‐mail: [email protected] sales@e‐lins.com www.szelins.com E-Lins H685m Series Router User Manual Step 11) Input the PPTP user name and password, then click “Connect” button, Step 12) Once it’s connected, it will show above. And the client PC will get a assigned PPTP IP from PPTP server. Here it gets an IP of 192.168.0.110. Step 13) Try to ping the PPTP server’s LAN IP 192.168.0.254 from the PPTP client, it’s through. E‐Lins Technology Co.,Limited Tel: +86 (755) 33231620 E‐mail: [email protected] sales@e‐lins.com www.szelins.com E-Lins H685m Series Router User Manual Step 14) Try to ping the IP of PPTP client from PPTP server, it should ping through. Both side can ping through, which means test is successful. And at the H685m PPTP server router, it will display the connected PPTP client numbers. E‐Lins Technology Co.,Limited Tel: +86 (755) 33231620 E‐mail: [email protected] sales@e‐lins.com www.szelins.com E-Lins H685m Series Router User Manual B2. H685m router as VPN client Step 1) make H685m client router to be online. (Get WAN public IP or private network IP) Step 2) at H685m router web, “PORT—WAN” Fill in the following: pptp_Username: it’s from the PPTP server, here it’s “elins” pptp_Password: it’s from the PPTP server, here it’s “123456” pptp_Server: fill in PPTP Server’s WAN IP or Domain. (The WAN IP is the obtained public IP from 3G/GSM networks. Must be public IP or Privacy Network’s IP), here it’s “113.115.216.52” E‐Lins Technology Co.,Limited Tel: +86 (755) 33231620 E‐mail: [email protected] sales@e‐lins.com www.szelins.com E-Lins H685m Series Router User Manual Step 3) Click “SAVE” button, and re-power on the router, then it will connect the PPTP Server after to be online. Step 4) It will get a assigned IP from the PPTP server. Here it gets 192.168.0.112. Step 5) Try ping the PPTP server LAN IP from PPTP client. It should be through. Step 6) Try ping the PPTP client assigned IP from PPTP server, it should not be through. With the test result above, the PPTP test is successful. E‐Lins Technology Co.,Limited Tel: +86 (755) 33231620 E‐mail: [email protected] sales@e‐lins.com www.szelins.com E-Lins H685m Series Router User Manual Notes for users: For PPTP VPN, if client is PC, the PPTP server can ping through PPTP client after PPTP is connected. But if client is router, the PPTP server cannot ping through PPTP client after the PPTP is connected. 11.4 IPSec setting sample Notes: before using IPSec, please make sure the H685m router can be online. H685m router cannot work in IPSec if cannot be online. Also please make sure the IPSec client can also get online, otherwise it will not connect the IPsec server. Normally, we recommend users take CISCO VPN Server as server VPN, and take our H685m router as client. However, we take H685m router as VPN Sever and VPN Client both for example. A) Server side: H685m router web – VPN – IPSEC, choose “Server” and click “Add VPN Setting”, Fill in the parameters. See the following picture. Here the VPN username and password are both “vpn” E‐Lins Technology Co.,Limited Tel: +86 (755) 33231620 E‐mail: [email protected] sales@e‐lins.com www.szelins.com E-Lins H685m Series Router User Manual B) Client side H685m router web – VPN – IPSEC, choose “Client” and click “Add VPN Setting”, Test Verification: 1) At PC connected with 192.168.1.0, ping 192.169.0.0 and it’s ping through. 2) At server or client router, you can check the IPSEC status. If the link is okay, there is info similar as followed picture E‐Lins Technology Co.,Limited Tel: +86 (755) 33231620 E‐mail: [email protected] sales@e‐lins.com www.szelins.com E-Lins H685m Series Router User Manual 11.5 Signal Strength Check H685m series will use different type of module modem depends on customer’s requirement or our stock. Some module modem can show the signal strength in the “System Info” page of the router web page. However some module modem will not show. Then how to find the signal? Way 1: at Router Web – PORT – WAN –WAN1, at “Modem Info”, please input a command like this. Then save, and reboot (power-off and power on) the router. At Router Web – MODEM, it will show the signal strength. E‐Lins Technology Co.,Limited Tel: +86 (755) 33231620 E‐mail: [email protected] sales@e‐lins.com www.szelins.com E-Lins H685m Series Router User Manual Way 2: at Router Web – LOG Input +CSQ at ONLY display with blank, then click Refresh Button. It will show the following. The number 17 is the signal strength. Signal Number Marks 0-5 Too poor 6-9 Poor to very weak 10-14 weak 15-19 Not too bad 20-25 Good 26-31 Very good 11.6 Keep alive feature The H685m series router supports watchdog. The watchdog avoid freezing for H685m. Meanwhile, it built-in PPP checking and DNS checking features, it will automatically check dead-link or fake-link from the network. And besides, there is another IP checking feature to keep alive. Router web – PORT – WAN – Step 1) choose WAN1 from “WAN Port”, choose Static IP from “WAN setting”, and click at “Enable disconnection detection function”. Click “Save” button. E‐Lins Technology Co.,Limited Tel: +86 (755) 33231620 E‐mail: [email protected] sales@e‐lins.com www.szelins.com E-Lins H685m Series Router User Manual Step 2) Choose WAN1 from “WAN Port”, and PPP(modem) from “WAN Setting”, and choose correct COM port at “COM” and fill in the correct related parameters, which explains at chapter “4.1.2 WAN configuration”. Click “Save” button. Step 3) Router web – FIREWALL—Options Fill in a domain name or IP address at “The ppp heart beat address:” Fill in a IP (can be ping through) at “The center ip”. E‐Lins Technology Co.,Limited Tel: +86 (755) 33231620 E‐mail: [email protected] sales@e‐lins.com www.szelins.com E-Lins H685m Series Router User Manual And click “Apply” button to save. Step 4) Re-power on the router. The H700 router will ping the domain name or IP address at “The ppp heart beat address” and “The center ip”, if not through, it will ping the carrier’s DNS. If both not through, it will reboot to dialup to network. 11.7 Modem IMEI check Step 1) Router web – Port – WAN, choose WAN1 from “WAN Port”, and PPP(modem) from “WAN Setting”, and choose correct COM port at “COM”, which explains at chapter “4.1.2 WAN configuration”. At “Modem Info’, please fill in like the following: Click “Save” button, and then reboot the router. Step 2) Router web – MODEM You can get the modem info similar to the following picture shows. And it shows the IMEI in the picture. E‐Lins Technology Co.,Limited Tel: +86 (755) 33231620 E‐mail: [email protected] sales@e‐lins.com www.szelins.com E-Lins H685m Series Router User Manual Notes: some module modem will not show the IMEI info with such operation. 11.8 Pin Code Some sim has pin code. If there is, please input the pin code when you config the parameters of the router. If there is none, please just keep blank. Please click “Save” button and reboot the router after the configuration. If sim card has pin code, and pincode is activated, the router will dialup and there is no indication in the sys log. If pin code is wrong set, the router will not dialup and get error while it send APN parameter to Base Station. 11.9 DTU feature (Serial to Cellular gateway feature) test sample Here we just test the router’s DTU feature is working or not. We make H685m as DTU client, and get a PC to run a server tool software. Step 1) check if your device is RS232 or RS485 port, should be same with the H685m series router. Step 2) get the H685m’s DTU feature right setted as follows, E‐Lins Technology Co.,Limited Tel: +86 (755) 33231620 E‐mail: [email protected] sales@e‐lins.com www.szelins.com E-Lins H685m Series Router User Manual Step 3) at server PC, run the server tool software. You can choose your own server tool software. Click “CreatServer” button, fill in the parameters similar as above. This is as server IP and Port. If your server E‐Lins Technology Co.,Limited Tel: +86 (755) 33231620 E‐mail: [email protected] sales@e‐lins.com www.szelins.com E-Lins H685m Series Router User Manual PC is behind a router/firewall, please make NAT/NAPT feature at the router/firewall. Click “Create” button to finish. Choose the Server we created, and click “StartzServer” button. Then the H685m-client will automatically try to connect the Server. Once the TCP connection is created, it will show the following. Step 4) at H685m-client, we run the serial tool. Here we use SSCOM3.2 software tool. You can use hypter terminal at Windows or other software tool. Config the right parameters with the H685m-client DTU parameters. Try to send some messenger, for example “client to server test (sending)”, and click “SEND” button. E‐Lins Technology Co.,Limited Tel: +86 (755) 33231620 E‐mail: [email protected] sales@e‐lins.com www.szelins.com E-Lins H685m Series Router User Manual The Server side will receive the related messenge, which indicates the “client to server” test is working. E‐Lins Technology Co.,Limited Tel: +86 (755) 33231620 E‐mail: [email protected] sales@e‐lins.com www.szelins.com E-Lins H685m Series Router User Manual Step 5) From “Server Side”, try to send some messenge to client side, for example, E‐Lins Technology Co.,Limited Tel: +86 (755) 33231620 E‐mail: [email protected] sales@e‐lins.com www.szelins.com E-Lins H685m Series Router User Manual The client side will receive the related messenge, which indicates the “server to client” test is working. E‐Lins Technology Co.,Limited Tel: +86 (755) 33231620 E‐mail: [email protected] sales@e‐lins.com www.szelins.com E-Lins H685m Series Router User Manual 11.10 Remote/SysLog tool records the sys log Step 1) Connect one PC to the H685m router via RJ45. And default it gets a IP of 192.168.0.100 Step 2) Run a Log Tool at PC 192.168.0.100, here we use “MT_Syslog.exe” Step 3) H685m router web – FIREWALL—Options, input “192.168.0.100” at “The log server address” , Then click “Apply” button. Step 4) Then the “MT_Syslog.exe” will show the log history inside. At the directory of “MT_Syslog.exe”, you can find a file named “tmplog.log”. This file stores all the sys log. Notes: before using this tool, please right click and choose “’Clear folder”, which will avoid the history mixed. E‐Lins Technology Co.,Limited Tel: +86 (755) 33231620 E‐mail: [email protected] sales@e‐lins.com www.szelins.com E-Lins H685m Series Router User Manual 11.11 Port Forwarding (NAT, NAPT) test Note: the test is simulation test to approve and show the feature. Please make it work in your real application. Warmly reminding: Question: I configure the port forwarding feature correctly, but still no work. Answer: first, please check the port if block by your ISP, because some ISP block some ports for security reason. For example, the H685m gets WAN IP 27.38.14.223. And the H685’s default web port is 10000. So from the other network, try to visit http:// 27.38.14.223:10000 if can be okay. If no okay, it means the ISP blocks the 10000 port. Then check with your ISP which ports are open for use. Then re-try the port forwarding feature. Step 1) make H685m router to be online. Step 2) configure the port forwarding feature for H685m router Click Apply Button to start the setting. It will show the following picture. E‐Lins Technology Co.,Limited Tel: +86 (755) 33231620 E‐mail: [email protected] sales@e‐lins.com www.szelins.com E-Lins H685m Series Router User Manual Step 3) here we take a PC to be as a TCP server/Remote Device. Connect the PC to H685 router LAN port via RJ45 cable. And it gets an IP 192.168.0.100. At the PC, run TCP&UDP_debug software (If you have no such software, require to get from us). Firstly, click Server Mode, and CreateServer, E‐Lins Technology Co.,Limited Tel: +86 (755) 33231620 E‐mail: [email protected] sales@e‐lins.com www.szelins.com E-Lins H685m Series Router User Manual Secondly, fill in the parameters like this. The Local IP is the PC’s IP from H685m router. The LocalPort is the port of the PC which will be mapped. Click Create Button to finish. Choose the created server, and click StartServer. It will show the following windows. Step 4) here we take another PC to be as a TCP client. This PC is with internet in another network. Run TCPUDP_debug software tool, choose Client Mode, and click CreateConn, E‐Lins Technology Co.,Limited Tel: +86 (755) 33231620 E‐mail: [email protected] sales@e‐lins.com www.szelins.com E-Lins H685m Series Router User Manual Type: choose TCP, DestIP: fill in the H685m router’s WAN IP (here is 183.43.179.134), Port: 8000 (This port is external port for mapped port 10001). Click Create button to finish. Then check the DestIP, DestPort and Type, and click Connect button to link. Once the link is done, at the Server PC’s side, it shows the following picture, which indicates the link is created. E‐Lins Technology Co.,Limited Tel: +86 (755) 33231620 E‐mail: [email protected] sales@e‐lins.com www.szelins.com E-Lins H685m Series Router User Manual Step 5) Test the link for sending and receiving At client PC, type “test from client to server”, and click Send button. At the server PC, it will receive the info the client PC. E‐Lins Technology Co.,Limited Tel: +86 (755) 33231620 E‐mail: [email protected] sales@e‐lins.com www.szelins.com E-Lins H685m Series Router User Manual At Server PC, type “reply from server to client”, and click Send button. At the client PC side, it will receive the related info from server PC side. E‐Lins Technology Co.,Limited Tel: +86 (755) 33231620 E‐mail: [email protected] sales@e‐lins.com www.szelins.com E-Lins H685m Series Router User Manual With this result, it indicates the port forwarding is working. Chapter 12 12 FAQ 12.1 WAN IP Address shows “Dialing” always. At Router web—System Info, it shows WAN IP Address and DNS once the router is online. For example, E‐Lins Technology Co.,Limited Tel: +86 (755) 33231620 E‐mail: [email protected] sales@e‐lins.com www.szelins.com E-Lins H685m Series Router User Manual However, if you find the following status that it shows “Dialing” always, Problem maybe: Item. May caused by Solution 1 WAN port is not right configed Refer to Chapter 4.1.2 WAN configuration to solve it. For some module modem type, please do not forget the command “CMD AT+CFUN=1” at “Modem Info” of WAN configuration page. 2 SIM card has problem for data business or no balance Check the sim card with the ISP or network provider or sim card provider. Try another working sim card. 3 No network signal Move the router to another site to check. 4 VPN configuration is wrong You may config the VPN in wrong way. Please check the WAN port configuration. 5 Module modem is defeated Send back the unit to factory for repair 12.2 Can not power on Solution: 1. Check if the power adapter connector is loose from the router. 2. Try to replace a power adapter. H685m series router uses 9V1.5A or 9V2A or 12V1A or 12V1.5A or 12V2A power adapter with 2.5mm connector 3. Router hardware defeated. Send back to factory for check or repair. 12.3 LOG shows “No network protocols running” Problem maybe: E‐Lins Technology Co.,Limited Tel: +86 (755) 33231620 E‐mail: [email protected] sales@e‐lins.com www.szelins.com E-Lins H685m Series Router User Manual Item. May caused by Solution 1 A. sim card no data business, or problem; B. sim card balance no available; A. Check sim card data business and balance. B. Get balance available 2. WAN APN parameter is wrong Check APN parameter of WAN port, then make it correct and try 3 Network unstable problem Try later, or move to other network to try. 4 Module modem inside router setting wrong by uncertain operation Tell the module modem type (marked at the back cover of router) to technical support for help. 5 Module modem inside router only support 2G or 3G only Need contact sales for replacement or repair 12.4 DNS is wrong after dialup A. H685m series router can get the right DNS automatically once it’s dialup to be online. Please follow the steps to setup. Step 1): at router “WAN Setting”, please choose “Yes” at “Get DNS from ISP?”. Click “Save” button. Step 2): once the H685m router dialup to be online. It will shows the DNS at “System Info”. And will also automatically filled in DNS table. E‐Lins Technology Co.,Limited Tel: +86 (755) 33231620 E‐mail: [email protected] sales@e‐lins.com www.szelins.com E-Lins H685m Series Router User Manual B. If you find the H685m router cannot get the correct DNS after it’s dialup online. Please fill the correct DNS from your ISP at “Router—NETWORK—DNS&DDNS”, then click “Apply” button and reboot the router. 12.5 Router is dialup to online, but cannot get internet. Step 1) Check if the router is online. If it’s online, you can find the WAN IP Address and DNS at “Router—System Info”. E‐Lins Technology Co.,Limited Tel: +86 (755) 33231620 E‐mail: [email protected] sales@e‐lins.com www.szelins.com E-Lins H685m Series Router User Manual If no WAN IP Address, please follow chapter “12.1” to make sure WAN Setting is correct. If there is WAN IP Address but no DNS, then please follow chapter “12.4” to check. Step 2) Check the router’s DHCP is right set, and check device or PC’s Ethernet LAN is right setted. Choose “DHCP Server”, and fill in the “Beginning LAN IP address”, “Ending LAN IP address”, and “LAN subnet mask”, then click “Apply” button and reboot the router. Step 3) make your PC/Device’s Ethernet LAN card as automatically getting IP. 12.6 DDNS not working 1) Please confirm the DDNS configuration is correct. 2) Check if the router is online and get IP, and can visit internet. E‐Lins Technology Co.,Limited Tel: +86 (755) 33231620 E‐mail: [email protected] sales@e‐lins.com www.szelins.com E-Lins H685m Series Router User Manual 3) Check if the WAN IP from sim card (shows in the status page once the router is online) is a public IP or privacy IP, privacy IP will make DDNS no work. 12.7 Port forwarding not working Question: I configure the port forwarding feature correctly, but still no work. Answer: first, please check the port if block by your ISP, because some ISP block some ports for security reason. For example, the H685m gets WAN IP 27.38.14.223. And the H685m’s web port is 10000. So from the other network, try to visit http:// 27.38.14.223:10000 if can be okay. If no okay, it means the ISP blocks the 10000 port. Then check with your ISP which ports are open for use. Then re-try the port forwarding feature. 12.8 Serial DTU point-to-point solution not working Problem: Take two H685m. Both support Serial to cellular gateway feature (DTU feature). Configure one as client, the other as server. But no work. Answer: First, we confirm that the H685m both are online, and the server’s IP is public IP that can be ping through from other networks. Second, we confirm both H685m’s DTU feature (Serial to Cellular Feature) are working. We test an example as follows, H685m DTU with vodafone sim as client (in Germany)--- China Telecom as server (In China): working H685m DTU with vodafone sim as server (in Germany)--- China Telecom as client (In China): working H685m DTU with vodafone sim as client (in Germany)----H685m DTU with vodafone sim as server (in Germany) : no working This indicates the two vodafone sim cards cannot communicates each other. The Vodafone ISP limit the two internal’s sim card’s communication. You have two ways to solve the problem. 1) get another sim card from another ISP to test. 2) ask the Vodafone ISP to unlimit two vadafone sim's communication. 12.9 DNS manual input not work Problem: after fill in the DNS server manually, it indicates “Host name error” after click “Apply” button to save. E‐Lins Technology Co.,Limited Tel: +86 (755) 33231620 E‐mail: [email protected] sales@e‐lins.com www.szelins.com E-Lins H685m Series Router User Manual DNS Server: Normally it will automatically be filled once the router is online. However some ISP will not provide the DNS automatically, then please input here manually. Notes: If you want to manually input DNS server, after fill in the parameter, please also fill in the “Host Name” with whatever characters, for example, E‐Lins Technology Co.,Limited Tel: +86 (755) 33231620 E‐mail: [email protected] sales@e‐lins.com www.szelins.com