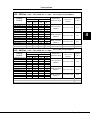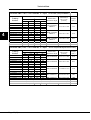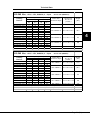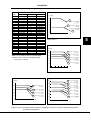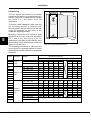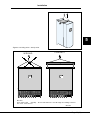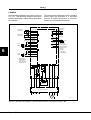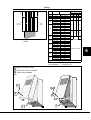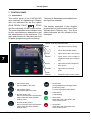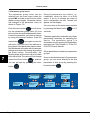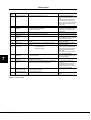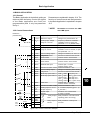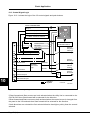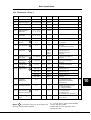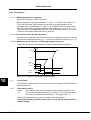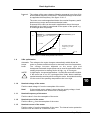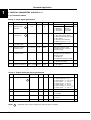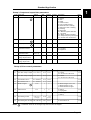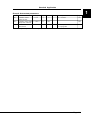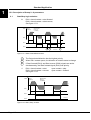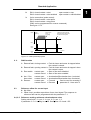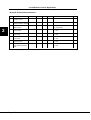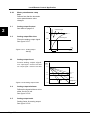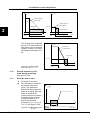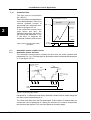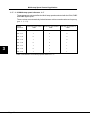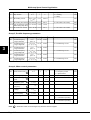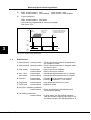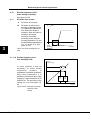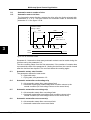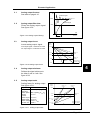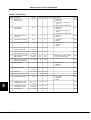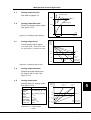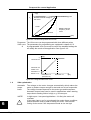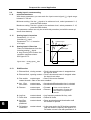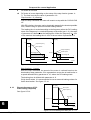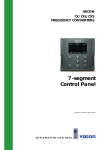
1
Users Manual
·
Application Manual
Excel VRL
CX/CXL/CXS
Constant and variable torque
Variable Speed Drives
for induction motors
1 Hp to 1100 Hp
Subject to changes without notice.
USERS MANUAL AND APPLICATION MANUAL
These two manuals provide the general information on how to use frequency converters
and how to apply, if required, Application Package.
CX/CXL/CXS Users manual provides the information necessary to install, start-up and
operate CX/CXL/CXS frequency converters. It is recommended that this manual is read
thoroughly before powering up the frequency converter for the first time.
If a different I/O configuration or different operational functions is required, see chapter
12 from the Users manual, Application package, for a more suitable application. For more
detailed information read the attached Application Package -application manual.
If problems are experienced, please contact your local Honeywell distributor. Honeywell
is not responsible for the use of the frequency converter differently from what is noted in
these instructions.
Monitoring values (MON)
Num.
n1
n2
n3
n4
n5
n6
n7
n8
n9
n 10
n
n
n
n
n
n
n
11
12
13
14
15
16
17
n 18
n 19
n 20
n
n
n
n
n
20
21
22
23
24
Data name
Output frequency
Motor speed
Motor current
Motor torque
Motor power
Motor voltage
DC-link voltage
Temperature
Operating day counter
Operating hours,
"trip counter"
MWh-hours
MWh-hours, "trip counter"
Voltage/analogue input
Current/analogue input
Digital input stat.,group A
Digital input stat.,group B
Digital and relay
output status
Control program
Unit nominal power
Motor temperature rise
Only in PI-controller
PI-controller reference
PI-controller actual value
PI-controller error value
PI-controller output
Motor temperature rise
Faults and warnings
Unit
Hz
rpm
A
%
%
V
V
°C
DD.dd
HH.hh
Code
F1
F2
F3
F4
F5
F9
F 10
F 11
F 12
F 13
F 14
F 15
F 16
F 17
F 18
F 19
F 20
F 21
F 22
F 23
F 24
F 25
F 26
F 29
F 36
F 41
MWh
MWh
V
mA
See
figure
below
kW
%
%
%
%
Hz
%
V15
Dig input A Stat
0.011
T erm in al
8
D IA 2
closed
9
D IA 3
op en
10
Programmable push-buttons (BTNS)
Button
A
A
A
A
15
16
17
24
A
A
A
A
28
30
45
46
0 = op en in p u t
1 = closed in p u t (active)
E xam p le:
In p u t
D IA 1
closed
Button
number
Overcurrent
Overvoltage
Earth fault
Inverter fault
Charging switch
Under voltage
Input line supervision
Output phase supervision
Brake chopper supervision
Vacon under temperature
Vacon over temperature
Motor stalled
Motor over temperature
Motor underload
Analogue input hardware fault
Option board identification
10 V voltage reference
24 V supply
EEPROM
checksum fault
Microprocessor watchdog
Panel communication error
Thermistor protection
Analogue input Iin 4-20 mA <4 mA
External fault
Warnings
1.) DD=full days, dd=desimal part
of a day
2.) HH=full hours, hh=desimal part
of an hour
D ig ital inp ut status
ind icatio n
Fault
A 47
Motor stalled
Motor over temperature
Motor underload
The values in the Fault history,
MWh-counters or operating day/
hour counters might have been
changed in the previous mains
interrupt
Change of application has failed
Unbalance current fault
Vacon overtemp. warning
Reference warning, analogue input
Iin+ <4 mA
External warning
ENTER-button
Function
name
Feedback information
0
b1
Reverse
Changes the direction of
motor rotation.
Active only if the panel is
the active control source
b2
Active
control
source
Selects the active control Control via Control from the
source between the panel I/O terminals Control Panel
and I/O terminals
b3
Clear trip
operating
hour counter
Clear trip
MWh
counter
Clears the trip operating
when pressed
b4
Direction
command
forward
Direction
command
backward
1
Feedback information
flashes as long as direction is different from the
command
No clearing
Clearing accepted
Clears
No clearing
the MWh trip counter when
pressed
Clearing accepted
M7
Contrast
15
C1
Contrast
15
M6
Fault History
F 1-9
H1
2. Overvoltage
M5
Active Faults
F 1-9
F1
1. Overcurrent
ENTER
2-3 s
Vikahistorian nollaus
Aktiivisten vikojen selailu
B 2 P a n e l C o n tr o l
Μ
M4
Buttons
B1-4
B1
Reverse
1
M3
Reference
R1-1
R1
Freq.reference
122.45 Hz
G2
Μ
G 12
M2
Parameter
G 1-12
B1
Reverse
0
R1
Freq.reference
122.45 Hz
}S p e c ia l p a r a m .
G1
Basic Param.
P 1-15
V 2 M otor S p e ed
Μ
V 2 0 M oto r te m p . r ise
M1
Monitor
V 1-20
ENTER
V1
Output frequency
122.44 Hz
P1.1
Min. frequency
12.34 Hz
P1.1
Min. frequency
12.34 Hz
ENTER
CONTENTS
CX/CXL/CXS USERS MANUAL
1
Safety ........................................................ 2
2
Directives .................................................. 4
3
Receiving .................................................. 5
4
Technical data ........................................... 7
5
Installation ............................................... 18
6
Wiring ..................................................... 24
7
Control panel .......................................... 56
8
Startup .................................................... 68
9
Fault tracing ............................................ 71
10 Basic application .................................... 73
11
System parameter group 0 ..................... 80
12 Application package ................................ 82
13 Options ................................................... 84
CX/CXL/CXS -APPLICATION MANUAL
A
General .................................................. 0-2
B
Application selection .............................. 0-2
C
Restoring default values of application
parameters ............................................ 0-2
D
Language selection ............................... 0-2
1
Standard Control Application ................. 1-1
2
Local/Remote Control Application ......... 2-1
3
Multi-step Speed Application .................. 3-1
4
PI-control Application ............................. 4-1
5
Multi-purpose Control Application .......... 5-1
6
Pump and Fan Control Application ........ 6-1
HOW TO USE THIS MANUAL
This manual provides you with the information
necessary to install, start-up and operate a
CX/CXL/CXS drive. We recommend that you
read this manual carefully.
At least the following 10 steps of the Quick
Start Guide must be done during installation
and startup.
If any problem occurs, please call the
telephone number listed on the back of this
manual for assistance.
Quick Start Guide
1. Check the equipment received
compared to what you have ordered,
see chapter 3.
2. Before doing any start-up actions
carefully read the safety instructions in
chapter 1.
3. Before mechanical installation, check
the minimum clearances around the
unit and verify that ambient conditions
will meet the requirements of chapter
5.2. and table 4.3-1a.
4. Check the size of the motor cable, the
utility cable and the fuses. Verify the
tightness of the cable connections.
Review chapters 6.1.1, 6.1.2 and 6.1.2.
5. Follow the installation instructions, see
chapter 6.1.4.
6 Control cable sizes and grounding
system are explained in chapter 6.2.
The signal configuration for the Basic
application is in chapter 10.2.
Remember to connect the common
If a different I/O configuration or different
operational functions from the basic
configuration are required, see chapter 12,
Application package for a more suitable
configuration. For a more detailed
description, see the separate application
manual.
terminals (CMA and CMB. See figure
10.2.1) of the digital input groups.
7. For instructions on how to use the
control panel see chapter 7.
8. The basic application has only 10
parameters in addition to the motor
rating plate data, the parameter and
application package lock. All of these
have default values. To ensure proper
operation verify the nameplate data of
both the motor and CX/CXL/CXS:
- nominal voltage of the motor
- nominal frequency of the motor
- nominal speed of the motor
- nominal current of the motor
- supply voltage
Parameters are explained in chapter
10.4.
9. Follow the start-up instructions, see
chapter 8.
10.Your CX/CXL/CXS is now ready for
use.
Honeywell is not responsible for the use of the
frequency converter differently than noted in
these instructions.
Users Manual
Excel VRL
CX/CXL/CXS
Constant and variable torque
Variable Speed Drives
for induction motors
1Hp to 1100 Hp
Subject to changes without notice
Contents
EXCEL VRL CX/CXL/CXS USERS MANUAL
CONTENTS
1 Safety .................................................... 2
1.1
1.2
1.3
1.4
Warnings ......................................... 2
Safety instructions .......................... 2
Grounding and ground fault protection3
Running the motor .......................... 3
2 Directives ............................................. 4
2.1 CE-label .......................................... 4
2.2 EMC-directive ................................. 4
2.2.1 General .................................... 4
2.2.2 Technical criteria ...................... 4
2.2.3 EMC-levels ............................... 4
2.2.4 Manufacturer's Declaration of
Conformity ................................ 4
2.3 UL-label ........................................... 4
7.6 Programmable push-button menu 62
7.7 Active faults menu ........................ 63
7.8 Fault history menu ........................ 65
7.9 Contrast menu ............................... 65
7.10 Active warning display ................. 66
7.11 Controlling the motor from the
front panel ................................... 67
7.11.1Control source change from I/Oterminals to the front panel .... 67
7.11.2 Control source change from
panel to I/O ............................. 67
8 Start-up ............................................... 68
8.1 Safety precautions ........................ 68
8.2 Sequence of operation.................. 68
3 Receiving............................................ 11
9 Fault tracing ....................................... 71
3.1 Type designation code .................. 11
3.2 Storing ........................................... 12
3.3 Warranty ....................................... 12
10 Basic application ............................... 73
4 Technical data .................................... 13
4.1 General ......................................... 13
4.2 Power ratings ................................ 14
4.3 Specifications ................................ 22
5 Installation ......................................... 24
5.1 Ambient conditions ....................... 24
5.2 Cooling .......................................... 24
5.3 Mounting ....................................... 28
6 Wiring ................................................. 30
6.1 Power connections........................ 33
6.1.1 Utility cable ............................ 33
6.1.2 Motor cable ............................ 33
6.1.3 Control cable .......................... 33
6.1.4 Installation instructions .......... 36
6.1.4.1 Cable selection and
installation for UL listing ......... 38
6.1.5 Cable and motor insulation
checks .................................... 53
6.2 Control connections ...................... 53
6.2.1 Control cables ........................ 53
6.2.2 Galvanic isolation barriers ..... 53
6.2.3 Digital input function inversion.55
7 Control panel ..................................... 56
7.1
7.2
7.3
7.4
7.5
Introduction ................................... 56
Panel operation ............................. 57
Monitoring menu ........................... 58
Parameter group menu ................. 60
Reference menu ........................... 61
10.1 General ...................................... 73
10.2 Control connections ................... 73
10.3 Control signal logic..................... 74
10.4 Parameters, group 1 .................. 75
10.4.1 Descriptions ......................... 76
10.5 Motor protection functions in the
Basic Application ......................... 79
10.5.1 Motor thermal protection ..... 79
10.5.2 Motor stall warning .............. 79
11 System parameter group 0 ............... 80
11.1 Parameter table .......................... 80
11.2 Description .................................. 80
12 Application package ......................... 82
12.1 Application selection ................... 82
12.2 Standard Application ................... 82
12.3 Local/Remote Application ........... 82
12.4 Multi-step Speed Application ...... 82
12.5 PI-control Application .................. 83
12.6 Multi-purpose Control App. ......... 83
12.7 Pump and Fan Control App. ....... 83
13 Options .............................................. 84
13.1 Remote control box ..................... 84
13.2 External filters ............................. 84
13.3 Dynamic braking ......................... 84
13.4 I/O-expander board ..................... 84
13.5 Communications ......................... 84
13.6 Graphics control panel ................ 84
13.7 FCDRIVE .................................... 84
13.8 Control panel door mount kit ....... 84
13.9 Protected chassis cable cover for
75-125 Hp open chassis units .... 84
13.10 Others ........................................ 84
Page 1 (84)
Safety
1
1 SAFETY
ONLY A QUALIFIED ELECTRICIAN CAN CARRY
OUT THE ELECTRICAL INSTALLATION
1.1 Warnings
1
Internal components and circuit boards (except the isolated I/O
terminals) are at utility potential when the CX/CXL/CXS is
connected to the line. This voltage is extremely dangerous and may
cause death or severe injury if you come in contact with it.
2
When the CX/CXL/CXS is connected to the utility, the motor
connections U(T1), V(T2), W(T3) and DC-link / brake resistor
connections -,+ are live even if the motor is not running.
3
The control I/O terminals are isolated from the line potential
but the relay outputs and other I/O:s (if jumper X4 is in OFF position
see figure 6.2.2-1) may have dangerous external voltages connected
even if the power is disconnected from the CX/CXL/CXS.
4
5
6
The CX/CXL/CXS has a large capacitive leakage current.
An upstream disconnect/protection device is to be used as noted in
the National Electric Code (NEC).
Only spare parts obtained from a Honeywell authorized distributor
can be used.
1.2 Safety instructions
!
Page 2 (84)
1
2
The CX/CXL/CXS is meant only for fixed installation. Do not make
any connections or measurements when the CX/CXL/CXS is connected to the utility.
3
4
5
6
7
Do not make any voltage withstand or megger tests on any part of
the CX/CXL/CXS.
After disconnecting the utility, wait until the unit cooling fan stops and
the indicators on the control panel are extinguished (if no keypad is
present, check the indicators in the cover). Wait 5 more minutes
before doing any work on the CX/CXL/CXS connections. Do not
open the cover before this time has run out.
Disconnect the motor cables from the CX/CXL/CXS before
meggering the motor cables.
Do not touch the IC-circuits on the circuit boards. Static voltage discharge may destroy the components.
Before connecting to the utility make sure that the cover of the CX/
CXL/CXS is closed
Make sure that nothing but a three-phase motor is connected to the
motor terminal, with the exception of factory recommended filters.
Receiving
1.3 Grounding and ground fault
protection
The CX/CXL/CXS must always be grounded
with a grounding conductor connected to the
grounding terminal .
Warning Symbols
For your own safety, please pay special
attention to the instructions marked with these
warning symbols:
The CX/CXL/CXS's ground fault protection
protects only the CX/CXL/CXS if a ground
fault occurs in the motor or in the motor cable.
Due to the high leakage current fault current
protective devices do not necessarily operate
correctly with drives. When using this type of
device its function should be tested in the
actual installation.
= Dangerous voltage
!
= General warning
1.4 Running the motor
!
1
2
Before running the motor, make sure that the motor is mounted
properly.
3
Before reversing the rotation of the motor shaft, make sure that this
can be done safely.
Maximum motor speed (frequency) should never be set to exceed
the motor's and driven machine's capability.
Page 3 (84)
1
Directives
2
2
DIRECTIVES
2.1 CE-label
2.2.3 EMC-levels
The CE-label on the product guarantees the
free movement of the product in the EU-area.
According to the EU-rules this guarantees that
the product is manufactured in accordance
with different directives relating to the product.
CX/CXL/CXSs are equipped with the CE-label
in accordance with the Low Voltage Directive
(LVD) and the EMC directive.
The EXCEL VRL frequency converters do not
fulfil any EMC emission requirements without
an optional RFI-filter, either buit-in or separate.
For EMC purposes, the frequency converters
are divided into three different levels. All the
products have the same functions and control
electronics, but their EMC properties vary as
follows:
2.2 EMC-directive
CX -level N:
2.2.1 General
The frequency converters (level N) do not fulfill any
EMC emmission demands without a separate RFIfilter. With an external RFI-filter, the product fulfill
the EMC emmissions demands in the heavy
industrial environment (EN50081-2).
The EMC directive (Electro Magnetic
Compatibility) states that the electrical
equipment must not disturb the environment
and must be immune to other Electro
Magnetic Disturbances in the environment.
A Technical Construction File (TCF) exists
which demonstrates that the CX/CXL/CXS
drives fulfill the requirements of the EMC
directive. A Technical Construction File has
been used as a statement of conformity with
the EMC directive as it is not possible to test
all combinations of installation.
2.2.2 Technical criteria
The design intent was to develop a family of
drives, which is user friendly and cost
effective, while fulfilling the customer needs.
EMC compliance was a major consideration
from the outset of the design.
The CX/CXL/CXS series is targeted at the
world market. To ensure maximum flexibility,
yet meet the EMC needs of different regions,
all drives meet the highest immunity levels,
while emission levels are left to the user's
choice.
The code "N" CX/CXL/CXS inverters are
designed for use outside the EU or for use
within the EU where the end user take
personal responsibility for EMC compliance.
Page 4 (84)
CXL, CXS -level I:
The frequency converters (level I) fulfill the EMC
emmissions requirements in the heavy industrial
environment (EN50081-2).
CXL, CXS -level C:
The frequency converters (level C) fulfill the EMC
emmission requirements in the commercial,
residential and light industrial environment (500811,-2, widest range of use)
All products (level N, I, C) fulfill all EMC immunity
requirements (EN50082-1,-2 and EN61800-3).
2.2.4 Manufacturer's Declarations of
Conformity
Following are copies of the Manufacturer's
Declarations of Conformity, which show
conformity with the directives for drives with
different EMC levels.
2.3 UL-label
The EXCEL VRL frequency converters are
UL-listed according to the standards, based on
the needed voltage and power range. For
more information contact you local Honeywell
distributor. More information of cable selection
and installation can be found from chapter
6.1.4.1.
Directives
EU DECLARATION OF CONFORMITY
2
We
Manufacturer's Name:
Vaasa Control
Manufacturer's Address: P.O. BOX 25
Runsorintie 7
FIN-65381 VAASA
Finland
hereby declares that the product:
Product name:
CX Frequency converter
CXL Frequency converter
CXS Frequency converter
Model number
CX........
CXL........
CXS........
has been designed and manufactured in accordance with the following standards:
Safety: EN 50178 (1995) and relevant parts of EN60950
(1992), Am 1 (1993), Am 2 (1993), Am 3 (1995), EN60204-1(1996)
EMC:
EN50082-2 (1995), EN61800-3
and conforms to the relevant safety provisions of the Low Voltage Directive (73/23/
EEC) as amended by the Directive (93/68/EEC) and EMC Directive 89/336/EEC.
It is ensured through internal measures and quality control that product conforms at
all times to the requirements of the current Directive and the relevant standards.
Vaasa 12.05.1997
Veijo Karppinen
Managing Director
The last two digits of the year the CE marking was affixed
97
Page 5 (84)
Directives
2
EU DECLARATION OF CONFORMITY
We
Manufacturer's Name:
Vaasa Control
Manufacturer's Address: P.O. BOX 25
Runsorintie 5
FIN-65381 VAASA
Finland
hereby declares that the product:
Product name:
CX Frequency converter
Model number
CX......N. + .RFI...
has been designed and manufactured in accordance with the following standards:
Safety: EN 50178 (1995) and relevant parts of EN60950
(1992), Am 1 (1993), Am 2 (1993), Am 3 (1995), EN60204-1 (1996)
EMC:
EN50081-2 (1993), EN50082-2 (1995), EN61800-3 (1996)
Technical construction file
Prepared by:
Vaasa Control Oy
Function:
Manufacturer
Date:
03.05.1996
TCF no.:
RP00012
Competent body
Name:
Address:
Country:
FIMKO LTD
P.O. Box 30 (Särkiniementie 3)
FIN-00211 Helsinki
Finland
and conforms to the relevant safety provisions of the Low Voltage Directive (73/23/
EEC) as amended by the Directive (93/68/EEC) and EMC Directive 89/336/EEC.
It is ensured through internal measures and quality control that product conforms at
all times to the requirements of the current Directive and the relevant standards.
Vaasa 12.05.1997
Veijo Karppinen
Managing Director
The last two digits of the year the CE marking was affixed
Page 6 (84)
97
Directives
EU DECLARATION OF CONFORMITY
2
We
Manufacturer's Name:
Vaasa Control
Manufacturer's Address: P.O. BOX 25
Runsorintie 5
FIN-65381 VAASA
Finland
hereby declares that the product:
Product name:
CXL Frequency converter
Model number
CXL......I.
has been designed and manufactured in accordance with the following standards:
Safety: EN 50178 (1995) and relevant parts of EN60950
(1992), Am 1 (1993), Am 2 (1993), Am 3 (1995), EN60204-1 (1996)
EMC:
EN50081-2 (1993), EN50082-2 (1995), EN61800-3 (1996)
Technical construction file
Prepared by:
Vaasa Control Oy
Function:
Manufacturer
Date:
03.05.1996
TCF no.:
RP00013
Competent body
Name:
Address:
Country:
FIMKO LTD
P.O. Box 30 (Särkiniementie 3)
FIN-00211 Helsinki
Finland
and conforms to the relevant safety provisions of the Low Voltage Directive (73/23/
EEC) as amended by the Directive (93/68/EEC) and EMC Directive 89/336/EEC.
It is ensured through internal measures and quality control that product conforms at
all times to the requirements of the current Directive and the relevant standards.
Vaasa 12.05.1997
Veijo Karppinen
Managing Director
The last two digits of the year the CE marking was affixed
97
Page 7 (84)
Directives
2
EU DECLARATION OF CONFORMITY
We
Manufacturer's Name:
Vaasa Control
Manufacturer's Address: P.O. BOX 25
Runsorintie 5
FIN-65381 VAASA
Finland
hereby declares that the product:
Product name:
CXL Frequency converter
Model number
CXL......C.
has been designed and manufactured in accordance with the following standards:
Safety: EN 50178 (1995) and relevant parts of EN60950
(1992), Am 1 (1993), Am 2 (1993), Am 3 (1995), EN60204-1 (1996)
EMC:
EN50081-1,-2 (1993), EN50082-1,-2 (1995), EN61800-3 (1996)
Technical construction file
Prepared by:
Vaasa Control Oy
Function:
Manufacturer
Date:
03.05.1996
TCF no.:
RP00014
Competent body
Name:
Address:
Country:
FIMKO LTD
P.O. Box 30 (Särkiniementie 3)
FIN-00211 Helsinki
Finland
and conforms to the relevant safety provisions of the Low Voltage Directive (73/23/
EEC) as amended by the Directive (93/68/EEC) and EMC Directive 89/336/EEC.
It is ensured through internal measures and quality control that product conforms at
all times to the requirements of the current Directive and the relevant standards.
Vaasa 12.05.1997
Veijo Karppinen
Managing Director
The last two digits of the year the CE marking was affixed
Page 8 (84)
97
Directives
EU DECLARATION OF CONFORMITY
2
We
Manufacturer's Name:
Vaasa Control
Manufacturer's Address: P.O. BOX 25
Runsorintie 5
FIN-65381 VAASA
Finland
hereby declares that the product:
Product name:
CXS Frequency converter
Model number
CXS......I.
has been designed and manufactured in accordance with the following standards:
Safety: EN 50178 (1995) and relevant parts of EN60950
(1992), Am 1 (1993), Am 2 (1993), Am 3 (1995), EN60204-1 (1996)
EMC:
EN50081-2 (1993), EN50082-2 (1995), EN61800-3 (1996)
Technical construction file
Prepared by:
Vaasa Control Oy
Function:
Manufacturer
Date:
03.05.1996
TCF no.:
RP00015
Competent body
Name:
Address:
Country:
FIMKO LTD
P.O. Box 30 (Särkiniementie 3)
FIN-00211 Helsinki
Finland
and conforms to the relevant safety provisions of the Low Voltage Directive (73/23/
EEC) as amended by the Directive (93/68/EEC) and EMC Directive 89/336/EEC.
It is ensured through internal measures and quality control that product conforms at
all times to the requirements of the current Directive and the relevant standards.
Vaasa 14.11.1997
Veijo Karppinen
Managing Director
The last two digits of the year the CE marking was affixed
97
Page 9 (84)
Directives
2
EU DECLARATION OF CONFORMITY
We
Manufacturer's Name:
Vaasa Control
Manufacturer's Address: P.O. BOX 25
Runsorintie 5
FIN-65381 VAASA
Finland
hereby declares that the product:
Product name:
CXS Frequency converter
Model number
CXS......C.
has been designed and manufactured in accordance with the following standards:
Safety: EN 50178 (1995) and relevant parts of EN60950
(1992), Am 1 (1993), Am 2 (1993), Am 3 (1995), EN60204-1 (1996)
EMC:
EN50081-1,-2 (1993), EN50082-1,-2 (1995), EN61800-3 (1996)
Technical construction file
Prepared by:
Vaasa Control Oy
Function:
Manufacturer
Date:
03.05.1996
TCF no.:
RP00016
Competent body
Name:
Address:
Country:
FIMKO LTD
P.O. Box 30 (Särkiniementie 3)
FIN-00211 Helsinki
Finland
and conforms to the relevant safety provisions of the Low Voltage Directive (73/23/
EEC) as amended by the Directive (93/68/EEC) and EMC Directive 89/336/EEC.
It is ensured through internal measures and quality control that product conforms at
all times to the requirements of the current Directive and the relevant standards.
Vaasa 14.11.1997
Veijo Karppinen
Managing Director
The last two digits of the year the CE marking was affixed
Page 10 (84)
97
Receiving
3 RECEIVING
This CX/CXL/CXS drive has been subjected
to demanding factory tests before shipment.
After unpacking, check that the device does
not show any signs of damage and that the
CX/CXL/CXS is as ordered (refer to the type
designation code in figure 3-1).
In the event of damage, please contact and file
a claim with the carrier involved immediately.
If the received equipment is not the same as
ordered, please contact your distributor
immediately.
Note! Do not destroy the packing. The
template printed on the protective cardboard
can be used for marking the mounting points
of the CX/CXL/CXS on the wall.
3.1 Type designation code
CX(x) 0750HP V 3
4
A
2 N
0
Product Series = CX, CXL, CXS
e.g. *
•
0015 HP = 1.5 Hp
0015 = 1.5 kW
0750 HP = 75 Hp
0750 = 75 kW
9000 HP = 900 Hp
9000 = 900 kW
10000 HP = 1000 Hp
10000 = 1000 kW
Voltage
Phase 1 or 3
Voltage •
(3-phase)
2 = 230V
4 = 380V
5 = 480V
6 = 600V
Panel
A = 7-segment LED Display
B = Graphic (LCD) Display
G = Alphanumerical Display
C = without local control panel
D = special equipped (switches, etc.)
IP
0 = chassis (IP00)
2 = Series CX/CXL: protected chassis
(IP20), Serie CXS:compact NEMA 1 (IP20)
5 = NEMA 12 (IP54)
7 = NEMA 1 (IP21)
RFI
C, I, N (no internal Filter)
Brake
1 = built in brake
0 = no brake
* in pump and fan applications (variable torque) the nominal power of the unit is one size larger (see section 4.2)
• 480 V units are rated in Hp, 380 V units are rated in kW
Figure 3-1 Type designation code.
Page 11 (84)
3
Receiving
3.2 Storing
If the CX/CXL/CXS must be stored before
installation and startup, check that the ambient
conditions in the storage area are acceptable
(temperature -40°C—+60°C; (-40°F - +
140°F), relative humidity <95%, no
condensation allowed).
3
3.3 Warranty
This equipment is covered by the Honeywell
standard drive warranty policy.
Honeywell distributors may have a different
warranty period, which is specified in their
sales terms and conditions and warranty
terms.
If any questions arise concerning the warranty,
please contact your distributor.
Page 12 (84)
Technical data
4 TECHNICAL DATA
4.1 General
Figure 4-1 shows a block diagram of the CX/
CXL/CXS drive.
and can be mounted externally and connected
via a cable to the drive.
The three phase AC-Choke with the DC-link
capacitor forms an LC filter which together
with the Diode Bridge produce the DC voltage
for the IGBT Inverter Bridge block. The ACChoke smooths the HF-disturbances from the
utility to the drive and HF-disturbances caused
by the drive to the utility. It also improves the
waveform of the input current to the drive.
The Control I/O block is isolated from line
potential and is connected to ground via a 1
MΩ resistor and 4.7 nF capacitor. If needed,
the Control I/O block can be grounded without
a resistor by changing the position of the
jumper X4 (GND ON/OFF) on the control
board.
The basic Control interface and parameters
(Basic application) make the inverter easy to
operate. If a more versatile interface or
parameter settings are needed, an optional
application can be selected with one
parameter from a Application package. The
application package manual describes these
in more detail.
The IGBT bridge produces a symmetrical
three phase pulse width modulated AC voltage
to the motor. The power drawn from the supply
is almost entirely active power.
The Motor and Application Control block is
based on microprocessor software. The
microprocessor controls the motor according
to measured signals, parameter value settings
and commands from the Control I/O block and
the Control Panel. The Motor and Application
Control block gives commands to the Motor
Control ASIC which calculates the IGBT
switching positions. Gate Drivers amplify
these signals for driving the IGBT inverter
bridge.
An optional Brake Chopper can be mounted
in the unit at the factory. Optional I/O-expander
boards are also available.
Input and Output EMC-filters are not required for
the functionality of the drive, they are only
required for compliance with the EU EMCdirective.
The Control Panel is a link between the user
and the drive. With the panel the user can set
parameter values, read status data and give
control commands. The panel is removable
Brake resistor,
if optional brake
chopper is installed
L2
L3
IGBT
Inverter Current
Sensors
=
3~
Input EMCfilter *
L1
Rectifier
3~
=
Motor
Output EMCfilter *
AC-choke
Mains
Optional
Brake
Chopper **
U
V
W
Fan
Power
Supply
Measurements
PE
Gate
Drivers
Control
Panel
RUN
MON
READY
PAR
REF
FAULT
BTNS
RST
PG
RS 232
Motor and
Application
Control
Galvanic
Isolator
* CXL/CXS-model
** standard in CXS-model
Control
I/O
Motor
Control
ASIC
Option
Card
K4_1
Figure 4-1 CX/CXL/CXS block diagram.
Page 13 (84)
4
Technical data
4.2 Power ratings
440 - 500Vac, +10% / -15%, 50/60 Hz, 3 ~ Input
Series CX (standard/protected chassis)
Rated Horsepower and output current
Catalog
Number
4
Constant Torque
Hp
Ict *
Variable Torque
Hp
Ivt **
Frame Size /
Enclosure Style
Dimensions
W xHxD
( inches )
CX 0030 HP V 3 5
3
5
CX 0040 HP V 3 5
5
8
4.7 x 11.4 x 8.5
M4 / Protected
CX 0050 HP V 3 5
5
8
7.5
11
CX 0075 HP V 3 5
7.5
11
10
15
CX 0100 HP V 3 5
10
15
15
21
6.2 x 15.9 x 9.4
M5 / Protected
CX 0150 HP V 3 5
15
21
20
27
CX 0200 HP V 3 5
20
27
25
32
CX 0250 HP V 3 5
25
34
30
40
CX 0300 HP V 3 5
30
40
40
52
M6 / Protected 8.7 x 20.7 x 11.4
CX 0400 HP V 3 5
40
52
50
65
CX 0500 HP V 3 5
50
65
60
77
CX 0600 HP V 3 5
60
77
75
96
CX 0750 HP V 3 5
75
96
100
125
M7 / Chassis *** 9.8 x 31.5 x 12.4
CX 1000 HP V 3 5
100
125
125
160
CX 1250 HP V 3 5
125
160
150
180
CX 1500 HP V 3 5
150
180
M8 / Chassis *** 19.5 x 35.0 x 13.9
CX 1750 HP V 3 5
200
260
CX 2000 HP V 3 5
200
260
250
320
CX 2500 HP V 3 5
250
320
300
400
M9 / Chassis *** 27.6 x 39.4 x 15.4
CX 3000 HP V 3 5
300
400
400
460
CX 4000 HP V 3 5
400
480
500
600
M10 / Chassis *** 38.9 x 39.4 x 15.4
CX 5000 HP V 3 5
500
600
600
672
CX 6000 HP V 3 5
600
700
700
880
M11 / Chassis 55.1 x 39.4 x 15.4
CX 7000 HP V 3 5
700
880
800
1020
CX 8000 HP V 3 5
800
1020
900
1070
M12 / Chassis 77.9 x 39.4 x 15.4
CX 9000 HP V 3 5
900
1070
1000
1200
CX 10000 HP V 3 5 1000
1200
CX 11000 HP V 3 5 1100
1300
* Ict = rated input and output current ( constant torque load, max 50C ambient )
** Ivt = rated input and output current ( variable torque load, max 40C ambient )
*** Protected Enclosure with Optional Cover
Page 14 (84)
Weight
( lbs )
15.4
33.1
77.2
133
309
485
684
948
1212
Technical Data
380 - 440Vac, +10% / -15%, 50/60 Hz, 3 ~ Input
Series CX (standard/protected chassis)
Rated Kilowatts and output current
Catalog
Number
Constant Torque
kW
Ict *
Variable Torque
kW
Ivt **
Frame Size /
Enclosure Style
Dimensions
W xHxD
( inches )
Weight
( lbs )
CX 0022 V 3 4
2.2
6.5
3
8
CX 0030 V 3 4
3
8
4
10
M4 / Protected
4.7 x 11.4 x 8.5
CX 0040 V 3 4
4
10
5.5
13
CX 0055 V 3 4
5.5
13
7.5
18
CX 0075 V 3 4
7.5
18
11
24
M5 / Protected
6.2 x 15.9 x 9.4
CX 0110 V 3 4
11
24
15
32
CX 0150 V 3 4
15
32
18.5
42
CX 0185 V 3 4
18.5
42
22
48
CX 0220 V 3 4
22
48
30
60
M6 / Protected 8.7 x 20.7 x 11.4
CX 0300 V 3 4
30
60
37
75
CX 0370 V 3 4
37
75
45
90
CX 0450 V 3 4
45
90
55
110
CX 0550 V 3 4
55
110
75
150
M7 / Chassis *** 9.8 x 31.5 x 12.4
CX 0750 V 3 4
75
150
90
180
CX 0900 V 3 4
90
180
110
210
CX 1100 V 3 4
110
210
132
270
M8 / Chassis *** 19.5 x 35.0 x 13.9
CX 1320 V 3 4
132
270
160
325
CX 1600 V 3 4
160
325
200
410
CX 2000 V 3 4
200
410
250
510
M9 / Chassis *** 27.6 x 39.4 x 15.4
CX 2500 V 3 4
250
510
315
580
CX 3150 V 3 4
315
600
400
750
M10 / Chassis *** 38.9 x 39.4 x 15.4
CX 4000 V 3 4
400
750
500
840
CX 5000 V 3 4
500
840
630
1050
M11 / Chassis 55.1 x 39.4 x 15.4
CX 6300 V 3 4
630
1050
710
1160
CX 7100 V 3 4
710
1270
800
1330
M12 / Chassis 77.9 x 39.4 x 15.4
CX 8000 V 3 4
800
1330
900
1480
CX 9000 V 3 4
900
1480
CX 10000 V 3 4
1000
1600
* Ict = continuous rated input and output current ( constant torque load, max 50C ambient )
** Ivt = continuous rated input and output current ( variable torque load, max 40C ambient )
*** Protected Enclosure with Option
15.4
33.1
77.2
133
309
485
684
948
1212
Page 15 (84)
4
Technical data
440 - 500Vac , +10% / -15%, 50/60 Hz, 3 ~ Input
Se rie s CXL (NEMA 1)
Rated Horsepower and output current
Catalog
Number
4
CXL
CXL
CXL
CXL
CXL
CXL
CXL
CXL
CXL
CXL
CXL
CXL
CXL
CXL
CXL
CXL
CXL
CXL
CXL
CXL
CXL
CXL
0030HP
0040HP
0050HP
0075HP
0100HP
0150HP
0200HP
0250HP
0300HP
0400HP
0500HP
0600HP
0750HP
1000HP
1250HP
1500HP
1750HP
2000HP
2500HP
3000HP
4000HP
5000HP
V
V
V
V
V
V
V
V
V
V
V
V
V
V
V
V
V
V
V
V
V
V
Constant Torque
3
3
3
3
3
3
3
3
3
3
3
3
3
3
3
3
3
3
3
3
3
3
5
5
5
5
5
5
5
5
5
5
5
5
5
5
5
5
5
5
5
5
5
5
Variable Torque
Hp
Ict *
Hp
Ivt **
3
5
7.5
10
15
20
25
30
40
50
60
75
100
125
150
200
250
300
400
500
5
8
11
15
21
27
34
40
52
65
77
96
125
160
180
260
320
400
480
600
5
7.5
10
15
20
25
30
40
50
60
75
100
125
150
200
250
300
400
500
600
8
11
15
21
27
32
40
52
65
77
96
125
160
180
260
320
400
460
600
672
Frame Size /
Enclosure Style
Dimensions
W x Hx D
( inches )
W eight
( lbs )
M4 / NEMA 1
4.7 x 15.4 x 8.5
17.6
M5 / NEMA 1
6.2 x 20.3 x 9.4
35.3
M6 / NEMA 1
8.7 x 25.6 x 11.4
83.8
M7 / NEMA 1
14.7 x 39.4 x 13.0
221
M8 / NEMA 1
19.5 x 47.6 x 13.9
309
M9 / NEMA 1
27.6 x 56.1 x 15.4
574
380 - 440Vac , +10% / -15%, 50/60 Hz, 3 ~ Input
Contact Factory
Se rie s CXL (NEMA 1)
Rated Kilowatts and output current
Dimensions
Frame Size /
Constant Torque Variable Torque
W x Hx D
Enclosure Style
kW
Ict *
kW
Ivt **
( inches )
CXL 0022 V 3 4
2.2
6.5
3
8
CXL 0030 V 3 4
3
8
4
10
M4 / NEMA 1
4.7 x 15.4 x 8.5
CXL 0040 V 3 4
4
10
5.5
13
CXL 0055 V 3 4
5.5
13
7.5
18
CXL 0075 V 3 4
7.5
18
11
24
M5 / NEMA 1
6.2 x 20.3 x 9.4
CXL 0110 V 3 4
11
24
15
32
CXL 0150 V 3 4
15
32
18.5
42
CXL 0185 V 3 4
18.5
42
22
48
CXL 0220 V 3 4
22
48
30
60
M6 / NEMA 1
8.7 x 25.6 x 11.4
CXL 0300 V 3 4
30
60
37
75
CXL 0370 V 3 4
37
75
45
90
CXL 0450 V 3 4
45
90
55
110
CXL 0550 V 3 4
55
110
75
150
M7 / NEMA 1
14.7 x 39.4 x 13.0
CXL 0750 V 3 4
75
150
90
180
CXL 0900 V 3 4
90
180
110
210
CXL 1100 V 3 4
110
210
132
270
M8 / NEMA 1
19.5 x 47.6 x 13.9
CXL 1320 V 3 4
132
270
160
325
CXL 1600 V 3 4
160
325
200
410
CXL 2000 V 3 4
200
410
250
510
M9 / NEMA 1
27.6 x 56.1 x 15.4
CXL 2500 V 3 4
250
510
315
580
CXL 3150 V 3 4
315
600
400
750
Contact Factory
CXL 4000 V 3 4
400
750
500
840
* Ict = continuous rated input and output current ( constant torque load, max 50C ambient )
** Ivt = continuous rated input and output current ( variable torque load, max 40C ambient )
Catalog
Number
Page 16 (84)
W eight
( lbs )
17.6
35.3
84
221
309
574
Technical Data
440 - 500Vac , +10% / -15%, 50/60 Hz, 3 ~ Input
Se rie s CXL (NEMA 12)
Rated Horsepower and output current
Catalog
Number
CXL
CXL
CXL
CXL
CXL
CXL
CXL
CXL
CXL
CXL
CXL
CXL
CXL
CXL
CXL
CXL
CXL
CXL
CXL
CXL
CXL
CXL
0030HP
0040HP
0050HP
0075HP
0100HP
0150HP
0200HP
0250HP
0300HP
0400HP
0500HP
0600HP
0750HP
1000HP
1250HP
1500HP
1750HP
2000HP
2500HP
3000HP
4000HP
5000HP
V
V
V
V
V
V
V
V
V
V
V
V
V
V
V
V
V
V
V
V
V
V
Constant Torque
3
3
3
3
3
3
3
3
3
3
3
3
3
3
3
3
3
3
3
3
3
3
5
5
5
5
5
5
5
5
5
5
5
5
5
5
5
5
5
5
5
5
5
5
Variable Torque
Hp
Ict *
Hp
Ivt **
3
5
7.5
10
15
20
25
30
40
50
60
75
100
125
150
200
250
300
400
500
5
8
11
15
21
27
34
40
52
65
77
96
125
160
180
260
320
400
480
600
5
7.5
10
15
20
25
30
40
50
60
75
100
125
150
200
250
300
400
500
600
8
11
15
21
27
32
40
52
65
77
96
125
160
180
260
320
400
460
600
672
Frame Size /
Enclosure Style
Dimensions
W x Hx D
( inches )
W eight
( lbs )
M4 / NEMA 12
4.7 x 15.4 x 8.5
17.6
M5 / NEMA 12
6.2 x 20.3 x 9.4
35.3
M6 / NEMA 12
8.7 x 25.6 x 11.4
83.8
M7 / NEMA 12
14.7 x 39.4 x 13.0
221
M8 / NEMA 12
19.5 x 47.6 x 13.9
309
M9 / NEMA 12
27.6 x 56.1 x 15.4
574
380 - 440Vac , +10% / -15%, 50/60 Hz, 3 ~ Input
Contact Factory
Se rie s CXL (NEMA 12)
Dimensions
Rated Kilowatts and output current
Frame Size /
W x Hx D
Constant Torque Variable Torque
Enclosure Style
( inches )
kW
Ict *
kW
Ivt **
CXL 0022 V 3 4
2.2
6.5
3
8
CXL 0030 V 3 4
3
8
4
10
M4 / NEMA 12
4.7 x 15.4 x 8.5
CXL 0040 V 3 4
4
10
5.5
13
CXL 0055 V 3 4
5.5
13
7.5
18
CXL 0075 V 3 4
7.5
18
11
24
M5 / NEMA 12
6.2 x 20.3 x 9.4
CXL 0110 V 3 4
11
24
15
32
CXL 0150 V 3 4
15
32
18.5
42
CXL 0185 V 3 4
18.5
42
22
48
CXL 0220 V 3 4
22
48
30
60
M6 / NEMA 12
8.7 x 25.6 x 11.4
CXL 0300 V 3 4
30
60
37
75
CXL 0370 V 3 4
37
75
45
90
CXL 0450 V 3 4
45
90
55
110
CXL 0550 V 3 4
55
110
75
150
M7 / NEMA 12 14.7 x 39.4 x 13.0
CXL 0750 V 3 4
75
150
90
180
CXL 0900 V 3 4
90
180
110
210
CXL 1100 V 3 4
110
210
132
270
M8 / NEMA 12 19.5 x 47.6 x 13.9
CXL 1320 V 3 4
132
270
160
325
CXL 1600 V 3 4
160
325
200
410
CXL 2000 V 3 4
200
410
250
510
M9 / NEMA 12 27.6 x 56.1 x 15.4
CXL 2500 V 3 4
250
510
315
580
CXL 3150 V 3 4
315
600
400
750
Contact Factory
CXL 4000 V 3 4
400
750
500
840
* Ict = continuous rated input and output current ( constant torque load, max 50C ambient )
** Ivt = continuous rated input and output current ( variable torque load, max 40C ambient )
Catalog
Number
W eight
( lbs )
17.6
35.3
84
221
309
574
Page 17 (84)
4
Technical data
525 - 600Vac, +10% / -15%, 50/60 Hz, 3 ~ Input
Series CX (standard/protected chassis)
Rated Horsepower and output current
Catalog
Number
4
Constant Torque
Hp
Ict *
Variable Torque
Hp
Ivt **
Frame Size /
Enclosure Style
Dimensions
WxHxD
( inches )
CX 0020HP V 3 6
2
3.5
3
4.5
CX 0030HP V 3 6
3
4.5
CX 0040HP V 3 6
5
7.5
CX 0050HP V 3 6
5
7.5
7.5
10
M5 / Protected
6.2 x 17.3 x 10.4
CX 0075HP V 3 6
7.5
10
10
14
CX 0100HP V 3 6
10
14
15
19
CX 0150HP V 3 6
15
19
20
23
CX 0200HP V 3 6
20
23
25
26
CX 0250HP V 3 6
25
26
30
35
CX 0300HP V 3 6
30
35
40
42
CX 0400HP V 3 6
40
42
50
52
M6 / Protected
8.7 x 24.3 x 11.4
CX 0500HP V 3 6
50
52
60
62
CX 0600HP V 3 6
60
62
75
85
CX 0750HP V 3 6
75
85
100
100
CX 1000HP V 3 6
100
100
125
122
M8 / Chassis *** 19.5 x 35.0 x 13.9
CX 1250HP V 3 6
125
122
150
145
CX 1500HP V 3 6
150
145
CX 1750HP V 3 6
200
222
M9 / Chassis *** 27.6 x 39.4 x 15.4
CX 2000HP V 3 6
200
222
250
287
CX 2500HP V 3 6
250
287
300
325
M10 / Chassis*** 38.9 x 39.4 x 15.4
CX 3000HP V 3 6
300
325
400
390
M11 / Chassis 55.1 x 39.4 x 15.4
CX 4000HP V 3 6
400
400
500
490
CX 5000HP V 3 6
500
490
600
620
CX 6000HP V 3 6
600
620
700
700
M12 / Chassis 77.9 x 39.4 x 15.4
CX 7000HP V 3 6
700
700
CX 8000HP V 3 6
800
780
* Ict = rated input and output current ( constant torque load, max 50C ambient )
** Ivt = rated input and output current ( variable torque load, max 40C ambient )
*** Protected Enclosure with Option
Page 18 (84)
Weight
( lbs )
33.1
83.8
300
466
602
948
1213
Technical Data
440 - 500Vac , +10% / -15%, 50/60 Hz, 3 ~ Input
Series CXS (compact NEMA 1)
Rated Horsepower and output current
Catalog
Number
CXS
CXS
CXS
CXS
CXS
CXS
CXS
CXS
CXS
CXS
CXS
CXS
0010HP
0015HP
0020HP
0030HP
0040HP
0050HP
0075HP
0100HP
0150HP
0200HP
0250HP
0300HP
V
V
V
V
V
V
V
V
V
V
V
V
Constant Torque
3
3
3
3
3
3
3
3
3
3
3
3
5
5
5
5
5
5
5
5
5
5
5
5
Variable Torque
Hp
Ict *
Hp
Ivt **
1
1.5
2
3
5
7.5
10
15
20
25
30
2.5
3
3.5
5
8
11
15
21
27
34
40
1.5
2
3
5
7.5
10
15
20
25
30
40
3
3.5
5
8
11
15
21
27
34
40
52
Frame Size /
Enclosure Style
Dimensions
WxHxD
( inches )
Weight
( lbs )
M3 / Compact
NEMA 1
4.7 x 12.0 x 5.9
9.9
M4B / Compact
NEMA 1
5.3 x 15.4 x 8.1
15.4
M5B / Compact
NEMA 1
4
33.1
380 - 440Vac , +10% / -15%, 50/60 Hz, 3 ~ Input
7.3 x 22.8 x 8.5
Series CXS (compact NEMA 1)
Dimensions
Rated Kilowatts and output current
Frame Size /
Constant Torque Variable Torque
WxHxD
Enclosure Style
( inches )
kW
Ict *
kW
Ivt **
CXS 0007 V 3 4
0.75
2.5
1.1
3.5
CXS 0011 V 3 4
1.1
3.5
1.5
4.5
M3 / Compact
4.7 x 12.0 x 5.9
CXS 0015 V 3 4
1.5
4.5
2.2
6.5
NEMA 1
CXS 0022 V 3 4
2.2
6.5
3
8
CXS 0030 V 3 4
3
8
4
10
CXS 0040 V 3 4
4
10
5.5
13
M4B / Compact
CXS 0055 V 3 4
5.5
13
7.5
18
5.3 x 15.4 x 8.1
NEMA 1
CXS 0075 V 3 4
7.5
18
11
24
CXS 0110 V 3 4
11
24
15
32
CXS 0150 V 3 4
15
32
18.5
42
M5B / Compact
7.3 x 22.8 x 8.5
CXS 0185 V 3 4
18.5
42
22
48
NEMA 1
CXS 0220 V 3 4
22
48
30
60
* Ict = continuous rated input and output current ( constant torque load, max 50C ambient )
** Ivt = continuous rated input and output current ( variable torque load, max 40C ambient )
Catalog
Number
Weight
( lbs )
9.9
15.4
33.1
Page 19 (84)
4
Technical Data
200-240 Vac. +10% / -15%. 50/60 Hz. 3 ~ Input
Series CXS (compact NEMA 1)
Rated Horsepower and output current
Catalog
Number
4
CXS
CXS
CXS
CXS
CXS
CXS
CXS
CXS
CXS
CXS
CXS
0007HP
0010HP
0015HP
0020HP
0030HP
0040HP
0050HP
0075HP
0100HP
0150HP
0200HP
V
V
V
V
V
V
V
V
V
V
V
Constant Torque
3
3
3
3
3
3
3
3
3
3
3
2
2
2
2
2
2
2
2
2
2
2
Variable Torque
Hp
Ict *
Hp
Ivt **
0.75
1
1.5
2
3
5
7.5
10
15
20
3.6
4.7
5.6
7
10
16
22
30
43
57
1
1.5
2
3
5
7.5
10
15
20
25
4.7
5.6
7
10
16
22
30
43
57
70
200-240 Vac, +10% / -15%. 50/60 Hz. 3 ~ Input
Frame Size /
Enclosure Style
Dimensions
WxHxD
( inches )
Weight
( lbs )
M3 / Compact
NEMA 1
4.7 x 12.0 x 5.9
9.9
M4B / Compact
NEMA 1
5.3 x 15.4 x 8.1
15.4
M5B / Compact
NEMA 1
7.3 x 22.8 x 8.5
33.1
Series CX (standard/protected chassis)
Dimensions
Rated Horsepower and output current
Frame Size /
Constant Torque Variable Torque
WxHxD
Enclosure Style
( inches )
Hp
Ict *
Hp
Ivt **
CX 0020HP V 3 2
2
7
3
10
M4 / Protected 4.7 x 11.4 x 8.5
CX 0030HP V 3 2
3
10
CX 0040HP V 3 2
5
16
CX 0050HP V 3 2
5
16
7.5
22
M5 / Protected 6.2 x 15.9 x 9.4
CX 0075HP V 3 2
7.5
22
10
30
CX 0100HP V 3 2
10
30
15
43
CX 0150HP V 3 2
15
43
20
57
CX 0200HP V 3 2
20
57
25
70
M6 / Protected 8.7 x 20.7 x 11.4
CX 0250HP V 3 2
25
70
30
83
CX 0300HP V 3 2
30
83
40
113
CX 0400HP V 3 2
40
113
50
139
M7 / Chassis*** 9.8 x 31.5 x 12.4
CX 0500HP V 3 2
50
139
60
165
CX 0600HP V 3 2
60
165
75
200
CX 0750HP V 3 2
75
200
100
264
M8 / Chassis*** 19.5 x 35 x 13.9
* Ict = continuous rated input and output current ( constant torque load. max 50C ambient )
** Ivt = continuous rated input and output current ( variable torque load. max 40C ambient )
*** Protected Enclosure with Option
Catalog
Number
Page 20 (84)
Weight
( lbs )
15.4
33.1
77.2
135
300
Technical Data
200-240 Vac , +10% / -15%, 50/60 Hz, 3 ~ Input
Series CXL (NEMA 12)
Rated Horsepower and output current
Catalog
Number
CXL
CXL
CXL
CXL
CXL
CXL
CXL
CXL
CXL
CXL
CXL
CXL
CXL
CXL
0020HP
0030HP
0040HP
0050HP
0075HP
0100HP
0150HP
0200HP
0250HP
0300HP
0400HP
0500HP
0600HP
0750HP
V
V
V
V
V
V
V
V
V
V
V
V
V
V
Constant Torque
3
3
3
3
3
3
3
3
3
3
3
3
3
3
2
2
2
2
2
2
2
2
2
2
2
2
2
2
Variable Torque
Hp
Ict *
Hp
Ivt **
2
3
5
7.5
10
15
20
25
30
40
50
60
75
7
10
16
22
30
43
57
70
83
113
139
165
200
3
5
7.5
10
15
20
25
30
40
50
60
75
100
10
16
22
30
43
57
70
83
113
139
165
200
264
200-240 Vac , +10% / -15%, 50/60 Hz, 3 ~ Input
Frame Size /
Enclosure Style
Dimensions
W xHxD
( inches )
Weight
( lbs )
M4 / NEMA 12
4.7 x 15.4 x 8.5
17.6
M5 / NEMA 12
6.2 x 20.3 x 9.4
35.3
M6 / NEMA 12
8.7 x 25.6 x 11.4
84
M7 / NEMA 12
14.7 x 39.4 x 13
180
M8 / NEMA 12
19.5 x 50.8 x 14
337
Series CXL (NEMA 1)
Dimensions
Rated Horsepower and output current
Frame Size /
Constant Torque Variable Torque
W xHxD
Enclosure Style
( inches )
Hp
Ict *
Hp
Ivt **
CXL 0020HP V 3 2
2
7
3
10
M4 / NEMA 1
4.7 x 15.4 x 8.5
CXL 0030HP V 3 2
3
10
CXL 0040HP V 3 2
5
16
CXL 0050HP V 3 2
5
16
7.5
22
M5 / NEMA 1
6.2 x 20.3 x 9.4
CXL 0075HP V 3 2
7.5
22
10
30
CXL 0100HP V 3 2
10
30
15
43
CXL 0150HP V 3 2
15
43
20
57
CXL 0200HP V 3 2
20
57
25
70
M6 / NEMA 1
8.7 x 25.6 x 11.4
CXL 0250HP V 3 2
25
70
30
83
CXL 0300HP V 3 2
30
83
40
113
CXL 0400HP V 3 2
40
113
50
139
M7 / NEMA 1
14.7 x 39.4 x 13
CXL 0500HP V 3 2
50
139
60
165
CXL 0600HP V 3 2
60
165
75
200
CXL 0750HP V 3 2
75
200
100
264
M8 / NEMA 1
19.5 x 50.8 x 14
* Ict = continuous rated input and output current ( constant torque load, max 50C ambient )
** Ivt = continuous rated input and output current ( variable torque load, max 40C ambient )
Catalog
Number
Weight
( lbs )
17.6
35.3
84
180
337
Page 21 (84)
4
Technical data
4.3 Specifications
Utility
Input voltage Vin
200-240V, 380—440V, 460—500V, 525—690V; -15%—+10%
connection
Input frequency
45—66 Hz
Connection to the mains
once per minute or less (normally)
Motor
Output voltage
0 — Vin
Connection
Continuous output
current
ICT: ambient max +50°C,
overload 1.5 x ICT (1min/10 min)
IVT: ambient max +40°C, 1.1 x ICT (1min/10 min)
4
Control
characteristics
Environmental
limits
Starting torque
200%
Starting current
2.5 x ICT: 2 s every 20 s if output frequency <30 Hz
and if the heatsink temperature <+60°C
Output frequency
0—500 Hz
Frequency resolution
0.01 Hz
Control method
Frequency Control (V/Hz)
Open Loop Sensorless Vector Control
Closed Loop Vector Control
Switching frequency
1—16 kHz (depending on horsepower rating)
Frequency Analog I/P
reference Panel refer.
Resolution 12 bit, accuracy ±1%
Resolution 0.01 Hz
Field weakening point
30—500 Hz
Acceleration time
0.1—3000 s
Deceleration time
0.1—3000 s
Braking torque
DC brake: 30%*TN (without brake option)
Ambient operating
temperature
-10 (no frost)—+50°C at ICT, (1.5 x ICT max 1min/10min)
-10 (no frost)—+40°C at IVT, (1.1 x ICT max 1min/10 min)
Storage temperature
-40°C—+60°C
Relative humidity
<95%, no condensation allowed
Air quality
- chemical vapors
- mechanical particles
IEC 721-3-3, unit in operation, class 3C2
IEC 721-3-3, unit in operation, class 3S2
Altitude
Max 1000 m at continuous ICT specification
Over 1000 m reduce ICT by 1% per each 100 m
Absolute maximum altitude 3000 m
Vibration
(IEC 721-3-3)
Operation: max displacement amplitude 3 mm
at 2—9 Hz,
Max acceleration amplitude 0.5 G at 9—200 Hz
Shock
(IEC 68-2-27)
Operation: max 8 G, 11 ms
Storage and shipping: max 15 G, 11 ms (in the package)
Enclosure
Open and protected chassis (IP00 and IP20)
Compact NEMA 1 (IP20)
NEMA 1 (IP21)
NEMA 12 (IP54)
Table 4.3-1 Specifications.
Page 22 (84)
Technical data
EMC
Noise immunity
Fulfils EN50082-1,-2 , EN61800-3
Emissions
CX x x x x x x N x -series equipped with external RFI-Filter fulfils
EN50081-2, EN61800-3
CXL x x x x x x I x -series fulfils EN50081-2, EN61800-3
CXL x x x x x x C x -series fulfils EN50081-1,-2, EN61800-3
CXS x x x x x x I x -series fulfils EN50081-2, EN61800-3
CXS x x x x x x C x -series fulfils EN50081-1,-2, EN61800-3
Safety
Fulfils EN50178, EN60204 -1,CE, UL, C-UL, FI, GOST R
(check from the unit nameplate specified approvals for each unit)
Control
Analog voltage
connections
0—+10 V, Ri = 200 kΩ, single ended
(-10—+10V , joystick control), resolution12 bit, accur. ±1%
Analog current
0 (4) — 20 mA, Ri = 250 Ω, differential
Digital inputs (6)
Positive or negative logic
Aux. voltage
+24 V ±20%, max 100 mA
Pot. meter reference
+10 V -0% — +3%, max 10 mA
Analog output
0 (4) — 20 mA, RL <500 Ω, resolution 10 bit, accur. ±3%
Digital output
Open collector output, 50 mA/48 V
Relay outputs
Max switching voltage:
Max switching load:
Max continuous load:
4
300 V DC, 250 V AC
8A / 24 V
0.4 A / 250 V DC
2 kVA / 250 V AC
2 A rms
Protective
Overcurrent protection
Trip limit 4 x ICT
functions
Overvoltage protection
Utility voltage: 220 V,
230 V,
240 V,
380 V,
400 V
Trip limit:
1.47x Vn, 1.41x Vn, 1.35x Vn, 1.47x Vn, 1.40x Vn
Utility voltage: 415 V,
440 V,
460 V,
480 V,
500 V
Trip limit:
1.35x Vn ,1.27x Vn, 1.47x Vn, 1.41x Vn, 1.35x Vn
Utility voltage: 525 V,
575 V,
600 V,
660 V,
690 V
Trip limit:
1.77x Vn, 1.62x Vn, 1.55x Vn, 1.41x Vn, 1.35x Vn
Undervoltage protection
Trip limit 0.65 x Vn
Ground-fault protection
Protects the inverter from an ground-fault in the output
(motor or motor cable)
Utility supervision
Trip if any of the input phases is missing
Motor phase supervision
Trip if any of the output phases is missing
Unit over temperature
protection
Yes
Motor overload protection
Yes
Stall protection
Yes
Motor underload protection Yes
Short-circuit protection of Yes
+24V and +10V reference
voltages
Table 4.3-1 Specifications.
Page 23 (84)
Installation
5 INSTALLATION
b
5.1 Ambient conditions
The environmental limits mentioned in table
4.3-1 must not be exceeded.
5.2 Cooling
5
The specified space around the drive ensures
proper cooling air circulation. See table 5.2-1
for dimensions. If multiple units are to be
installed above each other, the dimensions
must be b+c and air from the outlet of the
lower unit must be directed away from the inlet
of the upper unit.
a
c
Figure 5.2-1 Installation space.
With high switching frequencies and high
ambient temperatures the maximum
continuous output current has to be derated
according to Table 5.2-3 and Figures 5.2-3 ad.
Frame Size / Enclosure Style
M3 / Compact NEMA 1
a2
1
0.5
b
4
1
M4B / M5B Compact NEMA 1 1
M6 / Protected & NEMA 12
M6 / NEMA 1
M7 / Chassis* & NEMA 12
1
1.5
1.5
3 ( 1.5 )**
3 ( 2.5 )** 12
10*** ( 3 )**
3
12
8*** ( 3 )**
3
12
8*** ( 3 )**
3
10 - 25
480 / Compact NEMA 1
15 - 40
480 / Protected & NEMA 1/12
20 - 60
600 / Protected
20
230 / Compact NEMA 1
2.5
15 - 30
230 / Protected & NEMA 1 / 12
3.5
( 22 )
380 / Compact NEMA 1
3.5
30
480 / Compact NEMA 1
( 37 - 45 )
380 / Protected & NEMA 1/12
50 - 60
480 / Protected & NEMA 1/12
4
12
M10 / NEMA 1
M11 / Chassis & NEMA 12
M11 / NEMA 1
480 / Protected & NEMA 1/12
380 / Compact NEMA 1
M9 / NEMA 1
M10 / Chassis & NEMA 12
3 - 10
380 / Protected & NEMA 1/12
M8 / NEMA 1
M9 / Chassis* & NEMA 12
480 / Compact NEMA 1
( 11 - 30 )
M7 / NEMA 1
M8 / Chassis* & NEMA 12
1 - 7.5
2
2.5
6.5
380 / Protected & NEMA 1/12
230 / Protected & NEMA 1 / 12
2
1.5
380 / Compact NEMA 1
( 2.2 - 7.5 )
5 - 10
5
6.5
230 / Protected & NEMA 1 / 12
( 7.5 - 18.5 )
4
4
2-3
( 0.75 - 5.5 )
c
0.5
5
230 / Compact NEMA 1
600 / Protected
1
1
0.75 - 2
230 / Compact NEMA 1
M5 / Protected & NEMA 12
M5 / NEMA 1
Voltage / Enclosure
3 - 15
M4 / Protected & NEMA 12
M4 / NEMA 1
Hp ( KW )
2 - 15
Dimensions ( in )
a
a
Contact Factory
M12 / Chassis & NEMA 12
75
600 / Protected
40 - 75
230 / Chassis* & NEMA 1 / 12
( 55 - 90 )
380 / Chassis* & NEMA 1/12
75 - 125
480 / Chassis* & NEMA 1/12
( 110 - 160 )
380 / Chassis* & NEMA 1/12
150 - 200
480 / Chassis* & NEMA 1/12
100 - 150
600 / Chassis*
( 200 - 250 )
380 / Chassis* & NEMA 1/12
250 - 300
480 / Chassis* & NEMA 1/12
175 - 200
600 / Chassis*
( 315 - 400 )
380 / Chassis & NEMA 1/12
M12 / NEMA 1
400 - 500
480 / Chassis & NEMA 1/12
a2 - Distance from inverter to inverter in multiple inverter
250 - 300
600 / Chassis*
( 500 )
380 / Chassis
600
480 / Chassis
400
600 / Chassis
( 630 - 1000 )
380 / Chassis
installations
* - Protected enclosure with optional cover.
** - Minimum allowable space - No space available for fan
change.
*** - Space for fan change on sides of inverter.
*
Table 5.2 -1 Installation space dimensions.
Page 24 (84)
700 - 1100
480 / Chassis
500 - 800
600 / Chassis
Protected enclosure w ith optional cover.
Table 5.2-2 Required cooling air.
Required Airflow
( CFM )
42
100
218
383
765
1148
1736
2296
3473
Installation
W
W
1200
6000
CX/CXL 0150 / 0200HP
1000
CX/CXL 0110 / 0150HP
800
CX/CXL 0900 / 1250HP
5000
CX/CXL 0750 / 1000HP
4000
CX/CXL 0550 / 0750HP
CX/CXL 0450 / 0600HP
3000
CX/CXL 0370 / 0500HP
CX/CXL 0075 / 0100HP
600
CX/CXL 0055 / 0075HP
CX/CXL 0040 / 0050HP
CX/CXL 0030 / 0040HP
CX/CXL 0022 / 0030HP
400
200
0
1 2 3 4 5 6 7 8 9 10 11 12 13 14 15 16
fsw [kHz]
CX/CXL 0220 / 0300HP
CX/CXL 0185 /0250HP
1000
0
1 2 3 4 5 6 7 8 9 10 11 12 13 14 15 16
fsw [kHz]
18.5 - 90 kW,
25-125 HP
Figure 5.2-2b
2.2 - 15 kW,
3 - 20 hp
Figure 5.2-2a
CX/CXL 0300 / 0400HP
2000
5
W
16 000
CX/CXL 2500 / 3000HP
14 000
CX/CXL 2000 / 2500HP
12 000
10 000
CX/CXL 1600 / 2000HP
CX/CXL 1320 / 1500HP
8 000
CX/CXL 1100 / 1250HP
6 000
4 000
fsw [kHz]
1 2
3
4
5
Figure 5.2-2c
6
7
8
9 10 11 12 13 14 15 16
110 - 250 kW,
150 - 300 HP
Figures 5.2-2a—c Power dissipation as a function of the switching frequency for 400V (kW) and 500V
(Hp) for standard enclosures (IVT,variable torque).
W
W
4 000
1 200
CX/CXL 0750HP
CX/CXL 0200HP
1 000
CX/CXL 0150HP
CX/CXL 0600HP
3 000
800
CX/CXL 0500HP
CX/CXL 0100HP
600
CX/CXL 0400HP
2 000
CX/CXL 0300HP
CX/CXL 0075HP
400
CX/CXL 0250HP
CX/CXL 0050HP
CX/CXL 0040HP
CX/CXL 0030HP
CX/CXL 0020HP
200
fsw [kHz]
1
2
Figure 5.2-2d
3
4
5
2 - 20 HP
6
1 000
fsw [kHz]
1
2
Figure 5.2-2e
3
4
5
6
25 - 75 HP
Figures 5.2-2d—e: Power dissipation as a function of the switching frequency for 230V (Hp)
for standard enclosures (IVT,variable torque).
Page 25 (84)
Installation
300
900
800
250
200
CXS 0007 / 0010HP
CXS 0011 / 0015HP
CXS 0015 / 0020HP
CXS 0022 / 0030HP
CXS 0030 / 0040HP
150
100
Power loss / W
Power loss / W
700
600
500
CXS 0040 / 0050HP
CXS 0055 / 0075HP
400
CXS 0075 / 0100HP
CXS 0110 / 0150HP
300
200
50
100
0
3000
10000
0
3000
16000
Switching frequency / Hz
Figure 5.2-2f
16000
Figure 5.2-2g
1 600
1 400
1 200
Power loss / W
5
10000
Switching frequency / Hz
1 000
CXS 0150 / 0200HP
CXS 0185 / 0250HP
CXS 0220 / 0300HP
800
600
400
200
0
3000
10000
16000
Switching frequency / Hz
Figure 5.2-2h
Figures 5.2-2 f—h: Power dissipation as a function of the switching frequency for 400V and 500V
(IVT,variable torque), Compact Nema 1.
Page 26 (84)
Installation
Type
(HP)
3.6kHz
1-5
7.5
10
15
20
25
30
40
50
60
75
100
125
150
175
200
250
300
400
500
600
700
800
900
1000
1100
no derating
no derating
no derating
no derating
no derating
no derating
no derating
no derating
no derating
7
no derating
no derating
11
no derating
no derating
15
no derating
18
*
*
*
*
*
*
*
*
Curve
10kHz
16kHz
no derating
1
no derating
no derating
no derating
no derating
no derating
5
6
8
9
10
12
13
14
16
17
19
*
*
*
*
*
*
*
*
no derating
2
no derating
no derating
3
no derating
4
not allowed
not allowed
not allowed
not allowed
not allowed
not allowed
not allowed
not allowed
not allowed
not allowed
not allowed
*
*
*
*
*
*
*
*
Table 5.2-3 Constant output current derating
curves for 400—500 V (IVT,variable torque).
IVT (A)
45
40
3
35
CX /CXL 0150 / 0200HP
IVT 16 kHz
30
25
1
20
CX/CXL 0055 / 0075HP
IVT 10 kHz
15
CX/CXL 0550 / 0075HP
I
16 kHz
VT
10
2
5
0
0
10
20
30
40
°C
50
5
Figure 5.2.3 a
IVT (A)
120
7
CX/CXL 0450 / 0600HP
3.6 kHz
I
VT
100
8
80
CX/CXL 0450 / 0600HP
10 kHz
I
VT
CX/CXL 0370 / 0500HP
10 kHz
I
VT
CX/CXL 0300 /0400HP
10 kHz
I
VT
6
60
* = Ask factory for details
5
40
0
CX/CXL 0220 / 0300HP
16 kHz
I
VT
4
20
0
10
20
30
40
°C
50
Figure 5.2.3 b
IVT (A)
IVT (A)
600
18
CX/CXL 2500 / 3000HP
I
3. 6kHz
VT
500
19
CX/CXL 2500 / 3000HP
I
10 kHz
VT
17
CX/CXL 2000 / 2500HP
I
10 kHz
VT
250
11
200
CX/CXL 0900 / 1250HP
3.6 kHz
I
VT
400
15
150
12
100
50
0
0
10
Figure 5.2.3 c
20
30
40
CX/CXL 0900 / 125HP
I
10 kHz
VT
300
10
CX/CXL 0750 / 1000HP
10 kHz
I
VT
9
CX/CXL 0550 / 0750HP
I
10 kHz
VT
50
°C
CX/CXL 1600 / 2000HP
3.6 kHz
I
VT
16
CX/CXL 1600 / 2000HP
10 kHz
I
VT
200
14
CX/CXL 1320 / 1750HP
I
10 kHz
VT
100
13
0
0
10
20
30
40
50
CX/CXL 1100 / 1500HP
10 kHz
I
VT
°C
Figure 5.2-3 d
Figure 5.2-3a—d:Constant output current (IVT) derating curves as a function of ambient temperature
and switching frequency.
Page 27 (84)
Installation
5.3 Mounting
D1
W1
W2
The unit should be mounted in a vertical
position on the wall or on the back plane of a
cubicle. Follow the requirements for cooling,
see table 5.2-1 and figure 5.2-1 for
dimensions.
To ensure a safe installation, make sure that
the mounting surface is relatively flat.
Mounting holes can be marked on the wall
using the template on the cover of the
cardboard shipping package.
R2
R1
H1 H2
H3
R2
5
Mounting is done with four screws or bolts
depending on the size of the unit, see tables
5.3-1 and 5.3-2, and figure 5.3-1 for
dimensions. Units from 25 Hp to 500 Hp, have
special lifting "eyes" which must be used, see
figures 5.3-2 and 5.3-3.
H4
Figure 5.3-1 Mounting dimensions.
The mounting instructions for units over 500
Hp are given in a separate manual. If further
information is needed contact your Honeywell
distributor.
Frame Enclosure
Voltage
M3
M4B
M5B
Compact
NEMA 1
(CXS)
230 / 380 / 480
230 / 380 / 480
230 / 380 / 480
M4
M5
M6
M7
M8
M9
M10
230 / 380 / 480
230 / 380 / 480
230 / 380 / 480
NEMA 1 / 12 230 / 380 / 480
(CXL)
230 / 380 / 480
380 / 480
380 / 480
M4
M5
M5
M6
M6
M7
M8
M9
M10
M11
M12
Chassis /
Protected
(CX)
230 / 380 / 480
230 / 380 / 480
600
230 / 380 / 480
600
230 / 380 / 480
230 / 380 / 480 / 600
380 / 480 / 600
380 / 480 / 600
380 / 480 / 600
380 / 480 / 600
W1
4.7
5.3
7.3
W2
3.7
3.7
5.5
4.7
6.2
8.7
14.7
19.5
27.6
3.7
5
7.1
13.6
18
26
4.7
6.2
6.2
8.7
8.7
9.8
19.5
27.6
38.9
3.7
5
5
7.1
7.1
8.7
18
26
37.3
Table 5.3-1 Dimensions for open chassis units.
Page 28 (84)
Dimensions (inches)
H1
H2
H3
H4
13.5 13.1 12
17
16.5 15.4
23.4 22.8 21.7
D1
5.9
8.1
8.5
R1
0.28
0.28
0.35
R2
0.14
0.14
0.18
16.7 16.2 15.4
22.1 21.5 20.3
27.6 26.9 25.6
41.3 40.6 39.4
53.1 36.5 50.8
57.9 40.2 56.1
CONTACT FACTORY
8.5
9.4
11.4
13
13.9
15.4
0.28
0.35
0.35
0.35
0.45
0.45
0.14
0.18
0.18
0.18
0.24
0.24
12.7 12.3 11.4 1.6
17.8 17.1 15.9 1.8
19.1 18.5 17.3 1.8
22.6 22
20.7 3.9
26.3 25.6 24.3 3.9
33.6 32.9 31.5
37.4 36.5 35
41.1 40.2 39.4
41.1 40.2 39.4
CONTACT FACTORY
8.5
9.4
10.4
11.4
11.4
12.4
13.9
15.4
15.4
0.28
0.35
0.35
0.35
0.35
0.35
0.45
0.45
0.45
0.14
0.18
0.18
0.18
0.18
0.18
0.24
0.24
0.24
Installation
5
Figure 5.3-2 Lifting of 25—125 Hp units.
C O R R EC T
W RONG
RU N
RUN
R EAD Y
PAR
REF
R EA DY
F AUL T
FA UL T
MO N
MO N
PAR
RE F
BT N S
B TN S
R ST
R ST
PG
PG
UD 0 08 K1 7
UD 0 0 8 K 1 7
L1
L2
L3
U
V
W
-
+
+
+
L1
L2
L3
U
V
W
-
+
+
+
N O TE !
U nit sizes 150
500 H p - do not lift w ithout a rod through the lifting holes in
the unit - see above.
M 9N O S TO
Page 29 (84)
Wiring
6 WIRING
General wiring diagrams are shown in figures
6-1—6-3. The following chapters have more
detailed instructions about wiring and cable
connections.
Reference
(voltage)
Reference
(current)
5
24 V
GND
x)
6
24 V
GND
1
2
3
4
5
6
7
8
9
10
11
12
13
14
15
16
17
The general wiring diagrams for M11 and M12
frame sizes are provided in a separate
manual. If further information is required,
contact your Honeywell distributor.
+10 Vref.
I out + 18
I out - 19
Vin +
GND
0(4)/20mA
RL<500Ω
20
Iin +
DO1
Iin GND
RO1/1 21
1/2 22
DIA1
RO1/3 23
2 4 Vou t
DIA2
RO2/1 24
2/2 25
DIA3
CMA
RO2/3 26
2 4 Vou t
GND
DIB4
DIB5
DIB6
+
U<+48V
I<50mA
RL
ac/dc
Switching:
<8A/24Vdc,
<0.4A/300Vdc,
<2kVA/250Vac
Continuously:
<2Arms
1) Brake
Chopper
(Optional)
CMB
x)
x) dotted line
indicates the
connection
with inverted
signal levels
1)
L1 L2 L3
-
+
U
V
W
Brake Resistor
(Optional)
RFI-filter (optional)
L1 L2
L3
M
3~
k6_1
Figure 6-1 General wiring diagram, open/protected chassis units frame sizes M4—M6.
Page 30 (84)
Wiring
Reference
(voltage)
Reference
(current)
24 V
GND
x)
24 V
GND
1
2
3
4
5
6
7
8
9
10
11
12
13
14
15
16
17
+10 Vref.
I out + 18
I out - 19
Vi n +
GND
0(4)/20mA
RL<500Ω
20
Iin +
DO1
Iin GND
RO1/1 21
1/2 22
DIA1
RO1/3 23
2 4Vo u t
DIA2
CMA
RO2/1 24
2/2 25
2 4Vo u t
RO2/3 26
DIA3
GND
DIB4
DIB5
DIB6
+
V<+48V
I<50mA
RL
ac/dc
Switching:
<8A/24Vdc,
<0.4A/300Vdc,
<2kVA/250Vac
Continuously:
<2Arms
1) Brake
Chopper
(Optional)
5
CMB
x)
x) dotted line
indicates the
connection
with inverted
signal levels
6
1)
L1 L2 L3
-
+
U
Brake Resistor
(Optional)
V
W
M
3~
RFI-filter (optional)
L1 L2
L3
k6_2
Figure 6-2 General wiring diagram, open/protected chassis frame size M7 and NEMA 1/12 units frame
size > M8.
Page 31 (84)
Wiring
Reference
(voltage)
Reference
(current)
24 V
GND
x)
24 V
GND
5
1
2
3
4
5
6
7
8
9
10
11
12
13
14
15
16
17
+10 Vref.
I out + 18
I out - 19
Vi n +
GND
0(4)/20mA
RL<500Ω
20
Iin +
DO1
Iin GND
RO1/1 21
1/2 22
DIA1
RO1/3 23
2 4 Vo u t
DIA2
RO2/1 24
2/2 25
DIA3
CMA
2 4 Vo u t
RO2/3 26
GND
DIB4
+
V<+48V
I<50mA
RL
ac/dc
Switching:
<8A/24Vdc,
<0.4A/300Vdc,
<2kVA/250Vac
Continuously:
<2Arms
1) Brake
Chopper
(Optional)
DIB5
DIB6
CMB
x)
x) dotted line
indicates the
connection
with inverted
signal levels
6
L1 L2 L3
Internal RFI-filter
1)
L1 L2 L3
+
U
V
W
M
3~
Brake Resistor
(Optional)
k6_3
Figure 6-3 General wiring diagram, NEMA 1/12 units frame sizes M4 to M7 and compact NEMA 1 units.
Page 32 (84)
Wiring
6.1 Power connections
Use cables with a heat-resistance of +140°F
(+60°C) or higher. The cable (and the fuses)
have to be sized in accordance with the rated
output current of the unit. Installation of the
cable consistent with the UL Instructions is
explained in chapter 6.1.4.1.
The minimum dimensions for the Cu-cables
and corresponding fuses are given in the
tables 6.1-2 — 6.1-5. The fuses have been
selected so that they will also function as
overload protection for the cables.
6.1.1 Utility cable
Utility cables for the different EU EMC levels
are defined in the table 6.1-1.
6.1.2 Motor cable
Motor cables for the different EU EMC levels
are defined in the table 6.1-1.
6.1.3 Control cable
Control cables are specified in chapter 6.2.1.
Consistent with the UL requirements, for
maximum protection of the CX/CXL/CXS, UL
recognized fuses type RK should be used.
5
If the motor temperature protection (I2t) is used
as overload protection the cables may be
selected according to that. If 3 or more cables
are used in parallel, on larger units, every
cable must have its own overload protection.
6
These instructions cover the cases where one
motor is connected with one cable to the drive.
Always pay attention to the local authority
regulations and installation conditions.
Cable
level N
level I
Utility cable
1
1
Motor cable
2
2
Control cable
3
3
Table 6.1-1 Cable types for the different EMC levels.
1=
The power cable which is suitable for the installation, ampacity and voltage. Shielded cable is not
required.
2=
The power cable contains a concentric protection wire, and is suitable for the ampacity and voltage.
3=
The control cable is a compact low-impedance shielded cable.
Page 33 (84)
Wiring
5
6
480V
Hp
Ict
1
1.5
2
3
2.5
3
3.5
5
5
7.5
10
15
20
25
30
40
50
60
75
100
125
150
200
250
300
400
500 1100
8
11
15
21
27
34
40
52
65
77
96
125
160
180
260
320
400
480
Cu-cable
LINE & MOTOR
(Ground )
Fuse
10
16 ( 16 )
15
20
25
35
50
50
60
80
100
125
150
200
200
300
400
500
14 ( 14 )
12 ( 12 )
10 ( 10 )
8(8)
6(6)
4(6)
2(6)
0(4)
00 ( 2 )
000 ( 0 )
350MCM ( 000 )
2x [ 250MCM ( 00 ) ]
2x [ 350MCM ( 000 ) ]
Ivt
Fuse
Cu-cable LINE & MOTOR
(Ground )
3
3.5
5
10
16 ( 16 )
15
20
25
35
50
50
60
80
100
125
150
200
200
300
400
500
600
14 ( 14 )
12 ( 12 )
10 ( 10 )
8
11
15
21
27
32
40
52
65
77
96
125
160
180
260
320
400
460
600
8(8)
6(6)
4(6)
2(6)
0(4)
00 ( 2 )
000 ( 0 )
350MCM ( 000 )
2x [ 250MCM ( 00 ) ]
2x [ 350MCM ( 000 ) ]
2x [ 550MCM ( 250MCM ) ]
CONTACT FACTORY
Table 6.1-2 Utility, motor cables and fuse recommendations according to
output currents ICT and IVT, 500V range.
380V
KW
Ic t
0 .7 5
1 .1
1 .5
2 .2
3
4
5 .5
7 .5
11
15
1 8 .5
22
30
37
45
55
75
90
110
132
160
2 .5
3 .5
4 .5
6 .5
8
10
13
18
24
32
42
48
60
75
90
110
150
180
210
270
325
60
80
100
125
150
200
250
300
400
200
410
250
510
315 1000
Fu s e
C u - c a b le
L INE & M O TO R
(Ground)
Iv t
Fu s e
C u - c a b le
L INE & M O TO R
(Ground)
10
16 ( 16 )
15
20
25
35
14 ( 14 )
12 ( 12 )
10 ( 10 )
6 ( 6 )
4 ( 6 )
2 ( 6 )
0 ( 4 )
00 ( 2 )
000 ( 0 )
3 0 0 MC M ( 0 0 )
3 5 0 MC M ( 0 0 0 )
2 x [ 2 5 0 MCM ( 0 0 ) ]
3 .5
4 .5
6 .5
8
10
13
18
24
32
42
48
60
75
90
110
150
180
210
270
325
410
60
80
100
125
150
200
250
300
400
500
500
2 x [ 3 5 0 MCM ( 0 0 0 ) ]
510
600
600
2 x [ 5 0 0 MCM
(2 5 0 MCM )]
580
600
10
16 ( 16 )
15
20
25
35
14 ( 14 )
12 ( 12 )
10 ( 10 )
50
8 ( 8 )
50
8 ( 8 )
6 ( 6 )
4 ( 6 )
2 ( 6 )
0 ( 4 )
00 ( 2 )
000 ( 0 )
3 0 0 MC M ( 0 0 )
3 5 0 MC M ( 0 0 0 )
2 x [ 2 5 0 MCM ( 0 0 ) ]
2 x [ 3 5 0 MCM ( 0 0 0 ) ]
2 x [ 5 0 0 MCM
(2 5 0 MCM )]
2 x [ 5 0 0 MCM
(2 5 0 MCM )]
C O N TA C T FA C TO RY
Table 6.1-3 Utility, motor cables and fuse recommendations according to
output currents ICT and IVT, 400V range
Page 34 (84)
Wiring
600V
Hp
7.5
10
15
20
25
30
40
50
60
75
100
125
150
175
200
250 800
Ict
Cu-cable
Fuse LINE&MOTOR
(Ground)
10
14
19
23
26
35
42
52
62
85
100
122
145
10
15
20
25
35
35
50
60
60
100
100
125
150
16( 16 )
14( 14 )
12( 12 )
10( 10 )
222
250
300MCM( 00 )
8 ( 8)
6 ( 6)
2 ( 6)
0 ( 4)
00( 2 )
Ivt
Cu-cable
Fuse LINE&MOTOR
(Ground)
14
19
23
26
35
42
52
62
85
100
122
145
15
20
25
35
35
50
60
60
100
100
125
100
222
287
250 300MCM( 00 )
300 350MCM( 000)
14( 14 )
12( 12 )
10( 10 )
8 ( 8)
6 ( 6)
2 ( 6)
0 ( 4)
00( 2 )
CONTACTFACTORY
Table 6.1-4 Utility, motor cables and fuse
recommendations according to output currents
ICT and IVT, 600V range.
Fra me
Hp ( K W )
V o lt a g e
M3
M4
M4B
M5
A ll
A ll
A ll
A ll
10 - 20
( 15 - 22 )
230 / 380 / 480
230 / 380 / 480
230 / 380 / 480
230 / 380 / 480 / 600
230
380
20 - 30
15 - 30
( 1 8 .5 - 2 2 )
25 - 30
30 - 50
( 30 - 45 )
480
230
380
480
600
380
40 - 60
480
M5B
M6
*
60 - 75
40 - 75
M7
( 55 - 90 )
100 - 150
( 110 - 160 )
M8
150 - 200
100 - 150
( 200 - 250 )
M9
250 - 300
200
( 315 - 400 )
M10
400 - 500
250 - 300
( 500 )
M11
600
400
(630 - 1000)
M12
700 - 1100
500 - 800
N EM A 1 / 1 2 m a x im u m 3 p a r a lle l
230V
Ict Fuse
Hp
0.75
1
1.5
2
3
5
7.5
10
15
20
25
30
40
50
60
75
Cu-cable
LINE&
MOTOR
3.6
4.7
5.6 10
7
10
16 ( 16 )
15
14 ( 14 )
16
22
30
43
57
70
83
113
139
165
200
25 10 ( 10 )
35
8( 8)
50
60
6( 6)
80
4( 6)
100 2 ( 6 )
125 0 ( 4 )
150 00 ( 2 )
200
000 ( 0 )
200
Ivt
4.7
5.6
7
10
13
16
22
30
43
57
70
83
113
139
165
200
264
Fuse
Cu-cable
LINE&MOTOR
(Ground )
10
16 ( 16 )
15
14 ( 14 )
25
35
50
60
80
100
125
150
200
200
300
10 ( 10 )
8( 8)
6( 6)
4( 6)
2( 6)
0( 4)
00 ( 2 )
000 ( 0 )
350MCM( 000 )
Table 6.1-5 Utility, motor cables and fuse
recommendations according to output currents ICT
and IVT, 230V range.
CA B LE ( A W G / MCM )
M a in
Ground
14
14
10
10
6
6
2
00
0 Cu, 00 A l
600
230
380
350 MCM
480
380
2x 350 MCM Cu
480
2x 500 MCM A l
600
380
2x 600 MCM
480
600
380
4x 500 MCM *
480
600
380
480
600
CO NTA CT FA
380
480
600
c o n n e c t e d c a b le s c a n b e u s e d
5
00
000
2x 500 MCM
2x 500 MCM
2x 500 MCM
CTO RY
Table 6.1-6 Maximum cable sizes of the power terminals.
Page 35 (84)
6
Wiring
6.1.4 Installation instructions
1
If an CX open chassis unit is to be installed outside a control cabinet or a
separate cubicle a protective IP20 cover should be installed to cover the cable
connections, see figure 6.1.4-3. The protective cover may not be needed if
the unit is mounted inside a control cabinet or a separate cubicle.
All open chassis CX units should always be mounted inside a control cabinet,
or a separate cubicle.
2
5
Locate the motor cable away from the other cables:
- Avoid long parallel runs with other cables.
- If the motor cable runs in parallel with the other cables, the minimum
distances given in table 6.1.4-3 between the motor cable and control cables
should be followed.
- These minimum distances apply also between the motor cable and signal
cables of other systems.
- The maximum length of a motor cable can be 600ft (180 m) (except for ratings
1.5 Hp and below max. length is 160 ft (50 m) and 2 Hp max. length 330 ft (100
m). The power cables should cross other cables at an angle of 90 degrees. An output
dv/dt filter option is required for motor cable lengths exceeding 33ft (10m) for drives 2 Hp
and below and 100ft (33m) for drives 3Hp and larger
6
Distance
between cables
ft (m)
Motor
cable length
ft (m)
1 (0.3)
<165 (50)
3.3 (1)
<600 (180)
Table 6.1.4-3 Minimum cable distances.
3
4
Page 36 (84)
See chapter 6.1.5 for cable insulation checks.
Connecting cables:
- Motor and utility cables should be stripped according to the figure
6.1.4-2 and table 6.1.4-2.
- Open the cover of the CX/CXL according to figure 6.1.4-3.
- Remove sufficient plugs from the cable cover (open chassis) cable cover
or from the bottom of the NEMA 1/12 units.
- Pass cables through the holes in the cable cover.
- Connect the utility, motor and control cables to the correct terminals
See figures 6.1.4-3—16. CX + external RFI-filter: (See RFI-filter option
manual). The installation instructions for M11 and M12 frames are
explained in the separate manual for M11/M12 units. Contact your
Honeywell distributor for more information. Cable installation consitent
with UL-instructions is explained in chapter 6.1.4.1.
- Check that control cable wires do not make contact with electrical
components in the device.
- Connect optional brake resistor cable (if required).
- Ensure that the ground cable is connected to the
-terminal of the
frequency converter and motor.
- For open panel units, 150—500 Hp, connect the isolator plates of the
protective cover and terminals according to figure 6.1.4-11.
Wiring
- If a shielded power cable is used, connect its shield to the ground
terminals of the drive, motor and supply panel.
- Mount the cable cover (open chassis units) and the unit cover.
- Ensure that the control cables and internal wiring are not trapped between
the cover and the body of the unit.
NOTE:
5
The connection of the transformer inside the unit in frame sizes M7—M12
has to be changed if other than the default supply voltage of the drive is
used. Contact your Honeywell distributor if more information is needed.
Voltage Code
Default Supply Voltage
2
230V
4
380V
5
480V
6
600V
5
6
Page 37 (84)
Wiring
6.1.4.1 Cable selection and installation
for the UL listing
For the installation and cable connections the
following must be noted. Use only with copper wire temperature rating of at least 140/
167°F.
In addition to the connecting information the
tightening torques of the terminals are defined
in the table 6.1.4.1-2.
Units are suitable for use on a circuit capable
of delivering not more than the fault RMS symmetrical amperes mentioned in the table
6.1.4.1-1, 480V maximum.
Maximum RMS symmetrical
amperes on connecting circuitry
M4 / M5
5 000
380 / 480
M6 / M7
10 000
M8 / M9
18 000
Table 6.1.4.1-1 Maximum symmetrical supply current.
FRAME
5
Voltage
6
Tightening
torque ( in-lbs )
M4
All
7
380 / 480
M5
All
20
M6
( 18.5 - 22 )
380
35
M6
25 - 30
480
35
M6
( 30 - 45 )
380
44
M6
40 - 60
480
44
M7
All
130
380 / 480
M8
All
610*
M9
All
610*
* The isolated standoff of the busbar does not withstand the
listed tightening torque. Use a wrench to apply counter torque
when tightening.
FRAME
Hp ( KW )
Table 6.1.4.1-2 Tightening torque.
Page 38 (84)
Voltage
Wiring
L4
L1
Frame
Hp ( KW )
M3
M4
M4B
M5
All
All
All
All
10 - 20
( 15 - 22 )
M5B
L3
L2
Ground
conductor
Voltage
230 / 380 / 480
230 / 380 / 480
230 / 380 / 480
0.35 1.6
230 / 380 / 480 / 600
230
380
20 - 30
15 - 30
( 18.5 - 22 )
25 - 30
30 - 50
( 30 - 45 )
Utility
cables
M6
Stripping Lengths ( in
s1 s2 s3 s4
0.47 2.2 2.2 0.47
0.24 1.4 2.4 0.6
480
230
380
480
600
380
0.6
1.6
4
0.6
4
0.6
40 - 60
Figure 6.1.4-1 Stripping motor and utility
cables.
480
1
1.6 4
0.6
60 - 75
600
40 - 75
230
M7
( 55 - 90 )
380
2
1
100 - 150
480
( 110 - 160 )
380
M8
150 - 200
480
100 - 150
600
( 200 - 250 )
380
M9
250 - 300
480
200
600
( 315 - 400 )
380
CONTACT FACTORY
M10
400 - 500
480
250 - 300
600
( 500 )
380
M11
600
480
400
600
( 630 - 1000 )
380
M12
700 - 1100
480
500 - 800
600
* NEMA 1 / 12 maximum 3 parallel connected cables can be used
Table 6.1.4-2 Stripping lengths of the cables (in).
Compact NEMA 1
* Contact factory
1 Loosen screws (2 pcs)
2 Pull cover bottom outwards
3 Push cover upwards
3
3
2
2
1
1
IP54KANS
Figure 6.1.4-2 Opening the cover of the CX/CXL.
Page 39 (84)
5
6
Wiring
Power card
Control card
Control I/O
terminals
Connect the shield
to the terminal
6
Fix the control cable
with a tie wrap
1
2
3
4
5
6
7
8
9
10
11
12
13
14
15
16
17
18
19
20
21
22
23
24
25
26
DC-link/Brake
resistor
terminals (-,+)
Utility cable
terminals
(L1,L2,L3)
Ground
terminals
(PE)
Fixing screw
Motor cable
terminals
(U,V,W)
L1 L2 L3 -
+ U V W
Fixing screw
Cable cover
Control cable
Utility cable
Motor cable
Brake resistor cable
Figure 6.1.4-3 Cable assembly for open chassis: CX 0030-0200HP V 3 4/5 and CX 0020-0100HP V 3 2.
Page 40 (84)
Wiring
Control card
I/O terminals
1
2
3
4
5
6
7
8
9
10
11
12
13
14
15
16
17
18
19
20
21
22
23
24
25
26
5
6
Connect the
shield to
the terminal
Utility cable
terminals
Fix the control
cable with a tie
wrap
DC-link/brake
resistor terminals
L1 L2 L3 -
Ground terminal
+ U V W
Motor cable
terminals
Ground terminal
Rubber grommets
Motor cable
Brake resistor cable
Utility cable
Control cable
m4IP21
Figure 6.1.4-4 Cable assembly for NEMA 1: CXL 0030-0075HP V 3 4/5 and CXL 0020-0040HP V 3 2.
Page 41 (84)
Wiring
Control card
I/O terminals
5
6
1
2
3
4
5
6
7
8
9
10
11
12
13
14
15
16
17
18
19
20
21
22
23
24
25
26
Connect the
shield to
the terminal
Fix the control
cable with a tie
wrap
Utility cable
terminals
DC-link/brake
resistor terminals
L1 L2 L3 Ground terminal
+ U V W
Motor cable
terminals
Ground terminal
Rubber grommets
Motor cable
Brake resistor cable
Control cable
Utility cable
m5IP21
Figure 6.1.4-5 Cable assembly for NEMA 1: CXL 0100-0200HP V 3 4/5 and CXL 0050-0100HP V 3 2.
Page 42 (84)
Wiring
Control card
I/O terminals
1
2
3
4
5
6
7
8
9
10
11
12
13
14
15
16
17
18
19
20
21
22
23
24
25
26
5
6
Internal
cooling fan
Connect the
shield to
the terminal
Utility cable
terminals
DC-link/brake
resistor terminals
L1 L2 L3 Ground terminal
+ U V W
Motor cable
terminals
Ground terminal
Rubber grommets
Motor cable
Brake resistor cable
Control cable
Utility cable
Ch5IP54
Figure 6.1.4-6 Cable assembly for NEMA 12: CXL 0100-0200HP V 3 4/5 and CXL 0050-0100HP V 3 2.
Page 43 (84)
Wiring
Power card
Control card
1
2
3
4
5
6
7
8
9
10
11
12
13
14
15
16
17
18
19
20
21
22
23
24
25
26
Control I/O
terminals
5
6
Connect the
shield to the
terminal
Fix the control
cable with a tie
wrap
Utility cable
terminals
(L1,L2,L3)
Ground
terminals
(PE)
Fixing screw
L1
L2
L3
-
+
U
V
W
DC-link/Brake
resistor
terminals (-,+)
Motor cable
terminals
Fixing screw
Cable cover
Utility cable
Control cable
Motor cable
Brake resistor cable
Figure 6.1.4-7 Cable assembly for open chassis: CX 0250-0600HP V 3 4/5 and CX 0150-0300HP V 3 2.
Page 44 (84)
Wiring
5
Control card
I/O terminals
6
Connect the
shield to the
terminal
Utility cable
terminals
DC-link/brake
resistor terminals
Fix the control
cable with a tie
wrap
Motor cable
terminals
L1 L2 L3 -
Ground terminal
+ U V W
Ground terminals
Rubber grommets
Motor cable
Control cable
Brake resistor cable
Utility cable
Ch6IP2154
Figure 6.1.4-8 Cable assembly for NEMA 1: CXL 0250-0600HP V 3 4/5 and CXL 0150-0300HP V 3 2.
Page 45 (84)
Wiring
Utility cable
Ground
terminal
(PE)
Utility cable
terminals
(L1,L2,L3)
5
Power card
L1
L2
L3
Control card
6
1
2
3
4
5
6
7
8
9
10
11
12
13
14
15
16
17
18
19
20
21
22
23
24
25
26
Control I/O
terminals
Connect the screen
to the terminal
Fix the control cable
with a tie wrap
-
Ground
terminals
(PE)
+
U
V
W
DC-link/Brake
resistor
terminals (-,+)
Motor cable
terminals
Brake resistor
cable
Control cable
Motor cable
Figure 6.1.4-9 Cable assembly for open chassis: CX 0750-1250HP V 3 4/5 and CX 0400-0600HP V 3 2.
Page 46 (84)
Wiring
Control I/O
terminals
Control cable
grounding
5
Control cable
fixing
L1
L2
L3
U
V
W
-
+
+
+
6
PE terminal
for utility and
motor cables
DC-link/brake
resistor
terminals
Insulated
(yellow-green)
grounding
conductor twisted
of cable shield
Terminal
isolator
plates
Utility
cable
Control
cable
Motor
cable
Ch9KYTK2
Figure 6.1.4-10 Cable assembly for open chassis: CX 1500-5000HP V 3 4/5, CX 1250-4000HP V 3 6
and CX 0750HP V 3 2; for NEMA 1: CXL 1500-5000HP V 3 4/5 and CXL 0750HP V 3 2.
Page 47 (84)
Wiring
Fixing screws of
protective covers
L1
L2
L3
U
V
W
-
+
+
+
5
6
B
C
A
D
After connecting the cables but before switching on the utility supply,
ensure:
1. Insert all 10 terminal isolator plates (A) in the slots between the terminals,
see figure below
2. Insert and fix three plastic protective covers (B, C, and D) over the
Fixing the terminal isolation plates:
Bend the plate to
fit it into a slot.
Release to lock it
in correct position
Insert plate
into the slots
Terminal isolation plates
Ch9SUO JAT
Figure 6.1.4-11 Cable cover and terminal assembly for open chassis: CX 1500-5000HP V 3 4/5,
CX 1250-4000HP V 3 6 and CX 0750HP V 3 2; for NEMA 1: CXL 1500-5000HP V 3 4/5
and CXL 0750HP V 3 2.
Page 48 (84)
Wiring
Control card
I/O terminals
5
6
Connect the
shield to
the terminal
Utility cable
terminals
DC-link/brake
resistor terminals
L11 L2 L3 L
Motor cable
terminals
+ U V W
Ground terminal
Ground terminal
Ch5CX6
Control cable
Utility cable
Motor cable
Brake resistor cable
Figure 6.1.4-12 Cable assembly for open chassis: CX 0100-0300HP V 3 6.
Page 49 (84)
Wiring
Control card
I/O terminals
5
6
1
2
3
4
5
6
7
8
9
10
11
12
13
14
15
16
17
18
19
20
21
22
23
24
25
26
Connect the
shield to
the terminal
Utility cable
terminals
DC-link/brake
resistor terminals
L1 L2 L3 -
+ U V W
Ground terminal
Motor cable
terminals
Ground terminal
Ch6CX6
Control cable
Utility cable
Figure 6.1.4-13 Cable assembly for open chassis: CX 0400-1000HP V 3 6.
Page 50 (84)
Motor cable
Brake resistor cable
Wiring
Utility cable
terminals
(L1, L2, L3)
DC-link/brake
resistor
terminals (-,+)
Motor cable
terminals
(U,V,W)
Yellowgreen
protective
cable
Yellowgreen
protective
cable
Ground
terminal
Ground
terminal
Utility cable
Motor cable
Ground terminal
for the control cable
Figure 6.1.4-14 Cable assembly compact NEMA 1: CXS 0010-0030HP V 3 5.
Page 51 (84)
5
6
Wiring
DC-link/brake
resistor
terminals (-,+)
5
6
Motor cable
terminals
(U, V, W)
Utility cable terminals
(L1, L2, L3)
Yellow-green
protective
cable
Yellow-green
protective
cable
Ground
terminal
Motor cable
Ground
terminals
Utility cable
Control cable
(other)
Control cable
(relay outputs)
Figure 6.1.4-15 Cable assembly for compact NEMA1: CXS 0050-0150HP V 3 5.
Page 52 (84)
Wiring
6.1.5 Cable and motor insulation checks
6.2 Control connections
1 Motor cable insulation checks
Basic connection diagram is shown in the
figure 6.2-1.
Disconnect the motor cable from the
terminals U, V and W of the CX/CXL/CXS
unit and from motor.
Measure the insulation resistance of the
motor cable between each phase conductor
and between each phase conductor and
the protective ground conductor.
The insulation resistance must be >1MΩ.
2 Utility cable insulation checks
Disconnect the utility cable from terminals
L1, L2 and L3 of the CX/CXL/XS unit and
from the utlity.
Measure the insulation resistance of the
utility cable between each phase conductor
and between each phase conductor and
the protective ground conductor.
The insulation resistance must be >1MΩ.
3 Motor insulation checks
Disconnect the motor cable from the motor
and open any bridging connections in the
motor connection box.
Measure insulation resistance of each
motor winding. The measurement voltage
has to be at least equal to the utility voltage
but not exceeding 1000V.
The insulation resistance must be >1MΩ.
The functionality of the terminals for the Basic
application is explained in chapter 10.2. If one
of the alternative applications is selected,
check the application manual for the
functionality of the terminals for that
application.
6.2.1 Control cables
The control cables should be minimum of #20
gauge shielded multicore cables, see table
6.1-1. The maximum wire size rating of the
terminals is # 14.
5
6.2.2 Galvanic isolation barriers
The control connections are isolated from the
utility potential and the I/O ground is
connected to the frame of the CX/CXL/CXS
via a 1 MΩ resistor and 4.7 nF capacitor. The
control I/O ground can also be connected
directly to the frame, by changing the position
of the jumper X4 to ON-position, see figure
6.2.2-1.
Digital inputs and relay outputs are isolated
from the I/O ground.
Page 53 (84)
6
Wiring
Terminal
5
6
Function
Specification
1
+10Vref
Reference voltage output
Burden max 10 mA *
2
Vin+
Analog signal input
Signal range -10 V— +10 V DC
3
GND
I/O ground
4
Iin+
Analog signal (+input)
5
Iin-
Analog signal (-input)
6
24V out
24V supply voltage
7
GND
I/O ground
8
DIA1
Digital input 1
9
DIA2
Digital input 2
10
DIA3
Digital input 3
11
CMA
Common for DIA1—DIA3
Must be connected to GND or 24V of
I/O- terminal or to external 24V or GND
12
24V out
24V supply voltage
Same as # 6
13
GND
I/O ground
Same as # 7
14
DIB4
Digital input 4
Ri = min. 5 kΩ
15
DIB5
Digital input 5
16
DIB6
Digital input 6
17
CMB
Common for DIB4 — DIB6
Must be connected to GND or 24V of
I/O- terminal or to external 24V or GND
18
Iout+
Analog signal (+output)
Signal range 0(4)—20 mA,
19
Iout-
Analog ground (-output)
RL max. 500 Ω
20
DO1
Open collector output
Transistor output, max. Vin = 48 VDC
max. current 50 mA
21
RO1/1
22
RO1/2
Max switch. current
23
RO1/3
0.4 A / 250 VDC
24
RO2/1
25
RO2/2
26
RO2/3
Relay output 1
Relay output 2
Signal range 0(4)—20 mA
±20%, load max. 100 mA
Ri = min. 5 kΩ
Max. switch. voltage 250 VAC, 300 VDC
Max. switch. power
<2 kVA / 250 VAC
Max. cont. current
<2 A rms
Figure 6.2-1 Control I/O-terminal signals.
* If the potentiometer reference is used, potentiometer R = 1—10 kΩ
Page 54 (84)
8 A / 24 VDC,
Wiring
Utility
X4
10 Vref.
GND
L1 L2 L3
1 MΩ
+24 V
GND
Control I/O
ground
Uin
Iin +
Iin DIA1
...
Digital input
group A
DIA3
CMA
DIB4
...
Digital input
group B
DIB6
CMB
Iout +
Iout -
Analog
output
DO1
Digital
output
Main circuits
5
6
RO1.1
RO1.2
RO1.3
RO2.1
RO2.2
RO2.3
U V
W
K6_2_2_1
Motor
Figure 6.2.2-1 Isolation barriers.
6.2.3 Digital input function inversion
The active signal level of the digital input logic
depends on how the common input (CMA,
CMB) of the input group is connected. The
connection can be either to +24 V or to
ground. See figure 6.2.3-1.
Ground (-)
+24 V
Ground (-)
The +24V or ground for the digital inputs and
common terminals (CMA, CMB) can be either
external or internal (terminals 6 and 12 of the
drive).
DIA1
DIA1
DIA2
DIA2
DIA3
DIA3
CMA
Positive logic (+24 V active signal) = input is active
when the switch is closed.
+24 V
CMA
Negative logic (0 V active signal) = input is active
when the switch is closed.
Figure 6.2.3-1 Positive/negative logic.
Page 55 (84)
Control panel
7. CONTROL PANEL
7.1 Introduction
The control panel of the CX/CXL/CXS
drive features an alphanumeric Display
with five indicators for the Run status
The panel is detachable and isolated from
the input line potential.
(RUN, READY, FAULT,
, STOP)
and two indicators for the control source.
The panel embodies three indicator lines
for the menu/submenu descriptions and
the value/amount of the submenus. The
eight push buttons on the panel are used
for panel programming and monitoring.
The display examples in this chapter
present the text and numeric lines of the
Alphanumeric Display only. The drive
status indicators are not included in the
examples.
DRIVE STATUS INDICATORS
RUN
7
=
lights when motor is running
=
shows the selected rotation
STOP
=
lights when motor is not running
READY
=
lights when input voltage is
supplied and the unit is ready for
use
FAULT
=
lights when a fault in frequency
drive occurs
ALARM
=
lights when a warning is
given
Panel/
Remote
=
Shows the active control source
Figure 7-1 Control panel with LED display.
= Menu button (left)
Move forwards in the menu
= Menu button (right)
Move backwards in the menu
= Browser button (up)
Move in the main menu and between
pages inside the same submenu.
Change value.
= Browser button (down)
Move in the main menu and between
pages inside the same submenu.
Change value.
Page 56 (84)
= Enter button
Acknowledgement of changed value.
Fault history reset.
Function as programmable button.
= Reset button
Fault resetting
= Start button
Starts the motor if the panel is the
active control source
= Stop button
Stops the motor if the panel is the
active control source
Control panel
7.2 Panel operation
The panel is arranged in menus and
submenus. The menus are used for the
display of measurement and control signals,
parameter settings, reference values, fault
displays, contrast and the programmable
buttons.
The desired submenu can also be entered
from the main menu by using the menu
M7
Contrast
15
buttons when the letter M and the number of
the menu in question are visible on the first
line of the display. See the CX/CXL/CXS
User's Manual and the Application Manual for
the specific parameters available for the CX/
CXL/CXS setup needed.
The arrow (
) in the lower right corner
indicates a further submenu.
C1
Contrast
15
M6
Fault History
F 1-9
H1
2. Overvoltage
M5
Active Faults
F 1-9
F1
1. Overcurrent
ENTER
2-3 s
Fault history reset
Scroll the active fault list
B2 Panel Control
Μ
M4
Buttons
B1-4
B1
Reverse
1
M3
Reference
R1-1
R1
Freq.reference
122.45 Hz
7
ENTER
B1
Reverse
0
R1
Freq.reference
122.45 Hz
}Special param.
G2
Μ
G12
M2
Parameter
G 1-12
G1
Basic Param.
P 1-15
P1.1
Min. frequency
12.34 Hz
P1.1
Min. frequency
12.34 Hz
ENTER
V2 Motor Speed
Μ
V20 Motor temp. rise
M1
Monitor
V 1-20
V1
Output frequency
122.44 Hz
Figure 7-2 Panel operation.
Page 57 (84)
7.3 Monitoring menu
The monitoring menu can be entered from
the main menu when the symbol M1 is
visible on the first line of the Alpha-numeric
display. How to browse through the
monitored values is presented in Figure
7-3. All monitored signals are listed
in Table 7-1. The values are updated once
every 0.5 seconds. This menu is meant
only for signal checking. The values cannot
be altered here. See 7.4 Parameter group
menu.
V2 Motor Speed
Μ
V20 Motor temp. rise
M1
Monitor
V 1-20
V1
Output frequency
122.44 Hz
Figure 7-3 Monitoring menu.
Number
V1
V2
V3
V4
V5
V6
V7
V8
V9
V10
7
V11
V12
V13
V14
V15
V16
V17
V18
V19
V20
Signal name
Output frequency
Motor speed
Motor current
Motor torque
Motor power
Motor voltage
DC-link voltage
Temperature
Operating day counter
Operating hours, trip
counter
MW hours counter
MW hours, trip counter
Voltage/analog input
Current/analog input
Digital input status, gr. A
Digital input status, gr. B
Digital and relay output
status
Control program
Unit nominal power
Motor temperature rise
Table 7-1 Monitored signals.
1
2
DD = full days, dd = decimal part of day
HH = full hours, hh = decimal part of hour
Page 58 (84)
Unit
Hz
rpm
A
%
%
V
V
”C
DD.dd
HH.hh
MWh
MWh
V
mA
kW
%
Description
Frequency to the motor
Calculated motor speed
Measured motor current
Calculated actual torque/nominal torque of the unit
Calculated actual power/nominal power of the unit
Calculated motor voltage
Measured DC-link voltage
Heat sink temperature
1
Operating days , not resettable
2
Operating hours , can be reset with programmable
button #3
Total MWh, not resettable
Resettable with programmable button #4
Voltage of terminal Uin+ (term. #2)
Current of terminals Iin+ and Iin- (term. #4, #5)
See Figure 7-6
See Figure 7-6
See Figure 7-6
Version number of the control software
The rated power size of the unit
100% = nominal motor temperature has been
reached
Control panel
Digital input status
indication
V15
Dig input A Stat
011
0 = open input
1 = closed input (active)
Example:
Input
DIA1
closed
Terminal
8
DIA2
closed
9
DIA3
open
10
Figure 7-4 Digital inputs, Group A status.
V16
Dig input B Stat
101
Example:
Input
DIB4
closed
Terminal
14
DIB5
open
15
DIB6
closed
16
7
Figure 7-5 Digital inputs, Group B status.
V17
Dig & Rel Output
001
Example:
Input
Digital output
closed (sinking current)
Terminal
20
Relay output 1
open
21
Relay output 2
open
24
Figure 7-6 Output signal status.
Page 59 (84)
Control panel
7.4 Parameter group menu
The parameter group menu can be
entered from the main menu when the
symbol M2 is visible on the first line of the
Alpha-numeric display. Parameter values
are changed in the parameter menu as
shown in Figure 7-6:
Several parameters are locked, i.e.
uneditable, when the drive is in RUN
status. If you try to change the value of
such a parameter, the text *locked* will
appear on the display.
Push the menu button
by pressing the Menu button
once to move
into the parameter group menu (G) and
twice to enter the desired parameter menu.
Locate the parameter you want to change
by using the browser buttons. Push the
menu button
7
once again to enter the
edit menu. Once you are in the edit menu,
the symbol of the parameter starts to blink.
Set the desired new value with the browser
buttons and confirm the change by pushing
the Enter button. Consequently, the
blinking stops and the new value is visible
in the value field. The value will not change
unless the Enter button
is pushed.
You can go back by pressing the menu
button
}
G2
Special param.
Μ
G12
G1
Basic Param.
P 1-15
Figure 7-7 Parameter value change procedure
Page 60 (84)
for 2-3
seconds.
The basic application embodies only those
parameters necessary for operating the
device. The parameter group 0 is
accessible only by opening the Application
package lock. See Chapter 11 of the CX/
CXL/CXS User's Manual.
Other applications include more parameter
groups.
Once in the last parameter of a parameter
group, you can move directly to the first
parameter of that group by pressing the
browser button
.
M2
Parameters
G 1-12
You can return to the main menu anytime
}
P1.2
Μ
P12.x
P1.1
Min. frequency
12.34 Hz
.
P1.1
Min. frequency
13.34 Hz
P1.1
Min. frequency
12.34 Hz
ENTER
C
h
a
n
g
e
v
a
l
u
e
Control panel
7.5 Reference menu
The reference menu can be entered from
the main menu when the symbol M3 is
visible on the first line of the Alpha-numeric
panel.
Press the menu button
If the control panel is the active control
source, the frequency reference can be
changed by changing the value on the
display with the browser buttons (for the
selection of the active control source, see
Chapter 7.6 Programmable push-button
menu). See Figure 7-8.
Enter button
once and the
symbol R1 starts to blink. Now, you are
able to alter the frequency reference value
with the browser buttons. Pressing the
is not necessary. Motor
speed changes as soon as the frequency
reference changes or the load inertia
allows the motor to accelerate or
decelerate.
In some applications, there might be
several references. In this case, pressing
the menu button
once brings you to
the menu where you can choose (with the
browser buttons) the reference you wish
to change. Another push on the button
takes you to the editing mode.
M3
Reference
R1-1
R1
Freq.reference
122.45 Hz
7
R1
Freq.reference
122.45 Hz
Figure 7-8 Reference setting on the control panel.
Page 61 (84)
Control panel
7.6 Programmable push-button menu
The programmable push-button menu can
be entered from the main menu when the
symbol M4 is visible on the first line of the
Alpha-numeric display. In this menu, there
are four functions for the Enter button.
Each button has two positions: On and Off.
The functions are available in this menu
only. In the other menus, the button is used
for its original purpose. The status of the
controlled function is shown through a
feedback signal.
Enter the edit menu with the menu button
. To change the button value, push
the Enter button for a couple of seconds
When you do this, the Enter symbol ( )
on the display inverts and the feedback
value (On/Off) changes. The Enter symbol
remains inverted as long as the Enter button is pushed down. See Figure 7-9.
B2 Panel Control
Μ
M4
Buttons
B1-4
7
B1
Reverse
Off
ENTER
2-3 s
B1
Reverse
On
Figure 7-9 Programmable push-button.
Button
number
B1
Button
description
Reverse
B2
Active
control
source
Operating
hours, trip
counter;
Reset
MWh
counter,
reset
B3
B4
Function
Changes the rotation
direction of the motor.
Available only when the
control panel is the
active control source
Selection between I/O
terminals and control
panel
Resets the operating
hours trip counter when
pushed
Resets the MWh trip
counter when pushed
Table 7-2 Programmable push-button descriptions.
Page 62 (84)
Feedback information
0
1
Forwards
Backwards
Control via
I/O terminals
Control from
the panel
No resetting
Reset of the
operating
hours trip
counter
Reset of the
MWh trip
counter
No resetting
Note
Feedback
information
flashes as long as
the command is
carried out.
Control panel
7.7 Active faults menu
The active faults menu can be entered
from the main menu when the symbol M5
is visible on the first line of the Alphanumeric display as shown in Figure 7-10.
When a fault brings the frequency converter to a stop, the fault code (F#) and the
description of the fault are displayed. If
there are several faults at the same time,
the list of active faults can be browsed with
the browser buttons.
M5
Active Faults
F 1-9
F1
1. Overcurrent
The display can be cleared with the Reset
button and the read-out will return to the
same display it had before the fault trip.
The fault remains active until it is cleared
with Reset button or with a reset signal
from the I/O terminal.
Note! Remove external Start signal before
resetting the fault to prevent unintended
restart of the drive.
Scroll the active
fault list
CLEAR
WITH
RESET
Figure 7-10 Active faults menu.
Fault
codes
F1
Overcurrent
F2
Overvoltage
F3
Ground fault
F4
Inverter fault
F5
Charging switch
F9
Undervoltage
F10
Input line supervision
Output phase supervision
Brake chopper supervision
Input line phase is missing
Drive undertemperature
Temperature of heat sink below -10”C
F11
F12
F13
Fault
Possible cause
The frequency converter has measured too high a
current (>4*In) in the motor output:
- sudden heavy load increase
- short circuit in the motor cables
- unsuitable motor
The voltage of the internal DC-link of the frequency
converter has exceeded the nominal voltage by 35%
- deceleration time is too fast
- high overvoltage spikes at utility
Current measurement detected that the sum of the
motor phase current is not zero
- insulation failure in the motor or the cables
The frequency converter has detected faulty operation in the gate drivers or IGBT bridge
- interference fault
- component failure
Charging switch open when START command active
- interference fault
- component failure
DC-bus voltage has gone below 65% of the nominal
voltage
- most common reason is failure of the utility supply
- internal failure of the frequency converter can also
cause an undervoltage trip
Current measurement has detected that there is no
current in one motor phase
- brake resistor not installed
- brake resistor broken
- brake chopper broken
Checking
Check loading
Check motor size
Check cables
Adjust the deceleration time
Check the motor cables
Reset the fault and restart again.
If the fault occurs again contact
your Honeywell affiliate.
Reset the fault and restart again.
If the fault occurs again contact
your Honeywell affiliate.
In case of temporary supply
voltage break, reset the fault and
start again.
Check utility input.
If utility supply is correct and
internal failure has occurred.
Contact your Honeywell affiliate.
Check the utility connection
Check motor cables
Check brake resistor
- If resistor is OK the chopper is
broken. Contact your Honeywell
affiliate.
Table 7-3 Fault codes (cont.).
Page 63 (84)
7
Control panel
Fault
codes
F14
Possible cause
Drive overtemperature
Temperature of heat sink over 75”C
F15
F16
Motor stalled
Motor overtemperature
The motor stall protection has tripped
The frequency converter motor temperature model
has detected motor overheat
- motor is overloaded
F17
F18
Motor underload
Analog input hardware fault
Option board identification
The motor underload protection has tripped
Component failure on control board
F21
10 V voltage reference
24 V supply
F22
F23
EEPROM checksum fault
+10 V reference shorted on control board or option
board
+24 V supply shorted on control board or option
board
Parameter restoring error
- interference fault
- component failure
F25
Microprocessor
watchdog
- interference fault
- component failure
F26
Panel communication error
Thermistor protection
The connection between panel and the frequency
converter is not working
Thermistor input of the I/O expander board has detected increase of the motor temperature
Analog input Iin <
4mA (signal range
selected 4-20 mA)
External fault
The current in the analog input Iin is below 4 mA
- signal source has failed
- control cable is broken
Fault is detected in external fault digital input
F19
F20
7
Fault
F29
F36
F41
Table 7-3 Fault codes.
Page 64 (84)
Reading of the option board has failed
Checking
- Check the cooling air flow
- Check that the heat sink is not
dirty
- Check ambient temperature
- Check that the switching frequency is not too high compared
with ambient temperature and
motor load
- Check the motor
Decrease motor load.
Check the temperature model
parameters if the motor was not
overheated
Contact your Honeywell affiliate.
Check the installation
- If installation is correct, contact
your Honeywell affiliate.
Check the cabling from +10 V
reference voltage
Check the cabling from +24 V
reference voltage
When the fault is reset the frequency drive will automatically
load parameter default settings.
Check all parameter settings
after reset.
If the fault occurs again contact
your Honeywell affiliate.
Reset the fault and restart. If the
fault occurs again contact your
Honeywell affiliate.
Check the panel cable
- Check motor cooling and
loading
- Check thermistor connection
(If thermistor input of the I/O
expander board is not in use, it
has to be short circuited)
Check the current loop circuitry
Check the external fault circuit or
device
Control panel
7.8 Fault history menu
The fault history menu can be entered from
the main menu when the symbol M6 is
displayed on the first line of the Alphanumeric panel.
The memory of the frequency converter
can store the maximum of 9 faults in the
order of appearance. The latest fault has
the number 1, the second latest number 2
M6
Fault History
F 1-9
H1
2 Overvoltage
etc. If there are 9 uncleared faults in the
memory, the next fault will erase the oldest
from the memory.
Pressing the Enter button for about 2…3
seconds resets the fault history. Then, the
symbol F# will change for 0.
ENTER
2-3 s
Fault history reset
Figure 7-11 Fault history menu.
7.9 Contrast menu
The contrast menu can be entered from
the main menu when the symbol M7 is
visible on the first line of the Alpha-numeric
display.
M7
Contrast
15
Use the menu button (right) to enter the
edit menu. You are in the edit menu when
the symbol C starts to blink. Then change
the contrast to the desired level using the
browser buttons. The changes take effect
immediately.
C
Contrast
15
Figure 7-12 Contrast setting.
Page 65 (84)
7
Control panel
7.10 Active warning display
When a warning occurs, a text with a
symbol A# appears on the display.
Warning codes are explained in Table 73.
The warning on the display does not
disable the normal functions of the push
buttons.
The display does not have to be cleared
in any special way.
Code
A15
A16
A17
A24
A28
A30
A45
A46
A47
7
W arning
Motor stalled (Motor stall protection)
Motor overtemperature (Motor thermal protection)
Motor underload (W arning can be activated in Application manual applications)
The values in the Fault History, MW h counters or operating day/hour counters might have been changed
in the previous mains interruption
The change of application has failed.
Unbalance current fault; the load of the segments is
not equal.
The frequency converter overtemperature warning;
Temperature >70”C
Reference warning; the current of input Iin+ <4 mA
(W arning can be activated in Application manual
applications
External warning; (W arning can be activated in
Application manual applications)
Table 7-4 Warning codes.
Page 66 (84)
Checking
Check motor
Decrease motor loading
Check motor loading
No actions necessary. Take a
critical attitude to these values.
Choose the application again and
push the Enter button.
Contact your Honeywell affiliate.
Check the cooling air flow and the
ambient temperature.
Check the current loop circuitry.
Check the external fault circuit or
device.
Control panel
7.11 Controlling the motor from the front
panel
7.11.2 Control source change from panel
to I/O
The CX/CXL/CXS can be controlled from
either the I/O terminals or the control panel.
The active control source can be changed with
the programmable push button b2 (see
chapter 7.6). The motor can be started,
stopped and the direction of rotation can be
changed from the active control source.
After changing the control source, the I/O
terminals determine the run state, direction of
rotation and reference value.
7.11.1 Control source change from I/O
terminals to the front panel
After changing the control source the motor is
stopped. The direction of rotation remains the
same as with I/O control.
If the Start button is pushed at the same time
as the programmable push button B2, the Run
state, direction of rotation and reference value
will be copied from the I/O terminals to the
front panel.
If motor potentiometer is used in the
application, the panel reference value can be
copied for a value of motor potentiometer
reference by pushing the start button at the
same time as the programmable push button
B2. Motor potentiometer function mode must
be "resetting at stop state" (Local/Remote
Application: param. 1. 5 =4, Multi-purpose
Application : param. 1. 5 = 9).
7
Page 67 (84)
Startup
8 STARTUP
8.1 Safety precautions
Before startup, observe the following warnings and instructions:
!
8
1
Internal components and circuit boards (except the isolated I/O
terminals) are at line potential when the CX/CXL/CXS drive is
connected to the utility. This voltage is extremely dangerous and
may cause death or severe injury if you come in contact with it.
2
When the CX/CXL/CXS drive is connected to the utility, the motor
connections U, V, W and DC-link / brake resistor connections -,+ are
live even if the motor is not running.
3
4
Do not make any connections when the CX/CXL/CXS drive is
connected to the utility line.
5
The control I/O terminals are isolated from the utility potential but
the relay outputs and other I/O:s (if jumper X4 is in OFF position
see fig. 6.2.2-1) may have dangerous external voltages connected
even if the power is off from the CX/CXL/CXS drive.
6
Before connecting the utility make sure that the cover of the
CX/CXL/CXS drive is closed.
After disconnecting the utility, wait until the cooling fan on the unit
stops and the indicators in the panel are turned off (if no panel
check the indicators on the cover). Wait at least 5 minutes before
doing any work on the CX/CXL/CXS drive connections. Do not open
cover before this time has run out.
8.2 Sequence of operation
1 Read and follow the safety precautions
2 After installation ensure that the:
- Drive and motor are connected to ground.
- Utility and motor cables are in accordance with the installation and
connection instructions (chapter 6.1).
- Control cables are located as far as possible from the power cables
(table 6.1.3-1), shields of the control cables are connected
to the protective ground and wires do not have contact with any
electrical components in the CX/CXL/CXS.
- The common input of digital input groups is connected to +24 V or
ground of the I/O-terminal or external supply (See 6.2.3)
Page 68 (84)
Startup
3 Check the quantity and quality of the cooling air (chapters 5.1 and 5.2).
4 Check that moisture has not condensed inside the CX/CXL/CXS drive.
5 Check that all Start/Stop switches connected to the I/O terminals are in the Stop state.
6 Connect the CX/CXL/CXS to the utility and switch the power ON.
7 Ensure the parameters of the Group 1 match the application.
Set the following parameters to match the motor nameplate:
- nominal voltage of the motor
- nominal frequency of the motor
- nominal speed of the motor
- nominal current of the motor
- supply voltage
See values from the nameplate of the motor.
8 Start-up test without the motor
Perform either test A or B:
A Controls from the I/O terminals:
- turn Start/Stop switch to ON position
- change the frequency reference
- check from the Monitoring page of the control panel that the
output frequency follows the frequency reference
8
- turn Start/Stop switch to OFF position
B Controls from the Control Panel:
- change controls from the I/O terminals to the Control Panel with
the programmable button B2, see chapter 7.6.
- push Start button
- go to the Reference Page and change the frequency reference
with the buttons
, see chapter 7.5
- go to the Monitoring Page and check that the output frequency
follows the reference, see chapter 7.3.
- push Stop button
Page 69 (84)
Startup
9 If possible, make a start-up test with a motor which is not connected to the process.
If the inverter has to be tested on a motor connected to the process, ensure it is safe to
be powered up. Inform all possible co-workers about the tests.
- switch the utility power OFF and wait until the CX/CXL/CXS has
powered down according to chapter 8.1/ point 4
- connect the motor cable to the motor and the power terminals of
the CX/CXL/CXS
- check that all start/stop switches connected to the I/O terminals
are in the OFF state
- switch the utility power ON
- repeat test A or B of the test #8.
10 Connect the motor to the process (if the previous tests were done without the process)
- ensure it is safe to power up
- inform all possible co-workers about the tests.
- repeat test A or B of the test #8.
8
Page 70 (84)
Fault tracing
9 FAULT TRACING
When a fault trip occurs, the fault indicator is
illuminated and the fault code and its
description are displayed. The fault can be
cleared with the Reset button or via an I/O
terminal. The faults are stored to the fault
history from where they can be viewed (see
chapter 7.8). The fault codes are explained in
table 9-1.
Fault
codes
F1
Fault
Overcurrent
F2
Overvoltage
F3
Ground fault
F4
Inverter fault
F5
Charging switch
Possible cause
CX/CXL/CXS frequency converter has
measured too high a current (>4*In) in the
motor output:
- sudden heavy load increase
- short circuit in the motor cables
unsuitable motor
The voltage of the internal DC-link of the
CX/CXL/CXS frequency converter has
exceeded the nominal voltage by 35%
- deceleration time is too fast
- high overvoltage spikes at utility
Current measurement detected that the
sum of the motor phase current is not zero
- insulation failure in the motor or the cables
CX/CXL/CXS frequency converter has
detected faulty operation in the gate
drivers or IGBT bridge
- interference fault
- component failure
Charging switch open when START command active
- interference fault
- component failure
F9
Undervoltage
DC-bus voltage has gone below 65% of
the nominal voltage
- most common reason is failure of the
utility supply
- internal failure of the CX/CXL/CXS
frequency converter can also cause an
undervoltage trip
F10
Input line supervision
Output phase
supervision
Brake chopper
supervision
Input line phase is missing
FC undertemperature
Temperature of heat sink below -10”C
F11
F12
F13
Current measurement has detected that
there is no current in one motor phase
- brake resistor not installed
- brake resistor broken
- brake chopper broken
Checking
Check load
Check motor size
Check cables
Adjust the deceleration
time
Check the motor cables
Reset the fault and restart
again.
If the fault occurs again
contact your Honeywell
affiliate.
Reset the fault and restart
again.
If the fault occurs again
contact your Honeywell
affiliate.
In case of temporary
supply voltage break,
reset the fault and start
again.
Check utility input.
If utility supply is correct
an internal failure has
occurred.
Contact Honeywell
affiliate.
Check the utility
connection
Check motor cables
Check brake resistor
If resistor is OK the chopper is broken. Contact
your Honeywell affiliate.
Page 71 (84)
9
Fault tracing
Fault
codes
F14
9
Fault
Possible cause
Checking
Check the cooling air flow
Check that the heat sink is clean
Check the ambient temperature
Check that the switching frequency
is not too high for the ambient
temperature and load.
Check the motor
FC
overtemperature
Temperature of heatsink over
75° C
For Compact NEMA 1 over 80°
C
F15
Motor stalled
F16
Motor
overtemperature
F17
Motor underload
The motor stall protection has
tripped
The CX/CXL/CXS motor
temperature calculating model
has calculated a motor
overtemperature
The motor underload protection
has tripped
F18
Analog input
hardware fault
Component failure on the control
card
Contact your Honeywell affiliate.
F19
Option board
identification
Reading of the option board has
failed
Check the installation of the board.
If the installation is OK, contact
your Honeywell affiliate.
F20
10 V voltage
reference
Check the wiring connected to the +
10 V reference
F21
24 V supply
F22
F23
EEPROM
checksum
failure
+ 10 V reference shorted on the
control card or on an option
board
+ 24 V supply shorted on the
control card or on an option
board
Parameter restoring error
interference
component failure
F25
Microprocessor
watchdog
F26
Panel
communication
error
The connection between the
drive and the panel doesn t work
F29
Thermistor
protection
The thermistor input on the I/O
boards has detected a motor
temperature increase.
F36
Analog input
Im< 4 mA
(signal range 420 mA selected)
External fault
The analog input current is
below 4 mA
signal source failed
control cable broken.
An external fault has been
detected at the digital input
F41
Table 9-1 Fault codes.
Page 72 (84)
interference
component failure
Decrease motor load
Check the temperature model
parameters if the motor wasn t too
hot.
Check motor and possible belts etc.
Check the wiring connected to the +
24 V reference
On resetting this fault, the drive will
automatically load the parameter
default settings. Check all
parameters before restarting the
drive. If the fault occurs again,
contact your Honeywell affiliate.
Reset the fault and restart. If the
fault occurs again, contact your
Honeywell distributor
Check the panel cable and
connectors. If the fault occurs
again, contact your Honeywell
affiliate.
Check the motor load and cooling.
Check the thermistor connection. If
there are no thermistors, make sure
the inputs are short-circuited.
Check the current loop circuitry
Check the external fault source.
Basic Application
10 BASIC APPLICATION
10.1 General
The Basic Application is the default setting as
delivered from the factory. Control I/O signals
of the Basic application are fixed (not
programmable) and it only has parameter
Group 1.
Parameters are explained in chapter 10.4. The
function of motor thermal and stall protection
in the Basic Application is explained in chapter
10.5.
* NOTE!
10.2 Control Connections
Reference
potentiometer
Terminal
Remember to connect the CMA
and CMB inputs.
Signal
Description
1
+10Vref
Reference output
Voltage for a potentiometer, etc.
2
Vin+
Analog input, voltage
range 0—10 V DC
Frequency reference activated if
terminals 14 and 15 open and
parameter 1.17 = 0 (default value)
3
GND
I/O ground
Ground for reference and controls
4
Iin+
Analog input, current
Frequency reference activated if
5
Iin-
range 0—20 mA
terminals 14 and 15 closed, or open
and parameter 1.17 = 1
*
6
+24V
7
GND
I/O ground
Ground for reference and controls
8
DIA1
Start forward
Contact closed = start forward
9
DIA2
Start reverse
Contact closed = start reverse
10
DIA3
External fault input
Contact open = no fault
Contact closed = fault
RUN
FAULT
220
VAC
Max.
Voltage for switches, etc. max. 0.1 A
11
CMA
Common for DIA1—DIA3
Connect to GND or + 24V
12
+24V
Control voltage output
Voltage for switches, (same as #6)
13
GND
I/O ground
Ground for reference and controls
14
DIB4
15
DIB5
16
DIB6
17
CMB
18
Iout+
DIB4 DIB5 Frequency ref.
open
open
Ref. Vin (par.1.17=0)
closed open
Multi-step ref. 1
open
closed Multi-step ref. 2
closed closed Ref. Iin (term. #4,5)
Fault reset
Contact open = no action
Contact closed = fault reset
Common for DIB4—DIB6 Connect to GND or + 24V
Analog output 0—20 mA
0 - maximum frequency (par. 1. 2)
Output frequency
RL max 500 Ω
Digital output
activated = the CX/CXL/CXS
READY
is ready to operate
Relay output 1 Relay activated = CX/CXL/CXS is
RUN
operating (motor is running)
*
READY
Control voltage output
19
Iout-
20
DO1
21
RO1
22
RO1
Multi-step speed select 1
Multi-step speed select 2
23
RO1
24
RO2
Relay output 2
Relay activated = fault trip has
25
RO2
FAULT
occured
26
RO2
Figure 1.2-1 Control connection example.
Page 73 (84)
10
Basic Application
10.3 Control Signal Logic
Figure 10.3.-1 shows the logic of the I/O control signals and push buttons.
BASIC PARAMETERS
RUN
Group 1
1. 5 Multi-step speed reference 1
MON
READY
PAR
REF
1. 6 Multi-step speed reference 2
BTNS
RST
PG
1. 17 Basic reference selection
Panel reference
Uin+
FAULT
PROGRAMMABLE
PUSH-BUTTON 2
Start/Stop buttons
RST button
Internal
frequency
reference
Prog. button 1
Iin±
DIB4
DIB5
Internal
Start/Stop
DIA1 Start forward
DIA2 Start reverse
Start/Stop
Start/Stop
and reverse
logic
Internal
reverse
Reverse
Internal
fault reset
DIB6 Fault reset input
>1
DIA3 External fault input
10
= control line
= signal line
UD012K00
UD012K00
Figure 10.3-1 Control signal logic
If Start forward and Start reverse are both activated when the utility line is connected to the
CX/CXL/CXS then Start forward will be selected for the direction.
If Start forward and Start reverse are both activated when the control source is changed from
the panel to the I/O-terminals then Start forward will be selected for the direction.
If both directions are selected the first selected direction has higher priority than the second
selected.
Page 74 (84)
Basic Application
10.4 Parameters, Group 1
Num.
Parameter
Range
Step
Default
1. 1
Minimum frequency
1. 2
Maximum frequency
1. 3
Acceleration time
0.1—3000.0 s
1. 4
Deceleration time
1. 5
0—f max
1 Hz
0 Hz
fmin-120/500 Hz 1 Hz
60 Hz
*
76
0.1 s
3.0 s
Time from fmin (1. 1) to fmax (1. 2)
76
0.1—3000.0 s
0.1 s
3.0 s
Time from fmax (1. 2) to fmin (1. 1)
76
Multi-step speed
reference 1
f min —fmax
(1. 1) (1. 2)
0.1 Hz
10 Hz
76
1. 6
Multi-step speed
reference 2
f min —fmax
(1. 1) (1. 2)
0.1 Hz
60 Hz
76
1. 7
Current limit
1. 8
V/Hz ratio
selection
0—1
1
0
1. 9
V/Hz optimization
0—1
1
0
1. 10
Nominal voltage
of the motor
180—690 V
1V
1. 11
Nominal frequency
of the motor
30—500 Hz
1. 12
Nominal speed
of the motor
1. 13
1. 14
0.1—2.5 x InCX 0.1 A
1.5 x InCX
Customer Description
Page
76
Output current limit [A] of the unit
76
0 = Linear
1 = Squared
76
0 = None
1 = Automatic torque boost
77
230 V
380 V
480 V
600 V
CX/CXL/CXS V 3 2
CX/CXL/CXS V 3 4
CX/CXL/CXS V 3 5
CX V 3 6
77
1 Hz
60 Hz
fn from the nameplate of
the motor
77
1—20000 rpm
1 rpm
1720 rpm
**
nn from the nameplate of
the motor
77
Nominal current
of the motor
2.5 x InCX
0.1 A
InCX
In from the nameplate of
the motor
77
Supply voltage
208—240
230 V
CX/CXL/CXS V 3 2
78
380—440
380 V
CX/CXL/CXS V 3 4
380—500
480 V
CX/CXL/CXS V 3 5
525—690
600 V
CX V 3 6
1. 15
Application
package lock
0—1
1
1
0 = package lock open
Application is selected by
parameter 0.1
78
1. 16
Parameter value lock
0—1
1
0
Disables parameter changes:
0 = changes enabled
1 = changes disabled
78
1. 17
Basic frequency
reference selection
0—2
1
0
0 = analog input Vin
1 = analog input Iin
2 = reference from the panel
78
1. 18
Analog input Iin
range
0—1
1
0
0 = 0—20 mA
1 = 4—20 mA
78
Table 10.4-1 Group 1 basic parameters
= Parameter value can be changed only * If 1. 2 >motor synchr. speed, check suitability
of motor and drive system.
when the CX/CXL/CXS is stopped.
** Default value for a four pole motor and a
nominal size drive.
Note!
Page 75 (84)
10
Basic Application
10.4.1 Descriptions
1. 1, 1. 2 Minimum/maximum frequency
Defines the frequency limits of the drive.
Default maximum value for parameters 1. 1 and 1. 2 is 120 Hz. By setting 1. 2 =
120 Hz in Stop state (RUN indicator not lit) and pressing the Enter key the
maximum value of parameters 1. 1 and 1. 2 is changed to 500 Hz. At the same
time the panel reference display resolution is changed from 0.01 Hz to 0.1 Hz.
The max. value is changed from 500 Hz to 120 Hz when parameter 1. 2 is set to
119 Hz in Stop state and the Enter key is pressed.
1. 3, 1. 4 Acceleration time, deceleration time :
These limits correspond to the time required for the output frequency to accelerate
from the set minimum frequency (par. 1. 1) to the set maximum frequency (par. 1. 2).
1. 5, 1. 6 Multi-step speed reference 1, Multi-step speed reference 2:
Parameter values are limited between minimum and maximum frequency.
f[Hz]
Ref. Iin
Par. 1. 6
Ref. Vin
(Par. 1. 17 = 0)
Par. 1. 5
t
DIB4
DIB5
Closed
Open
Closed
Open
UD012K06
Figure 10.4.1-1 Example of Multi-step speed references.
10
1. 7
Current limit
This parameter determines the maximum motor current that the CX/CXL/CXS will
provide short term.
1. 8
V/Hz ratio selection
Linear:
0
The voltage of the motor changes linearly with the frequency from
0 Hz to the nominal frequency of the motor. The nominal voltage of
the motor is supplied at this frequency. See figure 10.4.1-2.
Linear V/Hz ratio should be used in constant torque applications.
This default setting should be used if there is no special requirement for
another setting.
Page 76 (84)
Basic Application
Squared:
1
The voltage of the motor changes following a squared curve from 0 Hz
to the nominal frequency of the motor. The Nominal voltage of the motor
is supplied at this frequency. See figure 10.4.1-2.
The motor runs undermagnetized below the nominal frequency and it
produces less torque and electromechanical noise.
A squared V/Hz ratio can be used in applications where the torque
demand from the load is proportional to the square of the speed, e.g.
in centrifugal fans and pumps.
V [V ]
Vn
D efault: N om inal v oltage o f
the m o to r
Lin ear
S qu are d
F ie ld w e ak enin g poin t
D efault: N om inal
fre que nc y of th e
m o to r
f [H z]
Figure 10.4.1-2 Linear and squared V/Hz curves.
1. 9
V/Hz optimization
Automatic The voltage to the motor changes automatically which allows the
torque
motor to produce sufficient torque to start and run at low frequencies.
boost
The voltage increase depends on the motor type and
horsepower.Automatic torque boost can be used in applications where
starting torque due to starting friction is high, e.g. in conveyors.
NOTE!
!
1. 10
In high torque - low speed applications - it is likely the motor will overheat.
If the motor has to run for a prolonged time under these conditions,
special attention must be paid to cooling the motor. Use external cooling
for the motor if the operating temperature rise is too high.
10
Nominal voltage of the motor
Find the rated voltage Vn from the nameplate of the motor.
Note!
1. 11
If the nominal motor voltage is lower than the supply voltage, check
that the insulation level of the motor is adequate.
Nominal frequency of the motor
Find the value fn from the nameplate of the motor.
1. 12
Nominal speed of the motor
Find the value nn from the nameplate of the motor.
1. 13
Nominal current of the motor
Find the value In from the nameplate of the motor. The internal motor protection
function uses this value as a reference value.
Page 77 (84)
Basic Application
1. 14
Supply voltage
Set parameter value according to the nominal voltage of the supply. Values are
predefined for CX/CXL/CXS V 3 2, CX/CXL/CXS V 3 4, CX/CXL/CXS V 3 5 and
CX V 3 6, see table 10.4-1.
1. 15
Application package lock
The application package lock can be opened by setting the the value of the
parameter 1.15 to 0. It will then be possible to enter the parameter group 0 from
parameter 1.1 by pressing arrow down button (see figure 11-1). The number of the
Application can be selected from the table 11-1 and it is selected by the value of
parameter 0.1. After this, the new Application is in use and its parameters will be
found in the Application manual.
1. 16
Parameter value lock
Defines access to the changes of the parameter values:
0 = parameter value changes enabled
1 = parameter value changes disabled
1. 17
Basic frequency reference selection
0
1
2
1. 18
Analog voltage reference from terminals 2—3, e.g. a potentiometer
Analog current reference trom terminals 4—5, e.g. a transducer.
Panel reference is the reference set from the Reference Page (REF), see
chapter 7.5.
Analog input Iin range
Defines the minimum value of the Analog input Iin signal (terminals 4,5).
10
Page 78 (84)
Basic Application
10.5 Motor protection functions in the Basic Application
10.5.1 Motor thermal protection
Motor thermal protection protects the motor from overheating. In the Basic application,
Motor thermal protection uses constant settings and always causes a fault trip if the
motor is overheated. To switch off the protection or to change the settings, see
application manual.
Your CX/CXL/CXS is capable of
supplying higher than nominal current to
the motor. If the load requires this high
current there is a risk that motor will be
thermally overloaded. This is true
especially at low frequencies, as the
cooling effect and thermal capacity of
the motor are reduced. The motor
thermal protection is based on a
calculated model which uses the output
current of the drive to determine the load
on the motor.
I
Current
limit
par. 1. 7
Overload area
100%
INmotor
IT
45%
INmotor
f
The thermal current IT specifies the load
current above which the motor is
overloaded. See figure 10.5.1-1. If the
motor current is above the curve, the
motor temperature is increasing.
35 Hz
UMCH7_91
Figure 10.5.1-1 Motor thermal current IT
curve.
!
CAUTION! The calculated model does not protect the motor if the airflow to the
motor is reduced by an air intake grill that is blocked
10.5.2 Motor Stall warning
In the Basic application, motor stall protection gives a warning of a short time overload
of the motor e.g. a stalled shaft. The reaction time of this stall protection is shorter than
the motor thermal protection time. The stall state is defined by Stall Current and Stall
Frequency.
Both parameters have constant values.
See figure 10.5.2-1. If the current is
higher than the set limit and the output
is lower than the set limit the stall state
is true.If the stall state lasts longer than
15 s the stall warning is given on the
display. To change th stall warning to a
fault trip or to change the protection
settings, see the application manual
I
Stall area
130%
INmot
f
Figure 10.5.2-1 Stall state.
25 Hz
UMCH7_10
Page 79 (84)
10
System parameter group 0
11
System parameter group 0
When the application package lock is open
(par. 1.15 = 0) the system parameter group 0
can be accessed. Parameter group 0 can be
entered from parameter 1.1 by the pressing
arrow down button. The parameters of group
0 are shown in table 11-1.
Group 1
1.18
*
*
*
1.2
1.1
Group 0
(system
parameters)
0.2
0.1
Figure 11-1 Group 0.
11.1
Parameter table
Number
11
Parameter
Range
Description
Page
0. 1
Application
selection
1—7
1 = Basic Application
2 = Standard Application
3 = Local / Remote Control Application
4 = Multi-step Speed Application
5 = PI-control Application
6 = Multi-purpose Control Application
7 = Pump and fan control Application
80
0. 2
Parameter
loading
0—5
0 = Loading ready / Select loading
1 = Load default settings
2 = Read up parameters to user's set
3 = Load down user's set parameters
4 = Read parameters up to the panel
(possible only with the graphic panel)
5 = Load down parameters from the panel
(possible only with graphic panel)
81
0. 3
Language
selection
0—5
0 = English
1 = German
2 = Swedish
3 = Finnish
4 = Italian
5 = French
81
Table 11-1 System parameters, Group 0.
11.2
Parameter descriptions
0.1 Application selection
With this parameter the Application type can be selected. The default setting is the Basic
Application. Applications are described in chapter 12.
Page 80 (84)
System parameter group 0
0.2 Parameter loading
With this parameter it is possible to do different kinds of parameter load operations. After
the operation is completed this parameter value changes automatically to 0 (loading ready).
0 Loading ready / Select loading
Loading operation has been completed and the drive is ready to operate.
1 Load default settings
By setting the value of parameter 0.2 to 1 and then pressing the Enter-button the
parameter default values are used. The default values are based on the application
selected with parameter 0.1.
2 Read up parameters to User's set
By setting the value of parameter 0.2 to 2 and then pressing Enter-button the parameter
values are read up to the User's parameter value set. The parameter values can be later
loaded by setting parameter 0.2 to 3 and pressing Enter button.
3 Load down user's set parameters
By setting the value of parameter 0.2 to 3 and then pressing Enter-button the parameter
values are set according to the user's parameter set.
4 Read parameters up to the panel (possible only with the graphic panel).
5 Load down parameters from the panel (possible only with the graphic panel).
0.3 Language selection
This parameter selects the language of the text displayed on the operator's panel.
11
Page 81 (84)
Application package
12 Application package
12.1 Application Selection
To use one of the Application package applications, first open the Application package lock
(parameter 1.15). Group 0 then comes visible (see figure 11-1). Changing the value of
parameter 0.1 changes the active application. See table 11-1.
12
Applications are presented in sections 12.2 - 12.7 and in more detail in the following,
separate application manual.
12.2 Standard Application
- Autorestart function
The Standard Application has the same I/O
- Motor Thermal and Stall protection fully
signals and same Control logic as the Basic
programmable
application.
- Motor Underload protection
Digital input DIA3 and all outputs are freely
- Unused analog input functions
programmable.
12.4 Multi-step Speed Application
Other additonal functions:
The Multi-step Speed Control Application
- Programmable Start/Stop and Reverse
can be used where fixed speed references
signal logic
are required. 9 different speeds can be
- Reference scaling
programmed: one basic speed, 7 multi-step
- One frequency limit supervision
speeds and one jogging speed. The speed
- Second set of ramps and choice of linear
steps are selected with digital signals DIB4,
or S curve
DIB5 and DIB6. If the jogging speed is used
- Programmable start and stop functions
DIA3 can be programmed for jogging
- DC-braking at stop
speed select
- One prohibit frequency lockout range
The basic speed reference can be either
- Programmable V/Hz curve and switching
voltage or current signal via analog input
frequency
terminals (2/3 or 4/5). All outputs are freely
- Autorestart function
programmable.
- Motor Thermal and Stall protection off /
warning / fault programming
Other additonal functions:
12.3 Local/Remote Application
- Programmable Start/stop and Reverse
signal logic
Utilizing the Local/Remote Control
Analog
input signal range selection
Application the use of two different control
Two
frequency
in band limit indications
and frequency reference sources is
Torque
in
band
limit indication
programmable. The active control source is
- Reference in band limit indication
selected with digital input DIB6. All outputs
- Second set of ramps and choice of linear
are freely programmable.
or S curve
Other additonal functions:
- DC-braking at start and stop
- Three prohibit frequency lockout ranges
- Programmable Start/stop and Reverse
- Programmable V/Hz curve and switching
signal logic
frequency
- Analog input signal range selection
- Autorestart function
- Two frequency in band limit indications
- Motor Thermal and Stall protection fully
- Torque in band limit indication
programmable
- Reference in band limit indication
- Motor Underload protection
- Second set of ramps and choice of linear
- Unused analog input functions
or S curve
- DC-braking at start and stop
- Three prohibit frequency lockout ranges
- Programmable V/Hz curve and switching
frequency
Page 82 (84)
Application package
12.5 PI-control Application
In the PI-control Application, there are two I/
O-terminal control sources. Source A is a
PI-controller and source B is a direct
frequency reference. The control source is
selected with the DIB6 input.
The PI-controller reference can be selected
from the analog inputs, motor
potentiometer, or panel reference. The
actual value can be selected from the
analog inputs or from a mathematical
function acting on the analog inputs. The
direct frequency reference can be used for
control without the PI-controller. The
frequency reference can be selected from
the analog inputs or the panel reference.
All outputs are freely programmable.
Other additonal functions:
- Programmable Start/stop and Reverse
signal logic
- Analog input signal range selection
- Two frequency in band limit indications
- Torque in band limit indication
- Reference in band limit indication
- Second set of ramps and choice of linear
or S curve
- DC-braking at start and stop
- Three prohibit frequency lockout ranges
- Programmable V/Hz curve and switching
frequency
- Autorestart function
- Motor Thermal and Stall protection fully
programmable
- Motor Underload protection
12.6 Multi-purpose Control Application
In the Multi-purpose Control Application, the
frequency reference can be selected from
the analog inputs, joystick control, motor
potentiometer, or a mathematical function of
the analog inputs. Multi-step speeds and jog
speed can also be selected if the digital
inputs are programmed for these functions
Digital inputs DIA1 and DIA2 are reserved
for Start/stop logic. Digital inputs DIA3 DIB6 are programmable for multi-step
speed select, jog speed select, motor
potentiometer, external fault, ramp time
select, ramp prohibit, fault reset and DCbrake command function. All outputs are
freely programmable.
Other additonal functions:
- Programmable Start/stop and Reverse
signal logic
- Analog input signal range selection
- Two frequency in band limit indications
- Torque in band limit indication
- Reference in band limit indication
- Second set of ramps and choice of linear
or S-curve
- DC-braking at start and stop
- Three prohibit frequency lockout ranges
- Programmable V/Hz curve and switching
frequency
- Autorestart function
- Motor Thermal and Stall protection fully
programmable
- Motor Underload protection
- Free analog input functions
12.7 Pump and Fan Control Application
The Pump and Fan Control Application can
be used to control one variable speed drive
and 0-3 auxiliary drives. The PI-controller of
the frequency converter controls the speed
of the variable speed drive and gives
control signals to Start and Stop auxiliary
drives to control the total flow.
The application has two control sources on
I/O terminal. Source A is Pump and fan
control and source B is direct frequency
reference. The control source is selected
with DIB6 input.
All outputs are freely programmable.
Other additonal functions:
- Programmable Start/stop and reverse
signal logic
- Analog input signal range selection
- Two frequency in band limit indications
- Torque in band limit indication
- Reference in band limit indication
- Second set of ramps and choice of linear
or S curve
- DC-braking at start and stop
- Three prohibit frequency lockout ranges
- Programmable V/Hz curve and switching
frequency
- Autorestart function
- Motor Thermal and Stall protection fully
programmable
- Motor Underload protection
Page 83 (84)
12
Options
13 Options
13.1 External filters
13.6 Graphics control panel
Information of CX/CXL/CXS external input
and output filters (RFI, dV/dT, and Sinusoidalfilters) can be found in their separate manuals.
The Graphics control panel can be used
inplace of the standard 3 line LCD panel. It
provides:
13.2 Dynamic braking
- parameters, monitored items etc. in text
format
- 3 monitored items at the same time in
display
- one monitored item can be shown in
increased text size with a graph bar
- The selected parameter value is shown
on a graph bar
- 3 monitored items can be shown on the
graphical trend display
- the parameters of the frequency
converter can be uploaded to the panel
and then downloaded to another inverter.
Effective motor braking and short deceleration
times are possible by using an external or
internal braking chopper with an external
brake resistor.
The internal braking chopper is assembled in
the factory (available in certain models). It has
the same continuous current specification as
the unit itself.
Select the correct brake resistor to get the
desired braking effect. More information can
be found in the separate brake manual.
13.3 I/O- expander board
The available I/O can be increased by using
the I/O- expander boards. I/O-expander
boards can be installed in the option board
position inside the open, protected, NEMA 1
and NEMA 12 models. For the Compact
NEMA 1 model the board needs to be installed
in a separate I/O-expander box.
More information can be found in the I/Oexpander board manuals.
13.4 Communication
CX/CXL/CXS frequency converters can be
connected to DeviceNet, Modbus RTU,
Interbus-S, Profibus-DP and Lonworks
systems by using the fieldbus option board.
The fieldbus board can be installed in the
option board position inside the open,
protected, NEMA 1 and NEMA 12 models. For
the compact NEMA 1 model the board needs
to be installed in a separate I/O-expander box.
More information can be found in the separate
communication manuals.
More information can be found in the
Graphics Panel manual.
13.7 FCDRIVE
FCDrive is the PC based tool for control and
monitoring of the CX/CXL/CXS. With
FCDrive:
- parameters can be loaded from the unit,
changed, saved to a file or loaded back to
the unit - parameters can be printed to
paper or to a file
- references can be set
- the motor can be started and stopped
- signals can be examined in graphical form
- actual values can be displayed
The CX/CXL/CXS can be connected to a PC
with a special RS232-cable.The same cable
can be used for downloading specialized
applications to the CX/CXL/CXS.
13.8 Operator panel door installation kit
An adapter kit is available to mount the
operator display panel on an enclosure door.
13.9 Protected chassis cable cover for
75 - 125 HP open panel units
This optional cable cover provides a
protected chassis capability equivalent to
IP20.
13
Page 84 (84)
Application Manual
Excel VRL
CX/CXL/CXS
Constant and variable torque
Variable Speed Drives
for induction motors
1 Hp to 1100 Hp
Subject to changes without notice
EXCEL VRL CX/CXL/CXS APPLICATION MANUAL
CONTENTS
A General ..............................................0-2
B Application selection .......................0-2
C Restoring default values of
application parameters ................... 0-2
D Language selection ..........................0-2
1 Standard Control Application ..........1-1
2 Local/Remote Control Application 2-1
3 Multi-step Speed Application ..........3-1
4 PI-control Application ......................4-1
5 Multi-purpose Application ...............5-1
6 Pump and fan control Application ..6-1
Page 0-1
General
A General
This manual provides you with the information
needed to apply these applications.
Each application is described in its own
chapter. Section B tells how to select the
application.
B Application selection
If the Basic Application is in use, first open the
application package lock (parameter 1.15 = 0)
Group 0 appears. By changing the value of
parameter 0.1 a different application can be
selected. See table B-1.
Number
Parameter
Range
0. 1
Application
1 —7
To change from one application to another,
simply change the value of parameter 0.1 to
that of the application desired: see table B-1.
Description
1 = Basic Application
2 = Standard Application
3 = Local / Remote Control Application
4 = Multi-step Speed Application
5 = PI-control Application
6 = Multi-purpose Control Application
7 = Pump and Fan Control Application
Table B-1 Application selection parameters.
C Restoring default values of
application parameters
Besides the parameter group 1, the
applications also have parameter groups 2 —
8 available (see figure B-1).
Parameters of the groups sequentially follow
each other and changing from the last
parameter of one group to the first parameter
of the next group or vice versa is done simply
by pushing the arrow up/arrow down buttons.
Default values of the parameters of the
applications 1 to 7 can be restored by
selecting the same application again with
parameter 0.1 or by setting the value of
parameter 0.2 to 1. See User's manual
chapter 12.
If parameter group 0 is not visible, make it
visible as follows:
1. If parameter lock is set on, open the lock,
parameter 1. 16, by setting the value of
the parameter to 0.
Groups 2—8
Group 1
Group 0
2. If parameter conceal is set on, open the
conceal parameter 1. 15, by setting the
value of the parameter to 0.
Group 0 becomes visible.
D Language selection
The language of the text shown on the
operator's panel can be chosen with
parameter 0. 3. See EXCEL VRL CX/CXL/
CXS User's Manual, chapter 11.
Figure B-1 Parameter Groups.
Page 0-2
Standard Application
STANDARD CONTROL APPLICATION
(par. 0.1 = 2)
CONTENTS
1 Standard Application ........................1-1
1.1
1.2
1.3
1.4
General ........................................1-2
Control I/O ....................................1-2
Control signal logic .......................1-3
Parameters Group 1 ....................1-4
1.4.1 Parameter table ..................1-4
1.4.2 Description of Group1 par ...1-5
1.5 Special parameters, Groups 2-8 ..1-8
1.5.1 Parameter tables .................. 1-8
1.5.2 Description of Groups. ........ 1-12
Page 1-1
1
Standard Application
1
1 STANDARD APPLICATION
1.1 General
The Standard application has the same I/O
signals and same Control logic as the Basic
application. Digital input DIA3 and all
outputs are programmable.
by setting the value of parameter 0. 1 to 2.
Basic connections of inputs and outputs are
shown in the figure 1.2-1. The control signal
logic is shown in the figure 1.3-1.
Programming of I/O terminals is explained
in chapter 1.5.
The Standard Application can be selected
1.2 Control I/O
Reference
potentiometer
Terminal
READY
RUN
FAULT
220
VAC
Max.
Signal
Description
1
+10Vref
Reference output
Voltage for a potentiometer, etc.
2
Vin+
Analog input, voltage
range 0—10 V DC
Frequency reference if activated if
terminals 14 and 15 open and parameter 1.17 = 0 (default value)
3
GND
I/O ground
Ground for reference and controls
4
5
Iin+
Iin-
Analog input, current
range 0—20 mA
Frequency reference activated if
terminals 14 and 15 closed, or open
and parameter 1.17 = 1
6
+24V
Control voltage output
Voltage for switches, etc. max. 0.1 A
7
GND
I/O ground
Ground for reference and controls
8
DIA1
Start forward
(Programmable)
Contact closed = start forward
9
DIA2
Start reverse
(Programmable)
Contact closed = start reverse
10
DIA3
External fault input
(Programmable)
Contact open = no fault
Contact closed = fault
11
CMA
Common for DIA1—DIA3
Connect to GND or + 24V
12
+24V
Control voltage output
Voltage for switches, (same as #6)
13
GND
I/O ground
14
DIB4
Multi-step speed select 1
15
DIB5
Multi-step speed select 2
16
DIB6
Fault reset
17
CMB
Common for DIB4—DIB6
18
Iout+
Output frequency
19
Iout-
Analog output
20
DO1
Digital output
READY
21
RO1
Relay output 1
Ground for reference and controls
DIB4 DIB5 Frequency ref.
open
open
Ref. Vin (par.1.17=0)
closed open
Multi-step ref. 1
open
closed Multi-step ref. 2
closed closed Ref. Iin (term. #4,5)
Contact open = no action
Contact closed = fault reset
Connect to GND or + 24V
Programmable (par. 3. 1)
Range 0—20 mA/RL max. 500 Ω
Programmable ( par. 3. 6)
Open collector, I<50 mA, V<48 VDC
Programmable ( par. 3. 7)
22
RO1
RUN
23
RO1
24
RO2
Relay output 2
25
RO2
FAULT
26
RO2
Programmable ( par. 3. 8 )
Figure 1.2-1 Default I/O configuration and connection example of the Standard Application.
Page 1-2
Standard Application
1
1.3 Control signal logic
BASIC PARAMETERS
RUN
Group 1
1. 5 Multi-step speed reference 1
MON
1. 6 Multi-step speed reference 2
PAR
REF
FAULT
BTNS
RST
PG
1. 17 Basic reference selection
Panel reference
Start/Stop buttons
RST button
Progr. button1
Uin+
READY
PROGRAMMABLE
PUSH-BUTTON 2
Internal
frequency
reference
Iin±
DIB4 Multi-step speed sel. 1
DIB5 Multi-step speed sel. 2
DIA1 Start forward
(programmable)
DIA2 Start reverse
(programmable)
Internal
Start/Stop
Start/Stop
Programmable
Start/Stop
and reverse
logic
Internal
reverse
Reverse
Internal
fault reset
DIB6 Fault reset input
DIA3 External fault input
(programmable)
>1
= control line
= signal line
UD012K01
UD012K00
Figure 1.3-1 Control signal logic of the Standard Application.
Page 1-3
Standard Application
1
1.4 PARAMETERS, GROUP 1
1.4.1 Parameter table
Code Parameter
Range
Step
Default
1. 1
Minimum frequency
0—fmax
1 Hz
0 Hz
1. 2
Maximum frequency
fmin-120/500 Hz 1 Hz
60 Hz
*
1-5
1. 3
Acceleration time 1
0.1—3000.0 s
0.1 s
3,0 s
Time from fmin (1. 1) to f max (1. 2)
1-5
1. 4
Deceleration time 1
0.1—3000.0 s
0.1 s
3.0 s
Time from fmax (1. 2) to fmin (1. 1)
1-5
1. 5
Multi-step speed
reference 1
fmin —fmax
0.1 Hz 10.0 Hz
1-5
1. 6
Multi-step speed
reference 2
fmin —fmax
0.1 Hz
1-5
1. 7
Current limit
1. 8
V/Hz ratio selection
0—2
1
1. 9
V/Hz optimization
0 —1
1. 10
Nominal voltage
of the motor
1. 11
Nominal frequency
of the motor
1. 12
Nominal speed
of the motor
1. 13
Nominal current
of the motor
2.5 x InCX
1. 14
Supply voltage
208—240
0.1—2.5 x InCX 0.1 A
Custom Description
Page
1-5
60.0 Hz
Output current limit [A] of the unit
1-5
0
0 = Linear
1 = Squared
2 = Programmable V/Hz ratio
1-5
1
0
0 = None
1 = Automatic torque boost
1-6
180—690 V
1V
230 V
380 V
480 V
575 V
CX/CXL/CXS V 3 2
CX/CXL/CXS V 3 4
CX/CXL/CXS V 3 5
CX V 3 6
1-7
30—500 Hz
1 Hz
60 Hz
fn from the nameplate of
the motor
1-7
1720 rpm
**
nn from the nameplate of
the motor
1-7
InCX
In from the nameplate of
the motor
1-7
230 V
CX/CXL/CXS V 3 2
1-7
380—440
380 V
CX/CXL/CXS V 3 4
380—500
480 V
CX/CXL/CXS V 3 5
525—690
575 V
CX V 3 6
1—20000 rpm 1 rpm
0.1 A
1.5 x InCX
1. 15
Parameter conceal
0—1
1
0
Visibility of the parameters:
0 = all parameter groups visible
1 = only group 1 is visible
1-7
1. 16
Parameter value
lock
0—1
1
0
Disables parameter changes:
0 = changes enabled
1 = changes disabled
1-7
1. 17
Basic frequency
reference selection
0—2
1
0
0 = analog input Vn
1 = analog input In
2 = reference from the panel
1-7
Table 1.4-1 Group 1 basic parameters.
Note!
Page 1-4
= Parameter value can be changed
only when the drive is stopped.
* If 1. 2 > motor synchr. speed, check suitability
for motor and drive system.
Selecting 120 Hz/500 Hz range see page 1-5.
** Default value for a four pole motor
and a nominal size drive.
Standard Application
1.4.2 Description of Group 1 parameters
1
1. 1, 1. 2 Minimum/maximum frequency
Defines the frequency limits of the drive.
The default maximum value for parameters 1. 1 and 1. 2 is 120 Hz. By setting
the value of the parameter 1. 2 to 120 Hz when the drive is stopped (RUN
indicator not lit) parameters 1. 1 and 1. 2 are changed to 500 Hz. At the same
time the resolution of the display panel is changed from 0.01 Hz to 0.1 Hz.
Changing the max. value from 500 Hz to 120 Hz in done by setting parameter 1.
2 to 119 Hz while the drive is stopped.
1. 3, 1. 4 Acceleration time1, deceleration time 1:
These limits correspond to the time required for the output frequency to accelerate
from the set minimum frequency (par. 1. 1) to the set maximum frequency (par. 1.
2).
1. 5, 1. 6 Multi-step speed reference 1, Multi-step speed reference 2:
f[Hz]
Ref. Iin
Par. 1. 6
Ref. Vin
(Par. 1.17 = 0)
Par. 1. 5
DIB4
DIB5
Run
Stop
t
Run
Stop
Ch009K06
Figure 1.4-1 Example of Multi-step speed references.
Parameter values are automatically limited between minimum and maximum
frequency ( par 1. 1, 1. 2).
1. 7
Current limit
This parameter determines the maximum motor current that the CX/CXL/CXS will
provide short term.
1. 8
V/Hz ratio selection
Linear:
0
The voltage of the motor changes linearly with the frequency in the
constant flux area from 0 Hz to the field weakening point (par. 6. 3)
where a constant voltage (nominal value) is supplied to the motor. See
figure 1.4-2.
A linear V/Hz ratio should be used in constant torque applications.
This default setting should be used if there is no special
requirement for another setting.
Page 1-5
Standard Application
1
Squared:
1
The voltage of the motor changes following a squared curve form
with the frequency in the area from 0 Hz to the field weakening
point (par. 6. 3) where the nominal voltage is also supplied to
the motor. See figure 1.4-2.
The motor runs undermagnetized below the field weakening point
and produces less torque and electromechanical noise. A squared
V/Hz ratio can be used in applications where the torque demand of the
load is proportional to the square of the speed, e.g. in centrifugal
fans and pumps.
U [V ]
D e fa u lt: N o m in a l
v o lta g e o f the m o to r
Vn
L ine a r
S q u a re d
F ie ld w e a k e nin g
p o in t
D e fa u lt: N o m in a l
fre q u e nc y o f the
m o to r
f [H z ]
Figure 1.4-2 Linear and squared V/Hz curves.
Programm. The V/Hz curve can be programmed with three different points.
V/Hz curve The parameters for programming are explained in chapter 1.5.2.
A programmable V/Hz curve can be used if the standard settings
2
do not satisfy the needs of the application. See figure 1.4-3.
Vn
Parameter 6.4
U[V]
Default: nominal
voltage of the
motor
Parameter 6.6
Default 10%
Field weakening
point
Default: nominal frequency
of the motor
Parameter 6.7
Default 1.3 %
Parameter 6.5
(Default 5 Hz)
Parameter 6.3
f[Hz]
Figure 1.4-3 Programmable V/Hz curve.
1. 9
V/Hz optimization
Automatic The voltage to the motor changes automatically which allows the
torque
motor to produce enough torque to start and run at low frequencies.
The boost voltage increase depends on the motor type and
horsepower. Automatic torque boost can be used in applications
where starting torque due to starting friction is high, e.g. in conveyors.
Page 1-6
Standard Application
NOTE!
!
1. 10
In high torque - low speed applications - it is likely that the motor will
overheat.
If the motor has to run for a prolonged time under these conditions,
special attention must be paid to cooling the motor. Use external
cooling for the motor if the operating temperature rise is too high.
Nominal voltage of the motor
Find this value from the nameplate of the motor.
This parameter sets the voltage at the field weakening point, parameter 6. 4, to
100% x Vnmotor.
Note!If the nominal motor voltage is lower than the supply voltage, check
that the insulation level of the motor is adequate.
1. 11
Nominal frequency of the motor
Find the nominal frequency fn from the nameplate of the motor.
This parameter sets the field weakening point, parameter 6. 3, to the same
value.
1. 12
Nominal speed of the motor
Find this value nn from the nameplate of the motor.
1. 13
Nominal current of the motor
Find the value In from the nameplate of the motor.
The internal motor protection function uses this value as a reference value.
1. 14
Supply voltage
Set parameter value according to the nominal voltage of the supply.
Values are predefined for CX/CXL/CXS V 3 2, CX/CXL/CXS V 3 4, CX/CXL/CXS
V 3 5 and CX V 3 6, see table 1.4-1.
1. 15
Parameter conceal
Defines which parameter groups are available:
0 = all groups are visible
1 = only group 1 is visible
1. 16
Parameter value lock
Permits access for changing the parameter values:
0 = parameter value changes enabled
1 = parameter value changes disabled
1. 17
Basic frequency reference selection
0
1
2
Analog voltage reference from terminals 2—3, e.g. a potentiometer
Analog current reference from terminals 4—5, e.g. a transducer.
Panel reference is the reference set from the Reference Page (REF),
see chapter 7.5.
Page 1-7
1
Standard Application
1
1.5 SPECIAL PARAMETERS, GROUPS 2—8
1.5.1 Parameter tables
Group 2, Input signal parameters
Code Parameter
Range
Step
Default
Custom Description
Page
DIA1
DIA2
Start reverse
Reverse
Run enable
Stop pulse
2. 1
Start/Stop logic
selection
0—3
1
0
0 = Start forward
1 = Start/Stop
2 = Start/Stop
3 = Start pulse
2. 2
DIA3 function
(terminal 10)
0—5
1
1
0 = Not used
1-13
1 = Ext. fault, closing contact
2 = External fault, opening contact
3 = Run enable
4 = Acc./dec. time selection
5 = Reverse (if par. 2. 1 = 3)
2. 3
Reference offset
for current input
0—1
1
0
0 = 0—20 mA
1 = 4—20 mA
1-13
2. 4
Reference scaling,
minimum value
0—par. 2.5
1 Hz
0 Hz
Selects the frequency that
corresponds to the minimum
reference signal
1-13
2. 5
Reference scaling,
maximum value
0—fmax
1 Hz
0 Hz
Selects the frequency that
corresponds to the maximum
reference signal
0 = Scaling off
>0 = Maximum frequency value
1-13
2. 6
Reference invert
0—1
1
0
0 = No inversion
1 = Reference inverted
1-14
2. 7
Reference filter time
0 = No filtering
1-14
0.00 —10.00s 0.01s
0.10s
1-12
Group 3, Output and supervision parameters
Code Parameter
Range
Step
Default Custom Description
0—7
1
1
3. 1
Analog output function
3. 2
Analog output filter time
0.00—10.00 s
0.01s
1.00 s
3. 3
Analog output inversion
0—1
1
3. 4
Analog output minimum
0—1
3. 5
Analog output scale
10—1000%
Note!
Page 1-8
Page
0 = Not used
Scale 100%
1-15
1 = O/P frequency (0—fmax)
2 = Motor speed (0—max. speed)
3 = O/P current (0—2.0xInCX)
4 = Motor torque (0—2xTnMot)
5 = Motor power (0—2xPnMot)
6 = Motor voltage (0—100%xVnMot)
7 = DC-link volt. (0—1000 V)
0 = no filtering
1-15
0
0 = Not inverted
1 = Inverted
1-15
1
0
0 = 0 mA
1 = 4 mA
1-15
1%
100%
= Parameter value can be changed only when the drive is stopped.
1-15
Standard Application
Group 3, Output and supervision parameters
Code Parameter
Range
Step
Default
3. 6
Digital output function
0—14
1
1
0 = Not used
1-16
1 = Ready
2 = Run
3 = Fault
4 = Fault inverted
5 = CX overheat warning
6 = External fault or warning
7 = Reference fault or warning
8 = Warning
9 = Reversed
10 = Multi-step speed selected
11 = At speed
12 = Motor regulator activated
13 = Output frequency limit superv.
14 = Control from I/O-terminal
3. 7
Relay output 1 function
0—14
1
2
As parameter 3. 6
1-16
3. 8
Relay output 2 function
0—14
1
3
As parameter 3. 6
1-16
3. 9
Output freq. limit
supervision function
0—2
1
0
0 = No
1 = Low limit
2 = High limit
1-16
0.0—fmax
(par. 1. 2)
0.1 Hz
0.0 Hz
0—7
1
3
As parameter 3. 1
1-15
1%
100%
As parameter 3. 5
1-15
3. 10 Output freq. limit
supervision value
3. 11 I/O-expander option board
analog output function
3. 12 I/O-expander option board 10—1000%
analog output scale
Custom Description
Page
1-16
Group 4, Drive control parameters
Code Parameter
Range
Step
Default Custom Description
Page
4. 1
Acc./Dec. ramp 1 shape
0.0—10.0 s
0.1 s
0.0 s
0 = Linear
>0 = S-curve acc./dec. time
1-17
4. 2
Acc./Dec. ramp 2 shape
0.0—10.0 s
0.1 s
0.0 s
0 = Linear
>0 = S-curve acc./dec. time
1-17
4. 3
Acceleration time 2
0.1—3000.0 s
0.1 s
10.0 s
4. 4
Deceleration time 2
0.1—3000.0 s
0.1 s
10.0 s
4. 5
Brake chopper
0—2
1
0
0 = Brake chopper not in use
1 = Brake chopper in use
2 = External brake chopper
1-17
4. 6
Start function
0—1
1
0
0 = Ramp
1 = Flying start
1-17
4. 7
Stop function
0—1
1
0
0 = Coasting
1 = Ramp
1-18
4. 8
DC-braking current
0.15—1.5 x
InCX (A)
0.1 A
0.5
x InCX
4. 9
DC-braking time at Stop 0.00—250.00 s 0.01 s 0.00 s
Note!
1-17
1-17
1-18
0 = DC-brake is off
1-18
= Parameter value can be changed only when the drive is stopped.
Page 1-9
1
Standard Application
1
Group 5, Prohibit frequency parameters
Code Parameter
Range
Step
Default
5. 1
Prohibit frequency
range low limit
fmin—fmax
par. 5. 2
0.1 Hz
0.0 Hz
5. 2
Prohibit frequency
range high limit
fmin—fmax
(1. 1) (1. 2)
0.1 Hz
0.0 Hz
Custom Description
Page
1-19
0 = no prohibit frequency range
(max limit = par. 1. 2)
1-19
Group 6, Motor control parameters
Code Parameter
Range
Step
Default
6. 1
Motor control mode
0—1
1
0
6. 2
Switching frequency
1.0—16.0 kHz
0.1
10/3.6 kHz
6. 3
Field weakening point
30—500 Hz
1 Hz
Param.
1. 11
1-20
6. 4
Voltage at field
weakening point
15—200%
x Vnmot
1%
100%
1-20
6. 5
V/Hz curve mid
point frequency
0.0—fmax
0.1 Hz
0.0 Hz
1-20
6. 6
V/Hz curve mid
point voltage
0.00—100.00%
x Vnmot
0.01%
0.00%
1-20
6. 7
Output voltage at
zero frequency
0.00—100.0%
x Vnmot
0.01%
0.00%
1-20
6. 8
Overvoltage controller
0—1
1
1
0 = Controller is off
1 = Controller is on
1-20
6. 9
Undervoltage controller
0—1
1
1
0 = Controller is off
1 = Controller is on
1-20
Note!
Custom Description
Page
0 = Frequency control
1 = Speed control
1-20
Dependant on Hp rating
1-20
= Parameter value can be changed only when the drive is stopped.
Group 7, Protections
Code Parameter
Range
Step
Default
Custom Description
Page
7. 1
Response to
reference fault
0—3
1
0
0 = No action
1-21
1 = Warning
2 = Fault, stop according par. 4.7
3 = Fault, always coasting stop
7. 2
Response to
external fault
0—3
1
2
0 = No action
1-21
1 = Warning
2 = Fault, stop according par. 4.7
3 = Fault, always coasting stop
7. 3
Phase supervision of
the motor
0—2
2
2
0 = No action
2 = Fault
1-21
7. 4
Ground fault protection
0—2
2
2
0 = No action
2 = Fault
1-21
7. 5
Motor thermal protection
0—2
1
2
0 = No action
1 = Warning
2 = Fault
1-22
7. 6
Stall protection
0—2
1
1
0 = No action
1 = Warning
2 = Fault
1-22
Page 1-10
Standard Application
Group 8, Autorestart parameters
Code Parameter
Range
Step
Default
8. 1
Automatic restart:
number of tries
0—10
1
0
8. 2
Automatic restart: multi- 1—6000 s
attempt max. trial time
1s
30 s
8. 3
Automatic restart:
start function
1
0
0—1
Custom Description
0 = no action
Page
1-23
1-23
0 = Ramp
1 = Flying start
1-24
Table 1.5-1 Special parameters, Groups 2—8.
Page 1-11
1
Standard Application
1
1.5.2 Description of Group 2—8 parameters
2. 1
Start/Stop logic selection
0
DIA1: closed contact = start forward
DIA2: closed contact = start reverse,
See figure 1.5-1.
Output
frequency
FWD
Stop function
(par 4. 7)
= coasting
t
REV
DIA1
DIA2
1
2
UD009K09
3
Figure 1.5-1 Start forward/Start reverse.
1
The first selected direction has the highest priority
2
When DIA1 contact opens, the direction of rotation starts to change
3
If Start forward (DIA1) and Start reverse (DIA2) signals are active
simultaneously, the Start forward signal (DIA1) has priority.
1
DIA1: closed contact = start
DIA2: closed contact = reverse
See figure 1.5-2.
FWD
Output
frequency
open contact = stop
open contact = forward
Stop function
(par 4. 7
= coasting
t
REV
DIA1
DIA2
Figure 1.5-2 Start, Stop, reverse.
Page 1-12
UD012K10
Standard Application
2:
DIA1: closed contact = start
DIA2: closed contact = start enabled
3:
3-wire connection (pulse control):
open contact = stop
open contact = start disabled
DIA1: closed contact = start pulse
DIA2: closed contact = stop pulse
(DIA3 can be programmed for reverse command)
See figure 1.5-3.
FWD
Output
frequency
Stop function
(par 4. 7)
= coasting
If Start and Stop pulses are
simultaneous the Stop pulse
overrides the Start pulse
t
REV
DIA1
Start
min 50 ms
UD009K11
DIA2
Stop
Figure 1.5-3 Start pulse/Stop pulse.
2. 2
DIA3 function
1: External fault, closing contact = Fault is shown and motor is stopped when
the contact is closed.
2: External fault, opening contact = Fault is shown and motor is stopped when
the contact is open.
2.3
3: Run enable
contact open
contact closed
= Start of the motor disabled
= Start of the motor enabled
4: Acc. / Dec
time select.
contact open
contact closed
= Acceleration/Deceleration time 1 selected
= Acceleration/Deceleration time 2 selected
5: Reverse
contact open
contact closed
= Forward
= Reverse
Can be used for reversing if
parameter 2. 1 has value 3
Reference offset for current input
0: No offset
1: Offset 4 mA, provides supervision of zero level signal. The response to
reference fault can be programmed with the parameter 7. 1.
2.4, 2.5
Reference scaling, minimum value/maximum value
Setting value limits: 0 < par. 2. 4 < par. 2. 5 < par. 1. 2.
If parameter 2. 5 = 0 scaling is set off. See figures 1.5-4 and 1.5-5.
Page 1-13
1
Standard Application
1
Output
frequency
Output
frequency
Max freq. par 1. 2
Max freq. par 1. 2
par. 2. 5
par. 2. 4
Analog
input [V]
Min freq. par 1. 1
0
Figure 1.5-4 Reference scaling.
2.6
10
Analog
input [V]
Min freq. par 1. 1
0
Ch012K12
10
Ch012K13
Figure 1.5-5 Reference scaling,
parameter 2. 5 = 0.
Reference invert
Output
frequency
Inverts reference signal:
max. ref. signal = min.set freq.
min. ref. signal = max. set freq.
Max freq. par 1. 2
par. 2. 5
par. 2. 4
Analog
input
Min freq. par 1. 1
0
max.
Ch012K14
Figure 1.5-6 Reference invert.
2.7
Reference filter time
Filters out disturbances from the
incoming reference signal. A long
filtering time makes regulation
response slower. See figure 1.5-7.
%
Unfiltered signal
100%
Filtered signal
63%
t [s]
Par. 2. 7
UD009K15
Figure 1.5-7 Reference filtering.
Page 1-14
Standard Application
3. 1
See table "Group 3, output and
supervision parameters" on the
page 1-8.
3. 2
1
Analog output function
%
Unfiltered signal
100%
Filtered signal
Analog output filter time
63%
Filters the analog output signal.
See figure 1.5-8.
t [s]
Par. 3. 2
Figure 1.5-8 Analog output filtering.
3.3
UD009K16
Analog output invert
Inverts analog output signal:
max. output signal = minimum set
value
min. output signal = maximum set
value
Analog
output
current
20 mA
12 mA
Param. 3. 5
= 50%
10 mA
Param. 3. 5
= 100%
4 mA
Param. 3. 5
= 200%
Figure 1.5-9 Analog output invert.
3. 4
Selected (para. 3. 1)
signal max. value
0 mA
0.5
0
1.0
Ch012K17
Analog output minimum
Defines the signal minimum to
be either 0 mA or 4 mA. See figure
1.5-10.
3. 5
Analog output scale
Scaling factor for analog output.
See figure 1.5-10.
Signal
Max. value of the signal
Output
frequency
Motor speed
Output
current
Motor torque
Motor power
Motor voltage
DC-link volt.
Max. frequency (p. 1. 2)
Max. speed (nnxfmax/fn)
2 x InCX
2 x TnMot
2 x PnMot
100% x VnMot
1000 V
Analog
output
current
Param. 3. 5
= 200%
Param. 3. 5
= 100%
20 mA
12 mA
Param. 3. 5
= 50%
10 mA
Par. 3. 4 = 1
4 mA
Max. value of signal
selected by param. 3. 1
Par. 3. 4 = 0
0 mA
0
0.5
1.0
Ch012K18
Figure 1.5-10 Analog output scale.
Page 1-15
Standard Application
1
3. 6
3. 7
3. 8
Digital output function
Relay output 1 function
Relay output 2 function
Setting value
Signal content
0 = Not used
Out of operation
Digital output DO1 sinks current and programmable
relay (RO1, RO2) is activated when:
1
2
3
4
5
6
7
=
=
=
=
=
=
=
8 =
9 =
10 =
11 =
12 =
13 =
Ready
Run
Fault
Fault inverted
CX overheat warning
External fault or warning
Reference fault or warning
Warning
Reversed
Multi-step speed selected
At speed
Motor regulator activated
Output frequency supervision
14= Control from I/O terminals
The drive is ready to operate
The drive operates
A fault trip has occurred
A fault trip has not occurred
The heat-sink temperature exceeds +70°C
Fault or warning depending on parameter 7. 2
Fault or warning depending on parameter 7. 1
- if analog reference is 4—20 mA and signal is <4mA
Always if a warning exists
The reverse command has been selected
A multi-step speed has been selected
The output frequency has reached the set reference
Overvoltage or overcurrent regulator was activated
The output frequency goes outside of the set supervision low limit/ high limit (par. 3. 9 and 3. 10)
Ext. control mode selected with progr. push-button #2
Table 1.5-2 Output signals via DO1 and output relays RO1 and RO2.
3. 9
Output frequency limit supervision function
0 = No supervision
1 = Low limit supervision
2 = High limit supervision
If the output frequency goes under/over the set limit (3. 10) this function generates
a warning message via the digital output DO1 and via a relay output RO1 or RO2
depending on the settings of the parameters 3. 6—3. 8.
3. 10
Output frequency limit supervision value
The frequency value to be supervised by the parameter 3. 9.
See figure 1.5-11.
Par. 3.9 = 2
f[Hz]
Par 3. 10
UD009K19
Example: 21 RO1
22 RO1
23 RO1
21 RO1
22 RO1
23 RO1
21 RO1
22 RO1
23 RO1
Figure 1.5-11 Output frequency supervision.
Page 1-16
t
Standard Application
4. 1
4. 2
1
Acc/Dec ramp 1 shape
Acc/Dec ramp 2 shape
The acceleration and deceleration ramp shape can be programmed with these
parameters.
Setting the value = 0 gives you a linear ramp shape. The output frequency
immediately follows the input with a ramp time set by parameters 1. 3, 1. 4 (4. 3, 4.
4 for Acc/Dec. time 2).
Setting 0.1—10 seconds for 4. 1
(4. 2) causes an S-shaped ramp.
The speed changes are smooth.
Parameter 1. 3/ 1. 4 (4. 3/ 4. 4)
determines the ramp time of the
acceleration/deceleration in the
middle of the curve. See figure
1.5-12.
f [Hz]
1. 3, 1. 4
(4. 3, 4. 4)
Figure 1.5-12 S-shaped
acceleration/deceleration.
4. 3
4. 4
4. 1 (4. 2)
4. 1 (4. 2)
[t]
UD009K20
Acceleration time 2
Deceleration time 2
These values correspond to the time required for the output frequency to change
from the set minimum frequency (par. 1. 1) to the set maximum frequency
(par. 1. 2). With this parameter it is possibile to set two different acceleration/
deceleration times for one application. The active set can be selected with the
programmable signal DIA3. See parameter 2. 2.
4. 5
Brake chopper
0 = No brake chopper
1 = Brake chopper and brake resistor installed
2 = External brake chopper
When the drive is decelerating the motor, the energy stored in the inertia of the motor
and the load is fed into the external brake resistor. If the brake resistor is selected
correctly the drive is able to decelerate the load with a torque equal to that of
acceleration. See the separate Brake resistor installation manual.
4. 6
Start function
Ramp:
0
The drive starts from 0 Hz and accelerates to the set reference
frequency within the set acceleration time. (Load inertia or starting friction
may extend the acceleration times).
Page 1-17
Standard Application
1
Flying start:
1
The drive starts into a running motor by first finding the speed the motor is
running at. Searching starts from the maximum frequency down until the actual
frequency reached. The output frequency then accelerates/decelerates to the
set reference value at a rate determined by the acceleration/deceleration ramp
parameters.
Use this mode if the motor may be coasting when the start command is given.
With the flying start it is possible to ride through short utility voltage
interruptions.
4. 7
Stop function
Coasting:
0
The motor coasts to an uncontrolled stop with the frequency converter off,
after the Stop command is issued.
Ramp:
1
4. 8
After the Stop command is issued, the speed of the motor is decelerated
based on the deceleration ramp time parameter.
If the regenerated energy is high, it may be necessary to use an external
braking resistor for faster deceleration.
DC braking current
Defines the current injected into the motor during DC braking.
4. 9
DC braking time at stop
Determines whether DC braking is ON or OFF. It also determines the braking
duration time of the DC-brake when the motor is stopping. The function of the DCbrake depends on the stop function, parameter 4. 7. See figure 1.5-13.
0
DC-brake is not used
>0
DC-brake is in use depending on the setup of the stop function
(param. 4. 7). The time is set by the value of parameter 4. 9:
Stop-function = 0 (coasting):
After the stop command, the motor will coast to a stop with the frequency
converter off.
With DC-injection, the motor can be electrically stopped in the shortest possible
time, without using an optional external braking resistor.
The braking time is scaled according to the frequency when the DC- braking
starts. If the frequency is > nominal frequency of the motor (par. 1.11), the value
of parameter 4.9 determines the braking time. When the frequency is < 10% of
the nominal, the braking time is 10% of the set value of parameter 4.9. See
figure 1.5-13.
Page 1-18
Standard Application
fout [Hz]
fout
fn
1
[Hz]
fn
Output frequency
S
p
e
e
d
Motor speed
Output frequency
0,1x fn
DC-braking ON
Motor speed
DC-braking ON
t
t
t = 0.1 x par. 4. 9
t = 1 x par. 4. 9
RUN
STOP
RUN
STOP
UD009K21
Figure 1.5-13 DC-braking time when stop = coasting.
Stop-function = 1 (ramp):
After a Stop command, the speed of the motor is reduced based on the deceleration
ramp parameter. If no regeneration occurs due to load inertia DC-braking starts at
a speed defined by parameter 4. 10.
The braking time is defined by
par. 4. 9. If the load has a high
inertia, use an external braking
resistor for faster deceleration.
fout [Hz]
Motor speed
Output frequency
See figure 1.5-14.
DC-braking
0.5 Hz
t
t = param. 4. 9
Figure 1.5-14 DC-braking time
when stop function = ramp.
RUN
STOP
5. 1
5. 2
Prohibit frequency area
Low limit/High limit
In some systems it may be
necessary to avoid certain
frequencies
because
of
mechanical resonance problems.
fout
[Hz]
With these parameters it is
possible to set limits for one "skip
frequency" region between 0 Hz
and 120 Hz/500 Hz. Accuracy of
the setting is 0.1 Hz.
See figure 1.5-15.
frequency reference
[Hz]
Figure 1.5-15 Example of prohibit
frequency area setting.
5. 1
5. 2
UD009K24
Page 1-19
Standard Application
1
6. 1
6. 2
Motor control mode
0 = Frequency control:
(V/Hz)
The I/O terminal and panel references are frequency references and the drive controls the output frequency (output freq. resolution 0.01 Hz)
1 = Speed control:
(sensorless vector)
The I/O terminal and panel references are speed references and the drive controls the motor speed (control
accuracy ± 0.5%).
Switching frequency
Motor noise can be minimized by using a high switching frequency. Increasing the
switching frequency reduces the current capacity of the CX/CXL/CXS.
Before changing the frequency from the factory default 10 kHz (3.6 kHz >40 Hp)
check the drive derating in the curves shown in figures 5.2-2 and 5.2-3 in chapter
5.2 of the User's Manual.
6. 3
6. 4
Field weakening point
Voltage at the field weakening point
The field weakening point is the output frequency where the output voltage reaches
the set maximum value (parameter 6. 4). Above that frequency the output voltage
remains constant at the set maximum value. Below that frequency the output voltage
depends on the setting of the V/Hz curve parameters 1. 8, 1. 9, 6. 5, 6. 6 and 6. 7.
See figure 1.5-16.
When the parameters 1. 10 and 1. 11, nominal voltage and nominal frequency of
the motor, are set, parameters 6. 3 and 6. 4 are also set automatically to the same
values. If you need different values for the field weakening point and the maximum
output voltage, change these parameters after setting parameters 1. 10 and 1. 11.
6. 5
V/Hz curve, middle point frequency
If the programmable V/Hz curve has been selected with parameter 1. 8, this parameter defines the middle frequency point of the curve. See figure 1.5-16.
6. 6
V/Hz curve, middle point voltage
If the programmable V/Hz curve has been selected with parameter 1. 8, this parameter defines the middle voltage point of the curve. See figure 1.5-16.
6. 7
Output voltage at zero frequency
If the programmable V/Hz curve has been selected with parameter 1. 8, this parameter defines the zero frequency voltage of the curve. See figure 1.5-16.
6. 8
6. 9
Overvoltage controller
Undervoltage controller
These parameters allow the over/undervoltage controllers to be switched ON or
OFF. This may be useful in cases where the utility supply voltage varies more than
-15%—+10% and the application requires a constant speed. If the controllers are
ON, they will change the motor speed in over/undervoltage cases. Overvoltage =
faster, undervoltage = slower.
Over/undervoltage trips may occur when the controllers are not used.
Page 1-20
Standard Application
1
Vn
Parameter 6.4
U[V]
Default: nominal
voltage of the
motor
Parameter 6.6
Default 10%
Field weakening
point
Default: nominal frequency
of the motor
Parameter 6.7
Default 1.3 %
Parameter 6.5
(Default 5 Hz)
Parameter 6.3
f[Hz]
Figure 1.5-16 Programmable V/Hz curve.
7. 1
Response to reference faults
0 = No response
1 = Warning
2 = Fault, stop mode after fault detection according to parameter 4.7
3 = Fault, always coasting stop mode after fault detection
A warning or a fault action and message is generated if the 4—20 mA reference
signal is used and the signal falls below 4 mA.
The information can also be programmed via digital output DO1 and via relay
outputs RO1 and RO2.
7. 2
Response to external fault
0 = No response
1 = Warning
2 = Fault, stop mode after fault detection according to parameter 4.7
3 = Fault, always coasting stop mode after fault detection
A warning or a fault action and message is generated from the external fault signal
in the digital input DIA3.
The information can also be programmed into digital output DO1 and into relay
outputs RO1 and RO2.
7. 3
Phase supervision of the motor
0 = No action
2 = Fault
Phase supervision of the motor ensures that the motor phases have approximately
equal current.
7. 4
Ground fault protection
0 = No action
2 = Fault
Ground fault protection ensures that the sum of motor phase currents is zero. The
standard overcurrent protection is always present and protects the drive from ground
faults with high current levels.
Page 1-21
Standard Application
1
7.5 Motor thermal protection
Operation:
0 = Not in use
1 = Warning
2 = Trip
The motor thermal protection protects the motor from overheating. In the Standard application
the thermal protection has fixed settings. In other applications it is possible to set the thermal
protection parameters. A trip or a warning will give an indication on the display. If trip is selected,
the drive will stop the motor and generate a fault.
Deactivating the protection by setting the parameter to 0 will reset the internal thermal model
to 0% heating.
The CX/CXL/CXS drive is capable of providing
higher than nominal current to the motor. If the
load requires this high current there is a risk
that motor will be thermally overloaded. This
is true especially at low frequencies. With low
frequencies the cooling effect of the motor fan
is reduced and the capacity of the motor is
reduced. Motor thermal protection is based on
a calculated model and it uses the output
current of the drive to determine the load on
the motor.
The thermal current IT specifies the load
current above which the motor is overloaded.
See figure 1.5-17. If the motor current is over
the curve the motor temperature is increasing.
Figure 1.5-17
!
7. 6
I
Current
limit
par. 1. 7
Overload area
IT
100%
×INmotor
45%
×INmotor
f
35 Hz
[Hz]
UMCH7_90
Motor thermal current IT curve.
CAUTION! The calculated model does not protect the motor if the cooling of
the motor is reduced either by blocking the airflow or due to dust
or dirt.
Stall protection
Operation:
0 = Not in use
1 = Warning
2 = Trip function
The Motor Stall protection provides a warning or a fault based on a short time
overload of the motor e.g. stalled shaft. The stall protection is faster than the motor
thermal protection. The stall state is defined with Stall Current and Stall Frequency.
In the Standard application they both have fixed values. See figure 1.5-18. If the
current is higher than the set limit and output frequency is lower than the set limit
the stall state is true. If the stall state lasts longer than 15 s a stall warning is given
on the display panel. In the other applications it is possible to set the parameters of
the Stall protection function. Tripping and warning will give a display indication. If
tripping is set on, the drive will stop and generate a fault.
Deactivating the stall protection by setting the parameter to 0 will reset the stall
time counter to zero.
Page 1-22
Standard Application
1
I
Stall area
130%
×INmotor
f
25 Hz
Figure 1.5-18
8. 1
8. 2
[Hz]
UMCH7_10
Stall state.
Automatic restart: number of tries
Automatic restart: trial time
The Automatic restart function will restart the drive after the following faults:
- overcurrent
- overvoltage
- undervoltage
- over/under temperature of the drive
- reference fault
Number of faults
during t = ttrial
ttrial
4
ttrial
3
2
Par. 8. 1 = 3
ttrial = Par. 8. 2
1
t
Three faults
RUN
STOP
Four faults
UD012K25
Figure 1.5-19 Automatic restart.
Parameter 8. 1 determines how many automatic restarts can be made during the
trial time set by the parameter 8. 2.
The count time starts from the first autorestart. If the number of restarts does not
exceed the value of the parameter 8.1 during the trial time, the count is cleared after
the trial time has elapsed. The next fault starts the counting again.
Page 1-23
Standard Application
1
8. 3
Automatic restart, start function
The parameter defines the start mode:
0 = Start with ramp
1 = Flying start, see parameter 4. 6.
Notes:
Page 1-24
Local/Remote Control Application
LOCAL/REMOTE CONTROL APPLICATION
(par. 0.1 = 3)
CONTENTS
2 Local/Remote Control Application ..2-1
2.1
2.2
2.3
2.4
General ........................................2-2
Control I/O ....................................2-2
Control signal logic .......................2-3
Parameters Group 1 ....................2-4
2.4.1 Parameter table ..................2-4
2.4.2 Description of Group1 par ...2-5
2.5 Special parameters, Groups 2—8 .. 2-8
2.5.1 Parameter tables .................. 2-8
2.5.2 Description of Group 2 par. . 2-15
Page 2-1
2
Local/Remote Control Application
2.1 General
By utilizing the Local/Remote Control
Application, the use of two different control
and frequency reference sources is
programmable. The active control source is
selected with digital input DIB6.
The Local/Remote Control Application can be
activated from the Group 0 by setting the
2
value of parameter 0. 1 to 3.
Basic connections of inputs and outputs are
shown in the figure 2.2-1. The control signal
logic is shown in the figure 2.3-1.
Programming of I/O terminals is explained in
chapter 2.5, Special parameters.
2.2 Control I/O
Local reference
potentiometer
Terminal
Remote reference
0(4)—20 mA
Remote control
24 V
RUN
FAULT
220
VAC
Max.
Description
1
+10Vref
Reference output
Voltage for a potentiometer, etc.
2
Vin+
Analog input,
voltage (programmable)
Source B frequency reference
range 0—10 V DC
3
GND
I/O ground
Ground for reference and controls
4
Iin+
Analog input,
Source A frequency reference
5
Iin-
current (programmable)
range 0—20 mA
6
+24V
Control voltage output
Voltage for switches, etc. max. 0.1 A
7
GND
I/O ground
Ground for reference and controls
8
DIA1
Source A: Start forward
(programmable)
Contact closed = start forward
9
DIA2
Source A: Start reverse
(Programmable)
Contact closed = start reverse
10
DIA3
Fault reset
(programmable)
Contact open = no action
Contact closed = fault reset
Remote control ground
READY
Signal
11
CMA
Common for DIA1—DIA3
Connect to GND or + 24V
12
+24V
Control voltage output
Voltage for switches, (same as #6)
13
GND
I/O ground
Ground for reference and controls
14
DIB4
Source B: Start forward
(programmable)
Contact closed = start forward
15
DIB5
Source B: Start reverse
(programmable)
Contact closed = start reverse
16
DIB6
Source A/B selection
Contact open = source A is active
Contact closed = source B is active
17
CMB
Common for DIB4—DIB6
Connect to GND or + 24V
18
Iout+
Output frequency
Programmable (par. 3. 1)
19
Iout-
Analog output
Range 0—20 mA/RL max. 500 Ω
20
DO1
Digital output
READY
Programmable (par. 3. 6)
Open collector, I<50 mA, V<48 VDC
21
RO1
Relay output 1 Programmable (par. 3. 7)
22
RO1
RUN
23
RO1
24
RO2
Relay output 2 Programmable (par. 3. 8)
25
RO2
FAULT
26
RO2
Figure 2.2-1 Default I/O configuration and connection example of the Local/
Remote Control Application.
Page 2-2
Local/Remote Control Application
2.3 Control signal logic
BASIC PARAMETERS
RUN
Group 1
MON
1. 5 Source A reference selection
READY
PAR
REF
FAULT
BTNS
RST
PG
1. 6 Source B reference selection
2
UD008 K 17
Uin+
Analog
reference
P
P
B
U
I
A
A/B
M
Iin±
PROGRAMMABLE
PUSH-BUTTON 2
Internal
frequency
reference
P
U
I
M
DIA2
DIA3
Up
Down
DIA1 Start FW
A DIA2
Start Rev.
Motorised
potentiometer
Programmable
Start/Stop and
Reverse signal
logic, Source A
Internal
Start/Stop
P
B
A
A/B
Internal
reverse
P
DIB4 Start FW
B DIB5
DIB6
Start Rev.
Programmable
Start/Stop and
Reverse signal
logic, Source B
B
A
A/B
Internal
fault reset
Source A/B selection
DIA3 Fault reset input
(programmable)
>1
= control line
= signal line
UD012K02
Figure 2.3-1 Control signal logic of the Local/Remote Control Application.
Switch positions shown are based on the factory settings.
Page 2-3
Local/Remote Control Application
2.4 Basic parameters, Group 1
2.4.1 Parameter table
2
Code Parameter
Range
Step
Default
Custom Description
Page
1. 1
Minimum frequency
0—fmax
1 Hz
0 Hz
1. 2
Maximum frequency
fmin-120/500 Hz 1 Hz
60 Hz
*
1. 3
Acceleration time 1
0.1—3000.0 s
0.1 s
3.0 s
Time from fmin (1. 1) to fmax (1. 2) 2-5
1. 4
Deceleration time 1
0.1—3000.0 s
0.1 s
3.0 s
Time from fmax (1. 2) to fmin (1. 1) 2-5
1. 5
Source A: reference
signal
0—4
1
1
0 = Anal. voltage input (term. 2)
2-5
1 = Anal. current input (term. 4)
2 = Set reference from the panel
3 = Signal from internal motor pot.
4 = Signal from internal motor pot.
reset if CX is stopped
1. 6
Source B: reference
signal
0—4
1
0
0 = Anal. voltage input (term. 2)
2-5
1 = Anal. current input (term. 4)
2 = Set reference from the panel
3 = Signal from internal motor pot.
4 = Signal from internal motor pot.
reset if CX unit is stopped
1. 7
Current limit
0.1—2.5 x InCX
0.1
1.5 x InCX
1. 8
V/Hz ratio selection
0—2
1
1. 9
V/Hz optimization
0—1
1. 10
Nominal voltage
of the motor
1. 11
Nominal frequency
of the motor
1. 12
Nominal speed
of the motor
1. 13
Nominal current
of the motor
2.5 x InCX
1. 14
Supply voltage
208—240
2-5
2-5
Output current limit [A] of the unit
2-5
0
0 = Linear
1 = Squared
2 = Programmable V/Hz ratio
2-5
1
0
0 = None
1 = Automatic torque boost
2-7
180—690 V
1V
230 V
380 V
480 V
575 V
CX/CXL/CXS V 3 2
CX/CXL/CXS V 3 4
CX/CXL/CXS V 3 5
CX V 3 6
2-7
30—500 Hz
1 Hz
60 Hz
fn from the nameplate of
the motor
2-7
nn from the nameplate of
the motor
2-7
In from the nameplate of
the motor
2-7
230 V
CX/CXL/CXS V 3 2
2-7
380—440
400 V
CX/CXL/CXS V 3 4
380—500
500 V
CX/CXL/CXS V 3 5
525—690
690 V
CX V 3 6
1—20000 rpm 1 rpm 1720 rpm
**
0.1 A
InCX
1. 15
Parameter conceal
0—1
1
0
Visibility of the parameters:
0 = All parameter groups visible
1 = Only group 1 is visible
2-7
1. 16
Parameter value lock
0—1
1
0
Disables parameter changes:
0 = Changes enabled
1 = Changes disabled
2-7
Table 2.4-1 Group 1 basic parameters.
Note!
Page 2-4
= Parameter value can be changed
only when the drive is stopped.
* If 1. 2 > motor synchr. speed, check suitability for motor
and drive system. Selecting 120 Hz/500 Hz range, see
page 2-5.
** Default value for a four pole motor and a nominal size
drive.
Local/Remote Control Application
2.4.2 Description of Group 1 parameters
1. 1, 1. 2 Minimum / maximum frequency
Defines the frequency limits of the drive.
The default maximum value for parameters 1. 1 and 1. 2 is 120 Hz. By setting the
value of parameter 1. 2 to 120 Hz when the drive is stopped (RUN indicator not lit)
parameters 1. 1 and 1. 2 are changed to 500 Hz. At the same time the resolution of
the panel reference is changed from 0.01 Hz to 0.1 Hz.
Changing the max. value from 500 Hz to 120 Hz is done by setting parameter 1. 2
to 119 Hz while the drive is stopped.
1. 3, 1. 4 Acceleration time1, deceleration time 1:
These limits correspond to the time required for the output frequency to
accelerate from the set minimum frequency (par. 1. 1) to the set maximum
frequency (par. 1. 2). Acceleration/deceleration times can be reduced with a free
analog input signal, see parameters 2. 18 and 2. 19.
1. 5
Source A reference signal
0
1
2
Analog voltage reference from terminals 2—3, e.g. a potentiometer
Analog current reference trom terminals 4—5, e.g. a transducer.
Panel reference is the reference set from the Reference Page (REF),see
chapter 7.5 in the User's Manual.
The reference value is controlled by digital input signals DIA2 and DIA3.
- switch in DIA2 closed = frequency reference increases
- switch in DIA3 closed = frequency reference decreases
The speed range for the reference change can be set with the parameter
2.3.
Same as setting 3 but the reference value is set to the minimum frequency
(par. 2. 14 or par. 1. 1 if par 2. 15 = 0) each time the drive is stopped. When
the value of parameter 1. 5 is set to 3 or 4, parameter 2. 1 is automatically
set to 4 and parameter 2. 2 is automatically set to 10.
3
4
1. 6
Source B reference signal
See the values of the parameter 1. 5.
1. 7
Current limit
This parameter determines the maximum motor current that the CX/CXL/CXS will
provide short term. Current limit can be set lower with a free analog input signal.
See parameters 2. 18 and 2. 19.
1. 8
V/Hz ratio selection
Linear:
0
The voltage of the motor changes linearly with the frequency in
the constant flux area from 0 Hz to the field weakening point
(par. 6. 3) where a constant voltage (nominal value) is supplied to the
motor. See figure 2.4-1.
A linear V/Hz ratio should be used in constant torque applications.
This default setting should be used if there is no special
requirement for another setting.
Page 2-5
2
Local/Remote Control Application
Squared:
1
The voltage of the motor changes following a squared curve form
with the frequency in the area from 0 Hz to the field weakening
point (par. 6. 3) where the nominal maximum voltage is supplied to
the motor. See figure 2.4-1.
The motor runs undermagnetized below the field weakening point
and produces less torque and electromechanical noise. A squared
V/Hz ratio can be used in applications where the torque demand of
the load is proportional to the square of the speed, e.g. in centrifugal
fans and pumps.
2
U [V ]
Vn
D e fa u lt: N o m in a l
v o lta g e o f the m o to r
L ine a r
S q u a re d
F ie ld w e a k e nin g
p o in t
D e fa u lt: N o m in a l
fre q u e nc y o f the
m o to r
f [H z ]
Figure 2.4-1 Linear and squared V/Hz curves.
Programm. The V/Hz curve can be programmed with three different points.
V/Hz curve The parameters for programming are explained in chapter 2.5.2
2
Programmable V/Hz curve can be used if the standard settings
do not satisfy the needs of the application. See figure 2.4-2.
Vn
Parameter 6.4
U[V]
Default: nominal
voltage of the
motor
Parameter 6.6
Default 10%
Default: nominal frequency
of the motor
Parameter 6.7
Default 1.3 %
Parameter 6.5
(Default 5 Hz)
Figure 2.4-2 Programmable V/Hz curve.
Page 2-6
Field weakening
point
Parameter 6.3
f[Hz]
Local/Remote Control Application
1. 9
V/Hz optimization
Automatic
torque
boost
The voltage to the motor changes automatically which allows the
motor to produce torque enough to start and run at low frequencies.
The voltage increase depends on the motor type and horsepower.
Automatic torque boost can be used in applications where starting
torque due to starting friction is high, e.g. in conveyors.
NOTE!
!
1. 10
In high torque - low speed applications - it is likely the motor will overheat.
If the motor has to run for a prolonged time under these conditions,
special attention must be paid to cooling of the motor. Use external
cooling for the motor if the temperature rise is too high.
Nominal voltage of the motor
Find this value Vn from the nameplate of the motor.
This parameter sets the voltage at the field weakening point, parameter 6. 4, to 100%
x Vnmotor.
1. 11
Nominal frequency of the motor
Find the nominal frequency fn from the nameplate of the motor.
This parameter sets the field weakening point, parameter 6. 3, to the same value.
1. 12
Nominal speed of the motor
Find this value nn from the nameplate of the motor.
1. 13
Nominal current of the motor
Find the value In from the nameplate of the motor.
The internal motor protection function uses this value as a reference value.
1. 14
Supply voltage
Set parameter value according to the nominal voltage of the supply.
Values are pre-defined for CX/CXL/CXS V 3 2, CX/CXL/CXS V 3 4, CX/CXL/CXS
V 3 5 and CX V 3 6. See table 2.4-1.
1. 15
Parameter conceal
Defines which parameter groups are available:
0 = all groups are visible
1 = only group 1 is visible
1. 16
Parameter value lock
Defines access for changing the parameter values:
0 = parameter value changes enabled
1 = parameter value changes disabled
If you have to adjust more of the functions of the Local/Remote Control Application, see
chapter 2.5 to set up parameters of Groups 2—8.
Page 2-7
2
Local/Remote Control Application
2.5 Special parameters, Groups 2—8
2.5.1 Parameter tables, Group 2, Input signal parameters
Code Parameter
2
Range
Step
Default Custom Description
Page
DIA1
DIA2
Start reverse
Reverse
Run enable
Stop pulse
Motor pot. UP
2. 1
Source A Start/Stop
logic selection
0—4
1
0
0 = Start forward
1 = Start/Stop
2 = Start/Stop
3 = Start pulse
4 = Start forward
2. 2
DIA3 function
(terminal 10)
0—10
1
7
0 = Not used
2-16
1 = Ext. fault, closing contact
2 = External fault, opening contact
3 = Run enable
4 = Acc./dec. time selection
5 = Reverse (if par. 2. 1 = 3)
6 = Jog speed
7 = Fault reset
8 = Acc/dec. operation prohibit
9 = DC-braking command
10 = Motor potentiometer DOWN
2. 3
Vin signal range
0—1
1
0
0 = 0—10 V
1 = Custom setting range
2. 4
Vin custom setting min. 0.00—100.00% 0.01%
2. 5
Vin custom setting max. 0.00—100.00% 0.01% 100.00%
2. 6
Vin signal inversion
0—1
1
0
0 = Not inverted
1 = Inverted
2-18
2. 7
Vin signal filter time
0.00 —10.00 s
0.01s
0.10s
0 = No filtering
2-18
2. 8
Iin signal range
0—2
1
0
0 = 0—20 mA
1 = 4—20 mA
2 = Custom setting range
2-19
2. 9
Iin custom setting minim. 0.00—100.00% 0.01%
0.00%
2-19
2. 10
Iin custom setting maxim. 0.00—100.00% 0.01%
100.00%
2-19
2. 11
Iin signal inversion
0—1
1
0
0 = Not inverted
1 = Inverted
2-19
2. 12
Iin signal filter time
0.01 —10.00 s
0.01s
0.10s
0 = No filtering
2-19
2. 13
Source B Start/Stop
logic selection
0—3
1
0
2. 14
Source A reference
scaling minimum value
0—par. 2. 15
1 Hz
0 Hz
Sets the frequency corresponding 2-20
to the min. reference signal
2. 15
Source A reference
scaling maximum value
0—fmax
(1. 2)
1 Hz
0 Hz
Sets the frequency corresponding 2-20
to the max. reference signal
0 = Scaling off
>0 = Scaled maximum value
2. 16
Source B reference
scaling minimum value
0—par. 2. 17
1 Hz
0 Hz
Sets the frequency corresponding 2-20
to the min. reference signal
2. 17
Source B reference
scaling maximum value
0—fmax
(1. 2)
1 Hz
0 Hz
Sets the frequency corresponding 2-20
to the max. reference signal
0 = Scaling off
>0 = Scaled maximum value
Note!
Page 2-8
0.00%
2-15
2-17
2-17
2-17
DIB4
0 = Start forward
1 = Start/Stop
2 = Start/Stop
3 = Start pulse
= Parameter value can be changed only when the drive is stopped.
DIB5
Start reverse
Reverse
Run enable
Stop pulse
2-20
Local/Remote Control Application
Code
Parameter
Range
Step
Default
2. 18
Free analog input,
signal selection
0—2
1
0
Custom
Description
0 = Not used
1 = Vin (analog voltage input)
2 = Iin (analog current input)
Page
2. 19
Free analog input,
function
0—4
1
0
0 = No function
2-20
1 = Reduces current limit (par. 1. 7)
2 = Reduces DC-braking current
3 = Reduces acc. and decel. times
4 = Reduces torque supervis. limit
2. 20
Motor potentiometer
ramp time
0.1—2000.0
Hz/s
0.1
Hz/s
10.0
Hz/s
2-20
2-22
2
Group 3, Output and supervision parameters
Code Parameter
Range
Step
0—7
1
Default Custom Description
1
Page
3. 1
Analog output function
0 = Not used
Scale 100%
2-22
1 = O/P frequency (0—fmax)
2 = Motor speed (0—max. speed)
3 = O/P current (0—2.0 x InCX)
4 = Motor torque (0—2 x TnMot)
5 = Motor power (0—2 x PnMot)
6 = Motor voltage (0—100%xVnMot)
7 = DC-link volt. (0—1000 V)
3. 2
Analog output filter time 0.00—10.00 s 0.01 s
3. 3
Analog output inversion
0—1
1
0
0 = Not inverted
1 = Inverted
2-22
3. 4
Analog output minimum
0—1
1
0
0 = 0 mA
1 = 4 mA
2-22
3. 5
Analog output scale
10—1000%
1%
100%
3. 6
Digital output function
0—21
1
1
100 s
2-22
2-22
0 = Not used
1 = Ready
2 = Run
3 = Fault
4 = Fault inverted
5 = CX overheat warning
6 = External fault or warning
7= Reference fault or warning
8 = Warning
9 = Reversed
10 = Jog speed selected
11 = At speed
12 = Motor regulator activated
2-23
13 = Output frequency limit
superv. 1
14 = Output frequency limit
superv. 2
15 = Torque limit supervision
16 = Reference limit supervision
17 = External brake control
18 = Control from I/O terminals
19 = Drive temperature limit
supervision
20 = Unrequested rotation direction
21 = External brake control
inverted
Note!
= Parameter value can be changed only when the drive is stopped.
Page 2-9
Local/Remote Control Application
2
Code
Parameter
Range
Step
Default
3. 7
Relay output 1 function
0—21
1
3. 8
Relay output 2 function
0—21
3. 9
Output freq. limit 1
supervision function
0—2
3. 10
Output freq. limit 1
supervision value
3. 11
Output freq. limit 2
supervision function
3. 12
Output freq. limit 2
supervision value
3. 13
Torque limit
supervision function
3. 14
Torque limit
supervision value
3. 15
0.0—fmax
(par. 1. 2)
0—2
0.0—fmax
(par. 1. 2)
Custom
Description
Page
2
As parameter 3. 6
2-23
1
3
As parameter 3. 6
2-23
1
0
0 = No
1 = Low limit
2 = High limit
2-24
0.1 Hz 0.0 Hz
1
0
2-24
0 = No
1 = Low limit
2 = High limit
0.1 Hz 0.0 Hz
0—2
1
0
0.0—200.0%
x TnSV9
0.1%
100.0%
Active reference limit
supervision
0—2
1
0
3. 16
Active reference limit
supervision value
0.0—fmax
(par. 1. 2)
3. 17
2-24
2-24
0 = No
1 = Low limit
2 = High limit
2-24
2-24
0 = No
1 = Low limit
2 = High limit
2-24
0.1 Hz 0.0 Hz
2-24
External brake OFF delay 0.0—100.0 s
0.1 s
0.5 s
2-25
3. 18
External brake ON delay
0.0—100.0 s
0.1 s
1.5 s
2-25
3. 19
Drive
temperature limit
supervision function
0—2
1
0
3. 20
Drive
temperature limit
-10—+75°C
1
+40°C
3. 21
I/O-expander board (opt.)
analog output function
0—7
1
3
See parameter 3. 1
2-22
3. 22
I/O-expander board (opt.) 0.00—10.00 s 0.01 s
analog output filter time
1.00 s
See parameter 3. 2
2-22
3. 23
I/O-expander board (opt.)
analog output inversion
0—1
1
0
See parameter 3. 3
2-22
3. 24
I/O-expander board (opt.)
analog output minimum
0—1
1
0
See parameter 3. 4
2-22
3. 25
I/O-expander board (opt.)
analog output scale
10—1000%
1
100%
See parameter 3. 5
2-22
Note!
Page 2-10
0 = No supervision
1 = Low limit
2 = High limit
2-25
2-25
= Parameter value can be changed only when the drive is stopped.
Local/Remote Control Application
Group 4, Drive control parameters
Code
Parameter
Range
Step
4. 1
Default Custom
Description
Page
Acc./Dec. ramp 1 shape
0.0—10.0 s
0.1 s
0.0 s
0 = Linear
>0 = S-curve acc./dec. time
2-26
4. 2
Acc./Dec. ramp 2 shape
0.0—10.0 s
0.1 s
0.0 s
0 = Linear
>0 = S-curve acc./dec. time
2-26
4. 3
Acceleration time 2
0.1—3000.0 s
0.1 s
10.0 s
2-26
4. 4
Deceleration time 2
0.1—3000.0 s
0.1 s
10.0 s
2-26
4. 5
Brake chopper
0—2
1
0
0 = Brake chopper not in use
1 = Brake chopper in use
2 = External brake chopper
2-26
4. 6
Start function
0—1
1
0
0 = Ramp
1 = Flying start
2-26
4. 7
Stop function
0—1
1
0
0 = Coasting
1 = Ramp
2-27
4. 8
DC-braking current
0.15—1.5
InCX (A)
0.1
4. 9
DC-braking time at Stop 0.00—250.00 s 0.01 s
0.00 s
4. 10
Turn on frequency of DC- 0.1—10.0 Hz
brake during ramp Stop
0.1 Hz
1.5 Hz
4. 11
DC-brake time at Start
0.00—25.00 s
0.01 s
0.00 s
4. 12
Jog speed reference
fmin —fmax
0.1 Hz
10.0 Hz
0.5 x
InCX
2-27
0 = DC-brake is off at Stop
2-27
2-28
0 = DC-brake is off at Start
2-28
2-29
Group 5, Prohibit frequency parameters
Code Parameter
Range
Step
Default
5. 1
Prohibit frequency
range 1 low limit
fmin—
par. 5. 2
0.1 Hz
0.0 Hz
5. 2
Prohibit frequency
range 1 high limit
fmin—fmax
(1. 1) (1. 2)
0.1 Hz
0.0 Hz
5. 3
Prohibit frequency
range 2 low limit
fmin—
par. 5. 4
0.1 Hz
0.0 Hz
5. 4
Prohibit frequency
range 2 high limit
fmin—fmax
(1. 1) (1. 2)
0.1 Hz
0.0 Hz
5. 5
Prohibit frequency
range 3 low limit
fmin—
par. 5. 6
0.1 Hz
0.0 Hz
5. 6
Prohibit frequency
range 3 high limit
fmin—fmax
(1. 1) (1. 2)
0.1 Hz
0.0 Hz
Note!
Custom Description
Page
2-29
0 = Prohibit range 1 is off
2-29
2-29
0 = Prohibit range 2 is off
2-29
2-29
0 = Prohibit range 3 is off
2-29
= Parameter value can be changed only when the drive is stopped.
Page 2-11
2
Local/Remote Control Application
Group 6, Motor control parameters
2
Code
Parameter
6. 1
Motor control mode
6. 2
Switching frequency
1.0—16.0 kHz
6. 3
Field weakening point
30—500 Hz
1 Hz
Param.
1. 11
2-29
6. 4
Voltage at field
weakening point
15—200%
x Vnmot
1%
100%
2-29
6. 5
V/Hz-curve mid
point frequency
0.0—fmax
0.1 Hz
0.0 Hz
2-30
6. 6
V/Hz-curve mid
point voltage
0.00—100.00 % 0.01%
x Vnmot
0.00%
2-30
6. 7
Output voltage at
zero frequency
0.00—100.00 % 0.01%
x Vnmot
0.00%
2-30
6. 8
Overvoltage controller
0—1
1
1
0 = Controller is not operating 2-30
1 = Controller is operating
6. 9
Undervoltage controller
0—1
1
1
0 = Controller is not operating 2-30
1 = Controller is operating
Note!
Range
Step
Default
0—1
1
0
0.1 kHz 10/3.6kHz
Custom
Description
0 = Frequency control
1 = Speed control
2-29
Depends on Hp rating
2-29
= Parameter value can be changed only when the drive is stopped.
Page 2-12
Page
Local/Remote Control Application
Group 7, Protections
Code Parameter
Range
Step
Default Custom Description
Page
7. 1
Response to
reference fault
0—3
1
0
0 = No action
1 = Warning
2 = Fault, stop according to
par. 4.7
3 = Fault, always coasting stop
2-30
7. 2
Response to
external fault
0—3
1
0
0 = No action
1 = Warning
2 = Fault, stop according to
par. 4.7
3 = Fault, always coasting stop
2-31
7. 3
Phase supervision of
the motor
0—2
2
2
0 = No action
2 = Fault
2-31
7. 4
Ground fault protection
0—2
2
2
0 = No action
2 = Fault
2-31
7. 5
Motor thermal protection
0—2
1
2
0 = No action
1 = Warning
2 = Fault
2-32
7. 6
Motor thermal protection 50.0—150.0%
break point current
x InMOTOR
1.0%
100.0%
2-32
7. 7
Motor thermal protection
zero frequency current
5.0—150.0%
x InMOTOR
1.0%
45.0%
2-32
7. 8
Motor thermal protection
time constant
0.5—300.0
minutes
0.5
min.
17.0
min.
7. 9
Motor thermal protection
break point frequency
10—500 Hz
1 Hz
35 Hz
7. 10
Stall protection
0—2
1
1
7. 11
Stall current limit
5.0—200.0%
x InMOTOR
1.0%
130.0%
2-34
7. 12
Stall time
2.0—120.0 s
1.0 s
15.0 s
2-34
7. 13
Maximum stall frequency
1—fmax
1 Hz
25 Hz
2-34
7. 14
Underload protection
0—2
1
0
7. 15
Underload prot., field
weakening area load
10.0—150.0%
x TnMOTOR
1.0%
50.0%
2-35
7. 16
Underload protection,
zero frequency load
5.0—150.0%
x TnMOTOR
1.0%
10.0%
2-35
7. 17
Underload time
2.0—600.0 s
1.0 s
20.0s
2-36
Default value is set according
to motor nominal current
2
2-33
2-33
0 = No action
1 = Warning
2 = Fault
0 = No action
1 = Warning
2 = Fault
2-34
2-35
Page 2-13
Local/Remote Control Application
Group 8, Autorestart parameters
2
Code Parameter
Range
Step
Default
8. 1
Automatic restart:
number of tries
0—10
1
0
8. 2
Automatic restart: multi
1—6000 s
attempt maximum trial time
1s
30 s
8. 3
Automatic restart:
start function
0—1
1
0
0 = Ramp
1 = Flying start
2-37
8. 4
Automatic restart of
undervoltage
0—1
1
0
0 = No
1 = Yes
2-37
8. 5
Automatic restart of
overvoltage
0—1
1
0
0 = No
1 = Yes
2-37
8. 6
Automatic restart of
overcurrent
0—1
1
0
0 = No
1 = Yes
2-37
8. 7
Automatic restart of
reference fault
0—1
1
0
0 = No
1 = Yes
2-37
8. 8
Automatic restart after
over/undertemperature
fault
0—1
1
0
0 = No
1 = Yes
2-37
Table 2.5-1 Special parameters, Groups 2—8.
Page 2-14
Custom Description
0 = Not in use
Page
2-36
2-36
Local/Remote Control Application
2.5.2 Description of Groups 2—8 parameters
2. 1
Start/Stop logic selection
0:
DIA1: closed contact = start forward
DIA2: closed contact = start reverse,
See figure 2.5-1.
FWD
Output
frequency
Stop function
(par 4. 7)
= coasting
2
t
REV
DIA1
DIA2
1
2
UD009K09
3
Figure 2.5-1 Start forward/Start reverse.
1
The first selected direction has the highest priority
2
When DIA1 contact opens, the direction of rotation starts to change
3
If Start forward (DIA1) and Start reverse (DIA2) signals are active
simultaneously, the Start forward signal (DIA1) has priority.
1:
DIA1: closed contact = start
DIA2: closed contact = reverse
See figure 2.5-2.
FWD
Output
frequency
open contact = stop
open contact = forward
Stop function
(par 4. 7
= coasting
t
REV
DIA1
DIA2
UD012K10
Figure 2.5-2 Start, Stop, reverse.
Page 2-15
Local/Remote Control Application
2:
DIA1: closed contact = start
DIA2: closed contact = start enabled
3:
3-wire connection (pulse control):
open contact = stop
open contact = start disabled
DIA1: closed contact = start pulse
DIA2: closed contact = stop pulse
(DIA3 can be programmed for reverse command)
See figure 2.5-3.
4:
2
DIA1: closed contact = start forward
DIA2: closed contact = reference increases (motor potentiometer
reference, par. 2. 1 is automatically set to 4 if
par. 1. 5 is set to 3 or 4).
FWD
Output
frequency
Stop function
(par 4. 7)
= coasting
If Start and Stop pulses are
simultaneous the Stop pulse
overrides the Start pulse
t
REV
DIA1
Start
min 50 ms
UD009K11
DIA2
Stop
Figure 2.5-3 Start pulse /Stop pulse.
2. 2
DIA3 function
1: External fault, closing contact = Fault is shown and motor is stopped when
the contact is closed
2: External fault, opening contact = Fault is shown and motor is stopped when
the input is open
3: Run enable
contact open
contact closed
= Start of the motor disabled
= Start of the motor enabled
4: Acc. / Dec
time select.
contact open
contact closed
= Acceleration/Deceleration time 1 selected
= Acceleration/Deceleration time 2 selected
5: Reverse
contact open
contact closed
= Forward Can be used for reversing if
= Reverse parameter 2. 1 has value 3
6: Jog freq.
contact closed
= Jog frequency selected for freq. refer.
7: Fault reset
contact closed
= Resets all faults
8: Acc./Dec. operation prohibited
contact closed = Stops acceleration and deceleration until
the contact is opened
9: DC-braking command
contact closed
= In the stop mode, the DC-braking operates
until the contact is opened, see figure 2.5-4.
Dc-brake current is set with parameter 4. 8.
10: Motor pot. meter down
contact closed = Reference decreases until the contact is
opened
Page 2-16
Local/Remote Control Application
Output
frequency
Param. 4. 10
t
2
DIA3
RUN
STOP
UD009K32
DIA3 as DC-brake command input and stop-mode = Ramp
t
DIA3
UD009K32
DIA3 as DC-brake command input and stop-mode = Coasting
Figure 2.5-4 DIA3 as DC-brake command input: a) Stop-mode = Ramp,
b) Stop-mode = Coasting.
2. 3
Vin signal range
0 = Signal range 0—10 V
1 = Custom setting range from custom minimum (par. 2. 4) to custom
maximum (par. 2. 5)
2. 4
Vin custom setting minimum/maximum
2. 5
With these parameters you can set Vin for any input signal span within 0—10 V.
Minimum setting: Set the Vin signal to its minimum level, select parameter 2. 4,
press the Enter button
Maximum setting: Set the Vin signal to its maximun level, select parameter 2. 5,
press the Enter button
Note!
The parameter values can only be set with this procedure (not with arrow up/arrow
down buttons).
Page 2-17
Local/Remote Control Application
Vin signal inversion
2. 6
Vin is source B frequency
reference, par. 1. 6 = 1 (default)
Parameter 2. 6 = 0, no inversion
of analog Vin signal.
2
Ou tput
frequ ency
P aram ete r
2.17
P aram ete r 2 .3 =0
V in = 0 10 V
P aram ete r 2 .3=1
V in = cus tom
P aram ete r
2.16
V in
(te rm . 2)
Figure 2.5-5 Vin no signal inversion.
0
P aram. 2.4
P aram . 2.5
10 V
Ch 01 2 K4 6
Parameter 2. 6 = 1, inversion of
analog Vin signal
Output
frequency
max. Vin signal = minimum set speed
min. Vin signal = maximum set speed
Par. 2. 17
Param. 2.3 =0
Par.
= 0V
Vin =2.
0 -310
Uin
= 0—10 V
par. 2. 2.5
5 = =11
Param.
Uin= =custom
custom
V
in
Par. 2. 16
V
in
Uin
(terminal2)
2)
(termin.
0
Par. 2. 4
Par. 2. 5
10 V
UD012K47
Figure 2.5-6 Vin signal inversion.
2. 7
Vin signal filter time
Filters out disturbances from the
incoming analog Vin signal.
A long filtering time makes
regulation response slower.
See figure 2.5-7.
%
Unfiltered signal
100%
Filtered signal
63%
t [s]
Figure 2.5-7 Vin signal filtering.
Page 2-18
Par. 2. 7
UD009K15
Local/Remote Control Application
2. 8
Analog input Iin signal range
0 = 0—20 mA
1 = 4—20 mA
2 = Custom signal span
See figure 2.5-8.
Output
frequency
par. 2. 15
par. 2. 8 = 2
Iin = custom
2. 9
2. 10
Analog input Iin custom
setting minimum/maximum
With these parameters you can
scale the input current to
correspond to a minimum and
maximum frequency range. See
figure 2.5-8.
Minimum setting:
Set the Iin signal to its minimum
level, select parameter 2. 9,
press the Enter button
Maximum setting:
Set the Iin signal to its maximun
level, select parameter 2. 10,
press the Enter button
par. 2. 8 = 0
Iin = 0—20 mA
2
par. 2. 8 = 1
Iin = 4—20 mA
par. 2. 14
0
4 mA
par. 2. 9
Iin
Uin
[term.3,4]
(term. 3,4)
par. 2. 10
Figure 2.5-8 Analog input Iinscaling.
Output
frequency
par. 2. 15
par. 2. 8 = 2
Iin = custom
Note! The parameter values can
only be set with this procedure
(not with arrow up/arrow downbuttons).
par. 2. 8 = 1
Iin = 4—20 mA
par. 2. 8 = 0
Iin = 0—20 mA
Iin
Uin
[term.3,4]
(term. 3,4)
par. 2. 14
2. 11
Analog input Iin inversion
max. I in signal = minimum set speed
min. I in signal = maximum set speed
2. 12
4 mA
0
Iin is source A frequency reference,
par. 1. 5 = 0 (default)
Parameter 2. 11 = 0, no inversion
of Iin input
Parameter 2. 11 = 1, inversion
of Iin input. See figure 2.5-9.
20 mA
par. 2. 9
par. 2. 10
UD009K29
Figure 2.5-9 Iin signal inversion.
%
Unfiltered signal
100%
Analog input Iin filter time
Filters out disturbances from the
incoming analog Iin signal. A long
filtering time makes regulation
response slower.
See figure 2.5-10.
20 mA
UD009K28
Filtered signal
63%
t [s]
Par. 2. 12
UD009K30
Figure 2.5-10 Analog input Iin filter time.
Page 2-19
Local/Remote Control Application
2. 13
Source B Start/Stop logic selection
See parameter 2. 1, settings 0—3.
2. 14,
2. 15
Source A reference scaling, minimum value/maximum value
Setting limits: 0 < par. 2. 14 < par. 2. 15 < par. 1. 2.
If par. 2. 15 = 0 scaling is set off. See figures 2.5-11 and 2.5-12.
(In figures voltage input Vin with signal range 0—10 V selected for source A reference)
Output
frequency
Output
frequency
2
Max freq. par 1. 2
Max freq. par 1. 2
par. 2. 5
par. 2. 4
Analog
input [V]
Min freq. par 1. 1
0
10 Ch012K12
Figure 2.5-11 Reference scaling.
2. 16,
2. 17
Source B reference scaling,
minimum value/maximum value
See parameters 2. 14 and 2. 15.
2. 18
Free analog input signal
Analog
input [V]
Min freq. par 1. 1
0
10 Ch012K13
Figure 2.5-12 Reference scaling,
par. 2. 15 = 0.
Selection of input signal of a free analog input (an input not used for reference
signal):
0 = Not in use
1 = Voltage signal Vin
2 = Current signal Iin
2. 19
Free analog input signal
function
Use this parameter to select a
function for a free analog input
signal:
0=
1=
100%
Par. 1. 7
Function is not used
Reducing motor current limit
(par. 1. 7)
This signal will adjust the
maximum motor current
between 0 and par. 1. 7 set
max. limit. See figure 2.513.
Figure 2.5-13 Scaling of max.
motor current.
Page 2-20
Torque limit
Analog
input
0V
0 mA
4 mA
Custom
Signal range
10 V
20 mA
20 mA
Custom
UD012K61
Local/Remote Control Application
2
Reducing DC brake current.
DC-braking
current
DC braking current can be
reduced with the free analog
input signal between current
0.15 x I nSV9 and the current
set by parameter 4. 8.
See figure 2.5-14.
Figure 2.5-14 Reducing DC
brake current.
100%
Par. 4. 8
0
3
Free analog
input
0,15
0.15xxInFU
InSV9
Signal range
UD012K58
Reducing acceleration and
deceleration times.
Acceleration and deceleration
times can be reduced with the
free analog input signal
according to the following
formulas:
Factor R
10
Reduced time = set acc./deceler.
time (par. 1. 3, 1. 4; 4. 3, 4. 4)
divided by the factor R from
figure 2.5-15.
Figure
2.5-15
Reducing
acceleration and deceleration
times.
4
2
Free analog
input
1
Signal range
Ch012K59
Reducing torque supervision
limit.
Torque supervision limit can
be reduced with a free analog
input signal between 0 and the
set supervision limit (par. 3.
14). See figure 2.5-16.
Torque limit
100%
Par. 3. 14
Figure 2.5-16 Reducing torque
supervision limit.
Free analog
input
0
Signal range
UD012K60
Page 2-21
2
Local/Remote Control Application
2. 20
Motor potentiometer ramp
time
Defines how fast the electronic
motor potentiometer value
changes.
3. 1
Analog output Content
See table on page 2-9.
2
%
Unfiltered signal
100%
3. 2
Analog output filter time
Filters the analog output signal.
See figure 2.5-17.
Filtered signal
63%
t [s]
Par. 3. 2
Figure 2.5-17 Analog output
filtering.
3.3
UD009K16
Analog output invert
Inverts analog output signal:
max. output signal = minimum set value
min. output signal = maximum set value
Analog
output
current
20 mA
12 mA
Param. 3. 5
= 50%
10 mA
Param. 3. 5
= 100%
4 mA
Param. 3. 5
= 200%
Figure 2.5-18 Analog output invert.
3. 4
Analog output minimum
Defines the signal minimum to be
either 0 mA or 4 mA .
See figure 2.5-19.
3. 5
Analog output scale
Scaling factor for analog output.
See figure 2.5-19.
Page 2-22
Selected (para. 3. 1)
signal max. value
0 mA
0
0.5
1.0
Ch012K17
Local/Remote Control Application
Signal
Max. value of the signal
Output frequency
Motor speed
Output
current
Motor torque
Motor power
Motor voltage
DC-link volt.
Max. frequency (p. 1. 2)
Analog
output
current
Param. 3. 5
= 200%
Param. 3. 5
= 100%
20 mA
Max. speed (nnxfmax/fn)
2 x InCX
2 x TnMot
2 x PnMot
100% x VnMot
1000 V
12 mA
Param. 3. 5
= 50%
10 mA
Par. 3. 4 = 1
4 mA
Max. value of signal
selected by param. 3. 1
Par. 3. 4 = 0
0 mA
0
0.5
1.0
Ch012K18
Figure 2.5-19 Analog output scale.
3. 6
3. 7
3. 8
Digital output function
Relay output 1 function
Relay output 2 function
Setting value
0 = Not used
Signal content
Out of operation
Digital output DO1 sinks current and programmable
relay (RO1, RO2) is activated when:
1
2
3
4
5
6
7
= Ready
= Run
= Fault
= Fault inverted
= CX overheat warning
= External fault or warning
= Reference fault or warning
8 = Warning
9 = Reversed
10 = Jog speed
11 = At speed
12 = Motor regulator activated
13 = Output frequency supervision 1
14 = Output frequency supervision 2
15 = Torque limit supervision
16 = Active reference
limit supervision
17 = External brake control
18 = Control from I/O terminals
19 = Drive
temperature limit supervision
20 = Unrequested rotation direction
21= External brake control inverted
The drive is ready to operate
The drive operates (motor is running)
A fault trip has occurred
A fault trip has not occurred
The heat-sink temperature exceeds +70°C
Fault or warning depending on parameter 7. 2
Fault or warning depending on parameter 7. 1
- if analog reference is 4—20 mA and signal is <4mA
Always if a warning exists
The reverse command has been selected
Jog speed has been selected with digital input
The output frequency has reached the set reference
Overvoltage or overcurrent regulator was activated
The output frequency goes outside of the set supervision
Low limit/ High limit (par. 3. 9 and 3. 10)
The output frequency goes outside of the set supervision
Low limit/ High limit (par. 3. 11 and 3. 12)
The motor torque goes outside of the set supervision
Low limit/ High limit (par. 3. 13 and 3. 14)
Active reference goes outside of the set supervision
Low limit/ High limit (par. 3. 15 and 3. 16)
External brake ON/OFF control with programmable
delay (par 3. 17 and 3. 18)
External control mode selected with prog. pushbutton #2
Temperature on drive is outside the set
supervision limits (par. 3. 19 and 3. 20)
Rotation direction of the motor shaft is different from the
requested one
External brake ON/OFF control (par. 3.17 and 3.18),
output active when brake control is OFF
Table 2.5-2 Output signals via DO1 and output relays RO1 and RO2.
Page 2-23
2
Local/Remote Control Application
3. 9
3. 11
Output frequency limit 1, supervision function
Output frequency limit 2, supervision function
0 = No supervision
1 = Low limit supervision
2 = High limit supervision
If the output frequency goes under/over the set limit (3. 10, 3. 12) this function
generates a warning message via the digital output DO1 or via a relay output RO1
or RO2 depending on the settings of the parameters 3. 6—3. 8.
2
3. 10
3. 12
Output frequency limit 1, supervision value
Output frequency limit 2, supervision value
The frequency value to be supervised by the parameter 3. 9 (3. 11).
See figure 2.5-20.
3. 13
Torque limit , supervision
function
0 = No supervision
1 = Low limit supervision
2 = High limit supervision
If the calculated torque value
goes under/over the set limit
(3.14) this function generates a
warning message via the digital
output DO1 or via a relay output
RO1 or RO2 depending on the
settings of the parameters 3. 6—
3. 8.
f[Hz]
Par 3. 9 = 2
Par 3. 10
UD012K19
Example: 21 RO1
22 RO1
23 RO1
21 RO1
22 RO1
23 RO1
t
21 RO1
22 RO1
23 RO1
Figure 2.5-20 Output frequency
supervision.
3. 14
Torque limit , supervision value
The calculated torque value to be supervised by the parameter 3. 13.
Torque supervision value can be reduced below the setpoint with a free analog input
signal, see parameters 2. 18 and 2. 19.
3. 15
Reference limit , supervision function
0 = No supervision
1 = Low limit supervision
2 = High limit supervision
If the reference value goes under/over the set limit (3. 16) this function generates
a warning message via the digital output DO1 or via a relay output RO1 or RO2
depending on the settings of the parameters 3. 6—3. 8. The supervised reference
is the current active reference. It can be source A or B reference depending on DIB6
input or panel reference if panel is the active control source.
3. 16
Reference limit , supervision value
The frequency value to be supervised by the parameter 3. 15.
Page 2-24
Local/Remote Control Application
3. 17
3. 18
External brake-off delay
External brake-on delay
The function of the external brake can be delayed from the start and stop control
signals with these parameters. See figure 2.5-21.
a)
tOFF = Par. 3. 17
tON = Par. 3. 18
External
BRAKE: OFF
2
Digital or
relay output
ON
DIA1: RUN FWD
STOP
DIA2: RUN REV
t
STOP
UD012K45
b)
tOFF = Par. 3. 17
tON = Par. 3. 18
External
BRAKE: OFF
ON
Digital or
relay output
DIA1: START
PULSE
DIA2: STOP
PULSE
t
Figure 2.5-21 Ext. brake control: a) Start/Stop logic selection par 2. 1 = 0, 1 or 2
b) Start/Stop logic selection par 2. 1 = 3.
The brake control signal can be programmed via the digital output DO1 or via
one of the relay outputs RO1 and RO2, see parameters 3. 6—3. 8.
3. 19
Drive temperature limit supervision
0 = No supervision
1 = Low limit supervision
2 = High limit supervision
If temperature of the unit goes under/over the set limit (par. 3. 20) this function
generates a warning message via the digital output DO1 and via a relay output RO1
or RO2 depending on the settings of the parameters 3. 6—3. 8.
3. 20
Drive temperature supervision limit value
The set temperature value to be supervised with the parameter 3. 19.
Page 2-25
Local/Remote Control Application
4. 1
4. 2
Acc/Dec ramp 1 shape
Acc/Dec ramp 2 shape
The acceleration and deceleration ramp shape can be programmed with these
parameters.
Setting the value = 0 gives you a linear ramp shape. The output frequency
immediately follows the input with a ramp time set by parameters 1. 3, 1. 4 (4. 3, 4.
4 for Acc/Dec time 2).
Setting 0.1—10 seconds for 4. 1
(4. 2) causes an S-shaped ramp.
The speed changes are smooth.
Parameter 1. 3/ 1. 4 (4. 3/ 4. 4)
determines the ramp time of the
acceleration/deceleration in the
middle of the curve. See figure
2.5-22.
2
f [Hz]
1. 3, 1. 4
(4. 3, 4. 4)
Figure 2.5-22 S-shaped acceleration/
deceleration.
4. 3
4. 4
4. 1 (4. 2)
4. 1 (4. 2)
[t]
UD009K20
Acceleration time 2
Deceleration time 2
These values correspond to the time required for the output frequency to accelerate
from the set minimum frequency (par. 1. 1) to the set maximum frequency (par. 1.
2). With this parameter it is possible to set two different acceleration/deceleration
times for one application. The active set can be selected with the programmable
signal DIA3. See parameter 2. 2. Acceleration/deceleration times can be reduced
with a free analog input signal. See parameters 2. 18 and 2. 19.
4. 5
Brake chopper
0 = No brake chopper
1 = Brake chopper and brake resistor installed
2 = External brake chopper
When the drive is decelerating the motor, the energy stored in the inertia of the motor
and the load is fed into the external brake resistor. If the brake resistor is selected
correctly the drive is able to decelerate the load with a torque equal to that of
acceleration. See the separate Brake resistor installation manual.
4. 6
Start function
Ramp:
0
Page 2-26
The drive starts from 0 Hz and accelerates to the set reference frequency
within the set acceleration time. (Load inertia or starting friction may cause
prolonged acceleration times).
Local/Remote Control Application
Flying start:
1
The drive starts into a running motor by first finding the speed the motor is
running at. Searching starts from the maximum frequency down until the actual
frequency reached. The output frequency then accelerates/decelerates to the
set reference value at a rate determined by the acceleration/deceleration ramp
parameters.
Use this mode if the motor may be coasting when the start command is given.
With the flying start it is possible to ride through short utility voltage
interruptions.
4. 7
Stop function
Coasting:
0
The motor coasts to an uncontrolled stop with the CX/CXL/CXS off, after
the Stop command.
Ramp:
1
After the Stop command, the speed of the motor is decelerated based on
the deceleration ramp time parameter.
If the regenerated energy is high, it may be necessary to use an external
braking resistor for faster deceleration.
4. 8
DC braking current
Defines the current injected into the motor during DC braking.
The DC braking current can be reduced from the setpoint with a external free
analog input signal, see parameters 2. 18 and 2. 19.
4. 9
DC braking time at stop
Determines whether DC braking is ON or OFF. It also determines the braking duration time of the DC-brake when the motor is stopping. The function of the DC-brake
depends on the stop function, parameter 4. 7. See figure 2.5-23.
0
DC-brake is not used
>0
DC-brake is in use and its function depends of the stop function,
(parameter 4. 7), The time is set by the value of parameter 4. 9:
Stop-function = 0 (coasting):
After the stop command, the motor will coast to a stop with the SV9000 off.
With DC-injection, the motor can be electrically stopped in the shortest possible
time, without using an optional external braking resistor.
The braking time is scaled according to the frequency when the DC- braking
starts. If the frequency is > nominal frequency of the motor (par. 1.11), the value
of parameter 4.9 determines the braking time. When the frequency is < 10%
of the nominal, the braking time is 10% of the set value of parameter 4.9. See
figure 2.5-13.
Stop-function = 1 (ramp):
After a Stop command, the speed of the motor is reduced based on the
deceleration ramp parameter. If no regeneration occurs due to load inertia DCbraking starts at a speed defined by parameter 4. 10.
Page 2-27
2
Local/Remote Control Application
fout [Hz]
fout [Hz]
fn
fn
Output frequency
Motor speed
Output frequency
2
Motor speed
0,1 x fn
DC-braking ON
DC-braking ON
t
t
t = 0,1 x par. 4. 9
t = 1 x par. 4. 9
RUN
RUN
STOP
STOP
UD012K21
Figure 2.5-23 DC-braking time when par. 4. 7 = 0.
The braking time is defined
by par. 4. 9. If the load has a
high inertia, use an external
braking resistor for faster
deceleration.See figure 2.524.
fout [Hz]
Motor speed
Output frequency
DC-braking
Par. 4. 10
t
t = Par. 4. 9
RUN
STOP
Figure 2.5-24 DC-braking
time when par. 4. 7 = 1.
4. 10
UD012K23
Execute frequency of DCbrake during ramp Stop
See figure 2.5-24.
4. 11
DC-brake time at start
0
>0
DC-brake is not used
The DC-brake is activated
by the start command
given. This parameter
defines the time before the
brake is released. After the
brake is released the
output frequency increases
according to the set start
function parameter 4. 6
and the acceleration
parameters (1. 3, 4. 1 or 4.
2, 4. 3). See figure 2.5-25.
Figure 2.5-25 DC-braking time
at start.
Page 2-28
Output
fout [Hz]
frequency
t
Par 4. 11
RUN
STOP
UD012K22
Local/Remote Control Application
4. 12
Jog speed reference
This parameter value defines the jog speed if the DIA3 digital input is programmed
for Jog and is selected. See parameter 2. 2.
5. 1- 5.6 Prohibit frequency area
Low limit/High limit
In some systems it may be
necessary to avoid certain
frequencies
because
of
mechanical resonance problems.
Output
frequency [Hz]
2
With these parameters it is
possible to set limits for three
"skip frequency" regions between
0 Hz and 500 Hz. The accuracy
of thesetting is 0.1 Hz. See figure
2.5-6.
5. 1
5. 3
5. 5
5. 2
5. 4
5. 6
frequency
reference
Reference [Hz]
UD012K33
Figure 2.5-26 Example of prohibit frequency area
setting.
6. 1
6. 2
Motor control mode
0 = Frequency control:
(V/Hz)
The I/O terminal and panel references are frequency references and the drive controls the output frequency (output freq. resolution 0.01 Hz)
1 = Speed control:
(sensorless vector)
The I/O terminal and panel references are speed
references and the drive controls the motor speed
(control accuracy ± 0.5%).
Switching frequency
Motor noise can be minimized by using a high switching frequency. Increasing the
switching frequency reduces the current capacity of the CX/CXL/CXS.
Before changing the frequency from the factory default 10 kHz (3.6 kHz >40 Hp)
check the drive derating in the curves shown in figures 5.2-2 and 5.2-3 in chapter
5.2 of the User's Manual.
6. 3
6. 4
Field weakening point
Voltage at the field weakening point
The field weakening point is the output frequency where the output voltage reaches
the set maximum value (parameter 6. 4). Above that frequency the output voltage
remains constant at the set maximum value. Below that frequency the output voltage
depends on the setting of the V/Hz curve parameters 1. 8, 1. 9, 6. 5, 6. 6 and 6. 7.
See figure 1.5-16.
When the parameters 1. 10 and 1. 11, nominal voltage and nominal frequency of
the motor, are set, parameters 6. 3 and 6. 4 are also set automatically to the same
values. If you need different values for the field weakening point and the maximum
output voltage, change these parameters after setting parameters 1. 10 and 1. 11.
Page 2-29
Local/Remote Control Application
6. 5
V/Hz curve, middle point frequency
If the programmable V/Hz curve has been selected with parameter 1. 8, this
parameter defines the middle frequency point of the curve. See figure 2.5-27.
6. 6
V/Hz curve, middle point voltage
If the programmable V/Hz curve has been selected with parameter 1. 8, this
parameter defines the middle point voltage (% of motor nominal voltage) of the
curve. See figure 2.5-27.
2
6. 7
Output voltage at zero frequency
If the programmable V/Hz curve has been selected with parameter 1. 8, this
parameter defines the zero frequency voltage (% of motor nominal voltage) of the
curve. See figure 2.5-27.
Vn
Parameter 6.4
U[V]
Default: nominal
voltage of the
motor
Parameter 6.6
Default 10%
Field weakening
point
Default: nominal frequency
of the motor
Parameter 6.7
Default 1.3 %
Parameter 6.5
(Default 5 Hz)
Parameter 6.3
f[Hz]
Figure 2.5-27 Programmable V/Hz curve.
6. 8
6. 9
Overvoltage controller
Undervoltage controller
These parameters allow the over/undervoltage controllers to be switched ON or OFF.
This may be useful in cases where the utility supply voltage varies more than -15%—
+10% and the application requires a constant speed. If the controllers are ON, they
will change the motor speed in over/undervoltage cases. Overvoltage = faster,
undervoltage = slower.
Over/undervoltage trips may occur when controllers are not used.
7. 1
Response to the reference fault
0 = No response
1 = Warning
2 = Fault, stop mode after fault according to parameter 4.7
3 = Fault, always coasting stop mode after fault detection
A warning or a fault action and message is generated if the 4—20 mA reference
signal is used and the signal falls below 4 mA.
The information can also be programmed via digital output DO1 and via relay
outputs RO1 and RO2.
Page 2-30
Local/Remote Control Application
7. 2
Response to external fault
0 = No response
1 = Warning
2 = Fault, stop mode after fault according to parameter 4.7
3 = Fault, always coasting stop mode after fault detection
A warning or a fault action and message is generated from the external fault signal
on digital input DIA3.
The information can also be programmed into digital output DO1 and into relay
outputs RO1 and RO2.
7. 3
2
Phase supervision of the motor
0 = No action
2 = Fault
Phase supervision of the motor ensures that the motor phases have approximately
equal current.
7. 4
Ground fault protection
0 = No action
2 = Fault message
Ground fault protection ensures that the sum of the motor phase currents is zero.
The standard overcurrent protection is always present and protects the frequency
converter from ground faults with high current levels.
Parameters 7. 5—7. 9 Motor thermal protection
General
Motor thermal protection protects the motor from overheating. The CX/CXL/CXS
drive is capable of supplying higher than nominal current to the motor. If the load
requires this high current there is a risk that motor will be thermally overloaded. This
is true especially at low frequencies. With low frequencies the cooling effect of the
motor fan is reduced and the capacity of the motor is reduced. If the motor is
equipped with a separately powered external fan, the load derating at low speed
is small.
Motor thermal protection is based on a calculated model and it uses the output current of the drive to determine the load on the motor. When the motor is powered
from the drive, the calculated model uses the heatsink temperature to determine
the initial thermal stage for the motor. The calculated model assumes that the ambient temperature of the motor is 40°C.
Motor thermal protection can be adjusted by setting several parameters. The thermal current IT specifies the load current above which the motor is overloaded. This
current level is a function of the output frequency. The curve for IT is set with parameters 7. 6, 7. 7 and 7. 9. Refer to the figure 2.5-28. The default values of these
parameters are set from the motor nameplate data.
With the output current at IT the thermal stage will reach the nominal value (100%).
The thermal stage changes by the square of the current. With output current at 75%
from IT the thermal stage will reach 56% value and with output current at 120% from
IT the thermal stage would reach 144% value. The function will trip the drive (refer
par. 7. 5) if the thermal stage will reach a value of 105%. The response time of the
thermal stage is determined with the time constant parameter 7. 8. The larger the
motor, the longer it takes to reach the final temperature.
Page 2-31
Local/Remote Control Application
The thermal stage of the motor can be monitored through the display. Refer to
the table for monitoring items. (User's Manual, table 7.3-1).
!
7. 5
CAUTION! The calculated model does not protect the motor if the cooling of
the motor is reduced either by blocking the airflow or due to dust
or dirt.
Motor thermal protection
Operation:
0 = Not in use
1 = Warning
2 = Trip function
2
Tripping and warning will give a display indication with the same message code. If
tripping is selected the drive will stop and activate the fault stage.
Deactivating the protection by setting this parameter to 0, will reset the thermal stage
of the motor to 0%.
7. 6
Motor thermal protection, break point current
This current can be set between 50.0—150.0% x InMotor.
This parameter sets the value for thermal current at frequencies above the break
point on the thermal current curve. Refer to the figure 2.5-28.
The value is set as a percentage of the motor nameplate nominal current , parameter
1. 13, not the drive's nominal output current.
The motor's nominal current is the current which the motor can withstand in direct
online use without being overheated.
If parameter 1. 13 is adjusted, this parameter is automatically restored to the default
value.
Setting this parameter (or
parameter 1. 13) does not affect
the maximum output current of the
drive. Parameter 1. 7 alone
determines the maximum output
current of the drive.
I
Current
limit
par. 1. 7
Overload area
IT
Par. 7. 6
Par. 7. 7
f [Hz]
Figure 2.5-28
7. 7
Motor thermal
current, IT curve.
Par. 7. 9
UMCH7_91
Motor thermal protection, zero frequency current
This current can be set between 10.0—150.0% x InMotor.
This parameter sets the value for thermal current at zero frequency. Refer to the
figure 2.5-28.
The default value is set assuming that there is no external fan cooling the motor. If
an external fan is used this parameter can be set to 90% (or higher).
Page 2-32
Local/Remote Control Application
The value is set as a percentage of the motor's nominal nameplate current,
parameter 1. 13, not the drive's nominal output current. The motor's nominal current
is the current which the motor can stand in direct on-line use without being
overheated.
If you change parameter 1. 13, this parameter is automatically restored to the
default value.
Setting this parameter (or parameter 1. 13) does not affect to the maximum output
current of the drive. Parameter 1. 7 alone determines the maximum output current
of the drive.
7. 8
Motor thermal protection, time constant
This time can be set between 0.5—300 minutes.
This is the thermal time constant of the motor. The larger the motor the greater
the time constant. The time constant is defined as the time that it takes the calculated thermal stage to reach 63% of its final value.
The motor thermal time is specific to a motor design and it varies between different
motor manufacturers.
The default value for the time constant is calculated based on the motor
nameplate data from parameters 1. 12 and 1. 13. If either of these parameters is
reset, then this parameter is set to default value.
If the motor's t6 -time is known (given by the motor manufacturer) the time
constant parameter could be set based on t6 -time. As a rule of thumb, the motor
thermal time constant in minutes equals to 2xt6 (t6 in seconds is the time a motor
can safely operate at six times the rated current). If the drive is stopped the time
constant is internally increased to three times the set parameter value. Cooling in
the stop stage is based on convection with an increased time constant
7. 9
Motor thermal protection, break point frequency
This frequency can be set between 10—500 Hz.
This is the frequency break point of the thermal current curve. With frequencies
above this point the thermal capacity of the motor is assumed to be constant.
Refer to the figure 2.5-28.
The default value is based on the motor's nameplate data, parameter 1. 11. It is 35
Hz for a 50 Hz motor and 42 Hz for a 60 Hz motor. More generally it is 70% of the
frequency at the field weakening point (parameter 6. 3). Changing either parameter
1. 11 or 6. 3, will restore this parameter to its default value.
Motor temperature
Trip area
105%
Motor
current
Trip/warning
par. 7. 5
I/IT
Time constant T*)
Motor temperature Θ = (I/IT)2 x (1-e-t/T)
Time
*) Changed with motor size and
adjusted with parameter 7. 8
UMCH7_92
Figure 2.5-29 Calculating motor temperature.
Page 2-33
2
Local/Remote Control Application
Parameters 7. 10— 7. 13, Stall protection
General
Motor stall protection protects the motor from short time overload situations like a
stalled shaft. The reaction time of stall protection can be set shorter than with motor
thermal protection. The stall state is defined with two parameters, 7.11, Stall Current
and 7.13., Stall Frequency. If the current is higher than the set limit and output
frequency is lower than the set limit the stall state is true. There is no true detection
of shaft rotation. Stall protection is a type of overcurrent protection.
2
7. 10
Stall protection
Operation:
0 = Not in use
1 = Warning
2 = Trip function
Tripping and warning will give a display indication with the same message code. If
tripping is set on, the drive will stop and generate a fault. Deactivating the stall
protection by setting the parameter to 0 will reset the stall time counter to zero.
7. 11
Stall current limit
I
The current can be set between
0.0—200% x InMotor.
In the stall stage the current has
to be above this limit. Refer to
figure 2.5-30. The value is set as
a percentage of the motor
name-plate nominal current,
parameter 1. 13. If parameter 1.
13 is adjusted, this parameter is
automatically restored to its
default value.
Stall area
Par. 7. 11
f [Hz]
Par. 7. 13
7. 12
Stall time
The time can be set between
2.0—120 s.
This is the maximum allowed time
for a stall stage. There is an
internal up/down counter to count
the stall time. Refer to the figure
2.5-31. If the stall time counter
value goes above this limit, this
protection will cause a trip (refer to
the parameter 7. 10).
7. 13
Page 2-34
Figure 2.5-30 Setting the stall characteristics.
Stall time counter
Trip area
Par. 7. 12
Trip/warning
par. 7. 10
Maximum stall frequency
This frequency can be set
between 1—fmax (param. 1. 2). In
the stall state the ouput frequency
has to be smaller than this limit.
Refer to the figure 2.5-30.
UMCH7_11
UMCH7_12
Time
Stall
No stall
Figure 2.5-31 Counting the stall time.
Local/Remote Control Application
Parameters 7. 14— 7. 17, Underload protection
General
The purpose of motor underload protection is to ensure there is load on the motor
while the drive is running. If the motor load is reduced, there might be a problem in
the process, e.g. broken belt or dry pump.
Motor underload protection can be adjusted by setting the underload curve with
parameters 7. 15 and 7. 16. The underload curve is a squared curve set between
zero frequency and the field weakening point. The protection is not active below
5Hz (the underload counter value is stopped). Refer to the figure 2.5-32.
The torque values for setting the underload curve are set with percentage values
which refer to the nominal torque of the motor. The motor's nameplate data,
parameter 1. 13, the motor's nominal current and the drive's nominal current ICT
are used to create the scaling ratio for the internal torque value. If other than a
standard motor is used with the drive, the accuracy of the torque calculation is
decreased.
7. 14
Underload protection
Operation:
0 = Not in use
1 = Warning message
2 = Fault message
Tripping and warning will give a display indication with the same message code. If
tripping is set active the drive will stop and activate the fault stage.
Deactivating the protection, by setting this parameter to 0, will reset the underload
time counter to zero.
7. 15
Underload protection, field weakening area load
The torque limit can be set
between 20.0—150 % x TnMotor.
This parameter is the value for
the minimum allowed torque
when the output frequency is
above the field weakening point.
Refer to the figure 2.5-32.
If parameter 1. 13 is adjusted,
this parameter is automatically
restored to its default value.
Torque
Par. 7. 15
Par. 7. 16
Underload area
ff[Hz]
Figure 2.5-32 Setting of minimum
load.
7. 16
5 Hz
Field weakening
point par. 6. 3
ChCH7_15
Underload protection, zero frequency load
The torque limit can be set between 10.0—150 % x TnMotor.
This parameter is the value for the minimum allowed torque with zero frequency.
Refer to the figure 2.5-32. If parameter 1. 13 is adjusted, this parameter is
automatically restored to its default value.
Page 2-35
2
Local/Remote Control Application
7. 17
Underload time
This time can be set between
2.0—600.0 s.
This is the maximum allowed time
for an underload state. There is an
internal up/down counter to
accumulate the underload time.
Refer to the figure 2.5-33.
If the underload counter value
goes above this limit, the
underload protection will cause a
trip (refer to the parameter 7. 14).
If the drive is stopped the
underload counter is reset to zero.
2
Trip area
Par. 7. 17
Trip/warning
par. 7. 14
UMCH7_17
Time
Underl.
No underl.
Figure 2.5-33 Counting the underload time.
8. 1
8. 2
Underload time counter
Automatic restart: number of tries
Automatic restart: trial time
The Automatic restart function restarts the drive after the faults selected with
parameters 8. 4—8. 8. The Start type for Automatic restart is selected with parameter
8. 3. See figure 2.5-34.
Number of faults
during t = ttrial
ttrial
ttrial
4
3
Par. 8. 1 = 3
ttrial = par. 8. 2
2
1
t
Three faults
Four faults
RUN
STOP
Figure 2.5-34 Automatic restart.
Parameter 8. 1 determines how many automatic restarts can be made during the
trial time set by the parameter 8. 2.
The count time starts from the first autorestart. If the number of restarts does not
exceed the value of parameter 8.1 during the trial time, the count is cleared after
the trial time has elapsed. The next fault starts the counting again.
Page 2-36
Local/Remote Control Application
8. 3
Automatic restart, start function
The parameter defines the start mode:
0 = Start with ramp
1 = Flying start, see parameter 4. 6.
8. 4
Automatic restart after undervoltage
0 = No automatic restart after undervoltage fault
1 = Automatic restart after undervoltage fault condition returns to the normal
condition (DC-link voltage returns to the normal level)
8. 5
Automatic restart after overvoltage
0 = No automatic restart after overvoltage fault
1 = Automatic restart after overvoltage fault condition returns to the normal
condition (DC-link voltage returns to the normal level)
8. 6
Automatic restart after overcurrent
0 = No automatic restart after overcurrent fault
1 = Automatic restart after overcurrent faults
8. 7
Automatic restart after reference fault
0 = No automatic restart after reference fault
1 = Automatic restart after analog current reference signal (4—20 mA)
returns to the normal level (>4 mA)
8. 8
Automatic restart after over-/undertemperature fault
0 = No automatic restart after temperature fault
1 = Automatic restart after heatsink temperature has returned to its normal
level between -10°C—+75°C.
Page 2-37
2
Local/Remote Control Application
Notes:
2
Page 2-38
Multi-step Speed Control Application
MULTI-STEP SPEED CONTROL APPLICATION
(par. 0.1 = 4)
CONTENTS
3 Multi-step Speed Control Appl. ........ 3-1
3.1
3.2
3.3
3.4
General ........................................3-2
Control I/O ....................................3-2
Control signal logic .......................3-3
Parameters Group 1 .................... 3-4
3.4.1 Parameter table .................. 3-4
3.4.2 Description of Group1 par ...3-5
3.5 Special parameters, Groups 2—8 .. 3-8
3.5.1 Parameter tables .................. 3-8
3.5.2 Description of Groups. ........ 3-14
3
Page 3-1
Multi-step Speed Control Application
3.1 GENERAL
The Multi-step Speed Control Application can
be used in applications where fixed speeds
are needed. in total 9 different speeds can be
programmed: one basic speed, 7 multi-step
speeds and one jog speed. The speed steps
are selected with digital signals DIB4, DIB5
and DIB6. If jog speed is used, DIA3 can be
programmed from fault reset to jog speed
select.
The basic speed reference can be either a
voltage or a current signal via analog input
terminals (2/3 or 4/5). The other analog input
can be programmed for other purposes
All outputs are freely programmable.
3.2 CONTROL I/O
Reference
potentiometer
3
Terminal
Basic reference
(optional)
READY
RUN
FAULT
220
VAC
Max.
Signal
Description
1
+10Vref
Reference output
2
Vin+
Input for reference voltage Basic reference (programmable),
range 0—10 V DC
3
GND
I/O ground
Input for reference current Basic reference (programmable),
Voltage for a potentiometer, etc.
Ground for reference and controls
4
Iin+
5
Iin-
6
+24V
7
GND
Control voltage ground
Ground for reference and controls
8
DIA1
Start forward
(Programmable)
Contact closed = start forward
9
DIA2
Start reverse
(Programmable)
Contact closed = start reverse
10
DIA3
Fault reset
(Programmable)
Contact open = no action
Contact closed = fault reset
11
CMA
Common for DIA1—DIA3
Connect to GND or + 24V
12
+24V
Control voltage output
Voltage for switches, (same as #6)
13
GND
I/O ground
Ground for reference and controls
14
DIB4
Multi-step speed select 1
sel 1
0
sel 2
0
sel 3
0
range 0—20 mA
Control voltage output
Voltage for switches, etc. max. 0.1 A
15
DIB5
Multi-step speed select 2
1
0
0
1
0
0
16
DIB6
Multi-step speed select 3
--1
1
--1
basic speed
speed 1
speed 2
speed 7
17
CMB
Common for DIB4—DIB6
Connect to GND or + 24V
18
Iout+
Analog output
Programmable
19
Iout-
Output frequency
Range 0—20 mA/RL max. 500 Ω
20
DO1
Digital output
READY
Programmable ( par. 3. 6)
Open collector, I<50 mA, V<48 VDC
21
RO1
Relay output 1
22
RO1
RUN
23
RO1
24
RO2
Relay output 2
25
RO2
FAULT
26
RO2
(par. 3. 1)
Programmable ( par. 3. 7)
Programmable ( par. 3. 8 )
Figure 3.2-1 Default I/O configuration and connection example of the
Multi-step speed Control Application.
Page 3-2
Multi-step Speed Control Application
3.3 Control signal logic
RUN
PARAMETERS
1. 5 Reference select
1. 6 Jogging speed
1. 17 Multi-step speed 1
1. 18 Multi-step speed 2
1. 19 Multi-step speed 3
1. 20 Multi-step speed 4
1. 21 Multi-step speed 5
1. 22 Multi-step speed 6
1. 23 Multi-step speed 7
MON
READY
PAR
REF
FAULT
BTNS
RST
PG
PROGRAMMABLE
PUSH-BUTTON 2
Internal
frequency
reference
Uin+
P
Ext. analogue reference
(Basic speed reference)
3
Iin±
DIB4
Multi-step speed selection 1
DIB5
Multi-step speed selection 2
DIB6
Multi-step speed selection 3
DIA3
Internal
fault reset
B
D
>1
Jogging speed reference selection (programmable input)
DIA3 Fault reset (programmable input)
DIA1 Start forward
DIA2 Start reverse
P
Programmable
Start/Stop and
Reverse signal
logic
P
= control line
= signal line
Internal
Start/Stop
Internal
reverse
UD012K03
Figure 3.3-1 Control signal logic of the Multi-step Speed Control Application.
Switch positions shown are based on the factory settings.
Page 3-3
Multi-step Speed Control Application
3.4 Basic parameters, Group 1
3
Code Parameter
Range
Step
Default
1. 1
Minimum frequency
0—fmax
1 Hz
0 Hz
1. 2
Maximum frequency
fmin-120/500Hz 1 Hz
60 Hz
*
1. 3
Acceleration time 1
0.1—3000.0 s
0.1 s
3.0 s
Time from fmin (1. 1) to fmax (1. 2) 3-5
1. 4
Deceleration time 1
0.1—3000.0 s
0.1 s
3.0 s
Time from fmax (1. 2) to fmin (1. 1) 3-5
1. 5
Basic reference
selection
0—1
1
0
1. 6
Jog speed
reference
fmin —fmax
(1. 1) (1. 2)
0.1 Hz
5.0 Hz
1. 7
Current limit
0.1—2.5 xInCX
0.1A
1.5 x InCX
1. 8
V/Hz ratio selection
0—2
1
0
0 = Linear
1 = Squared
2 = Programmable V/Hz ratio
3-6
1. 9
V/Hz optimisation
0—1
1
0
0 = None
1 = Automatic torque boost
3-7
1. 10
Nominal voltage
of the motor
180—690 V
1V
230 V
380 V
480 V
575 V
CX/CXL/CXS V 3 2
CX/CXL/CXS V 3 4
CX/CXL/CXS V 3 5
CX V 3 6
3-7
1. 11
Nominal frequency
of the motor
30—500 Hz
1 Hz
60 Hz
fn from the nameplate of
the motor
3-7
1. 12
Nominal speed
of the motor
nn from the nameplate of
the motor
3-7
1. 13
Nominal current
of the motor
2.5 x InCX
In from the nameplate of
the motor
3-7
1. 14
Supply voltage
208—240
230 V
CX/CXL/CXS V 3 2
3-7
380—440
380 V
CX/CXL/CXS V 3 4
380—500
480 V
CX/CXL/CXS V 3 5
525—690
575 V
CX V 3 6
1—20000 rpm 1 rpm 1720 rpm
**
0,1 A
InCX
Custom Description
Page
3-5
0 = Analog voltage input (term.2)
1 = Analog current input (term.4)
3-5
3-5
3-5
Output current limit [A] of the unit 3-5
1. 15
Parameter conceal
0—1
1
0
Visibility of the parameters:
0 = all parameter groups visible
1 = only group 1 is visible
3-7
1. 16
Parameter value lock
0—1
1
0
Disables parameter changes:
0 = changes enabled
1 = changes disabled
3-7
Note!
= Parameter value can be changed
only when the frequency converter
is stopped.
* If 1. 2 > motor synchr. speed, check suitability
for motor and drive system
Selecting 120/500 Hz range see page 3-5.
** Default value for a four pole motor and a
nominal size drive.
Page 3-4
Multi-step Speed Control Application
Code Parameter
Range
Step
Default
Custom Description
Page
1. 17
Multi-step speed
reference 1
fmin—fmax
(1. 1) (1. 2)
0.1 Hz
10.0 Hz
3-7
1. 18
Multi-step speed
reference 2
fmin—fmax
(1. 1) (1. 2)
0.1 Hz
15.0 Hz
3-7
1. 19
Multi-step speed
reference 3
fmin—fmax
(1. 1) (1. 2)
0.1 Hz
20.0 Hz
3-7
1. 20
Multi-step speed
reference 4
fmin—fmax
(1. 1) (1. 2)
0.1 Hz
25.0 Hz
3-7
1. 21
Multi-step speed
reference 5
fmin—fmax
(1. 1) (1. 2)
0.1 Hz
30.0 Hz
3-7
1. 22
Multi-step speed
reference 6
fmin—fmax
(1. 1) (1. 2)
0.1 Hz
40.0 Hz
3-7
1. 23
Multi-step speed
reference 7
fmin—fmax
(1. 1) (1. 2)
0.1 Hz
50.0 Hz
3-7
Table 3.4-1 Group 1 basic parameters.
3
3.4.2 Description of Group 1 parameters
1. 1, 1. 2 Minimum/maximum frequency
Defines the frequency limits of the drive.
The default maximum value for parameters 1. 1 and 1. 2 is 120 Hz. By setting 1. 2
= 120 Hz in the when the drive is stopped (RUN indicator not lit) parameters 1. 1
and 1. 2 are changed to 500 Hz. At the same time the resolution of the panel
reference is changed from 0.01 Hz to 0.1 Hz.
Changing the max. value from 500 Hz to 120 Hz is done by setting parameter
1. 2 to 119 Hz while the drive is stopped.
1. 3, 1. 4 Acceleration time 1, deceleration time 1:
These limits correspond to the time required for the output frequency to
accelerate from the set minimum frequency (par. 1. 1) to the set maximum
frequency (par. 1. 2). Acceleration/deceleration times can be reduced with a free
analog input signal, see parameters 2. 18 and 2. 19.
1. 5
Basic reference selection
0:
1:
1. 6
Analog voltage reference from terminals 2—3, e.g. a potentiometer
Analog current reference trom terminals 4—5, e.g. a transducer
Jog speed refrence
The value of this parameter defines the jog speed selected with the DIA3 digital input
which if it is programmed for Jog speed. See parameter 2. 2.
Parameter value is automatically limited between minimum and maximum frequency
(par 1. 1, 1. 2)
1. 7
Current limit
This parameter determines the maximum motor current that the CX/CXL/CXS will
provide short term. Current limit can be set lower with a free analog input signal,
see parameters 2. 18 and 2. 19.
Page 3-5
Multi-step Speed Control Application
1. 8
V/Hz ratio selection
Linear:
0
The voltage of the motor changes linearly with the frequency in
the constant flux area from 0 Hz to the field weakening point
(par. 6. 3) where a constant voltage (nominal vaue) is supplied to
the motor. See figure 3.4-1.
A linear V/Hz ratio should be used in constant torque applications
This default setting should be used if there is no special
requirement for another setting.
Squared:
1
The voltage of the motor changes following a squared curve form
with the frequency in the area from 0 Hz to the field weakening
point (par. 6. 3), where the nominal voltage is supplied to
the motor. See figure 3.4-1.
The motor runs undermagnetized below the field weakening point and
produces less torque and electromechanical noise. A squared V/Hz
ratio can be used in applications where the torque demand of the load
is proportional to the square of the speed, e.g. in centrifugal fans and
pumps.
3
V [V]
Vn
Default: Nominal voltage of
the motor
Field weakening point
Linear
Default: Nominal
frequency of the
motor
Squared
f [Hz]
Figure 3.4-1 Linear and squared V/Hz curves.
Programm. The V/Hz curve can be programmed with three different points.
V/Hz curve The parameters for programming are explained in chapter 3.5.2.
2
A programmable V/Hz curve can be used if the standard settings do
not satisfy the needs of the application See figure 3.4-2.
Vn
Parameter 6.4
U[V]
Default: nominal
voltage of the
Parameter 6.6
Default 10%
Default: nominal frequency
of the motor
Parameter 6.7
Default 1.3 %
Parameter 6.5
(Default 5 Hz)
Figure 3.4-2 Programmable V/Hz curve.
Page 3-6
Field weakening
point
Parameter 6.3
f[Hz]
Multi-step Speed Control Application
1. 9
V/Hz optimization
Automatic The voltage to the motor changes automatically which
torque
allows the motor to produce enough torque to start and
boost
run at low frequencies. The voltage increase depends on the motor type
and horsepower. Automatic torque boost can be used in applications
where starting torque due to starting friction is high, e.g. in conveyors.
NOTE!
!
1. 10
In high torque - low speed applications - it is likely the motor will
overheat.
If the motor has to run for a prolonged time under these conditions,
special attention must be paid to cooling the motor. Use external
cooling for the motor if the temperature rise is too high.
Nominal voltage of the motor
Find this value Vn from the nameplate of the motor.
This parameter sets the voltage at the field weakening point, parameter
6. 4, to 100% x Vnmotor.
1. 11
Nominal frequency of the motor
Find then nominal frequency fn from the nameplate of the motor.
This parameter sets the field weakening point, parameter 6. 3, to the same value.
1. 12
Nominal speed of the motor
Find this value nn from the nameplate of the motor.
1. 13
Nominal current of the motor
Find the value In from the nameplate of the motor.
The internal motor protection function uses this value as a reference value.
1. 14
Supply voltage
Set parameter value according to the nominal voltage of the supply.
Values are pre-defined for CX/CXL/CXS V 3 2, CX/CXL/CXS V 3 4, CX/CXL/CXS
V 3 5 and CX V 3 6. See table 3.4-1.
1. 15
Parameter conceal
Defines which parameter groups are available:
0 = all parameter groups are visible
1 = only group 1 is visible
1. 16
Parameter value lock
Defines access to the changes of the parameter values:
0 = parameter value changes enabled
1 = parameter value changes disabled
Page 3-7
3
Multi-step Speed Control Application
1. 17 - 1. 23 Multi-step speed reference 1—7
These parameter values define the Multi-step speeds selected with the DIA4, DIB5
and DIB6 digital inputs .
These values are automatically limited between minimum and maximum frequency
(par. 1. 1, 1. 2).
Speed
reference
3
Multi-step speed select 1 Multi-step speed select 2 Multi-step speed select 3
DIB4
DIB5
DIB6
Par. 1. 6
0
0
0
Par. 1. 17
1
0
0
Par. 1. 18
0
1
0
Par. 1. 19
1
1
0
Par. 1. 20
0
0
1
Par. 1. 21
1
0
1
Par. 1. 22
0
1
1
Par. 1. 23
1
1
1
Table 3.4-2 Selection of multi-step speed reference 1—7.
Page 3-8
Multi-step Speed Control Application
3.5 Special parameters, Groups 2—8
3.5.1 Parameter tables
Input signal parameters, Group 2
Code Parameter
Range
Step
Default Custom Description
Page
DIA1
DIA2
Start reverse
Reverse
Run enable
Stop pulse
2. 1
Start/Stop logic
selection
0—3
1
0
0 = Start forward
1 = Start/Stop
2 = Start/Stop
3 = Start pulse
2. 2
DIA3 function
(terminal 10)
0—9
1
7
0 = Not used
3-16
1 = Ext. fault, closing contact
2 = External fault, opening contact
3 = Run enable
4 = Acc./Dec. time selection
5 = Reverse (if par. 2. 1 = 3)
6 = Jog speed
7 = Fault reset
8 = Acc./Dec. operation prohibit
9 = DC-braking command
2. 3
Vin signal range
0—1
1
0
0 = 0 —10 V
1 = Custom setting range
2. 4
Vin custom setting min. 0.00-100.00%
0.01%
0.00%
2. 5
Vin custom setting max. 0.00-100.00%
0.01% 100.00%
2. 6
Vin signal inversion
0—1
1
0
0 = Not inverted
1 = Inverted
3-18
2. 7
Vin signal filter time
0.00 —10.0 s
0.01s
0.10 s
0 = No filtering
3-18
2. 8
Iin signal range
0—2
1
0
0 = 0—20 mA
1 = 4—20 mA
2 = Custom setting range
3-19
2. 9
Iin custom setting minim. 0.00-100.00%
0.01%
0.00%
2. 10
Iin custom setting maxim.0.00-100.00% 0.01% 100.00%
2. 11
Iin signal inversion
0—1
1
0
0 = Not inverted
1 = Inverted
3-19
2. 12
Iin signal filter time
0.01—10.00s
0.01s
0.10 s
0 = No filtering
3-19
2. 13
Reference scaling
minimum value
0—
par. 2. 14
1 Hz
0 Hz
Selects the frequency that corres- 3-20
ponds to the min. reference signal
2. 14
Reference scaling
maximum value
0—
fmax
(1. 2)
1 Hz
0 Hz
Selects the frequency that corres- 3-20
ponds to the max. reference signal
0 = Scaling off
>0 = Scaled maximum value
2. 15
Free analog input,
signal selection
0—2
1
0
0 = Not use
1 = Vin (analog voltage input)
2 = Iin (analog current input)
2. 16
Free analog input,
function
0—4
1
0
0 = No function
3-20
1 = Reduces current limit (par. 1.7)
2 = Reduces DC-braking current
3 = Reduces acc. and decel. times
4 = Reduces torque supervision limit
Note!
3-15
3-17
3-17
3-17
3-19
3-19
3-20
= Parameter value can be changed only when the drive is stopped.
Page 3-9
3
Multi-step Speed Control Application
Group 3, Output and supervision parameters
Code Parameter
Range
Step
0—7
1
Default Custom Description
1
Page
3. 1
Analog output function
3. 2
Analog output filter time 0.00—10.00 s 0.01 s
3. 3
Analog output
inversion
0—1
1
0
0 = Not inverted
1 = Inverted
3-22
3. 4
Analog output
minimum
0—1
1
0
0 = 0 mA
1 = 4 mA
3-22
3. 5
Analog output scale
10—1000%
1%
100%
3. 6
Digital output function
0—21
1
1
0 = Not used
3-23
1 = Ready
2 = Run
3 = Fault
4 = Fault inverted
5 = CX overheat warning
6 = External fault or warning
7 = Reference fault or warning
8 = Warning
9 = Reversed
10 = Jog speed selected
11 = At speed
12 = Motor regulator activated
13 = Output frequency limit superv. 1
14 = Output frequency limit superv. 2
15 = Torque limit supervision
16 = Reference limit supervision
17 = External brake control
18 = Control from I/O-terminals
19 = Drive temperature limit
supervision
20 = Unrequested rotation direction
21 = External brake control inverted
3. 7
Relay output 1 function
0—21
1
2
As parameter 3. 6
3-23
3. 8
Relay output 2 function
0—21
1
3
As parameter 3. 6
3-23
3. 9
Output freq. limit 1
supervision function
0—2
1
0
0 = No
1 = Low limit
2 = High limit
3-23
3. 10
Output freq. limit 1
supervision value
0.0—fmax
(par. 1. 2)
0.1 Hz
0.0 Hz
1.00 s
3
Note!
Page 3-10
0 = Not used
Scale 100%
3-22
1 = O/P frequency (0—fmax)
2 = Motor speed (0—max. speed)
3 = O/P current (0—2.0 x InCX)
4 = Motor torque (0—2 x TnMot)
5 = Motor power (0—2 x PnMot)
6 = Motor voltage (0—100%xVnMot)
7 = DC-link volt. (0—1000 V)
3-22
3-22
= Parameter value can be changed only when the drive is stopped.
3-23
Multi-step Speed Control Application
Code Parameter
Range
Step
0—2
1
Default Custom Description
3. 11
Output freq. limit 2
supervision function
3. 12
Output freq. limit 2
supervision value
3. 13
Torque limit
supervision function
3. 14
Torque limit
supervision value
3. 15
Reference limit
supervision function
3. 16
Reference limit
supervision value
3. 17
Extern. brake Off-delay
0.0—100.0 s
0.1 s
0.5 s
3-24
3. 18
Extern. brake On-delay
0.0—100.0 s
0.1 s
1.5 s
3-24
3. 19
Drive
temperature limit
supervision
3. 20
Drive
temperature limit value
3. 21
I/O-expander board (opt.)
analog output function
3. 22
0.0—fmax
(par. 1. 2)
0 = No
1 = Low limit
2 = High limit
3-23
0.1 Hz 0.0 Hz
0—2
1
0.0—200.0 % 0.1%
xTnCX
0—2
0.0—fmax
(par. 1. 2)
0
Page
0
3-23
0 = No
1 = Low limit
2 = High limit
3-24
100.0%
1
0
3-24
0 = No
1 = Low limit
2 = High limit
3-24
0.1 Hz 0.0 Hz
0—2
1
0
-10—+75°C
1
40°C
0—7
1
3
3-24
0 = No
1 = Low limit
2 = High limit
3-25
3-25
See parameter 3. 1
3-22
I/O-expander board (opt.) 0.00—10.00 s 0.01 s 1.00 s
analog output filter time
See parameter 3. 2
3-22
3. 23
I/O-expander board (opt.)
analog output inversion
0—1
1
0
See parameter 3. 3
3-22
3. 24
I/O-expander board (opt.)
analog output minimum
0—1
1
0
See parameter 3. 4
3-22
3. 25
I/O-expander board (opt.)
analog output scale
10—1000%
1
100%
See parameter 3. 5
3-22
Group 4, Drive control parameters
Code Parameter
Range
Step
Default
Custom Description
Page
4. 1
Acc./Dec. ramp 1 shape 0.0—10.0 s
0.1 s
0.0 s
0 = Linear
>0 = S-curve acc./dec. time
3-25
4. 2
Acc./Dec. ramp 2 shape 0.0—10.0 s
0.1 s
0.0 s
0 = Linear
>0 = S-curve acc./dec. time
3-25
4. 3
Acceleration time 2
0.1—3000.0s 0.1 s
10.0 s
3-25
4. 4
Deceleration time 2
0.1—3000.0s 0.1 s
10.0 s
3-25
4. 5
Brake chopper
0—2
1
0
0 = Brake chopper not in use
1 = Brake chopper in use
2 = External brake chopper
3-26
4. 6
Start function
0—1
1
0
0 = Ramp
1 = Flying start
3-26
Note!
= Parameter value can be changed only when the drive is stopped.
Page 3-11
3
Multi-step Speed Control Application
Code Parameter
Range
Step
Default
0—1
1
0
0.15—1.5 x
InCX (A)
0.1 A
4. 7
Stop function
4. 8
DC-braking current
4. 9
DC-braking time at Stop 0.00-250.00s 0.01 s
4. 10 Turn on frequency of DC 0.1—10.0 Hz
brake during ramp Stop
4. 11 DC-brake time at Start
0.1 Hz
0.00—25.00s 0.01 s
Custom Description
0 = Coasting
1 = Ramp
Page
3-26
3-26
0.5xInCX
0.00 s
0 = DC-brake is off at Stop
1.5 Hz
3-26
3-28
0.00 s
0 = DC-brake is off at Start
3-28
Group 5, Prohibit frequency parameters
Code Parameter
3
Range
Step
Default
5. 1
Prohibit frequency
range 1 low limit
fmin—
par. 5. 2
0.1 Hz
0.0 Hz
5. 2
Prohibit frequency
range 1 high limit
fmin—fmax
(1. 1) (1. 2)
0.1 Hz
0.0 Hz
5. 3
Prohibit frequency
range 2 low limit
fmin—
par. 5. 4
0.1 Hz
0.0 Hz
5. 4
Prohibit frequency
range 2 high limit
fmin—fmax
(1. 1) (1. 2)
0.1 Hz
0.0 Hz
5. 5
Prohibit frequency
range 3 low limit
fmin—
par. 5. 6
0.1 Hz
0.0 Hz
5. 6
Prohibit frequency
range 3 high limit
fmin—fmax
(1. 1) (1. 2)
0.1 Hz
0.0 Hz
Custom Description
Page
3-28
0 = Prohibit range 1 is off
3-28
3-28
0 = Prohibit range 2 is off
3-28
3-28
0 = Prohibit range 3 is of
3-28
Group 6, Motor control parameters
Code Parameter
Range
Step
0—1
1
Default
Page
6. 1
Motor control mode
6. 2
Switching frequency
6. 3
Field weakening
point
30—500 Hz
1 Hz
Param.
1. 11
3-29
6. 4
Voltage at field
weakening point
15—200%
x Vnmot
1%
100%
3-29
6. 5
V/Hz curve, midpoint
frequency
0.0—fmax
0.1 Hz
0.0 Hz
3-29
6. 6
V/Hz-curve, midpoint
voltage
0.00—100.00% 0.01%
x Vnmot
0.00%
3-29
6. 7
Output voltage at
zero frequency
0.00—100.00% 0.01%
x Vnmot
0.00%
3-29
6. 8
Overvoltage controller
0—1
1
1
0 = Controller is turned off
1 = Controller is operating
3-30
6. 9
Undervoltage controller
0—1
1
1
0 = Controller is turned off
1 = Controller is operating
3-30
Note!
0
Custom Description
1.0—16.0 kHz 0.1 kHz 10/3.6 kHz
0 = Frequency control
1 = Speed control
3-29
Dependant on Hp rating
3-29
= Parameter value can be changed only when the drive is stopped.
Page 3-12
Multi-step Speed Control Application
Group 7, Protections
Code Parameter
Range
Step
Default Custom Description
Page
7. 1
Response to
reference fault
0—3
1
0
0 = No action
1 = Warning
2 = Fault, stop according to
par. 4.7
3 = Fault, always coasting stop
3-30
7. 2
Response to
external fault
0—3
1
2
0 = No action
1 = Warning
2 = Fault, stop according to
par. 4.7
3 = Fault, always coasting stop
3-30
7. 3
Phase supervision of
the motor
0—2
2
2
0 = No action
2 = Fault
3-30
7. 4
Ground fault protection
0—2
2
2
0 = No action
2 = Fault
3-31
7. 5
Motor thermal protection
0—2
1
2
0 = No action
1 = Warning
2 = Fault
3-31
7. 6
Motor thermal protection 50.0—150.0 % 1.0 %
break point current
x InMOTOR
100.0%
3-32
7. 7
Motor thermal protection 5.0—150.0%
zero frequency current
x InMOTOR
1.0 %
45.0%
3-32
7. 8
Motor thermal protection
time constant
0.5—300.0
minutes
0.5
min.
17.0
min.
7. 9
Motor thermal protection
break point frequency
10—500 Hz
1 Hz
35 Hz
7. 10
Stall protection
0—2
1
1
7. 11
Stall current limit
5.0—200.0%
x InMOTOR
1.0%
130.0%
3-34
7. 12
Stall time
2.0—120.0 s
1.0 s
15.0 s
3-34
7. 13
Maximum stall frequency
1—fmax
1 Hz
25 Hz
3-34
7. 14
Underload protection
0—2
1
0
7. 15
Underload prot., field
weakening area load
7. 16
Underload protection,
zero frequency load
5.0—150.0%
x TnMOTOR
7. 17
Underload time
2.0—600.0 s
10.0—150.0 % 1.0%
x TnMOTOR
Default value is set according
to motor nominal current
3-33
3-33
0 = No action
1 = Warning
2 = Fault
0 = No action
1 = Warning
2 = Fault
3-34
3-35
50.0%
3-35
1.0%
10.0%
3-35
1.0 s
20.0s
3-36
Page 3-13
3
Multi-step Speed Control Application
Group 8, Autorestart parameters
3
Code Parameter
Range
Step
Default
8. 1
Automatic restart:
number of tries
0—10
1
0
8. 2
Automatic restart: multi 1—6000 s
attempt maximum trial time
1s
30 s
8. 3
Automatic restart:
start function
0—1
1
0
0 = Ramp
1 = Flying start
3-37
8. 4
Automatic restart after
undervoltage trip
0—1
1
0
0 = No
1 = Yes
3-37
8. 5
Automatic restart after
overvoltage trip
0—1
1
0
0 = No
1 = Yes
3-37
8. 6
Automatic restart after
overcurrent trip
0—1
1
0
0 = No
1 = Yes
3-37
8. 7
Automatic restart after
reference fault trip
0—1
1
0
0 = No
1 = Yes
3-37
8. 8
Automatic restart after
over/undertemperature
fault trip
0—1
1
0
0 = No
1 = Yes
3-37
Table 3.5-1 Special parameters, Groups 2—8.
Page 3-14
Custom Description
0 = not in use
Page
3-36
3-36
Multi-step Speed Control Application
3.5.2 Description of Groups 2—8 parameters
2. 1
Start/Stop logic selection
0:
DIA1: closed contact = start forward
DIA2: closed contact = start reverse,
See figure 3.5-1.
FWD
Output
frequency
Stop function
(par 4. 7)
= coasting
t
REV
DIA1
DIA2
1
2
UD009K09
3
3
Figure 3.5-1 Start forward/Start reverse.
1
The first selected direction has the highest priority
2
When DIA1 contact opens, the direction of rotation starts to change
3
If Start forward (DIA1) and start reverse (DIA2) signals are active
simultaneously, the start forward signal (DIA1) has priority.
1:
DIA1: closed contact = start
DIA2: closed contact = reverse
See figure 3.5-2.
FWD
Output
frequency
open contact = stop
open contact = forward
Stop function
(par 4. 7
= coasting
t
REV
DIA1
DIA2
UD012K10
Figure 3.5-2 Start, Stop, reverse.
Page 3-15
Multi-step Speed Control Application
2:
DIA1: closed contact = start
DIA2: closed contact = start enabled
3:
3-wire connection
open contact = stop
open contact = start disabled
DIA1: closed contact = start pulse
DIA2: closed contact = stop pulse
(DIA3 can be programmed for reverse command)
See figure 3.5-3.
FWD
Output
frequency
Stop function
(par 4. 7)
= coasting
If Start and Stop pulses are
simultaneous the Stop pulse
overrides the Start pulse
t
REV
DIA1
Start
min 50 ms
3
UD009K11
DIA2
Stop
Figure 3.5-3 Start pulse /Stop pulse.
2. 2
DIA3 function
1: External fault, closing contact = Fault is shown and motor is stopped when
the contact is closed
2: External fault, opening contact = Fault is shown and motor is stopped when
the input is open
3: Run enable
contact open
contact closed
= Start of the motor disabled
= Start of the motor enabled
4: Acc. / Dec
time select.
contact open
contact closed
= Acceleration/Deceleration time 1 selected
= Acceleration/Deceleration time 2 selected
5: Reverse
contact open
contact closed
= Forward Can be used for reversing if
= Reverse parameter 2. 1 has value 3
6: Jog speed
contact closed
= Jog speed selected for freq. refer.
7: Fault reset
contact closed
= Resets all faults
8: Acc./Dec. operation prohibited
contact closed = Stops acceleration or deceleration until
the contact is opened
9: DC-braking command
contact closed
Page 3-16
= In Stop mode, the DC-braking operates
until the contact is opened, see figure 3.5-4.
DC-brake current is set with parameter 4. 8.
Multi-step Speed Control Application
Output
frequency
Param. 4. 10
t
DIA3
RUN
STOP
UD009K32
DIA3 as DC-brake command input and stop-mode = Ramp
3
t
DIA3
UD009K32
DIA3 as DC-brake command input and stop-mode = Coasting
Figure 3.5-4 DIA3 as DC-brake command input:
2. 3
a) Stop mode = Ramp,
b) Stop mode = Coasting.
Vin signal range
0 = Signal range 0—10 V
1 = Custom setting range from custom minimum (par. 2. 4) to custom
maximum (par. 2. 5)
2. 4
Vin custom setting minimum/maximum
2. 5
These parameters set V in for any input signal span within 0—10 V.
Minimum setting: Set the Vin signal to its minimum level, select parameter 2.4,
press the Enter button
Maximum setting: Set the Vin signal to its maximum level, select parameter 2.5,
press the Enter button
Note!
The parameter values can only be set with this procedure (not with arrow up/arrow
down buttons).
Page 3-17
Multi-step Speed Control Application
2. 6
Vin signal inversion
Ou tput
frequ ency
V in is source B frequency
reference, par. 1. 6 = 1 (default)
Parameter 2. 6 = 0, no inversion
of analog Vin signal.
P aram ete r
2.17
P aram ete r 2 .3 =0
V in = 0 10 V
P aram ete r 2 .3=1
V in = cus tom
P aram ete r
2.16
V in
(te rm . 2)
0
P aram . 2.5
P aram. 2.4
10 V
Ch 01 2 K4 6
Figure 3.5-5 Vin no signal inversion.
Parameter 2. 6 = 1, inversion
of analog Vin signal
3
Output
frequency
max. Vin signal = minimum set speed
min. Vin signal = maximum set speed
Par. 2. 17
Param. 2.3 =0
Par.
= 0V
Vin =2.
0 -310
Uin
= 0—10 V
par. 2. 2.5
5 = =11
Param.
Uin= =custom
custom
V
in
Par. 2. 16
V
in
Uin
(terminal2)
2)
(termin.
0
Par. 2. 4
Par. 2. 5
10 V
UD012K47
Figure 3.5-6 Vin signal inversion.
2. 7
Vin signal filter time
Filters out disturbances from the
incoming analog Vin signal.
A long filtering time makes regulation response slower.
See figure 3.5-7.
%
Unfiltered signal
100%
Filtered signal
63%
t [s]
Par. 2. 7
Figure 3.5-7 Vin signal filtering.
Page 3-18
UD009K15
Multi-step Speed Control Application
2. 8
Analog input Iin signal range
0 = 0—20 mA
1 = 4—20 mA
2 = Custom signal span
See figure 3.5-8.
2. 9
2. 10
Output
frequency
Par. 2. 14
par. 2. 8 = 2
Iin = custom
Par. 2. 8 = 0
Iin = 0—20 mA
Analog input Iin custom
setting minimum/maximum
With these parameters you can
scale the input current to
correspond to a minimum and
maximum frequency range. See
figure 3.5-8.
Minimum setting:
Set the Iin signal to its minimum
level, select parameter 2. 9,
press the Enter button
Maximum setting:
Set the Iin signal to its maximum
level, select parameter 2. 10,
press the Enter button
Note! The parameter values can
only be set with this procedure
(not with arrow up/arrow downbuttons).
Par. 2. 8 = 1
Iin = 4—20 mA
Par. 2. 13
0
4 mA
Par. 2. 9
3
Par. 2. 14
par. 2. 8 = 2
Iin = custom
par. 2. 8 = 1
Iin = 4—20 mA
par. 2. 8 = 0
Iin = 0—20 mA
Iin
Par. 2. 13
Uin
(term. 3,4)
4 mA
20 mA
Par. 2. 10
UD012K29
Analog input Iin inversion
Parameter 2. 11 = 0, no inversion
of Iin input
Parameter 2. 11 = 1, inversion
of Iin input, see figure 3.5-9.
max. I in signal = minimum set speed
min. I in signal = maximum set speed
UD012K28
Output
frequency
Par. 2. 9
Iin is source A frequency reference,
par. 1. 5 = 0 (default)
20 mA
Par. 2. 10
Figure 3.5-8 Analog input Iin scaling.
0
2. 11
Iin
(term. 3,4)
Figure 3.5-9 Iin signal inversion.
%
Unfiltered signal
100%
Filtered signal
2. 12
Analog input Iin filter time
Filters out disturbances from the
incoming analog Iin signal. A long
filtering time makes regulation
response slower. See figure 3.510.
63%
t [s]
Par. 2. 12
UD009K30
Figure 3.5-10 Analog input Iin filter time.
Page 3-19
Multi-step Speed Control Application
2. 13, 2. 14
Reference scaling, minimum value/maximum value
Scales the basic reference.
Setting limits: par. 1. 1 <par. 2. 13<par. 2. 14 <par. 1. 2.
If par. 2. 14 = 0 scaling is set off. See figures 3.5-11 and 3.5-12.
Output
frequency
Output
frequency
Max freq. par 1. 2
Max freq. par 1. 2
par. 2. 5
par. 2. 4
Analog
input [V]
Min freq. par 1. 1
0
Analog
input [V]
Min freq. par 1. 1
10 Ch012K12
0
3
Figure 3.5-11 Reference scaling .
2. 18
10
Ch012K13
Figure 3.5-12 Reference scaling,
par. 2. 14 = 0.
Free analog input signal
Selection of input signal of free analog input (an input not used for reference signal):
0 = Not in use
1 = Voltage signal Vin
2 = Current signal Iin
2. 19
Free analog input signal
function
Use this parameter to select a
function for a free analog input
signal:
0 = Function is not used
Torque limit
100%
Par. 1. 7
1 = Reducing motor current limit
(par. 1. 7)
This signal will adjust the
maximum motor current
between 0 and with
parameter 1. 7 set max.
limit. See figure 3.5-13.
Figure 3.5-13 Reducing of max.
motor current.
Page 3-20
Analog
input
0V
0 mA
4 mA
Custom
Signal range
10 V
20 mA
20 mA
Custom
UD012K61
Multi-step Speed Control Application
2
DC-braking
current
Reducing DC brake current.
100%
Par. 4. 8
DC braking current can be
reduced with the free analog
input signal between current
0.15 x InSV9 and current set
by the parameter 4. 8. See
figure 3.5-14.
Free analog
input
0,15 x I
0.15 x nFU
I nSV9
0
Signal range
Figure 2.5-14 Reducing DC brake
current.
3
Reducing acceleration and
deceleration times.
Acceleration/deceleration
times can be reduced with a
free analog input signal
according to the following
formulas:
Reduced time = set acc./
deceler. time (par. 1. 3, 1. 4;
4. 3, 4. 4) divided by the
factor R from the figure 3.515.
Factor R
10
3
2
Free analog
input
1
Figure 3.5-15 Reducing acceleration
and deceleration times.
4
Signal range
Reducing torque supervision
limit.
Torque supervision limit can
be reduced with a free
analog input signal between
0 and set supervision limit
(par. 3. 14), see figure 3.5-16.
UD012K58
Ch012K59
Torque limit
100%
Par. 3. 14
Free analog
input
Figure 3.5-16 Reducing torque
supervision limit.
0
Signal range
Ch012K60
Page 3-21
Multi-step Speed Control Application
3. 1
Analog output function
%
See table on page 3-9.
Unfiltered signal
100%
Filtered signal
3. 2
Analog output filter time
63%
Filters the analog output signal.
See figure 3.5-17.
t [s]
Par. 3. 2
Figure 3.5-17 Analog output
filtering.
3.3
Analog output invert
Inverts analog output signal:
3
max. output signal = minimum set
value
min. output signal = maximum set
value
UD009K16
Analog
output
current
20 mA
12 mA
Param. 3. 5
= 50%
10 mA
Param. 3. 5
= 100%
4 mA
Param. 3. 5
= 200%
Figure 3.5-18 Analog output invert.
3. 4
Selected (para. 3. 1)
signal max. value
0 mA
0.5
0
1.0
Ch012K17
Analog output minimum
Defines the signal minimum to
be either 0 mA or 4 mA (living
zero). See figure 3.5-19.
3. 5
Analog output scale
Scaling factor for analog output.
See figure 3.5-19.
Signal
Max. value of the signal
Analog
output
current
Param. 3. 5
= 200%
Param. 3. 5
= 100%
20 mA
Output frequency
Output
current
Motor speed
Motor torque
Motor power
Motor voltage
DC-link volt.
Max. frequency (p. 1. 2)
2 x InCX
Max. speed (nnxfmax/fn)
2 x TnMot
2 x PnMot
100% x VnMot
1000 V
12 mA
Param. 3. 5
= 50%
10 mA
Par. 3. 4 = 1
4 mA
Max. value of signal
selected by param. 3. 1
Par. 3. 4 = 0
0 mA
0
Figure 3.5-19 Analog output scale.
Page 3-22
0.5
1.0
Ch012K18
Multi-step Speed Control Application
3. 6
3. 7
3. 8
Digital output function
Relay output 1 function
Relay output 2 function
Setting value
0 = Not used
Signal content
Out of operation
Digital output DO1 sinks current and programmable
relay (RO1, RO2) is activated when:
1
2
3
4
5
6
7
= Ready
= Run
= Fault
= Fault inverted
= CX overheat warning
= External fault or warning
= Reference fault or warning
8 = Warning
9 = Reversed
10 = Jog speed selected
11 = At speed
12 = Motor regulator activated
13 = Output frequency supervision 1
14= Output frequency supervision 2
15= Torque limit supervision
16= Active reference
limit supervision
17 = External brake control
18 = Control from I/O terminals
19 = Drive
20 = Unrequested rotation direction
21= External brake control inverted
The drive is ready to operate
The drive operates (motor is running)
A fault trip has occurred
A fault trip has not occurred
The heat-sink temperature exceeds +70°C
Fault or warning depending on parameter 7. 2
Fault or warning depending on parameter 7. 1
- if analog reference is 4—20 mA and signal is <4mA
Always if a warning exists
The reverse command has been selected
The Jog speed has been selected with digital input
The output frequency has reached the set reference
Overvoltage or overcurrent regulator was activated
The output frequency goes outside of the set supervision
Low limit/ High limit (par. 3. 9 and 3. 10)
The output frequency goes outside of the set supervision
Low limit/ High limit (par. 3. 11 and 3. 12)
The motor torque goes outside of the set supervision
Low limit/ High limit (par. 3. 13 and 3. 14)
Active reference goes outside of the set supervision
Low limit/ High limit (par. 3. 15 and 3. 16)
External brake ON/OFF control with programmable
delay (par 3. 17 and 3. 18)
External control mode selected with prog. push-button#2
Temperature on drive goes outside the set supervision
limits (par. 3. 19 and 3. 20)
Rotation direction of the motor shaft is different from the
requested one
External brake ON/OFF control (par 3.17 and 3.18),
output active when brake control is OFF
Table 3.5-2 Output signals via DO1 and output relays RO1 and RO2.
3. 9
3. 11
Output frequency limit 1, supervision function
Output frequency limit 2, supervision function
0 = No supervision
1 = Low limit supervision
2 = High limit supervision
If the output frequency goes under/over the set limit (3. 10, 3. 12) this function
generates a warning message via the digital output DO1 or via a relay output
RO1 or RO2 depending on the settings of the parameters 3. 6—3. 8.
3. 10
3. 12
Output frequency limit 1, supervision value
Output frequency limit 2, supervision value
The frequency value to be supervised by the parameter 3. 9 (3. 11).
See figure 3.5-20.
Page 3-23
3
Multi-step Speed Control Application
3. 13
Torque limit , supervision function
0 = No supervision
1 = Low limit supervision
2 = High limit supervision
If the calculated torque value goes
under/over the set limit (3. 14) this
function generates a warning
message via the digital output
DO1 or via a relay output RO1 or
RO2 depending on the settings of
the parameters 3. 6—3. 8.
Par. 3.9 = 2
f[Hz]
Par 3. 10
UD009K19
Example: 21 RO1
22 RO1
23 RO1
21 RO1
22 RO1
23 RO1
t
21 RO1
22 RO1
23 RO1
Figure 3.5-20 Output frequency
supervision.
3. 14
3
Torque limit , supervision value
The calculated torque value to be supervised by the parameter 3.13.
Torque supervision value can be reduced below the setpoint with al free analog input
signal, see parameters 2.18 and 2.19.
3. 15
Reference limit , supervision function
0 = No supervision
1 = Low limit supervision
2 = High limit supervision
If reference value goes under/over the set limit (3. 16) this function generates a
warning message via the digital output DO1 and via a relay output RO1 or
RO2 depending on the settings of the parameters 3. 6—3. 8. The supervised
reference is the current active reference. It can be source A or B reference depending
on DIB6 input or panel reference if panel is the active control source.
3. 16
Reference limit , supervision value
The frequency value to be supervised by the parameter 3. 15.
3. 17
External brake-off delay
3. 18
External brake-on delay
The function of the external brake
can be delayed from the start and
stop control signals with these
parameters. See figure 3.5-21.
The brake control signal can be
programmed via the digital output
DO1 or via one of the relay
outputs RO1 and RO2, see
parameters 3. 6—3. 8.
a)
tOFF = Par. 3. 17
tON = Par. 3. 18
External
BRAKE: OFF
Digital or
relay output
ON
DIA1: RUN FWD
STOP
DIA2: RUN REV
t
STOP
UD012K45
b)
tOFF = Par. 3. 17
tON = Par. 3. 18
External
Figure 3.5-21 External brake control:
a)
Start/Stop logic selection
par. 2. 1 = 0, 1 or 2
b)
Start/Stop logic selection
par. 2. 1 = 3.
BRAKE: OFF
ON
Digital or
relay output
DIA1: START
PULSE
DIA2: STOP
PULSE
t
Page 3-24
Multi-step Speed Control Application
3. 19
Drive temperature limit supervision
0 = No supervision
1 = Low limit supervision
2 = High limit supervision
If the temperature of the unit goes under/over the set limit (3. 20) this function
generates a warning message via the digital output DO1 or via a relay output RO1
or RO2 depending on the settings of the parameters 3. 6—3. 8.
3. 20
Drive temperature limit value
The temperature value to be supervised by the parameter 3. 19.
4. 1
4. 2
Acc/Dec ramp 1 shape
Acc/Dec ramp 2 shape
The acceleration and deceleration ramp shape can be programmed with these
parameters.
Setting the value = 0 gives you a linear ramp shape. The output frequency
immediately follows the input with a ramp time set by parameters 1. 3,1. 4 (4. 3, 4.
4 for Acc/Dec time 2).
Setting 0.1—10 seconds for 4. 1
(4. 2) causes an S-shaped ramp.
The speed changes are smooth.
Parameter 1. 3/ 1. 4 (4. 3/ 4. 4)
determines the ramp time of the
acceleration/deceleration in the
middle of the curve. See figure
3.5-22.
[Hz]
1. 3, 1. 4
(4. 3, 4. 4)
4. 1 (4. 2)
Figure 3.5-22 S-shaped acceleration/
deceleration.
4. 1 (4. 2)
[t]
UD009K20
4. 3
Acceleration time 2
4. 4
Deceleration time 2
These values correspond to the time required for output frequency to accelerate
from the set minimum frequency (par. 1. 1) to the set maximum frequency
(par. 1. 2). With this parameter it is possibile to set two different acceleration/
deceleration times for one application. The active set can be selected with the
programmable signal DIA3. See parameter 2. 2.
Acceleration/deceleration times can be reduced with a free analog input signal.
See parameters 2. 18 and 2. 19.
Page 3-25
3
Multi-step Speed Control Application
4. 5
Brake chopper
0 = No brake chopper
1 = Brake chopper and brake resistor installed
2 = External brake chopper
When the drive is decelerating the motor, the energy stored in the inertia of the motor
and the load is fed into the external brake resistor. If the brake resistor is selected
correctly the drive is able to decelerate the load with a torque equal to that of
acceleration. See the separate Brake resistor installation manual.
4. 6
Start function
Ramp:
0
The drive starts from 0 Hz and accelerates to the set reference frequency
within the set acceleration time. (Load inertia or starting friction may cause
prolonged acceleration times).
Flying start:
1
3
The drive starts into a running motor by first finding the speed the motor is
running at. Searching starts from the maximum frequency down until the actual
frequency reached. The output frequency then accelerates/decelerates to the
set reference value at a rate determined by the acceleration/deceleration ramp
parameters.
Use this mode if the motor may be coasting when the start command is given.
With the flying start it is possible to ride through short utility voltage
interruptions.
4. 7
Stop function
Coasting:
0
The motor coasts to an uncontrolled stop with the CX/CXL/CXS off, after the
Stop command.
Ramp:
1
After the Stop command, the speed of the motor is decelerated according to
the deceleration ramp time parameter.
If the regenerated energy is high it may be necessary to use an external
braking resistor for faster deceleration.
4. 8
DC braking current
Determines whether DC braking is ON or OFF. It also determines the braking
duration time of the DC-brake when the motor is stopping. The function of the DCbrake depends on the stop function, parameter 4. 7. See figure 3.5-23.
Page 3-26
0
DC-brake is not used
>0
DC-brake is in use depending on the setup of the stop function
(param. 4. 7). The time is set by the value of parameter 4. 9:
Multi-step Speed Control Application
Stop-function = 0 (coasting):
After the stop command, the motor will coast to a stop with the CX/CXL/CXS off.
With DC-injection, the motor can be electrically stopped in the shortest possible time,
without using an optional external braking resistor.
The braking time is scaled according to the frequency when the DC- braking starts.
If the frequency is > nominal frequency of the motor (par. 1.11), the value of
parameter 4.9 determines the braking time. When the frequency is < 10% of the
nominal, the braking time is 10% of the set value of parameter 4.9.
Stop-function = 1 (ramp):
After a Stop command, the speed of the motor is reduced based on the deceleration
ramp parameter. If no regeneration occurs due to load inertia DC-braking starts at
a speed defined by parameter 4. 10.
fout [Hz]
fout [Hz]
fn
3
fn
Output frequency
Motor speed
Output frequency
Motor speed
0,1x fn
DC-braking ON
DC-braking ON
t
t = 0.1 x par. 4. 9
t = 1 x par. 4. 9
RUN
STOP
t
RUN
STOP
UD009K21
Figure 3.5-23 DC-braking time when stop = coasting.
The braking time is defined with
parameter 4.9.
fout [Hz]
If high inertia exists it is
recommended to use an external
braking resistor for faster
deceleration. See figure 3.5-24.
Motor speed
Output frequency
DC-braking
Param. 4. 10
t
t = param. 4. 9
RUN
STOP
UD009K23
Figure 3.5-24 DC-braking time when stop
function = ramp.
Page 3-27
Multi-step Speed Control Application
4. 10
Execute frequency of DCbrake during ramp Stop
See figure 3.5-24.
4. 11
DC-brake time at start
0
>0
3
DC-brake is not used
DC-brake is active when
the start command is given.
This parameter defines the
time before the brake is
released. After the brake is
released, the output
frequency increases
according to the set start
function parameter 4. 6 and
the acceleration parameters
(1.3, 4.1 or 4.2, 4.3). See
figure 3.5-25.
fout [Hz]
Output
frequency
t
Par 4. 11
RUN
STOP
UD009K22
Figure 3.5-25 DC-braking time at
start.
5. 1- 5.6 Prohibit frequency area
Low limit/High limit
Output
frequency [Hz]
In some systems it may be
necessary to avoid certain
frequencies
because
of
mechanical resonance problems.
With these parameters it is
possible to set limits for three "skip
frequency" regions between 0 Hz
and 500 Hz. The accuracy of the
setting is 0.1 Hz. See figure 3.526.
Figure 3.5-26 Example of prohibit
frequency area
setting.
Page 3-28
5. 1
5. 3
5. 5
5. 2
5. 4
5. 6
Reference [Hz]
UD012K33
Multi-step Speed Control Application
6. 1
Motor control mode
0 = Frequency control:
(V/Hz)
1 = Speed control:
(sensorless vector)
6. 2
The I/O terminal and panel references are frequency
references and the drive controls the output
frequency (output freq. resolution 0.01 Hz)
The I/O terminal and panel references are speed
references and the drive controls the motor speed
(control accuracy ± 0.5%).
Switching frequency
Motor noise can be minimized by using a high switching frequency. Increasing the
switching frequency reduces the current capacity of the CX/CXL/CXS.
Before changing the frequency from the factory default 10 kHz (3.6 kHz >40 Hp)
check the drive derating in the curves shown in figures 5.2-2 and 5.2-3 in chapter
5.2 of the User's Manual.
6. 3
6. 4
Field weakening point
Voltage at the field weakening point
The field weakening point is the output frequency where the output voltage reaches
the set maximum value. Above that frequency the output voltage remains at the set
maximum value.
Below that frequency output voltage depends on the setting of the V/Hz curve
parameters 1. 8, 1. 9, 6. 5, 6. 6 and 6. 7. See figure 3.5-27.
When the parameters 1. 10 and 1. 11, nominal voltage and nominal frequency of
the motor are set, parameters 6. 3 and 6. 4 are also set automatically to the
corresponding values. If you need different values for the field weakening point and
the maximum output voltage, change these parameters after setting parameters 1.
10 and 1. 11.
6. 5
V/Hz curve, middle point frequency
If the programmable V/Hz curve has been selected with parameter 1. 8, this
parameter defines the middle frequency point of the curve. See figure 3.5-27.
6. 6
V/Hz curve, middle point voltage
If the programmable V/Hz curve has been selected with parameter 1. 8, this
parameter defines the middle point voltage (% of motor nominal voltage) of the curve.
See figure 3.5-27.
6. 7
Output voltage at zero frequency
If the programmable V/Hz curve has been selected with parameter 1. 8, this
parameter defines the zero frequency voltage of the curve. See figure 3.5-27.
Page 3-29
3
Multi-step Speed Control Application
Vn
Parameter 6.4
U[V]
Default: nominal
voltage of the
motor
Parameter 6.6
Default 10%
Field weakening
point
Default: nominal frequency
of the motor
Parameter 6.7
Default 1.3 %
Parameter 6.5
(Default 5 Hz)
Parameter 6.3
f[Hz]
Figure 3.5-27 Programmable V/Hz curve.
3
6. 8
6. 9
Overvoltage controller
Undervoltage controller
These parameters allow the over/undervoltage controllers to be switched ON or OFF.
This may be useful in cases where the utility supply voltage varies more than -15%—
+10% and the application requires a constant speed. If the controllers are ON, they
will change the motor speed in over/undervoltage cases. Overvoltage = faster,
undervoltage = slower.
Over/undervoltage trips may occur when controllers are not used.
7. 1
Response to the reference fault
0 = No response
1 = Warning
2 = Fault, stop mode after fault according to parameter 4.7
3 = Fault, always coasting stop mode after fault
A warning or a fault action and message is generated if the 4—20 mA reference
signal is used and the signal falls below 4 mA. The information can also be
programmed via digital output DO1 and via relay outputs RO1 and RO2.
7. 2
Response to external fault
0 = No response
1 = Warning
2 = Fault, stop mode after fault according to parameter 4.7
3 = Fault, stop mode after fault always by coasting
A warning or a fault action and message is generated from the external fault signal
in the digital input DIA3. The information can also be programmed into digital output
DO1 and into relay outputs RO1 and RO2.
7. 3
Phase supervision of the motor
0 = No action
2 = Fault
Phase supervision of the motor ensures that the motor phases have approximately
equal current.
Page 3-30
Multi-step Speed Control Application
7. 4
Ground fault protection
0 = No action
2 = Fault
Ground fault protection ensures that the sum of the motor phase currents is zero.
The standard overcurrent protection is always working and protects the frequency
converter from ground faults with high current levels.
Parameters 7. 5—7. 9 Motor thermal protection
General
Motor thermal protection is to protect the motor from overheating. The CX/CXL/CXS
drive is capable of supplying higher than nominal current to the motor. If the load
requires this high current there is a risk that motor will be thermally overloaded. This
is true especially at low frequencies. With low frequencies the cooling effect of the
motor fan is reduced and the capacity of the motor is reduced. If the motor is
equipped with a separately powered external fan, the load derating at low speed is
small.
Motor thermal protection is based on a calculated model and it uses the output
current of the drive to determine the load on the motor. When the motor is powered
from the drive, the calculated model uses the heatsink temperature to determine
the initial thermal stage for the motor. The calculated model assumes that the
ambient temperature of the motor is 40°C.
Motor thermal protection can be adjusted by setting several parameters. The thermal
current IT specifies the load current above which the motor is overloaded. This
current limit is a function of the output frequency. The curve for IT is set with
parameters 7. 6, 7. 7 and 7. 9, refer to the figure 3.5-28. The default values of
these parameters are set from the motor nameplate data.
With the output current at IT the thermal stage will reach the nominal value (100%).
The thermal stage changes by the square of the current. With output current at
75% from IT the thermal stage will reach 56% value and with output current at
120% from IT the thermal stage would reach 144% value. The function will trip the
drive (refer par. 7. 5) if the thermal stage will reach a value of 105%. The response
time of the thermal stage is determined with the time constant parameter 7. 8. The
larger the motor, the longer it takes to reach the final temperature.
The thermal stage of the motor can be monitored through the display. Refer to the
table for monitoring items. (User's Manual, table 7.3-1).
!
7. 5
CAUTION! The calculated model does not protect the motor if the cooling of the
motor is reduced either by blocking the airflow or due to dust or dirt.
Motor thermal protection
Operation:
0 = Not in use
1 = Warning
2 = Trip function
Tripping and warning will give a display indication with the same message code. If
tripping is selected, the drive will stop and activate the fault stage.
Page 3-31
3
Multi-step Speed Control Application
Deactivating the stall protection by setting the parameter to 0 will reset the stall time
counter to zero.
7. 6
Motor thermal protection, break point current
The current can be set between 50.0—150.0% x InMotor.
This parameter sets the value for thermal current at frequencies above the break
point on the thermal current curve. Refer to the figure 3.5-28.
The value is set as a percentage of the motor nameplate nominal current, parameter
1. 13, not the drive's nominal output current.
The motor's nominal current is the current which the motor can withstand in direct
on-line use without being overheated.
If parameter 1. 13 is adjusted, this parameter is automatically restored to the default
value.
Setting this parameter (or parameter 1. 13) does not affect the maximum output
current of the drive. Parameter 1. 7 alone determines the maximum output current
of the drive.
I
3
Current
limit
par. 1. 7
Overload area
IT
Par. 7. 6
Par. 7. 7
f
Figure 3.5-28 Motor thermal current
IT curve.
7. 7
Par. 7. 9
[Hz
UMCH7_91
Motor thermal protection, zero frequency current
The current can be set between 10.0—150.0% x InMotor.
This parameter sets the value for thermal current at zero frequency. Refer to
figure 3.5-28.
The default value is set assuming that there is no external fan cooling the motor.
If an external fan is used this parameter can be set to 90% (or higher).
The value is set as a percentage of the motor's nameplate nominal current,
parameter 1. 13, not the drive's nominal output current. The motor's nominal
current is the current which the motor can stand in direct on-line use without
being overheated.If you change parameter 1. 13, this parameter is automatically
restored to the default value.
Setting this parameter (or parameter 1. 13) does not affect to the maximum
output current of the drive. Parameter 1. 7 alone determines the maximum output
current of the drive.
Page 3-32
Multi-step Speed Control Application
7. 8
Motor thermal protection, time constant
This time can be set between 0.5—300 minutes. This is the thermal time constant
of the motor. The larger the motor the greater the time constant. The time constant
is defined as the time that it takes the calculated thermal stage to reach 63% of its
final value.
The motor thermal time is specific to a motor design and it varies between different
motor manufacturers.
The default value for the time constant is calculated based on the motor nameplate
data from parameters 1.12 and 1.13. If either of these parameters is reset, then
this parameter is set to default value.
If the motor's t6 -time is known (given by the motor manufacturer) the time constant
parameter could be set based on t6 -time. As a rule of thumb, the motor thermal
time constant in minutes equals to 2xt6 (t6 in seconds is the time a motor can safely
operate at six times the rated current). If the drive is stopped the time constant is
internally increased to three times the set parameter value. Cooling in the stop
stage is based on convection with an increased time constant.
7. 9
Motor thermal protection, break point frequency
The frequency can be set between 10—500 Hz. This is the frequency break point
of the thermal current curve. With frequencies above this point, the thermal capacity
of the motor is assumed to be constant. Refer to the figure 3.5-28.
The default value is based on the motor's nameplate data, parameter 1. 11. It is 35
Hz for a 50 Hz motor and 42 Hz for a 60 Hz motor. More generally it is 70% of the
frequency at the field weakening point (parameter 6. 3). Changing either parameter
1. 11 or 6. 3 will restore this parameter to its default value.
7. 10
Stall protection
Operation:
0 = Not in use
1 = Warning
2 = Trip function
Tripping and warning will give a display indication with the same message code. If
tripping is set on, the drive will stop and activate the fault stage. Setting the parameter
to 0 will deactivate the protection and will reset the stall time counter to zero.
Motor temperature
Trip area
105%
Motor
current
Trip/warning
par. 7. 5
I/IT
Time constant T*)
Motor temperature
Figure 3.5-29 Calculating motor
temperature.
Θ = (I/IT)2 x (1-e-t/T)
Time
*) Changed with motor size and
adjusted with parameter 7. 8
UMCH7_92
Page 3-33
3
Multi-step Speed Control Application
Parameters 7. 10— 7. 13, Stall protection
General
7. 11
Motor stall protection protects the motor from short time overload situations like a
stalled shaft. The reaction time of stall protection can be set shorter than with motor
thermal protection. The stall state is defined with two parameters, 7.11. Stall Current
and 7.13. Stall Frequency. If the current is higher than the set limit and output
frequency is lower than the set limit the stall state is true. There is actually no real
indication of the shaft rotation. Stall protection is a type of overcurrent protection.
Stall current limit
The current can be set between 0.0—200% x InMotor.
In the stall stage the current has to be above this limit. Refer to the figure 3.5-30.
The value is set as a percentage of the motor's nameplate nominal current,
parameter 1. 13. If parameter 1. 13 is adjusted, this parameter is automatically
restored to its default value.
7. 12
Stall time
The time can be set between
2.0—120 s. This is the maximum
allowed time for a stall stage.
There is an internal up/down
counter to count the stall time.
Refer to figure 3.5-31. If the stall
time counter value goes above
this limit the protection will cause
a trip (refer to the parameter 7.
10).
3
7. 13
I
Stall area
Par. 7. 11
Maximum stall frequency
The frequency can be set between
1—fmax (parameter 1. 2).
In the stall state, the output
frequency has to be smaller than
this limit. Refer to the figure 3.530.
f
Par. 7. 13
Motor underload protection can
be adjusted by setting the
underload curve with parameters
7. 15 and 7. 16. The underload
curve is a squared curve set
between zero frequency and the
field weakening point. The
Page 3-34
UMCH7_11
Figure 3.5-30 Setting the stall characteristics.
Parameters 7. 14— 7. 17,
Underload protection, General
The purpose of motor underload
protection is to ensure that there
is load on the motor while the
drive is running. If the motor
load is reduced, there might be a
problem in the process, e.g.
broken belt or dry pump.
[Hz]
Stall time counter
Trip area
Par. 7. 12
Trip/warning
par. 7. 10
UMCH7_12
Time
Stall
No stall
Figure 3.5-31 Counting the stall time.
Multi-step Speed Control Application
protection is not active below 5Hz (the underload counter value is stopped).
Refer to figure 3.5-32.
The torque values for setting the underload curve are set with percentage values
which refer to the nominal torque of the motor. The motor's nameplate data,
parameter 1. 13, the motor's nominal current and drive's nominal current ICT are
used to find the scaling ratio for the internal torque value. If other than a
standard motor is used with the drive, the accuracy of the torque calculation is
decreased.
7. 14
Underload protection
Operation:
0 = Not in use
1 = Warning
2 = Fault
Tripping and warning will give a display indication with the same message code. If
tripping is set active the drive will stop and activate the fault stage.
Deactivating the protection, by setting this parameter to 0, will reset the underload
time counter to zero.
7. 15
3
Underload protection, field weakening area load
The torque limit can be set between 20.0—150 % x TnMotor.
This parameter is the value for the minimum allowed torque when the output
frequency is above the field weakening point. Refer to the figure 3.5-32. If
parameter 1. 13 is adjusted, this parameter is automatically restored to its default
value.
7. 16
Underload protection, zero frequency load
The torque limit can be set between 10.0—150 % x TnMotor.
This parameter is the value for the minimum allowed torque with zero frequency.
Refer to the figure 3.5-32. If parameter 1. 13 is adjusted this parameter is
automatically restored to its default value.
7. 17
Underload time
This time can be set between 2.0—600.0 s.
This is the maximum allowed time for an underload state. There is an internal up/
down counter to accumulate the underload time. Refer to the figure 3.5-33.
If the underload counter value goes above this limit, the protection will cause a trip
(refer to the parameter 7. 14). If the drive is stopped, the underload counter is reset
to zero.
Underload time counter
To rq u e
Trip area
Par. 7. 17
P a r. 7 . 1 5
Trip/warning
par. 7. 14
P a r. 7 . 1 6
U n d e r lo a d
a re a
UMCH7_17
Time
f [Hz]
5 H z
F ie ld w e a k e n in g
p o in t p a r. 6 . 3
C hC H 7_15
Figure 3.5-32 Setting of minimum load.
Underl.
No underl.
Figure 3.5-33 Counting the underload time.
Page 3-35
Multi-step Speed Control Application
8. 1
8. 2
Automatic restart: number of tries
Automatic restart: trial time
The Automatic restart function restarts the drive after the faults selected with
parameters 8. 4 - 8. 8. The Start function for Automatic restart is selected with
parameter 8. 3. See figure 3.5-34.
Number of faults
during t = ttrial
ttrial
4
ttrial
3
2
Par. 8. 1 = 3
ttrial = Par. 8. 2
1
t
3
Three faults
Four faults
RUN
STOP
UD012K25
Figure 3.5-34 Automatic restart.
Parameter 8.1 determines how many automatic restarts can be made during the
trial time set by the parameter 8.2.
The time counting starts from the first autorestart. If the number of restarts does
not exceed the value of the parameter 8. 1 during the trial time, the count is cleared
after the trial time has elapsed. The next fault starts the counting again.
8. 3
Automatic restart, start function
The parameter defines the start mode:
0 = Start with ramp
1 = Flying start, see parameter 4. 6.
8. 4
Automatic restart after undervoltage trip
0 = No automatic restart after undervoltage fault
1 = Automatic restart after undervoltage fault condition returns to the
normal condition (DC-link voltage returns to the normal level)
8. 5
Automatic restart after overvoltage trip
0 = No automatic restart after overvoltage fault
1 = Automatic restart after overvoltage fault condition returns to the
normal condition (DC-link voltage returns to the normal level)
8. 6
Automatic restart after overcurrent trip
0 = No automatic restart after overcurrent fault
1 = Automatic restart after overcurrent faults
Page 3-36
Multi-step Speed Control Application
8. 7
Automatic restart after reference fault trip
0 = No automatic restart after reference fault
1 = Automatic restart after analog current reference signal (4—20 mA)
returns to the normal level (>4 mA)
8. 8
Automatic restart after over-/undertemperature fault trip
0 = No automatic restart after temperature fault
1 = Automatic restart after heatsink temperature has returned to its normal
level between -10°C—+75°C.
Notes:
3
Page 3-37
Multi-step Speed Control Application
Notes:
3
Page 3-38
PI-control Application
PI-CONTROL APPLICATION
(par. 0.1 = 5)
CONTENTS
4 PI-control Application .......................4-1
4.1
4.2
4.3
4.4
General ........................................4-2
Control I/O ....................................4-2
Control signal logic .......................4-3
Parameters Group 1 ....................4-4
4.4.1 Parameter table ..................4-4
4.4.2 Description of Group1 par ...4-5
4.5 Special parameters, Groups 2—8 .. 4-8
4.5.1 Parameter tables .................. 4-8
4.5.2 Description of Groups. ........ 4-15
4.6 Panel reference ............................ 4-36
4.7 Monitoring data. ............................ 4-36
4
Page 4-1
PI-control Application
4.1 General
In PI-control application there are two I/Oterminal control sources. Source A is the PIcontroller and source B is the direct frequency
reference. The control source is selected with
DIB6 input.
value can be selected from the analog inputs
or from mathematical functions of the analog
inputs.
The direct frequency reference can be used
for control without the PI-controller. The
frequency reference can be selected from
analog inputs or panel reference.
The PI-controller reference can be selected
from an analog input, motorized (digital)
potentiometer or panel reference. The actual
* NOTE!
4.2 Control I/O
PI-controller
reference value
2-wire
transmitter
Actual
value
I
(0)4..20mA
+
4
READY
RUN
FAULT
220
VAC
Max.
Terminal
Signal
Remember to connect CMA and
CMB inputs.
Description
1
+10Vref
Reference output
Voltage for a potentiometer, etc.
2
Vin+
Analog input,
voltage (programmable)
PI-controller reference value
range 0—10 V DC
3
GND
I/O ground
Ground for reference and controls
4
Iin+
Analog input,
PI-controller actual value
5
Iin-
current (programmable)
range 0—20 mA
6
+24V
Control voltage output
Voltage for switches, etc. max. 0.1 A
7
GND
Control voltage ground
Ground for reference and controls
8
DIA1
Start/Stop
Source A (PI-controller)
Contact open = stop
Contact closed = start
9
DIA2
External fault
(programmable)
Contact open = no fault
Contact closed = fault
10
DIA3
Fault reset
(programmable)
Contact open = no action
Contact closed = fault reset
11
CMA
Common for DIA1—DIA3
Connect to GND or + 24V
12
+24V
Control voltage output
Voltage for switches, (same as #6)
13
GND
I/O ground
Ground for reference and controls
14
DIB4
Start/Stop
Contact open = stop
Source B (Direct freq. ref.) Contact closed = start
15
DIB5
Jog speed select
(programmable)
Contact open = no action
Contact closed = Jog speed
16
DIB6
Source A/B selection
Contact open = source A is active
Contact closed = source B is active
17
CMB
Common for DIB4—DIB6
Connect to GND or + 24V
18
Iout+
Analog output
Programmable
19
Iout-
Output frequency
Range 0—20 mA/RL max. 500 Ω
20
DO1
Digital output
READY
Programmable ( par. 3. 6)
Open collector, I<50 mA, V<48 VDC
21
RO1
Relay output 1
22
RO1
RUN
23
RO1
24
RO2
Relay output 2
25
RO2
FAULT
26
RO2
(par. 3. 1)
Programmable ( par. 3. 7)
Programmable ( par. 3. 8 )
Figure 4.2-1 Default I/O configuration and connection example of the
PI-Control Application with 2-wire transmitter.
Page 4-2
PI-control Application
4.3 Control signal logic
The logic flow of the I/O-control signals and pushbutton signals from the panel is shown in figure
4.3-1.
PARAMETERS
2. 26 Source B ref. select.
2. 15 Source A ref. select.
4. 12 Jogging speed ref.
RUN
MON
READY
PAR
REF
FAULT
BTNS
RST
PG
Uin+
PROGRAMMABLE
PUSH-BUTTON 2
Reference,
Source B
Iin±
Reference,
Source A
Actual value
selection:
Uin
Iin
Uin + Iin
Uin - Iin
Iin x Uin
Iin - Uin
DIA2 Up
DIA3 Down
Motorised
potentiometer
reference
Internal
frequency
reference
P
PI-controller
P
I
Actual
value
DIB5
Jogging speed selection
(Programmable)
DIB6 Source A/B selection
4
Internal
fault reset
>1
DIA3 Ext. fault reset
P
(Programmable)
DIB4 Start/Stop, source B
Internal
Start/Stop
DIA1 Start/Stop, source A
DIA2 External fault
(Programmable)
= control line
= signal line
UD012K04
Figure 4.3-1 Control signal logic of the PI- Control Application.
Switch positions shown are based on the factory settings.
Page 4-3
PI-control Application
4.4 Basic parameters, Group 1
4.4.1 Parameter table, Group 1
4
Code Parameter
Range
Step
Default
1. 1
Minimum frequency
0—fmax
1 Hz
0 Hz
1. 2
Maximum frequency
fmin-120/500 Hz 1 Hz
60 Hz
*
1. 3
Acceleration time 1
0.1—3000.0 s
0.1 s
1.0 s
Time from fmin (1. 1) to fmax (1. 2) 4-5
1. 4
Deceleration time 1
0.1—3000.0 s
0.1 s
1.0 s
Time from fmax (1. 2) to fmin (1. 1) 4-5
1. 5
PI-controller gain
1—1000%
1%
100%
4-5
1. 6
PI-controller I-time
0.00—320.00 s 0.01s
10.00 s
1. 7
Current limit
0.1—2.5 x InCX 0.1 A
1.5 x InCX
1. 8
V/Hz ratio selection
0—2
1
0
0 = Linear
1 = Squared
2 = Programmable V/Hz ratio
4-5
1. 9
V/Hz optimization
0—1
1
0
0 = None
1 = Automatic torque boost
4-6
1. 10
Nominal voltage
of the motor
180—690 V
1V
230 V
380 V
480 V
575 V
CX/CXL/CXS V 3 2
CX/CXL/CXS V 3 4
CX/CXL/CXS V 3 5
CX V 3 6
4-7
1. 11
Nominal frequency
of the motor
30—500 Hz
1 Hz
60 Hz
fn from the nameplate of
the motor
4-7
1. 12
Nominal speed
of the motor
nn from the nameplate of
the motor
4-7
1. 13
Nominal current
of the motor
2.5 x InCX
In from the nameplate of
the motor
4-7
1. 14
Supply voltage
208—240
230 V
CX/CXL/CXS V 3 2
4-7
380—400
380 V
CX/CXL/CXS V 3 4
380—500
480 V
CX/CXL/CXS V 3 5
525—690
575 V
CX V 3 6
1—20000 rpm 1 rpm 1720 rpm
**
0.1 A
InCX
Custom Description
Page
4-5
0 = no Integral time in use
4-5
4-5
Output current limit [A] of the unit 4-5
1. 15
Parameter conceal
0—1
1
0
Visibility of the parameters:
0 = All parameter groups visible
1 = Only group 1 is visible
4-7
1. 16
Parameter value lock
0—1
1
0
Disables parameter changes:
0 = Changes enabled
1 = Changes disabled
4-7
Table 4.4-1 Group 1 basic parameters.
Note!
= Parameter value can be changed
only when the drive is stopped.
* If 1. 2 > motor synchr. speed, check suitability
for motor and drive system.
Selecting 120 Hz/500 Hz range see page 4-5.
** Default value for a four pole motor and a
nominal size drive.
Page 4-4
PI-control Application
4.4.2 Description of Group 1 parameters
1. 1, 1. 2 Minimum / maximum frequency
Defines frequency limits of the drive.
The default maximum value for parameters 1. 1 and 1. 2 is 120 Hz. By setting 1. 2
= 120 Hz when the drive is stopped (RUN indicator not lit) parameters 1. 1 and
1. 2 are changed to 500 Hz. At the same time the resolution of the panel is changed
from 0.01 Hz to 0.1 Hz.
Changing the max. value from 500 Hz to 120 Hz is done by setting parameter 1.2
= 119 Hz while the drive is stopped.
1. 3, 1. 4 Acceleration time 1, deceleration time 1:
These limits correspond to the time required for the output frequency to accelerate
from the set minimum frequency (par. 1. 1) to the set maximum frequency
(par. 1. 2).
1. 5
PI-controller gain
This parameter defines the gain of the PI-controller.
If this parameter is set to 100%, a 10% change in error value causes the controller
output to change by 1.0 Hz.
If the parameter value is set to 0, the PI-controller operates as an I-controller.
1. 6
PI-controller I-time
Defines the integration time of the PI-controller
1. 7
Current limit
This parameter determines the maximum motor current that the CX/CXL/CXS will
provide short term.
1. 8
V/Hz ratio selection
Linear:
0
The voltage of the motor changes linearly with the frequency in
the constant flux area from 0 Hz to the field weakening point
(par. 6. 3) where a constant voltage (nominal value) is supplied to the
motor. See figure 4.4-2.
A linear V/Hz ratio should be used in constant torque applications.
This default setting should be used if there is no special requirement for
another setting.
Squared:
1
The voltage of the motor changes following a squared curve form
with the frequency in the area from 0 Hz to the field weakening
point (par. 6. 3) where the nominal voltage is supplied to the motor.
See figure 4.4-2.
The motor runs undermagnetized below the field weakening point and
produces less torque and electromechanical noise. A squared V/Hz ratio
can be used in applications where the torque demand of the load is
proportional to the square of the speed, e.g. in centrifugal fans and
pumps.
Page 4-5
4
PI-control Application
V [V]
Vn
Default: Nominal voltage of
the motor
Field weakening point
Linear
Squared
Default: Nominal
frequency of the
motor
f [Hz]
Figure 4.4-2 Linear and squared V/Hz curves.
Programm. The V/Hz curve can be programmed with three different points.
V/Hz curve The parameters for programming are explained in chapter 4.5.2.
2
A programmable V/Hz curve can be used if the standard settings do
not satisfy the needs of the application. See figure 4.4-3 .
Vn
Parameter 6.4
4
U[V]
Parameter 6.6
Default 10%
Parameter 6.7
Default 1.3 %
Parameter 6.5
(Default 5 Hz)
Parameter 6.3
f[Hz]
Figure 4.4-3 Programmable V/Hz curve.
1. 9
V/Hz optimization
Automatic
torque
boost
The voltage to the motor changes automatically which makes the
motor produce enough torque to start and run at low frequencies.
The voltage increase depends on the motor type and horsepower.
Automatic torque boost can be used in applications where starting
torque due to starting friction is high, e.g. in conveyors.
NOTE!
!
Page 4-6
In high torque - low speed applications - it is likely the motor will
overheat.
If the motor has to run for a prolonged time under these conditions,
special attention must be paid to cooling the motor. Use external
cooling for the motor if the temperature rise is too high.
PI-control Application
1. 10
Nominal voltage of the motor
Find this value Vn from the nameplate of the motor.
This parameter sets the voltage at the field weakening point, parameter 6. 4, to 100%
x Vnmotor.
1. 11
Nominal frequency of the motor
Find the nominal frequency fn from the nameplate of the motor.
This parameter sets the frequency of the field weakening point, parameter 6. 3, to
the same value.
1. 12
Nominal speed of the motor
Find this value nn from the nameplate of the motor.
1. 13
Nominal current of the motor
Find the value In from the nameplate of the motor.
The internal motor protection function uses this value as a reference value.
1. 14
Supply voltage
Set parameter value according to the nominal voltage of the supply.
Values are pre-defined for CX/CXL/CXS V 3 2, CX/CXL/CXS V 3 4, CX/CXL/CXS
V 3 5 and CX V 3 6. See table 4.4-1.
1. 15
Parameter conceal
Defines which parameter groups are available:
0 = all parametergroups are visible
1 = only group 1 is visible
1. 16
Parameter value lock
Defines access to the changes of the parameter values:
4
0 = parameter value changes enabled
1 = parameter value changes disabled
To adjust more of the functions of the PI-Control application, see chapter 4.5 to modify the
parameters of Groups 2—8.
Page 4-7
PI-control Application
4.5 Special parameters, Groups 2—8
4.5.1 Parameter tables
Group 2, Input signal parameters
4
Code Parameter
Range
Step
Default
2. 1
DIA2 function
(terminal 9)
0—10
1
1
0 = Not used
4-15
1 = Ext. fault, closing contact
2 = External fault, opening contact
3 = Run enable
4 = Acceler./deceler. time selection
5 = Reverse
6 = Jog speed
7 = Fault reset
8 = Acc./dec. operation prohibit
9 = DC-braking command
10 = Motor (digital) pot. UP
2. 2
DIA3 function
(terminal 10)
0—10
1
7
0 = Not used
4-16
1 = Ext. fault, closing contact
2 = External fault, opening contact
3 = Run enable
4 = Acc./dec. time selection
5 = Reverse
6 = Jog speed
7 = Fault reset
8 = Acc./dec. operation prohibit
9 = DC-braking command
10 = Motor (digital) pot. DOWN
2. 3
Vin signal range
0—1
1
0
0 = 0—10 V
1 = Custom setting range
2. 4
Vin custom setting min. 0.00-100.00% 0.01%
0.00%
4-16
2. 5
Vin custom setting max. 0.00-100.00% 0.01%
100.00%
4-16
2. 6
Vin signal inversion
2. 7
Vin signal filter time
2. 8
Iin signal range
2. 9
Iin custom setting min. 0.00-100.00% 0.01%
0.00%
4-17
2. 10
Iin custom setting max. 0.00-100.00% 0.01%
100.00%
4-17
2. 11
Iin signal inversion
2. 12
Iin signal filter time
2. 13
DIB5 function
(terminal 15)
Note!
Page 4-8
0—1
1
0.00 —10.00 s 0.01 s
0—2
0—1
1
1
0.01 —10.00 s 0.01s
0—9
1
0
0.10 s
0
Custom Description
Page
4-16
0 = Not inverted
1 = Inverted
4-16
0 = No filtering
4-17
0 = 0—20 mA
1 = 4—20 mA
2 = Custom setting range
4-17
0
0 = Not inverted
1 = Inverted
4-17
0.10 s
0 = No filtering
4-18
6
0 = Not used
4-18
1 = Ext. fault, closing contact
2 = External fault, opening contact
3 = Run enable
4 = Acc./dec. time selection
5 = Reverse
6 = Jog speed
7 = Fault reset
8 = Acc./dec. operation prohibit
9 = DC-braking command
= Parameter value can be changed only when the drive is stopped
PI-control Application
Code Parameter
Range
Step
Default Custom Description
0.1
Hz/s
10.0
Hz/s
0—4
1
0
0 = Analog voltage input (term. 2)
1 = Analog current input (term. 4)
2= Set reference from the panel
(reference r2)
3 = Signal from internal motor pot.
4 = Signal from internal motor pot.
reset if CX/CXL/CXS is stopped
4-19
PI-controller actual
value selection
0—3
1
0
0 = Actual value 1
1 = Actual 1 + Actual 2
2 = Actual 1 - Actual 2
3 = Actual 1 * Actual 2
4-19
2. 17
Actual value 1 input
0—2
1
2
0 = No
1 = Voltage input
2 = Current input
4-19
2. 18
Actual value 2 input
0—2
1
0
0 = No
1 = Voltage input
2 = Current input
4-19
2. 19
Actual value 1
min scale
-320.00%—
+320.00%
0.01%
0 % = No minimum scaling
4-19
2. 20
Actual value 1
max scale
-320.00%—
+320.00%
0.01% 100.0%
100 % = No maximum scaling
4-19
2. 21
Actual value 2
min scale
-320.00%—
+320.00%
0.01%
0 % = No minimum scaling
4-19
2. 22
Actual value 2
max scale
-320.00%—
+320.00%
0.01% 100.0%
100 % = No maximum scaling
4-19
2. 23
Error value inversion
0—1
0 = No
1 = Yes
4-19
2. 24
PI-controller min. limit
fmin—fmax
(1. 1) (1. 2)
0.1 Hz 0.0 Hz
4-20
2. 25
PI-controller max. limit
fmin—fmax
(1. 1) (1. 2)
0.1 Hz 50.0 Hz
4-20
2. 26
Direct frequency
reference, source B
2. 27
2. 28
2. 14
Motor (digital)
0.1—2000.0
potentiometer ramp time
Hz/s
2. 15
PI-controller reference
signal (source A)
2. 16
Note!
1
0.00%
0.00%
0
0—4
1
0
Source B reference
scaling minimum value
0—
par. 2. 28
1 Hz
Source B reference
scaling maximum value
0—fmax
(1. 2)
1 Hz
Page
4-18
0 = Analog voltage input (term. 2)
1 = Analog current input (term. 4)
2 = Set reference from the panel
(reference r1)
3 = Signal from internal motor pot.
4 = Signal from internal motor pot.
reset if CX/CXL/CXS stopped
4-20
0 Hz
Selects the frequency that
corresponds to the min.
reference signal
4-20
0 Hz
Selects the frequency that
corresponds to the max.
reference signal
0 = Scaling off
>0 = Scaled maximum value
4-20
= Parameter value can be changed only when the drive is stopped.
Page 4-9
4
PI-control Application
Group 3, Output and supervision parameters
Code Parameter
Range
Step
0—7
1
Default Custom Description
3. 1
Analog output function
3. 2
Analog output filter time 0.00—10.00 s 0.01s
3. 3
Analog output inversion
0—1
1
0
0 = Not inverted
1 = Inverted
4-21
3. 4
Analog output minimum
0—1
1
0
0 = 0 mA
1 = 4 mA
4-21
3. 5
Analog output scale
10—1000%
1%
100%
3. 6
Digital output function
1
1
3. 7
Relay output 1 function
0—21
1
2
As parameter 3. 6
4-22
3. 8
Relay output 2 function
0—21
1
3
As parameter 3. 6
4-22
3. 9
Output freq. limit 1
supervision function
0—2
1
0
0 = No
1 = Low limit
2 = High limit
4-22
3. 10
Output freq. limit 1
supervision value
0—21
1
Page
1.00s
4
Note!
Page 4-10
0.0—fmax
(par. 1. 2)
0 = Not used
Scale 100%
4-21
1 = O/P frequency (0—fmax)
2 = Motor speed (0—max. speed)
3 = O/P current (0—2.0 x InCX)
4 = Motor torque (0—2 x TnMot)
5 = Motor power (0—2 x PnMot)
6 = Motor voltage (0—100% xVnMot)
7 = DC-link volt. (0—1000 V)
4-21
4-21
0 = Not used
4-22
1 = Ready
2 = Run
3 = Fault
4 = Fault inverted
5 = CX overheat warning
6 = External fault or warning
7 = Reference fault or warning
8 = Warning
9 = Reversed
10 = Jog speed selected
11 = At speed
12 = Motor regulator activated
13 = Output freq. limit superv. 1
14 = Output freq. limit superv. 2
15 = Torque limit supervision
16 = Reference limit supervision
17 = External brake control
18 = Control from I/O terminals
19 = Drive temperature limit
supervision
20 = Unrequested rotation direction
21 = External brake control inverted
0.1 Hz 0.0 Hz
= Parameter value can be changed only when the drive is stopped.
4-22
PI-control Application
Code Parameter
Range
Step
Default Custom Description
Page
0—2
1
0
0.1 Hz
0.0 Hz
0—2
1
0
0.0—200.0%
xTnSV9
0.1%
100.0%
0—2
1
0
0.1 Hz
0.0 Hz
4-23
3. 11
Output freq. limit 2
supervision function
3. 12
Output freq. limit 2
supervision value
3. 13
Torque limit
supervision function
3. 14
Torque limit
supervision value
3. 15
Active reference limit
supervision function
3. 16
Active reference limit
supervision value
3. 17
External brake off-delay
0.0—100.0 s
1
0.5 s
4-23
3. 18
External brake on-delay
0.0—100.0 s
1
1.5 s
4-23
3. 19
Drive
temperature limit
supervision
0—2
1
0
3. 20
Drive
temperature limit
-10—+75°C
1
+40°C
3. 21
I/O-expander board (opt.)
analog output function
0—7
1
3
See parameter 3. 1
4-21
3. 22
I/O-expander board (opt.)0.00—10.00 s 0.01s
analog output filter time
1.00s
See parameter 3. 2
4-21
3. 23
I/O-expander board (opt.)
analog output inversion
0—1
1
0
See parameter 3. 3
4-21
3. 24
I/O-expander board (opt.)
analog output minimum
0—1
1
0
See parameter 3. 4
4-21
3. 25
I/O-expander board (opt.) 10—1000%
analog output scale
1
100%
See parameter 3. 5
4-21
0.0—fmax
(par. 1. 2)
0.0—fmax
(par. 1. 2)
0 = No
1 = Low limit
2 = High limit
4-22
4-22
0 = No
1 = Low limit
2 = High limit
4-23
4-23
0 = No
1 = Low limit
2 = High limit
4-23
0 = No
1 = Low limit
2 = High limit
4-23
4-23
Group 4, Drive control parameters
Code Parameter
Range
Step
Default Custom Description
Page
4. 1
Acc./Dec. ramp 1 shape
0.0—10.0 s
0.1 s
0.0 s
0 = Linear
>0 = S-curve acc./dec. time
4-24
4. 2
Acc./Dec. ramp 2 shape
0.0—10.0 s
0.1 s
0.0 s
0 = Linear
>0 = S-curve acc./dec. time
4-24
4. 3
Acceleration time 2
0.1—3000.0 s
0.1 s
10.0 s
4-24
4. 4
Deceleration time 2
0.1—3000.0 s
0.1 s
10.0 s
4-24
4. 5
Brake chopper
0—2
1
0
0 = Brake chopper not in use
1 = Brake chopper in use
2 = External brake chopper
4-25
4. 6
Start function
0—1
1
0
0 = Ramp
1 = Flying start
4-25
Note!
= Parameter value can be changed only when the drive is stopped.
Page 4-11
4
PI-control Application
Code Parameter
Range
Step
Default
0—1
1
0
0.15—1.5 x
InCX (A)
0.1 A
4. 7
Stop function
4. 8
DC-braking current
4. 9
DC-braking time at Stop 0.00-250.00s 0.01 s
0.00 s
4. 10
Turn on frequency of
0.1-10.0 Hz
DC-brake at ramp Stop
1.5 Hz
4. 11
DC-brake time at Start 0.00—25.00s 0.01 s
4. 12
Jog speed reference
fmin—fmax
(1. 1) (1. 2)
0.1 Hz
Custom Description
0 = Coasting
1 = Ramp
0.5 x
InCX
0.00 s
Page
4-25
4-25
0 = DC-brake is off at Stop
4-25
4-26
0 = DC-brake is off at Start
0.1 Hz 10.0 Hz
4-27
4-27
Group 5, Prohibit frequency parameters
4
Code Parameter
Range
Step
Default
5. 1
Prohibit frequency
range 1 low limit
fmin—
par. 5. 2
0.1 Hz
0.0 Hz
5. 2
Prohibit frequency
range 2 high limit
fmin—fmax
(1. 1) (1. 2)
0.1 Hz
0.0 Hz
5. 3
Prohibit frequency
range 2 low limit
fmin—
par. 5. 4
0.1 Hz
0.0 Hz
5. 4
Prohibit frequency
range 2 high limit
fmin—fmax
(1. 1) (1. 2)
0.1 Hz
0.0 Hz
5. 5
Prohibit frequency
range 3 low limit
fmin—
par. 5. 6
0.1 Hz
0.0 Hz
5. 6
Prohibit frequency
range 3 high limit
fmin—fmax
(1. 1) (1. 2)
0.1 Hz
0.0 Hz
Range
Step
Default
1
0
Custom Description
Page
4-27
0 = no prohibit frequency range
4-27
4-27
0 = no prohibit frequency range
4-27
4-27
0 = no prohibit frequency range
4-27
Group 6, Motor control parameters
Code Parameter
Custom Description
Page
6. 1
Motor control mode
0—1
6. 2
Switching frequency
1.0-16.0 kHz
6. 3
Field weakening point
30—500 Hz
1 Hz
Param.
1. 11
4-28
6. 4
Voltage at field
weakening point
15—200%
x Vnmot
1%
100%
4-28
6. 5
V/Hz-curve mid
point frequency
0.0—fmax
0.1 Hz
0.0 Hz
4-28
6. 6
V/Hz-curve mid
point voltage
0.00-100.00% 0.01%
x Vnmot
0.00%
4-28
6. 7
Output voltage at
zero frequency
0.00-100.00% 0.01%
x Vnmot
0.00%
4-28
6. 8
Overvoltage controller
0—1
1
1
0 = Controller is not operating
1 = Controller is in operation
4-28
6. 9
Undervoltage controller
0—1
1
1
0 = Controller is not operating
1 = Controller is in operation
4-28
Note!
0.1 kHz 10/3.6kHz
0 = Frequency control
1 = Speed control
4-27
Depends on Hp rating
4-27
= Parameter value can be changed only when the drive is stopped.
Page 4-12
PI-control Application
Group 7, Protections
Code Parameter
Range
Step
Default
Custom Description
Page
7. 1
Response to
reference fault
0—3
1
0
0 = No action
1 = Warning
2 = Fault, stop according to
par. 4.7
3 = Fault, always coasting stop
4-29
7. 2
Response to
external fault
0—3
1
2
0 = No action
1 = Warning
2 = Fault, stop according to
par. 4.7
3 = Fault, always coasting stop
4-29
7. 3
Phase supervision of
the motor
0—2
2
2
0 = No action
2 = Fault
4-29
7. 4
Ground fault protection
0—2
2
2
0 = No action
2 = Fault
4-29
7. 5
Motor thermal protection
0—2
1
2
0 = No action
1 = Warning
2 = Fault
4-30
7. 6
Motor thermal protection 50.0—150.0 % 1.0 % 100.0%
break point current
x InMOTOR
4-30
7. 7
Motor thermal protection 5.0—150.0%
zero frequency current
x InMOTOR
4-30
7. 8
Motor thermal protection
time constant
7. 9
Motor thermal protection
break point frequency
7. 10
Stall protection
7. 11
Stall current limit
5.0—200.0%
x InMOTOR
1.0% 130.0%
4-32
7. 12
Stall time
2.0—120.0 s
1.0 s
15.0 s
4-33
7. 13
Maximum stall frequency
1—fmax
1 Hz
25 Hz
4-33
7. 14
Underload protection
0—2
1
0
7. 15
Underload prot., field
weakening area load
7. 16
Underload protection,
zero frequency load
5.0—150.0%
x TnMOTOR
1.0%
10.0%
4-34
7. 17
Underload time
2.0—600.0 s
1.0 s
20.0s
4-34
1.0 %
45.0%
0.5—300.0
minutes
0.5
min.
17.0
min.
10—500 Hz
1 Hz
35 Hz
0—2
1
1
10.0—150,.0 % 1.0% 50.0%
x TnMOTOR
Default value is set according
to motor nominal current
4-31
4-31
0 = No action
1 = Warning
2 = Fault
0 = No action
1 = Warning
2 = Fault
4-32
4-33
4-34
Page 4-13
4
PI-control Application
Group 8, Autorestart parameters
Code Parameter
Range
Step
8. 1
Automatic restart:
number of tries
0—10
1
0
8. 2
Automatic restart: multi 1—6000 s
attempt maximum trial time
1s
30 s
8. 3
Automatic restart:
start function
0—1
1
0
0 = Ramp
1 = Flying start
4-35
8. 4
Automatic restart after
undervoltage trip
0—1
1
0
0 = No
1 = Yes
4-35
8. 5
Automatic restart after
overvoltage trip
0—1
1
0
0 = No
1 = Yes
4-35
8. 6
Automatic restart after
overcurrent trip
0—1
1
0
0 = No
1 = Yes
4-35
8. 7
Automatic restart after
reference fault trip
0—1
1
0
0 = No
1 = Yes
4-35
8. 8
Automatic restart after
over/undertemperature
fault trip
0—1
1
0
0 = No
1 = Yes
4-35
Table 4.5-1 Special parameters, Groups 2—8.
4
Page 4-14
Default Custom Description
0 = not in use
Page
4-34
4-34
PI-control Application
4.5.2 Description of Groups 2—8 parameters
2. 1
DIA2 function
1: External fault, closing contact = Fault is shown and motor is stopped when
the input is active
2: External fault, opening contact = Fault is shown and motor is stopped when
the input is not active
3: Run enable
contact open
= Start of the motor disabled
contact closed = Start of the motor enabled
4: Acc. / Dec
time select.
contact open
contact closed
= Acceleration/Deceleration time 1 selected
= Acceleration/Deceleration time 2 selected
5: Reverse
contact open
contact closed
= Forward
= Reverse
6: Jog speed
contact closed
= Jog speed selected for freqency reference.
7: Fault reset
contact closed
= Resets all faults
8: Acc./Dec.
operation
prohibited
contact closed
= Stops acceleration and deceleration until
the contact is opened
9: DC-braking
command
contact closed
= In the stop mode, the DC-braking operates
until the contact is opened, see figure 4.5-1.
DC-brake current is set with parameter 4. 8.
10: Motor(digital) contact closed
pot. UP
If two or more inputs are
programmed to reverse, only
one of them is required to
reverse
= Reference increases until the contact is
opened
4
Output
frequency
Param. 4. 10
t
DIA3
RUN
STOP
UD012K32
a) DIA3 as DC-brake command input and stop-mode =
Ramp
t
DIA3
Figure 4.5-1 DIA3 as DC-brake command
input:
a) Stop-mode = ramp,
b) Stop-mode = coasting
RUN
STOP
UD012K32
b) DIA3 as DC-brake command input and stop-mode =
Coasting
Page 4-15
PI-control Application
2. 2
DIA3 function
Selections are same as in 2.1 except :
10: Motor(digital)
pot. DOWN
2. 3
contact closed = Reference decreases until the contact is
opened
Vin signal range
0=
1=
Signal range 0—10 V
Custom setting range from custom minimum (par. 2. 4) to custom
maximum (par. 2. 5)
2. 4
Vin custom setting minimum/maximum
2. 5
These parameters set Vin for any input signal span within 0—10 V.
Minimum setting: Set the Vin signal to its minimum level, select parameter 2. 4,
press the Enter button
Maximum setting: Set the Vin signal to its maximum level, select parameter 2. 5,
press the Enter button
Note!
The parameter values can only be set with this procedure (not with arrow up/arrow down buttons)
2. 6
Vin signal inversion
4
Page 4-16
Parameter 2. 6 = 0,
no inversion of analog Vin signal.
Parameter 2. 6 = 1,
inversion of analog Vin signal.
PI-control Application
2. 7
Vin signal filter time
Filters out disturbances from the
incoming analog Vin signal.
A long filtering time makes regulation response slower.
See figure 4.5-2.
%
Unfiltered signal
100%
Filtered signal
63%
t [s]
Par. 2. 7
UD009K15
Figure 4.5-2 Vin signal filtering.
2. 8
Analog input Iin signal range
0 = 0—20 mA
1 = 4—20 mA
2 = Custom signal span
Output
frequency
Par. 2. 14
2. 9
2. 10
par. 2. 8 = 2
Iin = custom
Analog input Iin custom
setting minimum/maximum
With these parameters you
can scale the input current
signal (Iin) signal range
between 0—20 mA.
Par. 2. 8 = 0
Iin = 0—20 mA
Par. 2. 8 = 1
Iin = 4—20 mA
Par. 2. 13
0
Minimum setting:
Set the Iin signal to its minimum
level, select parameter 2. 9,
press the Enter button
Maximum setting:
Set the Iin signal to its maximum
level, select parameter 2. 10,
press the Enter button
4 mA
Par. 2. 9
Iin
(term. 3,4)
Output
frequency
Par. 2. 14
par. 2. 8 = 2
Iin = custom
par. 2. 8 = 1
Iin = 4—20 mA
par. 2. 8 = 0
Iin = 0—20 mA
Par. 2. 13
Analog input Iin inversion
Parameter 2. 11 = 0, no inversion
of Iin input.
Parameter 2. 11 = 1, inversion of
Iin input.
UD012K28
Figure 4.5-3 Analog input Iin scaling.
Note! The parameter values can
only be set with this procedure
(not with arrow up/arrow down
buttons)
2. 11
20 mA
Par. 2. 10
IinUin
(term. 3,4)
[term.3,4]
4 mA
0
Par. 2. 9
20 mA
Par. 2. 10
UD012K29
Figure 4.5-4 Iin signal inversion.
Page 4-17
4
PI-control Application
2. 12
Analog input Iin filter time
Filters out disturbances from the
incoming analog Iin signal. A long
filtering time makes regulation
response slower.
See figure 4.5-3.
%
Unfiltered signal
100%
Filtered signal
63%
t [s]
Par. 2. 12
Figure 4.5-5 Analog input Iin filter
time.
2. 13
UD009K30
DIA5 function
1: External fault, closing contact = Fault is shown and motor is stopped when
the input is active
2: External fault, opening contact = Fault is shown and motor is stopped when
the input is not active
3: Run enable
contact open
= Start of the motor disabled
contact closed = Start of the motor enabled
4
2. 14
4: Acc. / Dec
time select.
contact open
contact closed
= Acceleration/Deceleration time 1 selected
= Acceleration/Deceleration time 2 selected
5: Reverse
contact open
contact closed
= Forward
= Reverse
6: Jog speed
contact closed
= Jog speed selected for freqency reference
7: Fault reset
contact closed
= Resets all faults
8: Acc./Dec.
operation
prohibited
contact closed
= Stops acceleration and deceleration until
the contact is opened
9: DC-braking
command
contact closed
= In the stop mode, the DC-braking operates
until the contact is opened, see figure 4.5-1.
DC-brake current is set with parameter 4. 8.
If two or more inputs are
programmed to reverse, only
one of them is required to
reverse
Motor potentiometer ramp time
Defines how fast the electronic motor (digital) potentiometer value changes.
Page 4-18
PI-control Application
2. 15
PI-controller reference signal
0
1
2
Analog voltage reference from terminals 2—3, e.g. a potentiometer
Analog current reference trom terminals 4—5, e.g. a transducer.
Panel reference is the reference set from the Reference Page (REF).
Reference r2 is the PI-controller reference, see chapter 4.7.
Reference value is changed with digital input signals DIA2 and DIA3.
- switch in DIA2 closed = frequency reference increases
- switch in DIA3 closed = frequency reference decreases
Speed of the reference change can be set with the parameter 2. 3.
Same as setting 3 but the reference value is set to the minimum frequency
(par. 1. 1) each time the drive is stopped. When the value of parameter 1. 5
is set to 3 or 4, the value of parameter 2. 1 is automatically set to 4 and
value of the parameter 2. 2 is automatically set to 10.
3
4
2. 16
2. 17
2. 18
PI-controller actual value selection
Actual value 1
Actual value 2
These parameters select the PI-controller actual value.
2. 19
Actual value 1 minimum scale
Sets the minimum scaling point for Actual value 1. See figure 4.5-6.
2. 20
Actual value 1 maximum scale
Sets the maximum scaling point for Actual value 1. See figure 4.5-6.
2. 21
Actual value 2 minimum scale
Sets the minimum scaling point for Actual value 2. See figure 4.5-6.
2. 22
4
Actual value 2 maximum scale
Sets the maximum scaling point for Actual value 2. See figure 4.5-6.
2. 23
Error value inversion
This parameter allows you to invert the error value of the PI-controller
(and thus the the operation of the PI-controller).
Scaled
input signal [%]
Scaled
input signal [%]
100
100
Par. 2 . 19 = 30%
Par. 2 . 20 = 80%
76. 5
(15.3 mA)
Par. 2. 19 = -30%
Par. 2. 20 = 140%
17. 7
(3.5 mA)
30
0
0
0
4
3.0
6.0
8.8
80
8.0
16.0
16.8
Analog
100 input [%]
10.0 V
20.0 mA
20.0 mA
-30
0
100
0
0
4
10.0 V
20.0 mA
20.0 mA
Analog
140 input [%]
C h01 2K 34
Figure 4.5-6 Examples of actual value scaling of PI-regulator.
Page 4-19
PI-control Application
2. 24
2. 25
PI-controller minimum limit
PI-controller maximum limit
These parameter set the minimum and maximum values of the PI-controller output.
Parameter value limits: par 1.1 <par. 2. 24 <par. 2. 2 5.
2. 26
Direct frequency reference. Place B
0
1
2
3
4
Analog voltage reference from terminals 2—3, e.g. a potentiometer
Analog current reference trom terminals 4—5, e.g. a transducer.
Panel reference is the reference set from the Reference Page (REF),
Reference r1 is the Place B reference, see chapter 6.
Reference value is changed with digital input signals DIA2 and DIA3.
- switch in DIA2 closed = frequency reference increases
- switch in DIA3 closed = frequency reference decreases
Speed of the reference change can be set with the parameter 2. 3.
Same as setting 3, but the reference value is set to the minimum frequency
(par. 1. 1) each time the drive is stopped. When the value of the parameter 1.
5 is set to 3 or 4, value of the parameter 2. 1 is automatically set to 4 and value
of the parameter 2. 2 is automatically set to 10.
2. 27
Source B reference scaling, minimum value/maximum value
2. 28
Setting limits: 0 < par. 2. 27 < par. 2. 28 < par. 1. 2.
If par. 2. 28 = 0 scaling is set off.
See figures 4.5-7 and 4.5-8.
(In the figures below the voltage input Vin with signal range 0—10 V is selected for source
B reference)
[Hz]
Output
frequency
[Hz]
Output
frequency
M ax freq. par 1 . 2
Max freq. par 1 . 2
Par. 2. 2 8
4
Par. 2. 27
Analog
input [V]
Min freq. par 1. 1
0
10
Analog
input [V]
Min freq. par 1. 1
0
10
Ch012K35
Figure 4.5-7 Reference scaling.
Page 4-20
Figure 4.5-8 Reference scaling, par. 2. 28 = 0.
PI-control Application
3. 1
Analog output Content
%
See table on page 4-10.
Unfiltered signal
100%
3. 2
Filtered signal
Analog output filter time
63%
Filters the analog output signal.
See figure 4.5-9.
t [s]
Par. 3. 2
Figure 4.5-9 Analog output filtering.
3.3
UD009K16
Analog output invert
Inverts analog output signal:
max output signal = minimum set value
min output signal = maximum set value
Analog
output
current
20 mA
12 mA
Param. 3. 5
= 50%
10 mA
Param. 3. 5
= 100%
4 mA
Param. 3. 5
= 200%
Selected (para. 3. 1)
signal max. value
0 mA
Figure 4.5-10 Analog output invert.
3. 4
0.5
0
1.0
Ch012K17
4
Analog output minimum
Defines the signal minimum to
be either 0 mA or 4 mA. See
figure 4.5-9.
3. 5
Analog output scale
Scaling factor for analog output.
See figure 4.5-11.
Signal
Max. value of the signal
Output
frequency
Motor speed
Output
current
Motor torque
Motor power
Motor voltage
DC-link volt.
Max. frequency (p. 1. 2)
Max. speed (nnxfmax/fn)
2 x InCX
2 x TnMot
2 x PnMot
100% x VnMot
1000 V
Analog
output
current
Param. 3. 5
= 200%
Param. 3. 5
= 100%
20 mA
12 mA
Param. 3. 5
= 50%
10 mA
Par. 3. 4 = 1
4 mA
Max. value of signal
selected by param. 3. 1
Par. 3. 4 = 0
0 mA
0
0.5
1.0
Ch012K18
Figure 4.5-11 Analog output scale.
Page 4-21
PI-control Application
3. 6
3. 7
3. 8
Digital output function
Relay output 1 function
Relay output 2 function
Setting value
0 = Not used
Signal content
Out of operation
Digital output DO1 sinks current and programmable
relay (RO1, RO2) is activated when:
1
2
3
4
5
6
7
= Ready
= Run
= Fault
= Fault inverted
= CX overheat warning
= External fault or warning
= Reference fault or warning
8 = Warning
9 = Reversed
10 = Jog speed
11 = At speed
12 = Motor regulator activated
13 = Output frequency supervision 1
14= Output frequency supervision 2
15= Torque limit supervision
16= Active reference
limit supervision
17 = External brake control
4
18 = Control from I/O terminals
19 = Drive
temperature limit supervision
20 = Unrequested rotation direction
21 = External brake control inverted
The drive is ready to operate
The drive operates (motor is running)
A fault trip has occurred
a fault trip has not occurred
The heat-sink temperature exceeds +70°C
Fault or warning depending on parameter 7. 2
Fault or warning depending on parameter 7. 1
- if analog reference is 4—20 mA and signal is <4mA
Always if a warning exists (see Table 7.10-1 in Users'
manual
The reverse command has been selected
Jog speed has been selected with digital input
The output frequency has reached the set reference
Overvoltage or overcurrent regulator was activated
The output frequency goes outside of the set supervision
Low limit/ High limit (par. 3. 9 and 3. 10)
The output frequency goes outside of the set supervision
Low limit/ High limit (par. 3. 11 and 3. 12)
The motor torque goes outside of the set supervision
Low limit/ High limit (par. 3. 13 and 3. 14)
Active reference goes outside of the set supervision
Low limit/ High limit (par. 3. 15 and 3. 16)
External brake ON/OFF control with programmable delay
(par 3. 17 and 3. 18)
External control mode selected with progr. push-button #2
Temperature on drive goes outside the set
supervision limits (par. 3. 19 and 3. 20)
Rotation direction of the motor shaft is different from the
requested one
External brake ON/OFF control (par. 3.18 and 3.18)
output active when brake control is OFF
Table 4.5-2 Output signals via DO1 and output relays RO1 and RO2.
3. 9
3. 11
Output frequency limit 1, supervision function
Output frequency limit 2, supervision function
0 = No supervision
1 = Low limit supervision
2 = High limit supervision
If the output frequency goes under/over the set limit (3. 10, 3. 12) this function
generates a warning message via the digital output DO1 or via a relay output RO1 or
RO2 depending on the settings of the parameters 3. 6—3. 8.
3. 10
3. 12
Output frequency limit 1, supervision value
Output frequency limit 2, supervision value
The frequency value to be supervised by the parameter 3. 9 (3. 11).
See figure 4.5-12.
Page 4-22
PI-control Application
3. 13
Torque limit , supervision
function
0 = No supervision
1 = Low limit supervision
2 = High limit supervision
If the calculated torque value goes
under/over the set limit (3. 14) this
function generates a warning
message via the digital output
DO1 or via a relay output RO1 or
RO2 depending on the settings of
the parameters 3. 6—3. 8.
Figure 4.5-12 Output frequency
supervision.
3. 14
Par. 3.9 = 2
f[Hz]
Par 3. 10
UD009K19
Example: 21 RO1
22 RO1
23 RO1
21 RO1
22 RO1
23 RO1
t
21 RO1
22 RO1
23 RO1
Torque limit , supervision value
The calculated torque value to be supervised by the parameter 3. 13.
3. 15
Reference limit , supervision function
0 = No supervision
1 = Low limit supervision
2 = High limit supervision
If the reference value goes under/over the set limit (3. 16) this function generates a
warning message via the digital output DO1 or via a relay output RO1 or
RO2 depending on the settings of the parameters 3. 6—3. 8. The supervised
reference is the current active reference. It can be source A or B reference depending
on DIB6 input or panel reference if panel is the active control place.
3. 16
Reference limit , supervision value
The frequency value to be supervised by the parameter 3. 15.
3. 17
3. 18
External brake-off delay
External brake-on delay
4
The function of the external brake can be delayed from the start and stop control
signals with these parameters. See figure 4.5-13.
The brake control signal can be programmed via the digital output DO1 or via one
of the relay outputs RO1 and RO2, see parameters 3. 6—3. 8.
3. 19
Drive temperature limit supervision
0 = No supervision
1 = Low limit supervision
2 = High limit supervision
If the temperature of the drive goes under/over the set limit (3. 20) this
function generates a warning message via the digital output DO1 or via a relay
output RO1 or RO2 depending on the settings of the parameters 3. 6—3. 8.
3. 20
Drive temperature limit value
The temperature value to be supervised by parameter 3. 19.
Page 4-23
PI-control Application
a)
tOFF = Par. 3. 17
tON = Par. 3. 18
External
BRAKE: OFF
Digital or
relay output
ON
DIA1: RUN FWD
STOP
DIA2: RUN REV
t
STOP
UD012K45
b)
tOFF = Par. 3. 17
tON = Par. 3. 18
External
BRAKE: OFF
Digital or
relay output
ON
DIA1: START
PULSE
DIA2: STOP
PULSE
t
Figure 4.5-13 External brake control: a) Start/Stop logic selection par. 2. 1 = 0, 1 or 2
b)Start/Stop logic selection par. 2. 1 = 3.
4. 1
4. 2
Acc/Dec ramp 1 shape
Acc/Dec ramp 2 shape
The acceleration and deceleration ramp shape can be programmed with these
parameters.
Setting the value = 0 gives you a linear ramp shape. The output frequency
immediately follows the input with a ramp time set by parameters 1. 3, 1. 4 (4. 3, 4.
4 for Acc/Dec time 2).
Setting 0.1—10 seconds for 4. 1
[Hz]
(4. 2) causes an S-shaped ramp.
The speed changes are smooth.
Parameter 1. 3/ 1. 4 (4. 3/ 4. 4)
determines the ramp time of the
acceleration/deceleration in the
1. 3, 1. 4
middle of the curve.
(4. 3, 4. 4)
See figure 4.5-14.
4
4. 1 (4. 2)
Figure 4.5-14 S-shaped acceleration/
deceleration.
4. 1 (4. 2)
[t]
UD009K20
4. 3
4. 4
Acceleration time 2
Deceleration time 2
These values correspond to the time required for the output frequency to accelerate
from the set minimum frequency (par. 1. 1) to the set maximum frequency
(par. 1. 2). With this parameter it is possibile to set two different acceleration/
deceleration times for one application. The active set can be selected with the
programmable signal DIA3 of this application, see parameter 2. 2.
Page 4-24
PI-control Application
4. 5
Brake chopper
0 = No brake chopper
1 = Brake chopper and brake resistor installed
2 = External brake chopper
When the drive is decelerating the motor, the energy stored in the inertia of the motor
and the load is fed into the external brake resistor. If the brake resistor is selected
correctly the drive is able to decelerate the load with a torque equal to that of
acceleration. See the separate Brake resistor installation manual.
4. 6
Start function
Ramp:
0
The drive starts from 0 Hz and accelerates to the set reference frequency within
the set acceleration time. (Load inertia or starting friction may extend the
acceleration times).
Flying start:
1
The drive starts into a running motor by first finding the speed the motor is
running at. Searching starts from the maximum frequency down until the actual
frequency reached. The output frequency then accelerates/decelerates to the
set reference value at a rate determined by the acceleration/deceleration ramp
parameters.
Use this mode if the motor may be coasting when the start command is given.
With the flying start it is possible to ride through short utility voltage
interruptions.
4. 7
Stop function
Coasting:
0
The motor coasts to an uncontrolled stop with the CX/CXL/CXS off, after the
Stop command.
Ramp:
1
After the Stop command, the speed of the motor is decelerated according to
the deceleration ramp time parameter.
If the regenerated energy is high it may be necessary to use an external
braking resistor for faster deceleration.
4. 8
DC braking current
Defines the current injected into the motor during the DC braking.
4. 9
DC braking time at stop
Defines if braking is ON or OFF and the braking time of the DC-brake when the motor
is stopping. The function of the DC-brake depends on the stop function, parameter
4. 7. See figure 4.5-15.
0
>0
DC-brake is not used
DC-brake is in use and its function depends on the Stop function,
(param. 4. 7), and the time depends on the value of parameter 4. 9:
Page 4-25
4
PI-control Application
Stop-function = 0 (coasting):
After the stop command, the motor will coast to a stop with the CX/CXL/CXS
off.
With DC-injection, the motor can be electrically stopped in the shortest possible
time, without using an optional external braking resistor.
The braking time is scaled according to the frequency when the DCbraking starts. If the frequency is >nominal frequency of the motor (par. 1.11),
setting value of parameter 4.9 determines the braking time. When the
frequency is <10% of the nominal, the braking time is 10% of the set value of
parameter 4.9.
fout [Hz]
fout [Hz]
fn
fn
Output frequency
Motor speed
Output frequency
Motor speed
0,1 x fn
DC-braking ON
DC-braking ON
t
t
t = 0,1 x par. 4. 9
t = 1 x par. 4. 9
RUN
RUN
STOP
STOP
UD012K21
Figure 4.5-15 DC-braking time when par. 4. 7 = 0.
4
Stop-function = 1 (ramp):
After the stop command, the speed of the motor is reduced based on the
deceleration ramp parameter, if no regeneration occurs due to load inertia, to
a speed defined with parameter 4. 10 where the DC-braking starts.
fout [Hz]
The braking time is defined
with parameter 4. 9.
If high inertia exists it is
recommended to use an
external braking resistor for
faster deceleration. See
figure 4.5-16.
Motor speed
Output frequency
DC-braking
Param. 4. 10
t
t = param. 4. 9
Figure 4.5-16 DC-braking
time when par. 4. 7 = 1.
4. 10
Execute frequency of DC-brake during ramp Stop
See figure 4.5-16.
Page 4-26
RUN
STOP
UD009K23
PI-control Application
4. 11
DC-brake time at start
0
>0
DC-brake is not used
DC-brake is active when
the start command is given.
This parameter defines the
time before the brake is
released. After the brake is
released the output
frequency increases
according to the set start
function parameter 4. 6 and
the acceleration parameters
(1. 3, 4. 1 or 4. 2, 4. 3). See
figure 4.5-17.
Output
fout [Hz]
frequency
t
Par 4. 11
RUN
STOP
UD012K22
Figure 4.5-17 DC-braking time at
start
4. 12
Jog speed reference
Parameter value defines the Jog speed selected with the digital input.
5. 1- 5.6 Prohibit frequency area,
Low limit/High limit
Output
frequency [Hz]
In some systems it may be
necessary to avoid certain
frequencies because of mechanical resonance problems.
With these parameters it is
possible to set limits for three "skip
frequency" regions. The accuracy
of the setting is 0.1 Hz.
5. 1
5. 3
5. 5
4
5. 2
5. 4
5. 6
Reference [Hz]
UD012K33
Figure 4.5-18 Example of prohibit
frequency area setting
6. 1
6. 2
Motor control mode
0 = Frequency control:
(V/Hz)
The I/O terminal and panel references are frequency
references and the drive controls the output
frequency (output freq. resolution 0.01 Hz)
1 = Speed control:
(sensorless vector)
The I/O terminal and panel references are speed
references and the drive controls the motor speed
(control accuracy ± 0.5%).
Switching frequency
Motor noise can be minimized using a high switching frequency. Increasing the
frequency reduces the capacity of the CX/CXL/CXS.
Before changing the frequency from the factory default 10 kHz (3.6 kHz >40 Hp)
check the drive derating in the curves shown in figures 5.2-2 and 5.2-3 in chapter
5.2 of the User's Manual.
Page 4-27
PI-control Application
6. 3
6. 4
Field weakening point
Voltage at the field weakening point
The field weakening point is the output frequency where the output voltage reaches
the set maximum value (par. 6. 4). Above that frequency the output voltage remains
at the set maximum value.
Below that frequency output voltage depends on the setting of the V/Hz curve
parameters 1. 8, 1. 9, 6. 5, 6. 6 and 6. 7. See figure 4.5-19.
When parameters 1. 10 and 1. 11, nominal voltage and nominal frequency of
the motor are set, parameters 6. 3 and 6. 4 are also set automatically to the
corresponding values. If you need different values for the field weakening point and
the maximum output voltage, change these parameters after setting parameters 1.
10 and 1. 11.
6. 5
V/Hz curve, middle point frequency
If the programmable V/Hz curve has been selected with parameter 1. 8, this
parameter defines the middle point frequency of the curve. See figure 4.5-19.
6. 6
V/Hz curve, middle point voltage
If the programmable V/Hz curve has been selected with parameter 1. 8, this
parameter defines the middle point voltage (% of motor nominal voltage) of the
curve. See figure 4.5-19.
6. 7
Output voltage at zero frequency
If the programmable V/Hz curve has been selected with parameter 1. 8 this
parameter defines the zero frequency voltage of the curve. See figure 4.5-19.
4
Vn
Parameter 6.4
U[V]
Default: nominal
voltage of the
motor
Parameter 6.6
Default 10%
Field weakening
point
Default: nominal frequency
of the motor
Parameter 6.7
Default 1.3 %
Parameter 6.5
(Default 5 Hz)
Parameter 6.3
f[Hz]
Figure 4.5-19 Programmable V/Hz curve.
6. 8
6. 9
Overvoltage controller
Undervoltage controller
These parameters allow the over/undervoltage controllers to be switched ON or OFF.
This may be useful in cases where the utility supply voltage varies more than -15%—
+10% and the application requires a constant speed. If the controllers are ON, they
will change the motor speed in over/undervoltage cases. Overvoltage = faster,
undervoltage = slower.
Over/undervoltage trips may occur when the controllers are not used.
Page 4-28
PI-control Application
7. 1
Response to the reference fault
0 = No response
1 = Warning
2 = Fault, stop mode after fault according to parameter 4.7
3 = Fault, always coasting stop mode after fault
A warning or a fault action and message is generated if the 4—20 mA reference
signal is used and the signal falls below 4 mA. The information can also be
programmed via digital output DO1 and via relay outputs RO1 and RO2.
7. 2
Response to external fault
0 = No response
1 = Warning
2 = Fault, stop mode after fault according to parameter 4.7
3 = Fault, always coasting stop mode after fault
A warning or a fault action and message is generated from the external fault signal
in the digital input DIA3. The information can also be programmed into digital output
DO1 and into relay outputs RO1 and RO2.
7. 3
Phase supervision of the motor
0 = No action
2 = Fault
Phase supervision of the motor ensures that the motor phases have approximately
equal current.
7. 4
Ground fault protection
0 = No action
2 = Fault
Ground fault protection ensures that the sum of the motor phase currents is zero.
The standard overcurrent protection is always working and protects the frequency
converter from ground faults with high current levels.
Parameters 7. 5—7. 9 Motor thermal protection
General
Motor thermal protection is to protect the motor from overheating. The CX/CXL/CXS
drive is capable of supplying higher than nominal current to the motor. If the load
requires this high current there is a risk that the motor will be thermally overloaded.
This is true especially at low frequencies. With low frequencies the cooling effect
of the motor fan is reduced and the capacity of the motor is reduced. If the motor is
equipped with an external fan, the load derating on low speed is small.
Motor thermal protection is based on a calculated model and it uses the output
current of the drive to determine the load on the motor. When the power is turned
on to the drive, the calculated model uses the heatsink temperature to determine
the initial thermal stage for the motor. The calculated model assumes that the
ambient temperature of the motor is 40°C.
Motor thermal protection can be adjusted by setting several parameters. The
thermal current IT specifies the load current above which the motor is overloaded.
This current limit is a function of the output frequency. The curve for IT is set with
Page 4-29
4
PI-control Application
parameters 7. 6, 7. 7 and 7. 9, refer to the figure 4.5-20. The default values of
these parameters are set from the motor nameplate data.
With the output current at IT the thermal stage will reach the nominal value (100%).
The thermal stage changes by the square of the current. With output current at
75% from IT the thermal stage will reach 56% value and with output current at
120% from IT the thermal stage would reach 144% value. The function will trip the
drive (refer par. 7. 5) if the thermal stage will reach a value of 105%. The response
time of the thermal stage is determined with the time constant parameter 7. 8. The
larger the motor, the longer it takes to reach the final temperature.
The thermal stage of the motor can be monitored through the display. Refer to the
table for monitoring items. (User's Manual, table 7.3-1).
CAUTION!
!
7. 5
The calculated model does not protect the motor if the cooling
of the motor is reduced either by blocking the airflow or due
to dust or dirt.
Motor thermal protection
Operation:
0 = Not in use
1 = Warning
2 = Trip function
Tripping and warning will give a display indication with the same message code. If
tripping is selected , the drive will stop and activate the fault stage.
4
Deactivating the protection by setting this parameter to 0, will reset the thermal stage
of the motor to 0%.
7. 6
Motor thermal protection, break point current
The current can be set between 50.0—150.0% x InMotor.
This parameter sets the value for thermal current at frequencies above the break
point on the thermal current curve. Refer to the figure 4.5-20.
The value is set as a percentage of the motor nameplate nominal current, parameter
1. 13, not the drive's nominal output current.
The motor's nominal current is the current which the motor can withstand in direct
on-line use without being overheated.
If parameter 1. 13 is adjusted, this parameter is automatically restored to the default
value.
Setting this parameter (or parameter 1. 13) does not affect the maximum output
current of the drive. Parameter 1. 7 alone determines the maximum output current
of the drive.
7. 7
Motor thermal protection, zero frequency current
The current can be set between 10.0—150.0% x InMotor. This parameter sets the
value for thermal current at zero frequency. Refer to the figure 4.5-20.
The default value is set assuming that there is no external fan cooling the motor. If
an external fan is used this parameter can be set to 90% (or higher).
Page 4-30
PI-control Application
The value is set as a percentage
value of the motor's nameplate
nominal current, parameter 1. 13,
not the drive's nominal output
current. The motor's nominal
current is the current which the
motor can stand in direct on-line use
without being overheated.
If you change the parameter 1. 13
this parameter is automatically
restored to the default value.
Setting this parameter (or
parameter 1. 13) does not affect to
the maximum output current of the
drive. Parameter 1. 7 alone
determines the maximum output
current of the drive.
.
7. 8
I
Current
limit
par. 1. 7
Overload area
IT
Par. 7. 6
Par. 7. 7
f [Hz]
Par. 7. 9
UMCH7_91
Figure 4.5-20 Motor thermal current IT curve
Motor thermal protection, time constant
This time can be set between 0.5—300 minutes.
This is the thermal time constant of the motor. The larger the motor the greater
the time constant. The time constant is defined as the time that it takes the calculated
thermal stage to reach 63% of its final value.
The motor thermal time is specific to a motor design and it varies between different
motor manufacturers.
The default value for the time constant is calculated based on the motor nameplate
data from parameters 1. 12 and 1. 13. If either of these parameters is reset, then
this parameter is set to default value.
If the motor's t6 -time is known (given by the motor manufacturer) the time constant
parameter could be set based on t6 -time. As a rule of thumb, the motor thermal
time constant in minutes equals to 2xt6 (t6 in seconds is the time a motor can safely
operate at six times the rated current). If the drive is stopped the time constant is
internally increased to three times the set parameter value. The cooling in the stop
stage is based on convection with an increased time constant.
7. 9
Motor thermal protection, break point frequency
This frequency can be set between 10—500 Hz.
This is the frequency break point of the thermal current curve. With frequencies
above this point, the thermal capacity of the motor is assumed to be constant. Refer
to figure 4.5-20.
The default value is based on the motor's nameplate data, parameter 1. 11. It is 35
Hz for a 50 Hz motor and 42 Hz for a 60 Hz motor. More generally it is 70% of the
frequency at the field weakening point (parameter 6. 3). Changing either parameter
1. 11 or 6. 3 will restore this parameter to its default value.
Page 4-31
4
PI-control Application
Motor temperature
Trip area
105%
Motor
current
Trip/warning
par. 7. 5
I/IT
Time constant T*)
Motor temperature Θ = (I/IT)2 x (1-e-t/T)
Time
*) Changed with motor size and
adjusted with parameter 7. 8
UMCH7_92
Figure 4.5-21 Calculating motor temperature.
Parameters 7. 10— 7. 13, Stall protection
General
Motor stall protection protects the motor from short time overload situations like a
stalled shaft. The reaction time of stall protection can be set shorter than with motor
thermal protection. The stall state is defined with two parameters, 7.11. Stall Current
and 7.13. Stall Frequency. If the current is higher than the set limit and output
frequency is lower than the set limit the stall state is true. There is no true detection
of shaft rotation. Stall protection is a type of overcurrent protection.
4
7. 10
Stall protection
Operation:
0 = Not in use
1 = Warning
2 = Trip function
Tripping and warning will give a display indication with the same message code. If
tripping is set on, the drive will stop and activate the fault stage. Setting the parameter
to 0 will deactivate the protection and will reset the stall time counter to zero.
7. 11
Stall current limit
I
The current can be set between
0.0—200% x InMotor.
In the stall stage the current has to
be above this limit. Refer to the
figure 4.5-22. The value is set as
a percentage of the motor's nameplate nominal current, parameter
1.13, motor's nominal current. If
parameter 1.13 is adjusted, this
parameter is automatically
restored to its default value.
Figure 4.5-22 Setting the stall
characteristics.
Page 4-32
Stall area
Par. 7. 11
f [Hz]
Par. 7. 13
UMCH7_11
PI-control Application
7. 12
Stall time
The time can be set between 2.0—120 s.
This is the maximum allowed time for a stall stage. There is an internal up/down
counter to count the stall time. Refer to figure 4.5-23.
If the stall time counter value goes above this limit the protection will cause a trip
(refer to parameter 7. 10).
7. 13
Maximum stall frequency
The frequency can be set between
1—fmax (par. 1. 2).
In the stall state, the output
frequency has to be smaller than
this limit. Refer to figure 4.5-22.
Stall time counter
Trip area
Par. 7. 12
Trip/warning
par. 7. 10
UMCH7_12
Time
Figure 4.5-23 Counting the stall time.
Stall
No stall
Parameters 7. 14— 7. 17, Underload protection
General
The purpose of motor underload protection is to ensure that there is load on the
motor while the drive is running. If the motor load is reduced, there might be a
problem in the process, e.g. broken belt or dry pump.
Motor underload protection can be adjusted by setting the underload curve with
parameters 7. 15 and 7. 16. The underload curve is a squared curve set between
zero frequency and the field weakening point. The protection is not active below 5
Hz (the underload counter value is stopped). Refer to the figure 4.5-24.
The torque values for setting the underload curve are set with percentage values
which refer to the nominal torque of the motor. The motor's nameplate data,
parameter 1. 13, the motor's nominal current and the drive's nominal current ICT
are used to find the scaling ratio for the internal torque value. If other than a standard
motor is used with the drive, the accuracy of the torque calculation is decreased.
7. 14
Underload protection
Operation:
0 = Not in use
1 = Warning
2 = Fault
Tripping and warning will give a display indication with the same message code. If
tripping is set active the drive will stop and activate the fault stage.
Deactivating the protection, by setting this parameter to 0, will reset the underload
time counter to zero.
Page 4-33
4
PI-control Application
7. 15
Underload protection, field weakening area load
Torque limit can be set between
20.0—150 % x TnMotor.
This parameter is the value for the
minimum allowed torque when the
output frequency is above the field
weakening point.
Refer to the figure 4.5-24.
If parameter 1. 13 is adjusted, this
parameter is automatically
restored to its default value.
Torque
Par. 7. 15
Par. 7. 16
Underload area
ff [Hz]
Figure 4.5-24 Setting of minimum
load.
7. 16
Field weakening
point par. 6. 3
5 Hz
ChCH7_15
Underload protection, zero frequency load
Torque limit can be set between 10.0—150 % x TnMotor.
This parameter is the value for the minimum allowed torque with zero frequency.
Refer to the figure 4.5-24. If parameter 1. 13 is adjusted this parameter is
automatically restored to its default value.
7. 17
Underload time
This time can be set between
2.0—600.0 s.
4
This is the maximum allowed time
for an underload state. There is an
internal up/down counter to
accumulate the underload time.
Refer to the figure 4.5-25.
If the underload counter value
goes above this limit, the
protection will cause a trip (refer to
the parameter 7. 14). If the drive is
stopped, the underload counter is
reset to zero.
Underload time counter
Trip area
Par. 7. 17
Trip/warning
par. 7. 14
UMCH7_17
Time
Underl.
No underl.
Figure 4.5-25 Counting the underload time.
8. 1
8. 2
Automatic restart: number of tries
Automatic restart: trial time
The Automatic restart function restarts the drive after the faults selected with
parameters 8. 4—8. 8. The Start function for Automatic restart is selected with
parameter 8. 3. See figure 4.5-26.
Page 4-34
PI-control Application
Number of faults
during t = ttrial
4
ttrial
ttrial
3
2
Par. 8. 1 = 3
ttrial = Par. 8. 2
1
t
Three faults
Four faults
RUN
STOP
UD012K25
Figure 4.5-26 Automatic restart.
Parameter 8. 1 determines how many automatic restarts can be made during the
trial time set by the parameter 8. 2.
The time counting starts from the first autorestart. If the number of restarts does
not exceed the value of the parameter 8. 1 during the trial time, the counting is
cleared after the trial time has elapsed. The next fault starts the counting again.
8. 3
Automatic restart, start function
The parameter defines the start mode:
0 = Start with ramp
1 = Flying start, see parameter 4. 6.
8. 4
4
Automatic restart after undervoltage trip
0 = No automatic restart after undervoltage trip
1 = Automatic restart after undervoltage fault condition returns to the normal
condition (DC-link voltage returns to the normal level)
8. 5
Automatic restart after overvoltage trip
1=
8. 6
0 = No automatic restart after overvoltage trip
Automatic restart after overvoltage fault condition returns to the normal
condition (DC-link voltage returns to the normal level)
Automatic restart after overcurrent trip
0 = No automatic restart after overcurrent trip
1 = Automatic restart after overcurrent faults
8. 7
Automatic restart after reference fault trip
0 = No automatic restart after reference fault trip
1 = Automatic restart after analog current reference signal (4—20 mA)
returns to the normal level (>4 mA)
8. 8
Automatic restart after over-/undertemperature fault trip
0 = No automatic restart after temperature fault trip
1 = Automatic restart after heatsink temperature has returned to its normal
level between -10°C—+75°C.
Page 4-35
PI-control Application
4.6 Panel reference
The PI-control application has an extra reference (r2) for the PI-controller on the panel's reference page. See table 4.6-1.
Reference
number
Reference
name
Range
Step
Function
r1
Frequency
reference
fmin—fmax
0.01 Hz
Reference for panel control and
I/O terminal Source B reference.
r2
PI-controller
reference
0—100%
0.1%
Reference for PI-controller
4.7 Monitoring data
The PI-control application has additional items for monitoring. See table 4.7-1
Number Data name
4
Unit
Description
v1
Output frequency
Hz
Frequency to the motor
v2
Motor speed
rpm
Calculated motor speed
v3
Motor current
A
Measured motor current
v4
Motor torque
%
Calculated actual torque/nominal torque of the unit
v5
Motor power
%
Calculated actual power/nominal power of the unit
v6
Motor voltage
V
Calculated motor voltage
v7
DC-link voltage
V
Measured DC-link voltage
v8
Temperature
°C
Temperature of the heat sink
v9
Operating day counter
DD.dd
Operating days 1, not resettable
v 10
Operating hours,
"trip counter"
HH.hh
Operating hours 2 , can be reset with programmable button #3
v 11
MW-hours
MWh
Total MW-hours, not resettable
v 12
MW-hours,
"trip counter"
MWh
MW-hours, can be reset with programmable
button #4
v 13
Voltage/analog input
V
v 14
Current/analog input
mA
v 15
Digital input status, gr. A
v 16
Digital input status, gr. B
v 17
Digital and relay output
status
v 18
Control program
v 19
Unit nominal power
Hp
Shows the horsepower size of the unit
v 20
PI-controller reference
%
Percent of the maximum reference
v 21
PI-controller actual value
%
Percent of the maximum actual value
v 22
PI-controller error value
%
Percent of the maximum error value
v 23
PI-controller output
Hz
v 24
Motor temperature rise
Voltage at the terminal Vin+ (term. #2)
Current at terminals Iin+ and Iin- (term. #4, #5)
Version number of the control software
%
100%= temperature of motor has risen to nominal
1
Table 4.7-1 Monitored items.
Page 4-36
DD = full days, dd = decimal part of a day
2 HH = full hours, hh = decimal part of an hour
PI-control Application
Notes:
4
Page 4-37
PI-control Application
Notes:
4
Page 4-38
Multi-purpose Control Application
MULTI-PURPOSE CONTROL APPLICATION
(par. 0.1 = 6)
CONTENTS
5 Multi-purpose Control Application ...... 5-1
5.1
5.2
5.3
5.4
General ............................................ 5-2
Control I/O ....................................... 5-2
Control signal logic .......................... 5-3
Parameters Group 1 ........................ 5-4
5.4.1 Parameter table ...................... 5-4
5.4.2 Description of Group1 par....... 5-5
5.5 Special parameters, Groups 2-8 ...... 5-9
5.5.1 Parameter tables ....................... 5-9
5.5.2 Description of Group 2 par. ..... 5-16
5
Page 5-1
Multi-purpose Control Application
5 Multi-purpose Control Application
5.1 General
In the Multi-purpose control application the
frequency reference can be selected from the
analog inputs, the joystick control, the
motorized (digital) potentiometer and a
mathematical function of the analog inputs.
Multi-step speeds and jog speed can also be
selected if digital inputs are programmed for
these functions.
Digital inputs DIA1 and DIA2 are reserved for
Start/stop logic. Digital inputs DIA3—DIB6 are
programmable for multi-step speed select, jog
speed select, motorized (digital potentiometer,
external fault, ramp time select, ramp prohibit,
fault reset and DC-brake command function.
All outputs are freely programmable.
5.2 Control I/O
Reference
potentiometer
5
Terminal
READY
RUN
FAULT
220
VAC
Max.
Signal
Description
1
+10Vref
Reference output
Voltage for a potentiometer, etc.
2
Vin+
Analog input,
voltage (programmable)
Frequency reference
range 0—10 V DC
3
GND
I/O ground
Ground for reference and controls
4
Iin+
Analog input,
Default setting: not used
5
Iin-
current (programmable)
range 0—20 mA
6
+24V
Control voltage output
Voltage for switches, etc. max. 0.1 A
7
GND
I/O ground
Ground for reference and controls
8
DIA1
Start forward
(programmable)
Contact closed = start forward
9
DIA2
Start reverse
(Programmable)
Contact closed = start reverse
10
DIA3
Fault reset
(programmable)
Contact open = no action
Contact closed = fault reset
11
CMA
Common for DIA1—DIA3
Connect to GND or + 24V
12
+24V
Control voltage output
Voltage for switches, (same as #6)
13
GND
I/O ground
Ground for reference and controls
14
DIB4
Jog speed select
(programmable)
Contact open = no action
Contact closed = jog speed
15
DIB5
External fault
(programmable)
Contact open = no fault
Contact closed = fault
16
DIB6
Accel./deceler. time select Contact open = par. 1.3, 1.4 in use
(programmable)
Contact closed = par. 4.3, 4.4 in use
17
CMB
Common for DIB4—DIB6
Connect to GND or + 24V
18
Iout+
Output frequency
Programmable (par. 3. 1)
19
Iout-
Analog output
Range 0—20 mA/RL max. 500 Ω
20
DO1
Digital output
Programmable (par. 3. 6)
READY
Open collector, I<50 mA, V<48 VDC
21
RO1
Relay output 1 Programmable (par. 3. 7)
22
RO1
RUN
23
RO1
24
RO2
Relay output 2 Programmable (par. 3. 8)
25
RO2
FAULT
26
RO2
Figure 5.2-1 Default I/O configuration and connection example of the
Multi-purpose Control Application.
Page 5-2
Multi-purpose Control Application
5.3 Control signal logic
The logic flow of the I/O-control signals and pushbutton signals from the panel is shown in figure
5.3-1.
PARAMETERS
1. 5 Reference selection
1. 6 Jogging speed ref.
RUN
MON
READY
PAR
REF
FAULT
BTNS
RST
PG
Uin+
PROGRAMMABLE
PUSH-BUTTON 2
Joystick
control
Internal
frequency
reference
P
Iin±
Joystick
control
Uin + Iin
Uin - Iin
Iin - Uin
Uin x Iin
DIB5 Up
DIB6 Down
Multi-step
speeds
(If any of
DI_ inputs
are programmed
for this
function)
Motorised
potentiometer
reference
DIB4 Jogging speed selection
Internal
Start/Stop
(programmable)
P
DIA1 Start FWD Programm.
Start/Stop
DIA2 Start REV.
and Reverse
signal logic
DIA3 Fault reset
Internal
reverse
P
>1
Internal
fault reset
(programmable)
DIB5
External fault
(programmable)
DIB6 Accel./deceler. time select
(programmable)
= control line
= signal line
UD012K05
Figure 5.3-1 Control signal logic of the Multipurpose Control Application.
Switch positions shown are based on the factory settings.
Page 5-3
5
Multi-purpose Control Application
5.4 Basic parameters, Group 1
5.4.1 Parameter table
Code Parameter
Range
Step
Default
0— fmax
1 Hz
0 Hz
Custom Description
Page
1. 1
Minimum frequency
1. 2
Maximum frequency
fmin-120/500Hz 1 Hz
60 Hz
1. 3
Acceleration time 1
0.1—3000.0 s
0.1 s
3.0 s
Time from fmin (1. 1) to fmax (1. 2)
5-5
1. 4
Deceleration time 1
0.1—3000.0 s
0.1 s
3.0 s
Time from fmax (1. 2) to fmin (1. 1)
5-5
1. 5
Reference selection
0—9
1
0
3 = Vin - Iin
0 = Vin
4 = Iin - Vin
1 = Iin
2 = Vin + Iin
5 = Vin * Iin
6 = Vin joystick control
7 = Iin joystick control
8 = Signal from internal motor pot.
9 = Signal from internal motor pot.
reset if CX/CXL/CXS is stopped
5-5
1. 6
Jog speed
reference
fmin —fmax
(1. 1) (1. 2)
0.1 Hz
5.0 Hz
1. 7
Current limit
1. 8
V/Hz ratio selection
0—2
1
1. 9
V/Hz optimization
0—1
1. 10
Nominal voltage
of the motor
1. 11
Nominal frequency
of the motor
1. 12
Nominal speed
of the motor
1. 13
Nominal current
of the motor
2.5 x InCX
1. 14
Supply voltage
208—240
5
0.1—2.5 x InCX 0.1 A
1.5 x InCX
5-5
*
5-5
5-6
Output current limit [A] of the unit
5-6
0
0 = Linear
1 = Squared
2 = Programmable V/Hz ratio
5-6
1
0
0 = None
1 = Automatic torque boost
5-8
180—690 V
1V
230 V
380 V
480 V
575 V
CX/CXL/CXS V 3 2
CX/CXL/CXS V 3 4
CX/CXL/CXS V 3 5
CX V 3 6
5-8
30—500 Hz
1 Hz
60 Hz
fn from the nameplate of
the motor
5-8
nn from the nameplate of
the motor
5-8
In from the nameplate of
the motor
5-8
230 V
CX/CXL/CXS V 3 2
5-8
380—440
380 V
CX/CXL/CXS V 3 4
380—500
480 V
CX/CXL/CXS V 3 5
525—690
575 V
CX V 3 6
1—20000 rpm 1 rpm 1720 rpm
**
0.1 A
InCX
1. 15
Parameter conceal
0—1
1
0
Visibility of the parameters:
0 = All parameter groups visible
1 = Only group 1 is visible
5-8
1. 16
Parameter value lock
0—1
1
0
Disables parameter changes:
0 = Changes enabled
1 = Changes disabled
5-8
Note!
= Parameter value can be changed
only when the drive is stopped.
Table 5.4-1 Group 1 basic parameters.
Page 5-4
* If 1. 2 >motor synchr. speed, check suitability for
motor and drive system.
Selecting 120/500 Hz range see page 5-5.
** Default value for a four pole motor and a
nominal size drive.
Multi-purpose Control Application
5.4.2 Description of Group 1 parameters
1. 1, 1. 2 Minimum / maximum frequency
Defines frequency limits of the drive.
The default maximum value for parameters 1. 1 and 1. 2 is 120 Hz. By setting 1. 2
= 120 Hz when the drive is stopped (RUN indicator not lit) parameters 1. 1 and 1. 2
are changed to 500 Hz. At the same time the panel reference resolution is changed
from 0.01 Hz to 0.1 Hz.
Changing the max. value from 500 Hz to 120 Hz is done by setting parameter
1. 2 = 119 Hz when the drive is stopped.
1. 3, 1. 4 Acceleration time 1, deceleration time 1:
These limits correspond to the time required for the output frequency to
accelerate from the set minimum frequency (par. 1. 1) to the set maximum
frequency (par. 1. 2).
1. 5
Reference selection
0
1
2
3
4
5
6
Analog voltage reference from terminals 2—3, e.g. a potentiometer
Analog current reference trom terminals 4—5, e.g. a transducer.
Reference is formed by adding the values of the analog inputs
Reference is formed by subtracting the voltage input (Vin) value from the
current input (Iin) value.
Reference is formed by subtracting the current input (Iin ) value from the
voltage input (Vin) value.
Reference is formed by multiplying the values of the analog inputs
Joystick control from the voltage input (Vin).
Signal range
Max reverse
speed
Direction change
Max forward
speed
0—10 V
Custom
0V
Par. 2. 7 x 10V
+10 V
Par. 2. 8 x 10 V
-10 V—+10 V
-10 V
5V
In the middle of
custom range
0V
Warning!
!
7
+10 V
Use only -10V—+10 V signal range. If a custom or 0—10 V signal
range is used, the drive will run at the max. reverse speed if the
reference signal is lost.
5
Joystick control from the current input (Iin).
Signal range
0—20 mA
Custom
4—20 mA
Warning!
!
Max reverse
speed
Direction change
0 mA
10 mA
Par. 2. 13 x 20 mA In the middle of
custom range
4 mA
12 mA
Max forward
speed
20 mA
Par. 2. 14 x 20 mA
20 mA
Use only 4—20 mA signal range. If a custom or 0—20 mA signal range
is used, the drive will run at the max. reverse speed if the control signal
is lost. Set the reference fault (par. 7. 2) active when the 4—20 mA
range is used, then the drive will stop with a reference fault if the
reference signal is lost.
Page 5-5
Multi-purpose Control Application
Note! When joystick control is used, the direction control is generated from the
joystick reference signal. See figure 5.4-1.
Analog input scaling, parameters 2. 16—2. 19 are not used when joystick
control is used.
Fout
fout [Hz]
Fout[Hz]
fout
Fmax
(par 1.2)
Fmax
(par 1.2)
Fmin.
(par 1.1)
-10V
VUin
in
Vin
-10V
+10V
+10V
Fmin.
(par 1.1)
Uin
hystereesi +/-2% (+/-0,2 V)
Fmax
(par 1.2)
Fmax
(par 1.2)
If minimum frequency (par 1. 1) >0,
hysteresis is ± 2% at reversing point.
If minimum frequency (par 1. 1) = 0,
there is no hysteresis at reversing point.
Fig. 5.4-1 Joystick control Vin signal -10 V—+10 V.
1. 6
8
Reference value is changed with digital input signals DIA4 and DIA5.
- switch in DIA3 closed = frequency reference increases
- switch in DIA4 closed = frequency reference decreases
Speed of the reference change can be set with the parameter 2. 20.
9
Same as setting 8 but the reference value is set to the minimum frequency
(par. 1. 1) each time the SV9000 is stopped.
When the value of parameter 1. 5 is set to 8 or 9, the value of parameters
2. 4 and 2. 5 are automatically set to 11.
Jog speed reference
Parameter value defines the jog speed selected with the digital input
1. 7
5
Current limit
This parameter determines the maximum motor current that the CX/CXL/CXS will
provide short term.
1. 8
V/Hz ratio selection
Linear:
0
The voltage of the motor changes linearly with the frequency in the
constant flux area from 0 Hz to the field weakening point (par. 6. 3)
where a constant voltage (nominal value) is also supplied to the motor.
See figure 5.4.-2. A linear V/Hz ratio should be used in constant torque
applications.
This default setting should be used if there is no special
requirement for another setting.
Page 5-6
Multi-purpose Control Application
Squared:
1
The voltage of the motor changes following a squared curve form
with the frequency in the area from 0 Hz to the field weakening
point (par. 6. 3) where the nominal voltage is also supplied to
the motor. See figure 5.4.-2.
The motor runs undermagnetized below the field weakening point
and produces less torque and electromechanical noise. A squared
V/Hz ratio can be used in applications where the torque demand of
the load is proportional to the square of the speed, e.g. in centrifugal
fans and pumps.
V [V]
Vn
Field weakening point
Default: Nominal voltage of
the motor
Linear
Default: Nominal
frequency of the
motor
Squared
f [Hz]
Figure 5.4.-2 Linear and squared V/Hz curves.
Programm. The V/Hz curve can be programmed with three different points.
V/Hz curve The parameters for programming are explained in chapter 1.5.2.
2
A programmable V/Hz curve can be used if the standard settings do
not satisfy the needs of the application. See figure 5.4.-3.
Vn
Parameter 6.4
U[V]
5
Parameter 6.6
Default 10%
Parameter 6.7
Default 1.3 %
Parameter 6.5
(Default 5 Hz)
Parameter 6.3
f[Hz]
Figure 5.4-3 Programmable V/Hz curve.
Page 5-7
Multi-purpose Control Application
1. 9
V/Hz optimization
Automatic
torque
boost
The voltage to the motor changes automatically which makes the
motor produce sufficient torque to start and run at low frequencies. The
voltage increase depends on the motor type and horsepower.
Automatic torque boost can be used in applications where starting
torque due to starting friction is high, e.g. in conveyors.
NOTE!
!
1. 10
In high torque - low speed applications - it is likely the motor will
overheat.
If the motor has to run prolonged time under these conditions,
special attention must be paid to cooling the motor. Use external
cooling for the motor if the temperature rise is too high.
Nominal voltage of the motor
Find this value Vn from the nameplate of the motor.
This parameter sets the voltage at the field weakening point, parameter 6. 4, to
100% x Vnmotor.
1. 11
Nominal frequency of the motor
Find the nominal frequency fn from the nameplate of the motor.
This parameter sets the frequency of the field weakening point, parameter 6. 3, to
the same value.
1. 12
Nominal speed of the motor
Find this value nn from the nameplate of the motor.
1. 13
Nominal current of the motor
Find the value In from the nameplate of the motor.
The internal motor protection function uses this value as a reference value.
1. 14
Supply voltage
Set parameter value according to the nominal voltage of the supply.
Values are pre-defined for CX/CXL/CXS V 3 2, CX/CXL/CXS V 3 4, CX/CXL/CXS
V 3 5 and CX V 3 6. See table 5.4-1.
1. 15
Parameter conceal
Defines which parameter groups are available:
0 = all parameter groups are visible
1 = only group 1 is visible
5
1. 16
Parameter value lock
Defines access to the changes of the parameter values:
0 = parameter value changes enabled
1 = parameter value changes disabled
To adjust more of the functions of the Multi-purpose application, see chapter 5.5 to modify the
parameters of Groups 2—8.
Page 5-8
Multi-purpose Control Application
5.5 Special parameters, Groups 2—8
5.5.1 Parameter tables
Group 2, Input signal parameters
Code Parameter
Range
Step
Default
Custom Description
Page
DIA1
DIA2
Start reverse
Reverse
Run enable
Stop pulse
2. 1
Start/Stop logic
selection
0—3
1
0
0 = Start forward
1= Start/Stop
2 = Start/Stop
3 = Start pulse
2. 2
DIA3 function
(terminal 10)
0—9
1
7
0 = Not used
5-17
1 = Ext. fault, closing contact
2 = External fault, opening contact
3 = Run enable
4 = Acc./dec. time selection
5 = Reverse
6 = Jog speed
7 = Fault reset
8 = Acc./dec. operation prohibit
9 = DC-braking command
2. 3
DIB4 function
(terminal 14)
0—10
1
6
0 = Not used
5-18
1 = Ext. fault, closing contact
2 = External fault, opening contact
3 = Run enable
4 = Acc./dec. time selection
5 = Reverse
6 = Jog speed
7 = Fault reset
8 = Acc./dec. operation prohibit
9 = DC-braking command
10 = Multi-Step speed select 1
2. 4
DIB5 function
(terminal 15)
0—11
1
1
0 = Not used
5-18
1 = Ext. fault, closing contact
2 = External fault, opening contact
3 = Run enable
4 = Acc./dec. time selection
5 = Reverse
6 = Jog speed
7 = Fault reset
8 = Acc./dec. operation prohibit
9 = DC-braking command
10 = Multi-Step speed select 2
11 = Motorized pot. speed up
2. 5
DIB6 function
(terminal 16)
0—11
1
4
0 = Not used
5-18
1 = Ext. fault, closing contact
2 = External fault, opening contact
3 = Run enable
4 = Acc./dec. time selection
5 = Reverse
6 = Jog speed
7 = Fault reset
8 = Acc./dec. operation prohibit
9 = DC-braking command
10 = Multi-Step speed select 3
11 = Motorized pot. speed down
2. 6
Note!
Vin signal range
0—2
1
0
5-16
0 = 0—10 V
5-19
1 = Custom setting range
2 = -10—+10 V (can be used only
with Joystick control)
= Parameter value can be changed only when the drive is stopped.
Page 5-9
5
Multi-purpose Control Application
Code Parameter
Range
Step
Default Custom Description
Page
2. 7
Vin custom setting min. 0.00-100.00% 0.01%
2. 8
Vin custom setting max. 0.00-100.00% 0.01% 100.00%
2. 9
Vin signal inversion
2. 10
Vin signal filter time
2. 11
Iin signal range
2. 12
Iin custom setting minim. 0.00-100.00% 0.01%
0.00%
5-20
2. 13
Iin custom setting maxim.0.00-100.00% 0.01%
100.00%
5-20
2. 14
Iin signal inversion
2. 15
Iin signal filter time
2. 16
Vin minimum scaling
-320.00%—
+320.00 %
2. 17
Vin maximum scaling
2. 18
0—1
1
0.00—10.00 s 0.01 s
0—2
0—1
0.00%
0
0.10 s
1
0
1
5-19
0 = Not inverted
1 = Inverted
5-19
0 = No filtering
5-19
0 = 0—20 mA
1 = 4—20 mA
2 = Custom setting range
5-19
0 = Not inverted
1 = Inverted
5-20
0.10 s
0 = No filtering
5-20
0.01
0.00%
0% = no minimum scaling
5-20
-320.00%—
+320.00 %
0.01
100.00%
100% = no maximum scaling
5-20
Iin minimum scaling
-320.00%—
+320.00%
0.01
0.00%
.
0% = no minimum scaling
5-20
2. 19
Iin maximum scaling
-320.00%—
+320.00 %
0.01
100.00%
100% = no maximum scaling
5-20
2. 20
Free analog input,
signal selection
0—2
1
0
0 = Not use
1 = Vin (analog voltage input)
2 = Iin (analog current input)
5-21
2. 21
Free analog input,
function
0—4
1
0
0 = No function
5-21
1 = Reduces current limit (par. 1.7)
2 = Reduces DC-braking current
3 = Reduces acc. and decel. times
4 = Reduces torque supervis. limit
2. 22
Motorized digital
0.1—2000.0
potentiometer ramp time
Hz/s
0.1
Hz/s
10.0
Hz/s
0.01 —10.00 s 0.01 s
0
5-19
5-22
Group 3, Output and supervision parameters
Code Parameter
Range
Step
Default Custom Description
0—7
1
1
Page
3. 1
Analog output function
3. 2
Analog output filter time
0.00-10.00s
0.01 s
1.00 s
3. 3
Analog output inversion
0—1
1
0
0 = Not inverted
1 = Inverted
5-23
3. 4
Analog output minimum
0—1
1
0
0 = 0 mA
1 = 4 mA
5-23
3. 5
Analog output scale
10—1000%
1%
100%
5
Note!
Page 5-10
0 = Not used
Scale 100%
5-23
1 = O/P frequency (0—fmax)
2 = Motor speed (0—max. speed)
3 = O/P current (0—2.0 x InCX)
4 = Motor torque (0—2 x TnMot)
5 = Motor power (0—2 x PnMot)
6 = Motor voltage (0—100% x VnMot)
7 = DC-link volt. (0—1000 V)
5-23
= Parameter value can be changed only when the drive is stopped.
5-23
Multi-purpose Control Application
Code Parameter
3. 6
Digital output function
Range
Step
0—21
1
Default Custom Description
1
Page
0 = Not used
5-24
1 = Ready
2 = Run
3 = Fault
4 = Fault inverted
5 = CX overheat warning
6 = External fault or warning
7 = Reference fault or warning
8 = Warning
9 = Reversed
10 = Jog speed selected
11 = At speed
12 = Motor regulator activated
13 = Output freq. limit superv. 1
14 = Output freq. limit superv. 2
15 = Torque limit supervision
16 = Reference limit supervision
17 = External brake control
18 = Control from I/O terminals
19 = Drive temperature limit
supervision
20 = Unrequested rotation direction
21 = External brake control inverted
3. 7
Relay output 1 function
0—21
1
2
As parameter 3. 6
5-24
3. 8
Relay output 2 function
0—21
1
3
As parameter 3. 6
5-24
3. 9
Output freq. limit 1
supervision function
0—2
1
0
0 = No
1 = Low limit
2 = High limit
5-24
3. 10
Output freq. limit 1
supervision value
3. 11
Output freq. limit 2
supervision function
3. 12
Output freq. limit 2
supervision value
3. 13
Torque limit
supervision function
3. 14
Torque limit
supervision value
3. 15
Reference limit
supervision function
3. 16
Reference limit
supervision value
3. 17
Extern. brake Off-delay
3. 18
Extern. brake On-delay
3. 19
Drive
temperature limit
supervision function
3. 20
Drive
temperature limit value
Note!
0.0—fmax
(par. 1. 2)
0—2
0.0—fmax
(par. 1. 2)
0—2
0.1 Hz 0.0 Hz
1
0.0—fmax
(par. 1. 2)
0 = No
1 = Low limit
2 = High limit
0.1 Hz 0.0 Hz
1
-200.0—200.0% 0.1%
xTnCX
0—2
0
5-24
1
0
5-24
0 = No
1 = Low limit
2 = High limit
100.0%
0
5-24
5-25
5-25
0 = No
1 = Low limit
2 = High limit
5-25
0.1 Hz 0.0 Hz
5-25
0.0—100.0 s
0.1 s
0.5 s
5-25
0.0—100.0 s
0.1 s
1.5 s
5-25
0—2
1
0
-10—+75°C
1°C
+40°C
0 = No
1 = Low limit
2 = High limit
5-25
5-25
= Parameter value can be changed only when the drive is stopped.
Page 5-11
5
Multi-purpose Control Application
Code Parameter
Range
Step
0—7
1
3. 21
I/O-expander board (opt.)
analog output content
3. 22
I/O-expander board (opt.) 0.00—10.00 s 0.01
analog output filter time
3. 23
I/O-expander board (opt.)
analog output inversion
0—1
3. 24
I/O-expander board (opt.)
analog output minimum
3. 25
I/O-expander board (opt.)
analog output scale
Default Custom Description
Page
3
See parameter 3. 1
5-23
1.00 s
See parameter 3. 2
5-23
1
0
See parameter 3. 3
5-23
0—1
1
0
See parameter 3. 4
5-23
10—1000%
1
100%
See parameter 3. 5
5-23
Group 4, Drive control parameters
Code Parameter
5
Range
Step
Default
Custom Description
Page
4. 1
Acc./Dec. ramp 1 shape 0.0—10.0 s
0.1 s
0.0 s
0 = Linear
>0 = S-curve acc./dec. time
5-26
4. 2
Acc./Dec. ramp 2 shape 0.0—10.0 s
0.1 s
0.0 s
0 = Linear
>0 = S-curve acc./dec. time
5-26
4. 3
Acceleration time 2
0.1—3000.0 s
0.1 s
10.0 s
5-27
4. 4
Deceleration time 2
0.1—3000.0 s
0.1 s
10.0 s
5-27
4. 5
Brake chopper
0—2
1
0
0 = Brake chopper not in use
1 = Brake chopper in use
2 = External brake chopper
5-27
4. 6
Start function
0—1
1
0
0 = Ramp
1 = Flying start
5-27
4. 7
Stop function
0—1
1
0
0 = Coasting
1 = Ramp
5-27
4. 8
DC-braking current
0.15—1.5
x InCX (A)
0.1 A
4. 9
DC-braking time at Stop 0.00-250.00s 0.01 s
4. 10
Execute frequency of DC- 0.1—10.0 Hz
brake during ramp Stop
0.1 Hz 1.5 Hz
4. 11
DC-brake time at Start
0.00-25.00 s
0.01 s
4. 12
Multi-step speed
reference 1
fmin—fmax
(1. 1) (1. 2)
0.1 Hz 10.0 Hz
5-29
4. 13
Multi-step speed
reference 2
fmin—fmax
(1. 1) (1. 2)
0.1 Hz 15.0 Hz
5-29
4. 14
Multi-step speed
reference 3
fmin—fmax
(1. 1) (1. 2)
0.1 Hz 20.0 Hz
5-29
4. 15
Multi-step speed
reference 4
fmin—fmax
(1. 1) (1. 2)
0.1 Hz 25.0 Hz
5-29
4. 16
Multi-step speed
reference 5
fmin—fmax
(1. 1) (1. 2)
0.1 Hz 30.0 Hz
5-29
4. 17
Multi-step speed
reference 6
fmin—fmax
(1. 1) (1. 2)
0.1 Hz 40.0 Hz
5-29
4. 18
Multi-step speed
reference 7
fmin—fmax
(1. 1) (1. 2)
0.1 Hz 50.0 Hz
5-29
Note!
Page 5-12
0.5 x InCX
0.00 s
0.00 s
5-27
0 = DC-brake is off at Stop
5-28
5-29
0 = DC-brake is off at Start
= Parameter value can be changed only when the drive is stopped.
5-29
Multi-purpose Control Application
Group 5, Prohibit frequency parameters
Code Parameter
Range
Step
Default
5. 1
Prohibit frequency
range 1 low limit
fmin—
par. 5. 2
0.1 Hz
0.0 Hz
5. 2
Prohibit frequency
range 1 high limit
fmin—fmax
(1. 1) (1. 2)
0.1 Hz
0.0 Hz
5. 3
Prohibit frequency
range 2 low limit
fmin—
par. 5. 4
0.1 Hz
0.0 Hz
5. 4
Prohibit frequency
range 2 high limit
fmin—fmax
(1. 1) (1. 2)
0.1 Hz
0.0 Hz
5. 5
Prohibit frequency
range 3 low limit
fmin—
par. 5. 6
0.1 Hz
0.0 Hz
5. 6
Prohibit frequency
range 3 high limit
fmin—fmax
(1. 1) (1. 2)
0.1 Hz
0.0 Hz
Custom Description
Page
5-29
0 = Prohibit range 1 is off
5-29
5-29
0 = Prohibit range 2 is off
5-29
5-29
0 = Prohibit range 3 is off
5-29
Group 6, Motor control parameters
Code Parameter
6. 1
Motor control mode
6. 2
Switching frequency
6. 3
Field weakening point
6. 4
Range
Step
Default
0—1
1
0
1.0—16.0 kHz 0.1 kHz 10/3.6kHz
Custom Description
Page
0 = Frequency control
1 = Speed control
5-29
Depends on Hp rating
5-30
30—500 Hz
1 Hz
Param.
1. 11
5-30
Voltage at field
weakening point
15—200%
x Vnmot
1%
100%
5-30
6. 5
V/Hz curve mid
point frequency
0.0—fmax
0.1 Hz
0.0 Hz
5-30
6. 6
V/Hz curve mid
point voltage
0.00—100.00% 0.01% 0.00 %
x Vnmot
5-30
6. 7
Output voltage at
zero frequency
0.00—100.00% 0.01% 0.00 %
x Vnmot
5-30
6. 8
Overvoltage controller
0—1
1
1
0 = Controller is not operating
1 = Controller is operating
5-31
6. 9
Undervoltage controller
0—1
1
1
0 = Controller is not operating
1 = Controller is operating
5-31
Note!
5
= Parameter value can be changed only when the drive is stopped.
Page 5-13
Multi-purpose Control Application
Group 7, Protections
Code Parameter
5
Range
Step
Default Custom Description
Page
7. 1
Response to
reference fault
0—2
1
0
0 = No action
1 = Warning
2 = Fault, stop according to
par 4.7
3 = Fault, always coasting stop
5-31
7. 2
Response to
external fault
0—2
1
2
0 = No action
1 = Warning
2 = Fault, stop according to
par 4.7
3 = Fault, always coasting stop
5-31
7. 3
Phase supervision of
the motor
0—2
2
2
0 = No action
2 = Fault
5-31
7. 4
Ground fault protection
0—2
2
2
0 = No action
2 = Fault
5-31
7. 5
Motor thermal protection
0—2
1
2
0 = No action
1 = Warning
2 = Fault
5-32
7. 6
Motor thermal protection 50.0—150.0 % 1.0 % 100.0%
break point current
x InMOTOR
5-32
7. 7
Motor thermal protection
zero frequency current
5.0—150.0%
x InMOTOR
1.0 %
45.0%
5-33
7. 8
Motor thermal protection
time constant
0.5—300.0
minutes
0.5
min.
17.0
min.
7. 9
Motor thermal protection
break point frequency
10—500 Hz
1 Hz
35 Hz
7. 10
Stall protection
0—2
1
1
7. 11
Stall current limit
5.0—200.0%
x InMOTOR
1.0% 130.0%
5-35
7. 12
Stall time
2.0—120.0 s
1.0 s
15.0 s
5-35
7. 13
Maximum stall frequency
1—fmax
1 Hz
25 Hz
5-35
7. 14
Underload protection
0—2
1
0
7. 15
Underload prot., field
weakening area load
7. 16
Underload protection,
zero frequency load
7. 17
Underload time
Page 5-14
10.0—150.0 % 1.0% 50.0%
x TnMOTOR
5.0—150.0% 1.0%
x TnMOTOR
2.0—600.0 s
1.0 s
Default value is set according
to motor nominal current
5-33
5-34
0 = No action
1 = Warning
2 = Fault
0 = No action
1 = Warning
2 = Fault
5-34
5-36
5-36
10.0%
5-36
20.0s
5-36
Multi-purpose Control Application
Group 8, Autorestart parameters
Code Parameter
Range
Step
Default
Custom Description
8. 1
Automatic restart:
number of tries
0—10
1
0
8. 2
Automatic restart:multi
1—6000 s
attempt maximum trial time
1s
30 s
8. 3
Automatic restart:
start function
0—1
1
0
0 = Ramp
1 = Flying start
5-38
8. 4
Automatic restart of
undervoltage
0—1
1
0
0 = No
1 = Yes
5-38
8. 5
Automatic restart of
overvoltage
0—1
1
0
0 = No
1 = Yes
5-38
8. 6
Automatic restart of
overcurrent
0—1
1
0
0 = No
1 = Yes
5-38
8. 7
Automatic restart of
reference fault
0—1
1
0
0 = No
1 = Yes
5-38
8. 8
Automatic restart after
over/undertemperature
fault
0—1
1
0
0 = No
1 = Yes
5-38
0 = not in use
Page
5-37
5-37
Table 5.5-1 Special parameters, Groups 2—8.
5
Page 5-15
Multi-purpose Control Application
5.5.2 Description of Groups 2—8 parameters
2. 1
Start/Stop logic selection
0:
DIA1: closed contact = start forward
DIA2: closed contact = start reverse,
See figure 5.5-1.
FWD
Output
frequency
Stop function
(par 4. 7)
= coasting
t
REV
DIA1
DIA2
1
2
UD009K09
3
Figure 5.5-1 Start forward/Start reverse.
1
The first selected direction has the highest priority
2
When DIA1 contact opens, the direction of rotation starts to change
3
If Start forward (DIA1) and Start reverse (DIA2) signals are active
simultaneously, the Start forward signal (DIA1) has priority.
1:
DIA1: closed contact = start
DIA2: closed contact = reverse
See figure 5.5-2.
FWD
Output
frequency
open contact = stop
open contact = forward
Stop function
(par 4. 7
= coasting
t
5
REV
DIA1
DIA2
Figure 5.5-2 Start, Stop,reverse.
Page 5-16
UD012K10
Multi-purpose Control Application
2:
DIA1: closed contact = start
DIA2: closed contact = start enabled
3:
3-wire connection (pulse control):
open contact = stop
open contact = start disabled
DIA1: closed contact = start pulse
DIA2: closed contact = stop pulse
(DIA3 can be programmed for reverse command)
See figure 5.5-3.
FWD
Output
frequency
Stop function
(par 4. 7)
= coasting
If Start and Stop pulses are
simultaneous the Stop pulse
overrides the Start pulse
t
REV
DIA1
Start
min 50 ms
UD009K11
DIA2
Stop
Figure 5.5-3 Start pulse /Stop pulse.
2. 2
DIA3 function
1: External fault, closing contact = Fault is shown and motor is stopped when
the input is active
2: External fault, opening contact = Fault is shown and motor is stopped when
the input is not active
3: Run enable
contact open
contact closed
= Start of the motor disabled
= Start of the motor enabled
4: Acc. / Dec
time select.
contact open
contact closed
= Acceleration/Deceleration time 1 selected
= Acceleration/Deceleration time 2 selected
5: Reverse
contact open
contact closed
= Forward
= Reverse
6: Jog speed.
contact closed
= Jog speed selected for freq. reference
7: Fault reset
contact closed
= Resets all faults
8: Acc./Dec.
operation
prohibited
contact closed
= Stops acceleration or deceleration until
the contact is opened
contact closed
= In Stop mode, the DC-braking operates until
the contact is opened, see figure 5.5-4.
DC-brake current is set with parameter 4. 8.
9: DC-braking
command
Can be used for reversing if
parameter 2. 1 has value 3
Page 5-17
5
Multi-purpose Control Application
Output
frequency
Param. 4. 10
t
DIA3
RUN
STOP
UD012K32
a) DIA3 as DC-brake command input and stop-mode =
Ramp
t
DIA3
RUN
STOP
UD012K32
b) DIA3 as DC-brake command input and stop-mode =
Coasting
Figure 5.5-4 DIA3 as DC-brake command input:
2. 3
a) Stop-mode = Ramp,
b) Stop-mode = Coasting.
DIB4 function
Selections are same as in 2. 2 except :
10: Multi-Step
contact closed = Selection 1 active
speed select 1
2. 4
DIB5 function
Selections are same as in 2. 2 except :
10: Multi-Step
contact closed = Selection 2 active
speed select 2
5
11: Motor pot.
UP
2. 5
contact closed= Reference decreases until the contact is
opened
DIB6 function
Selections are same as in 2. 2 except :
Page 5-18
10: Multi-Step
speed select 3
contact closed= Selection 3 active
11: Motor pot.
DOWN
contact closed= Reference decreases until the contact is
opened
Multi-purpose Control Application
2. 6
Vin signal range
0 = Signal range 0—+10 V
1 = Custom setting range from custom minimum (par. 2. 4) to custom
maximum (par. 2. 5)
2 = Signal range -10—+10 V , can be used only with Joystick control
2. 7
Vin custom setting minimum/maximum
2. 8
With these parameters, Vin can be set for any input signal span within 0—10 V.
Minimum setting: Set the Vin signal to its minimum level, select parameter 2. 7,
press the Enter button
Maximum setting: Set the Vin signal to its maximum level, select parameter 2. 8,
press the Enter button
Note!
These parameters can only be set with this procedure (not with arrow up/arrow
down buttons)
2. 9
Vin signal inversion
Parameter 2. 9 = 0, no inversion
of analog Vin signal.
Parameter 2. 9 = 1, inversion
of analog Vin signal.
2. 10
Vin signal filter time
Filters out disturbances from the
incoming analog Vin signal.
A long filtering time makes regulation response slower.
See figure 5.5-5.
%
Unfiltered signal
100%
Filtered signal
63%
t [s]
Par. 2. 10
Figure 5.5-5 Vin signal filtering.
2. 11
UD009K37
Analog input Iin signal range
0 = 0—20 mA
1 = 4—20 mA
2 = Custom signal span
Page 5-19
5
Multi-purpose Control Application
2. 12
2. 13
Analog input Iin custom
setting minimum/maximum
With these parameters, the
scaling of the input current
signal (Iin) range can be set
between 0—20 mA.
Minimum setting:
Set the Iin signal to its minimum
level, select parameter 2. 12,
press the Enter button
Maximum setting:
Set the Iin signal to its maximum
level, select parameter 2. 13,
press the Enter button
Note!These parameters can only
be set with this procedure (not
with arrow up/arrow
down buttons)
%
Unfiltered signal
2. 14
Analog input Iin inversion
Parameter 2. 14 = 0, no inversion
of Iin input
Parameter 2. 14 = 1, inversion of
Iin input.
2. 15
Filtered signal
63%
Analog input Iin filter time
Filters out disturbances from the
incoming analog Iin signal.
A long filtering time makes
regulation response slower.
See figure 5.5-6.
5
100%
t [s]
Par. 2. 15
Figure 5.5-6 Analog input Iin filter time.
2. 16
Vin signal minimum scaling
Sets the minimum scaling point for Vin signal. See figure 5.5-7.
2. 17
Vin signal maximum scaling
Sets the maximum scaling point for Vin signal. See figure 5.5-7.
2. 18
Iin signal minimum scaling
Sets the minimum scaling point for Iin signal. See figure 5.5-7.
2. 19
Iin signal maximum scaling
Sets the maximum scaling point for Iin signal. See figure 5.5-7.
Page 5-20
UD012K40
Multi-purpose Control Application
Scaled
input signal [%]
Scaled
input signal [%]
100
100
Par. 2 . 19 = 30%
Par. 2 . 20 = 80%
76.5
(15.3 mA)
Par. 2. 19 = -30%
Par. 2. 20 = 140%
17. 7
(3.5 mA)
30
0
0
0
4
3.0
6.0
8.8
80
8.0
16.0
16.8
Analog
100 input [%]
-30
0
10.0 V
20.0 mA
20.0 mA
Analog
140 input [%]
100
10.0 V
20.0 mA
20.0 mA
0
0
4
C h012 K 34
Figure 5.5-7 Examples of the scaling of Vin and Iin inputs .
2. 20
Free analog input signal
Selection of input signal of free analog input (an input not used for reference
signal):
0 = Not in use
1 = Voltage signal Vin
2 = Current signal Iin
2. 21
Free analog input signal
function
This parameter sets the function
of the free analog input:
Torque limit
100%
Par. 1. 7
0 = Function is not used
1 = Reducing motor current limit
(par. 1. 7)
This signal will adjust the
maximum motor current
between 0 and parameter
1. 7 set max. limit.
See figure 5.5-8.
Analog
input
0V
0 mA
4 mA
Custom
Figure 5.5-8 Reducing of max. motor
current.
2 = Reducing DC brake current.
The DC braking current can be
reduced, with the free analog
input signal, between 0.15xInCX
and current set by parameter
4. 8.
See figure 5.5-9.
Figure 5.5-9 Reducing DC brake
current.
Signal range
10 V
20 mA
20 mA
Custom
Ch012K61
5
DC-braking
current
100%
Par. 4. 8
Free analog
input
0
Signal range
Ch012K58
Page 5-21
Multi-purpose Control Application
3
Reducing acceleration and
deceleration times.
The
acceleration
and
deceleration times can be
reduced with the free analog
input signal, according to the
following formula:
Reduced time = set acc./
decel time (par. 1. 3, 1. 4; 4.
3, 4. 4) divided by the factor
R from figure 5.5-10.
Factor R
10
2
Free analog
input
1
Signal range
Figure 5.5-10 Reducing acceleration
and deceleration times.
4
Reducing torque supervision
limit.
The set torque supervision
limit can be reduced with the
free analog input signal
between
0
and
set
supervision limit (par. 3. 14),
see figure 5.5-11.
Ch012K59
Torque limit
100%
Par. 3. 14
Free analog
input
Figure 5.5-11 Reducing torque
supervision limit.
2. 22
0
Signal range
Ch012K60
Motor potentiometer ramp time
Defines how fast the electronic motor (digital) potentiometer value changes.
5
Page 5-22
Multi-purpose Control Application
3. 1
Analog output function
%
See table on page 5-10.
Unfiltered signal
100%
3. 2
Analog output filter time
Filtered signal
63%
Filters the analog output signal.
See figure 5.5-12.
t [s]
Par. 3. 2
Figure 5.5-12 Analog output filtering.
3.3
Analog output invert
Inverts analog output signal:
UD009K16
Analog
output
current
20 mA
max output signal = minimum set value
min output signal = maximum set value
12 mA
Param. 3. 5
= 50%
10 mA
Param. 3. 5
= 100%
4 mA
Param. 3. 5
= 200%
Selected (para. 3. 1)
signal max. value
0 mA
0
0.5
1.0
Ch012K17
Figure 5.5-13 Analog output invert.
3. 4
Analog output minimum
Defines the signal minimum to
be either 0 mA or 4 mA. See
figure 5.5-14.
3. 5
Analog output scale
Scaling factor for analog output.
See figure 5.5-14.
Analog
output
current
Param. 3. 5
= 200%
5
Param. 3. 5
= 100%
20 mA
Signal
Max. value of the signal
Output frequency
Motor speed
Output
current
Motor torque
Motor power
Motor voltage
DC-link volt.
Max. frequency (p. 1. 2)
Max. speed (nnxfmax/fn)
2 x InCX
2 x TnMot
2 x PnMot
100% x VnMot
1000 V
12 mA
Param. 3. 5
= 50%
10 mA
Par. 3. 4 = 1
4 mA
Max. value of signal
selected by param. 3. 1
Par. 3. 4 = 0
0 mA
0
0.5
1.0
Ch012K18
Figure 5.5-14 Analog output
scale.
Page 5-23
Multi-purpose Control Application
3. 6
3. 7
3. 8
Digital output function
Relay output 1 function
Relay output 2 function
Setting value
0 = Not used
Signal content
Out of operation
Digital output DO1 sinks current and programmable
relay (RO1, RO2) is activated when:
1
2
3
4
5
6
7
= Ready
= Run
= Fault
= Fault inverted
= CX overheat warning
= External fault or warning
= Reference fault or warning
8 = Warning
9 = Reversed
10 = Jog speed
11 = At speed
12 = Motor regulator activated
13 = Output frequency supervision 1
14= Output frequency supervision 2
15= Torque limit supervision
16= Reference limit supervision
17 = External brake control
18 = Control from I/O terminals
19 = Drive
20 = Unrequested rotation direction
21 = External brake control inverted
The drive is ready to operate
The drive operates (motor is running)
A fault trip has occurred
A fault trip has not occurred
The heat-sink temperature exceeds +70°C
Fault or warning depending on parameter 7. 2
Fault or warning depending on parameter 7. 1
- if analog reference is 4—20 mA and signal is <4mA
If a warning exists. See Table 7.10-1 in the Users'
Manual
The reverse command has been selected
Jog speed has been selected with digital input
The output frequency has reached the set reference
Overvoltage or overcurrent regulator was activated
The output frequency goes outside of the set supervision
Low limit/ High limit (par. 3. 9 and 3. 10)
The output frequency goes outside of the set supervision
Low limit/ High limit (par. 3. 11 and 3. 12)
The motor torque goes outside of the set supervision
Low limit/ High limit (par. 3. 13 and 3. 14)
Reference goes outside of the set supervision
Low limit/ High limit (par. 3. 15 and 3. 16)
External brake ON/OFF control with programmable delay
(par 3. 17 and 3. 18)
External control mode selected with prog. pushbutton #2
Temperature on drive goes outside the set temperature
supervision limits (par. 3. 19 and 3. 20)
Rotation direction of the motor shaft is different from the
requested one
External brake ON/OFF control (par. 3.17 and 3.18),
output active when brake control is OFF
Table 5.5-2 Output signals via DO1 and output relays RO1 and RO2.
5
3. 9
3. 11
Output frequency limit 1, supervision function
Output frequency limit 2, supervision function
0 = No supervision
1 = Low limit supervision
2 = High limit supervision
If the output frequency goes under/over the set limit (3. 10, 3. 12) this function
generates a warning message via the digital output DO1 or via a relay output RO1
or RO2 depending on the settings of the parameters 3. 6—3. 8.
3. 10
3. 12
Output frequency limit 1, supervision value
Output frequency limit 2, supervision value
The frequency value to be supervised by the parameter 3. 9 (3. 11).
See figure 5.5-15.
Page 5-24
Multi-purpose Control Application
3. 13
Torque limit , supervision
function
0 = No supervision
1 = Low limit supervision
2 = High limit supervision
If the calculated torque value goes
under/over the set limit (3. 14) this
function generates a warning
message via the digital output
DO1, via a relay output RO1 or
RO2 depending on the settings of
parameters 3. 6—3. 8.
Figure 5.5-15 Output frequency
supervision.
3. 14
Par. 3.9 = 2
f[Hz]
Par 3. 10
UD009K19
Example: 21 RO1
22 RO1
23 RO1
21 RO1
22 RO1
23 RO1
t
21 RO1
22 RO1
23 RO1
Torque limit , supervision value
The calculated torque value to be supervised by the parameter 3. 13.
3. 15
Reference limit , supervision function
0 = No supervision
1 = Low limit supervision
2 = High limit supervision
If the reference value goes under/over the set limit (3. 16) this function generates a
warning message via the digital output DO1 or via a relay output RO1 or
RO2 depending on the settings of the parameters 3. 6—3. 8. The supervised
reference is the current active reference. It can be source A or B reference depending
on DIB6 input or the panel reference if panel is the active control source.
3. 16
Reference limit , supervision value
The frequency value to be supervised by the parameter 3. 15.
3. 17
3. 18
External brake-off delay
External brake-on delay
The function of the external brake can be delayed from the start and stop control
signals with these parameters. See figure 5.5-16.
The brake control signal can be programmed via the digital output DO1 or via one
of relay outputs RO1 and RO2, see parameters 3. 6—3. 8.
3. 19
Drive temperature limit supervision function
0 = No supervision
1 = Low limit supervision
2 = High limit supervision
If the temperature of the drive goes under/over the set limit (3. 20) this function
generates a warning message via the digital output DO1 or via a relay output RO1
or RO2 depending on the settings of the parameters 3. 6—3. 8.
3. 20
Drive temperature limit value
The temperature value to be supervised by the parameter 3. 19.
Page 5-25
5
Multi-purpose Control Application
a)
tOFF = Par. 3. 17
tON = Par. 3. 18
External
BRAKE: OFF
Digital or
relay output
ON
DIA1: RUN FWD
STOP
DIA2: RUN REV
t
STOP
UD012K45
b)
tOFF = Par. 3. 17
tON = Par. 3. 18
External
BRAKE: OFF
Digital or
relay output
ON
DIA1: START
PULSE
DIA2: STOP
PULSE
t
Figure 5.5-16 External brake control:
4. 1
4. 2
a) Start/Stop logic selection par. 2. 1 = 0, 1 or 2
b)Start/Stop logic selection par. 2. 1 = 3.
Acc/Dec ramp 1 shape
Acc/Dec ramp 2 shape
The acceleration and deceleration ramp shape can be programmed with these
parameters.
Setting the value = 0 gives you a linear ramp shape. The output frequency
immediately follows the input with a ramp time set by parameters 1. 3, 1. 4 (4. 3, 4.
4 for Acc/Dec time 2).
Setting 0.1—10 seconds for 4. 1
(4. 2) causes an S-shaped ramp.
The speed changes are smooth.
Parameter 1. 3/ 1. 4 (4. 3/ 4. 4)
determines the ramp time of the
acceleration/deceleration in the
middle of the curve.
5
[Hz]
1. 3, 1. 4
(4. 3, 4. 4)
4. 1 (4. 2)
See figure 5.5-17.
Figure 5.5-17 S-shaped acceleration/
deceleration.
Page 5-26
4. 1 (4. 2)
[t]
UD009K20
Multi-purpose Control Application
4. 3
4. 4
Acceleration time 2
Deceleration time 2
These values correspond to the time required for the output frequency to accelerate
from the set minimum frequency (par. 1. 1) to the set maximum frequency
(par. 1. 2). With this parameter it is possibile to set two different acceleration/
deceleration times for one application. The active set can be selected with the
programmable signal DIA3 of this application, see parameter 2. 2.
Acceleration/deceleration times can be reduced with a external free analog input
signal, see parameters 2. 18 and 2. 19.
4. 5
Brake chopper
0 = No brake chopper
1 = Brake chopper and brake resistor installed
2 = External brake chopper
When the drive is decelerating the motor, the energy stored in the inertia of the motor
and the load is fed into the external brake resistor. If the brake resistor is selected
correctly the drive is able to decelerate the load with a torque equal to that of
acceleration. See the separate Brake resistor installation manual.
4. 6
Start function
Ramp:
0
The drive starts from 0 Hz and accelerates to the set reference frequency within
the set acceleration time. (Load inertia or starting friction may cause prolonged
acceleration times).
Flying start:
1
The drive starts into a running motor by first finding the speed the motor is
running at. Searching starts from the maximum frequency down until the actual
frequency reached. The output frequency then accelerates/decelerates to the
set reference value at a rate determined by the acceleration/deceleration ramp
parameters.
Use this mode if the motor may be coasting when the start command is given.
With the flying start it is possible to ride through short utility voltage interruptions
4. 7
Stop function
Stop
Coasting:
0
The motor coasts to an uncontrolled stop with the CX/CXL/CXS off, after the
command.
Ramp:
1
After the Stop command, the speed of the motor is decelerated according to
the deceleration ramp time parameter.
If the regenerated energy is high it may be necessary to use an external
braking resistor for faster deceleration.
4. 8
DC braking current
Defines the current injected into the motor during DC braking.
Page 5-27
5
Multi-purpose Control Application
4. 9
DC braking time at stop
Defines if braking is ON or OFF and braking time of the DC-brake when the motor
is stopping. The function of the DC-brake depends on the stop function, parameter
4. 7. See figure 5.5-18.
0
>0
DC-brake is not used
DC-brake is in use and its function depends on the Stop function,
(param. 4. 7), and the time depends on the value of parameter 4. 9:
Stop-function = 0 (coasting):
After the stop command, the motor will coast to a stop with the CX/CXL/CXS
off.
With DC-injection, the motor can be electrically stopped in the shortest possible
time, without using an optional external braking resistor.
The braking time is scaled according to the frequency when the DCbraking starts. If the frequency is > nominal frequency of the motor (par. 1.11),
setting value of parameter 4.9 determines the braking time. When the
frequency is < 10% of the nominal, the braking time is 10% of the set value of
parameter 4.9.
fout [Hz]
fout [Hz]
fn
fn
Output frequency
Motor speed
Output frequency
0,1x fn
Motor speed
DC-braking ON
DC-braking ON
t
t = 0.1 x par. 4. 9
t = 1 x par. 4. 9
RUN
STOP
t
RUN
STOP
UD009K21
Figure 5.5-18 DC-braking time when stop = coasting.
Stop-function = 1 (ramp):
After the Stop command, the speed of the motor is reduced based on the
deceleration parameter ramp parameter, if no regeneration occurs due to load
inertia, to a speed defined with parameter 4. 10, where the DC-braking starts.
5
fout [Hz]
The braking time is defined
with parameter 4. 9.
Motor speed
Output frequency
If high inertia exists, it is
recommended to use an
external braking resistor for
faster deceleration. See
figure 5.5-19.
DC-braking
Param. 4. 10
t
Figure 5.5-19 DC-braking time
when stop function = ramp
Page 5-28
t = param. 4. 9
RUN
STOP
UD009K23
Multi-purpose Control Application
4. 10
Execute frequency of DC-brake during ramp Stop
See figure 5.5-19.
4. 11
DC-brake time at start
0
>0
DC-brake is not used
DC-brake is active when
the start command is given.
This parameter defines the
time before the brake is
released. After the brake is
released the output frequency increases according
to the set start function
parameter 4. 6 and the
acceleration parameters (1.
3, 4. 1 or 4. 2, 4. 3). See
figure 5.5-20.
Figure 5.5-20
4. 12 - 4. 18
DC-braking
at start.
fout [Hz]
Output
frequency
t
Par 4. 11
RUN
STOP
UD009K22
Multi-Step speeds 1-7
These parameter values define the Multi-step speeds selected with the DIA4, DIB5
and DIB6 digital inputs. The selection of Multi-step speeds will occur similarly as
described in the table 3.4-2 page 3-8.
5. 1- 5.6
Prohibit frequency area
fout
[Hz]
Low limit/High limit
In some systems it may be
necessary to avoid certain
frequencies
because
of
mechanical resonance problems.
With these parameters it is
possible to set limits for three
"skip frequency" regions. The
accuracy of the setting is 0.1 Hz.
5. 1
5. 3
5. 5
5. 2
5. 4
5. 6
frequency
reference
[Hz]
Figure 5.5-21 Example of prohibit
frequency area setting.
6. 1
UD009K33
Motor control mode
0 = Frequency control:
(V/Hz)
1 = Speed control:
(sensorless vector)
The I/O terminal and panel references are frequency
references and the drive controls the output
frequency (output frequency resolution = 0.01 Hz)
The I/O terminal and panel references are speed
references and the drive controls the motor speed
(regulation accuracy ± 0.5%).
Page 5-29
5
Multi-purpose Control Application
6. 2
Switching frequency
Motor noise can be minimized using a high switching frequency. Increasing the
switching frequency reduces the capacity of the CX/CXL/CXS.
Before changing the frequency from the factory default 10 kHz (3.6 kHz > 40 Hp),
check the drive derating from the curves in figures 5.2-2 and 5.2-3 in the User's
Manual.
6. 3
6. 4
Field weakening point
Voltage at the field weakening point
The field weakening point is the output frequency at which the output voltage reaches
the set maximum value (par. 6. 4). Above this frequency the output voltage remains
at the set maximum value.
Below that frequency the output voltage depends on the setting of the V/Hz curve
parameters 1. 8, 1. 9, 6. 5, 6. 6 and 6. 7. See figure 5.5-22.
When the parameters 1. 10 and 1. 11, nominal voltage and nominal frequency of
the motor are set, parameters 6. 3 and 6. 4 are also set automatically to the
corresponding values. If you need different values for the field weakening point and
the maximum output voltage, change these parameters after setting parameters 1.
10 and 1. 11.
6. 5
V/Hz curve, middle point frequency
If the programmable V/Hz curve has been selected with parameter 1. 8, this
parameter defines the middle point frequency of the curve. See figure 5.5-22.
6. 6
V/Hz curve, middle point voltage
If the programmable V/Hz curve has been selected with parameter 1. 8 this
parameter defines the middle point voltage of the curve. See figure 5.5-22.
6. 7
Output voltage at zero frequency
If the programmable V/Hz curve has been selected with parameter 1. 8 this
parameter defines the zero frequency voltage of the curve. See figure 5.5-22.
Vn
Parameter 6.4
5
U[V]
Parameter 6.6
Default 10%
Parameter 6.7
Default 1.3 %
Parameter 6.5
(Default 5 Hz)
Figure 5.5-22 Programmable V/Hz curve.
Page 5-30
Parameter 6.3
f[Hz]
Multi-purpose Control Application
6. 8
6. 9
Overvoltage controller
Undervoltage controller
These parameters allow the over/undervoltage controllers to be switched ON or OFF.
This may be useful in cases where the utility supply voltage varies more than -15%—
+10% and the application requires a constant speed. If the controllers are ON, they
will change the motor speed in over/undervoltage cases. Overvoltage = faster,
undervoltage = slower.
Over/undervoltage trips may occur when controllers are not used
7. 1
Response to the reference fault
0 = No response
1 = Warning
2 = Fault, stop mode after fault according to parameter 4.7
3 = Fault, always coasting stop mode after fault
A warning or a fault action and message is generated if 4—20 mA reference signal
is used and the signal falls below 4 mA. The information can also be programmed
via digital output DO1 and via relay outputs RO1 and RO2.
7. 2
Response to external fault
0 = No response
1 = Warning
2 = Fault, stop mode after fault according to parameter 4.7
3 = Fault, always coasting stop mode after fault
A warning or a fault action and message is generated from the external fault signal
in the digital input DIA3. The information can also be programmed into digital output
DO1 and into relay outputs RO1 and RO2.
7. 3
Phase supervision of the motor
0 = No action
2 = Fault
Phase supervision of the motor ensures that the motor phases have approximately
equal current.
7. 4
Ground fault protection
0 = No action
2 = Fault
Ground fault protection ensures that the sum of the motor phase currents is zero.
The standard overcurrent protection is always working and protects the frequency
converter from ground faults with high current levels.
Parameters 7. 5—7. 9 Motor thermal protection
General
Motor thermal protection is to protect the motor from overheating. The CX/CXL/CXS
drive is capable of supplying higher than nominal current to the motor. If the load
requires this high current there is a risk that motor will be thermally overloaded. This
is true especially at low frequencies. With low frequencies the cooling effect of the
motor fan is reduced and the capacity of the motor is reduced. If the motor is
equipped with an external fan the load reduction on low speed is small.
Page 5-31
5
Multi-purpose Control Application
Motor thermal protection is based on a calculated model and it uses the output
current of the drive to determine the load on the motor. When the power is turned
on to the drive, the calculated model uses the heatsink temperature to determine
the initial thermal stage for the motor. The caculated model assumes that the
ambient temperature of the motor is 40°C.
Motor thermal protection can be adjusted by setting several parameters. The
thermal current IT specifies the load current above which the motor is overloaded.
This current limit is a function of the output frequency. The curve for IT is set with
parameters 7. 6, 7. 7 and 7. 9, refer to the figure 5.5-23. The default values of
these parameters are set from the motor nameplate data.
With the output current at IT the thermal stage will reach the nominal value (100%).
The thermal stage changes by the square of the current. With output current at
75% from IT the thermal stage will reach 56% value and with output current at
120% from IT the thermal stage would reach 144% value. The function will trip the
device (refer par. 7. 5) if the thermal stage will reach a value of 105%. The response
time of the thermal stage is determined with the time constant parameter 7. 8.
The larger the motor the longer it takes to reach the final temperature.
The thermal stage of the motor can be monitored through the display. Refer to
the table for monitoring items. (User's Manual, table 7.3-1).
CAUTION!
!
7. 5
The calculated model does not protect the motor if the cooling of
the motor is reduced either by blocking the airflow or due to dust
or dirt.
Motor thermal protection
Operation:
0 = Not in use
1 = Warning
2 = Trip function
Tripping and warning will give a display indication with the same message code. If
tripping is selected the drive will stop and activate the fault stage.
Deactivating the protection by setting this parameter to 0, will reset the thermal stage
of the motor to 0%.
7. 6
Motor thermal protection, break point current
The current can be set between 50.0—150.0% x InMotor.
This parameter sets the value for thermal current at frequencies above the
break point on the thermal current curve. Refer to the figure 5.5-23.
5
The value is set in percentage of the motor nameplate data of the
motor, parameter 1. 13, not the drive's nominal output current.
The motor's nominal current is the current which the motor can withstand in direct
on-line use without being overheated.
If parameter 1. 13 is adjusted, this parameter is automatically restored to the default
value.
Setting this parameter (or parameter 1. 13) does not affect the maximum output
current of the drive. Parameter 1. 7 alone determines the maximum output current
of the drive.
Page 5-32
Multi-purpose Control Application
I
Current
limit
par. 1. 7
Overload area
IT
Par. 7. 6
Par. 7. 7
f
Figure 5.5-23 Motor thermal current
IT curve.
7. 7
Par. 7. 9
UMCH7_91
Motor thermal protection, zero frequency current
The current can be set between 10.0—150.0% x InMotor. This parameter sets the
value for thermal current at zero frequency. Refer to the figure 5.5-23.
The default value is set assuming that there is no external fan cooling the motor. If
an external fan is used this parameter can be set to 90% (or higher).
The value is set as a percentage of the motor's nameplate nominal current,
parameter 1. 13, not the drive's nominal output current. The motor's nominal current
is the current which the motor can stand in direct on-line use without being
overheated.
If you change the parameter 1. 13 this parameter is automatically restored to the
default value.
Setting this parameter (or parameter 1. 13) does not affect to the maximum output
current of the drive. Parameter 1. 7 alone determines the maximum output current
of the drive.
7. 8
Motor thermal protection, time constant
This time can be set between 0.5—300 minutes.
This is the thermal time constant of the motor. The larger the motor the greater
the time constant. The time constant is defined as the time that it takes the calculated thermal stage to reach 63% of its final value.
The motor thermal time is specific to a motor design and it varies between different
motor manufacturers.
The default value for the time constant is calculated based on the motorname plate
data from parameters 1. 12 and 1. 13. If either of these parameters is reset, then
this parameter is set to its default value.
If the motor's t6 -time is known (given by the motor manufacturer) the time constant
parameter could be set based on t6 -time. As a rule of thumb, the motor thermal
time constant in minutes equals to 2xt6 (t6 in seconds is the time a motor can safely
operate at six times the rated current). If the drive is in the stop stage the time
constant is internally increased to three times the set parameter value. The cooling
in the stop stage is based on convection with an increased time constant.
Page 5-33
5
Multi-purpose Control Application
7. 9
Motor thermal protection, break point frequency
This frequency can be set between 10—500 Hz.
This is the frequency break point of thermal current curve. With frequencies
above this point the thermal capacity of the motor is assumed to be constant.
Refer to the figure 5.5-23.
The default value is based on motor's nameplate data, parameter 1. 11. It is 35 Hz
for a 50 Hz motor and 42 Hz for a 60 Hz motor. More generally it is 70% of the
frequency at the field weakening point (parameter 6. 3). Changing either parameter
1. 11 or 6. 3 will restore this parameter to its default value.
Motor temperature
Trip area
105%
Motor
current
Trip/warning
par. 7. 5
I/IT
Time constant T*)
Motor temperature Θ = (I/IT)2 x (1-e-t/T)
Time
*) Changed with motor size and
adjusted with parameter 7. 8
UMCH7_92
Figure 5.5-24 Calculating motor temperature.
Parameters 7. 10— 7. 13, Stall protection
General
5
Motor stall protection protects the motor from short time overload situations like a
stalled shaft. The reaction time of stall protection can be set shorter than with motor
thermal protection. The stall state is defined with two parameters, 7.11. Stall Current
and 7.13. Stall Frequency. If the current is higher than the set limit and output
frequency is lower than the set limit the stall state is true. There is no true detection
of shaft rotation. Stall protection is a type of overcurrent protection.
7. 10
Stall protection
Operation:
0 = Not in use
1 = Warning
2 = Trip function
Tripping and warning will give a display indication with the same message code. If
tripping is set on, the drive will stop and activate the fault stage.
Setting this parameter to 0 will deactivate the protection and will reset the stall time
counter to zero.
Page 5-34
Multi-purpose Control Application
7. 11
Stall current limit
I
The current can be set between
0.0—200% x InMotor.
In the stall stage the current has
to be above this limit. Refer to
the figure 5.5-25. The value is
set as a percentage of the
motor's name- plate nominal
current, parameter 1. 13, motor's
nominal current. If parameter
1.13 is adjusted, this parameter
is automatically restored to its
default value.
Stall area
Par. 7. 11
f [Hz]
Par. 7. 13
Figure 5.5-25 Setting the stall
characteristics.
7. 12
UMCH7_11
Stall time
The time can be set between 2.0—120 s.
This is the maximum allowed time for a stall stage. There is an internal up/down
counter to count the stall time. Refer to the figure 5.5-26.
If the stall time counter value goes above this limit the protection will cause a trip
(refer to the parameter 7. 10).
7. 13
Maximum stall frequency
The frequency can be set between
1—fmax (par. 1. 2).
In the stall state, the ouput
frequency has to be smaller than
this limit. Refer to the figure 5.525.
Stall time counter
Trip area
Par. 7. 12
Trip/warning
par. 7. 10
UMCH7_12
Time
Figure 5.5-26 Counting the stall time.
5
Stall
No stall
Parameters 7. 14— 7. 17, Underload protection
General
The purpose of motor underload protection is to ensure that there is load on the
motor while the drive is running. If the motor load is reduced, there might be a
problem in the process, e.g. broken belt or dry pump.
Motor underload protection can be adjusted by setting the underload curve with
parameters 7. 15 and 7. 16. The underload curve is a squared curve set
between zero frequency and the field weakening point. The protection is not
active below 5Hz (the underload counter value is stopped). Refer to the figure
5.5-27.
Page 5-35
Multi-purpose Control Application
The torque values for setting the underload curve are set with percentage values
which refer to the nominal torque of the motor. The motor's nameplate data,
parameter 1. 13, the motor's nominal current and the drive's nominal current ICT
are used to find the scaling ratio for the internal torque value. If other than a standard
motor is used with the drive, the accuracy of the torque calculation is decreased.
7. 14
Underload protection
Operation:
0 = Not in use
1 = Warning
2 = Fault
Tripping and warning will give a display indication with the same message code. If
tripping is set active the drive will stop and activate the fault stage.
Deactivating the protection, by setting this parameter to 0, will reset the underload
time counter to zero.
7. 15
Underload protection, field weakening area load
Torque
The torque limit can be set
between 20.0—150 % x TnMotor.
This parameter is the value for the
minimum allowed torque when the
output frequency is above the field
weakening point.
Refer to the figure 4.5-22.
If parameter 1. 13 is adjusted, this
parameter is automatically
restored to its default value.
Par. 7. 15
Par. 7. 16
Underload area
ff[Hz]
Figure 5.5-27 Setting of minimum
load.
7. 16
5 Hz
Fieldweakening
point par. 6. 3
UMCH7_15
Underload protection, zero frequency load
Torque limit can be set between 10.0—150 % x TnMotor.
This parameter is the value for the minimum allowed torque with zero frequency.
Refer to the figure 5.5-27. If parameter 1. 13 is adjusted, this parameter is
automatically restored to its default value.
5
7. 17
Underload time
This time can be set between 2.0—600.0 s.
This is the maximum allowed time for an underload state. There is an internal up/
down counter to accumulate the underload time. Refer to the figure 5.5-28.
If the underload counter value goes above this limit, the protection will cause a trip
(refer to the parameter 7. 14). If the drive is stopped the underload counter
is reset to zero.
Page 5-36
Multi-purpose Control Application
Underload time counter
Trip area
Par. 7. 17
Trip/warning
par. 7. 14
UMCH7_17
Time
Underl.
No underl.
Figure 5.5-28 Counting the underload time.
8. 1
8. 2
Automatic restart: number of tries
Automatic restart: trial time
The Automatic restart function restarts the drive after the faults selected with
parameters 8. 4—8. 8. The Start function for Automatic restart is selected with
parameter 8. 3.
Number of faults
during t = ttrial
ttrial
4
ttrial
3
2
Par. 8. 1 = 3
ttrial = Par. 8. 2
1
t
Three faults
RUN
STOP
Four faults
5
UD012K25
Figure 5.5-29 Automatic restart
Parameter 8. 1 determines how many automatic restarts can be made during the
trial time set by the parameter 8. 2.
The time counting starts from the first autorestart. If the number of restarts does
not exceed the value of the parameter 8. 1 during the trial time, the counting is cleared
after the trial time has elapsed. The next fault starts the counting again.
Page 5-37
Multi-purpose Control Application
8. 3
Automatic restart, start function
The parameter defines the start mode:
0 = Start with ramp
1 = Flying start, see parameter 4. 6.
8. 4
Automatic restart after undervoltage trip
0 = No
automatic
restart
after
undervoltage
fault
trip
1 = Automatic restart after undervoltage fault condition returns to the normal
condition (DC-link voltage returns to the normal level)
8. 5
Automatic restart after overvoltage trip
0 = No automatic restart after overvoltage fault trip
1 = Automatic restart after overvoltage fault condition returns to the normal
condition (DC-link voltage returns to the normal level)
8. 6
Automatic restart after overcurrent trip
0 = No automatic restart after overcurrent fault trip
1 = Automatic restart after overcurrent faults
8. 7
Automatic restart after reference fault trip
0 = No automatic restart after reference fault trip
1 = Automatic restart after analog current reference signal (4—20 mA)
returns to the normal level (>4 mA)
8. 8
Automatic restart after over-/undertemperature fault trip
0 = No automatic restart after temperature fault trip
1 = Automatic restart after heatsink temperature has returned to its normal
level between -10°C—+75°C.
5
Page 5-38
Multi-purpose Control Application
Notes:
5
Page 5-39
Multi-purpose Control Application
Notes:
5
Page 5-40
Pump and fan control Application
PUMP AND FAN CONTROL APPLICATION
(par. 0.1 = 7)
CONTENTS
6 Pump and fan control Application ................. 6-1
6.1
6.2
6.3
6.4
General ..................................................... 6-2
Control I/O ................................................ 6-2
Control signal logic .................................... 6-3
Basic parameters, Group 1 ....................... 6-4
6.4.1 Parameter table, Group 1 ................. 6-4
6.4.2 Description of Group1 parameters .... 6-5
6.5 Special parameters, Groups 2—9 ............. 6-8
6.5.1 Parameter tables, Groups 2—9 ........... 6-8
6.5.2 Description of Groups 2—9 param. 6-16
6.6 Monitoring data ....................................... 6-40
6.7 Panel reference ...................................... 6-41
6
Page 6-1
Pump and fan control Application
6.1 General
The pump and fan control appliation can be
selected by setting the value of parameter 0.1
to 7.
The application has two control sources on
the I/O terminals. Source A is Pump and fan
control and source B is direct frequency
reference. The control source is selected with
DIB6 input.
The application can be used to control one
variable speed drive and 0-3 auxiliary drives.
The PI-controller of the CX/CXL/CXS controls
the drive speed and provides control signals
to Start and Stop one to three auxiliary drives
to control the total flow.
* NOTE!
Remember to connect the CMA
and CMB inputs.
6.2 Control I/O
PI-controller
reference value
2-wire
transmitter
Actual
value
I
(0)4..20mA
+
READY
220
VAC
6
220
VAC
Max.
FAULT
Terminal
Signal
Description
1
+10Vref
Reference output
Voltage for a potentiometer, etc.
2
Vin+
Analog input,
voltage (programmable)
PI-controller reference value
range 0—10 V DC
3
GND
I/O ground
Ground for reference and controls
4
Iin+
Analog input,
PI-controller actual value
5
Iin-
current (programmable)
range 0—20 mA
6
+24V
Control voltage output
Voltage for switches, etc. max. 0.1 A
7
GND
Control voltage ground
Ground for reference and controls
8
DIA1
Start/Stop
Source A (PI-controller)
Contact open = stop
Contact closed = start
9
DIA2
External fault
(programmable)
Contact open = no fault
Contact closed = fault
10
DIA3
Fault reset
(programmable)
Contact open = no action
Contact closed = fault reset
11
CMA
Common for DIA1—DIA3
Connect to GND or + 24V
12
+24V
Control voltage output
Voltage for switches, (same as #6)
13
GND
I/O ground
Ground for reference and controls
14
DIB4
Start/Stop
Contact open = stop
Source B (Direct freq. ref.) Contact closed = start
15
DIB5
Jog speed select
(programmable)
Contact open = no action
Contact closed = jog speed
16
DIB6
Source A/B selection
Contact open = source A is active
Contact closed = source B is active
17
CMB
Common for DIB4—DIB6
Connect to GND or + 24V
18
Iout+
Analog output
Programmable
19
Iout-
Output frequency
Range 0—20 mA/RL max. 500 Ω
20
DO1
Digital output
READY
Programmable ( par. 3. 6)
Open collector, I<50 mA, V<48 VDC
21
RO1
22
RO1
Auxil. motor 1
23
RO1
control
Relay output 1
24
RO2
Relay output 2
25
RO2
FAULT
26
RO2
(par. 3. 1)
Programmable ( par. 3. 7)
Programmable ( par. 3. 8 )
Figure 6.2-1 Default I/O configuration and connection example of the
Pump and Fan Control Application with 2-wire transmitter.
Page 6-2
Pump and fan control Application
6.3 Control signal logic
The logic flow of the I/O-control signals and pushbutton signals from the panel is shown in figure
6.3-1.
PARAMETERS
2. 26 Source B ref. select.
2. 15 Source A ref. select.
4. 12 Jogging speed ref.
RUN
MON
READY
PAR
REF
FAULT
BTNS
RST
PG
Uin+
PROGRAMMABLE
PUSH-BUTTON 2
Freq. ref.,
Source B
Iin±
Reference,
Source A
Actual value
selection:
Uin
Iin
Uin + Iin
Uin - Iin
Iin x Uin
Iin - Uin
DIA2 Up
DIA3 Down
Motorised
potentiometer
reference
RO1 Aux. drive 1, start
PI-controller
P
I
Actual
value
Internal
frequency
reference
P
Calculation of
freq. ref. and
control logic of
auxiliary drives
RO2 Aux. drive 2, start
DO1 Aux. drive 3, start
DIB5 Jogging speed selection
(Programmable)
DIB6
Source A/B selection
Internal
fault reset
>1
DIA3 Ext. fault reset
P
(Programmable)
DIB4 Start/Stop, source B
Internal
Start/Stop
DIA1 Start/Stop, source A
DIA2 External fault
(Programmable)
= control line
= signal line
UD012K49
6
Figure 6.3-1 Control signal logic of the Pump and Fan control Application.
Switch positions shown are based on the factory settings.
Page 6-3
Pump and fan control Application
6.4 Basic parameters, Group 1
6.4.1 Parameter table, Group 1
Code Parameter
Range
Step
Default
Custom Description
Page
1. 1
Minimum frequency
0—fmax
1 Hz
0 Hz
1. 2
Maximum frequency
fmin-120/500 Hz 1 Hz
60 Hz
*
6-5
1. 3
Acceleration time 1
0.1—3000.0 s
0.1 s
1.0 s
Time from fmin (1. 1) to fmax (1. 2)
6-5
1. 4
Deceleration time 1
0.1—3000.0 s
0.1 s
1.0 s
Time from fmax (1. 2) to fmin (1. 1)
6-5
1. 5
PI-controllergain
1—1000%
1%
100%
1. 6
PI-controller I-time
0.00—320.00 s 0.01s
10.00s
1. 7
Current limit
0.1—2.5 x InCX 0.1 A
1.5 x InCX
1. 8
V/Hz ratio selection
0—2
1
1. 9
V/hz optimization
0—1
1. 10
Nominal voltage
of the motor
1. 11
Nominal frequency
of the motor
1. 12
Nominal speed
of the motor
1. 13
Nominal current
of the motor
2.5 x InCX
1. 14
Supply voltage
208—240
6-5
6-5
0= No Integral timein use
6-5
Output current limit [A] of the unit
6-5
0
0 = Linear
1 = Squared
2 = Programmable V/Hz ratio
6-5
1
0
0 = None
1 = Automatic torque boost
6-6
180—690 V
1V
230 V
380 V
480 V
575 V
CX/CXL/CXS V 3 2
CX/CXL/CXS V 3 4
CX/CXL/CXS V 3 5
CX V 3 6
6-7
30—500 Hz
1 Hz
60 Hz
fn from the rating plate of
the motor
6-7
nn from the rating plate of
the motor
6-7
In from the rating plate of
the motor
6-7
230 V
CX/CXL/CXS V 3 2
6-7
380—440
380 V
CX/CXL/CXS V 3 4
380—500
480 V
CX/CXL/CXS V 3 5
525—690
575 V
CX V 3 6
1—20000 rpm 1 rpm 1720 rpm
**
0.1 A
InCX
1. 15
Parameter conceal
0—1
1
0
Visibility of the parameters:
0 = All parametergroups visible
1 = Only group 1 is visible
6-7
1. 16
Parameter value lock
0—1
1
0
Disables parameter changes:
0 = Changes enabled
1 = Changes disabled
6-7
Table 6.4-1 Group 1 basic parameters.
Note!
= Parameter value can be changed
only when the drive is stopped.
6
Page 6-4
* If 1. 2 > motor synchr. speed, check suitability
for motor and drive system
Selecting 120 Hz/500 Hz range see page 6-5.
** Default value for a four pole motor and a
nominal size drive.
Pump and fan control Application
6.4.2 Description of Group 1 parameters
1. 1, 1. 2 Minimum / maximum frequency
Defines frequency limits of the drive.
The default maximum value for parameters 1. 1 and 1. 2 is 120 Hz. By setting 1. 2
= 120 Hz when the drive is stopped (RUN indicator not lit) parameters 1. 1 and 1. 2
are changed to 500 Hz. At the same time the resolution of the panel reference is
changed from 0.01 Hz to 0.1 Hz.
Changing the max. value from 500 Hz to 120 Hz is done by setting parameter 1. 2
= 119 Hz when the drive is stopped.
1. 3, 1. 4 Acceleration time 1, deceleration time 1:
These limits correspond to the time required for the output frequency to accelerate
from the set minimum frequency (par. 1. 1) to the set maximum frequency
(par. 1. 2).
1. 5
PI-controller gain
This parameter defines the gain of the PI-controller.
If this parameter is set to 100%, a 10% change in error value causes the controller
output to change by 1.0 Hz.
If the parameter value is set to 0 the PI-controller operates as I-controller.
1. 6
PI-controller I-time
Defines the integration time of the PI-controller.
1. 7
Current limit
This parameter determines the maximum motor current what the CX/CXL/CXS will
supply short term.
1. 8
V/Hz ratio selection
Linear:
0
The voltage of the motor changes linearly with the frequency in
the constant flux area from 0 Hz to the field weakening point
(par. 6. 3) where a constant voltage (nominal value) is supplied to the
motor. See figure 6.4-1.
Linear V/Hz ratio should be used in constant torque applications.
This default setting should be used if there is no special requirement for
another setting.
Squared:
1
The voltage of the motor changes following a squared curve form
with the frequency in the area from 0 Hz to the field weakening
point (par. 6. 3) where the nominal voltage is also supplied to the motor.
See figure 6.4-1.
The motor runs undermagnetized below the field weakening point
and produces less torque and electromechanical noise. A squared
V/Hz ratio can be used in applications where the torque demand of the
load is proportional to the square of the speed, e.g. in centrifugal fans
and pumps.
6
Page 6-5
Pump and fan control Application
V [V]
Field weakening point
Default: Nominal voltage of
the motor
Vn
Linear
Default: Nominal
frequency of the
motor
Squared
f [Hz]
Figure 6.4-1 Linear and squared V/Hz curves.
Programm. The V/Hz curve can be programmed with three different points.
V/Hz curve The parameters for programming are explained in chapter 6.5.2.
2
A programmable V/Hz curve can be used if the standard settings do
not satisfy the needs of the application. See figure 6.4-2.
Vn
Parameter 6.4
U[V]
Parameter 6.6
Default 10%
Parameter 6.7
Default 1.3 %
Parameter 6.5
(Default 5 Hz)
Parameter 6.3
f[Hz]
Figure 6.4-2 Programmable V/Hz curve.
1. 9
V/Hz optimization
Automatic
torque
boost
The voltage to the motor changes automatically which makes the
motor to produce torque enough to start and run at low frequencies.
The voltage increase depends on the motor type and horsepower.
Automatic torque boost can be used in applications where starting
torque due to starting friction is high, e.g. in conveyors.
NOTE!
!
6
Page 6-6
In high torque - low speed applications - it is likely the motor will
overheat.
If the motor has to run for a prolonged time under these conditions,
special attention must be paid to cooling the motor. Use external
cooling for the motor if the temperature tends to rise too high.
Pump and fan control Application
1. 10
Nominal voltage of the motor
Find this value Vn from the nameplate of the motor.
This parameter sets the voltage at the field weakening point, parameter 6. 4, to
100% x Vnmotor.
1. 11
Nominal frequency of the motor
Find the nominal frequency fn from the nameplate of the motor.
This parameter sets the frequency at the field weakening point, parameter 6. 3, to
the same value.
1. 12
Nominal speed of the motor
Find this value nn from the nameplate of the motor.
1. 13
Nominal current of the motor
Find the value In from the nameplate of the motor.
The internal motor protection function uses this value as a reference value.
1. 14
Supply voltage
Set parameter value according to the nominal voltage of the supply.
Values are pre-defined for CX/CXL/CXS V 3 2, CX/CXL/CXS V 3 4, CX/CXL/CXS
V 3 5 and CX V 3 6. See table 6.4-1.
1. 15
Parameter conceal
Defines which parameter groups are available:
0 = All parameter groups are visible
1 = Only group 1 is visible
1. 16
Parameter value lock
Defines access to the changes of the parameter values:
0 = Parameter value changes enabled
1 = Parameter value changes disabled
6
Page 6-7
Pump and fan control Application
6.5 Special parameters, Groups 2—9
6.5.1 Parameter tables
Group 2, Input signal parameters
6
Code Parameter
Range
Step
2. 1
DIA2 function
(terminal 9)
0—10
1
1
0 = Not used
6-16
1 = Ext. fault, closing contact
2 = External fault, opening contact
3 = Run enable
4 = Acceler./deceler. time selection
5 = Reverse
6 = Jog frequency
7 = Fault reset
8 = Acc./dec. operation prohibit
9 = DC-braking command
10 = Motor (digital) potent. UP
2. 2
DIA3 function
(terminal 10)
0—10
1
7
0 = Not used
6-17
1 = Ext. fault, closing contact
2 = External fault, opening contact
3 = Run enable
4 = Acceler./deceler. time selection
5 = Reverse
6 = Jog frequency
7 = Fault reset
8 = Acc./dec. operation prohibit
9 = DC-braking command
10 = Motor (digital) potent. DOWN
2. 3
Vin signal range
0—1
1
0
0 = 0—10 V
1 = Custom setting range
2. 4
Vin custom setting min.
2. 5
Vin custom setting max. 0.00-100.00% 0.01% 100.00%
2. 6
Vin signal inversion
2. 7
Vin signal filter time
2. 8
Iin signal range
2. 9
Iin custom setting minim. 0.00-100.00% 0.01%
2. 10
Iin custom setting maxim. 0.00-100.00% 0.01% 100.00%
2. 11
Iin signal inversion
0—1
1
0
2. 12
Iin signal filter time
0.01—10.00s
0.01s
1.00 s
2. 13
DIB5 function
(terminal 15)
0—9
1
6
Note!
Page 6-8
0.00-100.00% 0.01%
0—1
1
0.00—10.00 s 0.01s
0—2
1
Default Custom Description
0.00%
Page
6-17
6-17
6-17
0
0 = Not inverted
1 = Inverted
6-17
1.00s
0 = No filtering
6-17
0 = 0—20 mA
1 = 4—20 mA
2 = Custom setting range
6-17
0
0.00%
6-18
6-18
0 = Not inverted
1 = Inverted
6-18
0 = No filtering
6-18
0 = Not used
6-18
1 = Ext. fault, closing contact
2 = External fault, opening contact
3 = Run enable
4 = Acc./dec. time selection
5 = Reverse
6 = Jog speed
7 = Fault reset
8 = Acc./dec. operation prohibit
9 = DC-braking command
= Parameter value can be changed only when the drive is stopped
Pump and fan control Application
Code Parameter
Range
Step
Default
0.1
Hz/s
10.0
Hz/s
0—4
1
0
0 = Analog voltage input (term. 2)
619
1 = Analog current input (term. 4)
2 = Set reference from the panel
(reference r2)
3 = Signal from internal motor pot.
4 = Signal from internal motor pot.
reset if CX/CXLCXS unit is stopped
PI-controller actual
value selection
0—3
1
0
0 = Actual value1
1 = Actual 1 + Actual 2
2 = Actual 1 - Actual 2
3 = Actual 1 * Actual 2
6-19
2. 17
Actual value 1 input
0—2
1
2
0 = No
1 = Voltage input
2 = Current input
6-19
2. 18
Actual value 2 input
0—2
1
0
0 = No
1 = Voltage input
2 = Current input
6-19
2. 19
Actual value 1
min scale
-320.00%—
+320.00%
0.01%
0.00%
0% = no minimum scaling
6-19
2. 20
Actual value 1
max scale
-320.00%—
+320.00%
0.01% 100.00%
100% = no maximum scaling
6-19
2. 21
Actual value 2
min scale
-320.00%—
+320.00%
0.01%
0% = no minimum scaling
6-19
2. 22
Actual value 2
max scale
-320.00%—
+320.00%
0.01% 100.00%
100% = no maximum scaling
6-19
2. 23
Error value inversion
0 = No
1 = Yes
6-20
2. 24
2. 14
Motor(digital)
0.1—2000.0
potentiometer ramp time
Hz/s
2. 15
PI-controller reference
signal (source A)
2. 16
Page
6-19
1
0
PI-controller reference 0.0—100.0 s
value rise time
0.1 s
60.0 s
Time for reference value change
from 0 % to 100 %
6-20
2. 25
PI-controller reference 0.0—100.0 s
value fall time
0.1 s
60.0 s
Time for reference value change
from 100 % to 0 %
6-20
2. 26
Direct frequency
reference, source B
1
0
0 = Analog voltage input (term. 2)
6-20
1 = Analog current input (term. 4)
2 = Set reference from the panel
(reference r1)
3 = Signal from internal motor pot.
4 = Signal from internal motor pot.
reset if CX/CXL/CXS unit is stopped
2. 27
Source B reference
0—par.2. 28
scaling minimum value
1 Hz
0 Hz
Selects the frequency that corres- 6-20
ponds to the min. reference signal
2. 28
Source B reference
scaling maximum value
1 Hz
0 Hz
Selects the frequency that
corresponds to the max.
reference signal
0 = Scaling off
>0 = Scaled maximum value
Note!
0—1
0.00%
Custom Description
0—4
0—fmax
6-20
= Parameter value can be changed only when the drive is stopped
6
Page 6-9
Pump and fan control Application
Group 3, Output and supervision parameters
Code Parameter
Range
Step
Default
3. 1
Analog output function
0—15
1
1
3. 2
Analog output filter time 0.00—10.00 s 0.01s
3. 3
Analog output inversion
0—1
1
0
0 = Not inverted
1 = Inverted
6-21
3. 4
Analog output minimum
0—1
1
0
0 = 0 mA
1 = 4 mA
6-21
3. 5
Analog output scale
10—1000%
1%
100%
3. 6
Digital output function
0—30
1
1
0 = Not used
6-22
1 = Ready
2 = Run
3 = Fault
4 = Fault inverted
5 = CX overheat warning
6 = External fault or warning
7 = Reference fault or warning
8 = Warning
9 = Reversed
10 = Jog speed selected
11 = At speed
12 = Motor regulator activated
13 = Output freq. limit superv. 1
14 = Output freq. limit superv. 2
15 = Torque limit supervision
16 = Reference limit supervision
17 = External brake control
18 = Control from I/O terminals
19 = Drive temperature limit
supervision
20 = Unrequested rotation direction
21 = External brake control inverted
22—27 = Not in use
28 = Auxiliary drive 1 start
29 = Auxiliary drive 2 start
30 = Auxiliary drive 3 start
3. 7
Relay output 1 function
0—30
1
28
As parameter 3. 6
6-22
3. 8
Relay output 2 function
0—30
1
3
As parameter 3. 6
6-22
3. 9
Output freq. limit 1
supervision function
0—2
1
0
0 = No
1 = Low limit
2 = High limit
6-22
3. 10
Output freq. limit 1
supervision value
6
Note!
Page 6-10
0.0—fmax 0.1 Hz
(par. 1. 2)
Custom Description
Page
0 = Not used
Scale 100%
6-21
1 = O/P frequency(0—fmax)
2 = Motor speed (0—max. speed)
3 = O/P current (0—2.0 x InCX)
4 = Motor torque (0—2 x TnMot)
5 = Motor power (0—2 x PnMot)
6 = Motor voltage (0—100%xVnMot)
7 = DC-link volt. (0—1000 V)
8—10 = Not in use
11 = PI-controller reference value
12 = PI-controller actual value 1
13 = PI-controller actual value 2
14 = PI-controller error value
15 = PI-controller output
1.00s
6-21
6-21
0.0 Hz
= Parameter value can be changed only when the drive is stopped.
6-22
Pump and fan control Application
Code Parameter
Range
Step
Default Custom Description
0—2
1
0
0.0—fmax
(par. 1. 2)
0.1 Hz
0.0 Hz
0—2
1
0
0.0—200.0%
xTnCX
0.1%
100.0%
Page
3. 11
Output freq. limit 2
supervision function
0 = No
1 = Low limit
2 = High limit
6-22
3. 12
Output freq. limit 2
supervision value
3. 13
Torque limit
supervision function
3. 14
Torque limit
supervision value
3. 15
Active reference limit
supervision function
0—2
1
0
3. 16
Active reference limit
supervision value
0.0—fmax
(par. 1. 2)
0.1 Hz
0.0 Hz
6-23
3. 17
External brake off-delay
0.0—100.0 s
1
0.5 s
6-23
3. 18
External brake on-delay
0.0—100.0 s
1
1.5 s
6-23
3. 19
Drive
temperature limit
supervision function
0—2
1
0
3. 20
Drive
temperature limit
-10—+75°C
1
+40°C
3. 21
I/O-expander board (opt.)
analog output content
0—7
1
3
See parameter 3. 1
6-21
3. 22
I/O-expander board (opt.) 0.00—10.00 s
analog output filter time
0.01
1.00 s
See parameter 3. 2
6-21
3. 23
I/O-expander board (opt.)
analog output inversion
0—1
1
0
See parameter 3. 3
6-21
3. 24
I/O-expander board (opt.)
analog output minimum
0—1
1
0
See parameter 3. 4
6-21
3. 25
I/O-expander board (opt.) 10—1000%
analog output scale
1
100%
See parameter 3. 5
6-21
6-22
0 = No
1 = Low limit
2 = High limit
6-23
6-23
0 = No
1 = Low limit
2 = High limit
6-23
0 = No
1 = Low limit
2 = High limit
6-23
6-23
Group 4, Drive control parameters
Code Parameter
Range
Step
Default
Custom Description
Page
4. 1
Acc./dec. ramp 1 shape 0.0—10.0 s
0.1 s
0.0 s
0 = Linear
>0 = S-curve acc./dec. time
6-24
4. 2
Acc./dec. ramp 2 shape 0.0—10.0 s
0.1 s
0.0 s
0 = Linear
>0 = S-curve acc./dec. time
6-24
4. 3
Acceleration time 2
0.1—3000.0 s 0.1 s
10.0 s
6-25
4. 4
Deceleration time 2
0.1—3000.0 s 0.1 s
10.0 s
6-25
4. 5
Brake chopper
0—2
1
0
0 = Brake chopper not in use
1 = Brake chopper in use
2 = External brake chopper
6-25
4. 6
Start function
0—1
1
0
0 = Ramp
1 = Flying start
6-25
4. 7
Stop function
0—1
1
0
0 = Coasting
1 = Ramp
6-25
Note!
6
= Parameter value can be changed only when the drive is stopped.
Page 6-11
Pump and fan control Application
Code Parameter
4. 8
DC-braking current
Range
Step
Default
0.15—1.5 x
InCX (A)
0.1 A
0.5 x
InCX
4. 9
DC-braking time at Stop 0.00-250.00 s 0.01 s
0.00 s
4. 10
Turn on frequency of DC-0.1-10.0 Hz
brake during ramp Stop
1.5 Hz
4. 11
DC-brake time at Start
0.00-25.00 s 0.01 s
0.00 s
4. 12
Jog speed reference
fmin —fmax
(1. 1) (1. 2)
10.0 Hz
0.1 Hz
0.1 Hz
Custom Description
Page
6-25
0 = DC-brake is off at Stop
6-25
6-27
0 = DC-brake is off at Start
6-27
6-27
Group 5, Prohibit frequency parameters
Code Parameter
Range
Step
Default
5. 1
Prohibit frequency
range 1 low limit
fmin—
par. 5. 2
0.1 Hz
0.0 Hz
5. 2
Prohibit frequency
range 2 high limit
fmin—fmax
(1. 1) (1. 2)
0.1 Hz
0.0 Hz
5. 3
Prohibit frequency
range 2 low limit
fmin—
par. 5. 4
0.1 Hz
0.0 Hz
5. 4
Prohibit frequency
range 2 high limit
fmin—fmax
(1. 1) (1. 2)
0.1 Hz
0.0 Hz
5. 5
Prohibit frequency
range 3 low limit
fmin—
par. 5. 6
0.1 Hz
0.0 Hz
5. 6
Prohibit frequency
range 3 high limit
fmin—fmax
(1. 1) (1. 2)
0.1 Hz
0.0 Hz
Custom Description
Page
6-27
0 = No prohibit frequency range
6-27
6-27
0 = No prohibit frequency range
6-27
6-27
0 = No prohibit frequency range
6-27
Group 6, Motor control parameters
Code Parameter
6
6. 1
Motor control mode
6. 2
Switching frequency
6. 3
Field weakening point
6. 4
Range
Step
Default
0—1
1
0
1.0—16.0 kHz 0.1 kHz 10/3.6kHz
Custom Description
Page
0 = Frequency control
1 = Speed control
6-27
Depends on Hp rating
6-28
30—500 Hz
1 Hz
Param.
1. 11
6-28
Voltage at field
weakening point
15—200%
x Vnmot
1%
100%
6-28
6. 5
V/Hz curve mid
point frequency
0.0—fmax
0.1 Hz
0.0 Hz
6-28
6. 6
V/Hz curve mid
point voltage
0.00—100.00% 0.01%
x Vnmot
0.00%
6-28
6. 7
Output voltage at
zero frequency
0.00—100.00% 0.01%
x Vnmot
0.00%
6-28
6. 8
Overvoltage controller
0—1
1
1
0 = Controller is not operating
1 = Controller is in operation
6-29
6. 9
Undervoltage controller
0—1
1
1
0 = Controller is not operating
1 = Controller is in operation
6-29
Note!
Page 6-12
= Parameter value can be changed only when the drive is stopped.
Pump and fan control Application
Group 7, Protections
Code Parameter
Range
Step
Default
Custom Description
Page
7. 1
Response to
reference fault
0—3
1
0
0 = No action
1 = Warning
2 = Fault, stop according to
par 4.7
3 = Fault, always coasting stop
6-29
7. 2
Response to
external fault
0—3
1
2
0 = No action
1 = Warning
2 = Fault, stop according to
par 4.7
3 = Fault, always coasting stop
6-29
7. 3
Phase supervision of
the motor
0—2
2
2
0 = No action
2 = Fault
6-29
7. 4
Ground protection
0—2
2
2
0 = No action
2 = Fault
6-29
7. 5
Motor thermal protection
0—2
1
2
0 = No action
1 = Warning
2 = Fault
6-30
7. 6
Motor thermal protection 50.0—150.0 % 1.0 %
break point current
x InMOTOR
100.0%
6-30
7. 7
Motor thermal protection 5.0—150.0%
zero frequency current
x InMOTOR
1.0 %
45.0%
6-31
7. 8
Motor thermal protection
time constant
0.5—300.0
minutes
0.5
min.
17.0
min.
7. 9
Motor thermal protection
break point frequency
10—500 Hz
1 Hz
35 Hz
7. 10
Stall protection
0—2
1
1
7. 11
Stall current limit
5.0—200.0%
x InMOTOR
1.0%
130.0%
6-33
7. 12
Stall time
2.0—120.0 s
1.0 s
15.0 s
6-33
7. 13
Maximum stall frequency
1—fmax
1 Hz
25 Hz
6-33
7. 14
Underload protection
0—2
1
0
7. 15
Underload prot., field
weakening area load
7. 16
Underload protection,
zero frequency load
5.0—150.0%
x TnMOTOR
7. 17
Underload time
2.0—600.0 s
10.0—150.0 % 1.0%
x TnMOTOR
Default value is set according
to motor nominal current
6-31
6-32
0 = No action
1 = Warning
2 = Fault
0 = No action
1 = Warning
2 = Fault
6-32
6-34
50.0%
6-34
1.0%
10.0%
6-34
1.0 s
20.0 s
6-34
6
Page 6-13
Pump and fan control Application
Group 8, Autorestart parameters
Code Parameter
Range
Step
8. 1
Automatic restart:
number of tries
0—10
1
0
8. 2
Automatic restart:multi
1—6000 s
attempt maximum trial time
1s
30 s
8. 3
Automatic restart:
start function
0—1
1
0
0 = Ramp
1 = Flying start
6-36
8. 4
Automatic restart after
undervoltage trip
0—1
1
0
0 = No
1 = Yes
6-36
8. 5
Automatic restart after
overvoltage trip
0—1
1
0
0 = No
1 = Yes
6-36
8. 6
Automatic restart after
overcurrent trip
0—1
1
0
0 = No
1 = Yes
6-36
8. 7
Automatic restart after
reference fault trip
0—1
1
0
0 = No
1 = Yes
6-36
8. 8
Automatic restart after
over/undertemperature
fault trip
0—1
1
0
0 = No
1 = Yes
6-36
6
Page 6-14
Default Custom Description
0 = Not in use
Page
6-35
6-35
Pump and fan control Application
Group 9, Pump and fan control special parameters
Code Parameter
Range
Stepl
Default
Custom Description
Page
0—3
1
1
6-37
9. 1
Number of aux. drives
9. 2
Start frequency of
auxiliary drive 1
Imin—Imax
0.1 Hz
51.0 Hz
6-37
9. 3
Stop frequency of
auxiliary drive 1
Imin—Imax
0.1 Hz 25.0 Hz
6-37
9. 4
Start frequency of
auxiliary drive 2
Imin—Imax
0.1 Hz 51.0 Hz
6-37
9. 5
Stop frequency of
auxiliary drive 2
Imin—Imax
0.1 Hz 25.0 Hz
6-37
9. 6
Start frequency of
auxiliary drive 3
Imin—Imax
0.1 Hz
51.0 Hz
6-37
9. 7
Stop frequency of
auxiliary drive 3
Imin—Imax
0.1 Hz 25.0 Hz
6-37
9. 10
Start delay of the
auxiliary drives
0.0—300.0 s
0.1 s
4.0 s
6-37
9. 11
Stop delay of the
auxiliary drives
0.0—300.0 s
0.1 s
2.0 s
6-37
9. 12
Reference step after
0.0—100.0 %
start of the 1 aux. drive
0.1 %
0.0 %
In % of actual value
6-38
9. 13
Reference step after
0.0—100.0 %
start of the 2 aux. drive
0.1 %
0.0 %
In % of actual value
6-38
9. 14
Reference step after
0.0—100.0 %
start of the 3 aux. drive
0.1 %
0.0 %
In % of actual value
6-38
9. 15
(Reserved)
9. 16
Sleep level
0.0-120/500.0
Hz
0.1 Hz
0.0 Hz
Frequency below which the freq. 6-38
of the speed controlled motor has
go before starting the sleep delay
counting ( 0.0 = not in use)
9. 17
Sleep delay
0.0—3000.0 s
0.1 s
30.0 s
Time that freq. has to be below par. 6-38
9.16 before stopping the CX/CXL/CXS
9. 18
Wake up level
0.0—100.0 %
0.1 %
0.0 %
Level of the actual value for
restarting the CX/CXL/CXS
6-38
9. 19
Wake up function
0—1
1
0
0 =Wake up when falling below
the wake up level
1 = Wake up when exeeding the
wake up level
6-38
9. 20
PI-regulator bypass
0—1
1
0
1 = PI-regulator bypassed
6-39
9. 8
9. 9
Table 6.5-1 Special parameters, Groups 2—9.
6
Page 6-15
Pump and fan control Application
6.5.2 Description of Groups 2—9 parameters
2. 1
DIA2 function
1: External fault, closing contact = Fault is shown and motor is stopped when
the input is active
2: External fault, opening contact = Fault is shown and motor is stopped when
the input is not active
3: Run enable
contact open
= Start of the motor disabled
contact closed = Start of the motor enabled
4: Acc. / Dec
time select.
contact open
contact closed
= Acceleration/Deceleration time 1 selected
= Acceleration/Deceleration time 2 selected
5: Reverse
contact open
contact closed
= Forward
= Reverse
6: Jog freq.
contact closed
= Jog frequency selected for freq. refer.
7: Fault reset
contact closed
= Resets all faults
8: Acc./Dec.
operation
prohibited
contact closed
= Stops acceleration and deceleration until
the contact is opened
9: DC-braking
command
contact closed
= In the stop mode, the DC-braking operates
until the contact is opened, see figure 6.5-1.
DC-brake current is set with parameter 4. 8.
If two or more inputs are
programmed to reverse only
one of them is required for
reverse
10: Motor (digital) contact closed = Reference increases until the contact is
pot. UP
opened
Output
frequency
Param. 4. 10
t
DIA3
RUN
STOP
UD009K32
DIA3 as DC-brake command input and stop-mode = Ramp
t
DIA3
6
Figure 6.5-1 DIA3 as DC-brake
command input:
a) Stop-mode = ramp,
b) Stop-mode = coasting
Page 6-16
UD009K32
DIA3 as DC-brake command input and stop-mode = Coasting
Pump and fan control Application
2. 2
DIA3 function
Selections are same as in 2. 1 except :
10:
2. 3
Motor (digital) contact closed = Reference decreases until the contact is
pot. DOWN
opened
Vin signal range
0=
1=
Signal range 0—10 V
Custom setting range from custom minimum (par. 2. 4) to custom
maximum (par. 2. 5)
2. 4
Vin custom setting minimum/maximum
2. 5
These parameters set Vin for any input signal span within 0—10 V.
Minimum setting: Set the Vin signal to its minimum level, select parameter 2. 4,
press the Enter button
Maximum setting: Set the Vin signal to its maximum level, select parameter 2. 5,
press the Enter button
Note!
The parameter values can only be set with this procedure (not with arrow up/arrow
down buttons)
2. 6
Vin signal inversion
Parameter 2. 6 = 0, no inversion
of analog Vin signal
Parameter 2. 6 = 1, inversion
of analog Vin signal.
2. 7
Vin signal filter time
Filters out disturbances from the
incoming analog Vin signal.
A long filtering time makes the
regulation response slower.
See figure 6.5-2.
%
Unfiltered signal
100%
Filtered signal
63%
t [s]
Par. 2. 7
Figure 6.5-2 Vin signal filtering
2. 8
UD009K15
Analog input Iin signal range
0 = 0—20 mA
1 = 4—20 mA
2 = Custom signal span
6
Page 6-17
Pump and fan control Application
2. 9
2. 10
Analog input Iin custom setting
minimum/maximum
With these parameters you can scale the input current signal (Iin) signal range
between 0—20 mA.
Minimum setting: Set the Iin signal to its minimum level, select parameter 2. 9,
press the Enter button
Maximum setting: Set the Iin signal to its maximum level, select parameter 2. 10,
press the Enter button
Note!
The parameter values can only be set with this procedure (not with the arrow up/
arrow down buttons)
2. 11
Analog input Iin inversion
Parameter 2. 11 = 0, no
inversion of Iin input.
Parameter 2. 11 = 1, inversion
of Iin input.
2. 12
%
Unfiltered signal
100%
Analog input Iin filter time
Filters out disturbances from the
incoming analog Iin signal.
A long filtering time makes the
regulation response slower.
See figure 6.5-3.
Filtered signal
63%
t [s]
Figure 6.5-3 Analog input Iin filter
time
2. 13
Par. 2. 12
UD009K30
DIA5 function
1: External fault, closing contact = Fault is shown and motor is stopped when
the input is active
2: External fault, opening contact = Fault is shown and motor is stopped when
the input is not active
3: Run enable
contact open
= Start of the motor disabled
contact closed = Start of the motor enabled
6
Page 6-18
4: Acc. / Dec
time select.
contact open
contact closed
= Acceleration/Deceleration time 1 selected
= Acceleration/Deceleration time 2 selected
5: Reverse
contact open
contact closed
= Forward
= Reverse
6: Jog freq.
contact closed
= Jog frequency selected for freq. refer.
7: Fault reset
contact closed
= Resets all faults
8: Acc./Dec.
operation
prohibited
contact closed
= Stops acceleration and deceleration until
the contact is opened
9: DC-braking
command
contact closed
= In the stop mode, the DC-braking operates
until the contact is opened, see figure 6.5-1.
DC-brake current is set with parameter 4. 8.
If two or more inputs are
programmed to reverse only
one of them is required for
reverse
Pump and fan control Application
2. 14
Motor potentiometer ramp time
Defines how fast the electronic motor (digital) potentiometer value changes.
2. 15
PI-controller reference signal
0
1
2
Analog voltage reference from terminals 2—3, e.g. a potentiometer
Analog current reference trom terminals 4—5, e.g. a transducer.
Panel reference is the reference set from the Reference Page (REF).
Reference r2 is the PI-controller reference, see chapter 6.
Reference value is changed with digital input signals DIA2 and DIA3.
- switch in DIA2 closed = frequency reference increases
- switch in DIA3 closed = frequency reference decreases
Speed of the reference change can be set with the parameter 2. 3.
Same as setting 3 but the reference value is set to the minimum
frequency (par. 1. 1) each time the drive is stopped. When the value of
parameter 1. 5 is set to 3 or 4, the value of parameter 2.1 is automatically set
to 4 and the value of parameter 2. 2 is automatically set to 10.
3
4
2. 16
2. 17
2. 18
PI-controller actual value selection
Actual value 1
Actual value 2
These parameters select the PI-controller actual value.
2. 19
Actual value 1 minimum scale
Sets the minimum scaling point for Actual value 1. See figure 6.5-4.
2. 20
Actual value 1 maximum scale
Sets the maximum scaling point for Actual value 1. See figure 6.5-4.
Scaled
input signal [%]
Scaled
input signal [%]
100
100
Par. 2 . 19 = 30%
Par. 2 . 20 = 80%
76.5
(15.3 mA)
Par. 2. 19 = -30%
Par. 2. 20 = 140%
17. 7
(3.5 mA)
30
0
0
0
4
3.0
6.0
8.8
80
8.0
16.0
16.8
Analog
100 input [%]
10.0 V
20.0 mA
20.0 mA
-30
0
100
0
0
4
10.0 V
20.0 mA
20.0 mA
Analog
140 input [%]
C h012 K 34
Figure 6.5-4 Examples about the scaling of actual value signal.
2. 21
Actual value 2 minimum scale
Sets the minimum scaling point for Actual value 2.
2. 22
Actual value 2 maximum scale
6
Sets the maximum scaling point for Actual value 2.
Page 6-19
Pump and fan control Application
2. 23
Error value inversion
This parameter allows you to invert the error value of the PI-controller (and thus the
the operation of the PI-controller).
2. 24
2. 25
PI-controller minimum limit
PI-controller maximum limit
These parameters set the minmum and maximum values of the PI-controller output.
Parameter value limits: par 1.1 <par. 2. 24 <par. 2. 25.
2. 26
Direct frequency reference, Place B
0
1
2
3
4
Analog voltage reference from terminals 2—3, e.g. a potentiometer
Analog current reference trom terminals 4—5, e.g. a transducer.
Panel reference is the reference set from the Reference Page (REF),
Reference r1 is the Place B reference, see chapter 6.
Reference value is changed with digital input signals DIA2 and DIA3.
- switch in DIA2 closed = frequency reference increases
- switch in DIA3 closed = frequency reference decreases
Speed of the reference change can be set with the parameter 2. 3.
Same as setting 3 but the reference value is set to the minimum
frequency (par. 1. 1) each time the drive is stopped.
When the value of parameter 1. 5 is set to 3 or 4, the value of parameter
2.1 is automatically set to 4 and the value of parameter 2. 2 is automatically
set to 10.
2. 27
Place B reference scaling, minimum value/maximum value
2. 28
Setting limits: 0 < par. 2. 27 < par. 2. 28 < par. 1. 2.
If par. 2. 28 = 0 scaling is set off.
See figures 6.5-5 and 6.5-6.
(In the figures below the voltage input Vin with signal range 0—10 V is selected for source B
reference)
O utput
[Hz]
f requency
O ut put
[Hz]
f requency
M ax freq. par 1 . 2
Max f req. par 1 . 2
Par. 2. 2 8
Par. 2. 27
Analog
input [V]
Min freq. par 1. 1
0
10
Analog
input [V]
Min freq. par 1. 1
0
10
Ch012K35
Figure 6.5-5 Reference scaling.
6
Page 6-20
Figure 6.5-6 Reference scaling, par. 2. 15 = 0
Pump and fan control Application
3. 1
Analog output function
%
See table on page 6-10.
3. 2
Analog output filter time
Unfiltered signal
100%
Filters the analog output signal.
See figure 6.5-7.
Filtered signal
63%
t [s]
Par. 3. 2
UD009K16
Figure 6.5-7 Analog output filtering.
3.3
Analog output invert
Inverts analog output signal:
max output signal = minimum set value
min output signal = maximum set value
Analog
output
current
20 mA
12 mA
Param. 3. 5
= 50%
10 mA
Param. 3. 5
= 100%
4 mA
Param. 3. 5
= 200%
Figure 6.5-8 Analog output invert.
3. 4
Selected (para. 3. 1)
signal max. value
0 mA
0
0.5
1.0
Ch012K17
Analog output minimum
Defines the signal minimum to
be either 0 mA or 4 mA. See
figure 6.5-9.
3. 5
Analog output scale
Scaling factor for analog output.
See figure 6.5-9.
Signal
Max. value of the signal
Output freq.
Motor speed
Output
current
Motor torque
Motor power
Motor voltage
DC-link volt.
PI-ref. value
PI-act. value1
PI-act. value2
PI-error value
PI-output
Max. frequency (p. 1. 2)
Max. speed (nnxfmax/fn)
2 x InCX
2 x TnMot
2 x PnMot
100% x VnMot
1000 V
100% x ref. value max.
100% x act. value max.
100% x act. value max.
100%x error value max.
100% x output max.
Analog
output
current
Param. 3. 5
= 200%
Param. 3. 5
= 100%
20 mA
12 mA
Param. 3. 5
= 50%
10 mA
Par. 3. 4 = 1
4 mA
Max. value of signal
selected by param. 3. 1
Par. 3. 4 = 0
0 mA
0
0.5
1.0
Ch012K18
Figure 6.5-9 Analog output scale.
Page 6-21
6
Pump and fan control Application
3. 6
3. 7
3. 8
Digital output function
Relay output 1 function
Relay output 2 function
Setting value
0 = Not used
Signal content
Out of operation
Digital output DO1 sinks current and programmable
relay (RO1, RO2) is activated when:
1
2
3
4
5
6
7
= Ready
= Run
= Fault
= Fault inverted
= CX overheat warning
= External fault or warning
= Reference fault or warning
8 = Warning
9 = Reversed
10 = Multi-step or jog speed
11 = At speed
12 = Motor regulator activated
13 = Output frequency supervision 1
14= Output frequency supervision 2
15= Torque limit supervision
16= Active reference
limit supervision
17 = External brake control
18 = Control from I/O terminals
19 = Drive temperature limit
supervision
20 = Unrequested rotation direction
21 = External brake control inverted
22—27 = Not in use
28 = Auxiliary drive 1 start
29 = Auxiliary drive 2start
30 = Auxiliary drive 3 start
The drive is ready to operate
The drive operates (motor is running)
A fault trip has occurred
A fault trip has not occurred
The heat-sink temperature exceeds +70°C
Fault or warning depending on parameter 7. 2
Fault or warning depending on parameter 7. 1
- if analog reference is 4—20 mA and signal is <4mA
If a warning exists. See Table 7.10-1 in User's Manual
The reverse command has been selected
Multi-step or jog speed has been selected by digital inp.
The output frequency has reached the set reference
Overvoltage or overcurrent regulator was activated
The output frequency goes outside of the set supervision
Low limit/ High limit (par. 3. 9 and par. 3. 10)
The output frequency goes outside of the set supervision
Low limit/ High limit (par. 3. 11 and par. 3. 12)
The motor torque goes outside of the set supervision
Low limit/ High limit (par. 3. 13 and par. 3. 14)
Active reference goes outside of the set supervision
Low limit/ High limit (par. 3. 15 and par. 3. 16)
External brake ON/OFF control with programmable
delay (par 3. 17 and 3. 18)
External control mode selected with progr. pushbutton#2
Temperature on drive goes outside the
set supervision limits (par. 3. 19 and 3. 20)
Rotation direction of the motor shaft is different from the
requested one
External brake ON/OFF control (par. 3.17 and 3.18).
Output active when brake control is ON
Starts and stops auxiliary drive 1
Starts and stops auxiliary drive 2
Starts and stops auxilary drive 3
Table 6.5-2 Output signals via DO1 and output relays RO1 and RO2.
3. 9
3. 11
Output frequency limit 1, supervision function
Output frequency limit 2, supervision function
0 = No supervision
1 = Low limit supervision
2 = High limit supervision
If the output frequency goes under/over the set limit (3. 10, 3. 12) this function
generates a warning message via the digital output DO1 or via a relay output RO1
or RO2 depending on the settings of the parameters 3. 6—3. 8.
6
3. 10
3. 12
Output frequency limit 1, supervision value
Output frequency limit 2, supervision value
The frequency value to be supervised by the parameter 3. 9 (3. 11).
See figure 6.5-10.
Page 6-22
Pump and fan control Application
3. 13
Torque limit , supervision
function
0 = No supervision
1 = Low limit supervision
2 = High limit supervision
If the calculated torque value goes
under/over the set limit (3. 14) this
function generates a warning
message via the digital output
DO1 or via a relay output RO1 or
RO2 depending on the settings of
parameters 3. 6—3. 8.
Figure 6.5-10 Output frequency
supervision.
3. 14
Par. 3.9 = 2
f[Hz]
Par 3. 10
UD009K19
Example: 21 RO1
22 RO1
23 RO1
21 RO1
22 RO1
23 RO1
t
21 RO1
22 RO1
23 RO1
Torque limit , supervision value
The calculated torque value to be supervised by parameter 3. 13.
3. 15
Active reference limit, supervision function
0 = No supervision
1 = Low limit supervision
2 = High limit supervision
If the reference value goes under/over the set limit (3. 16) this function generates a
warning message via the digital output DO1 or via a relay output RO1 or
RO2 depending on the settings of parameters 3. 6—3. 8. The supervised reference
is the current active reference. It can be source A or B reference depending on DIB6
input or panel reference if the panel is the active control source.
3. 16
Active reference limit , supervision value
The frequency value to be supervised by the parameter 3. 15.
3. 17
3. 18
External brake-off delay
External brake-on delay
The function of the external brake can be delayed from the start and stop control
signals with these parameters. See figure 6.5-11.
The brake control signal can be programmed via the digital output DO1 or via one
of relay outputs RO1 and RO2, see parameters 3. 6—3. 8.
3. 19
Drive temperature limit supervision function
0 = No supervision
1 = Low limit supervision
2 = High limit supervision
If the temperature of the drive goes under/over the set limit (3. 20) this function
generates a warning message via the digital output DO1 or via a relay output RO1
or RO2 depending on the settings of parameters 3. 6—3. 8.
3. 20
6
Drive temperature limit value
The temperature value to be supervised by parameter 3. 19.
Page 6-23
Pump and fan control Application
a)
tOFF = Par. 3. 17
tON = Par. 3. 18
External
BRAKE: OFF
Digital or
relay output
ON
DIA1: RUN FWD
STOP
DIA2: RUN REV
t
STOP
UD012K45
b)
tOFF = Par. 3. 17
tON = Par. 3. 18
External
BRAKE: OFF
Digital or
relay output
ON
DIA1: START
PULSE
DIA2: STOP
PULSE
t
Figure 6.5-11 External brake control:
4. 1
4. 2
a) Start/Stop logic selection par. 2. 1 = 0, 1 or 2
b)Start/Stop logic selection par. 2. 1 = 3.
Acc/Dec ramp 1 shape
Acc/Dec ramp 2 shape
The acceleration and deceleration ramp shape can be programmed with these
parameters.
Setting the value = 0 gives you a linear ramp shape. The output frequency
immediately follows the input with a ramp time set by parameters 1. 3, 1. 4 (4. 3, 4.
4 for Acc/Dec time 2).
[Hz]
Setting 0.1—10 seconds for 4. 1 (4.
2) causes an S-shaped ramp. The
speed changes are smooth.
Parameter 1. 3/ 1. 4 (4. 3/ 4. 4)
determines the ramp time of the
acceleration/deceleration in the
middle of the curve. See figure See
figure 6.5-12.
Figure 6.5-12 S-shaped acceleration/
deceleration.
6
Page 6-24
1. 3, 1. 4
(4. 3, 4. 4)
4. 1 (4. 2)
4. 1 (4. 2)
[t]
UD009K20
Pump and fan control Application
4. 3
4. 4
Acceleration time 2
Deceleration time 2
These values correspond to the time required for the output frequency to accelerate
from the set minimum frequency (par. 1. 1) to the set maximum frequency
(par. 1. 2). With this parameter it is possibile to set two different acceleration/
deceleration times for one application. The active set can be selected with
programmable signal DIA3 of this application. See parameter 2. 2. Acceleration/
deceleration times can be reduced with a external free analog input signal. See
parameters 2. 18 and 2. 19.
4. 5
Brake chopper
0 = No brake chopper
1 = Brake chopper and brake resistor installed
2 = External brake chopper
When the drive is decelerating the motor, the energy stored in the inertia of the motor
and the load is fed into the external brake resistor. If the brake resistor is selected
correctly the drive is able to decelerate the load with a torque equal to that of
acceleration. See the separate Brake resistor installation manual.
4. 6
Start function
Ramp:
0
The drive starts from 0 Hz and accelerates to the set reference frequency within
the set acceleration time. (Load inertia or starting friction may cause prolonged
acceleration times).
Flying start:
1
The drive starts into a running motor by first finding the speed the motor is
running at. Searching starts from the maximum frequency down until the actual
frequency reached. The output frequency then accelerates/decelerates to the
set reference value at a rate determined by the acceleration/deceleration ramp
parameters.
Use this mode if the motor may be coasting when the start command is given.
With the flying start it is possible to ride through short utility voltage
interruptions.
4. 7
Stop function
Coasting:
0
The motor coasts to an uncontrolled stop with the CX/CXL/CXS off, after
the Stop command.
Ramp:
1
After the Stop command, the speed of the motor is decelerated according to
the deceleration ramp time parameter. If the regenerated energy is high it may
be necessary to use an external braking resistor for faster deceleration.
4. 8
DC braking current
Defines the current injected into the motor during the DC braking.
4. 9
DC braking time at stop
4. 9
DC braking time at stop
Determines whether DC braking is ON or OFF. It also determines the braking duration
time of the DC-brake when the motor is stopping. The function of the DC-brake
depends on the stop function, parameter 4. 7. See figure 6.5-13.
Page 6-25
6
Pump and fan control Application
0
DC-brake is not used
>0
DC-brake is in use depending on the setup of the stop function (param. 4.
7). The time is set by the value of parameter 4. 9:
Stop-function = 0 (coasting):
After the stop command, the motor will coast to a stop with the CX/CXL/CXS
off.
With DC-injection, the motor can be electrically stopped in the shortest possible
time, without using an optional external braking resistor.
The braking time is scaled according to the frequency when the DC- braking
starts. If the frequency is > nominal frequency of the motor (par. 1.11), the value
of parameter 4.9 determines the braking time. When the frequency is < 10%
of the nominal, the braking time is 10% of the set value of parameter 4.9.
fout [Hz]
fout [Hz]
fn
fn
Output frequency
Motor speed
Output frequency
Motor speed
0,1x fn
DC-braking ON
DC-braking ON
t
t
t = 0.1 x par. 4. 9
t = 1 x par. 4. 9
RUN
STOP
RUN
STOP
UD009K21
Figure 6.5-13 DC-braking time when par. 4. 7 = 0.
Stop-function = 1 (ramp):
After the Stop command, the speed of the motor is reduced baed on the
deceleration ramp parameter, if no regeneration occurs due to load inertia, to
a speed defined with by parameter 4. 10, where the DC-braking starts.
The braking time is defined with parameter 4. 9.
If high inertia exists, it is recommended to use an external braking resistor for
faster deceleration. See figure 6.5-14.
fout [Hz]
4. 10
Execute frequency of DCbrake during ramp Stop
Motor speed
Output frequency
See figure 6.5-14.
DC-braking
Param. 4. 10
t
6
t = param. 4. 9
RUN
STOP
UD009K23
Figure 6.5-14 DC-braking time when par. 4. 7 = 1.
Page 6-26
Pump and fan control Application
4. 11
DC-brake time at start
0
DC-brake is not used
>0
DC-brake is active when the start
command is given. This parameter
defines the time before the brake
is released. After the brake is released the output frequency increases according to the set start
function parameter 4. 6 and acceleration parameters (1. 3, 4. 1 or 4.
2, 4. 3), see figure 6.5-15.
fout [Hz]
Output
frequency
Figure 6.5-15 DC-braking time at
start.
4. 12
t
Par 4. 11
Jog speed reference
Parameter value defines the jog
speed selected with the digital
input.
RUN
STOP
UD009K22
5. 1-5.6 Prohibit frequency area,
Low limit/High limit
In some systems it may be necessary to avoid certain frequencies
because of mechanical resonance
problems.
fout
[Hz]
With these parameters it is
possible to set limits for three "skip
frequency" regions. The accuracy
of the setting is 0.1 Hz.
Figure 6.5-16 Example of prohibit
frequency area setting.
frequency
reference
5. 1
5. 3
5. 5
5. 2
5. 4
5. 6
[Hz]
UD009K33
6. 1
6. 2
Motor control mode
0 = Frequency control:
(V/Hz)
The I/O terminal and panel references are frequency
references and the drive controls the output
frequency (output freq. resolution 0.01 Hz)
1 = Speed control:
(sensorless vector)
The I/O terminal and panel references are speed
references and the drive controls the motor speed
(control accuracy ± 0.5%).
Switching frequency
Motor noise can be minimized by using a high switching frequency. Increasing the
frequency reduces the capacity of the CX/CXL/CXS. Before changing the frequency
from the factory default 10 kHz (3.6 kHz>40Hp), check the drive derating from the
curves in figure 5.2-2 and 5.2-3 of the User's Manual.
Page 6-27
6
Pump and fan control Application
6. 3
6. 4
Field weakening point
Voltage at the field weakening point
The field weakening point is the output frequency where the output voltage reaches
the set maximum value (par. 6. 4). Above that frequency the output voltage remains
at the set maximum value.
Below that frequency output voltage depends on the setting of the V/Hz curve
parameters 1. 8, 1. 9, 6. 5, 6. 6 and 6. 7. See figure 6.5-17.
When parameters 1. 10 and 1. 11, nominal voltage and nominal frequency of
the motor are set, parameters 6. 3 and 6. 4 are also set automatically to the
corresponding values. If different values for the field weakening point and
the maximum output voltage are required, change these parameters after setting
the parameters 1. 10 and 1. 11.
6. 5
V/Hz curve, middle point frequency
If the programmable V/Hz curve has been selected with parameter 1. 8 this
parameter defines the middle point frequency of the curve. See figure 6.5-17.
6. 6
V/Hz curve, middle point voltage
If the programmable V/Hz curve has been selected with parameter 1. 8 this
parameter defines the middle point voltage (% of motor nominal voltage) of the
curve. See figure 6.5-17.
6. 7
Output voltage at zero frequency
If the programmable V/Hz curve has been selected with parameter 1. 8 this
parameter defines the zero frequency voltage of the curve. See figure 6.5-17.
Vn
Parameter 6.4
U[V]
Parameter 6.6
Default 10%
Parameter 6.7
Default 1.3 %
Parameter 6.5
(Default 5 Hz)
Parameter 6.3
f[Hz]
Figure 6.5-17 Programmable V/Hz curve.
6. 8
6. 9
Overvoltage controller
Undervoltage controller
These parameters allow the over/undervoltage controllers to be switched ON or
OFF. This may be useful in cases where the utility supply voltage varies more than
-15%—+10% and the application requires a constant speed. If the controllers are
ON, they will change the motor speed in over/undervoltage cases. Overvoltage =
faster, undervoltage = slower.
6
Over/undervoltage trips may occur when controllers are not used.
Page 6-28
Pump and fan control Application
7. 1
Response to the reference fault
0 = No response
1 = Warning
2 = Fault, stop mode after fault according to parameter 4.7
3 = Fault, always coasting stop mode after fault
A warning or a fault action and message is generated if 4—20 mA reference signal
is used and the signal falls below 4 mA. The information can also be programmed
via digital output DO1 and via relay outputs RO1 and RO2.
7. 2
Response to external fault
0 = No response
1 = Warning
2 = Fault, stop mode after fault according to parameter 4.7
3 = Fault, always coasting stop mode after fault
A warning or a fault action and message is generated from the external fault signal
in the digital input DIA3. The information can also be programmed into digital output
DO1 and into relay outputs RO1 and RO2.
7. 3
Phase supervision of the motor
0 = No action
2 = Fault
Phase supervision of the motor ensures that the motor phases have approximately
equal current.
7. 4
Ground fault protection
0 = No action
2 = Fault message
Ground fault protection ensures that the sum of the motor phase currents is zero.
The overcurrent protection is always working and protects the drive from ground
faults with high current levels.
Parameters 7. 5—7. 9 Motor thermal protection
General
Motor thermal protection is to protect the motor from overheating. The CX/CXL/CXS
drive is capable of supplying higher than nominal current to the motor. If the load
requires this high current, there is a risk that motor will be thermally overloaded.
This is true especially at low frequencies. With low frequencies the cooling effect
of the motor fan is reduced and the capacity of the motor is reduced. If the motor is
equipped with an external fan, the load reduction on low speed is small.
Motor thermal protection is based on a calculated model and it uses the output
current of the drive to determine the load on the motor. When the power is turned
on to the drive, the calculated model uses the heatsink temperature to determine
the initial thermal stage for the motor. The calculated model assumes that the
ambient temperature of the motor is 40°C.
Motor thermal protection can be adjusted by setting several parameters. The thermal
current IT specifies the load current above which the motor is overloaded. This
current limit is a function of the output frequency. The curve for IT is set with
parameters 7. 6, 7. 7 and 7. 9. Refer to the figure 6.5-18. The default values of
these parameters are set from the motor nameplate data.
Page 6-29
6
Pump and fan control Application
With the output current at IT the thermal stage will reach the nominal value (100%).
The thermal stage changes by the square of the current. With output current at
75% from IT the thermal stage will reach 56% value and with output current at
120% from IT the thermal stage would reach 144% value. The function will trip the
drive (refer par. 7. 5) if the thermal stage will reach a value of 105%. The response
time of the thermal stage is determined with the time constant parameter 7. 8. The
larger the motor the longer it takes to reach the final temperature.
The thermal stage of the motor can be monitored through the display. Refer to the
table for monitoring items. (User's Manual, table 7.3-1).
!
7. 5
CAUTION! The calculated model does not protect the motor if the cooling of
the motor is reduced either by blocking the airflow or due to dust or
dirt.
Motor thermal protection
Operation:
0 = Not in use
1 = Warning
2 = Trip function
Tripping and warning will give a display indication with the same message code. If
tripping is selected, the drive will stop and activate the fault stage.
Deactivating the protectionby setting this parameter to 0, will reset the thermal stage
of the motor to 0%.
7. 6
Motor thermal protection, break point current
The current can be set between 50.0—150.0% x InMotor.
This parameter sets the value for thermal current at frequencies above the
break point on the thermal current curve. Refer to the figure 6.5-18.
The value is set as a percentage of the motor nameplate nominal current, parameter
1. 13, nominal current of the motor, not the drive's nominal output current.
The motor's nominal current is the current which the motor can withstand in direct
on-line use without being overheated.
If parameter 1. 13 is adjusted, this parameter is automatically restored to its default
value.
Setting this parameter (or parameter 1. 13) does not affect the maximum output
current of the drive. Parameter 1. 7 alone determines the maximum output
current of the drive.
7. 7
Motor thermal protection, zero frequency current
The current can be set between 10.0—150.0% x InMotor. This parameter sets the
value for thermal current at zero frequency. Refer to the figure 6.5-18.
The default value is set assuming that there is no external fan cooling the motor. If
an external fan is used this parameter can be set to 90% (or higher).
The value is set as a percentage of the motor's nameplate nominal current,
6
parameter 1. 13, not the drive's nominal output current. The motor's nominal current
is the current which the motor can stand in direct on-line use without being
overheated.
Page 6-30
Pump and fan control Application
I
Current
limit
par. 1. 7
Overload area
IT
Par. 7. 6
Par. 7. 7
f
Figure 6.5-18 Motor thermal current
IT curve.
Par. 7. 9
[Hz]
UMCH7_91
If you change parameter 1. 13, this parameter is automatically restored to the
default value.
Setting this parameter (or parameter 1. 13) does not affect to the maximum output
current of the drive. Parameter 1. 7 alone determines the maximum output current
of the drive.
7. 8
Motor thermal protection, time constant
The time can be set between 0.5—300 minutes.This is the thermal time constant
of the motor. The larger the motor the greater the time constant. The time constant
is defined as the time it takes the calculated thermal stage to reach 63% of its final
value.
The motor thermal time is specific to a motor design and it varies between different
motor manufacturers.
The default value for the time constant is calculated based on the motor nameplate
data from parameters 1. 12 and 1. 13. If either of these parameters is reset, then
this parameter is set to its default value.
If the motor's t6 -time is known (given by the motor manufacturer) the time constant
parameter could be set based on t6 -time. As a rule of thumb, the motor thermal
time constant in minutes equals to 2xt6 (t6 in seconds is the time a motor can safely
operate at six times the rated current). If the drive is in stopped, the time constant
is internally increased to three times the set parameter value. The cooling in the
stop stage is based on convection with an increased time constant.
7. 9
Motor thermal protection, break point frequency
The frequency can be set between 10—500 Hz.This is the frequency break point
of thermal current curve. With frequencies above this point the thermal capacity of
the motor is assumed to be constant. Refer to the figure 6.5-18.
6
Page 6-31
Pump and fan control Application
The default value is based on motor's nameplate data, parameter 1. 11. It is 35 Hz
for a 50 Hz motor and 42 Hz for a 60 Hz motor. More generally it is 70% of the
frequency at the field weakening point (parameter 6. 3). Changing either parameter
1. 11 or 6. 3 will restore this parameter to its default value.
Motor temperature
Trip area
105%
Motor
current
Trip/warning
par. 7. 5
I/IT
Time constant T
*)
Motor temperature Θ = (I/IT)2 x (1-e-t/T)
Time
*) Changed with motor size and
adjusted with parameter 7. 8
UMCH7_92
Figure 6.5-19 Calculating motor temperature
Parameters 7. 10— 7. 13, Stall protection
General
Motor stall protection protects the motor from short time overload situations like a
stalled shaft. The reaction time of stall protection can be set shorter than with motor
thermal protection. The stall state is defined with two parameters, 7.11. Stall Current
and 7.13. Stall Frequency. If the current is higher than the set limit and output
frequency is lower than the set limit, the stall state is true. There is actually no real
indication of the shaft rotation. Stall protection is a type of overcurrent protection.
7. 10
Stall protection
Operation:
0 = Not in use
1 = Warning
2 = Trip function
Tripping and warning will give a display indication with the same message code. If
tripping is set on, the drive will stop and activate the fault stage.
Setting this parameter to 0 will deactivate the protection and will reset the stall time
counter to zero.
6
Page 6-32
Pump and fan control Application
7. 11
Stall current limit
I
The current can be set between
0.0—200% x InMotor.
In the stall stage the current has to
be above this limit. Refer to the
figure6.5-20. The value is set as a
percentage of the motor's nameplate nominal current, parameter
1.13. If parameter 1.13 is
adjusted, this parameter is
automatically restored to its
default value.
Stall area
Par. 7. 11
f [Hz]
Figure 6.5-20 Setting the stall
characteristics.
7. 12
Par. 7. 13
UMCH7_11
Stall time
The time can be set between 2.0—120 s.
This is the maximum allowed time for a stall stage. There is an internal up/down
counter to count the stall time. Refer to the figure 6.5-21.
If the stall time counter value goes above this limit the protection will cause a trip
(refer to the parameter 7. 10).
7. 13
Maximum stall frequency
The frequency can be set between
1—fmax (par. 1. 2).
In the stall state, the output
frequency has to be smaller than
this limit. Refer to figure 6.5-20.
Stall time counter
Trip area
Par. 7. 12
Trip/warning
par. 7. 10
UMCH7_12
Time
Figure 6.5-21 Counting the stall time.
Stall
No stall
Parameters 7. 14— 7. 17, Underload protection
General
The purpose of motor underload protection is to ensure that there is load on the
motor while the drive is running. If the motor load is reduced, there might be a
problem in the process, e.g. broken belt or dry pump.
Motor underload protection can be adjusted by setting the underload curve with
parameters 7. 15 and 7. 16. The underload curve is a squared curve set between
zero frequency and the field weakening point. The protection is not active below
5Hz (the underload counter value is stopped). Refer to figure 6.5-22.
Page 6-33
6
Pump and fan control Application
The torque values for setting the underload curve are set with percentage values
which refer to the nominal torque of the motor. The motor's nameplate data,
parameter 1. 13, the motor's nominal current and the drive's nominal current ICT
are used to find the scaling ratio for the internal torque value. If other than
standard motor is used with the drive, the accuracy of the torque calculation is
decreased.
7. 14
Underload protection
Operation:
0 = Not in use
1 = Warning
2 = Fault
Tripping and warning will give a display indication with the same message code. If
tripping is set active the drive will stop and activate the fault stage.
Deactivating the protection, by setting this parameter to 0, will reset the underload
time counter to zero.
7. 15
Underload protection, field weakening area load
Torque
The torque limit can be set
between 20.0—150 % x TnMotor.
This parameter is the value for
the minimum allowed torque
when the output frequency is
above the field weakening point.
Refer to the figure 6.5-22.
If parameter 1. 13 is adjusted,
this parameter is automatically
restored to its default value.
Par. 7. 15
Par. 7. 16
Figure 6.5-22 Setting of minimum
load.
7. 16
Underload area
ff [Hz]
5 Hz
Field weakening
point par. 6. 3
ChCH7_15
Underload protection, zero frequency load
Torque limit can be set between 10.0—150 % x TnMotor.
This parameter is the value for the minimum allowed torque with zero frequency.
Refer to the figure 6.5-22. If parameter 1. 13 is adjusted, this parameter is
automatically restored to its default value.
7. 17
Underload time
This time can be set between 2.0—600.0 s.
This is the maximum allowed time for an underload state. There is an internal up/
down counter to accumulate the underload time. Refer to the figure 6.5-23.
If the underload counter value goes above this limit, the protection will cause a trip
(refer to the parameter 7. 14). If the drive is stopped the underload counter is reset
to zero.
6
Page 6-34
Pump and fan control Application
Underload time counter
Trip area
Par. 7. 17
Trip/warning
par. 7. 14
UMCH7_17
Time
Figure 6.5-23 Counting the underload time.
8. 1
8. 2
Underl.
No underl.
Automatic restart: number of tries
Automatic restart: trial time
The Automatic restart function restarts the drive after the faults selected with
parameters 8. 4—8. 8. The Start function for Automatic restart is selected with
parameter 8. 3.
Parameter 8. 1 determines how many automatic restarts can be made during the
trial time set by the parameter 8. 2.
The time counting starts from the first autorestart. If the number of restarts does
not exceed the value of parameter 8.1 during the trial time, the counting is cleared
after the trial time has elapsed. The next fault starts the counting again.
See figure 6.5-24.
Number of faults
during t = ttrial
ttrial
4
ttrial
3
2
Par. 8. 1 = 3
ttrial = Par. 8. 2
1
t
Three faults
RUN
STOP
Four faults
UD012K25
Figure 6.5-24 Automatic restart.
6
Page 6-35
Pump and fan control Application
8. 3
Automatic restart, start function
The parameter defines the start mode:
0 = Start with ramp
1 = Flying start, see parameter 4. 6.
8. 4
Automatic restart after undervoltage trip
0 = No automatic restart after undervoltage trip
1 = Automatic restart after undervoltage fault condition returns to the normal
condition (DC-link voltage returns to the normal level)
8. 5
Automatic restart after overvoltage trip
0 = No automatic restart after overvoltage trip
1 = Automatic restart after overvoltage fault condition returns to the normal
condition (DC-link voltage returns to the normal level)
8. 6
Automatic restart after overcurrent trip
0 = No automatic restart after overcurrent trip
1 = Automatic restart after overcurrent faults
8. 7
Automatic restart after reference fault trip
0 = No automatic restart after reference fault trip
1 = Automatic restart after analog current reference signal (4—20 mA)
returns to the normal level (>4 mA)
8. 8
Automatic restart after over/undertemperature fault trip
0 = No automatic restart after temperature fault trip
1 = Automatic restart after heatsink temperature has returned to its normal
level between -10°C—+75°C.
6
Page 6-36
Pump and fan control Application
9. 1
Number of auxiliary drives
With this parameter the number of auxiliary drives in use is defined. The signals to
control the auxiliary drives on and off can be programmed to the relay outputs or to
the digital output with parameters 3. 6 - 3. 8. The default setting is one auxiliary drive
in use, pre-programmed to relay output RO1.
9. 2
9. 4
9. 6
Start frequency of auxiliary drive 1
Start frequency of auxiliary drive 2
Start frequency of auxiliary drive 3
The frequency of the CX/CXL/CXS must exceed by 1 Hz the limit defined with these
parameters before the auxiliary drive is started. The 1 Hz provides hysteresis to avoid
unnecessary starts and stops. See figure 6.5-25.
9. 3
9. 5
9. 7
Stop frequency of auxiliary drive 1
Stop frequency of auxiliary drive 2
Stop frequency of auxiliary drive 3
The frequency of the CX/CXL/CXS must fall 1Hz below the limit defined with these
parameters before the auxiliary drive is stopped. The stop frequency limit also
defines the frequency the drive drops to after starting the auxiliary drive. See figure
6.5-25.
9. 10
Start delay of auxiliary drives
Starting of the auxiliary drives is delayed based on the time setting of parameter 9.
10. This prevents unnecessary starts which could be caused by a flow reference
request which is momentarily above the previous reference level. See figure 6.525.
9. 11
Stop delay of auxiliary drives
Stopping of the auxiliary drives is delayed based on the time setting of parameter
9. 10. This prevents unnecessary stops which could be caused by a flow reference
request which is momentarily below the previous reference level. See figure 6.525.
Output frequency [Hz]
Output frequency [Hz]
Start delay of the aux.
drives (par 9.10)
Start freq. of aux. drive 1 (par. 9.2 + 1 Hz)
Start freq. of aux. drive 1 (par. 9.2 + 1 Hz)
Frequency
increase
during the
start delay
Frequency after
starting the aux. drive1
is par. 9.3 - 1 Hz
Stop freq. of aux.
drive 1
(par. 9.3 - 1 Hz)
Fmin
par. 1.1
Stop freq. of aux. drive 1
(par. 9.3 - 1 Hz)
Frequency after
starting the aux. drive1
is par. 9.3 + 1 Hz
Flow
Frequency decrease
during the stop delay
Fmin
par. 1.1
Stop delay of the aux.
drives (par 9.11)
Flow
Figure 6.5-25 Example of the effect of parameters in variable speed and one auxiliary
drive system.
Page 6-37
6
Pump and fan control Application
9. 12
9. 13
9. 14
Reference step after start of the auxiliary drive 1
Reference step after start of the auxiliary drive 2
Reference step after start of the auxiliary drive 3
A reference step will automatically be added to the reference value when the
corresponding auxiliary drive is started. This allows compensation for the pressure
loss in the piping caused by the increased flow. See figure 6.5-26.
Reference for PI-controller
Reference step 3
par. 9.14
Reference step 2
par. 9.13
Reference step 1
par. 9.12
Reference
Reference
(analog
input)
(analoginput)
Time
start
Aux. drive 1
Aux. drive 2
stop
start
stop
start
Aux. drive 3
stop
Figure 6.5-26 Reference steps after starting and stopping the auxiliary drives.
9. 16
9. 17
Sleep level
Sleep delay
Changing this parameter from a value of 0.0 Hz activates the sleep function where
the drive is stopped automatically when the frequency is below the sleep level (par.
9.16) continuously over the sleep delay (9. 17) time. During the stop state the Pump
and fan control logic is operating and will switch the drive to the Run state when the
wake up level defined with parameters 9. 18 and 9. 19 is reached. See figure 6.527.
9. 18
Wake up level
The wake up level defines the percentage level below which the actual frequency
must fall or which has to be exceeded before starting the drive from the sleep
function. See figure 6.5-27.
6
9. 19
Wake up function
This parameter defines if the wake up occurs when the frequency either falls below
or exceeds the wake up level (par. 9. 18).
Page 6-38
Pump and fan control Application
Actual value
Wake up level (param. 9.18 )
Time
Output frequency
t < tsleep (param. 9.17)
tsleep
Sleep level
param. 9.16
Time
running
Start/Stop status of
the var. speed drive
stop
Figure 6.5-27 Example of the sleep function.
9. 20
PI-regulator bypass
With this parameter the PI-requlator can be programmed to be bypassed. Then the
frequency of the drive is controlled by the frequency reference and the starting points
of the auxiliary drives are also defined by this reference.
Output freq.
Max. freq.
(par. 1.2)
Start freq. of the aux. drive 1
(par.9.2)
Minimum freq.
(par. 1.1)
Start freq. of the aux. drive 2
(par.9.4)
Stop freq. of the aux.
drive 2 (par.9.5)
Stop freq. of the aux.
drive 1 (par.9.3)
Minimum of the
actual value
Start/stop control of
the freq. converter stop
Auxiliary drive 1
Auxiliary drive 2
Actual value
Maximum of the
actual value
start
start
stop
6
start
stop
Figure 6.5-28 Example of the function of variable speed drive and two auxiliary
drives when PI-requlator is bypassed with parameter 9. 20.
Page 6-39
Pump and fan control Application
6.6 MONITORING DATA
The PI-control application has additional items for monitoring (n20 - n25). See table 6.6-1
Data
number
Data
name
Unit
Description
v1
Output frequency
Hz
Frequency to the motor
v2
Motor speed
rpm
Calculated motor speed
v3
Motor current
A
Measured motor current
v4
Motor torque
%
Calculated actual torque/nominal torque of the unit
v5
Motor power
%
Calculated actual power/nominal power of the unit
v6
Motor voltage
V
Calculated motor voltage
v7
DC-link voltage
V
Measured DC-link voltage
v8
Temperature
°C
Temperature of the heat sink
v9
Operating day counter
DD.dd
Operating days 1, not resettable
v 10
Operating hours,
"trip counter"
HH.hh
Operating hours 2, can be reset with
programmable button #3
v 11
MW-hours
MWh
Total MW-hours, not resettable
v 12
MW-hours,
"trip counter"
MWh
MW-hours, can be reset with programmable
button #4
v 13
Voltage/analog input
V
v 14
Current/analog input
mA
v 15
Digital input status, gr. A
v 16
Digital input status, gr. B
v 17
Digital and relay output
status
v 18
Control program
v 19
Unit nominal power
Hp
Shows the horsepower size of the unit
v 20
PI-controller reference
%
Percent of the maximum reference
v 21
PI-controller actual value
%
Percent of the maximum actual value
v 22
PI-controller error value
%
Percent of the maximum error value
v 23
PI-controller output
Hz
v 24
Number of running
auxiliary drives
v 25
Motor temperature rise
Voltage of the terminal Vin+ (term. #2)
Current of terminals Iin+ and Iin- (term. #4, #5)
Version number of the control software
%
100%= temperature of motor has risen to nominal
Table 6.6-1 Monitored items.
1
2
6
Page 6-40
DD = full days, dd = decimal part of a day
HH = full hours, hh = decimal part of an hour
Pump and fan control Application
6.7 Panel reference
The Pump and fan control application has an extra reference (r2) for PI-controller on the panel's
reference page. See table 6.7-1.
Refrence
number
Reference
name
Range
Step
Function
r1
Frequency
reference
fmin—fmax
0.01 Hz
Reference for panel control and
I/O terminal Source B reference.
r2
PI-controller
reference
0—100%
0.1%
Reference for PI-controller
Table 6.7-1 Panel reference.
6
Page 6-41
Pump and fan control Application
Remarks:
6
Page 6-42
Home and Building Control
Honeywell Inc.
Honeywell Plaza
P.O. Box 524
Minneapolis MN 55408-0524
Honeywell Latin American Region
480 Sawgrass Corporate Parkway
Suite 200
Sunrise FL 33325
63-2554—4 J.H. Rev. 1-99
Home and Building Control
Honeywell Limited-Honeywell Limitée
155 Gordon Baker Road
North York, Ontario
Honeywell Regelsysteme GmbH
Honeywellstraße 2-6
63477 Maintall
Germany
Honeywell Asia Pacific Inc.
Room 3213-3225
Sun Hung Kai Centre
No. 30 Harbour Road
Wanchai
Hong Kong
www.honeywell.com
Home and Building Control
Honeywell Inc.
Honeywell Plaza
P.O. Box 524
Minneapolis MN 55408-0524
Honeywell Latin American Region
480 Sawgrass Corporate Parkway
Suite 200
Sunrise FL 33325
63-2554—4 J.H. Rev. 1-99
Home and Building Control
Honeywell Limited-Honeywell Limitée
155 Gordon Baker Road
North York, Ontario
Honeywell Regelsysteme GmbH
Honeywellstraße 2-6
63477 Maintall
Germany
Honeywell Asia Pacific Inc.
Room 3213-3225
Sun Hung Kai Centre
No. 30 Harbour Road
Wanchai
Hong Kong
www.honeywell.com