1
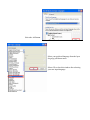
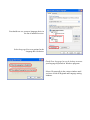
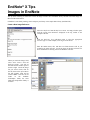
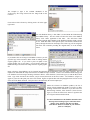
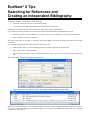
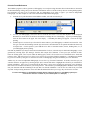
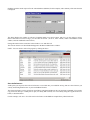
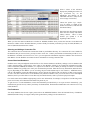
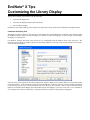
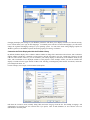
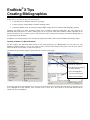
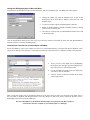
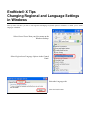
EndNote® X Tips
Changing Regional and Language Settings
in Windows
This tip sheet will show you how to add regional and language keyboard options in Windows to enable you to switch
languages in EndNote.
Select Control Panel from your Start menu on the
Windows desktop.
Select Regional and Language Options in the Control
Panel.
Select the Languages tab.
Select the Details button.
Select the Add button.
Select your preferred language from the Input
language pull-down menu.
Select OK to close this window after selecting
your new input language.
You should now see your new language choice in
the list of installed services.
Select Language Bar to set options for the
Language Bar’s behavior.
Check Show Language bar on the desktop to access
your language keyboards in Windows programs.
Select OK repeatedly in the various windows until
you have closed all Regional and Language setting
windows.
EndNote® X Tips
Entering References
This tip sheet will help you learn how to enter a reference into an EndNote library.
If EndNote is not already running, start it and open your library or the sample Paleo library (PALEO.ENL).
Create a New Reference
There are various ways to add references to an EndNote library. Connecting to an online bibliographic database and
retrieving the references directly into EndNote is one option; importing text files of references that have been downloaded
from online or CD-ROM bibliographic databases is another. Both are discussed in other tip sheets. This example
demonstrates how to manually enter references into an EndNote library.
Select New Reference from the References
menu. An empty window opens with the
words "New Reference" displayed at the top,
similar to the example at the left.
Click the Reference Type pull-down menu to
select the appropriate reference type. For this
example, select Book from the list.
You are now ready to enter the reference information, beginning with the author names. Author names can be entered two
ways: either "First Middle Last" such as "Carol Margaret Jacobson" or "Last, First Middle" such as "Jacobson, Carol
Margaret." Individual author names must be entered one per line. Corporate or institutional author names must be entered
with a comma at the end of the name so that EndNote does not confuse them with a name entered in the "First Middle Last"
manner. Anything before the first comma will be treated as a single "Last" name. To enter titles or other suffix information,
such as "Ph.D." or "Jr.," enter the name "Last, First Middle, Suffix." The suffix information will then follow the end of the
person's last name in a formatted bibliography.
With the cursor in the Author field, type in the following information (note that these are examples; feel free to enter your
own relevant reference data):
Jacobson, Carol, Ph.D. (then press the Enter key)
Roe, Jennifer
Thomson ResearchSoft,
As you type, you will see EndNote suggest names similar to the one you are entering. This is EndNote’s way of using term
lists to facilitate the process of entering new references. The name of the first author appears in red text to indicate that it is a
new name, not yet saved in the Author term list for this library. When you close or save the reference, it will be added to the
Author term list and the red text will change to black. The second author is already in the Paleo Library, so as you start
typing the last name, you will see EndNote complete the name for you. Press Tab or Enter to accept EndNote’s suggested
term, or keep typing to overwrite it.
Continue entering the reference as shown below, using the Tab key to move to the next field, and Shift+Tab to move to the
previous field, if necessary. You can also use the mouse to click in the desired field.
Year: 1994
Title: Impacts of Meteorites on Earth
City: New York
Publisher: Roe, Inc.
Number of Pages: 100
Abstract: The impact of a meteorite hitting the earth millions
of years ago may have led to the destruction or extinction of
some marine life.
Enter all information without any extra punctuation (such as
parentheses around the year or a period at the end of the title)
or text styles (such as bold, italics, etc.).
Close the reference window by selecting Close Reference
(Ctrl+W or Cmd+W) from the File menu or by clicking in the
"X" in the upper right corner of the window. All information
is automatically saved when you close a window. Your new
reference should now appear in the library window.
Spell Checking a Reference
In EndNote, open the reference Allen, 1988 by double clicking on it. Select Spell Check from the Tools menu or select the
Spell Check
menu.)
( ) tool button. (To activate the main toolbar in EndNote, select Show Toolbar then Main from the Tools
EndNote stops at the word “severn” and suggests “Severn” to replace it. Click on Change to make this adjustment. EndNote
notifies you that spell checking is complete, click on OK.
For more information see the EndNote manual chapter Entering and Editing References.
(Note that the manual is available in your EndNote folder as a PDF file.)
EndNote® X Tips
Images in EndNote
This tip sheet will help you learn how to enter an image reference into an EndNote library and then insert that image in a
Microsoft Word document.
If EndNote is not already running, start it and open your library or the sample Paleo library (PALEO.ENL).
Create a New Image Reference
Select New Reference from the References menu. An empty window opens
with the words "New Reference" displayed at the top, similar to the
example at the left.
Click the Reference Type pull-down menu to select the appropriate
reference type. For this example, select Figure from the list.
Enter the author names, title, and other text fields shown at left as you
would for any other reference. See the tip sheet on entering references for
more information on entering text into an EndNote reference.
When you reach the Image field,
select Insert Picture from the
References menu. You will see
the Insert Picture window open as
shown at right. Locate the image
file you want to insert, click on
the file, then on the Open button.
For this example, insert the file
Feather2.BMP. This file can be
found
in
the
EndNote
X\Examples folder, the same
folder the sample Paleo library is
stored in.
The example at right is the resultant thumbnail of the
Feather2.bmp file being inserted into the Image field of this
reference.
Close and save this reference by clicking on the "X" in the upper
right corner
For each EndNote library, a data folder is created inside the folder housing
the EndNote library. This new folder will have the name of the EndNote
library with ".Data" appended to that name. The Paleo.Data folder
associated with the Paleo database in the EndNote Examples folder is shown
at left. Inside this folder will be placed copies of all the files attached to the
library through insertion into the Image field. Each copy will be assigned a
file name with a number preceding the original name, as in the example
below.
If you double-click on an image in an EndNote reference you will
open the copy in the associated ".Data" folder for editing, not the
original graphic file. If you wish to place an update of the
original graphic file in your library, you will need to delete the
thumbnail image and reinsert the image from the original graphic
file.
Image references from EndNote can be inserted into Microsoft Word documents much like other references, but it is
important to understand the unique characteristics of EndNote images in Word. Create a new Word document and type the
text "EndNote can insert images and image citations in Word." Select EndNote X, then Find Figure(s) from the Word Tools
menu. Type "bird" and select the reference you just created, then click on the Insert button. You should see "(Figure 1)"
appear in your text at the point your cursor was located. Figures are placed either after the paragraph where cited or in a list
at the end of the Word document. This placement is determined by the current output style.
Unlike the reference list EndNote produces, the list of
figures will not automatically update if you move or delete
an image citation in the document. If you have moved or
deleted image citations, select EndNote X, then Generate
Figure List from the Word Tools menu to regenerate the
list of figures and associated citations.
For more information see the EndNote manual section
Inserting and Formatting Figures and Tables in the
chapter Using EndNote with Microsoft Word.
(Note that the manual is available in your EndNote
folder as a PDF file.)
EndNote® X Tips
Searching for References and
Creating an Independent Bibliography
This tip sheet will help you learn how to do the following:
•
Search for a subset of references in your EndNote library.
•
Create and print an independent bibliography using that subset of references.
If EndNote is not already running, start it and open the sample Paleo Library (PALEO.ENL).
Let’s assume you want to generate a list of all references about extinction that have been published since 1990.
•
Select Search References from the References menu, or type Ctrl+F in Windows or Command+F for Macintosh.
•
Type "extinction" as the first search term.
The words "Any Field” to the right of "extinction" mean that EndNote will search all fields in the library for the word
"extinction."
Now set up the second search item to find references from 1990 or later.
•
Make sure that “And” is selected from the pull down list at the far right of the first search item.
•
Type “1990” as the second search term.
•
Select Year from the field list in the second search item, then select Is greater than or equal to from the comparison
list.
The Search window should now look like the example below.
•
Click the Search button to begin the search. In a moment, EndNote displays the search results.
The status of your search will be in the bottom left corner of the library window and should now read, "Showing # references
out of ###." You are still looking at the same Paleo library you were before, but EndNote has restricted the view to display
only the results of the search.
Print the Found References
The EndNote program is able to generate a bibliography in a word-processing document from citations that are inserted in
the document during writing, and you can find more information on how to do this in the tip sheet on creating bibliographies;
but sometimes you want a list of references that are independent of an article or paper—you want an independent
bibliography. For this example we will create an annotated independent bibliography.
•
From the Styles pull-down menu in the EndNote toolbar, select the Annotated style.
•
To view your bibliography, select Print Preview from the File menu. You can click anywhere on the displayed
document (or use the Zoom In and Zoom Out buttons) to change the size of the display. To print your bibliography,
click the Print button in the upper left of the display. A standard print dialog will appear. Click OK to begin
printing.
•
Another option is to select Export from the File menu and save your bibliography as a Rich Text Format file. This
file type will retain all formatting from the style and create a document that can be opened and edited in almost any
word processor. Use this option if you would like to be able to customize headers, footers, heading titles, etc., in
your bibliography before printing.
Note that any EndNote style may be altered to include annotation. To do so, select the style in which the bibliography is to be
generated by selecting Open Style Manager from the Edit>Output Styles submenu. Locate your style, and click on Edit.
From the ensuing panel, select Layout under the Bibliography section. Click on the Insert Field button above “End each
reference with:” and select Abstract (or Notes if you want to use your Notes field for annotation). A modified style should
be given a new name by using Save As from the File menu. A bibliography using this modified style is now annotated.
Another way to create an independent bibliography is to use the Copy Formatted command. To do this, select the style you
want the references to appear in by selecting Output Styles from the Edit menu. Highlight the references you would like to
include in EndNote. Select Copy Formatted from the Edit menu. Open your word processor and create a new document,
then select Paste from the Edit menu in your word processor. The references you had highlighted in EndNote will be copied
into your document with the formatting of the style that was selected in EndNote. You can now save this file as you would
any other word-processing document. Please note that this method will allow you to copy only 50 references at a time.
For more information see the EndNote manual chapters Managing References and Bibliographic Styles.
(Note that the manual is available in your EndNote folder as a PDF file.)
EndNote® X Tips
Importing Reference Data
This tip sheet will help you learn how to do the following:
•
Download references from remote databases in an EndNote-friendly format.
•
Import downloaded references into the EndNote library.
If EndNote is not already running, start it and open the sample Paleo library (PALEO.ENL).
Introduction to Importing Reference Data
If you have access to an online bibliographic database, a university catalog, or a bibliographic database on CD-ROM, you
can probably use EndNote’s filters to import text files saved or downloaded from these sources. EndNote filters are
customizable so they give you the flexibility to import only the reference data you need.
To transfer references from an online bibliographic database into EndNote, you will need to save a text file with information
in an EndNote-friendly format. How you do this will vary from one data provider to another. In the EndNote manual's
chapter Importing Reference Data into EndNote you will find one of the most useful parts of the entire manual—a table
containing instructions for saving your data for each of the data providers for which EndNote has preconfigured filters.
Consulting this table so that you know the best download format before you do your database search can often save you
having to repeat the search later. (Note that the manual is available in your EndNote folder as a PDF file.) Another location
for this information is in the “About this filter” portion of the EndNote filter. You can view this information by opening the
filter for editing in the EndNote filter manager. To open a filter for editing, select Open Filter Manager from the
Edit>Import Filters submenu.
For text to be imported with an EndNote filter, the data must be consistently "tagged," with each tag starting on a new line.
Here are two examples of such an output:
AUTIPYSO-
CRAMER, -Z.O.
AQUATIC MACROPHYTES AND LAKE ACIDIFICATION
1993
ENVIRONMENTAL-POLLUTION. VOL. 5, NO. 2, PG.54-79
Author: Cramer, ZO
Title: Aquatic macrophytes and lake acidification
Year: 1993
Source: Environmental Air Pollution. Vol. 5, (2) pp.54-79
Import Instructions
In this example, you will download a PubMed search and import its results into EndNote.
•
To begin, access the PubMed web site at www.PubMed.gov using your internet browser.
•
In the line that begins "Search PubMed for:" type the phrase "sushi and health."
•
Click on the Go button to conduct the search. You should see the page change to show your search results, but the
results are not in a tagged format that EndNote can use.
•
Click on the pull-down menu where you see the word "Summary" by the Display option to see the list of available
formats. This list controls the format in which the data will be saved. Change it from "Summary" to "Medline." You
will see the data on the screen change to the tagged Medline format.
•
On the pull-down menu “Send to” menu, select File to save the file to your computer. You can give the file any
name you want and save it to your hard drive, a floppy disk, or a network drive, but it is very important that you
remember where you saved the file. EndNote will not "remember" for you when you import the file. Note that
EndNote can only import plain text files, so the data must be saved in plain text. EndNote cannot import rich text
format, Word, WordPerfect, or any other word-processing format, only plain text. However, it can import text files
in a variety of encoding options, such as Unicode UTF-8, ASCII, etc.
•
In EndNote, open the library into which you want to import the data.
•
Select Import from the File menu.
•
Click the Choose File button, then locate and open the text file you saved from PubMed containing the records you
want to import. Make sure “Files of Type” is set to “All Files” to view text files.
•
Click on the Import Option pull-down menu to select the filter you will use. The Import Options include a number
of default options, including EndNote Library, Refer/BibTex, and Tab-Delimited (very useful for transferring data
from spreadsheets and database programs like Access). It also includes recently-used filters and any filters you have
selected as "favorites" in the Filter Manager (see Help or the EndNote manual for information on setting favorite
filters). Note that most of the filters include a database name, followed by an abbreviated name of the data provider
in parentheses. For example, the PubMed filter will appear as "PubMed (NLM)" to show that the database name is
PubMed and the data provider is the National Library of Medicine. Different data providers may provide the same
database, but it will be formatted according to their own standards. So you will need to be careful that you are using
a filter with a name, and hence format, that matches both the database and the data provider you are using.
•
Select the PubMed (NLM) filter from the list. If you do not see it in the list, select Other Filters to open the Filter
Manager, showing a complete list of the available EndNote filters, then select PubMed (NLM) from the Filter
Manager list. "PubMed (NLM)" should now appear in the Import Option line. Once you select a filter to import a
file, EndNote retains that setting until you change it. You do not need to go through these steps again unless you
want to import from a different database and thus choose another import filter.
•
Select your preferred option from the Duplicates pull-down menu. (By default, a reference is considered a duplicate
if the Author, Year, Title, and Reference Type match a reference already in the library. These criteria may be
changed in the EndNote preferences. See the EndNote manual for details on changing preference settings.)
•
Select the text-encoding method from the text translation options if the default settings do not work. Note that you
may need to refer to documentation on the database’s encoding method from your database provider. For PubMed
use the default.
•
Click the Import button to begin the import process.
When the import is complete, only newly imported references are displayed in the library window. To view all of the
references in your library, select Show All References from the References menu.
For additional information see the EndNote manual chapter Importing Reference Data into EndNote.
(Note that the manual is available in your EndNote folder as a PDF file.)
EndNote® X Tips
Searching Online Resources
This tip sheet will help you learn how to do the following:
•
Connect to and search a remote database.
•
Retrieve and save references from a remote database.
If EndNote is not already running, start it and open the sample Paleo library (PALEO.ENL).
What EndNote's Searching Offers
EndNote's search interface provides a simple way to do basic searches of local EndNote libraries and remote databases. The
same Search window is used for both purposes, removing the need to learn a separate set of controls to search online
databases. This search interface is not intended to replace the advanced search options offered by your information provider's
interface. There may be times when you want to use the information provider's search interface (for example, when doing a
very detailed subject search such as a literature review) and then import the references into EndNote. This is an option using
EndNote's Import command, and you can find more information on it in the tip sheet on importing references into EndNote.
Connect to a Remote Database
The first step in searching a remote database is connecting to it, so we begin this example by connecting to the PubMed
database. Note that EndNote offers a variety of connection files to remote databases. Some of these databases are by paid
subscription only (password and account information necessary), and some are public access (no restrictions for general use).
Library catalogs, the Library of Congress book catalog, and the National Library of Medicine’s PubMed are examples of
public-access databases.
With EndNote running, choose Connect from the Tools menu and then select Connect again. The Connect menu presents a
"favorites" list of internet databases to which you have successfully connected previously. You may also customize this list
using the Connection Manager. (See the EndNote manual for details.)
Select the PubMed connection file (start typing the file name to quickly jump to it in the list), and click on the Connect
button to direct EndNote to connect to the PubMed database at the National Library of Medicine.
When the connection has been successfully established, EndNote opens a window showing "PubMed MEDLINE at PubMed
(NLM)," which will be populated with retrieved references after searching. This is the Retrieved References window. In
front of the this window you will see the Search window. Note that the "Search Remote: PubMed MEDLINE at PubMed
(NLM)" option is automatically selected. EndNote is ready to search the remote database.
Retrieved References window
Enter the search term(s) to find the references
you need. Searching a remote database is
very similar to searching an EndNote library.
Enter the term "radial keratotomy" in the
search window and click the Search button.
"Search Remote" is automatically selected
when you connect to a remote database.
EndNote sends the search request off to the remote database (PubMed, for this example), and a summary of the search results
is displayed.
The dialog displays the number of references found that match your search request, and gives you the option to retrieve
them. If the result set seems too large, you can refine the search. (To do so, click “Cancel,” return to the EndNote search
window, and enter additional search criteria.)
Change the number in the second box in the window to "10" and click OK.
The first ten references are downloaded and appear in the Retrieved References window.
NOTE : You can cancel a retrieval in progress by clicking the Pause.
Save the References
At this point you can peruse the retrieved references to see which ones you would like to keep, then save the references you
want by transferring them into one of your own EndNote libraries.
The selected references can be copied to an open library using drag-and-drop or the copy and paste commands. You can also
copy references directly to a library that is open, to a library that is closed, or to a new library using the Copy References To
button, as described below.
For this example, we'll save a few of the retrieved references to the EndNote example library called "Paleo.enl."
Select a subset of the references
displayed by holding down the Ctrl
key (Command key on the
Macintosh) and clicking on the
individual references. (Shift-click to
select a range of references).
Choose the option Copy # References To (where "#" stands for the
number of references) and select the
listed Paleo library.
Notice that the open libraries appear
below the New Library and Choose
Library choices. Paleo is listed
because you opened it at the
beginning of this exercise.
When you close the Retrieved References window for PubMed, EndNote alerts you that the references in the Retrieved
References window will be discarded. Because you have already saved what you needed, you may click OK (Windows) or
Discard (Macintosh) and close the window.
Selecting and Adding a Connection File
The connection files are located in the Connections folder in your EndNote directory. If a connection file is not available for
the database that you want to search, you may be able to create one. Contact your librarian or information provider to see if
the database is available on a Z39.50 server. If it is, you can request the information required to establish a Z39.50 client for
that database. See the EndNote user manual for more information on creating connection files.
Access-Restricted Databases
EndNote comes with preconfigured connection files to free reference databases and library catalogs as well as databases that
require payment and/or a password for access. Most of the databases offered by the commercial information providers
(OCLC FirstSearch, DIMDI, SilverPlatter, etc.) require an account for access. When you attempt to connect to a restricted
database, EndNote may prompt you to enter your user ID and/or password. Enter the necessary information, and click OK to
log on. (Depending on the database you are accessing, the passwords and IDs may be case-sensitive). Additional factors,
such as if the database requires IP authentication (a process whereby the data provider can check to see that you are logging
in from a site that is allowed access to the database) may influence whether or not you will be able to access subscription
databases, and if you will be able to access them only from limited locales, such as you school’s physical campus.
For certain connections, EndNote might prompt you for more information, for example, a Group ID or User ID along with a
password. You may leave blank the items that do not pertain to you.
To gain access to a restricted database, contact the information provider directly to set up an account. Alternatively, your
institution may provide access; contact your library for further details. Thomson ResearchSoft does not control access to any
online databases.
Free Databases
Two major databases that do not require passwords are the MEDLINE database from the National Library of Medicine
(PubMed) and the Library of Congress. Many of the general library catalogs are also unrestricted.
EndNote Connection Files and Firewalls/Proxy Servers
EndNote connection files using the z39.50 protocol (all except the PubMed and ISI Web of Science connection files) may
not work through a firewall. This includes so-called "invisible" firewalls. If you are unable to connect to a database that you
believe you should have access to, check with your network administrator and ask if your institution has a firewall. The
PubMed and ISI Web of Science connection files are able to connect through most (non-authenticating) proxy servers if the
proxy settings are set up in the computer's Internet Options. (Note that an authenticating proxy server is one where you must
enter a password to access the internet). See your operating system's Help files for information on setting up proxy server
settings in Internet Options or contact your network administrator.
For more information see the EndNote manual chapter entitled Searching Remote Databases with EndNote.
(Note that the manual is available in your EndNote folder as a PDF file.)
EndNote® X Tips
Customizing the Library Display
This tip sheet will help you learn how to do the following:
•
Customize the display font.
•
Customize the displayed fields within your library.
•
Sort your library display.
If EndNote is not already running, start it and open the sample Paleo library (Paleo.enl in the EndNote 9\Examples folder).
Customize the Display Font
The display font settings affect the size and type of font displayed for your EndNote library and other screen displays within
the EndNote program. They also affect the display of references in non-Latin languages. For this example we will change
the display to a Unicode font.
For Windows, from the Edit menu, select Preferences; for a Macintosh, from the EndNote menu, select Preferences. The
Preferences panel contains a wealth of options for customizing EndNote to suit your needs. For this example, select Display
Fonts from the listed options.
Select the Change Font button for the Library Display Font option to display a list of fonts available on your system, similar
to that shown below. In the example below the Arial Unicode MS font is selected. The fonts you have available will depend
on the operating system you are using and which versions of Word you have installed. Select a font for both the Library
Display Font and the General Display Font options that supports the languages you wish to work with. If it is available on
your computer, the Arial Unicode MS font is a good choice because it supports a large number of languages.
Changing the display font settings in your EndNote preferences will allow you to display references in Unicode correctly,
but it will not enable you to type in those languages. To manually enter references in non-Latin languages you will need to
change the regional and language settings in your operating system. To learn more about setting language options for
Windows, please see the EndNote tip sheet titled Changing Regional Settings in Windows.
Customize the Fields Displayed within the EndNote Library
By default, EndNote displays first a column to indicate whether an Image file is attached to each reference, then a column to
indicate whether a PDF files is attached to each reference, then the first author, year, title, journal title, reference type and
URL for each reference. However, you can customize your Library Display to include any of the EndNote fields, in any
order, with a maximum of five displayed columns. For the purposes of this example, assume you want to customize the
display to include reference types instead of URLs. This will help you distinguish journal articles from books, conference
proceedings from theses, etc.
For this example, select Display Fields from the listed options.
Pull down the Column 8 menu (currently listing URL) and select Language from the list. The heading “Language” will
automatically be assigned (you can overwrite this if you prefer). Click on OK (Windows) or Save and the Close box
(Macintosh) to leave the panel.
The Language column now appears on the far right.
To resize the columns for optimal viewing, simply position the cursor along the vertical edge of the column heading to be
resized, then drag it left or right. This will reapportion the viewable space within the Library window accordingly.
Sort the Library Display
Your EndNote Library can be sorted easily by any displayed field in ascending or descending order. Simply click on any
column heading to sort by that field. For example, click on the Year column and it sorts your database by year in ascending
order (i.e., from the record with the oldest date in the Year field to the one with the most recent). Click on the Year column a
second time to reverse the sort order.
For additional information see the EndNote manual chapter Introducing the EndNote Library.
(Note that the manual is available in your EndNote folder as a PDF file.)
EndNote® X Tips
Creating Bibliographies
In this section, you will learn how to do the following:
•
Locate and insert an EndNote citation into your paper.
•
Format your paper using EndNote’s Instant Formatting feature.
•
Change the EndNote style for your paper and let EndNote update the in-text citations and bibliography instantly.
EndNote's Cite While You Write technology allows users of Windows Microsoft Word 2000, XP, 2003, and 2007 or
Macintosh Microsoft Word X or 2004 to format papers in one step from within Word. EndNote installs commands on the
Word Tools menu to give you direct access to your references while writing. Find Citations(s) and Format Bibliography are
the main functions on this menu.
If EndNote is not already running, start it and open the sample Paleo library (Paleo.enl in the EndNote X\Examples folder).
Inserting a Citation in a Word Document
For this example, open Microsoft Word and start a new empty document. Type “Bibliographies are easier than ever with
EndNote’s Instant Formatting.” You are now ready to insert a citation at this location in the paper. From the Tools menu in
Microsoft Word, select EndNote X, then Find Citation(s).
An EndNote Insert Citations dialog box appears like the one below on the right.
• Search for references
• Sort the list by clicking on
a column heading
• View the highlighted
reference in lower pane
• Insert selected citations
In the upper left corner of this dialog box, next to Search type the keyword “excavation” then click the Search button or press
Enter. Highlight the record “Billoski, 1992” and click Insert or press Enter. This citation is inserted and formatted in the
output style selected in EndNote.
Change the Bibliography Style in Microsoft Word
From the Tools menu in Microsoft Word, select EndNote X, then Format Bibliography. The dialog box below appears:
•
Change the output style with the drop-down list on the Format
Bibliography tab or use the Browse button to select from over 2,300
EndNote styles.
•
Use the Layout tab to adjust your bibliography’s attributes.
•
Enable or disable EndNote’s Instant Formatting feature by clicking
on the Instant Formatting tab.
•
The Libraries Used tab tells you which EndNote libraries were used
to format this paper.
Click on the pull-down menu next to With output style and select Numbered from this list, then click OK. Watch EndNote
reformat your in-text citations and bibliography.
Customize the Favorites List of Output Styles in EndNote
Switch to EndNote to select a new output style from over 2,300 predefined styles. From the Edit menu in EndNote, select
Output Styles then Open Style Manager. Your Output Style Manager opens and you see a dialog box similar to the one below:
•
View a preview of the output style by highlighting
the output style in the upper pane and changing Style
Info to Style Preview in the drop-down list.
•
Use the Find button to quickly locate the output style
you want by name or discipline.
•
Click the Unmark All button to unmark the currently
selected output styles.
Mark your favorite output styles by clicking the check box to the left of the style name. Your favorites list of output styles is
now accessible in EndNote and Microsoft Word. Close this dialog box and switch back to Microsoft Word to create a
bibliography with a newly-selected output style.
For more information see the EndNote manual chapter Using EndNote with Microsoft Word.
(Note that the manual is available in your EndNote folder as a PDF file.)