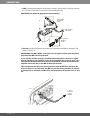
1
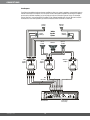
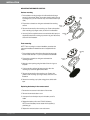
jbl
®
MS-8
System integration digital processor
User Guide
TABLE OF CONTENTS
www.jbl.com
Introduction
3
Important! Read Before You Begin
4
Box Contents
4
Applications
4
Connections
5
Power
5
Audio Inputs
7
Audio Outputs
11
Display
15
Microphone
15
Update
16
Installation
17
Choosing a Location for the Main Unit
17
Mounting the Main Unit
18
Choosing a Location for the Display Unit
18
Installing the Display Unit
19
Mounting the Remote Control
22
Using the Remote Control
23
Calibration/Setup
24
Language Selection
25
Input Setup
25
Output Setup
26
Acoustic Calibration
32
Using the MS-8
35
Volume Up and Volume Down Buttons
35
Main Menu
35
Input Selection Menu
36
Audio Controls Menu
36
Favorites Menu
39
System Settings Menu
40
Resetting the Microprocessor
41
Troubleshooting
42
Specifications
47
2
English
INTRODUCTION
Thank you for your purchase of the JBL®
MS-8 System Integration Digital Processor.
We have designed the MS-8 to make
successful installation and setup easy and to
provide you with years of enjoyable and great
sound.
We have also designed the MS-8 and this
owner’s manual to make do-it-yourself
installation an option for those DIYers who
have some experience in mechanical and
electrical procedures and who have access
to the simple tools required for minor
disassembly of automotive interior panels.
We have designed the MS-8 to minimize the
disassembly required and to make electrical
connections to any existing system as simple
as possible.
Please read this manual carefully before
attempting installation. If you do not have
the necessary tools or experience, do not
attempt the installation yourself. Instead,
please ask your authorized JBL car audio
dealer about professional installation or
visit www.JBL.com to find the nearest
professional.
This manual explains how to install, set up
and use your MS-8 in a general sense but
will not indicate the specific wiring codes,
connections and locations for your particular
vehicle. There are many online resources
that provide wiring codes and diagrams for
vehicles. JBL’s technicians or Web pages may
also be able to help.
This manual does not explain why the MS-8
works. If you have technical questions that
this manual does not answer, or if you want to
do some additional reading to understand the
technology that the MS-8 contains, please
visit us on the Internet at www.JBL.com.
Thanks again for your purchase, and we
sincerely hope that JBL’s MS-8 will provide
you with years of happy listening.
3
www.jbl.com
IMPORTANT! READ BEFORE YOU BEGIN
Warning
Playing loud music in an automobile can
hinder your ability to hear traffic and can
permanently damage your hearing. We
recommend listening at low or moderate
levels while driving your car. JBL accepts
no liability for hearing loss, bodily injury or
property damage resulting from the use or
misuse of this product.
Replacing the Fuse
If you must replace the MS-8’s fuse, use
only the same type and rating as that of the
original. Do not substitute another kind.
BOX CONTENTS
(1) MS-8 main unit
(1) MS-8 display unit and base
(1) Hi Level input wiring harness (gray and
white insulation)
(1) Speaker-output wiring harness (clear
insulation)
(1) 6m (19.7 ft), 2.5mm (1") three-conductor
cable for display unit
(1) Wireless remote control (battery installed)
(1) Remote-control installation tray
(1) Remote-control trim ring
(1) Binaural microphone headset
(1) Calibration and setup CD (includes
instruction manual and quick-start guide)
(1) Quick-start guide
(4) 4x20 screws
(3) 3.5x20 screws
(2) 3x20 screws
(2) Hexagonal (hex) wrenches
(2) Adhesive pads
(4) Alcohol prep pads
APPLICATIONS
The MS-8’s extensive crossover capabilities
allow you to configure its eight channels in
a number of different ways, depending on
the type and number of speakers in your
vehicle’s audio system. JBL recommends
that you carefully plan your system and its
connections before beginning installation.
www.jbl.com
4
English
CONNECTIONS
25A
fuse
Mic
connection
Remote out
connection
+12V
connection
Line input
connections
Remote in
connection
GND
connection
Hi Level input
REMOVE
FOR
SOFTWARE
UPDATE
Speaker output
connections
Line output
connections
Aux input
connections
Reset
button
Display
connection
Power
LED
Update
connection
Power
IMPORTANT: Perform the power connections in the following order.
1. Gnd: Connect this terminal to a paint-free location on the vehicle chassis.
IMPORTANT: Use at least 12-gauge wire for this connection.
Chassis
ground
(unpainted)
5
www.jbl.com
CONNECTIONS
2. +12V: Connect this terminal to the vehicle battery’s positive (+) terminal. Insert a 25A fuse in series on
the +12V wire no further than 18 inches (46cm) from the battery terminal.
IMPORTANT: Use at least 12-gauge wire for this connection.
1 x 25A
+
-
25A fuse within
18" of battery
terminal
Cable from MS-8
+12V terminal
Use a grommet
through the
firewall
3. Rem Out: Connect this terminal to the remote turn-on terminals of all amplifiers in the system. The
output is +12V DC, 1A.
IMPORTANT: The MS-8 MUST control the turn-on signal of all the other amplifiers
that follow the MS-8 in the signal path.
If your system includes a factory-installed outboard amplifier, the turn-on signal
may be available at the amplifier. If your factory amplifier has a turn-on wire, cut it
and connect the head-unit side of the wire to the MS-8’s Rem In terminal and the
amplifier side of the wire to the MS-8’s Rem Out terminal.
This arrangement will allow the factory stereo to turn the MS-8 on whenever the
stereo is turned on and will allow the MS-8 to turn the factory amplifier on and off.
It will also help to eliminate audible clicks and pops when the system turns on and
off.
To turn-on
terminals of
all system
amplifiers
www.jbl.com
6
English
CONNECTIONS
Rem In: Connect this terminal to the remote turn-on output of the system’s source unit, if the
source unit has a remote turn-on output. Alternately, you can connect this terminal to the vehicle’s
accessory (ACC) power circuit. Any voltage over +4V DC at this terminal will trigger the MS-8 to
turn on.
NOTE: See Step 3 for more details about connecting the Rem In terminal to a factory-installed
stereo system.
To head unit
remote turn-on
or vehicle
ACC terminal
AUDIO INPUTS
Many factory-installed systems include on-board equalization and crossovers that make simple
connection of aftermarket products difficult. The MS-8 includes the signal-summing circuitry, signalconditioning EQ and time-correction processing that are necessary to reconstruct a flat, full-range,
two-channel signal when you use the MS-8 with factory-installed equipment.
Aftermarket head units with line outputs provide a flat, full-range, two-channel signal on their front line
outputs, so you need to connect only those channels to the MS-8.
7
www.jbl.com
ConNECTIONS
Connecting an aftermarket head unit
If you’re using the MS-8 with an aftermarket head unit that has RCA-type outputs, connect the head unit’s
front left and front right outputs to the MS-8’s line inputs 1 and 2 only. Do NOT connect any other head-unit
output signals to the MS-8’s line inputs 3 – 8. During the calibration/setup process, the MS-8 will “normalize”
the input signals and derive as many output signals as your speaker system requires.
IMPORTANT: Do not connect the head unit directly to any amplifiers, including a subwoofer amplifier. The
MS-8’s signal processing takes nearly 8ms, so any signals connected directly to a head-unit will be ahead
of the signals leaving the MS-8 by about 8ms. This difference will cause them to be out of sync with the
signals that pass through the MS-8. The MS-8 must generate all the signals that are sent to all of the
system’s speakers!
Aftermarket head unit
Front
line out
Rear
line out
Subwoofer
line out
DO NOT USE
RCA
audio cables
MS-8 main unit
Line inputs
1 and 2
www.jbl.com
8
English
ConNECTIONS
Connecting a factory radio/head unit
If you will be connecting the MS-8 to a factory-installed stereo or a factory-installed amplifier (often located in
the vehicle’s trunk), connect each of your factory front-speaker and subwoofer outputs to one of the MS-8’s Hi
Level inputs. Be sure to connect the outputs for all speakers that are part of the vehicle’s front left and front right
speakers.
You can connect the factory front speaker outputs to any MS-8 Hi Level inputs, but factory stereo or amplifier
subwoofer outputs MUST be connected ONLY to the MS-8’s channel 7 and/or 8 inputs. During the calibration/
setup process, the MS-8 will “normalize” the input signals and derive as many output signals as your speaker
system requires.
Factory stereo
wiring harness
Front left
Subwoofer*
Front right
Center
Side left
+
Side right
–
+
+
DO NOT USE
–
+
Rear right
–
Connect
+
Rear left
Ch 4
–
Connect
+
Ch 5
Ch 3
–
–
Ch 6
Ch 2
Ch 7
Ch 8
Ch 1
MS-8 main unit
*NOTE: Subwoofers
MUST be connected
to MS-8 input 7
and/or input 8
NOTE: The above illustration shows only a general connection example and does not represent any particular
vehicle audio system.
Insert the included Hi Level input wiring harness into the MS-8’s Hi-Level-input connector until it locks into place.
IMPORTANT: The MS-8’s Hi Level input wiring harness has gray and white wires. Each channel has a white
(positive or “+”) wire and a gray (negative or “–”) wire. Each wire is labeled with its channel number and polarity,
and is pre-stripped for easy connection to your factory radio’s speaker outputs. Make sure that the ( + ) and
( – ) wires do not touch each other. Touching wires can cause a short circuit that can damage the
MS-8 or your head unit.
To ensure proper polarity, connect each factory-radio positive (+) terminal to the respective
“+” terminal on the MS-8. Connect the negative (–) terminals in a similar way.
9
www.jbl.com
ConNECTIONS
Aux input: If you will be using a portable music player or CD player as an auxiliary audio-source unit,
connect its line or headphone output to the MS-8's Aux input using a cable that terminates in stereo
RCA audio connections. You can switch between the MS-8's Head Unit inputs and Aux input in the
MS-8's Input Selection menu. See Main Menu, on page 35.
Aux
input
To
headphone
output
www.jbl.com
10
English
CONNections
AUDIO OUTPUTS
Configurations
You can configure the MS-8’s eight outputs in a variety of ways, depending on the speakers that are
installed in your vehicle. You can configure the MS-8 for a system with one-way (full-range), two-way or
three-way front speakers, a one-way or two-way center speaker, side speakers, rear speakers and one
or two subwoofers. Remember, however, that the total number of available channels is eight, so any
combination of front, center, side, rear and subwoofer channels cannot total more than eight. For example,
if you are allocating six channels for a pair of tri-amped, three-way front speakers, there will be only two
remaining channels, which will not accommodate a pair of rear speakers and a subwoofer.
If your system will include more than eight channels, use additional separate amplifiers (connected to the
MS-8’s line outputs) for the additional channels. For example, if you want to build a 7.1-channel system
that includes bi-amped or tri-amped front speakers, use the MS-8 to generate the 7.1-channel outputs
(seven full-range and one subwoofer). Connect the MS-8’s front line outputs to the inputs of an additional
crossover (or amplifier containing an additional crossover) that will provide the separate channels required
to drive the front midbass, midrange and/or tweeters separately.
Use the Configuration Chart below to record which of your system’s speakers you have connected
to which of the MS-8’s outputs. Keeping this record will simplify channel assignment during the setup
procedure. See Main Menu, on page 35.
Output #
Channel / Speaker Connected
Output Connector Used
1
RCA
SPEAKER
2
RCA
SPEAKER
3
RCA
SPEAKER
4
RCA
SPEAKER
5
RCA
SPEAKER
6
RCA
SPEAKER
7
RCA
SPEAKER
8
RCA
SPEAKER
11
www.jbl.com
CONNECTIONS
Speaker Outputs
If you’ll use the MS-8’s built-in power amplifiers to drive your system’s speakers, connect the speakers to the
MS-8’s speaker outputs. Insert the included speaker-output wiring harness into the MS-8’s speaker output
until it locks into place. See Main Menu, on page 35.
IMPORTANT: The MS-8’s speaker-output wiring harness’s wires have clear insulation. Each channel has a
copper (positive or “+”) conductor and a silver (negative or “–”) conductor. We have labeled each conductor
with its channel number and polarity, and pre-stripped it for easy connection to your system’s speakers.
Make sure that the ( + ) and ( – ) wires do not touch each other. Touching wires can cause a short
circuit that can damage the MS-8.
+
–
Left front
(tweeter)
Right front
(tweeter)
+
+
–
Left front
(midrange)
–
Right front
(midrange)
–
+
Vehicle
Speaker System
+
Right side
(coaxial)
Left side
(coaxial)
–
Left rear
(coaxial)
+
–
MS-8
main unit
–
+
Right rear
(coaxial)
+
–
Speaker-output
wiring harness
To ensure proper polarity, connect each MS-8 positive (+) terminal to the respective
“+” terminal on the speaker. Connect the negative (–) terminals in a similar way.
www.jbl.com
12
English
CONNECTIONS
NOTE: You can power some of the system's speakers by the MS-8's amplifiers and some by outboard
amplifiers, but you should use only one connection type per output. For example, output channel 1 may use the
MS-8's amplifer OR an outboard amplifier, but not both. Be sure to use the chart above to note which speakers
are connected to which MS-8 channels.
Left front
(Tweeter)
+
Right front
(Tweeter)
–
+
–
+
Vehicle
Speaker
System
Left front
(midrange)
Left rear
(coaxial)
+
–
Right front
(midrange)
+
+
Not
used
+
Right rear
(coaxial)
Subwoofer
–
–
–
–
Not
used
Speaker output
wiring harness
Line output
#6
Subwoofer
amplifier
13
www.jbl.com
CONNECTIONS
Line Outputs
If you’ll be using additional outboard power amplifiers to drive your system’s speakers, connect their inputs to
the MS-8’s line-output connectors. You can power some of the system’s speakers by the MS-8’s amplifiers
and some by outboard amplifiers, but you should use only one connection type per output. For example,
Output Channel 1 may use the MS-8’s amplifier OR an outboard amplifier, but not both. Be sure to use the
chart above to note which speakers you have connected to which of the MS-8’s channels.
Left front
(tweeter)
+
+
–
Right front
(tweeter)
–
Left rear
(coaxial)
Subwoofer
–
Rear
speaker
amplifier
Right front
(midrange)
Right rear
(coaxial)
+
+
Front
speaker
amplifier
–
Vehicle
Speaker
System
Left front
(midrange)
+
+
–
–
Subwoofer
amplifier
RCA
audio cables
MS-8 main unit
www.jbl.com
14
Ch. 8 is unused
in this example
–
+
Connections
DISPLAY
Use the included 6m (19.7 ft) cable to connect the display unit to the MS-8’s main unit’s display connection.
Insert the cable’s straight connector into the main unit and the right-angle connector into the display.
English
REMOVE
FOR
SOFTWARE
UPDATE
Plug angled connector
into display
Plug straight connector
into main unit
NOTE: The display unit must be connected during setup but may be disconnected after setup and after
you’ve made any additional adjustments in the Audio Controls menu (see Audio Controls Menu, on page 36).
If the display unit is disconnected after setup and final adjustment, you will not be able to make any additional
MS-8 adjustments, and the remote control will not function. See Main Menu, on page 35.
MICROPHONE
The included binaural microphone headset must be connected to the MS-8’s Mic connection during the
calibration/setup process. Once setup is complete, unplug the microphone headset and store it in a safe
place.
IMPORTANT: Do not use any other microphone with the MS-8.
Connect to mic input
15
www.jbl.com
connections
UPDATE
Use the Update port only for firmware upgrades. We have covered it with a sticker that you should leave in
place until you are ready to install a firmware upgrade that you will download from www.JBL.com.
REMOVE
FOR
SOFTWARE
UPDATE
After downloading a firmware upgrade into your PC, remove the sticker and connect the
Update port to a USB port on your PC. Follow the directions that accompany the upgraded
firmware to upload the new firmware from your PC to the MS-8.
www.jbl.com
16
INSTALLATION
Installation warning and tips
• Always wear protective eyewear when using tools.
• Before beginning the installation, disconnect the negative (–) lead from the vehicle’s battery.
• Check clearances on both sides of a potential mounting surface before you drill any holes or install any
screws. Remember that the screws can extend behind the surface.
• At the installation sites, locate and make a note of any fuel lines, hydraulic brake lines, vacuum lines and
electrical wiring. Use extreme caution when cutting or drilling in and around these areas.
• Before drilling or cutting holes, use a utility knife to remove unwanted fabric or vinyl to keep the material from
snagging in a drill bit.
• When routing cables, keep input-signal cables away from power cables and speaker wires.
• When making connections, make certain that they are secure and properly insulated.
CHOOSING A LOCATION FOR THE MAIN UNIT
Cables and wiring
• Before mounting the main unit, plan your system’s wiring to ensure that all the necessary
cables and wires will reach the mounting location.
• Leave enough room around the unit to accommodate all of the connecting cables
and wiring harnesses.
• If you’re planning on permanently mounting the display unit in the vehicle, be sure to mount
the main unit close enough to the display unit’s intended mounting location so the supplied
6m (19.7 ft) cable will reach between them.
Cooling requirements
• Make sure that the mounting location will supply enough air for the unit to cool itself.
• Do NOT mount the main unit in the engine compartment.
Suitable mounting locations
• Under a seat (provided that the unit and connecting cables don’t interfere with the seatadjustment mechanism).
• In the trunk.
• In any other location that provides enough cooling air.
17
www.jbl.com
INSTALLATION
MOUNTING THE MAIN UNIT
Using the main unit as a template, mark the locations of the mounting holes on the mounting
surface; drill pilot holes; and attach the unit to the mounting surface with the supplied screws.
• Mount the unit securely.
• Mount the unit so that it remains dry.
• Mount the unit so that neither it nor any of its connections are damaged by the feet of
backseat passengers or by cargo shifting in the trunk.
NOTE: You may find it easier to attach the MS-8’s main unit to the mounting surface after you’ve
made all connections to it (but before you reconnect the vehicle’s battery ground cable).
CHOOSING A LOCATION FOR THE DISPLAY UNIT
IMPORTANT: Install the MS-8’s display unit according to these instructions and any
relevant regulations. No part of this system should obstruct the driver’s view of the
road, the vehicle controls or the information displays necessary for safely operating
the vehicle. Position the display unit to eliminate glare and reflections and to be
as close as possible to the driver’s normal line of sight.
Mounting the MS-8’s display unit on the windshield, or top of the dashboard
between the driver and the windshield, may violate the law in your municipality. Be
sure to consult local laws before mounting the display unit.
You can mount the display unit in any of a variety of locations, as long as the location offers
a direct view of the display unit’s screen. For easiest viewing, mount the unit near other
instrument-panel gauges or on top of the dashboard.
Possible
mounting
locations
►
NOTE: The display unit is required to set up and calibrate the MS-8. However, once
you have set up the MS-8, you can remove the display unit from the vehicle. (All of
the MS-8’s equalization and digital signal processing functions will operate without
your intervention.) If you do disconnect the display unit after setup, though, you will
not be able to make any MS-8 adjustments, and the MS-8’s remote control will not
function.
If you plan on removing the display unit once your system’s setup and calibration is
complete, you do not have to choose a permanent mounting location.
www.jbl.com
18
INSTALLATION
INSTALLING THE DISPLAY UNIT
1. Select a safe site for the display unit, and temporarily place it there. Check the viewing angle from the
driver’s seat while adjusting the display unit’s pivot arm. If the viewing angle meets your needs, then
skip to Step 2. Otherwise, change the viewing angle as follows:
a) Using the supplied 3mm hex wrench, loosen the recessed hex screw (inside the display base) until
the pivot arm is free from the display assembly. The hex screw will remain captive.
Recessed
hex screw
b) Select one of the other two viewing-angle positions. Reassemble the parts in reverse
order and tighten the recessed hex screw.
Attach the base
to one of the
three positions
2. At the base, using the supplied 1.5mm hex wrench, loosen (but do not remove) the hex
set screw.
3. You can install the display unit using one of the supplied adhesive pads or the supplied
mounting screws.
19
www.jbl.com
INSTALLATION
a) Insert the mounting plate, rotate it 180°, and tighten the hex set screw as shown below.
b) Wipe the installation-site surface and the exposed mounting plate with one of the enclosed
alcohol pads. Allow both to dry.
c) Remove the protective tape from one side of one of the enclosed adhesive pads, and
press the pad against the mounting plate.
d) Remove the remaining protective tape, and press and hold the display unit to its site
for five seconds.
Mounting with adhesive
Set
screw
Mounting with screws
Set
screw
To install the display unit with mounting screws
1. Place the mounting plate at the installation site and rotate it so that its arrow will point toward
the hex set screw at the back of the base after it’s installed.
2. Holding the mounting plate in position, fasten it to the surface with three enclosed mounting
screws.
3. Place the display unit on the mounting plate (180° from its final position). Rotate it a half-turn to
the final position. Tighten the hex set screw at the back of the base.
4. Connect the supplied cable to the display unit. If you haven’t already done so, route the cable
to the main unit and plug it into the main unit’s display connector.
www.jbl.com
20
installation
Though you can leave the MS-8 RF remote control unmounted, JBL supplies two mounting
provisions to secure the remote, making it safe and convenient to operate. Since the remote
operates via radio frequency, it is not necessary to aim the remote while using it. NOTE: You can
also mount the remote to a convenient surface using a Velcro® strip (not supplied), which allows
you to remove the remote to change the battery.
Before mounting the remote
Remove its battery-protection strip by pulling it out in the direction indicated by the arrow.
Pull strip
out of
remote
21
www.jbl.com
installation
MOUNTING THE REMOTE CONTROL
Surface mounting
1. Find a suitable mounting location with a flat surface that’s large
enough for the remote. (Note: The remote control is held in the cup
by a magnet, so you can mount the cup on a vertical surface if you
want.)
2. Ensure that no hazards or wiring are underneath the mounting
surface.
Finger
cutout
Remote
control
3. Remove the remote from the mounting cup. Observe the position
of the mounting cup’s finger cutout, as shown in the illustration.
4. Use two (2) of the supplied screws or some double-stick tape (not
supplied) to attach the mounting cup and trim ring to a flat surface,
as shown in the illustration.
Mounting
cup
Trim
ring
Flush mounting
NOTE: Flush mounting is a custom-installation procedure that
may require additional materials that are not supplied with the
MS-8.
Mounting
cup
1. Find a suitable location with a flat surface that’s large enough
for the remote and has 1/2" (13mm) of clearance underneath.
2. Ensure that no hazards or wiring are underneath the
mounting surface.
3. Mark the cutout opening using the inside of the trim ring as a
template.
4. Cut the mounting surface just large enough to allow the
mounting cup to sit flush against the surface.
5. Remove the remote from the mounting cup. Observe the
position of the mounting cup’s finger cutout, as shown in the
illustration.
6. Secure the mounting cup in place using glue or double-stick
tape.
Replacing the battery in the remote control
1. Remove the two screws in the bottom of the remote.
2. Remove the remote’s bottom cover.
3. Use a pencil or similar object to push the battery out of its
holder.
4. Replace the battery with a new CR2032 3V battery.
NOTE: Insert the battery into the holder with its positive (+)
pole facing up.
5. Replace the remote’s bottom cover and screws.
www.jbl.com
22
Remote
control
using the REMOTE CONTROL
Volume Down
button
Volume Up
button
Select
button
Up/Down
navigation
buttons
Back
button
Left/Right
navigation
buttons
Mute
button
Volume Up and Down buttons: Pressing either of these buttons at any time (except during the
setup/calibration process) will display the MS-8’s System Volume screen, allowing you to change
the audio volume. The volume range is between –80dB and 0dB.
Navigation and select buttons: Use the four navigation buttons (Up, Down, Left and Right) to navigate
through the MS-8’s various setup and operation screens. The Select button selects or otherwise
changes the state of a highlighted item.
Back/menu button: Momentarily pressing this button causes the display to revert to the next-higher
menu. Holding the button reverts to your default screen (either the Main Menu or Audio Controls screen)
from whatever screen is active at the time. See Default Screen, on page 40.
Mute button: Press to mute the sound; press again to restore the sound. (Pressing either the Volume
Up or Volume Down button also restores the sound.)
23
www.jbl.com
CALIBRATION/setup
DISTRACTION WARNING: DO NOT SET UP YOUR MS-8 WHILE DRIVING. We recommend
performing these setup procedures while parked at home or after pulling off the road into
a position that you are absolutely sure presents no risk. Always obey all traffic laws while
driving.
Before you begin
IMPORTANT! The MS-8 will not pass an audio signal through to its outputs until
you have configured it according to the setup procedure described below.
The setup procedure consists of four main parts:
Language selection: You will select the language that the MS-8 will use on the display.
See , on page 25.
Input setup: The MS-8 will use the included setup CD to analyze and condition the input
signal for further processing. See , on page 25.
Output setup: You will configure the crossover settings and identify the output channels.
See , on page 26.
Acoustic calibration: The MS-8 will automatically equalize the signal sent to the
loudspeakers and optimize their response for up to four seating positions using the included
binaural microphone headset. See , on page 32.
You must complete all four of these steps in the above sequence. If you stop the setup
procedure before completing all of the steps, the MS-8 will start at the beginning of the last
complete section when you turn it back on. Be sure to have your completed Configuration
Chart (see page 11) handy. It will make configuring the outputs easy.
Start the MS-8 by turning on the vehicle radio or head unit (or turning the vehicle’s key to
the ACC position if you’ve connected the Rem In terminal to ACC power).
Use the remote control’s Up and Down navigation buttons to highlight items on the display.
Press the remote’s Select button to select a highlighted item. Use the remote’s Left and
Right navigation buttons to make changes in items on the display.
Select
button
Up/Down
navigation
buttons
Left/Right
navigation
buttons
Back
button
www.jbl.com
24
CALIBRATION/setup
LANGUAGE SELECTION
The first time you power up the MS-8, the Language screen will appear on the display. This screen
determines the language the MS-8 will use to display all of its setup, calibration and operation
menus. When this screen appears, choose a language. The following languages are available:
English, Spanish, French, Portuguese, German, Dutch, Italian, Danish, Norwegian, Swedish and
Finnish.
NOTE: After the setup and calibration process, you can change the language using the Main
Menu’s System Settings option. See System Settings Menu, on page 40.
INPUT SETUP
Once you have chosen a language, the MS-8 will display Input Setup.
IMPORTANT: You must use the calibration CD provided with the MS-8 for this step. If your
system does not have a CD player, you can convert the CD to a .WAV file for use with a
portable media player or other audio source. The file format you use MUST be lossless,
or the calibration process will not be accurate.
• If you are using an aftermarket head unit and have connected the head unit’s front left
output and right line outputs to the MS-8’s line inputs 1 and 2, you may select Skip Input
Setup and go directly to Output Setup, on page 26.
• If you are using a factory-installed stereo that you connected to the MS-8’s Hi Level
input or line inputs, continue with steps 1–3, below.
1. Set the head unit’s bass, treble, balance and fader controls to their “flat” or center
positions. If possible, defeat the factory system’s additional processing (Dolby® Pro
Logic® II, Logic 7®, seating-position selector, user-selectable equalization, etc.).
Consult your vehicle owner’s manual for instructions on how to do it.
2. Insert the calibration CD supplied with the MS-8 into the source unit, press the source
unit’s “Play” button and select Continue.
While the CD is playing, the MS-8 will analyze the input signal to ensure that it is receiving
the correct signal and that both right and left signals are present. The MS-8’s display will
show Signal, Level and Balance. An OK must appear next to each one before you can continue.
• If None appears next to Signal, be sure that the head unit is outputting a signal (increase the
volume control) and/or check the MS-8’s input connections.
• If Noisy appears next to Signal, check to see that the head unit’s volume control isn’t all
the way up; turn off the car’s engine (if the car is running), but be sure not to turn the key
past ACC.
• If High or Low appears next to Level, slowly adjust the head unit’s volume control until
OK appears.
• If Left or Right appears next to Balance, slowly adjust the head unit’s balance control until
OK appears.
3. Once OK, OK, OK appear on the display, stop making adjustments to the head unit, and select
Continue while the CD is playing. NOTE: Do NOT make any other adjustments to the head
unit during the entire input setup procedure.
The display will read Acquiring while the MS-8 analyzes and corrects the input signal. Once the
procedure is complete (it might take up to a minute or two), follow the instructions on the screen:
Turn the head unit’s volume down, remove the CD and select Continue.
25
www.jbl.com
CALIBRATION/setup
OUTPUT SETUP
Next, the MS-8 will display Xover Setup. During Xover Setup, you must tell
the MS-8 which speakers are connected to the system, and you must select
the crossover characteristics for all of the system’s speakers. Referring to the
Configuration Chart that you filled out when you connected the MS-8 will make
this process easy. During Xover Setup and Channel Selection, you must enter the
information according to the specific sequence that the MS-8’s display presents.
A note about crossovers
In general, your car stereo’s small speakers are designed to reproduce high frequencies,
while its large speakers are designed to reproduce low frequencies. Larger speakers do a
poor job of reproducing high frequencies, and smaller speakers are not able to reproduce
low frequencies and may even be damaged by them.
A crossover is a filter or combination of filters that limit the sounds that are sent to a
particular speaker so that it receives only the frequencies that it can safely reproduce.
The MS-8 features a sophisticated crossover system that you can set to get the best
performance from whatever type of speaker system is installed in your vehicle.
In the MS-8, a crossover (or filter, abbreviated “Xover” on the MS-8 display) frequency
refers to the frequency at which the sounds sent to that speaker will begin to be
attenuated. The crossover filter slope refers to the rate at which the sounds will be
attenuated. The MS-8’s crossover contains two types of filters:
• High-pass filters, which send the frequencies above the crossover frequency to a
speaker while attenuating the frequencies below the crossover frequency. This type of
filter is used to prevent lower frequencies from reaching smaller speakers.
• Low-pass filters, which send the frequencies below the crossover frequency to a speaker
while attenuating the frequencies above the crossover frequency. This type of filter is
used to prevent higher frequencies from reaching larger speakers.
A high-pass filter can be combined with a low-pass filter to create a third type of filter,
called a band-pass filter. A band-pass filter sends the band of frequencies between
the high-pass and low-pass crossover frequencies to a speaker while attenuating the
frequencies below the high-pass crossover frequency and above the low-pass crossover
frequency. This type of filter is used to prevent lower and higher frequencies from reaching
midrange speakers in three-way speaker systems.
The most important thing that determines your selection of an MS-8 crossover
filter’s frequency and slope is making sure that your system’s small speakers
don't receive too much bass, which can cause the sound they reproduce to be
distorted and can even damage them.
For example, an 80Hz high-pass filter will remove frequencies below 80Hz from the signal
that the MS-8 sends to a smaller speaker. However, it may not completely remove those
frequencies; a 6dB per octave filter slope will still allow the speaker to receive 1/4 of the
signal’s power at 40Hz, while a 24dB/octave filter slope will allow the speaker to receive
almost no power at 40Hz and will keep the speaker from receiving too much bass. We
recommend using 24dB/octave slopes between subwoofers and midrange
speakers and between midrange speakers and tweeters.
www.jbl.com
26
CALIBRATION/setup
If you make a mistake
If you make a mistake and need to reenter Output Setup information, you must abort
the Xover Setup process and start it again. To abort the process:
1. Hold the remote’s Back/Menu button until the Main Menu screen appears.
2. Select Calibration/Setup; then select Input/Output Setup.
3. When the Warning Message screen appears, select Continue.
4. When the Input Setup screen appears, select Skip Input Setup.
5. The MS-8 will display the Xover Setup, Sub screen. Continue below.
Subwoofer
1. Select Sub (for subwoofer).
2. The MS-8 will then display None, 1, 2. Use the remote’s Up and Down navigation buttons
to highlight one of these options, and press the Select button to select it. Your audio
system’s subwoofer configuration determines which option you should select.
For example, if you have one subwoofer being powered by one amplifier channel (either an
outboard amplifier or an MS-8 amplifier channel), select 1. If you have two subwoofers, each
powered by its own amplifier channel, connected to separate MS-8 outputs, select 2. If you
have two subwoofers, each powered by its own amplifier, but those amplifier channels are
connected to a single MS-8 output, select 1.
3. If you’ve chosen None, skip to Front speakers, on page 28.
4. If you’ve chosen 1 or 2, the display will then read Subsonic Filter. This screen enables you
to choose the subsonic (that is, infrasonic) high-pass filter for the system’s subwoofer(s).
Use the remote’s Left and Right navigation buttons to display a frequency between 20Hz
and 50Hz, and press the Select button to select it. If you’re not sure which frequency to
choose, we recommend using 20Hz.
5. The MS-8 will then display Subsonic Slope. This screen enables you to determine the
subsonic filter’s attenuation rate. Use the Up and Down navigation buttons to highlight an
attenuation rate, and press the Select button to select it. If you’re not sure which rate to
choose, we recommend using 12dB/octave.
6. The MS-8 will then display Sub/Front Xover. This screen enables you to determine the
crossover frequency between the subwoofer and the front left and right speakers. You
should determine this frequency by the amount of bass your left/right speakers can safely
produce, considering the amount of power that will be applied to them. Use the Left and
Right navigation buttons to display a frequency between 50Hz and 200Hz, and press the
Select button to select it. If you’re not sure which frequency to choose, we recommend
using 80Hz.
7. The MS-8 will then display Sub/Front Slope. This screen enables you to choose the rate
of attenuation between the subwoofer and the front speakers. The speakers’ performance
characteristics should determine your selection. Use the Up and Down navigation buttons
to highlight an attenuation rate, and press the Select button to select it. If you’re not sure
which rate to choose, we recommend using 24dB/octave.
27
www.jbl.com
CALIBRATION/setup
Front speakers
1. The MS-8 will then display Xover Setup > Sub, Front. Select Front.
2. The MS-8 will then display Front, with the options 1 way, 2 way, and 3 way. These
options refer to the number of MS-8’s output channels that will be devoted to driving
your front speakers.
MS-8 Crossover Configurations
Tweeter
Tweeter
Mid
Full Range
Mid
Woofer
1 way
2 way
3 way
Use the Up and Down navigation buttons to highlight one of these options, and
press the Select button to select it. The configuration of your system’s front speakers
determines your choice.
For example: If your front left and right speaker system consists of a pair of coaxial
speakers (one left and one right), or components with their own passive crossover
connected to two of the MS-8’s outputs (either speaker outputs or line outputs
connected to an outboard power amplifier), choose 1 way. If your front speakers
consist of a component system where the tweeters and the midranges will each be
connected to separate output channels, choose 2 way. If your front system consists of
separate tweeters, midrange and midbass, with each connected to a separate
channel, choose 3 way.
3. If your audio system does not have a subwoofer, the MS-8 will then display
Front Hi Pass. This screen enables you to choose the subsonic high-pass filter for
the system’s speakers. Use the Left and Right navigation buttons to display a
frequency between 20Hz and 100Hz, and press the Select button to select it. If
you’re not sure which frequency to choose, we recommend using 20Hz. Alternately,
you may want to use this setting to prevent your front speakers from receiving too
much bass, which can cause distortion at higher listening levels. If your front
speakers are 6" or larger, we suggest a setting between 20Hz and 40Hz. If your
front speakers are 5" or smaller, we suggest a setting between 40Hz and 60Hz.
4. The MS-8 will then display Front Hi Pass Slope. This screen enables you to choose
the subsonic filter’s rate of attenuation. Use the Up and Down navigation buttons to
highlight a filter slope, and press the Select button to select it. If you’re not sure
which rate to choose, we recommend using 12dB/octave.
5. If in Step 2 you selected 1 way: Skip to Center speaker, on page 29.
www.jbl.com
28
CALIBRATION/setup
6. If in Step 2 you selected 2 way
a) The MS-8 will display Front Lo/Hi Xover. This screen enables you to choose the
crossover frequency between the front midrange and tweeter (or between a
separate midbass driver and a midrange/tweeter). Use the Left and Right navigation
buttons to display a frequency between 50Hz and 10kHz, and press the Select
button to select it. If you’re using separate tweeters connected to the MS-8’s
amplifier or to an additional amplifier, we recommend using a setting of 3500Hz
or higher.
b) The MS-8 will then display Front Lo/Hi Slope. This screen enables you to choose
the rate of attenuation of the filter between the midrange and tweeter. Use the Up
and Down navigation buttons to highlight a filter slope, and press the Select button
to select it. If you’re using separate tweeters (as discussed in Step 5a), we
recommend using 24dB/octave.
7. If in Step 2 you selected 3 way
a) The MS-8 will display Front Lo/Mid Xover. This screen enables you to choose the
crossover frequency between the front midbass and midrange. Use the Left and
Right navigation buttons to display a frequency between 100Hz and 10kHz, and
press the Select button to select it. The design and performance of your front
speakers determines which frequency you should choose.
b) The MS-8 will then display Front Lo/Mid Slope. This screen enables you to choose
the attenuation rate of the filter between the midbass and midrange. Use the Up and
Down navigation buttons to highlight an attenuation rate, and press the Select
button to select it. The design and performance of your front speakers determines
which rate you should choose.
c) The MS-8 will then display Front Mid/Hi Xover. This screen enables you to choose
the crossover frequency between the front midrange and tweeter. Use the Left and
Right navigation buttons to display a frequency between 200Hz and 10kHz, and
press the Select button to select it. The design and performance of your front
speakers determines which frequency you should choose. If you’re using separate
tweeters connected to the MS-8’s amplifier or to an additional amplifier, we
recommend using a setting of 3500Hz or higher.
d) The MS-8 will then display Front Mid/Hi Slope. This screen enables you to choose
the attenuation rate of the filter between the midrange and tweeter. Use the Up and
Down navigation buttons to highlight an attenuation rate, and press the Select
button to select it. The design and performance of your front speakers determines
which rate you should choose. If you’re using separate tweeters (as discussed in
Step 7c, above), we recommend using 24dB/octave.
Center Speaker
1. The MS-8 will then display Xover Setup > Sub , Front , Center. Select Center.
2. The MS-8 will then display Center, with the options None, 1 way, 2 way. Use the Up
and Down navigation buttons to highlight one of these options, and press the Select
button to select it. The configuration of your system’s center speaker determines
your choice.
For example: If your center speaker system consists of a coaxial speaker or
component with its own passive crossover connected to one of the MS-8’s outputs
(either its speaker outputs or its line outputs connected to an outboard power
amplifier), choose 1 way. If your center speaker consists of a component system
where the tweeter and the midrange will each be connected to separate MS-8 output
channels, choose 2 way.
29
www.jbl.com
CALIBRATION/setup
NOTE: The available center-speaker, side-speaker and rear-speaker options will
depend on the number of MS-8 channels that are available after you have set up
the subwoofer and front speakers. For example, if you are using two subwoofer
channels and three-way front speakers, then all eight of MS-8’s channels will have
been allocated, and the only option that will be displayed for the center speaker
(as well as the side and rear speakers) will be None. If you have selected a single
subwoofer channel and three-way front speakers, seven of MS-8’s eight channels
will have been allocated, and the options displayed for the center speaker will be
None and 1.
3. The MS-8 will then display Center Hi Pass. This screen enables you to choose
the high-pass filter for the center speaker. Use the Left and Right navigation
buttons to display a frequency between 50Hz and 10kHz, and press the Select
button to select it. If you’re not sure which frequency to choose, we recommend
using 80Hz.
4. The MS-8 will then display Center Hi Pass Slope. This screen enables you to
choose the subsonic filter’s attenuation rate. Use the Up and Down navigation
buttons to highlight a rate, and press the Select button to select it. If you’re not
sure which rate to choose, we recommend using 24dB/octave.
5. If in Step 2 you selected 2 way:
a) The MS-8 will display Center Lo/Hi Xover. This screen enables you to choose
the crossover frequency between the center midrange and tweeter. Use the Left
and Right navigation buttons to display a frequency between 50Hz and 10kHz,
and press the Select button to select it. If you’re using separate tweeters
connected to the MS-8’s amplifier or to an additional amplifier, we recommend
using a setting of 3500Hz or higher.
b) The MS-8 will then display Center Lo/Hi Slope. This screen enables you to
choose the rate of attenuation of the filter between the midrange and tweeter. Use
the Up and Down navigation buttons to highlight a filter slope, and press the
Select button to select it. If you’re using separate tweeters (as discussed in Step
5a), we recommend using 24dB/octave.
Side speakers (side or rear speakers)
NOTE: If your system has side AND rear speakers, configure the side speakers in
this section (Side) and the rear speakers in the next section (Rear). If your system
has only side OR rear speakers, configure those speakers in this section (Side), and
skip the next section (Rear).
1. The MS-8 will then display Xover Setup > Sub, Front, Center, Side. Select Side.
2. The MS-8 will then display Side, with the options None and 1 way. (Separate
outputs for two-way speakers are not available for side or rear speakers.) Use the
remote’s Up and Down navigation buttons to highlight one of these options, and
press the Select button to select it.
3. The MS-8 will then display Side Hi Pass. This screen enables you to choose the
high-pass filter for the side speakers. Use the remote’s Left and Right navigation
buttons to display a frequency between 50Hz and 10kHz, and press the Select
button to select it. We recommend using at least 100Hz.
4. The MS-8 will then display Side Hi Pass Slope. This screen enables you to
choose the rate of attenuation of the filter between the midrange and tweeter. Use
the Up and Down navigation buttons to highlight a filter slope, and press the
Select button to select it. We recommend using 24dB/octave.
www.jbl.com
30
CALIBRATION/setup
Rear speakers
1. The MS-8 will then display Rear, with the options None and 1 way. (Separate outputs
for two-way speakers are not available for side or rear speakers.)
2. Use the remote’s Up and Down navigation buttons to highlight one of these options,
and press the Select button to select it. NOTE: If you are using only one set of
speakers in the back of the car or if there are no speakers in the back of the car, select
None.
3. The MS-8 will then display Rear Hi Pass. This screen enables you to choose the
high-pass filter for the rear speakers. Use the remote’s Left and Right navigation
buttons to display a frequency between 50Hz and 10kHz, and press the Select button
to select it. We recommend using at least 100Hz.
4. The MS-8 will then display Rear Hi Pass Slope. This screen enables you to choose the
filter’s attenuation rate. Use the Up and Down navigation buttons to highlight a slope,
and press the Select button to select it. We recommend using 24dB/octave.
The MS-8 will then display the Xover Setup menu, which lists all the speakers you have
set up. If you need to make corrections, select the appropriate speaker location from the
menu, and reenter the information as well as all of the information for the speakers that
follow. When you are finished with all of the output-setup settings, select Done.
Channel selection
The MS-8 will then display the Channel Selection menu. This menu enables you to
assign the outputs that you configured in all the Xover Setup menus to specific output
channels, by number. This menu will display only valid choices (according to your entries
in the Xover Setup menus). Select the output channel based on the connections that you
documented in the Configuration Chart you filled out on page 11, in the audio outputs
section:
1. If a speaker or amplifier is connected to the MS-8’s Channel 1, select Channel 1 from
the Channel Selection menu.
2. The MS-8 will display the Channel 1 menu, which will list the available choices based
on the entries that you made in Xover Setup. The following choices may be available:
FL – Front left (full-range speaker)
FL Hi – Front left tweeter (or midrange/tweeter combination with passive crossover)
FL Mid – Front left midrange
FL Lo – Front left low (woofer, midbass or midrange)
FR – Front right (full-range speaker)
FR Hi – Front right tweeter (or midrange/tweeter combination with passive crossover)
FR Mid – Front right midrange
FR Lo – Front right low (woofer, midbass or midrange)
Sub 1 – Subwoofer 1
Sub 2 – Subwoofer 2
Ctr – Center (full-range)
Ctr Hi – Center tweeter
Ctr Lo – Center low (woofer or midrange)
SL – Side left
SR – Side right
RL – Rear left
RR – Rear right
31
www.jbl.com
CALIBRATION/setup
3. If a speaker or amplifier is connected to the MS-8’s Channel 2, select
Channel 2 from the Channel Selection menu and repeat the procedure from
Step 2.
4. Repeat the procedure for each channel to which a speaker or amplifier is
connected. Skip channels that are not connected to speakers or additional
amplifiers. If you make a mistake, select the channel that you want to
correct, and then enter the correct selection. The MS-8 keeps track of the
number of channels that you have used and will not allow duplicate entries.
Check your entries carefully against the Configuration Chart you filled out on
page 11. Once you’re satisfied that everything is correct, select Done.
Output diagnostics
The MS-8 will then display the Output Diagnostics menu. We provide this
screen to help you confirm that your connections and channel assignments
are correct before you proceed to the next step.
Select any of the displayed speaker locations to hear pink noise through all of
the channels dedicated to that location. For example, if you’ve set up a threeway front system, selecting Front Right will cause the MS-8 to send test noise
to the three channels you’ve designated as “Front Right” (hi, mid and lo).
Listen carefully as you move through the speaker locations. If you’ve made
a mistake (that is, if the noise is coming from a speaker other than the one
you’ve selected), you may be able to correct the mistake by reconnecting the
RCA or speaker-wire connectors on the MS-8’s output.
If you can’t correct the mistake by changing connections, correct your
Configuration Chart and hold the remote’s Back/Menu button to return to the
Xover Setup menu (see the If you make a mistake sidebar on page 27). You will
need to enter the all of the correct information again from the beginning of the
section.
Once you’ve determined that all connections and selections are correct, select
Done in the Output Diagnostics menu. The MS-8 will display the Speaker
Conf iguration Complete screen. When you’re ready to begin the acoustic
calibration procedure, select Continue.
ACOUSTIC CALIBRATION
The last step in setting up the MS-8 is making acoustic measurements
that will help the MS-8 optimize the sound at the driver’s seating position.
(You may also make acoustic measurements to optimize the sound at three
additional seats.) To get the best results for you and a single passenger, make
measurements in the driver’s and front passenger’s seats.
The MS-8 will display Error > Please Connect Microphone.
Connect the included binaural microphone headset to the MS-8’s Mic input
jack. (The MS-8 will not continue the calibration process until you connect
the microphone.) Carefully route the microphone’s cable to the driver’s seat,
leaving enough excess wire to accommodate the movement of your head. Sit
in the driver’s seat and place the headset mic on your head. Be sure that the
left and right microphones are on the correct ears!
Select Continue. The MS-8 will display Set Volume > -20dB.
www.jbl.com
32
CALIBRATION/setup
• If the MS-8’s internal amplifier is set to drive the front speakers, leave the volume
set at –20dB.
• If an external, higher-powered amplifier is driving the front speakers, use the
remote’s Volume Down button to set the volume to a level lower than –20dB.
In either case, the test-signal sweeps that you will hear during acoustic calibration
should be about as loud as someone sitting in the passenger’s seat speaking at a
normal conversational level. Performing acoustic calibration with a level that’s too
high will negatively affect the calibration results. See Volume Up and Volume Down
buttons, on page 35.
After setting the volume, press the Select button. The MS-8 will display Driver's
Seat > Acoustic Measurement 1of4 > Look Forward
1. Make sure that you have positioned the binaural microphone headset over your
ears and that you are sitting in the driver’s seat. Look straight forward.
2. Select Go. The MS-8 will play a series of test signals.
3. Hold your head still until the test signals stop and the next screen (measurement
2of4 > Look Forward) appears.
4. Select Go and continue looking forward while the MS-8 plays the second series
of test signals.
5. Hold your head still until the test signals stop. NOTE: The subwoofer test signal in
measurements 2, 3 and 4 lasts a little longer than the other test signals, so be
sure to keep your head still until it has finished and the next screen (measurement
3of4 > Look Driver Side Mirror) appears.
6. Turn your head toward the driver’s side-view mirror for the third measurement
and select Go.
7. Hold your head still until the test signals stop and the next screen (measurement
4of4 > Look Passenger Side Mirror) appears.
8. Turn your head toward the passenger’s side-view mirror for the final
measurement and select Go.
9. Hold this position until the test signals stop and the MS-8 displays Driver's Seat,
with several options:
Next seating position: Selecting this option will perform acoustic calibration for the
front passenger seat.
NOTE: To calibrate for the front passenger seat, you'll need to sit in the front
passenger seat while the MS-8 makes the measurements. If you wish to calibrate
for the passenger’s seat, move to that seat before starting the next section.
After the front passenger-seat calibration is complete, “Next seating position” will
refer to the rear driver-side seat, and then the rear passenger-side seat. To calibrate
for those seating positions, you must move to those seats before beginning
calibration.
“Next seating position” repeats steps 1–9 for up to three additional seating
positions. When you have completed optimizing the sound for all positions, select
Done.
33
www.jbl.com
CALIBRATION/setup
Remeasure seating position: Selecting this option remeasures the seating
position that has just been measured. You can select this option if you think
you’ve made a mistake, if loud noises were present during any of the testsignal sweeps, if the sweeps were much louder than someone speaking at a
normal volume or if you want to remeasure the seating position for any other
reason.
Quit: Selecting this option aborts the calibration procedure and returns to the
beginning of acoustic calibration.
Done: Selecting this option will complete the calibration process if you do not
wish to measure additional seating positions. The MS-8 will display Acoustic
Measurement Complete > Please wait while it calibrates the system. When the
calibration is complete, the MS-8 will display Main Menu.
Disconnect the microphone, insert your favorite CD and have a listen.
Additional adjustments are available in the Main Menu (see Main Menu, on
page 35).
www.jbl.com
34
USING THE MS-8
VOLUME UP AND DOWN BUTTONS (on the remote control)
Pressing either of these buttons at any time (except during the setup/calibration
process) will display the MS-8’s System Volume screen, allowing you to change the
audio volume. The volume range is between –80dB and 0dB.
For the best results, leave the head unit’s volume control set at the level that
produced the OK, OK, OK readings on the display during the setup process (see Input
Setup, on page 25), and use the MS-8’s Volume Up and Volume Down buttons to
control the system’s volume. You may also use the head unit’s volume control to
control the system’s volume.
MAIN MENU
When you complete the calibration process, the MS-8 will display the Main Menu
screen. From MS-8’s Main Menu, you can navigate to all of the MS-8’s functions and
adjustments.
IMPORTANT: If you decide not to install the MS-8’s display permanently, the
Main Menu and all of the MS-8’s adjustments will not be available. In this
case, set the MS-8’s System Volume to –6dB (see Volume Up and Volume
Down buttons, on this page), and unplug the display unit. Be sure to store
the display unit, cable and remote control in a safe place in case you may
want to reconfigure the system or make other adjustments.
The Main Menu gives you the following selections:
Input Selection: This screen lets you choose a connected head unit or the Aux
input as the active source of audio. See Input Selection menu, on page 36.
Audio Controls: This screen lets you adjust the system level, tone controls and 31band graphic EQ, and engage/defeat the MS-8’s Logic 7 processing, digital signal
processing (time correction and equalization) and seating-position optimization. The
MS-8 also provides an option to reset all controls to their factory defaults. See Audio
Controls menu, on page 36.
Favorites: This option lets you store and recall currently active audio settings (you
can store and recall up to five different combinations of settings). See Favorites menu,
on page 39.
35
www.jbl.com
USING THE MS-8
Calibration/Setup: This selection performs the calibration procedures as documented in
this manual. See Calibration/Setup, on page 24. NOTE: If you would like to recalibrate the
acoustic performance of the system, you may enter its Calibration/Setup section, choose
Acoustic Calibration and re-tune the system without repeating the input-setup, xover-setup
and channel-selection procedures.
System Settings: This selection accesses the MS-8’s operational and display settings. See
System Settings Menu, on page 40.
INPUT SELECTION MENU
This menu lets you select between the MS-8’s Head Unit input (either the line-input
connections or Hi Level input connections) and the Aux input connections. The word Active
indicates which input is currently active.
AUDIO CONTROLS MENU
This menu provides control of all of the MS-8’s audio adjustments.
NOTE: Pressing the Select button while making any adjustment returns the adjustment to the
center position.
System Levels: This screen lets you adjust the levels of the Aux input and the system’s
speakers. Use the Left and Right navigation buttons to vary the levels. (NOTE: If the system
has both side and rear speakers, the Fader control will adjust between the front speakers and
both the side and rear speakers in tandem. It is not possible to adjust the balance between
the side and rear speakers.)
www.jbl.com
36
USING THE MS-8
Note for systems that include a center-channel speaker: Logic 7 processing steers
all mono information to the center channel. At first, the sound may seem wrong if you're
not used to listening with the Logic 7 system. However, after listening for an extended
period, you’ll find vocal and instrument placement with Logic 7 enabled and the centerchannel level in the center position to be natural sounding and consistent. If you listen to a
lot of news, sports or talk radio, you may want to attenuate the center channel – you can
even save a Favorite setting with such an adjustment. In any case, you can always set the
level of the center channel according to your preference.
Tone Control: This selection lets you adjust the system’s overall tone quality. The bass
control and treble control are shelving-type controls, with ±10dB of boost and cut at 20Hz
and 20kHz, respectively. The midrange control is a peak-and-dip type with a Q of 0.26 that
offers ±10dB of boost and cut at 650Hz. Use the Left and Right navigation buttons to vary
the levels.
Graphic EQ: The MS-8’s graphic equalizer is a sophisticated tone control that divides the
audio spectrum into 31 bands, each approximately a third of an octave wide. This format
allows you to fine-tune the system’s sound with extreme precision. Each band allows
±10dB of boost or cut at the band’s center frequency. We have designed the equalizer’s
circuitry to minimize destructive interaction between adjacent bands, giving you precise
control with superior sound quality.
Indicator
arrow
Active
frequency
Amount of
boost or cut
37
www.jbl.com
USING THE MS-8
The arrow indicates the selected band; the band’s center frequency is indicated
on the left side of the screen; the amount of boost or cut that you apply is
indicated on the right side of the screen.
Use the Left and Right navigation buttons to select the frequency band you want
to adjust, and use the Up and Down navigation buttons to make the adjustments.
Each press of an Up or Down button changes the level by 0.5dB. As you apply
boost or cut, the selected band will increase or decrease in size on the screen to
indicate the relative change in level.
IMPORTANT: The MS-8’s digital volume and equalization work differently
than standard analog controls. Boosting the MS-8’s subwoofer-level
control, bass-tone control and the low bass bands in the 31-band EQ to
their near-maximum, and setting the MS-8’s System Volume control to
0dB, will cause severe clipping (distorted sound) that may damage your
system’s loudspeakers.
Logic 7: Logic 7 technology creates an ideal 5.1-channel or 7.1-channel
surround-sound listening environment from two-channel source material. Logic
7 processing widens the stereo soundstage and increases the sense of sonic
envelopment, making the vehicle’s interior boundaries seem to disappear. The
music sounds as though it exists on its own, rather than coming from speakers.
We have specifically tuned the MS-8’s Logic 7 for use in vehicles. It includes
processing for the center-channel speaker (if one is present in the vehicle’s
system).
You can turn Logic 7 on and off by pressing the Select button while Logic 7 is
highlighted in the Audio Controls menu.
Processing: The Audio Controls Processing option activates and defeats the
MS-8’s digital time-correction and acoustic-equalization circuitry. Using the
Select button to switch between Active and Defeat will let you hear how the
MS-8’s advanced digital signal processing dramatically improves your system’s
performance.
Seat: You can optimize the sound for any of the seating positions that you
measured during the setup process. Pressing the Select button cycles through
the available positions: Driver, Passenger, Front, Rear, All. “Front” or “Rear”
optimizes both front seats or both rear seats as the preferred listening position.
“All” is a general setting that will produce good sound for any seating position.
www.jbl.com
38
USING THE MS-8
Reset to default: This setting restores all of the audio controls to their default settings. The
default settings are:
System Levels: All controls centered
Tone Control: Flat (all controls centered)
Graphic EQ: Flat (all controls centered)
Logic 7: On
Processing: Active
Seat: Driver
FAVORITES MENU
The MS-8 provides five Favorites positions that let you store the system’s currently active
audio settings. The system stores all audio and input selection settings in a Favorites setting
(except the Aux volume setting). This feature lets you tailor the sound for a certain type of
music or a certain driver, and save and recall the settings at any time.
To store a Favorite
Select “Save Favorites.” The Save Favorites screen will appear.
Use the Up and Down navigation buttons to select the Favorites position, then press the
Select button to save the current settings there. An asterisk (*) will appear next to the
selection to indicate into which Favorites position you have stored the current configuration.
To recall a stored Favorite
Select Recall Favorites. The Recall Favorites screen will appear (see above). Use the Up
and Down navigation buttons to select the Favorites position, then press the Select button
to activate it. The word Active will appear to the right of the active setting’s number. This
selection will remain until you choose another Favorites setting or you adjust any of the
audio settings.
39
www.jbl.com
USING THE MS-8
SYSTEM SETTINGS MENU
This menu lets you adjust the MS-8’s various system settings:
Turn off delay: This setting lets you select a delay time for the MS-8 to turn
additional amplifiers off via its Remote Out terminal when the MS-8 goes into
its standby mode. The options are zero seconds (no delay), two seconds or five
seconds. The factory default is two seconds.
Brightness: This setting lets you adjust the display’s brightness. Press the Select
button; then use the Left and Right navigation buttons to change the brightness.
When you’re finished, press the Select or Back button to return to the System
Settings screen.
Contrast: This screen lets you adjust the display’s contrast. Press the Select
button; then use the Left and Right navigation buttons to change the contrast.
When you’re finished, press the Select or Back button to return to the System
Settings screen.
Default Screen: This setting lets you choose which screen the MS-8 will default to
when you turn it on – the Main Menu screen or the Audio Controls screen.
Language: This screen lets you select the MS-8’s screen language. The following
languages are available: English, Spanish, French, Portuguese, German, Dutch,
Italian, Danish, Norwegian, Swedish and Finnish.
About: This screen displays the firmware versions loaded in your MS-8.
Restore Factory Defaults: This option erases ALL of the MS-8’s settings and
filters, and returns the unit to its out-of-the-box state.
www.jbl.com
40
USING THE MS-8
RESETTING THE MICROPROCESSOR
If your MS-8 stops responding to the remote control (even after you’ve replaced
the remote’s battery) or fails to operate in the way this manual describes, use
a pen or similar pointed object to press the Reset button on the main unit (see
Connections, on page 5.) NOTE: Pressing the Reset button will NOT erase your
calibration settings.
Need More Information?
For more information, visit www.JBL.com for the latest technical information and
other important MS-8 details.
41
www.jbl.com
TROUBLESHOOTING
If your MS-8 doesn’t seem to be working the way it should, read this section to
see if the problem and possible solution are listed here. If, after you try all of the
solutions listed here, the problem persists, contact JBL Customer Service at
516.255.4JBL (4525).
POWER
Symptom
Possible Cause
Solution
The power LED does not
illuminate.
The +12V, Gnd or Rem In
terminals are not properly
connected.
Confirm that all power
connections are correctly
made according to this
manual. See Connections:
Power, on page 5.
The fuse is blown.
Replace the fuse with an
identical 25A fuse.
The display is not properly
connected.
Check the connections at
display and at main unit.
See Connections: Display,
on page 14.
The MS-8’s microprocessor
needs to be reset.
Press Reset button with a
pen or similar object. See
Resetting the
Microprocessor, on page 41.
Symptom
Possible Cause
Solution
There is no sound in all
channels.
Improper input connections.
Confirm that all the required
channels of the source unit
are properly connected. See
Audio Inputs, on page 7.
Calibration/setup procedure
has not been performed.
Perform the calibration/
setup procedure. (The
procedure must be
performed before the MS-8
will pass an audio signal
through to its outputs.) See
Calibration/Setup, on page
24.
Incorrect input is selected
on the MS-8
Select the correct input
using the MS-8’s Input
Selection menu. See Input
Selection Menu, on page 35.
The MS-8’s System Volume
is turned all the way down.
Set the MS-8 System
Volume at –20dB. See
Acoustic Calibration, on
page 32, and Volume Up
and Volume Down Buttons,
on page 35.
The head-unit or source-unit
volume control is turned all the
way down.
Turn the head-unit or
source unit volume up to a
normal level.
The power LED illuminates,
but the display does not
illuminate.
SOUND
www.jbl.com
42
TROUBLESHOOTING
SOUND
Symptom
Possible Cause
Solution
There is no sound in one or
more channels.
Improper input connection.
Confirm that all required
channels of the source unit
are properly connected. See
Audio Inputs, on page 7.
Improper output connection.
Confirm that the speaker
in question is properly
connected to the MS-8’s
speaker output. See Audio
Outputs, on page 10.
If the speaker is connected
to an outboard amplifier,
confirm that the outboardamplifier channel is properly
connected to the MS-8. See
Audio Outputs, on page 10.
The sound comes from the
incorrect speaker.
Sound comes from only the
left or right side speakers; or
sound comes from only the
front or rear speakers.
Improper speaker connection to
outboard amplifier.
Confirm that the speaker is
properly connected to the
outboard amplifier.
Outboard amplifier channel is
not functioning.
Troubleshoot the outboard
amplifier and replace it, if
necessary.
Incorrect output connection.
Confirm that the speaker is
connected to the correct
MS-8 speaker output or
to the correct outboardamplifier channel.
Incorrect channel assignment.
Perform the Input
Setup (page 25) and
Output Setup (page 26)
procedures again. (See
the If you make a mistake
sidebar, on page 27.)
Before beginning the
procedures, make sure
to confirm and document
which speakers are
connected to which MS-8
The Balance and/or Fader
controls are set all one way
or another.
Use the MS-8’s System
Levels screen to set the
controls to their center
positions. See Audio
Controls Menu, on page 35.
43
www.jbl.com
TROUBLESHOOTING
SOUND
Symptom
Possible Cause
Solution
The source connected to the
Aux input is too quiet or too
loud.
The Aux input level is not
properly set.
Use the MS-8’s System
Levels screen to set the
Aux level so that the Aux
source’s level matches
the level of the head unit
source. See Audio Controls
Menu, on page 35.
The source player’s volume
control is set too low.
Set the source player’s
volume control to a higher
level.
The MS-8’s System Volume
control and the head unit’s
volume control are not properly
adjusted.
If you have connected the
front speakers to be driven
directly by the MS-8’s
internal amplifier, set the
MS-8’s System Volume at
–20dB.
The sound in all speakers is
distorted.
If you have connected
the front speakers to an
external, higher-powered
amplifier that is connected
to the MS-8’s line outputs,
set the MS-8’s System
Volume to a level lower than
–20dB.
In either case, you should
use the head unit’s volume
control to control the
system’s volume. You may
need to make a minor
adjustment to the MS-8’s
System Volume setting to
allow you to use more of
the range in the head unit's
volume control.
If you hear distortion when
the head unit’s volume
control is at higher settings,
increase the MS-8’s System
Volume to compensate.
This change will let you
keep the head unit’s volume
control within a lower (more
distortion-free) portion of its
range.
The MS-8’s Bass Control and/
or Graphic EQ bass bands
are set with too much boost,
combined with a high System
Volume setting.
www.jbl.com
44
Reduce the Bass Control
and/or Graphic EQ boost
levels. We recommend
never combining high levels
of Graphic EQ bass-band
boost with high Bass
Control boost.
TROUBLESHOOTING
SOUND
Symptom
Possible Cause
Solution
The center speaker seems
too loud when you’re listening
to news, sports or talk radio
stations.
The MS-8’s Logic 7 processing
is (by design) sending all mono
information to the center
speaker.
Use the MS-8’s System
Levels screen to reduce the
center speaker’s level until
it sounds correct to you.
Then save the settings as
one of the MS-8’s Favorite
settings so you can recall it
whenever you listen to this
type of station. See Audio
Controls Menu, on page
36, and Favorites Menu, on
page 39.
The sound always has too
much or too little bass or
treble.
The MS-8’s Tone Controls
and/or Graphic EQ are misadjusted.
Use the MS-8’s Tone
Controls and/or Graphic EQ
screens to return all controls
to their center positions. See
Audio Controls Menu, on
page 36.
Music is dull, lifeless and
confined-sounding, with poor
stereo imaging.
The MS-8’s Logic 7 and digital
signal processing (DSP) are
defeated.
Use the MS-8’s Audio
Controls menu to activate
Logic 7 and DSP. See , on
page 36.
The MS-8’s System Volume
was set at too high a level
during the acoustic-calibration
process.
Perform the acousticmeasurement portion
of the calibration/setup
process again, with the
MS-8’s System Volume set
at –20dB. See Acoustic
Calibration, on page 32.
45
www.jbl.com
TROUBLESHOOTING
ERROR MESSAGES ON DISPLAY
Symptom
Possible Cause
Solution
“MS-8 Has Overheated…”
There is insufficient cooling air
around the main unit.
Re-install the main unit in a
less confined area that will
allow cooling air to circulate
around the unit. See
Choosing a Location for the
Main Unit, on page 17.
“No DSP Response…”
There has been a possible
electrostatic discharge within
the main unit.
If the message displays only
once and the MS-8 resets
without incident, no further
involvement is necessary.
If the message displays
often, contact JBL
Technical Support at
516.255.4JBL (4525).
“Voltage Too High…” or
“Voltage Too Low…”
The vehicle’s electrical system
may be malfunctioning.
If the message displays only
once and the MS-8 resets
without incident, no further
involvement is necessary.
If the message displays
often, contact your vehicle’s
dealer or mechanic.
MISCELLANEOUS
www.jbl.com
Symptom
Possible Cause
Solution
The display is hard to read.
The Brightness and/or Contrast
controls are not properly
adjusted.
Use the MS-8’s Brightness
and Contrast screens
to adjust the display for
better viewing. See System
Settings Menu, on page
40.
46
SPECIFICATIONS
Power Output:
20W x 8 channels @ 4 ohms
Maximum Output Power:
30W x 8 channels @ 2 ohms
Frequency Response:
20Hz–20kHz
Signal-to-Noise Ratio (Line Input to Line Output):
>90dB
Signal-to-Noise Ratio (Line Input to Speaker Output):
>85dB
Maximum Input Voltage (Speaker-Level Input):
15V
Maximum Input Voltage (Line Input):
2.8V
Maximum Output Voltage (Line Output):
2.8V
Maximum Current Draw:
16A
Standby Current Draw:
<0.01A
Display LCD Screen:
128 x 64 pixels
Power Requirement:
12V DC, negative ground
Main Unit Dimensions (L x W x H):
11-1/2" x 7-3/8" x 2-1/8"
(293mm x 187mm x 55mm)
Display Unit Dimensions (H x W x D, including stand):3-1/8" x 3-3/8" x 2-7/16"
(79mm x 86mm x 62mm)
Weight:
Main unit – 6.4 lb (2.9kg)
Display unit – 2.8 oz (80g)
Remote control – 1.4 oz (40g)
47
www.jbl.com
© 2010 Harman International Industries, Incorporated. All rights reserved. JBL and Logic 7 are trademarks of
Harman International Industries, Incorporated, registered in the United States and/or other countries. Dolby
and Pro Logic are registered trademarks of Dolby Laboratories. iPod is a trademark of Apple Inc., registered in
the U.S. and other countries. iPod is not included. Velcro is a registered trademark of Velcro Industries
B.V. Features, specifications and appearance are subject to change without notice.
www.jbl.com
Harman Consumer, Inc.
8500 Balboa Boulevard
Northridge, CA 91329 USA
www.jbl.com
48