1
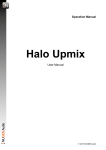
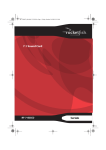
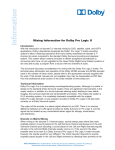
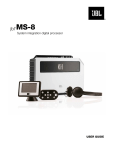
Auro Technologies
Auro-Matic Pro - User Guide
Plug-in Version:
2.2.0
User Guide Version: 2.2.0
i
Auro Technologies NV
Kievitstraat 42
B-2400 Mol
Belgium
Phone: +32 14 31 43 43
Email: [email protected]
Support: [email protected]
Web:
www.auro-technologies.com
Auro-Matic Pro - User Guide
Chapter 1: Using Auro-Matic Pro .......................................................................5
1.1
Configuring Auro-Settings.........................................................5
1.2
Configuring a DAW Session ....................................................6
1.2.1
1.3
1.4
1.5
Configuring Playback Engine... and I/O... ....................6
Auro-Matic Pro 2D .........................................................................7
1.3.1
Stand-alone Mode ...............................................................7
1.3.2
In combination with the Auro-3D Authoring Tools .....8
Auro-Matic Pro 3D .......................................................................11
1.4.1
Stand-alone Mode .............................................................11
1.4.2
In combination with the Auro-3D Authoring Tools ...13
Using Fader Link ..........................................................................17
Auro-Matic Pro - Reference Manual
Chapter 2: Introduction to Auro-3D...............................................................20
Chapter 3: System Requirements and Installation .......................23
3.1
System Requirements and Compatibility .......................23
3.2
Installation ........................................................................................23
3.2.1
Licensing ..............................................................................24
Chapter 4: Auro-Matic Pro Plug-ins ..............................................................25
4.1
Auro-Matic Pro ...............................................................................25
4.1.1
Connection ..........................................................................25
4.1.2
Fader Link LED ..................................................................26
4.1.3
High Latency Mode LED .................................................26
4.1.4
HDX Aux ..............................................................................26
iii
4.1.5
Name.....................................................................................26
4.1.6
Volume .................................................................................26
4.1.7
Bus Assignment .................................................................28
4.1.8
Input Source........................................................................28
4.1.9
Configuration ......................................................................28
4.1.10 Ambience .............................................................................29
4.1.11 Strength ................................................................................29
4.1.12 Space ....................................................................................29
4.1.13 Depth.....................................................................................29
4.1.14 Weight ...................................................................................29
4.1.15 Center ...................................................................................29
4.1.16 Equalizer ..............................................................................30
4.1.17 Controls and Settings Tabs ............................................31
4.2
4.3
Auro-Return .....................................................................................33
4.2.1
Connection ..........................................................................33
4.2.2
Name.....................................................................................33
4.2.3
Bus .........................................................................................34
4.2.4
Stem ......................................................................................34
4.2.5
Output ...................................................................................34
4.2.6
Preset....................................................................................34
4.2.7
1...N .......................................................................................34
Auro-Settings Application ........................................................35
4.3.1
Solo Mode ...........................................................................35
4.3.2
DAW ......................................................................................35
4.3.3
Hardware .............................................................................36
4.3.4
Fader Link ............................................................................37
4.3.5
Restart Service...................................................................37
iv
Chapter 1: Using Auro-Matic Pro
This is a step by step guide on setting up a DAW-session with Auro-Matic Pro 2D and Auro-Matic
Pro 3D. It covers upmixing mono, stereo, 5.1 surround, and 7.1 surround sound sources to a sound
field of a higher dimension. The DAW used here is Pro Tools, but the workflow is the same in any
DAW.
Before launching your DAW to use Auro-Matic Pro 2D or 3see “Using Fader Link” on page 16D,
you need to set the correct DAW and Hardware setting in the Auro-Settings menu bar application.
1.1
Configuring Auro-Settings
1.
Go to Auro-Settings > DAW and select the DAW you use.
Figure 4-1 Selecting your DAW
2.
INFO:
Go to Auro-Settings > Hardware and select the type of hardware used with the DAW.
•
Native: Select this option if you are using a Pro Tools Native or HD Native system.
•
HDX High Latency: Select this setting if you are using an HDX System with a H/W
buffer size of 1024 samples.
•
HDX Low Latency: Select this setting if you are using an HDX System with a H/W buffer
size lower than 1024 samples.
Please note that only H/W buffer sizes of 256, 512 or 1024 samples are supported when
working with the Auro-3D Authoring Tools.
5
Using Auro-Matic Pro
ATTENTION: If you are using a H/W buffer size lower than 1024 samples, and therefore have
selected the HDX Low Latency setting, a DSP plug-in must be inserted on the first
Insert slot of every track that contains an Auro-3D plug-in.
Inserting a (multi)-mono DSP version of the Trim plug-in reduces the DSP-overhead to
a minimum and leaves the audio unaffected if the initial settings remain unchanged.
TIP:
For more information about the Hardware setting, please refer to "Hardware" on page 36.
1.2
Configuring a DAW Session
For this example, Pro Tools HD 11 will be used as DAW.
1.2.1
Configuring Playback Engine... and I/O...
1.
Go to Pro Tools > Setup > Playback Engine... and select a H/W Buffer Size corresponding
to your Hardware setting in Auro-Settings.
2.
Go to Pro Tools > Setup > I/O… > Output and create two 5.1 output paths.
3.
Name the first 5.1 output path Lower, and the second one Height.
The Lower and Height output paths make up the Auro 11.1 monitoring setup.
INFO:
4.
Go to Pro Tools > Setup > I/O… > Bus, create a 7.1 bus, and name it Mix Engine.
Make sure you enable the Auto-create sub paths option when creating the Mix Engine
bus.
TIP:
Figure 4-2 Auto-create sub paths
5.
Still in the Bus tab, create a mono bus, name it Scrubbing, and map it bus to the Centerchannel output.
6
Using Auro-Matic Pro
1.3
Auro-Matic Pro 2D
Auro-Matic Pro 2D can function as a stand-alone plug-in that upmixes mono and stereo sound
sources to a 5.1 surround sound field. If the Auro-3D Authoring Tools are installed, Auro-Matic Pro
2D can also connect to the Auro-Mix Engine to use the upmixed sound source directly in an Auro3D mix.
1.3.1
Stand-alone Mode
To upmix a stereo song to a 5.1 surround configuration:
1.
Create a stereo audio track in Pro Tools and import the song to that track.
2.
Rename the audio track to an appropriate name, e.g. Sugar Plum Fairy.
3.
On the stereo track, insert an instance of Auro-Matic Pro 2D (stereo/5.1).
Figure 4-3 Inserting Auro-Matic Pro 2D (stereo/5.1)
4.
Pro Tools automatically changes the track output configuration to 5.1 surround. If the audio
track already had an output assigned, you will be prompted with the following message:
Figure 4-4 Changing the track output configuration removes the outputs.
5.
Click Add.
6.
Still on the audio track, select the Lower output path as output of the track to monitor the
upmixed sound source through.
7
Using Auro-Matic Pro
7.
Open the plug-in user interface.
8.
Change the name of the Auro-Matic Pro 2D instance to something more recognizable, like
Sugar Plum Fairy.
9.
Start playback and adjust the controls to your liking.
Following these steps, you should now hear the stereo song upmixed to 5.1 surround.
1.3.2
In combination with the Auro-3D Authoring Tools
To upmix a mono sound effect to 5.1 surround and use the output in an Auro-3D mix:
1.
Create a mono audio track in Pro Tools and import the sound effect to that track.
2.
Rename the audio track to an appropriate name, e.g. Lightsaber.
3.
On the audio track, insert Auro-Matic Pro 2D (mono/5.1). Pro Tools automatically changes
the track output configuration to 5.1 surround. If the audio track already had an output
assigned, you will be prompted with the following message:
Figure 4-5 Changing the track output configuration removes the outputs.
4.
Click Add.
5.
Open the plug-in user interface.
6.
Change the name of the Auro-Matic Pro 2D instance to something more recognizable, like
Lightsaber.
Instead of directly listening to the 5.1 track output, we will connect this instance of Auro-Matic Pro
2D to an Auro-Mix Engine via an Auro-Bus plug-in, while the audio track output will be routed to the
Mix Engine bus:
7.
On the audio track, select the Mix Engine bus as output
8.
Create a mono audio track in Pro Tools, and name it FX.
9.
On the FX track, insert an Auro-Bus plug-in and name it FX as well.
10. Open the plug-in user interface of the Auro-Matic Pro 2D plug-in previously created.
8
Using Auro-Matic Pro
11. Below the Volume fader, select FX from the bus assignment menu.
Figure 4-6 Assigning Auro-Matic Pro to an Auro-Bus
12. In the FX bus, Lightsaber appears in the Tracks field.
Figure 4-7 The Tracks field in the FX bus
The output of this Auro-Matic Pro 2D instance gets sent to the FX bus now. Next you need to create
an Auro-Mix Engine that receives the FX bus:
13. Create a 7.1 aux input track in Pro Tools, and name it Mix.
14. On the aux input track, insert an Auro-Mix Engine plug-in and name it Mix as well.
15. In the plug-in user interface, select a compatible channel-based configuration, e.g. Auro
11.1. It is one of the compatible configurations because it has a 5.1 surround channel-layer
in the bottom, just like the output configuration of the Auro-Matic Pro 2D instance.
16. Select FX from the Buses field.
9
Using Auro-Matic Pro
Figure 4-8 Selecting the FX bus in Auro-Mix Engine
In the Auro-Mix Engine, the output of the Auro-Matic Pro 2D instance is mixed together with the
output of other Auro-Matic Pro and Auro-Panner plug-ins that connect to it through their respective
Auro-Buses.
To be able to monitor the output of the Auro-Mix Engine, the channels need to be delivered back
to the DAW:
17. Create one 5.1 aux input track for the lower channels and one 5.1 aux input track for the
height channels.
18. Rename the tracks to Lower and Height, respectively.
19. On the audio tracks, insert an Auro-Return plug-in and rename the plug-ins corresponding
to the respective track names.
20. In both Auro-Return instances, select Mix from the Bus menu so that the Auro-Return plugins receive the output channels of the Auro-Mix Engine called Mix.
ATTENTION: The Auro-Mix Engine outputs a Mix and a Downmix at the same time. To monitor the
Downmix, select it from the Auro-Return Output menu.
21. In both Auro-Return instances, select the desired channel order from the 1 ... N dropdown
menu’s. Instead of selecting them one by one, you can choose a preset from the Preset
dropdown menu as well.
22. For monitoring, select the Lower and Height output paths as the respective output of both
tracks.
23. Open the Auro-Matic Pro 2D instance.
24. Start playback and adjust the controls to your liking.
Following these steps, you should now hear the mono sound effect upmixed to 5.1 surround, along
with other sources you connect to the Auro-Mix Engine.
10
Using Auro-Matic Pro
1.4
Auro-Matic Pro 3D
Auro-Matic Pro 3D can function as a stand-alone plug-in (without an Auro-Mix Engine) that
upmixes mono, stereo, 5.1 surround, and 7.1 surround sound sources to a three-dimensional
sound field. If the Auro-3D Authoring Tools are installed, Auro-Matic Pro 3D can also be connected
to the Auro-Mix Engine to use the upmixed sound source directly in an Auro-3D mix.
1.4.1
Stand-alone Mode
To upmix a 5.1 soundtrack to an Auro 11.1 configuration:
1.
Create a 5.1 audio track in Pro Tools and import the soundtrack to that track.
2.
Rename the audio track to an appropriate name, e.g. Moonlight Sonata.
3.
On the 5.1 track, insert an instance of Auro-Matic Pro 3D (5.1).
4.
Change the name of the Auro-Matic Pro 3D instance to something more recognizable, like
Moonlight Sonata.
5.
Set the Configuration to Auro 11.1.
Figure 4-9 Selecting the Configuration
11
Using Auro-Matic Pro
The Auro 11.1 configuration has more channels than a single audio track can handle in most
DAW’s. Therefore, the output channels of the Auro-Matic Pro 3D instance are delivered back to the
DAW with two Auro-Return plug-ins, each on a separate track:
6.
Create two 5.1 aux input tracks, one for the lower channels and one for the height channels.
7.
Rename the tracks to Lower and Height, respectively.
8.
On the aux input tracks, insert an Auro-Return plug-in and rename the plug-ins
corresponding to the respective track names.
9.
In both Auro-Return instances, select Moonlight Sonata from the Bus menu so that the
Auro-Return plug-ins receive the output channels of the Auro-Matic Pro 3D instance called
Moonlight Sonata.
10. In both Auro-Return instances, select the desired channel order from the 1 ... N dropdown
menu’s. Instead of selecting them one by one, you can choose a preset from the Preset
dropdown menu as well.
Figure 4-10 Two Auro-Returns deliver the output channels from Auro-Matic Pro 3D to the DAW.
11. For monitoring, select the Lower and Height output paths as the respective output of both
tracks.
12. Open the Auro-Matic Pro 3D instance.
13. Start playback and adjust the controls to your liking.
Following these steps, you should now hear the 5.1 soundtrack upmixed to Auro 11.1.
12
Using Auro-Matic Pro
1.4.2
In combination with the Auro-3D Authoring Tools
To upmix a 7.1 ambience sound source to Auro 13.1 and use the output in an Auro-3D mix:
1.
Create a 7.1 audio track in Pro Tools and import the ambience source file to that track.
2.
Rename the audio track to an appropriate name, e.g. Ambience.
3.
On the audio track, insert Auro-Matic Pro 3D (7.1).
4.
Open the plug-in user interface.
5.
Change the name of the Auro-Matic Pro 3D instance to something more recognizable, like
Ambience.
6.
Change the Configuration to Auro 13.1
Figure 4-11 Selecting the Configuration
Next you need to connect this instance of Auro-Matic Pro 3D to an Auro-Mix Engine via an AuroBus plug-in, while the audio track output will be routed to the Mix Engine bus:
7.
On the audio track, select the Mix Engine bus as output.
8.
Create a mono audio track in Pro Tools, and name it FX.
9.
On the FX track, insert an Auro-Bus plug-in and name it FX as well.
10. Open the plug-in user interface of the Auro-Matic Pro 3D plug-in previously created.
13
Using Auro-Matic Pro
11. Below the Volume fader, select FX from the bus assignment menu.
Figure 4-12 Assigning Auro-Matic Pro to an Auro-Bus
12. In the FX bus, Ambience appears in the Tracks field.
Figure 4-13 The Tracks field in the FX bus
The output of this Auro-Matic Pro 3D instance gets sent to the FX bus now. Next you need to create
an Auro-Mix Engine that receives the FX bus:
13. Create a 7.1 aux input track in Pro Tools, and name it Mix.
14. On the aux input track, insert an Auro-Mix Engine plug-in and name it Mix as well.
15. In the plug-in user interface, select a compatible channel-based configuration, e.g. Auro
13.1. It is the only real compatible configuration because we are upmixing to Auro 13.1 with
the Auro-Matic Pro 3D instance.
16. Select FX from the Buses field.
14
Using Auro-Matic Pro
Figure 4-14 Selecting the FX bus in Auro-Mix Engine
In the Auro-Mix Engine, the output of the Auro-Matic Pro 3D instance is mixed together with the
output of other Auro-Matic Pro and Auro-Panner plug-ins that connect to it through their respective
Auro-Buses.
To be able to monitor the output of the Auro-Mix Engine, the channels need to be delivered back
to the DAW:
17. Create one 7.1 aux input track for the lower channels and one 5.1 aux input track for the
height channels.
18. Rename the tracks to Lower and Height, respectively.
INFO:
For step 18, the Lower bus needs to be modified from a 5.1 to a 7.1 bus.
19. On the audio tracks, insert an Auro-Return plug-in and rename the plug-ins corresponding
to the respective track names.
20. In both Auro-Return instances, select Mix from the Bus menu so that the Auro-Return plugins receive the output channels of the Auro-Mix Engine instance called Mix.
ATTENTION: The Auro-Mix Engine outputs a Mix and a Downmix at the same time. To monitor the
Downmix, select it from the Auro-Return Output menu.
21. In both Auro-Return instances, select the desired channel order from the 1 ... N dropdown
menu’s. Instead of selecting them one by one, you can choose a preset from the Preset
dropdown menu as well.
15
Using Auro-Matic Pro
Figure 4-15 Selecting which channels Auro-Return delivers to the DAW
22. For monitoring, select the Lower and Height output paths as the respective output of both
tracks.
23. Open the Auro-Matic Pro 3D instance.
24. Start playback and adjust the controls to your liking.
Following these steps, you should now hear the 7.1 ambience sound source, upmixed to Auro 13.1,
along with other sources you send to the Auro-Mix Engine.
16
Using Auro-Matic Pro
1.5
Using Fader Link
The Fader Link feature allows the Pro Tools fader, solo and mute buttons to control the Auro-Matic
Pro plug-in fader, solo and mute buttons.
ATTENTION: The Fader Link feature for Auro-Matic Pro is only available when used in
conjunction with the Auro-3D Authoring Tools.
For more information about setting up Auro-Matic Pro to use the Fader Link feature, please refer
to “Chapter 3: Using Fader Link” in the Auro-3D Authoring Tools User Guide.
17
Auro Technologies
Auro-Matic Pro - Reference Manual
Plug-in Version:
2.2.0
User Guide Version: 2.2.0
xviii
Auro Technologies NV
Kievitstraat 42
B-2400 Mol
Belgium
Phone: +32 14 31 43 43
Email: [email protected]
Support: [email protected]
Web:
www.auro-technologies.com
Chapter 1: Introduction to Auro-3D
Welcome to Auro-3D®, the next step in sound evolution brought to you by Auro Technologies.
Audio reproduction has evolved from a point source (mono), to a single dimension (stereo), to twodimensional surround sound (5.1 or 7.1). To produce true three-dimensional sound, a reproduction
system must include a vertical Z axis (top-to-bottom), in addition to the existing X (side-to-side) and
Y (front-to-back) planar axes found in current systems. Auro-3D’s three-layered approach (Lower,
Height, and Top Layers) completes this evolution by creating a realistic three-dimensional
soundscape.
Auro-3D films can still be shown in theatres without an Auro-3D decoding system by storing the
Auro-3D content in a surround sound (5.1 or 7.1) carrier and playing back the 5.1 or 7.1 surround
sound standard without any loss of audio quality. Theatres with an Auro-3D system decode and
play back the Auro-3D format while ignoring the 5.1- or 7.1-channel version.
Auro-3D Formats
The Auro 9.1–11.1 formats are based on and compatible with the 5.1 surround standard. They
include the following additional channels:
•
Auro 9.1: 5.1 surround + four Height Channels (one above each corner channel)
•
Auro 10.1: Auro 9.1 + Top Channel (aka Voice of God)
•
Auro 11.1: Auro 10.1 + Height Center Channel
The Auro 11.1b and 13.1 formats are based on and compatible with the 7.1 surround standard.
They include the following additional channels:
•
Auro 11.1b: 7.1 surround + four Height Channels (one above each corner channel)
•
Auro 13.1: Auro 11.1b + Height Center Channel + Top Channel
Auro Technologies has developed the Auro-3D Authoring Tools to allow three-dimensional
panning and Auro-Matic Pro 2D and 3D to allow two- and three-dimensional upmixing in any DAW
on Mac that supports AAX plug-ins.
20
Introduction to Auro-3D
Auro-Matic Pro
Auro-Matic Pro is an upmixing plug-in based on an intelligent and highly efficient algorithm which
uses a variety of early reflection patterns to create a two-dimensional sound field from a onedimensional source, or a three-dimensional sound field from a one- or two-dimensional source, all
without affecting the intentional aesthetics of the original mix. There are two available versions of
the plug-in:
•
Auro-Matic Pro 2D can create a surround 5.1 sound field from mono and stereo sources.
It acts as a stand-alone plug-in that outputs directly to a DAW-track but can also be used in
combination with the Auro-3D Authoring Tools.
•
Auro-Matic Pro 3D can create an Auro-3D sound field from mono, stereo, and surround
5.1 and 7.1 sources. This version needs to be connected to other plug-ins in the Auro-3D
ecosystem to surmount the eight-channel format limitation of most DAW’s.
Auro-Bus plug-in: The Auro-Bus collects multiple Auro-Matic Pro and Auro-Panner outputs to
form a subgroup or a stem.
Auro-Mix Engine plug-in: The Auro-Mix Engine sets the Auro-3D configuration and controls how
all connected Auro-Buses are mixed and encoded. It displays the level of all channels in the Auro3D field and outputs a mix and downmix to the connected Auro-Return plug-ins. It also outputs a
downmix to the DAW-track it is inserted on.
Auro-Return plug-in: The Auro-Return delivers the output channels of an Auro-Mix Engine or an
Auro-Matic Pro 3D to the DAW. Because most DAW’s have an eight-channel format limitation, the
Height and Lower layers are typically delivered to two separate multichannel tracks, each with its
own Auro-Return instance.
ATTENTION: The Auro-Panner, Auro-Bus and Auro-Mix Engine plug-ins are part of the Auro-3D
Authoring Tools and are not included in Auro-Matic Pro.
A3DHost: A3DHost runs as a background service that ensures that all Auro-3D plug-ins are
correctly connected to each other.
The Auro-Settings application (accessible through the Mac menu bar) enables you to select the
Solo behavior for Auro-3D plug-ins, specify the hardware and software the Auro-3D Authoring
Tools are used with, and activate the global Fader Link option.
ATTENTION: We currently support AAX plug-ins for Avid's Pro Tools 10 and 11. Please contact
Auro Technologies for information on when VST and AU versions will be available.
21
Introduction to Auro-3D
This reference manual covers the following information:
Chapter 2: System Requirements and Installation – Lists system and DAW requirements and
discusses how to install Auro-3D software.
Chapter 3: Auro-Matic Pro Plug-ins – Elaborates on the Auro-Matic Pro and the other Auro-3D
plug-in parameters.
22
Chapter 2: System Requirements and
Installation
2.1
System Requirements and Compatibility
Auro-Matic Pro exists in AAX format and run on the following:
•
Operating Systems: Mac OS X 10.8.5, 10.9.5 and 10.10.5
•
DAW’s: Pro Tools 10, 11 and 12
Only the latest update of your DAW is supported.
TIP:
•
Hardware: Pro Tools|HDX and Pro Tools|HD Native
Please refer to complete system requirements and a list of qualified computers, operating systems,
hard drives, and third-party devices for Avid’s Pro Tools by visiting:
www.avid.com/compatibility
ATTENTION: Auro-Matic Pro supports sample rates of 44.1 and 48 kHz. A future release will support
higher sample rates.
2.2
Installation
After purchasing the software, download the latest software using the provided download link.
If the download link has expired, contact support for a new one:
[email protected]
To install Auro-Matic Pro on a Mac running OS X:
1.
Uninstall any previous installation of Auro-Matic Pro, by double-clicking
AuroMaticPro.Uninstall.command from:
/Library/Application Support/Auro Technologies/
2.
Restart your computer.
3.
Double-click the ZIP file you downloaded from the Auro Technologies website, then doubleclick Auro-Matic Pro 2D.pkg or Auro-Matic Pro 3D.pkg to begin the standard installation.
4.
Follow installation instructions.
23
System Requirements and Installation
5.
Finally, restart your computer.
ATTENTION: Restarting your computer in step 2 and 5 is mandatory for a correct installation.
Auro-Matic Pro 2D.pkg only installs the Auro-Matic Pro 2D plug-in.
Auro-Matic Pro 3D.pkg installs the following software:
•
Auro-Matic Pro 2D and Auro-Matic Pro 3D plug-ins
•
Auro-Return plug-in
•
A3DHost service
•
Auro-Settings menu bar application
2.2.1
Licensing
To use Auro-Matic Pro, it is required to install the correct license(s) on a 2nd generation iLok USB
key. There are two license levels:
•
Auro-Matic Pro 2D – Includes 2D upmixing functionality.
•
Auro-Matic Pro 3D – Extends the Auro-Matic Pro 2D license with 3D upmixing
functionality.
For more information about iLok, visit:
www.ilok.com
24
Chapter 3: Auro-Matic Pro Plug-ins
Auro-Matic Pro is used as an insert plug-in on an audio track.
3.1
•
Auro-Matic Pro 2D can be inserted on a mono or stereo track and outputs a 5.1 sound field
to the DAW-track it is inserted on.
•
Auro-Matic Pro 3D can be inserted on a mono, stereo, 5.1, or 7.1 audio track. It can connect
to an Auro-Mix Engine via an Auro-Bus or can be routed directly to Auro-Return plug-ins.
Auro-Matic Pro
Figure 3-1 Auro-Matic Pro 3D
3.1.1
Connection
The Connection LED indicates the connection state of the Auro-Matic Pro plug-in. If the LED blinks
red, there is a connectivity problem (see "Restart Service" on page 37 for help). If it lights yellow,
the plug-in is ready to use.
25
Auro-Matic Pro Plug-ins
3.1.2
Fader Link LED
The Fader Link LED indicates the current state of the Fader Link option in Auro-Settings (see “Using
Fader Link” on page 16 for help). If the LED lights blue, Fader Link is active. Otherwise it is inactive.
3.1.3
High Latency Mode LED
The High Latency Mode LED lights red, when an Advanced Center algorithm is selected. For more
information about the Center option, please refer to "Center" on page 29.
3.1.4
HDX Aux
On Pro Tools|HDX Systems, an Auro-Matic Pro instance inserted on an Aux Input track requires
enabling the HDX Aux switch. This ensures correct delay compensation between Auro-Matic Pro
and Auro-Panner instances inserted on regular audio tracks and those inserted on aux input track,
before being mixed together in the Auro-Mix Engine.
HDX Aux switch
Figure 3-2 HDX Aux switch in Auro-Matic Pro
3.1.5
Name
This field initially displays a unique, automatically generated name. To rename an Auro-Matic Pro
instance, click the Name field and type a new name.
ATTENTION: Changing the name of the Auro-Matic Pro instance does not change the name of the
respective DAW-track.
3.1.6
Volume
The Volume fader sets the signal level sent to a connected Auro-Bus or Auro-Return instance, and
affects Auro-Matic Pro’s direct output to the DAW-track.
The Volume can be set three ways:
•
Click and drag the fader.
•
Click in the path of the fader.
•
Double-click the numerical field below the fader and enter a value.
Level Meter
This meter displays the DAW-track’s direct input level to the Auro-Matic Pro plug-in.
26
Auro-Matic Pro Plug-ins
Clip
The Clip LED lights red if one sample exceeds a threshold of -0.1 dBFS on any of the input
channels. Click the Clip LED to clear it.
Solo
The S switch lights yellow to indicate this instance is soloed, and all instances which aren’t soloed
nor designated solo safe are muted.
The S switch flashes yellow to indicate another Auro-Matic Pro or Auro-Panner instance is soloed.
•
Click the S switch to toggle the solo status of this Auro-Matic Pro instance only.
•
Alt + click the S switch to unsolo all soloed Auro-Matic Pro and Auro-Panner instances.
•
Command + click the S switch to designate this Auro-Matic Pro instance solo safe: When
other Auro-Matic Pro or Auro-Panner instances are soloed, this Auro-Matic Pro instance will
remain audible.
ATTENTION: The Solo behavior can be set to X-OR or Latch in the Auro-Settings application (see
"Solo Mode" on page 35).
Mute
The M switch lights red to indicate this instance is muted. Multiple instances can be muted at the
same time.
•
Click the M switch to toggle the mute status for this instance only.
•
Alt + click the M switch to unmute all muted Auro-Matic Pro and Auro-Panner instances.
Volume Link
The Volume Link button links the Volume fader of an Auro-Matic Pro instance to the Volume fader
of the Pro Tools track it’s inserted on. The level of the Auro-Matic Pro instance can then be
controlled by adjusting the corresponding Pro Tools track’s fader, either from the software or from
a control surface.
27
Auro-Matic Pro Plug-ins
Figure 3-3 Volume Link button
Deactivating the Volume Link button will unlink the Volume fader of this Auro-Matic Pro instance
from the Volume fader of the hosting Pro Tools track, in which case the level of the Auro-Matic Pro
instance is purely controlled from the plug-in.
3.1.7
Bus Assignment
The bus assignment menu, located below Solo and Mute, lets you send the processed output of
this Auro-Matic Pro plug-in to the Main Bus or an Auro-Bus plug-in. This bus can then be selected
in an Auro-Mix Engine. The currently selected bus name is displayed in the menu.
ATTENTION: By default, all Auro-Matic Pro instances connect to the Main Bus, which is available
even when no Auro-Bus plug-ins are inserted.
3.1.8
Input Source
The Input Source field displays the input source format to this Auro-Matic Pro plug-in. If the instance
has been inserted on a mono, stereo or 5.1 track, this field will display mono, stereo or 5.1
respectively.
3.1.9
Configuration
The Configuration field displays the output configuration of this instance of Auro-Matic Pro:
•
In Auro-Matic Pro 2D, the output configuration is 5.1 Surround.
•
In Auro-Matic Pro 3D, the output configuration options are: Auro 9.1, Auro 10.1, Auro 11.1,
and Auro 13.1.
ATTENTION: For mono and stereo inputs, x.1 output configurations leave the LFE channel empty. The
introduction of an LFE-generator is expected in an upcoming release.
28
Auro-Matic Pro Plug-ins
3.1.10
Ambience
The Ambience parameter sets the overall size and sonic characteristics of the virtual space. Two
versions of each size are available: Small, Medium, Large, and Open.
3.1.11
Strength
The Strength fader sets the amount of generated signal in the upmix.
A low Strength value produces less signal in the upmixed channels, while a high Strength value
produces more signal in the upmixed channels. In the latter case, the source channels are
attenuated to maintain equal loudness.
3.1.12
Space
This parameter changes the strength of the added ambience.
3.1.13
Depth
These parameters affect how spatial information is sent to the additional Auro 3D channels.
3.1.14
Weight
Both F/R and Height determine where the weight of the upmixing effect lies. They influence directly
how much of the generated spatial information is sent to Front/Rear and Height channels,
respectively.
F/R
The F/R control adjusts the general balance between front and rear. Increasing the F/R control
towards the rear gives the impression of sound emanating from behind the listening position and
is useful for increasing the effect of surround channels in ambience processing.
Height
The Height control adjusts the general balance between lower layer (regular 5.1 or 7.1 layer) and
height layer (height and top channels).
3.1.15
Center
The Center parameters determine how the Center channel is generated if the format of the input
source is stereo. The Center menu has the following options: Bypass, Classic, Standard, Advanced
Music, Advanced Medium, and Advanced Dialog.
ATTENTION: In Bypass, Classic, and Standard modes, the Center generating algorithm doesn’t
induce latency. When using Advanced Music, Medium, and Dialog modes, the
algorithm has a latency of 4095 samples.
29
Auro-Matic Pro Plug-ins
Level
The Level knob sets the output level of the of the Center channel, whether it is a generated or native
center channel.
Divergence
The Divergence knob allows you to divert the generated Center signal to the other generated
channels.
ATTENTION: The Divergence setting is only available for Advanced Center Algorithms.
3.1.16
Equalizer
The Equalizer section can be used to fine-tune the spectral quality of the upmixed channels. It can
be toggled on and off by clicking the toggle button.
Bass
The Bass control sets the low-frequency gain that is applied to the upmixed channels, ranging from
-6 dB to +6 dB.
Treble
The Treble control sets the high-frequency gain that is applied to the upmixed channels, ranging
from -6 dB to +6 dB.
ATTENTION: Strength, Space, Depth, Weight, and EQ only affect the generated output channels.
30
Auro-Matic Pro Plug-ins
3.1.17
Controls and Settings Tabs
Click the Controls tab to access the plug-in’s main controls.
Click the Settings tab to access Routing and Knob Mode settings.
Figure 3-4 Auro-Matic Pro Settings
Routing
The routing panel can be used to change the routing of:
•
input channels to Auro-Matic Pro
•
output channels from Auro-Matic Pro
ATTENTION: This feature is inactive for the AAX version of Auro-Matic Pro, which uses Pro Tools’
default channel ordering.
General
The Knob Mode menu determines how the knobs are adjusted:
•
Rotary: Click the knob and drag counterclockwise to decrease and clockwise to increase
the value.
•
Horizontal Drag: Click the knob and drag left to decrease and right to increase the value.
•
Vertical Drag: Click the knob and drag down to decrease and up to increase the value.
31
Auro-Matic Pro Plug-ins
About
Click the user manual link to view this guide as a PDF.
Click the www.auro-technologies.com weblink to visit our website.
32
Auro-Matic Pro Plug-ins
3.2
Auro-Return
The Auro-Return plug-in routes channels from an Auro-Mix Engine or Auro-Matic Pro to the DAWtrack it is inserted on.
Figure 3-5 Auro-Return plug-in
3.2.1
Connection
The Connection LED indicates the connection state of this Auro-Return instance. If the LED blinks
red, there is a connectivity problem (see "Restart Service" on page 37 for help). If it lights yellow,
the plug-in is ready to use.
3.2.2
Name
The Name field initially displays a unique, automatically generated name. We recommend
assigning a more meaningful name to each Auro-Return instance, such as the channel layer it
routes back to the DAW.
To rename an Auro-Return instance, click the Name field and type a new name.
ATTENTION: Changing the name of the Auro-Return instance does not change the name of the
respective DAW-track.
33
Auro-Matic Pro Plug-ins
3.2.3
Bus
This menu lets you select the Auro-Mix Engine or Auro-Matic Pro plug-in from which to receive the
audio channels.
3.2.4
Stem
This menu lets you select all stems or a single stem (i.e. an Auro-Bus).
3.2.5
Output
This menu lets you choose between the regular mix or downmix.
3.2.6
Preset
This menu lets you select a channel configuration that best suits your application. Film and ITU
conventions are both available for Lower and Height channels.
The options in this menu depend on the following:
•
The Configuration selected in the Auro-Mix Engine connected to this Auro-Return plug-in
(see page 23).
- and -
•
3.2.7
Whether Mix or Downmix is selected in the Output menu.
1...N
The 1...N channel menu’s are initially populated by the selected preset, but can be individually set
to create a custom format. The Preset menu displays Custom to indicate a modified preset.
Select from these menus to reassign the Auro-Mix Engine channels routed to this Auro-Return
plug-in’s output channels.
ATTENTION: To assign an incremental range of channels, hold down Alt and select an output.
34
Auro-Matic Pro Plug-ins
3.3
Auro-Settings Application
Auro-Settings runs as a menu bar application. It provides easy access to Solo Mode, DAW and
Hardware settings, and can restart the A3DHost (Restart Service) if necessary.
Figure 3-6 Auro-Settings options in the Finder menu bar
3.3.1
Solo Mode
There are two Solo Mode options:
•
X-OR: Each solo selection replaces the previous selection(s).
•
Latch: Each solo selection adds to the previous selection(s).
ATTENTION: When using the Auro-Matic Pro plug-in in combination with the Auro-3D Authoring
Tools, all Auro-Panner and Auro-Matic Pro instances belong to the same Solo and
Mute group. Enabling Solo in an Auro-Matic Pro instance will therefore disable Solo
in an Auro-Panner instance if the X-OR Solo Mode is enabled.
3.3.2
DAW
Before launching your DAW, select which DAW you are using. There are two options:
•
Pro Tools 10: Choose this option to use the Auro-3D Authoring Tools in Pro Tools 10.
•
Pro Tools 11+: Choose this option to use the Auro-3D Authoring Tools in Pro Tools 11 or 12.
ATTENTION: If an incorrect DAW is selected, the Connection LED blinks red, indicating that the
plug-in will not function correctly.
35
Auro-Matic Pro Plug-ins
3.3.3
Hardware
To apply correct delay compensation, you need to select the hardware you are using:
•
Native: Select this option if you are using a Native or HD Native system.
•
HDX High Latency: Select this setting if you are using an HDX System with a H/W buffer
size of 1024 samples.
•
HDX Low Latency: Select this setting if you are using an HDX System with a H/W buffer
size lower than 1024 samples.
Pro Tools 11 (or higher) and its Low- and High-Latency Hardware Buffer
Pro Tools 11 HD introduced different hardware buffers, namely a low-latency buffer and a highlatency buffer. The high-latency buffer has a fixed value depending on the session sample rate
(1024 samples for 48 kHz, 2048 samples for 96 kHz) and is used to play back tracks without
sacrificing plug-in performance. The low-latency buffer is set to a user-defined value of 64, 128, 256,
512, or 1024 samples (in Setup > Playback Engine > H/W Buffer Size). This low-latency buffer is
automatically enabled by Pro Tools under specific conditions where low-latency monitoring is
required, like:
INFO:
•
on an input monitor-enabled track
•
on a record-enabled track
•
on a track which has a DSP plug-in inserted on it
•
on an aux input track with both an active input and output
Please note that only the following hardware buffer sizes are supported: 256, 512 or 1024
when Fader Link is enabled.
ATTENTION: Auro-Matic Pro and the Auro-3D Authoring Tools currently don’t support the use of
multiple buffer sizes simultaneously, and are therefore restricted to work in either the
low-latency domain or the high-latency domain.
To force the Auro-3D Authoring Tools to work in the low-latency domain only, a DSP plug-in needs
to be inserted on the first Insert slot of every track that contains an Auro-3D plug-in. Working with
the low-latency buffer also keeps the latency to a minimum.
TIP:
Inserting a (multi-)mono DSP version of the Trim plug-in reduces the DSP-overhead to
a minimum and leaves the audio unaffected if the initial settings remain unchanged.
36
Auro-Matic Pro Plug-ins
3.3.4
Fader Link
The Fader Link feature allows the Pro Tools fader, solo and mute buttons to control the AuroPanner (or Auro-Matic Pro) fader, solo and mute buttons. Additionally, X/Y panning can also be
linked to the Pro Tools X/Y panning controls.
Click Fader Link to activate the Fader LInk mode.
Figure 3-7 Active Fader Link mode
3.3.5
Restart Service
If the Connection LED in an Auro-Matic Pro or Auro-3D Authoring Tools plug-in blinks red, there is a
connectivity problem with that plug-in instance. This can occur for the following reasons:
TIP:
•
The A3DHost service, which is responsible for establishing plug-in connections, was not
installed properly, or the workstation was not restarted after installation.
•
An incorrect DAW setting has been selected from the Auro-Settings application.
•
The A3DHost service stopped for some reason and did not restart automatically.To restore
your system, quit your DAW, select Restart Service from the Auro Settings application and
restart your DAW. If the Connection LED still blinks red, restart your computer.
The Restart Service command can also be found in /Library/Application Support/Auro
Technologies/A3DHost (A3DHost.RestartService.command).
37