1
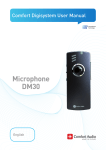
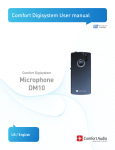
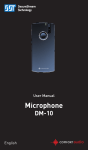
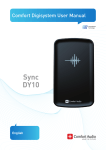
SecureStream Technology User Manual Handset DH-10 English Handset DH-10 1 User Manual Table of Contents Page Introduction to the Comfort Digisystem 3 Functions of the Handset DH-10 4 Getting Started 5 First Time Use 6 Menu 7 More Functions 12 Radio Range and Channels 13 Original Accessories 14 Trouble Shooting 15 Service and Warranty 16 Technical Data 16 Important Safety Instructions 17 2 Handset DH-10 Introduction to the Comfort Digisystem Thank you for choosing Comfort Digisystem. The products are easy to use, whether you use a hearing aid or not. Before using the product, please read this User Manual carefully. With the Handset DH-10 receiver, the signal is received digitally, resulting in an excellent clear sound. SecureStream Technology Comfort Digisystem is fitted with SecureStream Technology – a type of digital technology allowing eavesdrop-secure radio transfer in real time. Handset DH-10 3 Functions of the Handset DH-10 Socket for neckloop Function indicator Volume button + Volume button - Charging socket On / Off Pairing button Menu control Socket for headphones/earphones Display indicating active neckloop 4 Display indicating connected headphones/earphones Handset DH-10 Getting Started Charging The Handset DH-10 is chargeable. Charge the DH-10 at least two hours before you use it for the first time. An empty battery is fully charged within two hours. During charging, the function indicator shows red and a lightning bolt appears through the battery symbol in the display. Once the battery symbol is filled with green columns, the unit is fully charged and switches to automatic float charging. A fully charged battery has an operating time of up to ten hours. Battery lifetime is up to five years. You must not change the battery yourself; please contact your point of purchase. Connecting a charger to the Handset DH-10 Please note: Only use the charger supplied by Comfort Audio AB. Handset DH-10 5 First Time Use Switch on the handset by pressing the On/Off button for around two seconds. Connect the neckloop or earplugs/headphones in combination with the neckloop. The neckloop is then disconnected and acts as a necklace (it can be removed if you want). Connect neck loop carefully. The contacts have to be pressed in straightly. Press in the contacts to the end. Check that the neck loop is connected firmly. When putting on/taking off the receiver connected to the neck loop, be careful that the contacts do not break off. 6 Handset DH-10 Listen to the microphone in the transmitter. (Please note: Start listening at low volume). Too loud a sound may damage your hearing. Adjust the volume with the volume buttons. If you listen with a neckloop and a hearing aid, set the hearing aid to the T or MT position. Other functions are explained later in this manual. With neckloop With neckloop and earplugs Handset DH-10 7 Menu Menu control Three different selections can be made: Scroll up Press/select Scroll down To access the menu, press the menu control: Back Communication Channel Pairing Balance Max volume Fix volume PIN code Charge Language Name Button sound Sound Settings Key lock About 8 Handset DH-10 Back (relates to both the main menu and submenus) Here you can choose to return to the menu and to the main display. Communication Channel To use the receiver and the transmitter together, they must be set to the same channel. The transmitter and receiver are set to the default channel by the manufacturer.(This does not apply to units with both sender and receiver. In this case the transmitter/receiver are adjusted as described in chapter Radio range and Channels). To change channel, select Channel in the menu. Choose transmitter or receiver (this applies only to units with both transmitter and receiver). Select a new channel using the menu control. Channel information is also given when the units are paired. Channels 1, 2 and 3 are free channels in most European countries that do not require a licence. Under Extended more channels can be selected, but these usually require a licence – see the section Radio Range and Channels. FFC (Free Frequency Check) indicates in green the suitable frequencies for the specific environment. Pairing To use a receiver and transmitter together, they must be paired. All transmitters and receivers are default paired at the factory and will work together. To prevent eavesdropping, a new code key must be generated and transmitted between the units by pairing. Transmitting/receiving of pairing information along with a new code can be performed from any Comfort Digisystem unit with a display. To pair units without a display, see secHandset DH-10 9 tions Pairing (via pairing button) and Pairing (Connector DT-10) for more information. Pairing information or a new code key can be received by several activated units. Comfort Digisystem units with both transmitters and receivers built-in can be paired separately. When opening the pairing menu, choose the concerning unit (transmitter/receiver). In units with both transmitters and receivers, the pairing button controls the transmitter. The transmitter and receiver are paired separately in these units. The code key is always the same for the transmitter and the receiver when these are built-in in the same unit. The easiest way to get the same code key in the whole Digisystem, when using units with both transmitter and receiver built-in, is to generate a new code key from the combined unit; in that way the built-in receiver gets the same code as the rest of the system. Pairing (via menu) Select Receive info on one unit. Ready to receive pairing info is shown in the display. Select New code on the other unit; select Yes. Generate new code and send info? is shown in the display. Select Yes (Now both the channel and the coding information have been sent, and sound transfer is eavesdrop-secure). To pair another unit into your coded system, select Send info instead on one of your paired units. Pairing (via pairing button) (The only way of pairing units without a display, with the pairing button) You can activate the Pairing function via the pairing button. One brief press of the button opens the Pairing menu. Two brief presses activate the Send info function. One long press activates the Receive info function. 10 Handset DH-10 Pairing (Connector DT-10) The connector cannot send information, only receive it. To activate the position Receive info, the connector must be in operation (position I or II) and connected to an operating hearing aid. The selector is then quickly moved to position 0 and back to the operating position (I or II). The connector can now receive pairing info. If no info is received by the connector, after a short time this returns automatically to the previous setting. Sound Balance Can be adjusted by using the menu control under Balance (right/left). Press the menu control to return to the menu. Max. volume Here you can activate and adjust the maximum volume. Fixed volume Here you can activate the fixed volume function and set a permanent volume level. Settings PIN code Here you can turn the PIN code function on and off (selected functions lock). Under the menu item Change PIN you can create your own PIN code. Under the menu item Lock Select, you can select different types of menu locks: - Sound: Locks all functions in the “Sound” menu (can be combined with the “Pairing” menu item) - Pairing: Locks all pairing functions in the unit, as well as the pairing button - All menus: Locks all menus Handset DH-10 11 A PIN code is needed to be able to unlock selected functions when PIN code has been activated. If you forget your PIN code, please contact your point of purchase to unlock the unit. Charging Here you can activate the Auto Power Off function to shut down the unit automatically during charging. Language Here you can select the menu language. Name Here the text to be displayed is selected. Choose symbols with the menu control. Select to save and x to close without saving. To move the cursor during editing, use the symbols > and <. Button sound Here you can activate or deactivate the button sound. Key lock Here you can activate the key lock and thereby lock all buttons. Once the key lock has been activated, Unlock keys? appears in the display. Select Yes to unlock. About Here you find software information. 12 Handset DH-10 More Functions Function indicator (LED) The function indicator shows the unit's status. On normal operation, the indicator flashes once every three seconds. During charging the indicator shows red. When the battery level gets low, the indicator slowly flashes red (check the battery status on the display). Once the unit has been set to receive pairing information, the indicator flashes green quickly. When receiving pairing information, the indicator shows green for three seconds. When sending pairing information, the indicator flashes red five times. If the radio signal is weak, the indicator flashes red. Handset DH-10 13 Radio Range and Channels The transmitter and receiver have built-in antennas. The radio range between the units is around 30 metres. This may however vary depending on the particular environment you are in. Like all radio systems, Comfort Digisystem communicates on specific channels. If you use two transmitters on the same channel or a neighbouring one, there may be interference. Other electronic equipment can also interfere with radio transmissions. In most European countries, channels 1-3 (863.250 – 864.750 MHz) may be used for hearing products. However, you should always check with the frequency assignment authority in your own country which channels are free and which require a licence. In addition to channels 1-3, under Extended there are several channels in bands A-F, which require a licence in most European countries: A B C D E F 14 768 - 790 MHz 854 - 863 MHz 790 - 800 MHz 800 - 820 MHz 820 - 854 MHz 865 - 872 MHz Handset DH-10 Original Accessories Car charger The car charger is designed for cars with a 12 volt (-) earthed electrical system. The charger has short-circuit and automatic overload protection. Disconnect the charger from the socket after use. Charging stand Charging stand to connect to the charger supplied. Desk stand Desk stand for the Handset DH-10. Short neckloop A shorter neckloop for the Handset DH-10 is also available. Headphones/earplugs For other accessories, please visit our website, www.comfortaudio.com Handset DH-10 15 Trouble Shooting The transmitter and receiver do not start Charge the transmitter and receiver. Remember to press the On/Off button down for 2 seconds to switch the unit on. Check that the charger is connected to the plug socket. Poor speech intelligibility The distance between the transmitter and the receiver may be too long. The range is around 30 metres. The distance between the microphone and the person who is talking may also be too long; move the microphone nearer to the person talking. Try to change channel/environment. Poor range and interference In some environments involving, e.g., concrete, iron or sheet metal structures, the range may be reduced. There may also be equipment nearby causing interference. Change channel. No sound Check that the transmitter and receiver are set to the same channel. Loud hissing noise (no sound transfer) Check that the units are paired. The unit will not start during charging Disconnect the charger. Check the selection Auto power off under Charging in the menu. NB! When using with a hearing aid, make sure that it works both in the T and the MT position. 16 Handset DH-10 Service and Warranty Comfort Audio AB provides a comprehensive warranty for two years as from the date of delivery. This covers all defects of manufacture and materials. Defects caused by careless handling or intervention inside the product or its accessories are not covered by the warranty. Under normal use, battery lifetime is up to five years. Contact your point of purchase once it is time to change the battery. You are always welcome to contact us at Comfort Audio if you have any questions. Technical Data Type of receiver: Range: Dimensions: Weight: Frequency range: Antenna: Operating time: Battery: Charging time: Connections: SST – SecureStream Technology Approx. 30 m 74 x 39 x 13 mm 35 g 768 - 872 MHz Built-in Up to ten hours Chargeable Li-Polymer Approx. two hours Neckloop, headphones/earplugs ! Handset DH-10 17 Important Safety Instructions Read these before using your product 1) Read these instructions. 2) Keep these instructions. 3) Heed all warnings. 4) FolIow all instructions. 5) Do not use this apparatus near water. 6) Clean only with dry cloth. 7) Do not use near any heat sources such as radiators heat registers stoves, or other apparatus (including amplifiers) that produce heat. 8) Do not defeat the safety purpose of the polarized or grounding-type plug. A polarized plug has two blades with one wider than the other. A grounding type plug has two blades and a third grounding prong. The wide blade or the third prong are provided for your safety. If the provided plug does not fit into your outlet consult an electrician for replacement of the obsolete outlet. (Only when using polarized plug) 9) Protect the power cord from being walked on or pinched particularly at plugs convenience receptacles. and the point where they exit from the apparatus. 10) Only use attachments/accessories specified by Comfort Audio AB. 11) Unplug this apparatus during Iightning storms or when unused for long periods of time. 12) Refer all servicing to qualified service personnel. Servicing is required when the apparatus has been damaged in any way such as power-supply cord or plug is damaged Iiquid has been spilled or objects have fallen into the apparatus, the apparatus has been exposed to rain or moisture does not operate normally or has been dropped. 13) Start listening at a low volume. 14) Too high a volume can seriously damage your 18 Handset DH-10 hearing. 15) Don’t dissasemble the product. 16) Should the product break open because of damage, service should only be done by qualified service personnel. 17) Never use a transmitter or receiver set to a non-permitted frequency. Check with the frequency authority in the country where the equipment is to be used. 18) The product contains sensitive electronic equipment and must be handled carefully. 19) Never charge product in closed, unaired spaces such as handbags, cases or other closed storage bags. 20) Only use batteries and power supply specified by Comfort Audio AB. 21) You must not change the battery yourself; please contact your point of purchase. 22) CAUTION! Danger of explosion if battery is incorrectly replaced. 23) The product shall not be exposed to excessive heat such as sunshine, fire or the like. Handset DH-10 19 Manufactured by: Comfort Audio AB Box154, SE-301 05 Halmstad, Sweden Tel. +46 (0)35 15 23 00 Fax +46 (0)35 15 23 23 [email protected] www.comfortaudio.com 20 Handset DH-10