1
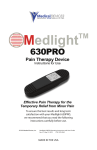
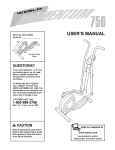
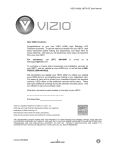
130.00 mm
16. Clean the stainless steel probe and dry thoroughly after each and every use.
17. Turn off the transmitter.
MODEL #ET-705C
REMOTE BBQ THERMOMETER
HELPFUL HINTS
CAUTIONS:
Alwayswear a heat resistant gloveto touch the stainless steel probe sensor or wire during or just after cooking.
Do not touch with bare hands.
Keepthe stainless steel probe sensor and wire awayfrom children.
Clean the stainless steel probe and dry thoroughly after each and everyuse.
Do not use the receiveror transmitter in the rain. Theyare not waterproof.
Do not expose the plug of the stainless steel probe or the plug in hole of the transmitter to water or any liquid. This
will result in a bad connection and faulty readings.
Do not expose the receiveror transmitter to direct heat or surface.
Do not use stainless steel probe in microwave oven.
The Remote BBQ Thermometer registerstemperatures as lowas 14 F (-10 C) and as high 410 F (210 C). LLL will be displayed
below14 F and HHH will be displayed above410 F.Do not use the stainless steel probe sensor above410 F.Doing so
will deteriorate the wire.
CLEANING
Alwayswear a heat resistant gloveto touch the stainless steel probe sensor or wire during or just after cooking. Do
not touch with bare hands.
Keepthe stainless steel probe sensor and wire awayfrom children.
Washthe metal probe tip with hot soapy water and dry thoroughly.Do not immersethe probe in water while cleaning.
Wipe the transmitter and receiverwith damp cloth. Do not immerseeither in water.
INSTRUCTION MANUAL
INTRODUCTION
Congratulations on your purchase of the Remote BBQ Thermometer, a programmable radio frequency food thermometer.
You will now be able to remotely monitor the time and temperature of food cooking on your grill from anywhere, even
in your home.
COMPONENTS
1. 1 - receiverunit
2. 1 - transmitter unit
3. 1 - detachable stainless steel probe sensor
RECEIVER FEATURES
180.00 mm
If the receiverand/or the transmitter display LLL or HHH instead of the probe temperature,wait for probe to reach
room temperature.If LLL or HHH is still displayed it is likely the internal probe wire has shorted out either through
moisture or heat damage.
Do not immerse the probe in water while cleaning.
Do not allow the probe or probe wire to come into contact with flames. If cooking with grill cover
closed, only use medium or low heat.
Returndefective probe to address belowalong with returnaddress and wewill send you newprobe no charge.
If the temperaturedisplayed seems to read too high or the temperatureseems to increase too quickly check to make
sure the probe tip is not poking through the food to outside.Reposition the probe tip in the center of the thickest part
of food.
Avoidtouching bone or heavy fat areas.
LCD(Liquid Crystal Display) - Displays all icons,
temperatureand time.See LCDdiagram for
detailed information.
CLIP - Battery compartment clip allowsyou to
be mobile.Clip the receiverunit to belt.
ON/OFF
BATTERYCOMPARTMENT - Holds 2 AAA batteries.
HR
START
STOP
F/ C
MEAT
MIN
TASTE
MODE
LIMITED NINETY DAY WARRANTY
MaverickIndustries Inc. warrantsthe Remote BBQ Thermometerto be freeof defects in parts,materials and workmanshipfor a period of
90 day s, fr om date of purchas e.Should a ny repairso r servic ing unde r this warranty be re quired,contact MaverickCustomer Service bymail
or phone for instructions on howto pack and ship the RemoteBBQ Thermometerto Maverick'sNational Service Center located as follows:
Maverick Customer Service
94 Mayfield Ave.
Edison NJ 08837
Telephone:(732) 417-9666
Hours: Weekdays 8:30 AM- 4:30 PM
Do not send any parts or productto Maverickwithout calling and obtaining a ReturnAuthorization Number and instructions.
Thiswarranty is VOIDif instructions for use arenot followed;for accidental damage;for commercialuse; for damageincurred while
in transit;or if the Remote BBQ Thermometer hasbeen tamperedwith.
Thiswarranty givesyou specific legalrights and youmay also haveother rights which varyfrom state to state.
4
BUTTONS
1. HR - In timer mode, press to set hour. Press & hold for 2 seconds, the hours will increase 10 hours per second. In
thermometer mode, press to increase the temperature value. Press & hold for 2 seconds, the temperature value will
increase 10 degrees per second.
2. START STOP/F/ C - In timer mode, press to start or stop the timer. In thermometer mode press to select temperature
readings in Celsius or Fahrenheit.
3. MIN - In timer mode, press to set minutes. Press & hold for 2 seconds, the minutes will increase 10 minutes per second.
In thermometer mode, press to decrease the temperature value. Press & hold for 2 seconds, the temperature value will
decrease 10 degrees per second.
4. MEAT - In thermometer mode, press to select meat type, HAM, BEEF, G. BEEF (ground beef), VEAL, LAMB, PORK,
CHICK (chicken), TURKY (turkey) or PGM (program).
5. TASTE - In thermometer mode, select the taste level, W.DONE (well done), MEDIUM, M. RARE (medium rare) or RARE.
7. MODE - Press to select thermometer or timer mode. Press & hold for 2 seconds to register with the transmitter.
8. ON/OFF - Turns receiver functions on and off.
1
LCD
MEASURE MEAT TEMPERATURE SET TO YOUR SPECIFIC TASTE
TIMER
1. Press MODE to select thermometermode. The upper display will showa small MEATand a meat type such as HAM.
2. Press HR or MIN toraise or lowerthe set temperature.Holding the button will raise or lowerthe temperaturesetting
rapidly.The
as wellas the taste levelwill disappear from the display when setting for your ownindividual
taste.Pressing MEATor TASTEwill returnyou to the preset USDAranges.
3. Once the temperatureof meat reaches the preset doneness levelthe receiverwill beep,the
icon and the probe
temperaturewill blink.
MEAT
W. DONE
MEDIUM
M .RARE
RARE
SET
TEMP
USING THE TIMER
PROBE
TEMP
Count down
1. Press MODE to select timer mode.The upper display will showa small TIMER and 0:00.
2. Press HR and MIN button to set the timer.Press START/STOPbutton to start countdown.
Will blin for every
second.3. Tostop the countdownprocess , press START/STOPbutton. The
becomes solid.
4. Press HR & MIN buttons togetherto clear the setting back to 0:00.
TRANSMITTER FEATURES
Note: The minimum setting for the timer is 1 minute. When the timer counts down below 1 hour 1:00 the
display will change to 59'59 display advising 59 minutes 59 seconds. The seconds will be shown
counting down then. When the countdown reaches 0'00 the timer starts counting up and it will beep for
20 seconds. The timer and
will blink. Press the START/STOP button to stop beeping. When the count
up reaches 23:59:59 (59 seconds are not displayed) the display will turn to 0:00, the unit beeps and
will blink for 20 seconds.
HOLDER - Holds the receiver.
BATTERYCOMPARTMENT - holds 2 AAA batteries.
S - plug in for stainless steel probe sensor.
Count up
1. Press MODE to select timer mode.The upper display will showa small TIMER and 0:00.
2. Press START/STOPbutton to start count up. The
will blink for everysecond.
3. Tostop the count up process , press START/STOPbutton. The
becomes solid.
4. Press CLEAR to clear the setting back to 0:00.
BUTTONS
ON/OFF - on normaloperation with full function. Off turns transmitter off.
PROCEDURE FOR TYPICAL USE ON AN OUTDOOR GRILL:
REGISTRATION PROCEDURES
The followingtypical example will go through the steps to havethe Remote BBQ Thermometer alertyou to when a beef steak
is cooked to medium (USDAdoneness level)and remind you to rotate hot dogs in 5 minutes.
Open the battery compartment of receiverand insert the two AAA batteries. Open the battery compartment of
transmitter and insert the two AAA batteries.
The Remote BBQ Thermometerneeds the receiverto registerthe radio frequency signal from the transmitter.
TRANSMITTER & RECEIVER ARE OFF.
1. Plug the stainless steel probe sensor into the plug in of the transmitter.
2. Turnthe receiveron by sliding switch on the side of the receiverfrom OFF to ON.
3. Turntransmitter on by sliding switch on the side of the transmitter from OFF to ON. This needs to be done within 60
seconds of turning on the receiverin order for the receiverto registerthe signal from the transmitter.If it doesn't
showthe probe temperaturewithin 5-10 seconds slide switch OFF wait a fewseconds and then switch back ON.
4. Registrationis complete when the receivershows the probe temperaturewhere the --- was flashing.
MEASURE MEAT TEMPERATURE TO USDA DONENESS TEMPERATURE RANGE
1. Press MODE to select thermometermode. The upper display will showa small MEATand a meat type such asHAM .
2. Press MEATto select meat type. HAM, BEEF, G.BEEF (ground beef), VEAL, LAMB,PORK, CHICK (chicken), TURKY (turkey)or
PGM (program).
3. Press TASTEto select the levelof doneness for the meat type selected. W.DONE (welldone), MEDIUM, M. RARE
(medium rare)or RARE indicated by a
.
Note: The temperature displayed to the right of the selected taste will show the preset temperature SET
TEMP according to USDA doneness levels. Example: Beef will be Well Done at 170 F.
4. Once the temperatureof meat reaches the preset doneness levelthe receiverwill beep,the
temperaturewill blink.
2
icon and the probe
1. Followthe registrationprocedure.
2. Place steak and hot dogs on grill rack.
3. Insert probe sensor into the center of thickest portion of the steak. Avoidtouching bone or heavy fat areas.
4. Position the probe sensor wire so they will not come into contact with flames and exit the grill surface area without
being pinched/crushed by the grill cover.
5. Stand the transmitter awayfrom heat source of grill. DO NOT put transmitter on closed coveror under the cover.
The transmitter is not waterproof DO NOT use in the rain.
6. Press MEATso BEEF is displayed.
7. Press TASTEso MEDIUM has
around it 160 will be shownas the SET TEMP.
8. Press MODE to change to timer mode.
9. Press MIN 5 times to set for 5 minutes so that 0:05 is displayed. Press START/STOPto start the countdown.
Press MODE to go back to thermometermode.
10. Turnon the grill.
11. Clip the receiverto your belt or pocket and moveup to 100 ft awayfrom the outdoor grill. Go indoorsif desired.
12. When 5 minutes are up the receiverwill beep for 20 seconds.
13. When the temperatureof probe in the steak reaches MEDIUM the receiverwill beep continuously.The probe
temperatureand
will blink continuously.
14. Press STOP to turn off the alert. The alert will beep and blink after two minutes if the probe temperatureremains
abovethe set temperature.The alert stops when the probe temperaturefalls belowthe set temperature.
15. Turnoff grill. Removethe probe sensor from steak. Alwayswear a heat resistant gloveto touch the stainless
steel probe sensor or wire during or just after cooking. Do not touch with bare hands.
3