1
User manual for
the information system of
Web Interface
This document is the property of the company Operátor trhu s elektřinou, a.s. (OTE) and its
contents are confidential. This document, or any parts thereof, may not be reproduced, disclosed
to third parties or used for any other purposes than those it is intended for without the prior
written consent of OTE.
Reviewed on:
11.11.2008
Document name: Web Interface
Document version 4.0.2
Page 1 of 65
TABLE OF CONTENTS
1
CLIENT STATION CONFIGURATION ..........................................................................................5
1.1
1.2
1.3
2
OPERATION SYSTEM AND INTERNET BROWSER VERSIONS ...............................................................5
CONFIGURATION FOR INPUT AND OUTPUT VIA FILE .........................................................................5
SETTING OF REGISTERS ...................................................................................................................6
CONFIGURATION OF CLIENTS STATION FOR SUN JAVA ...................................................7
2.1
BRIEF DESCRIPTION OF TRANSITION FROM MS JAVA TO SUN JAVA ................................................7
2.2
VERIFICATION OF SUN JAVA ON THE CLIENT STATION ....................................................................7
2.3
MICROSOFT VM - MS JAVA ...........................................................................................................8
2.4
HOW TO UNINSTALL MS JAVA APPLICATION ..................................................................................8
2.5
SUN JAVA INSTALLATION INSTRUCTIONS......................................................................................10
2.6
INTERNET BROWSER SETTINGS ......................................................................................................14
2.7
SUN JAVA SETTINGS......................................................................................................................17
2.8
INSTALLATION OF CERTIFICATE AND OTHERS SECURITY SETTINGS ...............................................23
2.9
SETUP OF RIGHTS ..........................................................................................................................24
2.10
TROUBLE SHOOTING .....................................................................................................................25
2.10.1
Applets download................................................................................................................25
2.10.2
The installation of updates of Sun Java application ...........................................................26
2.10.3
Protected/unprotected items................................................................................................27
2.10.4
Internet browser shutting down ..........................................................................................28
2.10.5
Others problems..................................................................................................................29
3
SYSTEM ENTRY PROCESS ...........................................................................................................31
3.1
USER’S PERSONAL CERTIFICATE ...................................................................................................31
3.2
OTE CERTIFICATES .......................................................................................................................31
3.3
INSTALLATION OF ENCRYPTION MODULES ....................................................................................31
3.4
ENTERING THE DATA THROUGH THE FILE ......................................................................................32
3.5
OPENING WINDOW ........................................................................................................................33
3.6
FIRST LOGIN..................................................................................................................................33
3.7
SUBSEQUENT LOGIN ......................................................................................................................34
3.8
READING OF APPLETS....................................................................................................................34
3.8.1 Confirmation of reading and launching of applets .................................................................34
3.8.2 Automatic updating .................................................................................................................36
3.8.3 File structure on the local disk ................................................................................................36
3.9
MAIN MENU ..................................................................................................................................38
4
UPPER BAR OF WINDOW .............................................................................................................39
4.1
4.2
INFORMATION ON TIME AND DATE ................................................................................................39
OTE MESSAGES ............................................................................................................................40
5
QUICK ACCESS PANEL .................................................................................................................42
6
CONSULTATIONS APPLET...........................................................................................................43
6.1
6.2
6.3
6.4
6.5
ENTERING OF PARAMETERS ..........................................................................................................45
NAVIGATION BETWEEN RECORDS .................................................................................................46
COLUMN WIDTH ............................................................................................................................46
SORTING .......................................................................................................................................46
FILTERING.....................................................................................................................................47
Reviewed on:
11.11.2008
Document name: Web Interface
Document version 4.0.2
Page 2 of 65
6.6
6.7
6.8
6.9
6.10
7
SAVING OF SORTING AND FILTERING CRITERIA .............................................................................49
RECORD-RELATED ACTIVITIES ......................................................................................................50
RECORDS-RELATED ACTIVITIES ....................................................................................................50
SAVE TO FILE ................................................................................................................................52
PRINTING ......................................................................................................................................52
APPLICATION LOG ........................................................................................................................54
7.1
7.2
FUNCTIONALITY ...........................................................................................................................54
STRUCTURE ..................................................................................................................................54
8
SUBMISSION OF SIGNED DATA ..................................................................................................56
9
SETTLEMENT CONSULTATION .................................................................................................57
9.1
9.2
ACCESS .........................................................................................................................................57
CONSULTATION TYPES ..................................................................................................................57
Reviewed on:
11.11.2008
Document name: Web Interface
Document version 4.0.2
Page 3 of 65
INTRODUCTION
The web interface of the OTE information system provides market participants with access to
functions for submitting and consulting data through an Internet browser using an open and
secure connection.
The scope of functionality accessible through the web interface covers the submission of bid data
to the day-ahead market, bilateral contracts, bids for the intra-day market and balancing market
and claims. It also covers the consultation of data information sent earlier as well as the results of
processes for intra-day market matching, bilateral contract aggregation, bid aggregation on the
intra-day and balancing market, imbalance calculation and settlement.
The presented document describes the general web interface functions, including client station
configuration and access to the server.
The user manuals for specific individual areas included into the web are given separately as
follows:
•
Day-ahead market
•
Bilateral contracts
•
Claims
•
Intra-day market and balancing market
The settlement matter is dealt with briefly in the document, primarily regarding consultations
accessible via the web interface.
Reviewed on:
11.11.2008
Document name: Web Interface
Document version 4.0.2
Page 4 of 65
1 CLIENT STATION CONFIGURATION
1.1
Operation system and Internet browser versions
The client station used to operate the IS OTE is supported in the following operation system
configurations:
1.2
•
Windows 2000 Professional SP4 + MS IE 6.0 SP1
•
Windows 2000 Professional SP4 + MS IE 6.0 SP2
•
Windows XP Professional SP2 + MS IE 6.0 SP2
•
Windows XP Professional SP2 + MS IE 7.0
Configuration for input and output via file
Depending on the operation system of the client station, it is necessary to perform the following
configuration for consulting day-ahead market bid data, the realization of bilateral contracts and
for intra-day market and balancing market bids via file (please see the respective user manuals):
Windows 2000 Professional, Windows XP Professional
1. Select Tools in the Windows Explorer, then select Folder options.
2. The following new file types must be created under the tab File Types: NAB, DVS, VVT,
VVA. Click the New button and enter a new file extension (i.e. "NAB"). By clicking on
Advanced, an Associated File Type list will open up, in which you will select Application
Data Control, or Tabular Data Control.
3. In the File Types tab, mark the file extension just defined and click on Advanced. In the
newly opened Edit File Type window, add a new Action by clicking on New. In the New
Action window, enter “open” in the Action field and “Notepad.exe” into the Application used
to perform action field.
4. In order to save the created file onto disk, check the Confirm open after download option in
the Edit File Type window. If this option is not checked, the last selected application
(Notepad) will be opened for each output via file. If the user marks this option as inactive
through the Internet browser, the user will have to return to Windows Explorer to activate it.
If these file types are not defined ("NAB" for day-ahead market bids, "DVS" for the bilateral
contract realizations, "VVT" and "VVA" for the intra-day market and balancing market), the file
content will be displayed in the Internet Explorer browser when consulting via file in place of the
option to select a directory for saving file onto disk.
Reviewed on:
11.11.2008
Document name: Web Interface
Document version 4.0.2
Page 5 of 65
1.3
Setting of registers
It is suitable, on computers processing large volumes of data via file (hundreds of BC
realizations), to select in the following folder:
HKEY_CURRENT_USER\Software\Microsoft\Windows\CurrentVersion\InternetSettings
a DWORD type parameter entitled ReceiveTimeout and set it at 86400000. This value sets the
period in which the Internet Explorer (IE) will wait for a response from the server. If the IE does
not receive a response within the set period, it will resend the data to the server with a request to
process, and the repeated sending and processing of data may occur (i.e. two versions of each BC
realization will be created) or the connection to the server may be lost (the submitting party then
may not know whether his request was entered into the OTE IS). The value sets the waiting
period in milliseconds.
As the setting in the HKEY_CURRENT_USER folder applies only for the user is logged onto the
computer at the time of the parameter creation, it is necessary - in the event that there are more
users working on this computer - to enter a parameter for each user submitting instructions.
Reviewed on:
11.11.2008
Document name: Web Interface
Document version 4.0.2
Page 6 of 65
2 CONFIGURATION OF CLIENTS STATION FOR SUN JAVA
Following chapters describe installation and configuration of Sun Java application, which is
necessary to the right functioning of new applets of the WEBSIOM application. Chapters
describe configuration of internet browser and other necessary configuration.
2.1
Brief description of transition from MS Java to Sun Java
This chapter summarizes how to make a transition from a current MS Java to SUN Java virtual
machine. Please see following chapters:
•
•
•
•
•
•
2.2
Chapter 2.4 – describes removal of Microsoft Java VM. This step should be done by an
expert user (system administrator).
Chapter 2.2 – provides a user with a set of steps for verification of a workstation on
existence of SUN Java including Java version.
Chapter 2.5 – installation of SUN Java including download.
Chapter 2.6 – Internet Explorer setup for SUN Java
Chapter 2.8 – installation instruction for certificates (from now certificates must be
installed directly in the SUN Java directory in order to run applets).
Chapters 3.6 and 3.7 – changes in login procedure enforced by a SUN Java approach
(valid for SIOM; market server).
Verification of Sun Java on the client station
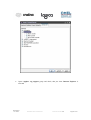
In order to verify existence of SUN Java on your workstation do following. Open Control Panel
window (main menu„Start -> Control Panel). Click on Java icon in order to open “Java Control
Panel”. Click on the About button. About Java window shows a current Java version. If you will
not find Java icon in the ControlPanel window then Java has not been installed on your
workstation yet.
Important: If you have Sun Java on your computer, it is necessary to do following steps:
1. Do you have version J2SE(TM) Runtime Environment 5.0 Update 6 (version
1.5.0_06)? If yes, it is not necessary to download and install this program. Continue with
configuration of IE, chapter 2.6.
2. Do you have higher version of Sun Java than in the point 1? If yes, it is not necessary to
download and install this program. Continue with configuration of IE, chapter 2.6.
3. Do you have lower version of Sun Java than in the point 1? If yes, it is necessary to
continue with downloading and installing Sun Java, chapter 2.5.
It is always necessary to install correct certificate for the right functioning of the application
WEBSIOM, chapter 2.8.
Reviewed on:
11.11.2008
Document name: Web Interface
Document version 4.0.2
Page 7 of 65
2.3
2.4
Microsoft VM - MS Java
•
If it is necessary to use both of Java applications (MS and Sun), than you have to switch
between them. It is not possible to switch on both at the same time. Only one of them can
be used.
•
If is necessary to uninstall MS Java application (Microsoft VM) from the clients station
then do the following steps, chapter 2.4. The uninstallation of Microsoft VM can be
done only by administrator!
How to uninstall MS Java application
Reviewed on:
11.11.2008
Document name: Web Interface
Document version 4.0.2
Page 8 of 65
The uninstallation of Microsoft VM application (MS Java) from client’s station does just
the administrator. Do the following steps:
1. First it is necessary to deactivate Microsoft VM in the IE settings: Tools – Internet
options – Advanced. There you can find Microsoft VM item. Deactivate all its nested
items.
2. Download following files from OTE web page http://www.ote-cr.cz/theparticipants/registration-procedure/files-installation-procedure-sunjava/MS_JAVA_Uninstall.bat – MS_JAVA_Uninstall.bat and from http://www.otecr.cz/the-participants/registration-procedure/files-installation-procedure-sunjava/MS_JAVA_Uninstall_2.bat - file MS JAVA_Uninstall_2.bat. Store those files in
the root directory on your HD, e.g. c:\ drive
3. Run MS_JAVA_Uninstall.bat file from a root directory (c drive)
4. Microsoft_VM_uninstall will be open. Please click on„Yes“ button.
5. If needed restart your workstation in order to complete the removal of Microsoft VM.
6. After restart of the workstation run MS_JAVA_Uninstall_2.bat file.
7. The Microsoft VM (MS Java) is removed from your workstation now. If this procedure
has not completed successfully please follow instructions, which can be found in
Reviewed on:
11.11.2008
Document name: Web Interface
Document version 4.0.2
Page 9 of 65
appendix A (just in case that automated uninstall failed and Microsoft VM is still on your
workstation).
2.5
Sun Java Installation instructions
Because of switching from MS Java to Sun Java some applications which need MS Java can work
improperly. If there is situation both of Java applications are needed it is necessary to solve this
with administrator. The following steps don’t solve problems of using both Java applications
together.
If you want to uninstall Microsoft VM application (MS Java) from the client’s station and to use
just Sun Java application, uninstall Microsoft VM before you begin with installation of Sun Java.
Uninstallation of Microsoft VM describes chapter 2.4
Description of installation of Sun Java follows.
First it is necessary to download Java Sun installation package:
1. Open
Internet
Explorer
a
use
the
address
to
open
the
website:
https://cds.sun.com/is-bin/INTERSHOP.enfinity/WFS/CDSCDS_Developer-Site/en_US/-/USD/ViewProductDetailStart?ProductRef=jre-1.5.0_06-oth-JPR@CDS-CDS_Developer.
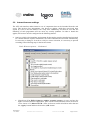
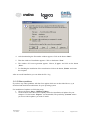
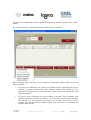
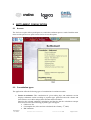
2. If the security window s in the picture appears, it’s necessary to click on the “Yes”
button:
3. After this the website J2SE(TM) Runtime Environment 5.0 Update 6 opens.
4. On this site it’s necessary to choose Platform - Windows, set up Language on
Multi-language, choose I agree… and click on the Continue button.
5. The new website Download J2SE(TM) Runtime Environment 5.0 Update 6 for
Windows, Multi-language is shown (If the security window appears again, click on
the Yes button).
6. On this website it’s necessary to choose Windows Offline Installation in the part
called Required Files, it means to click on the shortcut jre-1_5_0_06-windowsReviewed on:
11.11.2008
Document name: Web Interface
Document version 4.0.2
Page 10 of 65
i586-p.exe by using the left button of the mouse (in the end of row you can see size
of the file 16,00 MB).
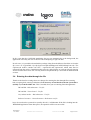
7. After clicking on the shortcut the window for downloading the install file is shown.
It’s necessary to click on the “Open” button:
8. In the dialog window you can see the downloading process:
Installation of Sun Java:
9. After downloading the Java installation file the window for installation is shown. It’s
necessary to click on the “Run” button:
Reviewed on:
11.11.2008
Document name: Web Interface
Document version 4.0.2
Page 11 of 65
10. After a while the installation begins automatically and a License agreement window
is shown. It’s necessary to choose “Typical setup…” and then click on the “Accept”
button:
11. Than the installation process window appears. For finishing the process it’s necessary
to click on the „Finish“ button
Reviewed on:
11.11.2008
Document name: Web Interface
Document version 4.0.2
Page 12 of 65
12. When the installation is finished the requirement of restarting the system can appears.
If yes, click on the „Yes“ button to restart the computer.
13. The installation is typically done into the system drive (usually C:\, in the next text
is termed like system_drive) into directory Program Files\Java\jre1.5.0_06 (in the
next text just Java_dir).
Reviewed on:
11.11.2008
Document name: Web Interface
Document version 4.0.2
Page 13 of 65
2.6
Internet browser settings
The OTE web interface makes intensive use of components that can be launched from the web
server. This involves Java programmes, also known as applets, which have previously been
signed by OTE so that the browser can verify their authenticity and thus be sure that the
launching of such programmes will not cause any security problems. In order to launch the
applets, the browser must be configured in the following manner:
•
Sun Java, which is the launching environment for the applets, must be installed and activated.
In a default Internet Explorer installation, the JVM is installed and activated automatically.
It’s necessary to change it. In order to verify its correct activation, it is necessary to proceed
according to the following steps in the browser menu.
Tools Æ Internet options… Æ Advanced
.
•
Nested item „Use JRE 1.5.0_06 for <applet> (requires restart)“ (in case you have the
higher version of Sun Java application, your version is mentioned hear) has to be chosen,
if not, choose it. If „Microsoft VM“ items are chosen, unclick all of them. After that use
the „Apply“ button and then click on the „OK“ button
Reviewed on:
11.11.2008
Document name: Web Interface
Document version 4.0.2
Page 14 of 65
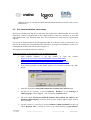
•
It is necessary to add the WEBSIOM website among the Trusted sites. You can do it
through internet browser menu: Tools – Internet options – Security – Trusted sites
•
Close all windows of the Internet Explorer application.
The browser must allow for the downloading of signed applets. For this purpose, it is enough to
select the Medium security level in the Internet zone, which is the preset security configuration
when installing the Internet Explorer programme. In order to check this configuration, the
following steps must be taken in the browser menu:
Tools Æ Internet options… Æ Security
Select the Internet zone in this window and activate the Medium security level. In the event
that the OTE Web Site is included in the zone of Trusted sites, this zone must have a Medium
security level set.
The stated security level suffices for the majority of secured web servers. It thus allows for
the launching of read components, but only upon the user’s approval.
Your company’s policy may restrict You from modifying registry, however, when
downloading applets (e.g. after implementing a new functionality) system stores information
into the registry and the current user must have registry access rights. Afterward this right
can be taken away (or the download can be done under user who has such rights).
•
The browser must enable the use of cookies (small information elements that the server
installs on the client’s computer). The OTE web interface cookies are used solely for
checking active sessions and cease to exist upon the end of a session.
After enabling cookies, select the Medium security level, as described in the point above.
If the security configuration of the client was modified due to the use of other applications or
due to company security policies, we state below the minimum selections, which must be
activated for the correct use of the system (only the required selections were described –
those which are not described are not stated as they do not have an effect on the application).
The values will be activated in the Internet zone, except in cases when the OTE Web will be
integrated into other zones (Local intranet, Trusted sites, Restricted sites). In such event,
these values would be activated in the respective areas.
Tools Æ Internet Options… Æ Security Æ Internet
Reviewed on:
11.11.2008
Document name: Web Interface
Document version 4.0.2
Page 15 of 65
Microsoft VM
Java permissions
( ) Custom
( ) Disable Java
(9) High safety 1
( ) Low safety
( ) Medium safety
ActiveX controls and plug-ins
Script ActiveX controls marked safe for scripting
( ) Disable
(9) Enable
( ) Prompt
Run ActiveX controls and plug-ins
( ) Administrator approved
( ) Disable
(9) Enable
( ) Prompt
Download signed ActiveX controls
( ) Disable
( ) Enable
(9) Prompt 2
Scripting
Active scripting
( ) Disable
(9) Enable
( ) Prompt
Scripting of Java applets
( ) Disable
(9) Enable
( ) Prompt
1
This level has the highest restriction level, which allows for the functioning of the application
2
Necessary so that the user records applets to the client station right when he enters the application
Reviewed on:
11.11.2008
Document name: Web Interface
Document version 4.0.2
Page 16 of 65
Downloads
Automatic prompting for file downloads
( ) Disable
(9) Enable 3
File download
( ) Disable
(9) Enable 4
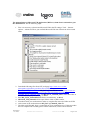
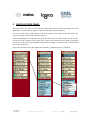
2.7
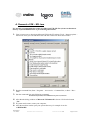
Sun Java settings
For the right working of Sun Java application it is necessary to change some settings of this
environment. Do following steps:
•
Open Java Control Panel through menu „Start -> Control Panel -> Java“ and switch
to the Advanced folder:
3
Necessary for recording a file of day-ahead market bids, of realizations of bilateral contracts, of intra-day
market bids and of balancing market bids
4
Necessary for recording a file of day-ahead market bids, of realizations of bilateral contracts, of intra-day
market bids and of balancing market bids
Reviewed on:
11.11.2008
Document name: Web Interface
Document version 4.0.2
Page 17 of 65
•
Open the Debugging group and make sure, that none of the items of this group is chosen.
If yes, deactivate it.
Reviewed on:
11.11.2008
Document name: Web Interface
Document version 4.0.2
Page 18 of 65
•
Open the Java console group and check, that the Hide console is chosen. If not, choose
it.
Reviewed on:
11.11.2008
Document name: Web Interface
Document version 4.0.2
Page 19 of 65
•
Open <Applet> tag support group and check, that just item: Internet Explorer is
activated
Reviewed on:
11.11.2008
Document name: Web Interface
Document version 4.0.2
Page 20 of 65
•
Open the Security group and check, that all of items are chosen except two of them: Use
personal certificate automatically if only one matches server request and Use TLS
1.0. If these items are activated, deactivate them.
Reviewed on:
11.11.2008
Document name: Web Interface
Document version 4.0.2
Page 21 of 65
•
It is necessary to disable the automatic downloading of updates of the Sun Java
application. You can do it through „Control panel – Java“. Choose „Update“ and
unclick the field „Check for Updates Automatically“, look on the picture. Then click on
the “OK” button.
Reviewed on:
11.11.2008
Document name: Web Interface
Document version 4.0.2
Page 22 of 65
2.8
Installation of certificate and others security settings
For the right functioning of the new applets the certificate OTECA installation is needed. You can
download it from the OTE website. This certificate must be stored in the directory of trustable
authority of the Java Runtime Environment, which you have installed in chapter 2.5. Do the
following steps:
1. From the OTE website (http://www.ote-cr.cz/the-participants/registrationprocedure/installation-procedure-logicacmg/installation-procedurelogicacmg/?set_language=en) download the OTECA certificate - „The OTECA
authority certificate (DER format)“ and save it into the root directory on system
drive (usually c:\) - After clicking on the certificate the window for saving appears.
Click on the „Save“ button and save the certificate into the root directory of the
system drive.
Reviewed on:
11.11.2008
Document name: Web Interface
Document version 4.0.2
Page 23 of 65
2. Download following file from OTE web page http://www.ote-cr.cz/theparticipants/registration-procedure/files-installation-procedure-sunjava/Certificate_Import.bat Certificate_Import.bat. Store the file in the root
directory on your HD, e.g. c:\ drive
3. Run Certificate_Import.bat file from a root directory (c:\ drive). The certificate is
successfully installed on your workstation now.
4. If this procedure has not completed successfully please follow instructions, which can
be found in appendix B (just in case that automated install failed).
Note: Users who have MS Windows 2000 installed on their computers have to use the
process from the appendix B!
2.9
Setup of rights
It is necessary to install .java.policy file. This file sets rights of the CS OTE system to write all
the data about the user’s activities in the CS OTE system into the log file. It is possible to use this
log file to solve some user’s problems with the system. The .java.policy file allows insert bids
through files on those markets, on which this functionality exists. The new Sun Java policy sets
special rules which define your access to the local drives (for the safety reasons). In order to
access your local drive (e.g. if you want to submit a bid) you are required to set up these access
via .java.policy file. Otherwise the system refuses this file. The rules defined in .java.policy file
allow to Sun Java technology the access into the directory „c:\ote“, from which you can insert
your bids through files.
Reviewed on:
11.11.2008
Document name: Web Interface
Document version 4.0.2
Page 24 of 65
1. Download following file from OTE web page http://www.ote-cr.cz/theparticipants/registration-procedure/files-installation-procedure-sun-java/.java.policy –
.java.policy.
2. If the .java.policy file already exists in „c:\Documents and Settings\user_name“,
where „user name“ means folder of a current user (the user who is going to use IS
OTE system), it is necessary to copy the content of the .java.policy file you have just
downloaded into your existing .java.policy file. If the .java.policy file doesn’t exist
on the client’s station, store the file in the following directory: „C:\Documents and
Settings\user_name“. It is necessary to save this file exactly as .java.policy, without
another suffix like txt or other. If the file has different name, it is necessary to rename
it manually.
The Internet Explorer is ready for the first launch of WEBSIOM applications with SUN Java
applets (1.5.0_06), or higher version.
2.10 Trouble shooting
This chapter describes cases, which can occur despite of the right installation and configuration
of the Sun Java application.
2.10.1 Applets download
If the Sun Java application is installed correctly, the internet browser has the right configuration
and the other configuration is done correctly, but in spite of that the WEBSIOM application
applets are not download, it is possible that the downloading of these applets wasn’t right. In this
case do following steps:
1. Open the window Control Panel – through the menu „Start – Control Panel“
2. Click on the Java by the right button and choose „Open“. „Java Control Panel“ is
opened.
3. In the tuck „General“ click on the button „Delete files “
Reviewed on:
11.11.2008
Document name: Web Interface
Document version 4.0.2
Page 25 of 65
4. The window „Delete Temporary Files“ is opened, in which it is necessary to choose all
items. After that click on the button „OK“.
5. Then in the „Java Control Panel“ window click on the button „OK“.
After this run the internet browser and open the WEBSIOM application website. Now the applets
are right downloaded.
2.10.2 The installation of updates of Sun Java application
If the updates or new version of Sun Java are installed, it is recommended to uninstall these
updates or new version:
1. Through the menu „Start – Control Panel – Add/Remove Programs“ look at the list of
installed programs of your computer.
2. In the list find Sun Java application items.
3. Choose update which is higher than the one set for the WEBSIOM application and
choose „Remove“.
Reviewed on:
11.11.2008
Document name: Web Interface
Document version 4.0.2
Page 26 of 65
4. Confirm uninstalling of this update.
5. Restart the computer.
If there is requirement for keeping of updates or new version of Sun Java application it is
necessary to repeat all steps in chapters 2.6, 2.7 and 2.8. Then it is necessary to restart the
computer.
2.10.3 Protected/unprotected items
If the window of protected and unprotected items is shown during your work with WEBSIOM
application, it is possible to switch it of:
1. Through the menu ”Tools – Internet Options – Security – Internet – Custom Level”.
2. Find the item “Miscellaneous - Display mixed content” and choose “Enable”.
3. Click on the button “OK”.
Then the window will not be shown any more.
Reviewed on:
11.11.2008
Document name: Web Interface
Document version 4.0.2
Page 27 of 65
2.10.4 Internet browser shutting down
If the internet browser is shutting down when you enter the WEBSIOM application and the file
*.log is saved on the desktop in spite of the installation of Sun Java is right, the configuration of
internet browser is right and other configuration is exactly according to this manual, do following
steps to install the actualization of the Internet Explorer for MS Windows XP Service Pack 2
(KB912812).
1. Open the website
http://www.microsoft.com/Downloads/details.aspx?FamilyID=f05ffb31-e6b4-4771-81f14accebf72133&displaylang=en
2. First choose the language of the Internet Explorer on the bottom of the window. Then
click on the button “Download”.
3. The dialog window appears. Choose the button “Open”
Reviewed on:
11.11.2008
Document name: Web Interface
Document version 4.0.2
Page 28 of 65
4. After downloading the file another window appears. Click on the button “Run”:
5. Then the window of installation appears. Click on the button “Next”.
6. The window of Licence agreement appears. Choose „I agree“ and click on the button
„Next“.
7. For finishing the installation of the actualization click on the button „Finish“ and restart
the computer.
After successful installation you can delete the file *.log.
2.10.5 Others problems
If you have any others problems with Sun Java applets which are not described above, try to
download and install all actualizations for your operating system.
For installation of updates use following steps:
1. Choose the menu „Start – Windows Update“
2. On the website of the Microsoft company choose the installation of updates for your
computer. Use the button “Express” (recommended). The possibility „Custom“ means
you choose which updates you want to install.
Reviewed on:
11.11.2008
Document name: Web Interface
Document version 4.0.2
Page 29 of 65
3. Click on the button „Download updates“
4. If you first need to install the Windows Update application, than after clicking on the
„Windows Update“ choose installation of this application.
5. After finishing the updates will be found and you can install them on your computer.
Reviewed on:
11.11.2008
Document name: Web Interface
Document version 4.0.2
Page 30 of 65
3 SYSTEM ENTRY PROCESS
3.1
User’s personal certificate
To enter the system you must possess a personal digital certificate (authentication certificate)
issued for this purpose by an independent authority supported by OTE. The medium for the
certificate is a smart card or a USB token. In order to use the smart card, you must have a card
reader connected to the client station, or have the respective USB port driver installed.
When entering the system, the Internet browser will check whether the certificate is acceptable
for the web server and will display it to the user in order for the user to confirm its use. Using the
certificate, the user is identified in the system and thus also the market participant who the user
represents.
3.2
OTE certificates
The server automatically verifies the authenticity of the certificate and its validity. The Internet
browser also checks the authenticity of the web server based on the certificate issued for the
server. The server presents the certificate to the browser.
Upon the first entry into the system through the browser, the browser does not regard the
presented certificate as data issued by trusted subjects. For this reason, the browser will display a
confirmation window after which the user can continue in the process.
In order to prevent the displaying of this message and in order to simplify the ensuing applet
operations, the OTE master certificate must be installed into the browser (which introduces the
certificate subject of OTE and which also guarantees the certificates issued to users, web server
certificates and the certificate for the signature of applets).
In the event that the OTE master certificate is not installed, the user must confirm the entry
process upon the first entry and thereafter open installation help and install the certificate.
3.3
Installation of encryption modules
Upon the first entry into the system, the automatic installation of CAPICOM components from
Microsoft will take place, which provide encrypting functions for the user’s computer, allowing
for the utilization of digital signature of data sent into the system. The procedure is automatic and
displays only notification on the downloaded package, which is digitally signed by Microsoft.
Reviewed on:
11.11.2008
Document name: Web Interface
Document version 4.0.2
Page 31 of 65
In the event that the CAPICOM installation does not run automatically in the background, the
application will notify the user of this fact when attempting to sign sent data.
In such case, it is possible to download the package either from the Microsoft website or from the
ftp server of LogicaCMG: ftp://ftp.logica.com/pub/OTESupport/CAPICOM/capicom.cab. The
capicom.cab archive contains two files - capicom.dll and capicom.inf, which must first be
extracted from the archive. Installation takes place by right-clicking on capicom.inf and selecting
Install from the menu item. This can only however be performed by a user with an administration
account.
3.4
Entering the data through the file
Thanks to the Sun Java settings there are changes for entering the data through files (entering
bids, accepting bids, entering realizations) It is necessary to load the file from the system drive
(usually C:) from the folder Ote. This is needed, when you use entering fines through menu:
IM and BM – Bid submission – Via file
IM and BM – Notice board – Via file
Day-ahead market – Bid submission – Via file
Bilateral contracts – Data submission –Realization via file
has to be saved on the system drive (usually drive C:) in folder Ote. If the file is loading into the
WEBSIOM application from other place, the operation will be not successful.
Reviewed on:
11.11.2008
Document name: Web Interface
Document version 4.0.2
Page 32 of 65
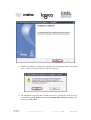
3.5
Opening window
When entering the system, the following window will appear:
Firstly, the user should select the preferred language of communication in the system by clicking
on the flag at the bottom left side of the window. This window is the only window in the system
where the preferred language can be selected.
The options available in this window are as follows:
•
Modification: Information on the last changes carried out in the system.
•
Help: Help on individual parts of the system.
•
Enter: Entry into the main menu of the application.
3.6
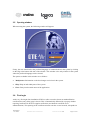
First login
At the very first login after installation SUN Java (after a user has chosen an authentification
certificate) the entry (blue) page is shown. This is automatically followed by a pop-up window
requiring certificate for SUN Java applet verification (use identical certificate as for
authentification). This opening of the certificate window can take several seconds, it depends on
Reviewed on:
11.11.2008
Document name: Web Interface
Document version 4.0.2
Page 33 of 65
the Sun Java startup speed. It is necessary to wait for it, otherwise the WEBSIOM application
stay on the main page.
Based on technological requirements the certificate is required twice. This verification is
independent from the user’s authentification and must be done.
The procedure must be done every time after downloading a new version of applets.
3.7
Subsequent login
At every other login the SUN Java applet verification is required just once. This verification is
independent from the user’s authentification and must be done.
This opening of the Sun Java certificate window can take few seconds, it depends on the Sun Java
startup speed. It is necessary to wait for it, otherwise the WEBSIOM application stay on the main
page.
3.8
Reading of applets
3.8.1 Confirmation of reading and launching of applets
By clicking on Enter on the opening page, the main menu for the system will open.
There are three active applets active in this window, two of which are visible (quick access panel
and the upper bar of the window), and the third is not visible (records user activities into a local
log file). As stated above, these applets are signed by the same certification authority that
represents OTE and must thus be installed into the Internet browser as a trustworthy issuer. If this
is done, the browser will open a window before showing the main menu, in which the user must
confirm the reading and launching of applets.
Reviewed on:
11.11.2008
Document name: Web Interface
Document version 4.0.2
Page 34 of 65
It is also necessary in this window to select Always run software from …(this option will not be
available if the OTE master certificate was not previously installed). If we do not wish this
window to appear when entering the system in the future, this option must be checked.
Reviewed on:
11.11.2008
Document name: Web Interface
Document version 4.0.2
Page 35 of 65
3.8.2 Automatic updating
The automatic installation of some systems applets onto the local disk will take place when first
entering the application. When entering the main menu, the applet for the quick access panel and
upper window bar will be installed. Automatic installation will again take place when first
launching the consultation applet.
The installation process is automatic and can be monitored in the following window, which
automatically deactivates after each applet reading is completed.
In the future, the Internet browser will repeat this fully automatic process only when updating
applets.
3.8.3 File structure on the local disk
The structure of information which the Internet browser updates on the client station in the
systems directory is as follows:
•
C:\WINDOWS\Downloaded Program Files
The folder contains records of ActiveX controls.
•
C:\WINDOWS\JAVA\lib
Various sub-directories are created in this folder, which contain the required modules and
libraries located on the local disk.
The stated directory structure and the contents thereof may not be manually modified by the user
or station administrator. When the stated folders are damaged or any other errors found, which
would cause the applets to function incorrectly, the problem must be solved using the following
procedure:
•
Close the open Internet browser on the client station.
•
Remove all input pertaining to Applet Consulta 1.0.0.6, MenuDinamico 2.0.0.5 and Applet
Superior 1.0.0.4 (version numbers can change in the future) from the directory
C:\WINDOWS\Downloaded Program Files.
•
Remove the following sub-directories and folders from the directory C:\WINDOWS\java\lib:
\borland
\com
\images
\jclass
Reviewed on:
11.11.2008
Document name: Web Interface
Document version 4.0.2
Page 36 of 65
•
\MenuDinamico
\netscape
\OM_Consultas
InterfazSiom.class
siomCli.class
Repeat connection to the OTE web interface. The new, standard, reading of applets will
appear.
The stated operations must be performed by a user with administration rights to the client station.
Reviewed on:
11.11.2008
Document name: Web Interface
Document version 4.0.2
Page 37 of 65
3.9
Main menu
After the applet reading process, the following main menu for the system will open up:
The ensuing chapters detail each of the main web areas.
Reviewed on:
11.11.2008
Document name: Web Interface
Document version 4.0.2
Page 38 of 65
4 UPPER BAR OF WINDOW
The upper bar of the window shows information on the current date and time, as well as other
relevant data on the markets and accepted claims.
The upper bar appears as follows:
Date and time
OTE
messages
Market information
Claims
periods
Information accessible on the upper bar:
•
Date and time – the current date and time.
•
OTE messages – an indicator showing the existence of active OTE messages for market
participants.
•
Claims periods – information on market claims periods and on the existence of urgent claims.
Includes information on day-ahead market claims and bilateral contract claims. This
information is detailed in the user manual entitled Claims.
•
Market information – dynamic information on the day-ahead market, bilateral contracts,
intra-day markets and balancing market by web sections which the user is in. This
information contains the date of the next session, the date and time of session closing and the
date of session with the last available results for the daily market and bilateral contracts, as
well as the date and time of the closest trading hour closing on the intra-day and balancing
markets. This information is detailed in the user manuals entitled Day-ahead Market,
Bilateral Contracts, Intra-day Market and Balancing Market.
4.1
Information on time and date
The upper bar of the window shows the current date and time of the WEB server (indicated by the
attribute Remote. The synchronisation of minutes and seconds takes place when connecting to the
WEB server, while the hour and date is selected from the local station. Hour or date
synchronisation takes place upon the changing of hours or date on the WEB server. If connection
to the WEB server is not possible for any reason and its time cannot be determined, then the time
Reviewed on:
11.11.2008
Document name: Web Interface
Document version 4.0.2
Page 39 of 65
of the local station will show in its place (indicated by the attribute Local). This can be seen in the
following figure.
Date
4.2
Time
Time synchronization indicator
(whether time is taken from remote
server or from local station)
OTE messages
The indicator showing the existence of OTE messages for market participants is located on the
upper bar and has the following appearance:
if there is no active message pending.
if there is an active message pending.
The message contents appear when clicking on the icon.
Reviewed on:
11.11.2008
Document name: Web Interface
Document version 4.0.2
Page 40 of 65
If there are active messages pending, a window will automatically appear with the messages when
entering into the system. If the user is already in the system, the window will appear
automatically upon the activation of new messages. When messages become inactive (are read),
the icon stops flashing.
Reviewed on:
11.11.2008
Document name: Web Interface
Document version 4.0.2
Page 41 of 65
5 QUICK ACCESS PANEL
This panel allows for quick access to the main application options. When connecting to the OTE
application, a main menu will appear on the left, showing the opening options.
For access to the menu column options, click on the option of your choice in the main menu. The
respective options of the menu column will appear.
After the displaying of the dynamic menu from the main menu or menu column, we can see that,
in both cases, the respective page opens in the centre of the window for each option. The upper
bar of the window also shows updated information according to which section of the Web the
user is moving about in.
By moving the mouse along the column menu options, a submenu rolls out, if defined.
Reviewed on:
11.11.2008
Document name: Web Interface
Document version 4.0.2
Page 42 of 65
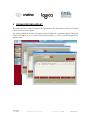
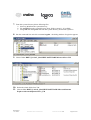
6 CONSULTATIONS APPLET
This applet provides a range of functions for consultations. The main menu or quick access panel
can be used to access this applet.
The standard Windows window will appear when launching the consultation applet. The applet
window will appear in a new window in the Internet browser, i.e. more consultation applets can
appear at once.
Reviewed on:
11.11.2008
Document name: Web Interface
Document version 4.0.2
Page 43 of 65
The contents of this window differ for each consultation, but the structure always remains the
same:
Consultation name
Column names
Consultation parameters
Tabs
No. of records
Mesage row
Execute button
Filters row
Action button
Results area
After filling in the search parameters for the consultation (i.e. participant identification, trading
day, etc.) and after clicking Execute, the results will appear (the applet will check the entered
parameters and acquire the data to be displayed, or will notify of any potential error). This
method allows one to change parameters and obtain new results without having to leave the
consultation applet.
Reviewed on:
11.11.2008
Document name: Web Interface
Document version 4.0.2
Page 44 of 65
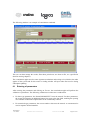
The following window is an example of consultation conducted.
The user can then arrange the results, filter them, print them, save them to file, etc. (specified in
detail in ensuing chapters).
The consultation applet uses the same signature mechanism and writing to local disk as the other
applets of the system and for this reason a reading window will open when first used or during
subsequent updating.
6.1
Entering of parameters
After entering the parameters and clicking on Execute, the consultation applet will perform the
validation of parameters. The following validations are taken into consideration:
•
For date-type parameters, the format DD/MM/YYYY must be entered. For these parameters,
the system will display an additional button Date next to the date field, enabling the opening
of a calendar in which the required date can be comfortably selected.
•
For numerical-type parameters, the correct number value must be entered. A comma must be
used to separate decimal numbers.
Reviewed on:
11.11.2008
Document name: Web Interface
Document version 4.0.2
Page 45 of 65
•
For text-type parameters, the maximum length will be checked and these depend on the
specific parameter and consultation (i.e. a maximum of 5 characters for the participant
identification).
•
No special validations will take place for parameters specified by a list of values.
Depending on the consultation, the ‘*’ sign can be used as a replacement for some parameter
types. If such possibility exists, the ‘*’sign is displayed on the right of the parameter.
6.2
Navigation between records
The first column of each record contains the sequence number of the record in the consultation
table.
If the number of records exceeds the maximum display capacity in the window, a vertical bar will
appear that can be moved up and down the list, as in any other regular Windows application.
The total number of records will be marked in the bottom left side of the window using a “X / Y”
format, where X and Y are whole numbers. If filters were not used (see Chapter 5.5 - Filtering),
then values X and Y will be the same and will indicate the total number of records displayed. If a
filter was specified, then value X will indicate the number of records that were filtered and are
given in the consultation results, while value Y will indicate the total number of records.
6.3
Column width
The column width, which is predefined for each column, can be modified using the mouse, by
merely dragging the separating line between column names (as in many other Windows
applications).
If the total width of the column exceeds the applet window size, a horizontal scroll bar will be
activated.
6.4
Sorting
In order to modify the order in which records are displayed in the consultation results, the user
can use the column sorting option.
In order to arrange a column according to values, click on its name.
If the user clicks on a column header once, the records are sorted in ascending order according to
their values in the columns. When clicking again on the same column, the sorting process is
repeated and the records are sorted in descending order. By clicking again on the column name,
the records are again sorted in ascending order.
After sorting the first column, the user may wish to sort another column. Sorting by values in the
first column is not affected, but the second column will be used as the second sorting criteria.
When clicking again on the second column, the sorting criteria change (switching between
Reviewed on:
11.11.2008
Document name: Web Interface
Document version 4.0.2
Page 46 of 65
descending and ascending order). Other columns can be added to the sorting criteria using the
same method.
Information on the current sorting can be displayed using the Filters button and selecting Show
current sorting.
The Remove current sorting button can be used for removing the sorting criteria, which will be
displayed after clicking on Filters in the bottom part of the consultation window.
6.5
Filtering
Directly under the row with the column names, the user will find a row of filters with a field
marked in the header with the letter F. On the right of this is a function for the selection of filters
that is marked with the letters f-1, f-2, f-3. This allows for selection from three possible filter
rows.
The user can specify various filters in one or more columns and thus reduce the number of
records displayed to those that meet the users set requirements.
For the specification of filters, the following syntaxes will be used:
•
Comparison-based filters: These work with all value types in the columns. Operators used:
“=”, “<”, “>”, “<=”, “>=” and “<>”. Some examples are:
For alphanumeric values: “< ABC” (alphabetical comparison is used)
For numeric values: “> 2”
For date-type values: “<= 10/12/2003”
For time-type values: “>= 10:34:22”
For date and time type values: “= 10/12/2003 10:34:22”
•
Filters according to scope of values: These work with all value types in the columns.
Operators used: “BETWEEN” and “AND”. Some examples are:
For alphanumeric values: “BETWEEN A1 AND A9” (alphabetical comparison is used)
For numeric values: “BETWEEN 2 AND 10”
For date-type values: “BETWEEN 10/12/2003 AND 31/12/2003”
For time-type values: “BETWEEN 10:00:00 AND 11:00:00”
For date and time type values:
“BETWEEN 10/12/2003 10:00:00 AND 10/12/2003 11:00:00”
•
Similarity-based filtering: This works solely with alphanumeric type values and uses the
“LIKE” operator and the substitution sign “%”. Some examples are:
“LIKE AB%” (values beginning with “AB”)
“LIKE %AB” (values ending with “AB”)
“LIKE AB%CD” (values beginning with “AB” and ending with “CD”)
“LIKE %AB%” (values containing “AB”)
Reviewed on:
11.11.2008
Document name: Web Interface
Document version 4.0.2
Page 47 of 65
The filters do not distinguish between capital and small letters, with the exception of the operator
“LIKE”.
The window showing a consultation with three defined filters is as follows:
When specifying filters, the filters can be combined in individual columns. There are several
options available:
To specify one condition for one column. The condition must be specified in the first row
of filters f-1 (appears automatically). After defining conditions and clicking on F, the
application will display rows of all data whose value in the given column meets the
required conditions.
To specify various conditions for several columns in the table. These conditions must
again be specified in the first row of filters f-1 of each column. After defining conditions
and clicking on F the application will display rows of data, whose values in these
columns meet all the entered conditions (upon joint verification of conditions the
operation AND is used).
Reviewed on:
11.11.2008
Document name: Web Interface
Document version 4.0.2
Page 48 of 65
To specify several conditions for one column (up to 3). These conditions must be
specified in filter rows f-1, f-2 and f-3 (successively). After defining conditions and
clicking on F the application will display rows of data, whose values in the given column
meet any of the specified conditions (upon joint verification of conditions the operation
OR is used).
To combine the last two options in several columns, one or more filters were specified
there. The result of a combination of filters is firstly the result of operation AND (all
conditions must be met) between all conditions in each individual row of filters f-1, f-2, f3. Subsequently, the operation OR is executed for whole rows of filters f-1, f-2, f-3 (the
meeting of one condition suffices).
If the result of consultation does not correspond with the specified filters, the F button will turn
red. The user must click on the button in order to update the results. After their update, the button
will again turn green.
Information on the current filter can be displayed using the Filters button and selecting Show
current filter.
To remove filters, erase its specification in filters row f-1, f-2, f-3 and click on F.
The Remove current filter button can be used to deactivate all filters, which will be displayed
after clicking on Filters in the bottom part of the consultation window.
6.6
Saving of sorting and filtering criteria
For the specification of a combination of filters and criteria for sorting in a given consultation, the
user can save his/her configuration for later use. Several configurations can be stored for one
consultation.
Management of configurations:
Save filter/sorting: After manual specification of filter selections or required sorting, the
user must click on Filters Î Save filter/sorting. The system will then request a brief
description and the configuration will be saved.
Load filter/sorting: The selection Filters Î Load filter/sorting can be selected anytime
after launching certain consultations and reading of data from the server. The system will
display all configurations saved in the past for the given consultation, as well as the
description which the user entered for each. By selecting the required configuration, its
activation will take place.
Remove filter/sorting: The user can, at any point, remove earlier defined configurations
by clicking on Filters Î Remove filter/sorting. The system will display all
configurations saved in the past for the given consultation. After selecting some of these,
the system will request a confirmation of operation. If the user confirms the operation,
the selected configuration will be erased.
Reviewed on:
11.11.2008
Document name: Web Interface
Document version 4.0.2
Page 49 of 65
Changing filter/sorting configuration: After activation of filters/sorting, their
configuration can be changed. By selecting Filters Î Save filter/sorting the system will
display the same description of the selected filter. If the user does not change this
description, the filter/sorting will be saved in the modified configuration under the same
name. If the user does modify the description, a new filter/sorting will be created for the
given consultation.
These configurations are always linked to a concrete consultation. If therefore the user wishes to
save the same filter/sorting configuration to two similar consultations, they will need to be
specified and be saved to the two consultations separately. The filter/sorting configuration is
saved locally on the user’s PC and therefore, in the event that the user logs onto the Web from
another PC, these filters/sorting will not be available on the other PC.
6.7
Record-related activities
Some consultations were configured in such a way so as to enable access to detailed information
on each record displayed in consultation result (i.e. view all data of one bid or access to another
consultation directly relating to it).
The Action – record button is used for this, which always shows as being inactive in the
beginning. The button is activated after marking the record by clicking on the row header grey on
the left (the record row will then turn blue), if there is a certain action defined for it. The activities
are general for the given consultation regardless of which record is selected. By clicking on
Action – record a flyout menu will be displayed allowing for the selection of some of the below
activities.
There are three basic activity types carried out for the record:
•
Access to the record’s detail (i.e. access to the page for consultation of claims data, which
appears in the consultation results records): the browser will show details of the selected
record.
•
The generating of files on the local disk (i.e. the generating of bid files for a bid selected from
consultation results): The browser will show a standard dialogue window, which allows for
the opening of a file or to save it to disk.
•
Access to new consultation (i.e. Valid implicit BC realizations or IM cumulated
consultations). In this case, the detailed data will appear in a new applet tab, which is
automatically activated and shows the results.
6.8
Records-related activities
These are special case activities for all records which form the result of consultation. The Action –
all records button is used for this purpose. This button is active if such activities were defined for
the given consultation and one or more records were retrieved by the consultation. If it does not
depend on the displayed records in the consultation results, the activities are general for the given
consultation.
Reviewed on:
11.11.2008
Document name: Web Interface
Document version 4.0.2
Page 50 of 65
If a filter was applied, only those records will be processed that meet the filter requirements.
By clicking on the button, a flyout menu will be displayed allowing for the selection of some of
the below activities.
Basic activity types carried out on records:
•
Access to the records’ details – this is mainly for the intra-day and balancing market.
For example, statistic calculations can be consulted for all the bids displayed in consultation
results, or all bids displayed in consultation results can be accepted or cancelled.
•
Generating files on the local disk - the browser will show a standard dialogue window, which
allows for the saving of a file to disk.
For example, when viewing BC realizations, the File of realizations allows for the creation of
a file on the local disk containing all BC realizations from consultation result in the format for
submitting realizations via file.
Reviewed on:
11.11.2008
Document name: Web Interface
Document version 4.0.2
Page 51 of 65
6.9
Save to file
If records are displayed in the results area, the Save to file button will become active. The button
allows for the writing of data contained in the consultation result to the file and does so in text
format.
After activation of the button, a dialogue window will be displayed, enabling for the specification
of:
•
Name and location of the generated file (file location can be selected using the Path button).
The location should be on the system drive (usually drive C:), folder Ote. Otherwise the
system can interrupt the operation with error.
•
The separating sign between record values (tab, semi-colon, space).
•
Decimal separator for numerical values (comma or full stop).
After the specification of the given values and after clicking on Ok button, a text file is created
with the entered name and location.
6.10 Printing
If any records appear in the results area, the Print button will be activated. This button allows for
the sending of parameters for the given consultation to the printer, the date of consultation
execution, description of active filters, number of records and data contained in the consultation
results.
When performing this action, a new browser window will open with the contents ready to be
printed. At the same time, a standard dialogue window will open up for printer selection.
Reviewed on:
11.11.2008
Document name: Web Interface
Document version 4.0.2
Page 52 of 65
Reviewed on:
11.11.2008
Document name: Web Interface
Document version 4.0.2
Page 53 of 65
7 APPLICATION LOG
7.1
Functionality
When going through the application, a list of pages visited by the user is created in the log file. In
the file named LOGAM.log, a row is generated for each page visited and is saved in the local
directory C:\Ote\LogAM\. If the directory does not exist, it will be created automatically.
Each row contains information on the page visited, the time of visit and the actions performed on
this page. The aim is to secure the local control of pages visited by individual users. The log file
rows contain the following information: time and date, connection (R – remote or L - local),
market participant identification, action performed, name of visited page and comments.
The file size is limited to 500 kB. If this size is exceeded, the log file will be closed (the file will
be
renamed
using
a
name
containing
the
current
date
and
time
LOGAM_YYYYMMDD_HHMISS.log)and a new LOGAM.log will be created, in which the entry
of information will continue. All created log files will be saved in the same directory.
7.2
Structure
The overall appearance of the above-described LOGAM.log file is as follows:
04/12/2001
04/12/2001
04/12/2001
04/12/2001
04/12/2001
04/12/2001
04/12/2001
04/12/2001
04/12/2001
04/12/2001
04/12/2001
04/12/2001
04/12/2001
04/12/2001
04/12/2001
04/12/2001
04/12/2001
04/12/2001
04/12/2001
04/12/2001
04/12/2001
04/12/2001
13:22:57
13:23:02
13:23:06
13:23:11
13:23:51
13:23:51
13:23:52
13:24:40
13:24:53
13:24:53
13:24:54
14:58:59
14:01:36
14:01:41
14:05:19
14:05:28
14:16:22
14:16:25
14:16:28
14:16:54
14:18:59
14:19:00
Reviewed on:
11.11.2008
R
R
R
R
R
R
R
R
R
R
R
R
R
R
R
R
R
R
R
R
R
R
-7
-7
-7
-7
-7
-7
-7
-7
-7
-7
-7
-7
-7
-7
-7
-7
-7
-7
-7
-7
-7
-7
-EntradaPagina
-EntradaPagina
-EntradaPagina
-EntradaPagina
-BotónPulsado
-BotónPulsado
-BotónPulsado
-EntradaPagina
-BotónPulsado
-BotónPulsado
-BotónPulsado
-EntradaPagina
-BotónPulsado
-EntradaPagina
-BotonPulsado
-EntradaPagina
-EntradaPagina
-EntradaPagina
-BotónPulsado
-BotonPulsado
-EntradaPagina
-BotónPulsado
Document name: Web Interface
-Diario
-MenuDiario
-DiarioInsOfertaPantalla
-InsercionOfertas
-DiarioGenerarOferta
-SelBloquesOferta
-ofertama
-ofertama
-Envío de la Ofer
-ofertama
-Validación local
-ofertama
-No hay errores.
-ofertama
-ofertama
-Envío de la
-ofertama
-Validación local
-ofertama
-No hay errores.
-Bilaterales
-MenuBilaterales
-BilateralesInsEjecucionCBFichero-Buscando el
-Diario
-MenuDiario
-BilateralesInsEjecucionCBFichero-Validación
-diario
-MenuDiario
-bilaterales
-MenuBilaterales
-Diario
-MenuDiario
-BilateralesInsEjecucionCBFichero-Buscando el
-BilateralesInsEjecucionCBFichero-Validación
-Diario
-MenuDiario
-BilateralesInsEjecucionCBFichero-Buscando el
Document version 4.0.2
Page 54 of 65
The following diagram explains the fields in individual rows:
04/12/2001 16:17:22 R
Date and time
-7
Participant
-clicked on button
Action
-ofertama
Visited page
-no error
Comments
Connection
•
Date and time: The date and time of the WEB server at the time of log entry or at the time of
the local station in the event that connection to the server is lost.
•
Connection: R (Remote), if the stated time and date is server-based data. L (Local), if the
data is from the local station.
•
Participant: Identification of market participant.
•
Action: The activity performed on the relevant application page (opening of page, clicking of
button, etc.).
•
Visited page: Name of page based on which the log was created.
•
Comments: Comments on the action performed on the page.
Note: The local log file was proposed with the aim of facilitating the determining and removal of
any potential errors in the system reported by participants. The contents of the log file are always
saved on the local disk and the participant can be requested to supply the log, if required. A
situation when a participant announces an error in the system is seen as a reason for such
request. For this reason, it was decided to keep the message contents in the original language of
the development team.
Reviewed on:
11.11.2008
Document name: Web Interface
Document version 4.0.2
Page 55 of 65
8 SUBMISSION OF SIGNED DATA
The IS OTE web interface includes a digital signature for confidential data submitted by the
participants of the Market Operator. The operation for submission of data, to which the digital
signature is attached, is as follows:
The submission of bids for the day-ahead market via screen or via file
Cancellation of bids on the day-ahead market
Removal of implicit bids on the day-ahead market
The submission, confirmation or rejection of bilateral contract definitions
The submission of bilateral contract realizations via screen or via file
Confirmation or rejection of bilateral contract realizations
Cancellation of bilateral contract realizations
Removal of implicit bilateral contract realizations
The submission of bids for the intra-day market and balancing market via screen or via
file
Cancellation of bids on the intra-day market and balancing market
The acceptance of bids for the intra-day market and balancing market via screen or via
file
The digital signature process requires the participation of the user, especially for the selection of a
signature certificate to be used and for the entering of the PIN of the given certificate.
Reviewed on:
11.11.2008
Document name: Web Interface
Document version 4.0.2
Page 56 of 65
9 SETTLEMENT CONSULTATION
9.1
Access
The Settlement option allows participants to consult the settlement process results. Both the main
menu and the quick access panel can be used to access this option:
9.2
Consultation types
The application offers the following types of consultation for settlement results:
•
Result of settlement: This consultation for given trading days and settlement version
displays settlement results according to payment type: purchased and sold volumes and
their balance, receivables and payables amounts and their balance.
Based on the selected settlement consultation and the fact that the calculation concepts
have been activated, the following payment types will appear:
CDS access fee
Consumption fee (it has not been calculated since January 1st, 2005)
DM settlement
Reviewed on:
11.11.2008
Document name: Web Interface
Document version 4.0.2
Page 57 of 65
Additional costs
DM fee
Positive imbalance
Negative imbalance
BM access fee
IM purchase
IM sale
IM fee
Imbalance
Monthly fee
Rounding off difference
Positive RE
Negative RE
State of emergency - consumption
State of emergency - supply
RE settlement surplus
•
LP Reconciliation: This consultation for given trading days will display the consultation
results for LP reconciliation: The date of change to the LP price, purchased and sold
volumes and their balance, receivables and payables amounts and their balance.
•
Hourly breakdown of settlement results: For the given period, the market participant
and settlement version, the settlement results will be displayed per individual hours for
the selected day or month.
A column for purchase/sale trade arising on the IM market is added to this consultation
(for both volume and for the amount). The columns for regulating energy contain RE
volumes sent to the TSO, part of which is also the amount traded on the BM. The
consultation contains fee payments for the IM and BM.
The following settlement result values are displayed:
BC purchase [MWh]
BC sale [MWh]
DM purchase [MWh]
DM sale [MWh]
Total purchase [MWh]
Total sale [MWh]
Positive imbalance [MWh]
Negative imbalance [MWh]
RE+ [MWh]
RE- [MWh]
Amount – positive imbalance [CZK]
Amount – negative imbalance [CZK]
Additional costs [CZK]
Amount – DM purchase [CZK]
Amount – DM sale [CZK]
Amount – RE+ [CZK]
Amount – RE- [CZK]
DM fee [CZK]
Consumption fee [CZK]
Reviewed on:
11.11.2008
Document name: Web Interface
Document version 4.0.2
Page 58 of 65
Monthly fee [CZK]
Rounding off difference [CZK]
CDS access fee [CZK]
IM purchase [MWh]
IM sale [MWh]
IM purchase [CZK]
IM sale [CZK]
IM fee [CZK]
BM access fee [CZK]
•
Results - RE settlement: Will display a detailed breakdown of regulating energy per
hour, divided up according to PDT and blocks, for the given trading day and settlement
version. The volume, unit price and total amount of the negative/positive regulating
energy are displayed.
•
State of emergency: Will display settlement results in a state of emergency per hour for
the given trading day and settlement version. The supplied and consumed volumes and its
amount are displayed.
•
Advanced payment: In a given month, the detail of the total volume and total payment
obligation or receivables will be displayed for individual days, settlement versions,
participants, payment types (CDS access fee, Consumption fee, DM settlement,
Additional costs, DM fee, Positive imbalance, Negative imbalance, BM access fee, IM
purchase, IM sale, IM fee, Imbalance, Monthly fee, Rounding off difference, Positive RE,
Negative RE, RE, LP reconciliation, RE settlement surplus) and operation types
(Purchase, Sale).
•
Settlement fees: Information on the scope of validity and each fee price will be displayed
for the entered period. This consultation is supplemented with records for settlement fees
on the IM and BM markets, the LP reconciliation price and the prices for resource types
for a state of emergency.
•
Settlement prices: The settlement price value in each trading hour is displayed for
selected trading days and settlement version.
•
Settlement prices and their origin: The settlement price for each hour, its origin
(whether the price was determined by curve or by the regulating energy price) and the
regulating energy settlement surplus (information accessible only for ČEPS and OTE
users) is displayed for given trading days and settlement version.
The Origin column contains the follows values:
o MinRE – settlement price set according to minimum price of negative RE in a
given trading hour
o MaxRE – settlement price set according to maximum price of positive RE in a
given trading hour
o Curve – settlement price set according to settlement price curve
o RE price – settlement price set according to ČEPS
Two other consultations with data on metering and regulating energy are as follows:
Reviewed on:
11.11.2008
Document name: Web Interface
Document version 4.0.2
Page 59 of 65
•
Subject of settlement’s aggregated metering: Shows the hourly metering of supplied
and consumed volumes for given trading days.
•
Regulating energy: Shows the amount and volume of regulating energy, separated
according to PDT and blocks, for individual trading day hours.
Reviewed on:
11.11.2008
Document name: Web Interface
Document version 4.0.2
Page 60 of 65
A. Removal of VM – MS Java
It is strongly recommended that removal of Microsoft VM (MS Java) from workstation is
done by a system administrator as per following instructions:
1.
First it is necessary to deactivate Microsoft VM in the IE settings: Tools – Internet options –
Advanced. There you can find Microsoft VM item. Deactivate all its nested items.
2.
Run the command line (Start – Programs – Accessories – Command line, or Start – Run –
cmd)
Into the command line write following command:
3.
RunDll32 advpack.dll,LaunchINFSection java.inf,UnInstall
4.
5.
6.
After that the dialog window of Microsoft VM uninstall is shown. Click on the button
„Yes“.
If system needs restart, restart your computer.
After the machine restarts open your system directory, for example it can be:
c:\WINDOWS\
Reviewed on:
11.11.2008
Document name: Web Interface
Document version 4.0.2
Page 61 of 65
7.
From this system directory delete following files:
a. directory java from the system directory
b. file java.pnf from the system directory from folder system32 – if available
c. files jview.exe and wjview.exe from the system directory from folder system32
8.
Into the command line write this command regedit – the dialog window of registries appears
9.
Choose folder HKEY_LOCAL_MACHINE/SOFTWARE\Microsoft\Java VM
10.
11.
Delete the whole folder Java VM
Choose folder HKEY_LOCAL_MACHINE\SOFTWARE\Microsoft\Internet
Explorer\AdvancedOptions\JAVA_VM
Reviewed on:
11.11.2008
Document name: Web Interface
Document version 4.0.2
Page 62 of 65
12.
Delete the whole folder JAVA_VM
The removal of Microsoft VM application (MS Java) is finished now.
B. Certificate Installation
For the right functioning of the new applets the certificate OTECA installation is needed. You can
download it from the OTE website. This certificate must be stored in the directory of trustable
authority of the Java Runtime Environment, which you have installed in chapter. Do the
following steps:
1.
From
the
OTE
website
(http://www.ote-cr.cz/the-participants/registrationprocedure/installation-procedure-logicacmg/installation-procedurelogicacmg/?set_language=en) download the OTECA certificate - „The OTECA authority
certificate (DER format)“ and save it into the root directory on system drive (usually c:\) After clicking on the certificate the window for saving appears. Click on the „Save“ button
and save the certificate into the root directory of the system drive.
Reviewed on:
11.11.2008
Document name: Web Interface
Document version 4.0.2
Page 63 of 65
2.
Open command line from menu „Start -> Programs -> Accessories -> Command
Prompt“. Switch into the system drive, for example. by command c:\ which is supposed to
be a system drive, command cd \ switches it into the root directory of the system_drive.
Command cd \Java_dir\bin\ switches it into the directory of Java environment.
3.
In this directory run command keytool -import -alias oteca -trustcacerts -file c:\oteca.cer keystore "system_drive\Java_dir\ lib\security\cacerts" in which you have to replace
system drive and Java_dir by real drive and folder to import the root certificate authority
OTECA (we recommend to write the whole command into the command line manually, not
to copy it). When you are asked for typing password for the certificate store, type password
changeit.
Reviewed on:
11.11.2008
Document name: Web Interface
Document version 4.0.2
Page 64 of 65
4.
The system will write on the screen „Trust this certificate?“ Write yes into the line and press
enter.
5.
Now the import of OTECA certificate authority is finished and the command window can be
closed.
6.
For proper finalization restart the computer
Reviewed on:
11.11.2008
Document name: Web Interface
Document version 4.0.2
Page 65 of 65