1
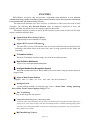
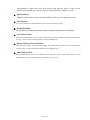
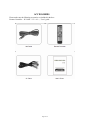
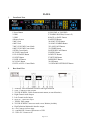
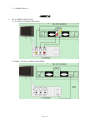
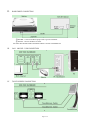
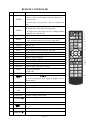
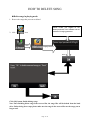
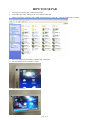
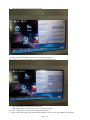
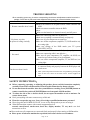
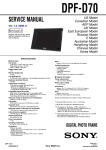
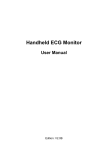
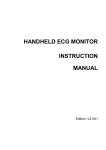
KOD-2800 User manual Page: 1/ 39 FEATURES KOD-2800uses low-power chip and provides a high-quality video experience. It is an advanced embedded technology capable of eliminating system crashes. Moreover, it does not only produce minimal heat, but its operations are quite stable and easy to access. This latest model maintains ease of use and also, its functions are able to meet the needs of most consumers. The following Key Powerful Features offers an impressive experience of users, and probably will allow this machine to be one strongly required in the market. This karaoke machine is perfect for use by special occasions or places such as Club, DJs, KJs, Pub, rentals, restaurants and family party. Supports Hard Drives Of Any Capacity Support multiple external hard drive expand. Support Wi-Fi wireless VOD function: The latest Wi-Fi wireless VOD function, take you into the mobile Internet era ahead of perfect technology and fashion fusion at the same time, more let song operation become simple and interesting. 3D Aimation Iterface The latest 3D animation interface, bring your vision on the endless pleasure High Definition Multimedia Supports 1920*1080P High Definition Multimedia. Intelligent Handwriting Recognition System Song title or artist's name can be directly written on the touch screen using your hand in search for songs or artists. Supports Multi-Format Medium Supports:MPG,TS,MKV,AVI,DAT,VOB,MP4,MP3, H.264 formats etc. Intelligent Search Supports different methods of searching songs such as “Artists, Hand –writing, Spell(song title), Genres, Word Counts, Language, Song No.” etc. Easy To Add Songs Easy to add songs and artist pictures. Unique smart function of preview / insert song's video To preview song's video immediately once you click on a button beside the song title, no matter what song is playing on TV screen. Preview song's video does not interrupt the music video that is already playing on the TV screen. Press smart [insert] button to replace the current playing song with the song you just preview. More simple and convenient. My Favorite Songs’ Library: Page: 2/ 39 Input number (11 digits) and reserve your favorite songs under the folder,so that you can quickly search and play your favorite songs by inputting number (11 digits) as a code. Operation Mode Supports external mouse, remote controller, MID and touch screen to operate the system. Video Function VGA screen OSD can be switched between music video and search song menu. Scoring Function You can score your singing performance in order to make the experience more worthwhile. Coin Karaoke Mode: Make money without labor cost. The system can ask for more coins from USER and deduct coins after some one sing. 1-9 coins can be set. Bring benefits to investor automatically. Machine Working Time Controllable: "Song time limit" allows you to preset the working time of the machine. Smart time lock management is helping owner to collect all the money that the users are suppose to pay. Multi-Working-Mode: Karaoke Mode (double screen). Coin Karaoke Mode. Song Time Limit. Single Screen Mode (no need monitor, both search song menu and music video display on TV screen.) Page: 3/ 39 ACCESSORIES Please make sure the following accessories are included in the box: Remote Controller,AV Cable,USB cable, User’s guide Page: 4/ 39 PANEL I. Front Panel View 1.Power Button 2.USB1 3.USB2 4.Remote Sensor 5.MIC1 Jack 6.MIC2 Jack 7.MIC1 VOLUME Control knob 8.MIC2 VOLUME Control knob 9.ECHO Control knob 10.TONE Control knob 11.PLAY/PAUSE Button 12.NEXT Button 13.REPLAY Button 14.VOCAL Button 15.KEY- or KEY+ Control Knob II. 16.VOLUME- or VOLUME+ 17.TOMBOL KNGKA(0-9 atau A-Z) 18.PAGE+ or PAGE- Button 19.ARTISTS Button 20.SONG TITLE Button 21.SONG NUMBER Button 22.LANGUAGE Button 23.GENRE Button 24.NEW RELEASE Button 25.MENU Button 26.DELETE Button 27..RETURN Button 28.RESERVE Button 29.OK Button 30.UP/DOWN/LEFT/RIGHT Button Rear Panel View 1、AV-HDMI:Switch Standard Definition and High Definition 2、COIN:Connect to coin acceptor 3、TOUCH SCREEN -COM: connect to touch screen (for touch function) 4、Right Channel Audio Output 5、Left Channel Audio Output 6、OPTICAL:Optical fiber output 7、VIDEO: Video output 8、TOUCH SCREEN: Connect to touch screen, Monitor (for VGA) 9、High Definition Multimedia Interface output 10、LAN: Connect wireless router 11、USB MOUSE: Connect USB mouse or USB 12、USB→PC: Connect to PC Page: 5/ 39 13、POWER: Power in CONNECTION I. AV TO HDMI CONNECTION ① AV OUTPUT CONNECTION (RCA) ② HDMI OUTPUT CONNECTION (HDMI) Page: 6/ 39 II. HARD DRIVE CONNECTION ①Main HD:Connect main HD to purple cable to get into USB mode. ② Sub HD:Connect sub HD to red cable. PS: ONLY HD CONNECTED TO PURPLE CABLE CAN SET USB MODE ON. III. LAN、MOUSE、USB CONNECTION IV. TOUCH SCREEN CONNECTION Page: 7/ 39 HOW TO ADJUST THE TOUCH SCREEN WITHOUT REMOTE CONTROLLER 1. Connect KOD-2800 with touch screen first. 2. Power on KOD-2800 and touch screen then KOD-2800 get into system. 3. Touch screen shows promote “Setup button to access Setup menu, 3, 2, 1…”,at this time, use finger to touch screen any places. 4. There are five “+”(Cross) on touch screen one by one at the Left top, Right top, Left bottom, Right bottom and Middle, touch them sequence one by one, after done and save, it get into Karaoke mode again. PS:At touch screen status if do not touch “+” to adjust or adjust wrong, system will wait 15 seconds to out of touch adjusting and get into Karaoke mode automatically. Page: 8/ 39 REMOTE CONTROLLER NO. 1 BUTTON POWER 2 VIDEO 3 SUNG LIST FUNCTION 1. Power stand-by. 2. Pop up a window to switch KOD to different working mode 3. Song time limit 4. Switch to single screen play mode when it is in double screen mode 1. In double screen play mode: press it to switch between full screen music video and select song menu. 2. In single screen play mode: press it to change machine to [double screen play mode]. The list of sung song SETUP 1. Accesses setup menu at the moment power on player 2. Open and close setup menu in search song mode 5 KEY+,- Adjust key up/down 6 VOCAL MUTE 4 7 8 NEXT 9 PLAY/PAUSE 10 REPEAT 11 LANGUAGES 12 TITLE 13 VOL+, VOL- 14 Genres 15 TOP HITS 16 MENU 17 RETURN Vocal on/ off Mute all music output Stop playing current song and play next song Switch between the function of “PLAY” and “PAUSE” Repeat the current playing song Search a song by language Search a song by song title Increase or decrease music volume Search a song by genres Search a song by top hit list of songs 19 ENTER 1.Open or close menu 2.Open USB Return to the previous Menu. Move cursor by press ; To delete wrong input while typing in English letter or Chinese Stroke. Enter or confirm the selected item 20 ARTIST Search a song by artist 21 RESERVED LIST Open or close list of all reserved songs 22 NEW SONG Search a song by New Song 23 ADVANCE Advance a song in reserved list. 18 24 25 MY FAVOUR● APPLAUSE 28 Applause In first spell or strokes, press this button to delete the wrong input 26 27 Store favour songs SCORE AMBIENCE/● Score on or score off open the AMBIENCE face Page: 9/ 39 29 0-9 30 31 DELETE RESERVE ①Press number buttons to select /search a song directly. ②Input English letters/Chinese Strokes ③Press [0/CHANGE] buttons to switch the function of 1 to 9 buttons among English Letter/ Chinese Stroke / digit number. ① Delete the wrong input. ② Delete song that you select in reserved list Reserve song while playing Page: 10/ 39 INSTRUCTION FOR SYSTEM SETUP MENU 1. Enter setup menu Systems setup menu is within the karaoke interface. It allows you to change settings in regards to the functions of the player itself. Power on the player, press Setup button on the remote control when the VGA screen is black or before a prompt note disappears ------“Press Setup button to access Setup menu. 3, 2, 1….” See below . 1-1 2. Details about system setup menu: ※Press [▲/▼] or “0-5” button to select, press [ENTER]button to confirm. 1. Language: S. Chinese T. Chinese English 2. Upgrade System : update system software 3. Touch Screen Setup: Amend screen recognizably by adjusting the cross cursor. 4. USB Mode: Connect or disconnect to PC 5. Network Setup: set IP address of touch pad 6.UI Mode:3D-UI Classic UI 0. Exit :Exit setup menu Page: 11/ 39 DOUBLE-SCREEN PLAY MODE Search song from VGA screen (touch screen) by Artists, Title, Song number, Language, Genre, Top hits, New Song. Search / select song by finger-touch on the touch screen; please connect a touch screen into the jack 3 and 8 of rear panel of the player. ① Search/select a song by PC mouse. Please connect a PC mouse into Jack 3 on the rear panel of the player. ③Search/select a song by Remote controller. Please connect a VGA monitor into jack 4 or Touch screen into jack 4 and 9 on the rear panel of the player. 1. Hand-Writing/ Strokes Function: 1.1 Hand-writing function: Advance hand-write function makes search song faster and more convenient. System can recognize English and Chinese characters. Hand-write artist name to search songs: In “Artist” menu, you can hand-write artist name on the hand-writing window for searching the artist photo and all songs sung by an artist. See picture:1-1. 1-1 Page: 12/ 39 1-2 1.2 Strokes function: Search song by first few strokes of Chinese songs title(Simple). See below reference:1-3 1-3 2. Slide Screen Function: a. Except "Reserved List", in other list, you can operate sliding screen function. b. There are 2 ways to slide screen: 1.By mouse; 2. By finger-touch. c. Slide and touch function: 1). In the current page, slide your finger/Mouse right and left or up and down to view previous page and next page. 2).Finger-touch [page up] and [page down] button to the first page or the last page if it is in the last page and first page. d. Slide movement direction can be: diagonal, vertical, horizontal. e. Slide mouse icon by PC mouse: left click the mouse and hold it, move the mouse icon to right and left or up or down. 3. Artists: a.Power on the player and VGA Screen, the VGA screen display artists menu, (See picture 3-1). Page: 13/ 39 3-1 b. Chinese singer: search singer by first spell /Hand-writing/ Strokes(Chinese characters). c. Foreign singer: search singer by first spell /Hand-writing. 3.1 Song list of singer: a. Click the picture of singer to enter song list of singer, see Picture 3-1.1 b. Search song by first spell /Hand-writing/ Strokes(Chinese Characters)/word count. c. Under each singer photo submenu, click the singer’s picture in the song list of singer to view singer’s information. 4. Preview / Insert Song's Video: You can preview any song's video immediately once you click on preview icon beside any song title, no matter what song is playing on the TV screen. Preview song's video does not interrupt the music video that is already playing on the TV screen. Press smart [insert] button to replace the current playing song with the song you just previewed. More simple and convenient. In the menu of " ARTIST, TOP HIPTS, SUNG, REFERVED LIST, NEW SONG, Click [ ] , pop up Preview Song's Video window, as show in Figure 4-1 and Figure 4-2 Click "insert" button, as shown in Picture: 4-2, system stop the current playing song and play the preview window song, operation simple and convenient. Page: 14/ 39 4-2 5. Title: Input the first spell of song title to search song. a. Click the icon of Title to enter all songs playlist, as shown in Picture 5-1 5-1 b. Search song by first spell /Hand-writing/ Strokes(Chinese Characters)/word count. c. Search song by reverse view singer: In the “title, song number, language, genres, top hits, sung list, reserved, New Song” list, click the button of on the left side of singer name to view all songs sung by this singer. 6. Song Number: Input song number to search song a. Click the button of Number to enter number list, as shown in Picture 6-1 Page: 15/ 39 6-1 b. Number you input is 6 digits. c. After input effective number, related song number and title will be displayed in the song list 7. Language: Search song by language a. Click the icon of Language to enter language list, as shown in Picture 7-1. 7-1 b. Search song by first spell /Hand-writing/ Strokes(Chinese Characters)/word count. 8. Genres: Search song by genres. a. Click the icon of Genres to enter genres list, as shown in Picture8-1. Page: 16/ 39 8-1 9. Top Hits: Search song by top hits. a. Click the icon of TopHits to enter top hits list, as shown in Picture9-1. 9-1 10. New Song: The newest added song will be listed on this submenu. New Song menu display only 200 newest added songs history. If more than 200 songs added, the system will automatically empty the earliest of songs. a. Click the icon of New Song to enter new song list, as shown in Picture10-1. Page: 17/ 39 10-1 11. Reserved list: In the reserved list, you can change the priority ordering, delete the song you want to delete ※Click on a song title in the songs progress bar, the song will be moved forward 5 ranks automatically in reserved list. a. Click the icon of ReservedList to enter reserved playlist, as shown in Picture 11-1 11-1 b. Priority play: select a song, click or press [ADVANCE] or [ENTER] button on the remote to priority. c. Move priority: use the mouse or finger-touch to move the selected song to the arbitrary line d. Select a song, click or press [delete] button on the remote to delete song from the reserved list. 12. My Favour: Input number (11 digits)and reserve your favorite songs under the folder of your password, so that you can easy fast to search and play your favorite songs by input number(11 digits) next time. It is empty list if you do not create password of Favour folder when you press the button of “ “. Page: 18/ 39 a. In “ ” item, input number(11 digits), follow by press [OK] button to save it. see picture 12-1 12-1 b. In all types of song list, click “ ” button to store the songs you like, all selected songs at this steps will put into your favorite song folder. See picture 12-2 12-2 c. Click [My Favour] button, see picture 12-1, you can view/play/delete all your favorite songs you had reserved after input number (11 digits) Page: 19/ 39 12-3 13. SUNG SONG: Records the reserved songs; the song reserved most will automatically arranged priority at the first rank. SungList menu display only 300 reserved songs history. If more than 300 songs reserved, the system will automatically empty the earliest of songs. a. Click the icon of SungList to view reserved song’s history, as shown in Picture13-1. 13-1 14.Video Function: ※KOD-2800The latest advanced provides a brand new humanized face for search song. The music video of the current playing song display on the 1/4 part of VGA screen (on the top right corner of VGA Screen). The search song operation menu displays on the other part of VGA screen. They won’t interrupt each other. a. Click the video on the top right corner of screen, for example the following picture 14-1. The video will appear on the full screen. (See picture 14-2) Page: 20/ 39 14-1 b. Click any position of the screen to return back to screen interface like picture 14-2 and 14-1 14-2 c. In picture 14-3, click [Pic in Pic] button to switch to music video playing face, in the meantime you can operate function bar, (See picture 14-3) 14-3 Page: 21/ 39 15. Music And Movie: 15.1 Music a. Click the icon of [Pic In Pic], at the bottom right corner display the icon , click this button, Pop up a hidden function bar at the right of the screen, as shown in Picture15-1 15-1 b. Click the button of [Music] in the hidden function bar, pop-up music song list, as shown in Picture15-2. b.1 In the root directory of hard disk, create a folder named “Music”. b.2 Copy the mp3 files to the folder “Music” The format of music file:MP3 15-2 15.2 Movie: a. Click the button [Movie] from the hidden function bar, pop-up Movie list. As shown in picture 15-3". b. In the root directory of hard disk, create a folder named “Movie”. b.1 In the folder of “movie”, create sub folder named “code for movie kind_movie name”. There are 6 code of movie kind: Horror: 1 Drama:2 Comedy:3 SCI-FI:4 Action:5 Cartoon:6 Last put the movie file into the sub folder. For ex. Movie” THE LOST WORLD JURASSIC PARK” it belongs to Horror kind, the sub folder Page: 22/ 39 should be named “1_THE LOST WORLD JURASSIC PARK”. b3. If the movie file has several chapters, you must add 1-9 or a-z to mark the order of playing. The format of movie file: avi, mpg, dat, vob, mkv. Foe ex.: The movie “THE LOST WORLD JURASSIC PARK” has two chapters, the movie files path see below example for reference. G:\movie\1_ THE LOST WORLD JURASSIC PARK\THE LOST WORLD JURASSIC PARK A.vob G:\movie\1_ THE LOST WORLD JURASSIC PARK\THE LOST WORLD JURASSIC PARK B.vob 15-3 16. Setup Click the icon of [setup], as shown in Picture16-1 16-1 a. [Company] [Traffic] [Workshop]: Click one of them to mute current playing music and start to play related scene sound. Click [Off] to cancel playing scene sound. b. [Themes]: Click this icon to switch VGA Screen face to different face in different languages (Chinese simple---Chinese traditional---English) c. [Advance]: Click it to Delete songs or Power Off, Copy, WIFI setup and Classic/3D UI. Notice: Without plug in USB drive, VGA screen prompts ”please plug in USB” after click copy icon. As shown in Picture16-2 Page: 23/ 39 16-2 1) Delete song: Please read the <How to delete song> for more information 2)Wifi Setting 1、Wifi Mode: Select to“ON”to open USB WIFI function after inserted USB WIF to KOD. (Wifi Mode defaulted to“OFF). Notice: If USB WIFI do not inserted into KOD, system will pop-up menu of prompt “please insert USB WIFI”; as below picture 16-3 2、Network ID: SSID defaulted to “SJKOD-001”, there are digits from “0-9” to change SSID for you. 3、Finish setup Network ID, press “Enter” button on remote controller to save WIFI setting. 16-4 3)Copy:Copy songs from KOD to USB drive. Plug in USB drive to KOD->Power on KOD and entry to system->Select songs which need to copy to USB->Open Reserved List to check the songlist ->Click “Advance” icon in the SETUP menu->Click Page: 24/ 39 Copy item to start copying, VGA screen will pop up the progress bar “copying”, after done, the copied songs will be named as KOD machine recognized files to USB drive; or you can click “cancel” button to cancel copy. 4)lassic/ 3D UI: ①、Click "Classic /3D UI” in the "Advanced”, it will pop-up dialog box of "Whether to entry the 3D interface", click "enter" to confirm, click the "return" to cancel; ②、After to 3D interface, it will pop-up dialog box of "Please input the password of 8 digits", defaulted password is: 88888888 ③、Modify the password of “Classic/3D UI”: create a TXT file renamed to “3D-CLASSIC UI.txt” in the hard disk root catalog then input 8 digits as password and directly save in this TXT file. 5)Power off: Input 8 digit password (Default password: 888888). Then click the button of [ENTER], system will automatically power off. 17. AMBIENCE: ※In playing or singing, add entertainment atmosphere a. Click the icon [Ambience] to add different images to on-screen display and extra cheerful sounds for more exciting atmosphere of singing, as shown in Picture17-1 17-1 b. Click “cheer, catcall, flower, expression”, the TV screen will also display the corresponding icon c. "Applause, drums, whistle, trumpet", click one of them to add related extra cheerful sounds for more exciting atmosphere of singing. d. Score: the first click, open score, the second click, close score. In open score mode, system will give a score after you sing a song by microphone. e. Blessings: click it to hand-write blessing words and click [Send] to display them on TV screen. 18.REPLAY: Replay the current playing song 19.PAUSE/PLAY: While the player is playing, press this button to pause the playing song, press this button again to resume playing. 20.VOCAL: Click it to switch MTV song's vocal ON /OFF 21.NEXT: When playing a song, click this icon to stop current playing song and to play the next song you have reserved or next Random-play song. 22.MENU: In “Pic In Pic” mode, press the button of [MENU] to back the main menu. Page: 25/ 39 In the main menu, press the button of [MENU], automatically switch to artist list. COIN KARAOKE MODE I. Preset Settings For Coin Karaoke Mode In karaoke mode, press [POWER] button on the remote controller, it shows menu of 4 items: “1.Power Off? 2. Coin Mode On/Off 3. Song Time Limit 4.Switch To Single”. As shown in Picture18-1 18-1 a、Select "2.Coin Mode On/Off", input password and press [enter] button by remote controller to get into Coin mode setting. (Default password is 88888888), as shown in Picture 18-2 18-2 Coin Karaoke mode setting: 1. Karaoke: Close 2. Coin Karaoke: open 3. Coin Setup: 3 Press [left][right] button to setup coins number that how many coins for a song, (1-9 coins can be selected). 4. Total Income: 0 Coins, it shows total income coins be collected by the KOD. 5. Total Income Zero Clearing: press [enter] button to zero clearing the record. 6. Present Income Zero Clearing, press [enter] button to zero clearing the record. 7. Exit Setup ●The above parameters are saved once power off the machine Page: 26/ 39 II. Coin Karaoke Mode While coin karaoke mode is open, TV screen and VGA display: “songs: * */3” The first “*”: means the number of available select songs The second “*”::The number of remaining coins (N-ary) /3 is the number of coins pre-setting for one song. Notice: The above parameters are saved once power off the machine. A. How KOD works without putting any coins in: 1、Power on KOD and entry to system, the VGA default displays Artist list, the TV screen display: “songs:0 0/3”. as shown in Picture 1 and 2. in Picture :1 in Picture:2 2、The KOD Randomly play each song for 30 seconds only then stop and play next. 3. If you do not put in coins and operate to select songs, the screen display a prompt “please put coins in”. It is not allowed to play whole songs without coins. B. How KOD works with coins inserted. 1. You can search/select/reserve any songs by the ways of Artist, Song Title, Song number, Genre, Language, Top Hits and New songs by Touch screen or remote controller, if the number of inserted coins are equal to or greater than the number of pre-setup coins for each song. For example: Preset 3 coins a song, when you insert 6 coins so you can order two songs, the screen display " Song1 0/3 ", as shown picture in Picture :1 in Picture:2 2. System will not deduct the remaining coins when playing the selected song at first 30 seconds. seconds, system will automatically deduct the number of available select songs. Page: 27/ 39 After playing 30 3、Press [Replay] button within 30 seconds will not deduct coin; after 30 seconds playing, press [Replay] button , system automatically deduct the number of available select song 4. When the number of reserved song is equal to the number of available select songs , after playing selected songs 30 seconds, the number of available select songs will be deducted automatically once you press[replay] button, system also cancel a reserved song from Reserved List. 5. Operating select song menu by remote controller. Default settings of digit buttons is to type in English letters. Press [0/Change] the first time to switch to Chinese Stroke function. Press [0/Change] the second time to display a number 1-6 or 1-8 beside the song titles or artist pictures, so that you can press digit buttons on the remote controller directly to select a corresponding song. Press [0/Change] the third time to return to default setting (for type in English letters). ※Modify the password of entry to “coin mode” operation steps: 1)Create a text file, type-in the password you like (the password must be 8 digits) and save it.. 2)the text file named “coin”, extension “.txt” doesn’t modify. 3)Copy the file “coin.txt” to the root of hard disc.(Root: the same level as the LIST folder and so on) Note: Coin Karaoke only works when the KOD is in double-screen play mode. Page: 28/ 39 SONG TIME LIMIT I. Setup Of Song Time Limit: 1、In karaoke mode, press [POWER] button on the remote controller, it shows menu of 4 items: “1.power off? 2.coin mode on/off 3 song time limit 4 switch to single”, as shown in Picture. ] and [enter] button or [3] button to select “3 song time limit”, input 2、Press [ password(defaulted password:88888888 ), then press [enter] button, as shown in Picture. II. About Song Time Limit Menu: 1. Time Limit: Press [enter] button to open/close the menu of Time Limit. 2. Time Limit:1-24 hour(defaulted Time Limit:1 hour) 2.1 Press [left][right] button to select time of limited. 2.2 After the selected limited time end, system can’t select any songs till set limited time again to activate select song function. . 3. Total Play Press [enter] button to zero clearing 4.Exit: Exit the menu of Song Time Limit. Note: Song Time Limit menu is active only if the KOD works in double-screen play mode. Page: 29/ 39 SINGLE-SCREEN PLAY MODE I. How to set single-screen play mode: 1、In karaoke mode, press [POWER] button on the remote controller, it shows menu of 4 items: “1.power off? 2. coin mode on/off 3 song time limit 4 switch to single”, as shown in Picture. 2、Press [ ] and [enter] button or [4] button to select “4 switch to single”, pop up the prompt, press [enter] button to entry, as shown in Picture. II. Function of single-screen play mode ●The song that select in single or double screen mode can continue to play each other. In single screen mode, you can still select song from touch screen if touch screen is connected to the KOD. ●There is a number for each item shown on TV screen. You can select the corresponding number to enter an item or press [ ] directly on remote controller to move cursor to the item you choose then press [ENTER] to access. ●At single mode, system defaulted to Artists but you can press [return] button on the remote controller to back to the main menu. ●You can press [Language] [Title][ Genres][ Top hits][Artist][ New Song] button to enter into the corresponding menu. 1、ARTISTS: ] to select “Artist” then press [ENTER] or [1] directly to enter “Artist” menu then you Press [ can select a song according to the artist’s name. 2、TITLE: 2.1 Press [ ] to select “Title” then press [ENTER] or [2] directly to enter “Title” menu. Input the initial letter of each word of song title to search a song. 2.2For example: song title is “Pretty Girl”, you can input initial letter of each word “PG” then press [ENTER] to search. 3、LANGUAGE: Press [ ] to select “Language” then press [ENTER] or [3] directly to enter. 4. GENRE: Press [ ] to select “Genre” then press [ENTER] or [4] directly to enter. 5. TOP HITS: Press [ ] to select “Top Hits” then press [ENTER] or [5] directly to enter. Tips: Press [RETURN] to return to the previous menu Page: 30/ 39 6. NEW SONG: Press [ ] to select “New Song” then press [ENTER] or [6] directly to enter then select a song from the latest updated songs list. 7. OPERATION OF OTHER BUTTONS: 7.1 Power Power on or off 7.2 Video Press [Video] and [ENTER] button to switch to Double screen mode. 7.3 Song list ] button to move the cursor in song list, press [PLAY/PAUSE] or [RESERVE] Record sung song, press [ button to play or reserve song 7.4 Score Open score function, after the song finished playing, system will automatically score 7.5 Reserved List Press [Reserved List] to enter reserved songs list. Press [ ] to select a song in reserved list then press [ADVANCE] or [ENTER] directly to take priority to play after the current playing song. Page: 31/ 39 How to add up songs I. Format of song-file’s name: song-file’s name format: Title_SingerName_Language_Pinyin_Length_Genre_VocalTrack_Volume.MidiaType 1、Title & SingerName:use text directly. 2、Language:use code(descript in follow) marderin→1 condonese→2 taiwanese→3 english→0 japenese→4 korian→10 other language→27 3、Pinyin:first character for each word of song title. 4、Length:Length of song’s title. 5、Genres:use the code(descript in follow) holiday→1 oldies→2 country→3 children→4 Chinese special→5 duet→6 dance→7 disco&rock→8 popular→9 6、VocalTrack:use code(descript in follow) vocal in right audio channel(avi,dat,mpeg1) →0 vocal in left audio channel(avi,dat,mpeg1) →1 vocal in right audio channel of single track(vob,mpeg2,mp4) →4 vocal in left audio channel of single track(vob,mpeg2,mp4) →5 vocal in the 1st track of multive tracks(vob,mpeg2,mp4) →3 vocal in the 2nd track of mulitive tracks(vob,mpeg2,mp4) →2 7、volume:volume range from 0 to 99, 50 or 0:normal volume 1 to 49:reduce volume 51-99:increase volume. 8、sample : Original songs 1.singers’ name must separate by ‘&’ if tow or more singers; 2.language,genres,vocal,volume must use code. Use ‘#’ or ‘0’ if no information. 3.options seperate by “_”. 4.media type must lowcase letters. Page: 32/ 39 Renamed songs’ file notice: II. Step of adding up songs: Copy these files to U-disk or Hard disk in root. Plus the U-disk or Hard disk into KOD-2800 USB port.,then turn on the machine. After the welcome picture,system will find the songs that need to be added and show the notice message. Press [Ok] will perform the action of adding songs. Press [Back] will cancel the action and enter KARAOKE . Page: 33/ 39 Press [Ok],the screen will show the message like the follow picture。 After the action,the system will open KARAOKE system,and the new songs will issue in the first of “New release”. Notice: 1、 If there are more than 200 songs in “New release”,the fresh songs will not show in this item. 2、The new songs’ code will be set between 900000-999999. Page: 34/ 39 HOW TO DELETE SONG ●Delete songs in playing mode 1、Reserve the songs that you want to deleted 2、click“ Please contact your supplier for the default password of the software and the method of changing password. ”item Click Input password Click Click [Ok] button, finish deleting songs. Note: Once finishing delete songs from reserved list, the songs files will be deleted from the hard drive. Before doing above steps, please make sure the songs in the reserved list are the songs you no longer need. Page: 35/ 39 HOW TO USE PAD 1. Uninstall the “CimovKtv.apk” in MID touch pad first. 2. Used USB cable connect MID pad to PC first, open the USB mode. 3. Put the new software “CimovKtv.apk” to MID pad, delete the files “singer.db”, “songs.db” in MID pad root catalog. 4. Disconnect USB mode, then install “CimovKtv.apk” in MID pad. 5. You will find the icon of “CimovKtv” on pad. 6. Click to open the tool, Page: 36/ 39 7. Click the icon of signal to search the wireless router. 8. Input Host IP address: 192.168.0.1(if use USB Adapter)or 192.168.1.18 (if use Wireless Router) Press “LIST” to search wireless router or you can input the WIFI SSID directly 9. Select to the SSID you wanted and input password. SSID and passwords is the same as your set in wireless router before. 10. Click “Save Setup” and “Test Link” to connect MID to KOD. 11. After connect, MID will got song data from KOD of HD auto. Then you can operate MID to control KOD. Page: 37/ 39 TROUBLE SHOOTING When something goes wrong, check the corresponding check items and adjustment method to solve the problem; if there are any abnormal cases happened during using, pls contact the dealer service. Phenomenon ? Remote controller doesn’t work ?No picture, no color, the picture is rolling vertically ? No sound. Touch screen doesn’t work Solution Remove the obstacles in the path between remote controller and KOD. Make sure remote controller aim at the KOD player Make sure the batteries are inserted correctly and still power. Make sure connecting cables are not defective. Make sure everything is connected firmly and properly. Make sure all your components are turned on. Make sure all the components (amplifier, TV, KOD machine etc) are setting right. Make sure settings of the KOD match your TV system (PAL/NTSC/AUTO) . Make sure audio cable is connected firmly and properly; Make sure connecting cable is not defective ; Make sure all your components (TV, amplifier, the KOD) are turned on and volume setting is not in minimum.; Make sure all the components (amplifier, TV, the KOD etc) are setting right. Reconnect touch screen then make sure the two touch screen cable is connected firmly and properly between the KOD player and touch screen. Enter system setup menu to amend screen recognizable by pressing four times on the cross cursor on the touch screen. Contact supplier for steps. SAFETY INSTRUCTIONS: ● ● Before connecting, operating, or adjusting this product, please read this instruction completely carefully. Please follow all instructions. Please keep this instruction for future reference. Do not shut down the machine when the system indicates searching. Press [POWER] button on remote control before switch off [POWER]button on front panel of KOD machine. To reduce the risk of fire or electric shocks, do not expose the machine to rain or moisture. Do not use it near water. Don’t put anything with water content on top of this unit. Please do not open the top cover. Leave all servicing to qualified maintenance personnel. Please keep this unit POWER PLUG OFF in case of any damage when you are not using it. When KOD machine connect with external components(such as external control-board, touch-screen, hard disc, display monitor, TV etc), make sure their connections are firm. Please make sure all components are connected firmly and properly before turning on KODmachine. Please power off when the machine has a problem, then restart it after several minutes. Page: 38/ 39 ● Provide appropriate aeration for the machine when the KOD machine has been operating for a long time. SPECIFICATIONS Audio Characteristics (V)Output Voltage 2.0(+0.2 -1.0) (dB)Frequency Response 20Hz-20kHz ±3dB (dB)Signal/Noise Ratio (dB)Dynamic Range ≥70(1kHz) (dB)Distortion And Noise ≤-60(1kHz) (dB)Channel Separation Video Characteristics NTSC Video Out Up-P 1.0±0.2 Power Voltage 75Ω AC 100-250V/50-60Hz 60W MAX Power Wattage Unit Size Weight(no hardware included) Dimension Interface Max. Capacity Hard Drive 430X76X318 3KG 3.5” SATA No limit(>More than 2000G need be divided into multiple partitions) FAT32/NTFS File System Subarea USB ≥70(1kHz) ≥360 Horizontal Definition TV System (Ω)Output Impedance POWER &Appearance ≥80 Primary partition/ extended partition Format USB2.0 Page: 39/ 39