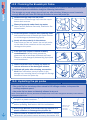
1
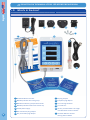
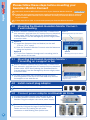
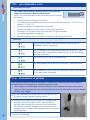
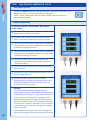
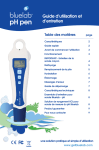
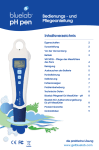
Care and use guide Stay connected 24/7. Monitor, data log and remotely view pH, conductivity and temperature readings Only one connect stick required for multiple devices Contents English page Features 3 page pH calibration 8 Bluelab Guardian Monitor Connect 3 Placement of probes 10 What’s in the box? 4 Set alarms (optional) 11 IMPORTANT - Bluelab pH Probe care 5 Cleaning the conductivity/ temperature probe 13 Mounting the Guardian Monitor Connect Cleaning the pH probe 14 6 Hydrating the pH probe 14 Install correct plug adaptor 6 Troubleshooting guide 15 Connect power adaptor and Bluelab pH Probe 6 Technical specifications 16 Power up 7 Associated Products 17 Select the desired conductivity unit Product guarantee 18 7 Limitation of liability 18 Contact details 18 Select the desired temperature unit 7 Select the desired brightness level of the LED displays 7 Congratulations on purchasing the Guardian Monitor Connect The Guardian Monitor Connect is not only a consistent indicator of the desired levels of pH, conductivity and temperature of your nutrient solution, it also data logs these critical parameters to your computer for you. 2 Features Compatible with Bluelab Connect Stick and Bluelab Connect Range Extender View data and current status remotely via Google Docs (A computer with permanent internet access is required) Free Bluelab Connect Software available online ‘Plant Safe’ green LED display Visual alarm for both high and low settings Large easy to read displays No calibration required for conductivity or temperature Selectable units for conductivity and temperature Simple push button pH calibration Water resistant design Greater tolerance to RF/electronic interference provided English Data logging capability (ONE Bluelab Connect Stick is required, sold separately) International power supply Adjustable display brightness What is Plant Safe? Green LED’s are safe for continued growth during a plant’s fruiting stage when hours of darkness are required. Guardian Monitor Connect Bluelab Conductivity/ Temperature Probe Conductivity display Conductivity units button Temperature display Temperature units button pH display pH calibration button Conductivity/ temperature probe shroud Display brightness button Bluelab pH Probe Conductivity LEDs Temperature LEDs pH calibration LEDs pH probe storage cap Alarm on LED Alarm button Power input Down button Up button pH probe BNC connector ATTENTION 3 If it dries, it dies! Keep your pH probe tip wet at all times to avoid permanent damage PLEASE FOLLOW THE MANUAL STEP BY STEP BEFORE FIRST USE BEGINS English 1.0 What’s in the box? Please verify the box contents from the information below. 5 6 7 8 9 10 13 1 2 3 11 4 12 1 Guardian Monitor Connect 9 European plug adaptor 3 Bluelab Conductivity/Temperature Probe 10 4 x mounting fasteners 4 Bluelab pH Probe holder with suction cup 11 2 x cable ties 5 5V DC power supply 12 pH 7.0, pH 4.0 and EC 2.77 single use calibration solution sachets 6 North American plug adaptor 4 8 UK plug adaptor 2 Bluelab pH Probe with storage cap 7 NZ / Australian plug adaptor 13 Guardian Monitor Connect Getting Started Guide English 2.0 IMPORTANT - Bluelab pH Probe care The Bluelab pH Probe is the only part of the Guardian Monitor Connect that should ever require replacing. pH probes DO NOT last forever. They age through normal use and will eventually fail. The life time of a pH probe depends on the environment it is used in and the way that it is treated. To receive a long life from your pH probe, please ensure you follow the guide below. pH probes contain glass and are therefore FRAGILE. With good care, they will give a long service life. Bluelab pH Probe pH probe holder suction cup pH probe tip BNC connector pH probe storage cap Glass tube inside plastic barrel Glass bulb DO NOT let the pH probe tip dry. IF IT DRIES IT DIES! DO NOT bend the probe; this will break its internal glass tube. DO NOT knock the probe; this will break its internal glass tube or external glass bulb. DO NOT plunge a cold pH probe into a hot liquid - sudden temperature changes can crack the glass and permanently damage the probe. DO NOT immerse in oils, proteins or suspended solids that will leave a coating on the glass bulb. DO NOT ‘kink’ or bend the lead sharply. DO NOT attempt to lengthen the lead on the pH probe. DO NOT wet the BNC connector at the end of the lead. Always remove pH probe storage cap before use 1. Grip the top of the cap and gently twist the base one rotation clockwise to loosen slightly. 2. Next slowly slide the cap off the pH probe. DO NOT completely remove the base of the cap from the top of the cap. 3. Store the storage cap in a safe place. Storing the pH probe When storing the pH probe, the pH probe tip must be kept moist. To prepare the pH probe for storage, add enough Bluelab pH Probe KCl Storage Solution to the storage cap so the probe tip is covered. Then replace the cap and store in a secure place. DO NOT use RO (Reverse Osmosis), Distilled or De-ionized water. Pure water changes the chemistry in the reference, causing the probe to die. Removing pH probe storage cap If the pH probe has been accidentally allowed to dry out; 5 The pH probe must be ‘hydrated’ for 24 hours in KCl storage solution (never use RO, Distilled or De-ionized water). Following this; carry out a calibration to check if the probe has already suffered permanent damage. Ensure probe tip is covered by the KCl storage solution in cap Please follow these steps before mounting your Guardian Monitor Connect English A Note the 4 character KEY CODE on the rear of your Guardian Monitor Connect. C Follow steps 3.0 to 12.0 to mount and operate your Guardian Monitor Connect. 3.0 1 2 Mounting the Bluelab Guardian Monitor Connect if wall mounting Option 1 Select a suitable location that is less than 2 meters from your reservoir, and less than 1.5 meters from an electrical mains outlet. NOTE: Avoid placing the Guardian Monitor Connect where it can be damaged by direct sunlight, water or nutrient salts. Mounting keyholes top and bottom Option 1 a) Install two fasteners (top and bottom) to the wall 172mm / 6.¾” apart. b) Slide the Guardian Monitor Connect onto the fasteners using the keyholes. Option 2 a) Fix the four fasteners through each mounting hole in each corner of the case. 3.1 Option 2 Mounting holes top and bottom Mounting the Bluelab Guardian Monitor if mounting on a support or bar 1 Select a suitable location that is less than 2 meters from your reservoir, and less than 1.5 meters from an electrical mains outlet. NOTE: Avoid placing the Guardian Monitor Connect where it can be damaged by direct sunlight, water or nutrient salts. 2 Fix each of the cable ties provided through the small mounting holes in the top of the case and wrap around the support or bar and secure. 4.0 Cable ties fixed through small mounting holes around a support or bar. Install correct plug adaptor 1 Select the appropriate mains plug adaptor for your country. 2 Connect the plug adaptor to the power supply. 5.0 6 key code: abcd B Follow the getting started instructions supplied with the Bluelab Connect Stick to install the Bluelab Connect Stick, Bluelab Connect Software and add your Guardian Monitor Connect to your computer. Connect power adaptor and Bluelab pH Probe 1 Connect the power adaptor into the base of the Guardian Monitor Connect where ‘Power Input’ is labelled. Plug the adaptor into mains power supply. 2 Connect the pH probe to the Guardian Monitor Connect by lining up the lugs of the BNC fittings. Fasten securely by pushing the pH probe connector on and twisting one quarter turn. Inserting Twisting Attached English 6.0 Power up 1 Switch on power adaptor at the mains. 2 When power is applied the Guardian Monitor Connect will complete a display test sequence. 7.0 Select the desired conductivity unit Conductivity readings can be displayed in EC, CF, TDS or ppm 700. The selected unit is indicated by one of the 3 LEDs next to the conductivity window. When the EC/CF LED is on, the Guardian Monitor Connect is displaying conductivity in units of EC or CF. If there is a decimal point present in the conductivity display, the units are EC. If there is no decimal point the units are CF. 1 Press and hold the conductivity unit button and after 3 seconds it will change to the next unit indicated by the glowing LED. 2 Release. 3 Repeat steps 1 and 2 until the desired unit is selected. 8.0 Select the desired temperature unit Temperature readings can be displayed in either degrees celsius (°C) or degrees fahrenheit (°F). The selected unit is indicated by one of the two LEDs next to the temperature window. 1 Press and hold the temperature unit button and after 3 seconds it will change to the next unit indicated by the glowing LED. 2 Release. 3 Repeat steps 1 and 2 until the desired unit is selected. 9.0 Select the desired brightness level of the LED displays These can be adjusted to best suit the light levels of the environment. There are 8 levels of ‘brightness’ that can be selected. 1 7 Press and hold the brightness button and at the same time press either the up or down buttons to change the brightness. Brightness levels are shown in the pH window. 1 = least bright, 8 = brightest 10.0 Calibration English pH calibration is required before first use to ensure that the first reading is accurate. • The Bluelab Conductivity/Temperature Probe DOES NOT require calibration. • The pH of the Guardian Monitor Connect DOES require calibration. For accurate pH readings the pH probe is cleaned and recalibrated when: • The reading is different to what you were expecting. • The Guardian Monitor Connect is reset to factory default. • The pH probe is replaced with a new one. • It has been a month since the last successful calibration and the calibration indicator lights are flashing. When calibrating the pH after first use the pH probe needs to be cleaned. See pH probe cleaning in section 14.0. For best pH calibration pH reading accuracy is dependant on the accuracy and age of the calibration solutions used, and use and cleanliness of the pH probe tip. • Ensure the pH probe has been cleaned and rinse the pH probe with clean water between calibration solutions to reduce contamination of the pH solutions. • Only fresh uncontaminated solutions should be used. • Calibrate the pH at the same temperature as the solution to be measured. • ALWAYS calibrate the pH probe with pH 7.0 then pH 4.0 or pH 10.0. NOTE: The conductivity/temperature probe does not need to be calibrated, but must be cleaned to remove any build up of nutrient salts. See Section 13.0. The pH calibration involves cleaning the pH probe tip and then calibrating in TWO SOLUTIONS. If a reading below pH 7.0 is expected, use pH 7.0 and pH 4.0 calibration solutions. If a reading above pH 7.0 is expected, use pH 7.0 and pH 10.0 calibration solutions. Follow the steps on the following page for Guardian Monitor Connect pH calibration. Storage and use of calibration solutions • Always place the lid back onto the bottle after use or evaporation will occur rendering the solution useless. • DO NOT measure directly into the bottle. Tip a small amount into a clean container and discard after use. • Never add water to solutions. • Store in a cool place. pH reading accuracy is dependant on the accuracy and age of the calibration solutions used, and use and cleanliness of the pH probe tip. 8 10.0 pH calibration cont. English To calibrate the pH 1 Clean pH probe tip. See section 14.0 (the pH probe does not require cleaning before the first use). 2 pH 7.0 calibration a) Prepare a small amount of pH 7.0 calibration solution in a container. b) Ensure the Guardian Monitor Connect is plugged in and in operation mode. c) Rinse the pH probe tip in fresh water, shake off excess water and place in the pH 7.0 calibration solution. Wait at least one minute for reading to stabilize. d) Press and hold the pH cal button for a few seconds until ‘PH’ and ‘CAL’ appear in the windows, then release the pH cal button. The ‘7’ LED will glow green. All three windows will return to monitoring mode with all current values being displayed. e) If ‘Err’ is displayed see the troubleshooting guide on section 16.0. clean the pH probe pH 7.0 calibration solution rinse in tap water pH 4.0 or pH 10.0 calibration solution 3 9 pH 4.0/10.0 calibration a) Prepare a small amount of pH 4.0 or pH 10.0 calibration solution in a container. b) Rinse the pH probe tip in fresh water, shake off excess water and place in either pH 4.0 or pH 10.0 calibration solution. Wait at least one minute for reading to stabilize. c) Press and hold the pH cal button for a few seconds until ‘PH’ and ‘CAL’ appear in the windows, then release the pH cal button. The 4/10 LED will glow green. All three windows will return to monitoring mode with all current values being displayed. d) If ‘Err’ is displayed see the troubleshooting guide on section 16.0. e) The Guardian Monitor Connect is now calibrated and ready for use. Successful pH 7 and pH 4 calibration 10.0 pH calibration cont. pH calibration LEDs English The LEDs next to the pH window will let you know the status of calibration. See the table below. NOTE: The pH probe and hence calibration will eventually fail due to; • Contamination and age of pH probe. • pH probe used to measure solutions at temperatures above 50 °C (122 °F) or below 0 °C (32 °F). • pH probe exposed to aggressive chemicals. • Internal damage to the pH probe from rough treatment. • Damage to the cable of the pH probe from rough treatment. • pH probe repeatedly drying out. • Moisture getting inside the BNC connector on the pH probe cable. pH LEDs Using factory default calibration values. Both LEDs off. Readings may be unreliable. pH 7 calibrated OK. Using factory default for pH 4/10. pH 7 calibrated OK. Using factory default for pH 4/10. Readings may be unreliable. pH 7 and pH 4 or pH 10 calibrated OK. 30 days passed since last full calibration - calibration due. If 7 is flashing and 4/10 is off, calibration is also required as 4/10 was never calibrated. 11.0 Placement of probes Both the Bluelab pH Probe and Bluelab Conductivity/Temperature Probe require submersion in the liquid for a measurement to occur. • Do not pour concentrated nutrient solution or pH adjuster directly onto probes when in the reservoir, as very strong acid may damage the probes or your alarms (if set) may trigger. 10 1 Fit the (optional) pH probe holder to the stem of the pH probe using a gentle twisting motion. 2 Place the pH probe into the reservoir and push the suction cup onto the side of the reservoir but far enough down so the pH probe tip is in the solution. The holder prevents damage to the pH probe from banging onto the side of the reservoir with movement of the solution. Place the conductivity/temperature probe into the reservoir selected. 3 English 12.0 Set alarms (optional) The alarm function warns you when the solution deviates from the desired levels you have chosen for each measurement. When an alarm condition is present, the display of the affected measurement will flash. If the measurement changes back to within the limits you have chosen, the flashing will stop. Even though the resolution of the Guardian is 10 ppm / TDS, the alarms will set only in 50 ppm and 70 ppm increments. There are two ways to set the alarm, ‘quick-set’ or ‘detailed-set’. Alarm ‘quick-set’ This allows you to quickly set the ‘alarm HIGH’ and ‘alarm LOW’ values for all of the three measurements. The table below shows the values that are pre-set when ‘quickset’ is used. NOTE: Before you use the quick-set function, the solution in the tank/reservior must be adjusted to the desired/actual levels for all three parameters and the levels displayed in each of the windows. If this is not done you should use the alarm ‘detailed-set’. Alarm low Alarm high Conductivity actual value – 2 CF / 0.2 EC 100 TDS 140 ppm actual value + 2 CF / 0.2 EC 100 TDS 140 ppm Temperature actual value – 3 °C / 5 °F actual value + 3 °C / 5 °F pH actual value – 0.5 pH actual value + 0.5 pH To activate the ‘quick-set’ alarm; 11 1 Press and hold the alarm button until ‘AL H’ is displayed in all three windows. Release the alarm button. 2 Press the brightness button once. 3 All three windows will display Auto for 1 second and then SAVE will be displayed in the conductivity window. The alarms are now auto set and the alarm mode will be turned on. The alarm LED will glow. 12.0 Set alarms (optional) cont. Turn alarm ON/OFF English Press the alarm button to change between alarm ON and alarm OFF. When the alarm is ON the alarm LED will glow. NOTE: If you press and hold the alarm button you will enter the alarm setting mode. Alarm ‘detailed-set’ To set the detailed ‘alarm HIGH’ and ‘alarm LOW’ values; 1 Press and hold the alarm button until ‘AL H’ is displayed in all three windows. 2 Release the button and the current ‘alarm HIGH’ values are displayed in each window. 3 To set conductivity alarm high value, press the conductivity unit button then the up and down buttons to change its value. 4 To set temperature alarm high value, press the temperature unit button then the up and down buttons to change its value. 5 To set pH alarm high value, press the pH unit button then the up and down buttons to change its value. 6 Press the alarm button to now select the low alarm values. 7 Set the low alarm values the same way as you did the high alarms. 8 Press the alarm button. SAVE is briefly displayed in the conductivity window and the Guardian Monitor Connect will return to its normal monitoring mode. NOTES: To review current alarm settings without changing the values, repeatedly press the alarm button to step through the high and low alarms. If you want to exit the alarm settings mode without keeping any changes you have made DO NOT press any keys. The Guardian Monitor Connect will ‘timeout’ and return to its normal monitoring mode without saving any changes after 1 minute. The software will prevent you from setting low alarm values higher than the high alarm values. 12 13.0 Cleaning the conductivity/temperature probe Cleaning the Bluelab Conductivity/Temperature Probe English Cleaning the conductivity/temperature probe periodically ensures accurate readings. The conductivity/temperature probe is cleaned using the Bluelab Conductivity Probe Cleaner, or “Jif” a trade name for a liquid scourer cream used in home bathrooms and kitchens. Similar products are called “Liquid Vim”, “Soft Scrub”, “Cif cream”, or “Viss”. Never use scented varieties as they contain oils that contaminate the conductivity/temperature probe. Follow the steps below to clean the conductivity/temperature probe. 1 Remove shroud. Warm the shroud in your hand for a few seconds to help with removal. Hold the body and pull the shroud off. 2 Clean the conductivity probe face. Place one or two drops of Bluelab Conductivity Probe Cleaner onto the probe face and rub with the Bluelab Chamois or your finger firmly and vigorously. 3 Rinse the conductivity probe face. Rinse off all traces of cleaner under running tap water while scrubbing the probe face with the other side of the Bluelab Chamois or the same finger. 4 5 Check that the water forms a smooth film on the probe face. Ensure you have a clean, smooth film without any beads of water. If you have beads of water, repeat steps 2 and 3. Refit the shroud and test in 2.77 EC Conductivity Standard Solution to ensure adequate cleaning. Place the probe tip into the solution, wait for the reading to stabilize to a constant value. This can take a few minutes while the probe adjusts to the temperature of the solution. Repeat the cleaning process if the reading given is not within 0.1 EC, 1 CF, 50 ppm or 70 ppm of the values in the table below. 1 2 3 3 clean, smooth film of water uneven beads of water 5 2.77 EC Conductivity Standard Solution Testing the Bluelab Conductivity/Temperature Probe The conductivity/temperature probe is tested in either 2.77EC/27.7CF/1385 ppm or 1940 ppm solution Unit chosen depending on the unit of conductivity chosen. Solution 13 Use the standard solutions in the table to the required right. Bluelab solutions are recommended. NOTE: The shroud MUST be left on the probe when taking readings. ppm EC CF ppm 500 700 2.77 27.7 1385 1940 English 14.0 Cleaning the Bluelab pH Probe To ensure accurate readings the pH probe tip needs to be rinsed in water after each use and cleaned prior to calibration using the following instructions. The storage cap must always be put back on after cleaning. Always ensure it contains enough Bluelab pH Probe KCl Storage Solution to cover the probe tip. 1 Remove storage cap from pH probe. Hold the top of the storage cap, twist the cap to loosen then remove. 2 Rinse pH probe tip under fresh tap water. Never use RO (Reverse Osmosis), Distilled or Deionized water. 3 Fill a small plastic container with clean tap water. Add a small amount of Bluelab pH Probe Cleaner or mild detergent (dishwashing liquid). 4 Gently stir the probe tip in the mixture. Ensure that you do not ‘knock’ the soil pH probe on the side of the container as this may cause damage to the probe. 5 If the probe tip requires removal of heavy contamination: Gently brush around the glassware with a few drops of Bluelab pH Probe Cleaner or mild detergent (dishwashing liquid) and a soft toothbrush. 6 Rinse well under fresh running tap water to remove all traces of the detergent mixture. 7 Calibrate pH probe after cleaning, see section 10.0 After calibration, store pH probe in the storage cap, ensuring there is enough KCl Storage Solution to cover the probe tip. 1 2 3 4 5 6 7 15.0 Hydrating the pH probe Hydrate the pH probe in Bluelab pH Probe KCl Storage Solution when: • the probe tip has not always been stored in KCl storage solution, to improve the reading response speed. • the probe tip has been accidentally allowed to dry out. Never use RO (Reverse Osmosis), De-ionized or Distilled water. Pure water changes the chemistry in the reference, causing the probe to die. 14 1 Loosen, then remove the storage cap. Place the pH probe upright in a plastic container. 2 Clean the pH probe tip. Ensure the probe tip is cleaned before hydrating. See section 14.0 for instructions. 3 Add enough Bluelab pH Probe KCl Storage Solution to a plastic container to submerge the pH probe tip. 4 Leave to soak for at least 24 hours. After hydration, always calibrate the pH probe to ensure accuracy, see section 10.0. Bluelab pH Probe KCl Storage Solution 16.0 Troubleshooting guide Trouble English Nutrient reading low Temperature reading inaccurate pH reading inaccurate Display shows ‘Err’ during calibration Reason Correction Contaminated conductivity/temperature probe. Clean conductivity/temperature probe (see section 13.0) . Temperature of conductivity/temperature probe and solution different. Wait 5-10 minutes for conductivity/temperature probe to reach solution temperature. Temperature of conductivity/temperature probe different to solution temperature. Wait 5-10 minutes for conductivity/temperature probe to reach solution temperature. Contaminated pH probe / glassware not clean. Clean pH probe (see Section 14.0); then calibrate (see Section 10.0). Using factory default calibration. Calibrate pH probe (see section 10.0). Calibration old. Calibrate pH probe (see section 10.0). Broken glass bulb, tube or connector. Check pH probe for damage. pH probe damaged or old. Replace pH probe. An attempt was made to calibrate with pH 4.0 or pH 10.0 calibration solution more than one hour after calibration with the pH7.0 solution. Calibrate to pH 7.0 again then do pH 4.0 / pH 10.0 calibration within one hour. Old or contaminated solutions used for calibration. Use fresh calibration solutions. Dirty or contaminated pH probe. Clean pH probe (see section 14.0). pH probe tip been allowed to dry. Hydrate pH probe (see section 15.0). pH probe damaged or old. Replace pH probe. No display Mains not switched on. Power adaptor not plugged into the Guardian Monitor Connect. Switch mains power on. Plug power adaptor into the base of the Guardian Monitor Connect labeled ‘Power Input’. pH displays ‘or’ pH displays ‘ur’ Over range pH. Under range pH. Solution > 14.0 pH. Solution < 0.0 pH. Check pH probe connection. pH probe could be faulty. Guardian Monitor Connect could be wet inside. temp displays ‘or’ temp displays ‘ur’ Over range temperature. Under range temperature. conductivity displays ‘or’ Over range conductivity/nutrient. A display shows _ _ _ _ EC and pH cannot be determined as temperature range is over/under. (see technical specification range section 17.0). Test pH probe in calibration solutions and conductivity/temperature probe in a known conductivity standard solution to eliminate these as a cause of this problem. Check solution tank/ reservoir for problems. Device doesn’t add to Connect Software Device authentication code incorrect Enter correct 4 charactor key code on rear of product into software. Device doesn’t add to Connect Software Weak signal and/or device is outside connect stick range Move device closer to stick. Also refer to positioning your devices document on www. getbluelab.com Device doesn’t reconnect when I move it to its location Device outside connect stick range Move device closer to stick. Also refer to positioning your devices below Device may be connected through Device loses connection another device, if the closest device when it’s signal drops out all connected devices also strength is good drop out 15 Solution >51 °C / 122 °F. Solution <0 °C / 32 °F. Conductivity/temperature probe or Guardian Monitor Connect faulty. Over range conductivity >9.9 EC, 99 CF, 1990 ppm. Conductivity/temperature probe or Guardian Monitor Connect faulty. Increase the signal strength of the device connected to the stick For customer support go to go to our Support Centre on www.getbluelab.com 17.0 Technical specifications English Specifications pH Conductivity Temperature 0.0 – 14.0 pH 0 – 5.0 EC, 0 – 50 CF, 0 – 2500 TDS (ECx500), 0 – 3500 ppm (ECx700) 0 – 50 °C 32 - 122 °F Resolution 0.1 pH 0.1 EC, 1 CF, 10 TDS, 10 ppm 1 °C 1 °F Accuracy at 25°C/77°F ±0.1 pH ±0.1 EC, ±1 CF ±50 TDS, ±70 ppm ±1 °C ±2 °F Calibration Two point (pH 7.0 and pH 4.0 or pH 10.0) Not required (factory calibrated) Not required (factory calibrated) Yes (if conductivity/ temperature probe is in same solution as pH probe) Yes - Measurement Range Automatic Temperature Compensation Operating Environment 0 - 50°C / 32 - 122°F Power Source Input: 100-240 Vac, 50-60 Hz, 5 VA, 4 interchangeable plug types (USA, Euro, UK, NZ/AUS) Output: 5VDC 1Amp Signal Range Indoor / Urban: 66 feet / 20 meters Outdoor / RF line-of-sight: 164 feet / 50 meters Frequency Band System Requirements Certs 16 User Manual Languages Available 2.4 GHz ISM Microsoft Windows XP or greater for Bluelab Connect Software. Internet connection for remote access & datalogging to the cloud CE, FCC, IC. Contains Model XBEE2 Radio, IC: 4214A-XBEE2, FCC ID: OUR-XBEE2 English Bluelab Connect Stick English The Bluelab Connect Stick receives wireless data from one or more Bluelab connect devices. Your data can then be logged to your local computer and/or to the cloud. One Connect Stick will receive data from multiple Bluelab Connect devices. You can add other Bluelab Connect devices to your Connect Software at the click of a button. Bluelab Connect Range Extender A Bluelab Connect Range Extender boosts the data signal strength. Extend the wireless range by positioning a range extender between your Bluelab Connect devices and your connect stick. Using the Bluelab Connect Range Extender requires you to already have a connect stick and one or more Bluelab Connect enabled devices. Bluelab pH Probe replacement The Bluelab pH Probe is the only part of the Bluelab pH Meter that requires replacing. pH probes do not last forever. They age through normal use and will eventually fail. To ensure you receive a long life from your pH probe, please read the instructions provided with it. When the time comes to replace your Bluelab pH Probe all you have to do is order a replacement from your supplier! Bluelab Probe Care Kit - pH and Conductivity The instrument is only as accurate as the probe is clean! Probe cleaning is one of the most important parts of owning and operating any Bluelab meter, monitor or controller. If the probe is contaminated (dirty) it affects the accuracy of the reading displayed. The kit contains instructions and all the tools you need to clean the Guardian Monitor Connect probes. Bluelab pH Probe KCl Storage Solution The perfect solution to store and hydrate your Bluelab pH products. 17 Bluelab pH Probe KCl Storage Solution is designed to increase response time and maximize the life of Bluelab pH pens and pH probes. For best results, use the KCl solution to store the pH pen/probe after use and hydrate monthly. Instructions are on the label of the bottle. Bluelab Guardian Monitor Connect product guarantee English Standard Terms and Conditions of the Bluelab Limited Product Guarantee How Long Does The Coverage Last? 1. The product guarantee becomes effective from the date of purchase by the first purchaser. Coverage terminates if you sell or otherwise transfer the product. 2. The repair of your product under guarantee will not extend the period of the guarantee. How Do You Get Service? 1. Products are to be returned to point of purchase. 2. Any parts replaced will become the property of Bluelab Corporation Limited (“Bluelab”). What is covered? Provided you supply proof of purchase via a store-printed receipt, we will repair or replace your product if your product is found, within the guarantee period, to be defective due to defective materials or workmanship existing at the time of purchase. If any part is no longer available or out of manufacture, Bluelab will replace it with a functionally-equivalent replacement part. What is not covered? Bluelab shall not be liable for costs of repair or replacement of a product incurred as a result of: 1. Normal wear and tear. 2. Accidental damage, faults caused by negligent use or care, neglect, careless operation or handling of the product which is not in accordance with the Bluelab Instruction Manuals. 3. Use of parts not assembled or installed in accordance with the instructions of Bluelab. 4. Use of parts or accessories other than those produced or recommended by Bluelab. 5. External sources such as transit damage or weather. 6. Repairs or alterations carried out by parties other than Bluelab or its authorised agents. 7. Serial numbers defaced or missing. TO THE MAXIMUM EXTENT PERMITTED BY LAW, THIS GUARANTEE AND THE REMEDIES SET FORTH ABOVE ARE EXCLUSIVE AND IN LIEU OF ALL OTHER WARRANTIES, GUARANTEES AND REMEDIES, WHETHER ORAL OR WRITTEN, EXPRESS OR IMPLIED. ANY IMPLIED WARRANTIES THAT MAY BE IMPOSED BY LAW (INCLUDING, WITHOUT LIMITATION, MERCHANTABILITY) ARE LIMITED IN DURATION TO THE PERIOD OF THIS LIMITED GUARANTEE. TO THE MAXIMUM EXTENT PERMITTED BY LAW, BLUELAB IS NOT RESPONSIBLE FOR, AND CONSUMER RELEASES BLUELAB FROM SPECIAL, INCIDENTAL OR CONSEQUENTIAL DAMAGES RESULTING FROM ANY BREACH OF WARRANTY, OR RELATED IN ANY WAY TO THE PRODUCT, OR UNDER ANY OTHER LEGAL OR EQUITABLE THEORY. How Does State Law Relate to This Warranty? Some states do not allow limitations on how long an implied warranty lasts, so the above limitation may not apply to you. Additionally, some states do not allow the exclusion or limitation of incidental or consequential damages, so the above limitation or exclusion may not apply to you. This guarantee gives you specific legal rights, and you may also have other rights, which vary from state to state. Register your guarantee online at www.getbluelab.com Limitation of Liability Under no circumstances shall Bluelab Corporation Limited be liable for any claims, losses, costs and damages of any nature whatsoever (including any consequential loss) that result from the use of, or the inability to use, these instructions. If you need assistance or advice - we’re here to help you. Phone: +64 7 578 0849 Fax: +64 7 578 0847 Email: [email protected] Looking for specifications or technical advice? Visit us online at www.getbluelab.com Bluelab Corporation Limited 8 Whiore Avenue, Tauriko Industrial Park Tauranga 3110, New Zealand 18 Instruction Manual English MONGUACON_V01_240114 © Copyright 2013, all rights reserved, Bluelab Corporation Limited