1
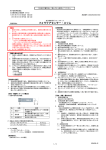
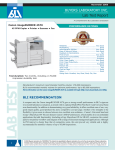
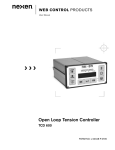
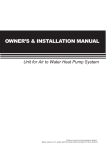
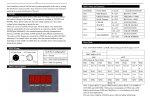
LM SERIES
Intelligent Tank
Level Monitor
USER MANUAL
CONTENTS
SECTION
PAGE
SECTION 1
Introduction to LM Series
1
SECTION 2
Specification
Mechanical/Electrical
2-3
SECTION 3
Installation
Mechanical/Electrical
4-5
SECTION 4
Run Mode
9-11
SECTION 5
Instrument Setup and Calibration
Summary of Setup Parameters
12-31
32
DRAWINGS
Outline Dimensions
6
Connection Arrangements
7
Connection Arrangements for Transmitter Connection
8
SECTION 1
INTRODUCTION
The LM Series Intelligent Tank Monitor provides comprehensive monitoring and control facilities for
liquid storage vessels in all types of industries.
It will interface with, and power all level transmitters in the Measurement Resources range as well as
most other transmitters providing a standard signal output.
Current vessel contents and refill quantities may be displayed in a number of engineering units, and a
20 segment bargraph provides an instant indication of how full the tank is. Visual annunciators also
indicate the status of the control relays, of which up to four may be fitted to the unit.
The unit has facilities to compensate for any shape of tank and correct any transmitter offsets to give
true volumetric display.
Two basic versions of the unit are offered, one being a 96mm DIN panel unit, and the second, a wall
mounted unit in a weatherproof IP67 environmentally protected enclosure. The facilities of both
versions are identical, and both are covered in this manual.
All of the LM Series functions are fully under software control. This means that the user is able to set
up or subsequently amend all operational parameters using the six multifunction buttons on the front
panel. No trimming of potentiometers or other mechanical adjustment is necessary. All of these
operational parameters can have password protection to prevent unauthorised amendments being
made.
Options available to the unit enable point to point or multidrop serial communications, automatic
specific gravity compensation, temperature monitoring and compensation, and other special functions.
These options together with the LM’s standard facilities make it suitable for virtually all applications
where tank level monitoring and control is required.
LM Series User Manual
UM/LM/A/97
Page 1
SECTION 2
SPECIFICATION
MECHANICAL
Panel Version:
Standard 96 x 96mm DIN housing. Total back of panel depth
160mm. Mounting via 92 x 92mm panel cutout.
Wall Mounting Version:
GRP Construction dual section enclosure to IP67. Overall dimensions
215 x 220 x 152mm.
Front Panel Display:
5 decade LED display with 14.2mm characters. 20 segment
bargraph. 7 dedicated function LED annunciators to indicate units
selected and setpoint status.
ELECTRICAL
All terminations via terminal strips on rear of panel version, and in separate terminal enclosure on wall
mounting version.
Fuse:
500mA 250VAC located in rear of panel mounting version and in
terminal enclosure of wall mounting version.
Mains Power Requirement:
110/120/240Volts 50/60Hz AC. Specified at time of manufacture.
Optional 24V DC.
Input Signals:
Standard: 4-20mA DC.
Optional: Factory configured 0-5V, 1-5V, 0-10V DC, 0-1mA DC.
The LM incorporates a 24VDC power supply to drive the level transmitter which is
selected/deselected by connecting the transmitter to the appropriate terminals.
Signal Outputs
Alarm Outputs:
Two separate volt free relays with programmable setpoint and
hysteresis settings. Intended for high and low level alarm switching.
A visual indication of the status of these alarms is provided by
‘HIGH’ and ‘LOW’ LED’s on the front panel. alarms are
acknowledged via the ‘ALARM’ button on the front panel.
Contact Rating:
3 Amp 240VAC S.P.C.O. Volt free.
LM Series User Manual
UM/LM/A/97
Page 2
Additional Relays:
One or two additional relays may be fitted. These may be set as
alarm type (as above) or control function. These additional relays
may be defined as ‘MAKE ON RISE’ or ‘MAKE ON FALL’.
When set in control mode, the front panel ‘ALARM’ button is used to
acknowledge the condition. The state of these relays is indicated by
the TRIP 3 and TRIP 4 LED’s on the front panel.
Contact Rating:
3 amp 240VAC S.P.C.O. Volt free.
Analogue Output:
Optional 4-20mA via additional integral PCB maximum load 1000
ohms, linearised for tank shape, for driving remote indicators
Communications:
Optional RS232/485 serial port for communication to host computer.
This may run set up and access the LM Series information using
software provided by Measurement Resources. Multidrop
communication is also possible.
Environmental Temperature:
Operational range 0 to 50°C. Storage range -30 to 50°C.
Humidity:
No effect in the range 0 to 95% relative humidity non condensing.
LM Series User Manual
UM/LM/A/97
Page 3
SECTION 3
INSTALLATION
MECHANICAL INSTALLATION
Panel Version:
The unit is housed in a standard 96mm DIN case which requires a 92
x 92mm square panel cut out. Installation is achieved simply by
sliding the unit through the cut out from the front of the panel, locating
the clamps provided either side of the unit and tightening. Care
should be taken not to overtighten these clamps.
Wall Mounting Version:
The unit is fitted with a wall mounting plate which mounting holes are
200 x 120mm.
Refer to diagrams 1 and 2 for clarification and dimensions of the mounting arrangements.
ELECTRICAL INSTALLATION
Panel Version:
All electrical connections are made using the locking 2 part terminals
provided. All connections should be made to the plug before pushing
it in. The terminal blocks have locating pins to prevent incorrect
location.
Wall Mounting Version:
The wall mounting enclosure has all field terminations located in the
lower section. Access is gained by removal of the two securing
screws. The enclosure has PG9 cable glands in the base of the
terminal section, to ensure separate wiring and that the signal input
and control relay wiring are individually glanded. This will avoid
potential pick up or interference problems in ‘noisy’ environments.
All terminations are clearly identified on both versions of unit and are as shown in diagrams 3 and 4.
Input Signal:
LM Series User Manual
UM/LM/A/97
Connection of the two wire signal from the transmitter depends upon
whether the unit is required to power the transmitter, or if the
transmitter is driven by an external power supply, connect as shown
in diagrams 5 and 6.
Page 4
Output Signal:
Of either 2.56V DC or 4-20mA DC. Connect positive and negative
as marked on unit terminations.
Serial Link:
This is an optional function. If fitted tot he unit a supplement will
have been included with this manual to cover its connection and
operation.
Relay Connections:
Dependent upon which options were specified at time of
manufacture, up to four Control/Alarm relays may be fitted. Relay
outputs are single pole volt-free changeover type and connections are
identified as follows:
N/O - Normally open
COM - Common
N/C - Normally closed
Power Supply:
LM Series User Manual
UM/LM/A/97
Before connection of the mains power supply to the unit, ensure that
the instrument operating voltage is the same as the supply to be
connected.
Page 5
OUTLINE DIMENSIONS
LM Series User Manual
UM/LM/A/97
Page 6
CONNECTION ARRANGEMENTS
LM Series User Manual
UM/LM/A/97
Page 7
CONNECTION ARRANGEMENTS
LM Series User Manual
UM/LM/A/97
Page 8
SECTION 4
RUN MODE
This section describes the facilities and the operation of the LM Series when it is in run Mode, ie, the
normal operating mode.
Where the unit has been supplied factory configured for its intended application, this section should be
read and fully understood prior to putting the unit into service.
Where the unit has been supplied unconfigured, the appropriate data must be entered as described in
the section entitled ‘Instrument Set Up and Calibration’ before it can be operated.
The unit is equipped with six multifunction buttons which provide access to all of the facilities available.
The function of each button is described.
UNIT
The instrument can display current vessel contents in different engineering units. Upon power up, the
default unit of litres is selected. The user may, be depressing the button market ‘UNIT’ change the
display to read in gallons. The units selected are indicated by the appropriate LED being illuminated on
the annunciator panel.
A third display unit is also available. This unit may be in terms of mass, volume or head/level, and is
selected by a further depression of the ‘UNIT’ button.
Selection of this unit is indicated by illumination of the third LED annunciator. Configuration of this
unit is covered in section 5, covering ‘Instrument set up and calibration’.
%
When in Run mode depression of the ‘%’ button causes the display to show what percentage of the
full tank volume is currently within the vessel. This display is maintained only while the button is
depressed.
REFILL
When in Run mode depression of the ‘REFILL’ button will cause the instrument to display the volume
required to fill the vessel to maximum capacity. This display is maintained only while the button is
depressed.
Note: Refill quantity is shown in the currently selected engineering units as indicated by
the
annunciator display.
LM Series User Manual
UM/LM/A/97
Page 9
SG
When in run mode, depression of the SG button will cause the value currently stored in the unit for
specific gravity to be displayed. While it is being displayed the value may be amended to suit any
changes in the liquid being monitored. If no changes are made within 5 seconds, the unit reverts to
normal operation and displays vessel contents.
To change the current SG, the four buttons marked with (⇑) up, (⇓) down, (⇐) left, (⇒) right arrows
are used. Depressing the button with the left hand arrow causes the least significant digit to flash.
This digit is then the ‘active’ digit and its value may be increased or decreased by depressing the up
and down arrows respectively. Once this digit is correctly set depressing the left arrow causes the
next digit to become the ‘active’ digit. This is then set in the same way. At any time depression of the
right arrow moves the active digit to the right. Once the correct value is entered, depressing SG again
will accept the changes and return to run mode. Allowing the unit to ‘time out’ by making no
adjustments for approximately 5 seconds causes the orignal values to be retained.
For plant safety, the facility to change specific gravity in the run mode can be enabled/disabled from
within the set up routine (see SP09/2 and SP21). Also, where the optional second input is configured
to provide automatic specific gravity compensation, pressing the ‘SG’ button will display the current
value being measured and no changes are possible.
Valid values for specific gravity are within the range 0.5 to 2.0.
Note: It is vital that the correct value of specific gravity for the fluid currently being
monitored is entered into the unit, since this is one of the factors used in
determining the vessel content from the level transmitter input signal.
SP
When in the run mode this button is used to examine or change the alarm and control setpoints. When
the button is pressed once, the display will show the current value of the high level setpoint.
Further depression of the button will display the low, trip 3, and trip 4 setting respectively. Note: Whilst
examining setpoints, the operation for the relays is suspended. The unit indicates that it is in this mode
by illuminating all four high, low, trip 3 and trip 4 LED’s. The setpoint currently displayed is indicted by
its LED annunciator flashing whilst the other three are steadily illuminated.
LM Series User Manual
UM/LM/A/97
Page 10
Setpoint values are entered and displayed in therms of % content. To change a setpoint value, the
arrow keys are used in the same manner as described for specific gravity adjustments. Any changes
made are not accepted unless the SP button is pressed a fifth time to return to normal mode. A ‘time
out’ of 5 seconds applies if no changes are made.
Trip 3 and trip 4 settings have no effect unless the optional extra relays have been fitted to the unit.
For plant safety the facility to change setpoint values in the run mode can be enabled/disabled in the
set up routine (see SP09/3).
ALARM
This button is used to acknowledge high and low alarm conditions when they occur. Upon the input
signal exceeding the value entered in the setpoint, and remaining outside this value for the period of
time defined in the debounce setting, the appropriate LED annunciator will flash and the relay (if fitted)
for that alarm will close.
Depression of the ALARM button will acknowledge the alarm condition. This will cause the alarm
relay to drop out, and the LED annunciator become steadily illuminated. This annunciator will remain
illuminated until the input signal has returned to within the hysteresis setting defined for the alarm. This
also applies to Trips 3 and 4, where the optional relays are fitted and configured as alarms. Where
they have been configured as controls, the ALARM button has no effect on their operation.
LM Series User Manual
UM/LM/A/97
Page 11
SECTION 5
INSTRUMENT SET-UP AND CALIBRATION
All configuration and operational parameters of the LM Series may be entered or subsequently
amended by the user.
Parameters which are likely to change under normal operating conditions, include specific gravity
values and Alarm/Control setpoints. For changes to these; please refer to the previous section entitled
‘Run Mode’.
All other parameters are entered using a Configuration routine. To prevent unauthorised amendment
of those details, entry of a password is required before any changes can be made. As the unit is
shipped from the factory, the password is set to 12345, but since it can be amended careful note must
be made of any changes.
Note: When the unit is in CONFIG mode no time out applies and all relay control and
monitoring functions are suspended. This ensures that the re-setting of control
parameters does not cause tank over-filling or other potentially dangerous
situations. It must also be ensured that the vessel is in a steady state and will
remain so during configuration since it is temporarily not being monitored.
It is strongly recommended that because of the extensive facilities and as a result of the
number of steps in the set up procedure, a safe record is kept of the values of all settings.
When entering CONFIG mode, the user is able to scan through the data without making
changes until the relevant details are reached.
Stepping though is achieved by the depression of the button SP. At any time the user can quit
the configuration mode by the depression of the button SG. This button also has the effect of
saving any changes made.
Before entering configuration mode it should be ensured that the display unit is set in either
Litres or Gallons by pressing the ‘UNIT’ button if necessary. The instrument should not
initially be configured with the display set to the third ‘custom’ unit, since this itself is set up
during the procedure.
Configuration Mode is entered as follows: Depress button SP followed immediately by button SG, you
will now be prompted for a password. It will also be noted at this stage that the 4 alarm/control LED’s
flash. This indicates that Configuration Mode has been entered and all control operations are inhibited.
LM Series User Manual
UM/LM/A/97
Page 12
Note: A time out will apply at this stage, and if a valid password is not entered with less
than 5 second intervals between button depressions, the unit will run through a self
check routine and then return to normal operation mode. This is also the case
where an incorrect password is entered.
Entry of the password is achieved by means of the four buttons marked with up, down, left
and right arrows. The left and right arrows are used to select the active digit and the up and
down arrows to increase or decrease its value. The procedure for entering data is common
throughout the Configuration Mode.
When entering the password, for security only the active digit is visible.
Once the correct number has been entered, depress button SP again and whilst it is depressed the
legend SP01 will be displayed. Once the button SP is released you will be in Configuration Mode and
displaying the first parameter ‘Display Resolution’.
A full list of the set parameters with explanatory notes follows:
SP01
Display resolution. Left and right arrows are used to toggle the display until the desire value is
shown. Options range between 0.001 and 100 units. The value selected will depend upon the
stability of the liquid level in the vessel (to eliminate flickering) and process requirements.
SP02
Filter factor: This factor enables the effects of a fluctuating liquid level to be stabilised. Using
the left and right arrows the appropriate value between 0-50 seconds may be entered. This
factor is defined as the time taken for a unit to respond to a step in input to within 0.1% of its
final value.
SP03
This is a multiplying factor which relates the input signal to volumetric units. The number
entered is either the full or useable tank capacity dependent upon what the display is required
to show. For example: in a tank holding 6000 litres maximum, the outlet pipe is at a point
above the tank base equivalent to 248 litres. For a display of full capacity, SP03 is entered as
6000 for a display of useable capacity SP03 is entered as 6000-248 = 5752 litres.
Note: Before entering a value for SP03 verify which volumetric units the instrument is
currently displaying by checking the LED annunciators. SP03 must be entered in
these units ie, Gallons or Litres.
LM Series User Manual
UM/LM/A/97
Page 13
SP04 & SP05: The combination of these two parameters and the specific gravity setting are used to
convert the signal actually being provided by the level transmitter to a value of 0 to
100% liquid level over the actual tank depth. This corrected 0 to 100% value is then
used in the units ‘look up’ table facility (see SP26 to SP47), to relate % liquid level to
% tank volume, and finally multiplied by the tank capacity (SP03) to give a volumetric
display.
The formula used for this correction is:
Where
((% Signal Input) x 100) + SP04 = % Level
SG x SP05
Signal Input:
Is the signal actually being provided by the level transmitter.
SG:
Is the specific gravity value entered into the unit (refer to section 4 covering run
mode).
SP04:
Is a compensating factor which corrects for negative or positive offsets which are
introduced where the transmitter is mounted above or below the tank empty point.
SP05:
Is a compensating factor which enables the use of ‘nominally’ ranged level transmitter
ie, this is used in installations where, when the tank is full of liquid the output signal
from the transmitter is not 100% (eg 20mA on a 4-20mA transmitter).
Values for SP04 and SP05 are calculated as shown in the following examples:
Example:
Tank Depth:
Transmitter Position:
Transmitter Calibration
SP04
3000mm
250mm above tank base
0 to 4 metres WG
= Transmitter Fitting Height x 100
Tank Depth
= 250
3000
= 0.0833 x 100 = 8.33%
The value entered is therefore 8.33
LM Series User Manual
UM/LM/A/97
Page 14
SP05
=
Tank Depth x 100
Transmitter Calibrated Range
= 3000 x 100
4000
= 0.75 x 100 = 75%
The value entered is therefore 75
If in the same tank the same transmitter was located 250mm below the tank based SP05 remains as
before but SP04 is now calculated by:
SP04
= Transmitter Fitting Height x 100
Tank Depth
= -250 x 100
3000
= -0.883 x 100 = -8.33%
The value entered is therefore -8.33
Note: This is a negative value because the effect of 250mm of liquid level is to be
suppressed, i.e., removed since it does not represent tank content.
USEABLE CONTENT
If required, the instrument can be set to display only the useable portion of the tanks capacity i.e., from
the outlet pipe upwards.
Where this is the case the tank capacity SP03, will have entered in useable terms. SP04 and SP05 are
calculated as shown above with the exception that the useable tank depth instead of the full tank depth
is used in the calculations.
For example:
Using the same tank depth as before of 3000mm and with the sensor ranged 0-4m WG and mounted
250mm above the base also as before, the outlet pipe is mounted at 100mm above the tank base.
SP04
= Transmitter Fitting Height x 100
Useable Tank Depth
= 250-100
3000-100
= 0.0517 x 1000 = 5.17%
The value entered is therefore 5.17
LM Series User Manual
UM/LM/A/97
Page 15
SP05
= Useable Tank Depth x 100
Transmitter Calibration Range
= 3000-100 x 100
4000
= 0.725 x 100 = 72.5%
The value entered is therefore 72.5
If the transmitter was mounted 250mm below the tank base SP04 and SP05 would be calculated as
follows:
SP04
= Transmitter Fitting Height x 100
Useable Tank Depth
= -250-100
3000-100
= -350 x 100
2900
= -0.1207 x 100 = -12.07%
The value entered is therefore -12.07. Note: That this is a negative value.
SP05 is the same as before ie:
Tank Depth x 100
Transmitter Calibrated Range
= 3000 x 100
4000
= 0.75 x 100 = 75%
Note: Where the sensor is mounted level with either the tank base for applications where a
full capacity display is required, or level with the outflow pipe for applications where
a useable contents display is required, then no zero offset exists and SP04 is entered
as zero.
Notes on setting of SP05 and SG
The above examples assumes that the liquid level transmitter is also of Measurement Resources
supply.
However, it may be in a particular installation that another manufacturers liquid level transmitter is
being used, or that a Measurement Resources transmitter has been previously supplied and that this
unit has been calibrated to provide a full output signal of 4-20mA relative to the actual tank depth and
the actual specify gravity.
LM Series User Manual
UM/LM/A/97
Page 16
It is therefore most important to establish the exact calibration of the transmitter before
attempting to configure the LM Series.
For installations where the transmitter has been supplied ranged for the actual tank conditions
(Measurement Resources policy), then the scaling factors SP05 and SG on the LM Series would not
normally be used and should be left to their normal default values of SP05 = 100 and SG = 1.00. If
however, the specific gravity of the liquid being monitored is likely to change in service, unless this is
compensated for, it will introduce an error. It is therefore possible to use SP05 and the SG parameters
to provide the necessary correction. This is achieved in the same way as previously described. The
following example will clarify the procedure.
Example:
Tank Depth:
3000mm
Specific Gravity:
0.95
Transmitter calibrated range:
= (i.e. 3000 x 0.95) = 2850mm WG
SP05 is given by
Tank Height
Transmitter calibrated range
= 3000
2850
= 1.0526 x 100 = 105.26%
The number entered is therefore 105.26
The value for SG is then entered as the actual value, i.e. 0.95. If the specific gravity of the fluid
subsequently changes and the new value is entered the LM Series will compensate accordingly.
Calculation of the value of any zero offset (SP04) is done in the normal way, as described above.
It must be considered that if the SG does increase, the level transmitter will then be driving into
overrange, i.e. more than 20mA output, when the vessel is full. The LM Series will accept a signal up
to 25% overrange and Measurement Resources level transmitters are capable of linear performance
up to this value. This cannot be guaranteed for other manufacturers transmitters and inaccuracy or
damage to the transmitter may result.
SP06 &SP07
These parameters are used in conjunction with the software ‘ switches’ SP08/1, SP08/7 and SP08/8 to
scale the third ‘custom’ display unit to read in the required units of liquid level, head, volume, or mass.
Where SP08/1 is OFF, ie, display in volume or mass terms SP06 has no effect and a value of 0.00
should be entered. For a custom display in volumetric units, SP07 is simply entered as the full tank
capacity eg, for a tank holding 5327 US Gallons then 5327 is entered. For a custom display in mass
units for example kilograms, eg, for a tank holding 5000 kilograms of liquid with a specific gravity of
1.0 SP07 is entered as 5000. The LM Series will then automatically correct the display when a liquid
with a SG other than 1.00 is monitored, and its actual SG is keyed in as described in the run mode
selection.
LM Series User Manual
UM/LM/A/97
Page 17
Where SP08/1 has been set ON, ie, display in level or head units, the display value required when the
tank is empty should be entered for SP06 and the display value required when the tank is full should be
entered for SP07.
** eg
If the custom unit was required to show millimetres head of a tank 4 metres deep, SP06 would
be 0.00 and SP07 would be 4000.
SP08
This parameter contains eight software ‘switches’ SP08/1 to SP08/8. These switches are
employed to define the operation of the optional 3rd and 4th relay (Trip 3 and Trip 4) and the
3rd ‘custom’ display unit.
The switches are scrolled on the display using the Left/Right arrows and their settings are
altered using the Up/Down arrows.
SP08/1
OFF
ON
This sets the custom unit to display in volume of mass units.
This sets the custom unit to display in level or head terms.
SP08/2
This switch relates to the optional relays 3 and 4. Where these are not fitted
it has not effect.
When fitted the optional relays may be configured in a number of ways, to provide either an alarm or
control function.
Where only one additional relay is fitted (Relay 3) and this is to be used for pump control, if SP08/2 is
set ON, then both of the LED annunciators for Trip 3 and Trip 4 are used to indicate the pump status.
Trip 4 LED will illuminate whilst the pump is running and Trip 3 LED illuminates whilst the liquid level
is above the pump cut off point.
Note: When this option is used the hysteresis setting for Trip 3 and 4 (SP13 & SP14), and
the switches SP08/3 to SP08/6 are over-ridden and have no effect.
Where both relays 3 and 4 are fitted, SP08/2 is switched OFF and their function is defined by the
settings for switches SP08/3 to SP08/6.
SP08/3
This switch defines Trip 3 as either a high or low level setpoint.
OFF energises relay on a rising input signal.
ON energises relay on a falling input signal.
SP08/4
This switch defines Trip 4 as either a high or low level setpoint.
SP08/5
This switch defines Trip 3 as a control or alarm function.
OFF defines Relay 3 as a control operation.
ON defines Relay 3 as an alarm operation.
SP08/6
This switch defines Trip 4 as a control or alarm function.
OFF defines Relay 4 as a control operation.
ON defines Relay 4 as a alarm operation.
LM Series User Manual
UM/LM/A/97
Page 18
SP08/7
This switch defines which type of units the custom unit will display in. This is done in
combination with the settings for SP08/1
OFF applies a multiplier of 1.00 (ie no effect) to the custom unit. This is used where a
display in volume or level units is required.
ON applies a multiplier equivalent to the current specific gravity setting to the custom
unit. This is used where a display in mass or head units is required.
The following table clarifies the switch setting for the different units of measurement, the custom unit
can be set to display:
Unit
SP08/1
SP08/7
Volume
Mass
Level
Head
OFF
OFF
ON
ON
OFF
ON
OFF
ON
SP08/8
This switch enables a decimal point to be applied to the custom unit display.
OFF - Display shows XXXXX
ON - Display shows XXX.XX
This enables the resolution to be improved where necessary.
SP09
This parameter contains eight software switches SP09/1 to SP09/8. Their positions
(ON or OFF) are set as described for SP08.
SP09/1
This switch is used to enable or disable all relays fitted to the unit, for example during
plant maintenance.
SP09/2
This parameter is used to enable or disable the facility of amending the specific gravity
value whilst in the Run Mode.
OFF - Prevents unauthorised changes to specific gravity.
ON - Enables the specific gravity to be changed in Run Mode.
SP09/3
This parameter is used to enable or disable the facility of amending the alarm setpoints
whilst in the Run Mode.
OFF - Prevents unauthorised changes to setpoint values.
ON - Enables the alarm setpoints to be changed in the Run Mode.
SP09/4
This parameter selects the type of computation used in the ‘look up’ table (SP26 to
SP47) to convert the liquid level input to a volumetric display.
There are two types of computation:
SP09/4 OFF- Employs a 10th order polynomial correction method.
SP09/4 ON - Employs a linear interpolation method.
The type of computation selected depends upon the shape of the vessel to be
corrected.
LM Series User Manual
UM/LM/A/97
Page 19
For horizontal cylindrical tanks with or without dished ends the 10th order polynomial
correction should be used, therefore SP09/4 should be set to OFF.
LM Series User Manual
UM/LM/A/97
Page 20
The linear interpolation method, ie, SP09/4 set ON, is reserved for linear tanks, and
those where there are both linear and non-linear sections. For example a vertical
cylinder with a coned or dished base, the ‘look up’ points can be concentrated in the
non-linear section of the tank to provide the best possible correction.
Refer to parameters SP26 and SP47 for guidance on ‘look up’ table configuration.
SP09/5
This parameter is used to provide ‘FULL’ and ‘EMPTY’ messages when the tank is
at 100% and 0% volume respectively.
With SP09/5 ON the above messages are displayed.
With SP09/5 OFF a flashing zero is shown at tank empty and the full capacity when
the tank is full.
SP09/6
This parameter is used to provide ‘FAULT and O.LOAD’ messages where the input
signal goes more than 25% outside its normal operational span.
SP09/6
ON enables the message.
SP09/6
OFF disables the messages.
SP09/7 and SP09/8
These parameters are reserved for special applications and have no effect for standard units.
SP10
This is a relay debounce setting which is entered in seconds and is common to the high and low alarm
relays.
Debounce is defined as the delay period between an alarm condition occurring and the associated
control relay operating. A debounce period would be required for example, where the level in the
vessel is liable to fluctuate under normal circumstances and the effect of these fluctuations is to be
removed to prevent spurious alarms. The length of the debounce period will be determined by the
process requirements.
SP11
This is a hysteresis setting for the high level alarm, it is entered in percent volume terms. The high
level relay operates on a rising input condition. Hysteresis is defined as the difference between the
alarm set point and its reset point. e.g. An alarm which operates at 75% volume on the rise and resets
at 70% volume on fall, has a 5% hysteresis.
SP12
This is the hysteresis setting for the low level alarm. Data is entered as described for SP11. The low
level alarm operates on a falling input condition.
SP13
This is the hysteresis setting for Trip Level 3 and it is entered as described for SP11. Trip 3 can
operate on either a rising or falling input signal dependent upon the setting of switch SP08/3.
LM Series User Manual
UM/LM/A/97
Page 21
SP14
This is the hysteresis setting for Trip Level 4. It is entered as described for SP11. Trip 4 can operate
on either rising or falling input signal dependent upon the setting of switch SP08/4.
SP15
This the setpoint value for the high level alarm. Note that this is entered in percent volume terms. eg.
in a 6000 litre vessel the alarm is required to rate at 5000 litres therefore the value entered is 83.33%
SP16
This is the setpoint value for the low level alarm. Data is entered as for SP15.
SP17
This is the setpoint value for the optional Trip 3 relay. Data is entered as for SP15.
SP18
This is the setpoint value for the Optional Trip 4 Relay. Data is entered as for SP15.
Note: The function of SP17 and SP18 will depend upon the setting of the switches
contained in SP08. Refer to the section covering SP08 for clarification.
SP19
This parameter defines the Baud rate (communication speed) between the unit and a host computer.
The appropriate speed is selected by toggling through the options displayed. This parameter is only
employed where the serial communications port option is fitted.
SP20
This parameter is used to enter a ‘Site Address’ code into the unit. This code uniquely identifies the
unit when it is remotely addressed via the serial port. Where the serial port option is not fitted this
parameter has no effect.
Where the unit is equipped with a serial port, a supplement will have been included wit this manual to
cover its setup and operation.
SP21
This parameter is used to enter the specified gravity for the product being monitored. the ability to
entered a specific gravity at this parameter is always enabled. Where SP09/2 is set to ON it is also
possible to change the specific gravity setting while in the Run Mode.
Also, when the optional second input is being used to automatically measure the specific gravity by the
two level transmitter method, this parameter is used to entered the default specific gravity value.
Refer to SP23 and SP24 for clarification of this.
SP22
This parameter is reserved for special functions and no user adjustment is necessary or possible on the
standard unit.
LM Series User Manual
UM/LM/A/97
Page 22
SP23, SP24
These parameters are used in setting up the optional second input. Where the second input is not fitted
they have no effect.
The second analogue input option can be factory set in several ways and is used in conjunction with
the normal liquid level input. It enables the LM Series to measure and automatically compensate for
various changes which would otherwise effect the displayed value.
The second input will have been factory set to operate in one of the following ways:
A) Automatic compensation of blanket pressure in a pressurised tank, where the second input signal
comes from a transmitter measuring the topping pressure.
B) Automatic compensation of changes in the liquid density, where the second input signal comes
from liquid level transmitter mounted at a known height above the main transmitter.
C) Automatic compensation of changes in the liquid density where the second input signal comes
from an independent transmitter.
A - TOPPING PRESSURE COMPENSATION
The following equation is applied:
Correct Value = A - B x
Where
A is input 1 (liquid level)
B is input 2 (topping pressure)
X is compensation factor SP23.
SP23 is calculated as follows:
SP23
=
Set Range of Transmitter B x 100
Set Range of Transmitter A
Where the two transmitters are the same range then SP23 will be 100. It is possible, however, that
transmitter A will be calibrated to tank depth plus topping pressure, where as transmitter B will be
calibrated for topping pressure only.
eg.
Transmitter A = 0 to 16mWG
Transmitter B = 0 to 5mWG
SP23 = 5 x 100
16
= 31.25
SP24 is not required in its type of compensation and must be set to 0.00.
LM Series User Manual
UM/LM/A/97
Page 23
B - DENSITY COMPENSATION (DUAL TRANSMITTER)
For this compensation the following equation replaces the specific gravity value which is manually
entered in the stand single input unit.
SG = (A - Bx) 100
Y
Where
A is the first input (bottom transmitter)
B is the second input (top transmitter)
X is SP23 which enables the two transmitter outputs to be matched.
eg Transmitter A is calibrated 0 to 10mWG
Transmitter B is calibrated 0 to 8mWG
SP23
=
Calibrated range of Transmitter B x 100
Calibrated range of Transmitter A
= 8 x 100 = 80.00
10
Y is SP24 which defines the distance between the two transmitters. eg transmitter B is mounted
800mm above transmitter A. Transmitter A is calibrated 0 to 10mWG.
SP24
=
Distance between Transmitters x 100
Calibrated Range of Transmitter B
800 x 100 = 8.0
10000
Note: When the LM Series is configured for this type of operation, depressing button SG
will display the current measured value of specific Gravity. Also, since this method
of measuring density operates by comparing the output difference between the
bottom transmitter and the top transmitter, it will not operate when the liquid level in
the tank is below the top transmitter. For this reason a specific gravity value must
be metered at SP21 and when the output of the top transmitter drops to zero the LM
Series automatically switches to using this fixed value. It is recommended that the
specific gravity value used is the average value for the product being measured. ie:
Maximum Value + Minimum Value
2
This will maximise any errors when the unit changes over to the fixed SG value.
LM Series User Manual
UM/LM/A/97
Page 24
C - DENSITY COMPENSATION (INDEPENDENT INPUT)
For this compensation the following equation replaces the manually entered Specific Gravity value of
the standard single input unit:
Bx + y
100
Where
B
x
y
Example:
is the second input from an independent density transmitter.
is SP23 a compensation factor which scales the second input in terms of the actual
specific gravity being measured.
is SP24 a compensation factor which enables an offset to be applied to the second
input.
The density transmitter has a calibrated range of 0.0 to 1.32 over 4-20mA.
SP23 is given by calibrated range x 100, ie:
1.32 x 100 = 132.00
SP24 would not be required in this instance and should be set at 0.00
If the same transmitter is recalibrated to improve the resolution over the actual density variation of the
product, ie, 0.8 to 1.32 over 4-20mA, then SP23 and SP24 are entered as follows:
SP23 = Calibrated range x 100
(1.32 - 0.8) x 100 = 52.00
SP24 = Zero offset of transmitter in percent
0.8 x 100% = 80
Note: When the unit is configured in this mode, depressing button ‘SG’ will display the
current measured value of Specific Gravity. Also SP21 (manual input Specific
Gravity) has not effect in this mode.
SP25
This parameter enables the user password to be changed. The current password will be displayed and
it may be amended using the arrow keys in the normal way. Care must be taken to record any
changes in a safe place. The factory set password is 12345.
Note: Entry of 0000 disables the password protection
LM Series User Manual
UM/LM/A/97
Page 25
TANK SHAPE DATA ENTRY
SP25 to SP46
These parameters are used to relate the liquid level signal from the transmitter to actual tank contents
so that the unit provides a display in volumetric terms.
Parameters are arranged in two columns which provide a ‘look up’ table as shown below:
% Level
Tank Empty
Tank Full
SP26 = 0
SP28 = 10
SP30 = 20
SP32 = 30
SP34 = 40
SP36 = 50
SP38 = 60
SP40 = 70
SP42 = 80
SP44 = 90
SP46 = 100
% Volume
relates to
“
“
“
“
“
“
“
“
“
“
SP27 = 0
- Zero Capacity
SP29 = 10
SP31 = 20
SP33 = 30
SP35 = 40
SP37 = 50
SP39 = 60
SP41 = 70
SP43 = 80
SP45 = 90
SP47 = 100 - Max. Capacity
Note: The parameters shown in the above table are the default values which provide a
linear relationship between liquid level and volume in equal steps of 10%.
Before setting the ‘look up’ table for a particular vessel it should be ensured that the following
parameters have been correctly set:
SP04 and SP05 - input signal scaling factors.
SP09/4 - ‘Look up’ table equation type (depends upon shape of vessel)
The LM Series uses the ‘look up’ table as follows:
1) The input signal from the level transmitter is corrected as necessary by parameters SP04 and
SP05.
2) The resultant ‘% level’ value is looked up in the first column and a comparison is made with the
second column to determine the ‘% volume’ at this level.
3) This value is then multiplied by the full tank capacity (SP03) and the result is displayed in the
selected engineering units.
LINEAR TANKS
Where the relationship between liquid level and volume is linear, for example a level mounted
rectangular vessel, no amendments are necessary and the standard default values may be used.
Note: SP09/4 should be ON.
LM Series User Manual
UM/LM/A/97
Page 26
NON-LINEAR TANKS
Vessels in this category include horizontal cylinders and spherical tanks. Where the relationship is
non-linear, to obtain the most accurate results from the look up table it should be ensured that each
increment in the ‘% level’ column is as close as possible to the ideal 10 step.
Note: For this type of vessel SP09/4 should be OFF.
The following example will assist in illustrating the procedure for setting the ‘look up’ table.
Example: This example relates to a level mounted flat ended horizontal cylinder. the internal
dimensions are:
9118mm length
2726mm diameter
The total tank capacity (SP03) is 54,000 litres and a tank sounding chart has been provided which
relates level to volume at 250 litre increments.
To convert the information in this comparison chart into configuration data for the unit the following
method is used:
1)
The values entered into the ‘%l liquid level’ column relate to the actual depth of the liquid in
the tank.
i.e.
SP26 = 0% - 0mm (tank empty)
SP46 = 100% - 2726mm (tank full).
To determine the ideal calibration points the tank depth is simply divided by 10 to give 10 equal
increments.
e.g. Increment = 2726mm
10
= 272.6mm
The ideal calibration points are then tabulated as shown below.
% Liquid Level
Actual Tank Depth in mm
0
10
20
30
40
50
60
70
80
90
100
0
272.6
545.2
817.8
1090.4
1363
1635.6
1908.2
2180.8
2453.4
2726
LM Series User Manual
UM/LM/A/97
Page 27
By referring to the tank sounding chart the points which are closest to these ideal values are selected
as well as the corresponding tank value at these actual points. As follows:
Ideal Calibration Point in mm
0
272.6
545.2
817.8
1090.4
1363
1635.6
1908.2
2180.8
2453.4
2726
Closest Actual in mm
(From chart)
0
270.16
551.42
817.06
1089.65
1360.77
1631.46
1913.39
2177.29
2453.75
2726
Corresponding In Litres
(From chart)
0
2750
7750
13500
20000
26750
3350
40250
46000
51000
54000
The figures in the actual Level and Tank Capacity columns above are the ones used to configure the
unit and must first be converted to ‘% Liquid Level’ and ‘% Volume’ as follows:
Liquid Level - This is calculated using the equation:
% Level = Actual Level x 100%
Tank Depth
The following example illustrates this procedure:
Example:
Vertical cylinder with 45 degree coned base, internal diameter 3200mm, straight length 6500mm, depth
of cone 1600mm. ie: 8100mm overall.
By calculation, volume of cone section is 4289 litres, and straight section 52276 litres. ie, total capacity
(SP03) 56565.
Since the linear section requires only two points, the remaining nine are concentrated into the cone as
follows:
Cone Depth = 1600mm
1600 = 177.77mm
9
The level column is then as follows:
Actual Level in mm
SP26
0.00
SP28
177.77
SP30
355.55
SP32
533.31
SP34
711.08
SP36
888.85
SP38
1066.62
LM Series User Manual
UM/LM/A/97
Corresponding % of Tank Depth
0.00
2.19
4.39
6.58
8.78
10.97
13.17
Page 28
SP40
SP42
SP44
SP46
LM Series User Manual
UM/LM/A/97
1244.39
1422.16
1600
8100
15.36
17.56
19.75
100.00
Page 29
Having established the level increments the corresponding volumes at these increments are then either
determined from the sounding table or by calculation if no sounding table is provided. In this example
the formula is:
Volume of a Cone = ∏r²h
3
SP27
SP29
SP31
SP33
SP35
SP37
SP39
SP41
SP43
SP45
SP47
Actual Volume
0.00
6
47
158
376
235
1271
2018
3012
4289
56565
% of Volume
0.00
0.01
0.08
0.28
0.66
1.30
2.25
3.57
5.32
7.58
100.00
The calculated values are then entered into the LM Series in the normal way.
The foregoing methods should cater for all combinations of tank shapes where the liquid level/volume
relationship is known or maybe calculated. Where there is some doubt regarding the best method
Measurement Resources will be pleased to assist.
For installation where the liquid level/volume relationship is not known and cannot be calculated there
is a final method of calibration ‘Self Teach’.
SELF TEACH
This method involves filling the vessel in accurately metered stages, noting the volume and level signal
at each stage and then transferring these values into the LM Series in the normal way.
Since this method necessitates filling the vessel which may cause disruption to the process or other
inconvenience, it is recommended that where the necessary information is available then one of the
previously described methods is used, as they enable the system to be totally configured via the
keypad.
To undertake self teach calibration only the following parameters need to be known:
A) The tank type, ie. linear, non-linear or mixed.
B) The specific gravity of the liquid.
C) The actual measuring depth of liquid between tank empty and tank full, and where the transmitter
is mounted, ie. on, above, or below the tank empty point.
LM Series User Manual
UM/LM/A/97
Page 30
METHOD
1) Ensure vessel is empty of fluid.
2) Enter the specific gravity of the fluid which will be used to perform the calibration.
3) Enter the configuration mode and ensure that SP04 is set to 0.00 and SP05 is set to 100.00. These
input scaling factors are not employed in this type of calibration.
4) Step through the CONFIG mode to SP09/4. The position of this switch will depend upon the
shape of the tank.
For non-linear tanks, eg. horizontal cylinders, SP09/4 should be OFF. Likewise, for linear tanks
eg. rectangular, SP09/4 is switched OFF. For tanks which are a mixture of both linear and nonlinear SP09/4 should be ON.
5) The next stage is to determine the ideal calibration points in terms of the liquid level. This again
depends upon the shape of the vessel, the setting of SP09/4 and the mounting point of the
transmitter relative to the tank empty point.
For tanks where SP09/4 is OFF the ideal calibration points are determined as follows:
Where the transmitter is installed in line with the tank base the points are determined simply by
dividing the tank depth by 10,
eg. Tank depth = 6000mm
Increments = 6000 = 600mm
10
Where the transmitter is above the tank base the points are determined by dividing the distance
between transmitter and the tank full point.
eg. Tank depth
Transmitter
Increments
6000mm
400mm above base
6000-400 = 560mm
10
Where the transmitter is mounted below the tank base the first increment is the distance up to the
tank base. The remaining nine are calculated by dividing the full tank depth by 9,
eg. Tank depth = 600mm
Transmitter 400mm below base
First increment is at tank base, ie. 400mm above transmitter
Remaining nine = 6000 = 666.66
9
LM Series User Manual
UM/LM/A/97
Page 31
For tanks which are a mixture of linear and non linear sections, ie. SP09/4 is ON, the first point is
again dependant upon the mounting position of the transmitter and is calculated as described
above. The positioning of the remaining nine points is dependent upon the shape of the particular
vessel being calibrated, and the following points should be observed.
The linear section (or sections) of the tank require only 2 points, one at its start and one at its
end. The remaining points should then be equally spaced through the non linear section (or
sections).
Note: The accuracy of this method of correction depends upon selecting the best points.
Measurement Resources will be pleased to provide guidance in this respect.
FILLING THE VESSEL
Having determined the calibration points the vessel is filled in stages to each liquid level via an
accurate flowmeter. Once each level is reached, after allowing the liquid to settle, the ‘SG’ button
followed immediately by the ‘SP’ button should be pressed. The display will then show the value to be
used in the ‘look up’ table level column. This should be noted and alongside it the exact capacity
entered at that point.
Note: It is not necessary to fill exactly to the calculated calibration points but it should be
as close as possible.
Once the vessel is full and all the calibration points have been recorded the unit is programmed in the
normal way. The % level values are entered exactly as read on the display and the % volume values
are calculated as follows:
Value Recorded x 10
Maximum Volume
Note: The total volume entered at the last calibration point is the figure which must be
entered at SP03 (tank capacity).
It may be noted that the % level figure at tank full is less than 100%. This will occur when the
transmitters calibrated range is higher than the tank depth and so its full output is not reached.
SP47 is the final configuration parameter and so after entering the appropriate data configuration mode
is exited by pressing button ‘SG’ which saves the programmed details.
eg:.
at 26750 litres
% level = 1360.77 x 100%
2726
= 49.92%
% Volume - this is calculated using equation:
‘actual content’ x 100%
total content
eg at 26750 litres % volume = - 49.54%
LM Series User Manual
UM/LM/A/97
Page 32
Using these calculations the following table is defined:
Actual Level in mm
0
270.16
551.4
817.06
1089.65
1360.77
1631.46
1913.39
2177.29
2453.75
2726
% Level
SP26 = 0
SP28 = 9.99
SP30 = 20.22
SP32 = 29.97
SP34 = 39.97
SP36 = 49.92
SP38 = 59.85
SP40 = 70.19
SP42 = 79.87
SP44 = 90.01
SP46 = 100
Tank Capacity
0
2750
7750
13500
20000
26750
33500
40250
46000
51000
54000
% Volume
SP27 = 0.00
SP29 = 5.09
SP31 = 14.35
SP33 = 25.00
SP35 = 37.04
SP37 = 49.54
SP39 = 62.04
SP41 = 74.54
SP43 = 85.18
SP45 = 94.44
SP47 = 100
This data is then entered in the normal way.
TANKS HAVING BOTH LINEAR AND NON LINEAR SECTIONS
For vessels of this nature the linear interpolation computation method should be applied to the ‘look up’
table, ie. SP09/4 should be ON. This method enables the look up points to be concentrated in the non
linear sections of the vessel providing the best possible conversion accuracy.
An example of this vessel type is a vertical cylindrical tank having a coned base. Within the coned
based the liquid level/volume relationship is non linear, but is linear in the straight section. This means
it is only necessary to use two look up points for the straight section, one at the top and one at the
bottom, leaving nine points which can be concentrated in the coned section.
INSTRUMENT DETAILS
SP48 to SP54 - These parameters are ‘read only’ information which is entered during factory
configuration of the unit and may not be amended by the user. The parameters, if
quoted to Measurement Resources will confirm exact model and type of the
instrument together with its factory calibration and software variation.
The parameters are as follows:
SP48 - Calibration Zero - normally set to a value of 0.
SP49 - Calibration Span - normally set to a value of 16000.
SP50 - Scale zero - normally set to a value of 800.
SP51 - Scale span - normally set to a value of 3200.
SP52 - Instrument serial number - eg. 21001.
SP53 - Issue date - eg 29048 (29/04/88)
SP54 - Revision eg. 1
SP55 - Type - eg 0.
Depression of the button SP when SP54 is being displayed will cause the unit to prompt for further
password. This password provides access to the factory set up of the unit and as such the user will
not need to enter this mode or make any changes. Therefore at this point button SP will return the unit
LM Series User Manual
UM/LM/A/97
Page 33
directly to Run Mode, or button SG will save any configuration ‘changes’ made to the parameters
SP01 to SP46 and then return to normal Run Mode.
LM Series User Manual
UM/LM/A/97
Page 34
SUMMARY OF SET UP PARAMETERS
SP/SG
01
02
03
04
05
06
07
08
/01
/02
/03
/04
/05
/06
/07
/08
09
/01
/02
/03
/04
/05
/06
/07 & /08
10
11
12
13
14
15
16
17
18
19
20
21
22
23
24
25
26 to 47
- Prompt for Password (12345 from factory)
- Display resolution (0.001 to 100 units)
- Display Filter (0 to 50 secs. response)
- Tank Capacity
- Zero Offset
- Range Factor
- Zero Offset/minimum display - custom unit
- Range Factor/maximum display - custom unit
- Software Switches
- Custom Unit OFF = Display in Volume or Mass
ON = Display in level or head
- Set Trip 3 & 4 operation OFF = as /03 to /06 below. ON = Pump control
- Trip 3 OFF = make on rise. ON = make on fall.
- Trip 4 OFF = make on fall. ON = make on rise.
- Trip 3 OFF = Control Type. ON = Alarm Type.
- Trip 4 OFF = Control Type. ON = Alarm Type.
- Custom unit scaler OFF = display in volume or level. ON = display in Mass or
head.
- Custom unit resolution OFF = XXXXX
ON = XXX.XX
- Software switches
- Global relay enable ON - relays enabled.
- SG changes in Run Mode On = SG changes enabled.
- Setpoint changes in Run Mode ON = changes enabled.
- Look up formula select OFF = 10th order polynomial. ON = linear interpolation.
- ‘Fill’, ‘Empty’ messages. ON = enabled. OFF = not used.
- ‘Fault’, ‘O.Load’ messages. ON = enabled. OFF = not used.
- Reserved.
- Alarm/Control Relay debounce in seconds
- % hysteresis high level alarm
- % hysteresis low level alarm
- % hysteresis Trip 3
- % hysteresis Trip 4
- Setpoint (in % volume) High Alarm
- Setpoint (in % volume) Low Alarm
- Setpoint (in % volume) Trip 3
- Setpoint (in % volume) Trip 4
- Baud Rate for serial port
- Reserved
- Specific Gravity setting
- Reserved
- Second input factor
- Second input factor
- Change user password
- Look Up Table co-ordinate points
LM Series User Manual
UM/LM/A/97
Page 35
48 to 55
- Read Only - configuration details
LM Series User Manual
UM/LM/A/97
Page 36