1
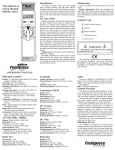
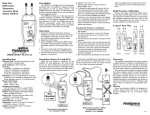
Operation & Maintenance
Instructions for the
Automatic Feed/Retriever
Manufacturers of Quality
Sewer & Drain Cleaning
Equipment since 1957
www.MyTana.com
651-222-8228
746 Selby Ave • St. Paul MN, 55104
fax: 651.222.1739
Factory Direct Customer Service
M –F 7am – 5pm CST
Competent • Polite • Clear
Parts Breakdown for the
MyTana Autofeed/Retriever
Qty Per Unit
Part #
Description
Front disc
1
AF111
Drive pin
3
AF101
Rear disc
1
AF112
Spring retainer
3
AF102
Mounting bracket
1
AF113Spacer
6
AF103
Hand knob
1
AF114
Short housing
2
AF104
Movement assembly
1
AF115
Lower piston(solid)
2
AF104P
Movement stop pin
1
AF116
Thrust bearing
2
AF105
Upper end plate
1
AF117
Thrust race
4
AF106
Long(top) housing
1
AF118
Spacer plate(s)
8
AF107
Upper piston(hollow)
1
AF119
Lower end plate
2
AF108Spring
1
AF120
Conical spring
1
AF109
Pressure pad
1
AF121
Plastic knob
1
AF110
Drive wheel (bearing)
3
AF122
Outlet Collar
1
Part #
Description
AF100
Qty Per Unit
AF103
AF121
AF112
AF110
AF113
AF101
AF105
AF102
AF113
AF106
AF122
AF111
AF104
AF115
AF109
AF120
AF114
AF108
7
11
AF100
AF
AF107
16
1
AF
17
1
AF
AF118
AF119
2
Installing the Auto Feed onto your machine:
Step 1
Pull the top two bolts (that hold the top cylinder in place) back
flush with the backplate of the auto feed.
Step 1
Attach the auto feed by hooking the silver bracket at the back of
the feed onto the bottom flange of the front casting of your sewer
machine. Pull upward on the auto feed so that the top bolts line
up with the holes on the front of the front casting (where toggle
switch is mounted).
Step 1
Secure the auto feed into place by threading the bolts into the
threaded holes.
Step 1
If the silver bracket needs to be adjusted upward for a secure fit,
loosen the bottom two bolts that hold the bracket in place and
slide the bracket upward. The bracket has adjustor slots. Retighten
bolts.
Spacers
The spacer plates at the bottom end of the lower two cylinders
determine the proper space to maximize the grip of the drive
wheels on your cable. Normally, the correct spacing is preset for
the cable you will be using. However, double-check to make sure
(see chart below).
Should you need to adjust spacers, make sure that the drain hole
on the bottom end plates are in the most downward position to
maximize drainage. (see schematic on page 5)
4 spacers
Cable Spacers
Size Required
5/16"0
3/8"1
13/32"1
1/2"2
9/16"3
11/16"4
3/4"4
2 spacers
3
General Operation
Using the Automatic Cable Feed/
Retriever
uNOTE: MyTana machines tend to push cable forward,
out of the machine. For this reason, we recommend
manually feeding the cable into sewer lines and
manually cleaning the obstruction.
1. Disengage auto feed (by loosening screw knob on top
cylinder) and insert cable into pipe opening several feet
before turning on machine. Do not try to insert a spinning
blade into a sewerline!
2. If you choose to use the auto feed for pushing cable into
the sewer line (see “Note” above), move the feed lever
about 10 degrees toward the “F” and turn on your machine.
Turn the screw knob on the top cylinder to the right until
the cable starts to move forward. Do not tighten the knob
more than is required to move the cable forward. Push
lever fully into the forward position.
uProceed with caution, keeping in mind that it
is essential that the cutting blade not be forced
through an obstruction using the forward force
of the auto feed!
3. When your blade finds an obstruction it will usually stop
the rotation of your cutting blade. If the blade does not
release after several seconds of torque by moving the auto
feed lever to the “R” (reverse) position, read instructions
from your machine user manual for releasing a stuck blade.
The most efficient cleaning is achieved by learning how to
use torque build-up in your cable without over-torquing to
the point of damaging cables or blades.
If the cable resists going forward or backward than
one of several things is occurring:
A. You are hitting an obstruction. However, if torque does not
start to build, you may be at an elbow or the blade may
be hitting an offset or break in the sewerline. Apply some
forward pressure manually to help you figure out what it is
there.
B. The feed wheels are worn and need replacing.
C. There is debris hanging onto the end of cable and blade
that is resisting retrieval. In this case manually help the auto
feed pull the cable back into the reel, clear blade of debris
and run cable through sewerline again to make sure all
blockages are removed.
4
4. When the obstruction is removed, place the auto feed/
retriever fully in the “R” position until you hear the blade
nearing the pipe opening. Disengage feed (by turning
screw knob to the left) shut off machine and pull the blade
out of the pipe opening.
The following tips will add life to your cable, blades
and Auto Feed/Retriever.
Avoid turning down the screw knob on top cylinder of feed
too tightly. This causes excessive wear on cable and, if extreme
pressure is applied, can impede the proper rotation of the
cable through the auto feed. The will cause the cable to stack
loosely into the reel, rather than snugly against the outer walls
as it should. Over tightening can also break feed wheels.
Do not run cable fittings (i.e. couplings, splicers, cable ends)
through a tightened down auto feed. Again, this can break
feed wheels. Release the feed, pull fittings through manually
and then re-engage.
Turn screw knob only as far as needed to move cable back or
forth.
Lubrication
Routine Maintenance
As with any mechanical device, proper care will maximize the
life of your MyTana automatic feed/retriever. Keeping it clean
and properly lubricated is essential.
Watch for wear on drive wheels (bearings) and drive pins.
The feed unit has been greased at the factory. However,
routinely continue to grease all housing equipped with zerks
(grease fittings).
Remove front disc periodically, clean and lubricate. Free movement of the front disc is crucial to proper movement
of cylinders and drive wheels.
Make sure drive pins stay in designated slots on
movement disc.
Remove debris (i.e. rags, string, hair) from cable before running
through the feed. This kind of debris can clog up the feed
wheels and movement parts rather quickly.
If feed will not used for a period of time, lubricate before
storage.
Replacing Drive Wheels
(Drive Bearings)
1. Remove auto feed from machine
2. Remove six acorn nuts and lockwashers
AF113
3. Remove front disc and movement assembly
4. Slip cylinder housing (whichever one that needs new drive
wheel) from hex bolts
AF110
AF113
AF112
AF111
5. Remove piston from housing (it will lift out of housing)
6. 6. Remove clip spring that holds drive pin
7. Carefully pull out drive pin
8. Remove spacers and drive wheels
9. Clean all parts in cleaning solvent before reversing
procedure to install new drive wheel(s)
uNOTE: While installing new drive wheels, take the time
to clean up cylinder housing. There are thrust bearing
(and two races) at the bottom of each cylinder that
need to be cleaned periodically. These parts can be
accessed by removing the spacer plates and end cap at
the bottom of the housing.
AF112
AF110
Figure 7
AF113
AF113
AF111
5