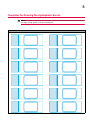
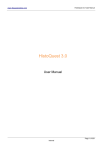
1
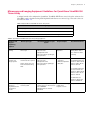
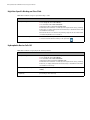
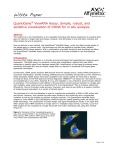
User Manual QuantiGene® ViewRNA ISH Tissue Assay Format: 2-Plex Sample: OCT-Embedded Frozen Tissues Equipment: ThermoBrite Hybridization System P/N 18960 Rev.A 120414 For research use only. Not for use in diagnostic procedures. Trademarks Affymetrix® , and QuantiGene® are trademarks of Affymetrix, Inc. All other trademarks are the property of their respective owners. Limited License Subject to the Affymetrix terms and conditions that govern your use of Affymetrix products, Affymetrix grants you a non-exclusive, nontransferable, non-sublicensable license to use this Affymetrix product only in accordance with the manual and written instructions provided by Affymetrix. You understand and agree that, except as expressly set forth in the Affymetrix terms and conditions, no right or license to any patent or other intellectual property owned or licensable by Affymetrix is conveyed or implied by this Affymetrix product. In particular, no right or license is conveyed or implied to use this Affymetrix product in combination with a product not provided, licensed, or specifically recommended by Affymetrix for such use. Citing QuantiGene ViewRNA in Publications When describing a procedure for publication using this product, please refer to it as the QuantiGene ViewRNA ISH Tissue Assay. Disclaimer Affymetrix, Inc. reserves the right to change its products and services at any time to incorporate technological developments. This manual is subject to change without notice. Although this manual has been prepared with every precaution to ensure accuracy, Affymetrix, Inc. assumes no liability for any errors or omissions, nor for any damages resulting from the application or use of this information. Copyright © 2012 Affymetrix Inc. All rights reserved. Contents Chapter 1 Introduction . . . . . . . . . . . . . . . . . . . . . . . . . . . . . . . . . . . . . . . . . . . . . . . . . . . 1 About This Manual . . . . . . . . . . . . . . . . . . . . . . . . . . . . . . . . . . . . . . . . . . . . . . . . . . . . . . . . 1 Related User Documents . . . . . . . . . . . . . . . . . . . . . . . . . . . . . . . . . . . . . . . . . . . . . . . . . . . . 1 Assay Overview . . . . . . . . . . . . . . . . . . . . . . . . . . . . . . . . . . . . . . . . . . . . . . . . . . . . . . . . . . . 1 How it Works . . . . . . . . . . . . . . . . . . . . . . . . . . . . . . . . . . . . . . . . . . . . . . . . . . . . . . . . . . 2 Performance Highlights . . . . . . . . . . . . . . . . . . . . . . . . . . . . . . . . . . . . . . . . . . . . . . . . . . . 3 Safety Warnings and Precautions . . . . . . . . . . . . . . . . . . . . . . . . . . . . . . . . . . . . . . . . . . . . . 3 Required Materials . . . . . . . . . . . . . . . . . . . . . . . . . . . . . . . . . . . . . . . . . . . . . . . . . . . . . . . . 4 QuantiGene ViewRNA ISH Tissue Assay Kit . . . . . . . . . . . . . . . . . . . . . . . . . . . . . . . . . . . . 4 QuantiGene ViewRNA Probe Sets . . . . . . . . . . . . . . . . . . . . . . . . . . . . . . . . . . . . . . . . . . . 5 Required Materials and Equipment Not Provided . . . . . . . . . . . . . . . . . . . . . . . . . . . . . . . . 5 Microscopy and Imaging Equipment Guidelines for QuantiGene ViewRNA ISH Tissue Assay . 7 Chapter 2 Assay Guidelines . . . . . . . . . . . . . . . . . . . . . . . . . . . . . . . . . . . . . . . . . . . . . . . 9 Tissue Preparation Guidelines . . . . . . . . . . . . . . . . . . . . . . . . . . . . . . . . . . . . . . . . . . . . . . 9 Experimental Design Guidelines . . . . . . . . . . . . . . . . . . . . . . . . . . . . . . . . . . . . . . . . . . . . . 9 Probe Set Considerations . . . . . . . . . . . . . . . . . . . . . . . . . . . . . . . . . . . . . . . . . . . . . . . . 10 Chapter 3 QuantiGene ViewRNA ISH Tissue Assay Procedure . . . . . . . . . . . . . . . . . . . 11 About the QuantiGene ViewRNA ISH Tissue Assay Procedure . . . . . . . . . . . . . . . . . . . . . 11 Important Procedural Notes and Guidelines . . . . . . . . . . . . . . . . . . . . . . . . . . . . . . . . . . .11 Essential Keys for a Successful Assay . . . . . . . . . . . . . . . . . . . . . . . . . . . . . . . . . . . . . . . . 11 Part 1: Sample Preparation and Target Probe Hybridization . . . . . . . . . . . . . . . . . . . . . . . . . 12 Part 1 Procedure . . . . . . . . . . . . . . . . . . . . . . . . . . . . . . . . . . . . . . . . . . . . . . . . . . . . . . . 12 Part 2: Signal Amplification and Detection . . . . . . . . . . . . . . . . . . . . . . . . . . . . . . . . . . . . . 15 Part 2 Procedure . . . . . . . . . . . . . . . . . . . . . . . . . . . . . . . . . . . . . . . . . . . . . . . . . . . . . . . 15 Chapter 4 Troubleshooting . . . . . . . . . . . . . . . . . . . . . . . . . . . . . . . . . . . . . . . . . . . . . . 19 Contacting Technical Support . . . . . . . . . . . . . . . . . . . . . . . . . . . . . . . . . . . . . . . . . . . . . 19 Weak or No Signals . . . . . . . . . . . . . . . . . . . . . . . . . . . . . . . . . . . . . . . . . . . . . . . . . . . . . 19 Diffused Signals . . . . . . . . . . . . . . . . . . . . . . . . . . . . . . . . . . . . . . . . . . . . . . . . . . . . . . .21 Poor Cell Morphology . . . . . . . . . . . . . . . . . . . . . . . . . . . . . . . . . . . . . . . . . . . . . . . . . . . 21 Tissue Detachment from Slide . . . . . . . . . . . . . . . . . . . . . . . . . . . . . . . . . . . . . . . . . . . . . 21 High Non-Specific Binding on Glass Slide . . . . . . . . . . . . . . . . . . . . . . . . . . . . . . . . . . . . . 22 Hydrophobic Barrier Falls Off . . . . . . . . . . . . . . . . . . . . . . . . . . . . . . . . . . . . . . . . . . . . . . 22 High Background . . . . . . . . . . . . . . . . . . . . . . . . . . . . . . . . . . . . . . . . . . . . . . . . . . . . . . 23 iv QuantiGene® ViewRNA ISH Tissue Assay User Manual Appendix A Assay Optimization Procedures . . . . . . . . . . . . . . . . . . . . . . . . . . . . . . . . . . 25 About the Optimization and Typical Results . . . . . . . . . . . . . . . . . . . . . . . . . . . . . . . . . . .25 Optimization Procedure Overview . . . . . . . . . . . . . . . . . . . . . . . . . . . . . . . . . . . . . . . . . .25 Experimental Design Layout for Optimization . . . . . . . . . . . . . . . . . . . . . . . . . . . . . . . . . 25 Important Procedural Notes and Guidelines . . . . . . . . . . . . . . . . . . . . . . . . . . . . . . . . . . .26 Essential Keys for a Successful Assay . . . . . . . . . . . . . . . . . . . . . . . . . . . . . . . . . . . . . . . . 26 Sample Preparation and Target Probe Hybridization . . . . . . . . . . . . . . . . . . . . . . . . . . . . . . 26 Procedure . . . . . . . . . . . . . . . . . . . . . . . . . . . . . . . . . . . . . . . . . . . . . . . . . . . . . . . . . . . . 26 Appendix B Templates for Drawing the Hydrophobic Barrier . . . . . . . . . . . . . . . . . . . . 29 1 Introduction About This Manual This manual provides complete instructions for performing the QuantiGene ViewRNA ISH Tissue Assay for visualization of 2 target RNAs in OCT-embedded frozen tissue samples prepared in accordance with the guidelines provided. This manual provides assay procedures that utilize the ThermoBrite denaturation/hybridization system. Related User Documents See the following documents for assay instructions that utilize additional sample types and equipment. Table 1.1 Related Manuals for Other Sample Types and Equipment Document Format Sample Type Equipment QuantiGene ViewRNA ISH Tissue Assay User Manual 2-Plex OCT-Embedded Frozen Tissue Sections Dry Oven and Humidified Incubator QuantiGene ViewRNA ISH Tissue Assay User Manual 2-Plex FFPE Tissue Sections ThermoBrite denaturation/ hybridization system QuantiGene ViewRNA ISH Tissue Assay User Manual 2-Plex FFPE Tissue Sections Dry Oven and Humidified Incubator See the QuantiGene ViewRNA ISH Tissue Assay Supplemental Reference Guide for the following information: Guidelines for data interpretation Typical results for assay optimization Troubleshooting images, examples of backgrounds Assay specificity Guidance for fluorescence and brightfield imaging Procedure for remounting slides Procedure for RNase treatment of samples Procedure for DNase treatment of samples Assay Overview In situ hybridization (ISH) techniques are used to visualize DNA or RNAs within cells in tissue. However, the in situ analysis of RNA has always been limited by low sensitivity and difficult probe synthesis. The QuantiGene® ViewRNA ISH Tissue Assay, based on branched DNA signal amplification technology, has the sensitivity and robustness to measure two different genes at single copy sensitivity. The assay design is illustrated and explained in Figure 1.1. 2 QuantiGene® ViewRNA ISH Tissue Assay User Manual How it Works Figure 1.1 QuantiGene ViewRNA ISH Tissue Assay Workflow Sample Preparation. FFPE or frozen tissue sections are fixed, then permeabilized to allow target accessibility. Target Hybridization. A target-specific Probe Set(s) hybridizes to the target RNA(s). Subsequent signal amplification is predicated on specific hybridization of adjacent Probe Set oligonucleotides indicated by “II” in the image above. A typical Probe Set will contain 20 oligonucleotides pairs (“II”), for simplicity only two are shown. TYPE 1 Probe Sets will generate red dot patterns while TYPE 6 Probe Sets will generate blue dot patterns. Separate but compatible signal amplification systems enable the multiplex assay. Signal Amplification. Signal Amplification is achieved via a series of sequential hybridization steps. The PreAmplifier hybridizes to each pair of bound Probe Set oligonucleotides, then multiple Amplifier hybridize to each PreAmplifier. Next, multiple Label Probe oligonucleotides conjugated to alkaline phosphate hybridize to each Amplifier. Each Amplifier branched structure has about 400 binding sites for the Label Probe and each gene typically contains about 20 Amplifiers or 8,000 binding sites. Detection. The sequential addition of Fast Blue and Fast Red alkaline phosphatase substrates produce precipitate blue and red dots that indicate the presence of the target RNA molecules. Target mRNA is visualized using a standard brightfield or fluorescence microscope. Chapter 1 | Introduction Performance Highlights Table 1.2 Performance Highlights Specification Description Sample types OCT-embedded frozen tissue or formalin-fixed paraffin-embedded (FFPE) tissue sections Assay area 20 x 30 mm on standard 25 x 75 mm glass slide FFPE tissue thickness: 5 ± 1 μm Fresh frozen thickness: 11 ± 2 μm FFPE tissue microarray (TMA): Greater than 1 mm diameter and 5 ± 1 μm thickness Sensitivity Single RNA molecule per dot Multiplexing Simultaneous detection of 2 target RNAs Detection Chromogenic and fluorescence Nuclear stain Hematoxylin and/or DAPI Instrumentation brightfield and/or fluorescence microscope or scanner Safety Warnings and Precautions Formaldehyde is a poison and an irritant. Avoid contact with skin and mucous membranes. Use in a fume hood. Ammonium hydroxide is highly volatile. Use in a fume hood. Perform all procedural steps in a well-ventilated area at room temperature unless otherwise noted. Discard all reagents in accordance with local, state, and federal laws. 3 4 QuantiGene® ViewRNA ISH Tissue Assay User Manual Required Materials The QuantiGene ViewRNA ISH Tissue Assay is composed of the following 2 modules, each sold separately and available in multiple sizes: QuantiGene ViewRNA ISH Tissue Assay Kit QuantiGene ViewRNA TYPE 1 and TYPE 6 Probe Sets QuantiGene ViewRNA ISH Tissue Assay Kit QuantiGene ViewRNA ISH Tissue Assay Kits are available in two sizes: QVT0010 and QVT0011, sufficient for 24 or 96 assays respectively. Each kit is configured for processing a minimum of 6 or 12 slides, respectively, per experiment. The components of the QuantiGene ViewRNA ISH Tissue Assay Kit and their recommended storage conditions are listed below. Refer to the Package Insert for quantities of individual components supplied. Kits are shipped in 2 parts, based on storage conditions and have a shelf life of 6 months from date of delivery when stored as recommended. Table 1.3 Assay Kit Components and Their Storage Conditions Component Description 100X Pretreatment Solution Aqueous buffered solution 2-8 °C Protease QFa Enzyme in aqueous buffered solution 2-8 °C Probe Set Diluent QT Aqueous solution containing formamide, detergent, and blocker 2-8 °C Label Probe Diluent QF Aqueous solution containing detergent 2-8 °C PreAmplifier Mix QT DNA in aqueous solution containing formamide and detergent 2-8 °C Amplifier Mix QT DNA in aqueous solution containing formamide and detergent 2-8 °C Label Probe 6-AP Alkaline phosphatase-conjugated oligonucleotide in aqueous buffered solution 2-8 °C Blue Buffer Buffer required for preparation for Blue Substrate 2-8 °C Blue Reagent 1 Blue precipitating substrate component 1 for the detection of alkaline phosphatase activity 2-8 °C Blue Reagent 2 Blue precipitating substrate component 2 for the detection of alkaline phosphatase activity 2-8 °C Blue Reagent 3 Blue precipitating substrate component 3 for the detection of alkaline phosphatase activity 2-8 °C AP Enhancer Solution Aqueous buffered solution 2-8 °C Fast Red tablets Red precipitating substrate for the detection of alkaline phosphatase activity 2-8 °C Naphthol Buffer Buffer required for preparation of Red Substrate 2-8 °C Label Probe 1-AP Alkaline phosphatase-conjugated oligonucleotide in aqueous buffered saline 2-8 °C Wash Buffer Component 1 (Wash Comp 1) Aqueous solution containing detergent 15-30 °C Wash Buffer Component 2 (Wash Comp 2) Aqueous buffered solution 15-30 °C a IMPORTANT! Do not freeze. Storage Chapter 1 | Introduction QuantiGene ViewRNA Probe Sets In addition to the QuantiGene ViewRNA ISH Tissue Assay Kit, QuantiGene ViewRNA TYPE 1 and TYPE 6 Probe Sets, specific to your targets of interest, must be purchased separately. Probe Sets are available in multiple sizes and should be stored at –20 °C. Refer to the Package Insert for quantities provided and design specificities. Table 1.4 ViewRNA Probe Set and Storage Conditions Component Description Storage QuantiGene ViewRNA TYPE 1 Probe Set RNA-specific oligonucleotides to your target of interest and compatible with the TYPE 1 Signal Amplification system comprised of: PreAmp Mix QT, Amp Mix QT, Label Probe 1-AP, and Fast Red substrate –20 °C QuantiGene ViewRNA TYPE 6 Probe Set RNA-specific oligonucleotides to your target of interest and compatible with the TYPE 6 Signal Amplification system comprised of: PreAmp Mix QT, Amp Mix QT, Label Probe 6-AP, and Fast Blue Substrate –20 °C Required Materials and Equipment Not Provided Other materials required to perform the QuantiGene ViewRNA ISH Tissue Assay that are not included in the QuantiGene ViewRNA ISH Tissue Assay Kit are listed here. IMPORTANT: When specified, do not use alternate materials or suppliers. Table 1.5 QuantiGene ViewRNA Tissue Assay Materials and Equipment Material Source Part Number Tissue Tek Staining Dish (clear color, 3 required) (clear staining dish) Affymetrix or American Master Tech Scientific QVC0502 LWT4457EA Tissue Tek Vertical 24 Slide Rack American Master Tech Scientific LWSRA24 Aluminum slide rack VWR 100493380 Double-distilled water (ddH20) MLS (major laboratory supplier) 100% Ethanol VWR 89125-172 10X PBS, pH 7.2-7.4 Bio-Rad Laboratories or Invitrogen 161-0780 Gill's Hematoxylin I American Master Tech Scientific HXGHE1LT 37% Formaldehyde Fisher Scientific F79-1 27-30% Ammonium Hydroxide VWR JT9726-5 Hydrophobic Barrier Pen Affymetrix or Vector Laboratories QVC0500 H4000 Ultramount or Advantage Mounting Media DAKO Innovex S1964 NB300 Cover Glass, 24 mm x 55 mm VWR or Affymetrix 48382-138 QVC0501 700134-032 5 6 QuantiGene® ViewRNA ISH Tissue Assay User Manual Table 1.5 QuantiGene ViewRNA Tissue Assay Materials and Equipment (Continued) Material Source Part Number Optional. DAPIa Invitrogen D3571 ThermoBrite Humidity Strips Abbott Molecular 07J68-001 ThermoBrite Denaturation/Hybridization System 110/120 VAC Abbott Molecular 07J91-010 QuantiGene View Temperature Validation Kit Affymetrix QV0523 Pipettes, P20, P200, P1000 MLS Fume hood (for dispensing formaldehyde and ammonium hydroxide) MLS Table-top microtube centrifuge MLS Water Bath capable of maintaining 40 ± 1 °C MLS Microscope and imaging equipment See QuantiGene ViewRNA ISH Tissue Assay Imaging Options on page 7 Equipment a Required for fluorescence detection Chapter 1 | Introduction 7 Microscopy and Imaging Equipment Guidelines for QuantiGene ViewRNA ISH Tissue Assay A unique benefit of the Affymetrix QuantiGene ViewRNA ISH Tissue Assay is that the stains used to label RNA can be visualized using both brightfield and fluorescence microscopy. The stain colors are described in Table 1.6. Table 1.6 QuantiGene ViewRNA ISH Tissue Assay Stains Stain/Detection Molecule Staining Reagent Stain Color/Fluorescence RNA 1 (using TYPE 1 probe) Fast Red Red dot/Red dot RNA 2 (using TYPE 6 probe) Fast Blue Dark blue dot/Far red dot Hemotoxylin/DAPI Light blue/Dark blue Nuclear stain Table 2 QuantiGene ViewRNA ISH Tissue Assay Imaging Options Viewing and Digital Capturing Options Brightfield viewing Microscope Type Standard brightfield microscope Recommended Microscope/ System Fluorescence viewing and image capture Microscope with camera and fluorescence options Verify camera does not have infrared blocking filter Required Optics Leica DM series Nikon E series Olympus BX series Zeiss Axio Lab/Scope /Imager Or equivalent Requires 20 and 40x objectives Leica DM series Nikon E series Olympus BX series Zeiss Axio Lab/Scope/Imager Or equivalent Requires 20 and 40x objectives Numerical Aperture (NA) ≥0.5 Recommended Filter Requires neutral density filters and/or color filters for white balancing For Fast Red Substrate, use Cy3/TRITC filter set: Excitation: 530 ± 20 nm Emission: 590 ± 20 nm Dichroic: 562 nm For Fast Blue Substrate, use custom filter set:a Excitation: 630 ± 20 nm Emission: 775 ± 25 nm Dichroic: 750 nm For DAPI filter set Excitation: 387/11 nm Emission: 447/60 nm Automated image capture in brightfield and/or fluorescence modes a Recommended Digital pathology scanner system Aperio ScanScope AT/XT/CS, use FL version for fluorescence Leica SCN400-F Olympus Nanozoomer RS Or similar vendor: Semrock Cy7-B/Alexa 750 filter modified with excitation filter FF02-628/40-25. Recommend scanning at 40x when expression is low Compatible to above 8 QuantiGene® ViewRNA ISH Tissue Assay User Manual 2 Assay Guidelines Tissue Preparation Guidelines The following are critical guidelines for preparation of OCT-embedded frozen tissue sections for use with the QuantiGene ViewRNA ISH Tissue Assay. Samples prepared outside of these guidelines may not produce optimal results. Frozen Tissue Preparation Upon removal of tissue, immediately snap freeze the tissue using liquid nitrogen then embed into OCT block. If OCT preparation cannot be performed immediately, keep tissues on dry ice during the processing and transport to minimize RNA degradation. Store samples at -80 °C until sectioning. Frozen Tissue Slide Preparation Samples should be sectioned at 12 ± 1 µm Mount a single section onto one of the following positively-charged glass slides: Leica SurgiPath X-tra P/N 3800200 Tru Scientific TruBond360 P/N 0360W Mercedes StarFrost Platinum P/N MER 7200 Prepared frozen tissue slides should be used immediately in the assay or can be stored at -80 °C for up to 6 months. Ship at -80 °C Experimental Design Guidelines Assay Controls We recommend running positive and negative control slides, based on your sample type, in every QuantiGene ViewRNA ISH Tissue Assay. This will allow you to qualify/interpret your results. Negative Control This slide undergoes the entire assay procedure and assesses the assay background. The negative control can be one of the following: Omitting target Probe Set(s) Using a Probe Set designed to the sense strand of target Using a target not present in your sample, for example the bacterial gene DapB Positive Control This slide undergoes the entire assay procedure using Probe Set(s) for targets that have a consistently high to medium-high homogenous or cell-type specific expression in your sample type. This control ensures the assay procedure has been run successfully. The following are examples of genes to use: Housekeeping genes: ACTB, GAPD, or UBC. Housekeeping Pan Panel (pool the individual housekeeping genes together) Replicates We recommend running all assays in duplicate. 10 QuantiGene® ViewRNA ISH Tissue Assay User Manual Recommended Assay Optimization When working with a new tissue type, we recommend performing the assay optimization procedure as described in Assay Optimization Procedures on page 25 to identify the optimal protease digestion time to un-mask the mRNA. Applying the optimal condition will not only provide a favorable environment for the QuantiGene ViewRNA Probe Set to bind to the target mRNA but will also have an impact on the final chromogenic staining quality and tissue morphology. Once identified, the same optimal condition can be used for different Probe Sets. Probe Set Considerations QuantiGene ViewRNA Probe Sets, TYPE specific, are designed to a specified region of a target RNA. TYPE 1 Probe Set(s) will be visualized using a Fast Red substrate, alkaline phosphatase breaks down the substrate to form a dark red precipitate wherever the target RNA molecule is localized. This vivid red color is easily visible to the eyes in brightfield. TYPE 6 Probe Set(s) will be visualized using a Fast Blue substrate, alkaline phosphatase breaks down the substrate to form a dark blue precipitate wherever the target RNA molecule is localized. The dark blue color is visible to the eyes in brightfield; however the contrast, especially when expression is very low and in the presence of hematoxylin nuclear staining, may make it more difficult to visualize under lower magnifications (10X). Our recommendation, when defining which target(s) will be of a particular TYPE, is to assign the lowest expressing target to TYPE 1 and the higher expressing target to TYPE 6. This recommendation is based on the easy of viewing by eye under brightfield using 10X magnification. Probe Sets, TYPE specific, can be combined to create “pan” panels or target cocktails. For example, if you wanted to identify epithelial cells, you could combining several cytokeretins. To do this, you would add, for example, TYPE 1 Probe Sets for KRT5, KRT7, KRT8, KRT10, KRT18, KRT19 and KRT20 into a single assay. We do not recommend combining more than 10 targets for a specific signal amplification system (for example, TYPE 1 or TYPE 6) in a single assay. Another example might be creating a pan housekeeping panel as a positive internal assay control to assess RNA integrity. In this case, you might add TYPE 6 Probe Sets for UBC, ACTB, PPIB and GAPD into a single assay well. Typically, QuantiGene ViewRNA Probe Set designs cover approximately 1,000 bases and contain 20 pairs of oligos to achieve maximal sensitivity. The requirement for a pair of oligos to bind, side-by-side, in order to build the signal amplification system, is at the core of the assays sensitivity and specificity. The use of multiple pairs of oligos in a Probe Set ensure that we have many opportunities for binding to the specific targets’ unmasked regions (accessible regions), and generating signal at that location. If you are working with smaller targets, or applications such as splice variants or RNA fusions, there are only a few available pairs of oligos in a Probe Set and this will directly impact assay sensitivity. That is, probes will have fewer opportunities to find unmasked areas of the target and generate signal at that location. In these cases, increasing the Probe Set concentration used in the assay might increase the sensitivity. 3 QuantiGene ViewRNA ISH Tissue Assay Procedure About the QuantiGene ViewRNA ISH Tissue Assay Procedure The QuantiGene ViewRNA ISH Tissue Assay procedure is broken up into 2 parts that are performed over 2 days: Part 1: Sample Preparation and Target Probe Set Hybridization (day 1) Part 2: Signal Amplification and Detection (day 2) We do not recommend stopping the procedure at any other point in the assay. Important Procedural Notes and Guidelines Procedure assumes running a maximum of 12 slides at a time. Do not mix and match kit components from different kit lots. Before beginning procedure, know the protease digestion time (optimized condition) for your sample type. If you do not know these optimized conditions, refer to Appendix A, Assay Optimization Procedures on page 25. Throughout the procedure, dedicate one clear staining dish for fixing in formaldehyde (we recommend labeling this dish). The other two clear staining dishes can be used interchangeably for: 1X PBS, Wash Buffer, and Storage Buffer. Rinse staining dishes in between steps with ddH2O. Typical processing times included in the assay procedure assume that preparation for the following step is being done during the incubation periods. Essential Keys for a Successful Assay Prepare samples following Tissue Preparation Guidelines on page 9. Organize the preparation of the assay before you start: Verify that all materials and equipment are available Be mindful of the incubation times/temperatures, there are small tolerances Double-check all reagent calculations, concentration of reagents is critical Employ good washing techniques. Frequently, this washing is performed too gently. Adequate washing is important for consistent low backgrounds. Verify and validate temperatures for all equipment with the QuantiGene View Temperature Validation Kit DO NOT let tissues dry out where indicated in the procedure Incorporate controls, both positive and negative, so that ambiguous results can be interpreted. See Experimental Design Guidelines on page 9. Refer to the Quick Reference Guide to quickly get an overview of the assay workflow. Once you become familiar with the procedures, you can rely on this quick guide and a Reagent Preparation Guide for running the assay. 12 QuantiGene® ViewRNA ISH Tissue Assay User Manual Part 1: Sample Preparation and Target Probe Hybridization Part 1 Procedure Step Step 1. Tissue Pretreatment 16-18 hr Action A. Prepare 3 L of 1X PBS: To a 3 L container add 300 mL of 10X PBS and 2.7 L ddH2O. B. Prepare chilled 4%formaldehyde in 1X PBS in a fume hood: To a 200 mL capacity container add 178 mL 1X PBS and 22 mL of 37% formaldehyde and mix well. Refrigerate at 4 °C for 1 hr. C. Insert slides into an empty slide rack and submerge into a clear staining dish containing chilled 4% formaldehyde. Incubate 16-18 hour at 4C. D. Remove the slide rack from the chilled 4% formaldehyde and submerge it into a clear staining dish containing 200 mL of 1X PBS. Incubate for 1 min with frequent agitation. E. Decant the 1X PBS, refill with 200 mL of fresh 1X PBS and incubate for 1 min with frequent agitation. F. Pour 4% formaldehyde back into the 200 mL container and save for later use. Store at RT. Step 2. Tissue Dehydration A. Ensure availability of: 200 mL 100% ethanol 65 min B. C. 200 mL 70% ethanol. To a 200 mL capacity container add 140 mL of 100% ethanol to 60 mL of ddH2O 200 mL of 50% ethanol. To a 200 mL capacity container add 100 mL of 100% ethanol to 100 mL of ddH2O Pour 200 mL of 50% ethanol into a clean clear staining dish. Remove the slide rack from the 1X PBS and submerge it into the 50% ethanol. Move slide rack up and down 3 times. Cover with lid and incubate for 10 min at RT without agitation. D. Pour 200 mL of 70% ethanol into a clean clear staining dish. E. Remove the slide rack from the 50% ethanol and submerge it into the 70% ethanol. Move slide rack up and down 3 times. Cover with lid and incubate for 10 min at RT without agitation. F. Pour 200 mL of 100% ethanol into a clean clear staining dish. G. Remove the slide rack from the 70% ethanol and submerge it into the 100% ethanol. Move slide rack up and down 3 times. Cover with lid and incubate for 10 min at RT without agitation. H. Remove the slides from the slide rack and place them face up on a paper towel to air dry for 5 min at RT. Discard all ethanol solutions. I. J. Step 3. Draw Hydrophobic Barrier Set ThermoBrite at 60 ± 1°C and bake the slides for 30 min with the lid open. A. Dab the hydrophobic pen on a paper towel several times before use to ensure proper flow of the hydrophobic solution. B. 1 hr Use a pencil to label the slides. To create a hydrophobic barrier, place the slide over the template image below, tissue sections should fall inside blue rectangle, and lightly trace the thick blue rectangle 2 to 4 times with the Hydrophobic Barrier Pen to ensure a solid seal. Allow for barrier to dry at RT for 20-30 min. Chapter 3 | QuantiGene ViewRNA ISH Tissue Assay Procedure 13 Step Step 4. Prepare Buffers and Reagents Action A. Prepare 4 L of Wash Buffer: To a 4 L capacity container add components in the following order and mix well: 1 hr B. 3 L ddH2O 36 mL Wash Comp 1 10 mL Wash Comp 2 ddH2O to 4 L. Prepare 200 mL of Storage Buffer: To a 200 mL container add 60 mL of Wash Comp 2 to 140 mL ddH2O and mix well. C. Prewarm 40 mL of 1X PBS and Probe Set Diluent QT to 40 ± 1 °C. D. Thaw Probe Set(s). Place on ice until use. Step 5. Protease Digestion and Fixation IMPORTANT: From this point forward, do not let tissue sections dry out. 30-50 min, depending on optimized time A. Set the ThermoBrite to 40 ± 1 °C and insert two wet ThermoBrite Humidity strips. B. Using the table below as a guide, prepare the Working Protease Solution by diluting the Protease QF 1:100 in prewarmed 1X PBS. Scale reagents according to the number of assays to be run. Include one slide volume overage. Working Protease Solution per Slide Reagent Volume Protease QF 4 μL 1X PBS (prewarmed to 40 °C) 396 μL Total volume 400 μL C. Place the slides flat face up on the lab bench and immediately add 400 μL of the Working Protease Solution onto the tissue section. D. Place the slides in the ThermoBrite. Close the lid and incubate at 40 °C for the optimal time as determined in the Assay Optimization Procedures on page 25. E. F. Pour 200 mL of 1X PBS into a clear staining dish and insert an empty rack into it. After incubation, decant the Working Protease Solution from the slides, insert them into the slide rack and rinse by moving up and down for 1 min. G. Decant the 1X PBS, refill with 200 mL of fresh 1X PBS and rinse by moving slide rack up and down for 1 min. H. Transfer the slide rack into the clear staining dish containing 4% formaldehyde and incubate under a fume hood for 5 min at RT. I. J. Decant the clear staining dish containing 1X PBS and refill with 200 mL of fresh 1X PBS. Transfer the slide rack from the 4% formaldehyde solution to the clear staining dish containing 1X PBS, and incubate for 1 min with frequent agitation. K. Decant the 1X PBS, refill with 200 mL of fresh 1X PBS and rinse by moving slide rack up and down for 1 min. L. Transfer the 4% formaldehyde solution to a 200 mL capacity container, keep for later use. 14 QuantiGene® ViewRNA ISH Tissue Assay User Manual Step Step 6. Target Probe Set Hybridization Action A. Using the table below as a guide, prepare the Working Probe Set Solutions by diluting the QuantiGene ViewRNA Probe Set(s) 1:40 in prewarmed Probe Set Diluent QT and briefly vortex. Scale reagents according to the number of assays to be run. Include one slide volume overage. 2 hr 10 min Working Probe Set Solution per Slide Reagent Volume Probe Set Diluent QT (prewarmed to 40 °C) 380 μL QuantiGene ViewRNA TYPE 1 Probe Set 10 μL QuantiGene ViewRNA TYPE 6 Probe Set 10 μL Total volume 400 μL B. Remove each slide and flick it to remove 1X PBS. Tap the slide on its edge then wipe the backside on a laboratory wipe. C. Place the slides flat face up on the lab bench and immediately add 400 μL Working Probe Set Solution to each tissue section. D. Place the slides in the ThermoBrite, close the lid and incubate at 40 °C for 2 hr. Step 7. Wash Slides A. Insert an empty slide rack into a clear staining dish containing 200 mL of Wash Buffer. B. After incubation, decant the Working Probe Set Solution from the slides and insert them 10 min into the slide rack. C. Incubate the slides in Wash Buffer at RT for 2 min with frequent agitation. D. Decant the Wash Buffer, refill with 200 mL fresh Wash Buffer and incubate the slides at RT for 2 min with frequent agitation. Repeat this step one more time for a total of 3 washes. Step 8. Stop Point A. Store slides in a clear staining dish containing 200 mL of Storage Buffer for up to 24 hours at RT. 1 min B. The following reagent preparations should be stored at RT for use in Part 2: 4% formaldehyde 1X PBS Wash Buffer C. All other reagent and solution preparations should be discarded. D. When you are ready to continue the assay, proceed to Step 9. Prepare Additional Buffers and Reagents on page 15. Chapter 3 | QuantiGene ViewRNA ISH Tissue Assay Procedure 15 Part 2: Signal Amplification and Detection Part 2 Procedure Step Step 9. Prepare Additional Buffers and Reagents 10 min Action A. Prepare 1 L of 0.01% ammonium hydroxide in ddH2O: In a fume hood, add 0.33 mL 30% ammonium hydroxide to 999.67 mL ddH2O and mix well. B. Ensure availability of 200 mL Gill’s Hematoxylin. Pour into a clear staining dish and store at RT away from light until use. C. If you plan on using fluorescence detection, prepare 200 mL DAPI. The final dilution of DAPI should be 3.0 μg/mL in 1X PBS. Store in the dark at 4 °C until use or place on ice. D. Prewarm PreAmplifier Mix QT, Amplifier Mix QT, and Label Probe Diluent QF buffers to 40 °C. E. F. Place Label Probe 1-AP, Label Probe 6-AP, and Blue reagents on ice. Bring Fast Red Tablets, Naphthol Buffer, AP Enhancer Solution, and Blue Buffer to RT. Step 10. Wash Slides A. Remove the slides from Storage Buffer, transfer slide rack to clear staining dish containing 5 min B. Step 11. PreAmp Hybridization A. Set the ThermoBrite to 40 ± 1 °C and rewet the ThermoBrite Humidity strips with ddH2O. B. Swirl PreAmplifier Mix QT bottle briefly to mix the solution. C. Remove each slide and flick it to remove the Wash Buffer. Tap the slide on its edge then Wash Buffer, and incubate for 2 min with frequent agitation. 30 min Decant Wash Buffer, refill with 200 mL fresh Wash Buffer, and incubate for 2 min with frequent agitation. wipe the backside on a laboratory wipe. Place slides flat face up on the lab bench and immediately add 400 μL of PreAmplifier Mix QT directly to each tissue section. D. Place slides in the ThermoBrite. Close the lid and incubate at 40 °C for 25 min. Step 12. Wash Slides A. Insert an empty slide rack into a clear staining dish containing 200 mL of Wash Buffer. B. After incubation, decant the PreAmplifier Mix QT from the slides and insert them into the 10 min slide rack. C. Incubate the slides in Wash Buffer at RT for 2 min with frequent agitation. D. Decant the Wash Buffer, refill with 200 mL fresh Wash Buffer and incubate the slides at RT for 2 min with frequent agitation. Repeat this step one more time for a total of 3 washes. Step 13. Amp Hybridization A. Swirl Amplifier Mix QT bottle briefly to mix the solution. B. Remove each slide and flick it to remove the Wash Buffer. Tap the slide on its edge then wipe the backside on a laboratory wipe. Place slides flat face up on the lab bench and immediately add 400 μL of Amplifier Mix QT directly to each tissue section. 20 min C. Step 14. Wash Slides 10 min Place slides in the ThermoBrite. Close the lid and incubate at 40 °C for 15 min. A. Insert an empty slide rack into a clear staining dish containing 200 mL of Wash Buffer. B. After incubation, decant the Amplifier Mix QT from the slides and insert them into the slide rack. C. Incubate the slides in Wash Buffer at RT for 2 min with frequent agitation. D. Decant the Wash Buffer, refill with 200 mL fresh Wash Buffer and incubate the slides at RT for 2 min with frequent agitation. Repeat this step one more time for a total of 3 washes. 16 QuantiGene® ViewRNA ISH Tissue Assay User Manual Step Step 15. Label Probe 6-AP Hybridization Action A. Briefly vortex and spin down Label Probe 6-AP before using. B. Using the table below as a guide, prepare Working Label Probe 6-AP Solution by diluting 1:1000 in prewarmed Label Probe Diluent QF and briefly vortexing to mix. Scale reagents according to the number of assays to be run. Include one slide volume overage. 20 min Working Label Probe 6-AP Solution Per Slide Reagent Label Probe Diluent QF (prewarmed to 40 °C) Volume 399.6 μL Label Probe 6-AP 0.4 μL Total volume 400 μL C. Remove each slide and flick it to remove the Wash Buffer. Tap the slide on its edge then wipe the backside on a laboratory wipe. Place slides flat face up on the lab bench and immediately add 400 μL of Working Label Probe 6-AP solution directly to each tissue section. D. Place the slides in the ThermoBrite. Close the lid and incubate at 40 °C for 15 min. Step 16. Wash Slides A. Insert an empty slide rack into a clear staining dish containing 200 mL of Wash Buffer. B. After incubation, decant the Working Label Probe 6-AP Solution from the slides and insert 15 min them into the slide rack. C. Incubate the slides in Wash Buffer at RT for 3 min with frequent agitation. D. Decant the Wash Buffer, refill with 200 mL fresh Wash Buffer and incubate the slides at RT for 3 min with frequent agitation. Repeat this step one more time for a total of 3 washes. Step 17. Apply Fast Blue Substrate A. Prepare the Fast Blue Substrate: in a 15 mL conical tube, add 5 mL of Blue Buffer. Add 40 min B. Remove each slide and flick it to remove the Wash Buffer. Tap the slide on its edge then wipe the backside on a laboratory wipe. Place slides flat face up on an aluminum slide rack. C. Immediately add 400 μL Fast Blue Substrate and incubate in the dark at RT for 30 min. 105 μL of Blue Reagent 1, vortex, add 105 μL of Blue Reagent 2, vortex, and add 105 μL Blue Reagent 3, then briefly vortex. Store solution away from direct light until use. NOTE: Fast Blue Substrate precipitate inactivates Label Probe 6-AP. Step 18. Wash Slides 5 min A. Insert an empty slide rack into a clear staining dish containing 200 mL of Wash Buffer. B. After incubation, decant the Fast Blue Substrate from the slides and insert them into the slide rack. C. Incubate the slides in Wash Buffer at RT for 2 min with frequent agitation. D. Decant the Wash Buffer, refill with 200 mL fresh Wash Buffer and incubate the slides at RT for 2 min with frequent agitation. Chapter 3 | QuantiGene ViewRNA ISH Tissue Assay Procedure 17 Step Step 19. Label Probe 1-AP Hybridization Action A. Briefly vortex and spin down Label Probe 1-AP before using. B. Using the table below as a guide, prepare Working Label Probe 1-AP Solution by diluting 1:1000 in prewarmed Label Probe Diluent QF and briefly vortexing to mix. Scale reagents according to the number of assays to be run. Include one slide volume overage. 20 min Working Label Probe 1-AP Solution Per Slide Reagent Label Probe Diluent QF (prewarmed to 40 °C) Volume 399.6 μL Label Probe 1-AP 0.4 μL Total volume 400 μL C. Remove each slide and flick it to remove the Wash Buffer. Tap the slide on its edge then wipe the backside on a laboratory wipe. Place slides flat face up on the lab bench and immediately add 400 μL of Working Label Probe 1-AP solution directly to each tissue section. D. Place the slides in the ThermoBrite. Close the lid and incubate at 40 °C for 15 min. Step 20. Wash Slides A. Insert an empty slide rack into a clear staining dish containing 200 mL of Wash Buffer. B. After incubation, decant the Working Label Probe 1-AP Solution from the slides and insert 15 min them into the slide rack. C. Incubate the slides in Wash Buffer at RT for 3 min with frequent agitation. D. Decant the Wash Buffer, refill with 200 mL fresh Wash Buffer and incubate the slides at RT for 3 min with frequent agitation. Repeat this step one more time for a total of 3 washes. Step 21. Apply Fast Red Substrate A. Remove each slide and flick it to remove the Wash Buffer. Tap the slide on its edge then wipe the backside on a laboratory wipe. Place slides flat face up on the lab bench. B. Immediately add 400 μL of the AP-Enhancer Solution to each tissue section (pipet directly from bottle) and incubate at RT for 5 min while preparing the Fast Red Substrate. C. Prepare the Fast Red Substrate: in a 15 ml conical tube, add 5 ml of Naphthol Buffer and one Fast Red Tablet. Vortex at high speed to completely dissolve the tablet. 1 hr D. Decant the AP Enhancer Solution by flicking. Tap the slide on its edge then wipe the backside on a laboratory wipe. Immediately add 400 μL of Fast Red Substrate onto each tissue section. E. Place the slides in the ThermoBrite. Close the lid and incubate at 40 °C for 30 min. F. Insert an empty slide rack into a clear staining dish containing 200 mL of 1X PBS. G. After incubation, decant the Fast Red Substrate from the slides and insert them into the slide rack. H. Move the slide rack up and down several times for 1 min to rinse off the Fast Red Substrate. I. Retrieve 200 mL of 4% formaldehyde (used previously) and pour in the clear staining dish labeled for formaldehyde. J. Move the slide rack to the clear staining dish containing 200 mL of 4% formaldehyde and incubate for 5 min under a fume hood. K. Rinse off the residual formaldehyde by transferring the slide rack to a clear staining dish containing fresh 1X PBS. Move the slide rack up and down several times for 1 min. 18 QuantiGene® ViewRNA ISH Tissue Assay User Manual Step Step 22. Counterstain Action A. Transfer the slide rack to the clear staining dish containing the 200 mL of Gill’s Hematoxylin. Incubate slides for 1 min at RT. 50 min B. After incubation, transfer the slide rack to a clear staining dish containing ddH 2O. Move the slide rack up and down several times to rinse off the Gill’s Hematoxylin. C. Decant the ddH2O, refill with 200 mL fresh ddH2O and move slide rack up and down several times. Repeat this step one more time. D. Decant the ddH2O, refill with 200 mL 0.01% ammonium hydroxide and incubate for 10 sec. E. Decant 0.01% ammonium hydroxide, refill with fresh ddH2O and move slide rack up and down several times. Unused 0.01% ammonium hydroxide solution can be stored at RT for up to one month. F. Optional. If you plan to view slides using the fluorescent microscope, then move slide rack into a clear staining dish containing 200 mL DAPI staining solution. Incubate the slides for 1 min. Decant DAPI staining solution, refill with 200 mL fresh ddH2O and move the slide rack up and down several times to rinse off DAPI solution. G. Remove the slides from the slide rack and decant the ddH2O by flicking. Tap the slide on its edge then wipe the backside on a laboratory wipe. Place them face up onto a paper towel to air dry. H. Ensure that slide sections are completely dry before mounting (about 20 min). Step 23. Add Coverslip and Image 20 min If using DAKO Ultramount mounting medium: A. Dab the first 2-3 drops of mounting medium onto a paper towel to remove bubbles. B. Add a minimum of 2 drops of DAKO Ultramount mounting medium to tissue section without making any bubbles. Use a pipette tip to draw out any air bubbles in the droplets. C. Slowly place the cover glass onto the specimen slide at an angle. Make sure the cover glass comes into contact with the mounting medium first before completely releasing the cover glass to overlap with the glass slide. D. After mounting, place the slide on its edge on a laboratory wipe to remove excess mounting medium. Image the results under a brightfield and/or fluorescence microscope. E. Store the mounted slides at 4 °C to avoid bubble formation over time. If using Innovex Advantage mounting medium: A. Place a 24 mm x 55 mm cover glass horizontally onto a clean, flat surface. B. Dab the first 2-3 drops of mounting media onto a paper towel to remove bubbles. C. Add 2 drops of the Innovex Advantage medium directly onto the middle of the cover glass. Use a pipette tip to draw out any air bubbles in the droplets. D. Invert the specimen slide and slowly place it onto the mounting medium at an angle. Make sure the tissue comes into contact with the mounting medium first before completely letting go of the glass slide to overlap with the cover glass. E. After mounting, flip the slide over and place it on its edge on a laboratory wipe to remove excess mounting medium. Allow slides to dry at RT for 15 min. Do not bake slides to speed up the drying process. F. To prevent bubble formation, seal all 4 edges of the cover glass with nail polish. G. Image the results under a brightfield and/or fluorescence microscope. H. Store slides at RT. 4 Troubleshooting Contacting Technical Support For technical support, contact the appropriate resource provided below based on your geographical location. For an updated list of FAQs and product support literature, visit our website at www.affymetrix.com/panomics. Table 4.7 Technical Support Contacts Location Contact Information North America 1.877.726.6642 option 1, then option 3; [email protected] Europe +44 1628-552550; [email protected] Asia +81 3 6430 430; [email protected] Weak or No Signals Table 4.1 Troubleshooting Weak or No Signal Probable Cause Recommended Action Incorrect protease digestion conditions Repeat assay optimization procedure to determine optimal protease digestion time. Improper fixation, reagents, or concentrations Make sure correct concentration of NBF was used to fix the slides in respective steps. Tissue dries up during hybridization steps ThermoBrite recommendations: Prewet the ThermoBrite Humidity strips inside the ThermoBrite before starting hybridization Make sure the ThermoBrite is placed on a level bench. Calibrate the ThermoBrite to 40°C using QuantiGene View Temperature Validation Kit (Affymetrix P/N QV0523). Close the ThermoBrite lid during hybridization steps. Prevent sections from drying out by: Preparing enough reagents and use the recommended volumes for each step of the assay. Ensuring that you have a solid seal when drawing your hydrophobic barriers. Adding all working reagents onto the slides before moving them to the 40°C ThermoBrite. Tissue dries up during processing Keep tissue section moist starting from the protease digestion step by: Adding respective reagents immediately after decanting solution from the slides. Limiting tissue exposure to air for too long before adding hybridization reagents. Adding all working reagents onto the slides before moving them to the 40°C ThermoBrite. Tissue over-fixed after protease digestion Make sure the tissue sections are not fixed for more than 5 min in 4% formaldehyde after protease digestion. Reagents applied in wrong sequence Apply target Probe Set (s), PreAmplifier Mix QT, Amplifier Mix QT, Label Probe-AP, and substrates in the correct order. Incorrect storage condition Store the components at the storage condition as written on the component label or kit boxes. 20 QuantiGene® ViewRNA ISH Tissue Assay User Manual Table 4.1 Troubleshooting Weak or No Signal Probable Cause Recommended Action Hybridization temperature not optimal Calibrate the ThermoBrite at 40°C using a QuantiGene View Temperature Validation Kit (Affymetrix P/N QV0523). Probe Set hybridization temperature, time, and/or concentration not optimal Decrease hybridization temperature from 40 to 38 °C and increase Probe Set concentration by diluting target Probe Set 1:30 instead of 1:40 and hybridize for 2 hr. Label Probe-AP concentration too low Mounting solution contained alcohol Use DAKO Ultramount or Innovex Advantage mounting media to mount your tissue. Avoid any mounting solution containing alcohol. Fast Red and Fast Blue Substrate solutions not freshly prepared Prepare Fast Red and Fast Blue Substrate solutions immediately before use. Gene of interest is not expressing Verify expression using other tissue lysate methods such as QuantiGene, QuantiGene Plex assay or Affymetrix array. Run the same Probe Set on known samples that have been validated to express the gene of interest. RNA in tissue is degraded Verify tissue fixation: Ensure tissue was freshly harvested and immediately fixed in 10% NBF or 4% PFA for 16-24 hrs. Ensure FFPE blocks and sections were stored correctly. In the Fast Blue detection channel, use a positive control Probe Set such as a pan housekeeping panel, which might include TYPE 6 Probe Sets for ACTB, GAPD and UBC, to assess RNA integrity. In that same assay, the Fast Red channel would be used to detect target of interest using a TYPE 1 Probe Set. Verify that the correct concentrations were used. Increase the recommended concentrations for Label Probe-AP. If this is necessary, it may result in higher backgrounds. Dark hematoxylin stain reduces visibility for the Blue dots Reduce hematoxylin staining time to 5 sec. Tissues with lower cell density require longer hematoxylin incubation than tissues that have higher cell density. It may be helpful to titrate incubation times. Increase brightness of lamp during viewing. View under 40X objective. Image under fluorescent mode. Chapter 4 | Troubleshooting 21 Diffused Signals Table 4.2 Troubleshooting diffused signals Probable Cause Recommended Action Tissue dries up during processing Keep tissue section moist starting from the protease digestion step by: Adding respective reagents immediately after decanting solution from slides. Limiting tissue exposure to air for too long before adding hybridization reagents. Adding all working reagents onto the slides before moving them to the 40 °C ThermoBrite. Insufficient washing in 1X PBS Make sure tissues are washed in 1X PBS twice after protease digestion and twice again after subsequent fixing in 4% formaldehyde. Fast Red substrate not freshly prepared Prepare Fast Red substrate immediately before use. Slides are not dried before mounting Ensure that slide sections are completely dry before mounting (about 20 min). Mounting solution contained alcohol Use DAKO Ultramount or Innovex Advantage mounting media to mount your tissue. Avoid any mounting solution containing alcohol. Poor Cell Morphology Table 4.3 Troubleshooting poor cell morphology Probable Cause Recommended Action Incorrect protease digestion conditions See Experimental Design Layout for Optimization on page 25. Section thickness not optimal Make sure tissues are sectioned at 12 ± 1 μm thick. Tissue Detachment from Slide Table 4.4 Troubleshooting tissue detachment from slides Probable Cause Recommended Action Insufficient baking and fixing of slides Verify that 16-18 hours of chilled 4% formaldehyde fixing was done. Verify that 30 min baking step was done. It may be necessary to increase baking time to 1 hr. Incorrect protease digestion conditions See Experimental Design Layout for Optimization on page 25. Improper fixation, reagents, or concentrations Make sure the correct concentration of NBF was used to fix the slides in the respective steps. Protease treatment is too long or at too high concentration Reduce protease concentration and/or incubation time. 22 QuantiGene® ViewRNA ISH Tissue Assay User Manual High Non-Specific Binding on Glass Slide Table 4.5 Troubleshooting non-specific binding to slide Probable Cause Recommended Action Incompatible glass slide Use the glass slides from the following recommended vendors: Leica Surgipath X-tra P/N 3800200 Tru Scientific TruBond360 P/N 0360W Mercedes StarFrost Platinum P/N MER 7200 Prevalidate each new batch of slides by running the entire assay, including Probe Set(s), on empty slides (without fixed tissues) to determine if the slides are suitable for the assay. Decrease Probe Set concentration by diluting target Probe Set 1:50 instead of 1:40 and hybridize for 3 hr at 40 °C. Insufficient washing Move the slide rack up and down with frequent agitation. Increase wash incubation time by 1 min per wash. Hydrophobic Barrier Falls Off Table 4.6 Troubleshooting hydrophobic barrier problems Probable Cause Recommended Action Incompatible glass slide Use the glass slides from the following recommended vendors: Leica Surgipath X-tra P/N 3800200 Tru Scientific TruBond360 P/N 0360W Mercedes StartFrost Platinum P/N MER 7200 Prevalidate each new batch of slides by running the entire assay, including Probe Set, on empty slides (without fixed tissues) to determine if the slides are suitable for the assay. Incorrect hydrophobic pen Use Hydrophobic Barrier Pen (Affymetrix QVC0500 or Vector Laboratories H4000). Hydrophobic barrier was not dried completely Allow 20-30 min for hydrophobic barrier to dry completely before proceeding to the next step. Chapter 4 | Troubleshooting 23 High Background Table 4.7 Troubleshooting high background Probable Cause Recommended Action Tissue dries up during hybridization steps Keep tissue section moist starting from the protease treatment step by: Adding respective reagents immediately after decanting solution from the slides. Limiting tissue exposure to air for too long before adding hybridization reagents. Adding all working reagents onto the slides before moving them to the 40°C ThermoBrite. Incorrect protease digestion conditions See Experimental Design Layout for Optimization on page 25. Insufficient washing Move the slide rack up and down with frequent agitation. Increase wash incubation time by 1 min per wash. Concentration of hybridization reagents was too high Double check the dilution calculation for all working solutions. Hybridization temperature not optimal Calibrate the ThermoBrite at 40 °C using the QuantiGene View Temperature Validation Kit (Affymetrix P/N QV0523). Label Probe-AP concentration too high Verify that the correct concentrations were used. Decrease the recommended concentration for Label Probe-AP. 24 QuantiGene® ViewRNA ISH Tissue Assay User Manual A Assay Optimization Procedures About the Optimization and Typical Results The QuantiGene ViewRNA ISH Tissue Assay procedure is broken up into 2 parts that are performed over 2 days: Part 1: Sample Preparation and Target Probe Set Hybridization (day 1) Part 2: Signal Amplification and Detection (day 2) We do not recommend stopping the procedure at any other point in the assay. The condition to be optimized, protease digestion time, is included in Part 1: Sample Preparation. An example of typical results for both brightfield and fluorescence detection, can be found in the QuantiGene ViewRNA ISH Tissue Assay Supplemental Reference Guide. Optimization Procedure Overview You will need to prepare five, 12 ± 1 µm thick OCT-embedded frozen tissue sections from a block, or blocks which were prepared in the same way (section thickness and tissue type) as the OCT-embedded frozen tissue of your interest. Each slide will be treated with a different protease incubation time as described in Table A.1. With the exception of Slide 4, hybridize every slide with medium expression housekeeping genes, for example, ACTB and GAPD. These control targets should have consistent homogenous expression in your samples. Once an optimal assay condition is determined for your sample type, apply those conditions to your targets of interest. Experimental Design Layout for Optimization Table A.1 Optimization Experiment Setup Protease Incubation Time (min) Sample 0 Slide 1 with probe 10 Slide 2 with Probe 20 Slide 3 with probe, Slide 4 without probe 40 Slide 5 with probe 26 QuantiGene® ViewRNA ISH Tissue Assay User Manual Important Procedural Notes and Guidelines Procedure assumes running a maximum of 12 slides at a time. Do not mix and match kit components from different kit lots. Throughout the procedure, dedicate one clear staining dish for fixing in formaldehyde (we recommend labeling this dish). The other two clear staining dishes can be used interchangeably for: 1X PBS, Wash Buffer and Storage Buffer. Rinse staining dishes in between steps with ddH2O. Typical processing times included in the assay procedure assume that preparation for the following step is being done during the incubation periods. Essential Keys for a Successful Assay Prepare samples following the Tissue Preparation Guidelines on page 9. Organize the preparation of the assay before you start: Verify that all materials and equipment are available Be mindful of the incubation times/temperatures, there are small tolerances Double-check all reagent calculations, concentration of reagents is critical Employ good washing techniques. Frequently, this washing is performed too gently. Adequate washing is important for consistent low backgrounds. Verify and validate temperatures for all equipment DO NOT let tissues dry out where indicated in the procedure Incorporate controls, both positive and negative, so that ambiguous results can be interpreted. See Experimental Design Guidelines on page 9. Sample Preparation and Target Probe Hybridization Procedure Step Step 1. Tissue Pretreatment 16-18 hr Action A. Prepare 3 L of 1X PBS: To a 3 L container add 300 mL of 10X PBS and 2.7 L ddH2O. B. Prepare chilled 4%formaldehyde in 1X PBS in a fume hood: To a 200 mL capacity container add 178 mL 1X PBS and 22 mL of 37% formaldehyde and mix well. Refrigerate at 4 °C for 1 hr. C. Insert slides into an empty slide rack and submerge into a clear staining dish containing chilled 4% formaldehyde. Incubate 16-18 hour at 4C. D. Remove the slide rack from the chilled 4% formaldehyde and submerge it into a clear staining dish containing 200 mL of 1X PBS. Incubate for 1 min with frequent agitation. E. Decant the 1X PBS, refill with 200 mL of fresh 1X PBS and incubate for 1 min with frequent agitation. F. Pour 4% formaldehyde back into the 200 ml container and save for later use. Appendix A | Assay Optimization Procedures Step 27 Action Step 2. Tissue Dehydration A. Ensure availability of: 200 mL 100% ethanol 65 min B. C. 200 mL 70% ethanol. To a 200 mL capacity container add 140 mL of 100% ethanol to 60 mL of ddH2O 200 mL of 50% ethanol. To a 200 mL capacity container add 100 mL of 100% ethanol to 100 mL of ddH2O Pour 200 mL of 50% ethanol into a clean clear staining dish. Remove the slide rack from the 1X PBS and submerge it into the 50% ethanol. Move slide rack up and down 3 times. Cover with lid and incubate for 10 min at RT without agitation. D. Pour 200 mL of 70% ethanol into a clean clear staining dish. E. Remove the slide rack from the 50% ethanol and submerge it into the 70% ethanol. Move slide rack up and down 3 times. Cover with lid and incubate for 10 min at RT without agitation. F. Pour 200 mL of 100% ethanol into a clean clear staining dish. G. Remove the slide rack from the 70% ethanol and submerge it into the 100% ethanol. Move slide rack up and down 3 times. Cover with lid and incubate for 10 min at RT without agitation. H. Remove the slides from the slide rack and place them face up on a paper towel to air dry for 5 min at RT. Discard all ethanol solutions. I. J. Step 3. Draw Hydrophobic Barrier Set ThermoBrite to 60 ± 1°C and bake the slides for 30 min with the lid open. A. Dab the hydrophobic pen on a paper towel several times before use to ensure proper flow of the hydrophobic solution. B. 1 hr Step 4. Prepare Buffers and Reagents Use a pencil to label the slides. To create a hydrophobic barrier, place the slide over the template image below, tissue sections should fall inside blue rectangle, and lightly trace the thick blue rectangle 2 to 4 times with the Hydrophobic Barrier Pen to ensure a solid seal. Allow for barrier to dry at RT for 20-30 min. A. Prepare 4 L of Wash Buffer: To a 4 L capacity container add components in the following order and mix well: 1 hr B. 3 L ddH2O 36 mL Wash Comp 1 10 mL Wash Comp 2 ddH2O to 4 L. Prepare 200 mL of Storage Buffer: To a 200 mL container add 60 mL of Wash Comp 2 to 140 mL ddH2O and mix well. C. Prewarm 40 mL of 1X PBS and Probe Set Diluent QT to 40 ± 1 °C. D. Thaw Probe Set(s). Place on ice until use. 28 QuantiGene® ViewRNA ISH Tissue Assay User Manual Step Action Step 5. Protease Digestion and Fixation IMPORTANT: From this point forward, do not let tissue sections dry out. 50 min A. Set the ThermoBrite to 40 ± 1 °C and insert two wet ThermoBrite Humidity strips. B. Using the table below as a guide, prepare the Working Protease Solution by diluting the Protease QF 1:100 in prewarmed 1X PBS. Scale reagents according to the number of assays to be run. Include one slide volume overage. Working Protease Solution per Slide Reagent Volume Protease QF 4 μL 1X PBS (prewarmed to 40 °C) 396 μL Total volume 400 μL C. Leave slide 1 on the lab bench as it is excluded from this step. D. Place slide 5 face up on a clean, flat surface and add 400 μL of the Working Protease Solution onto the tissue section. E. Carefully move the slide onto the ThermoBrite, close the lid and incubate for 20 min at 40 °C. F. After 19 min, place slides 3 and 4 face up on a clean, flat surface and add 400 μL of the Working Protease Solution onto the tissue section. G. Carefully move the slides onto the ThermoBrite, close the lid and incubate for 10 min. H. Wait 9 min, then place slide 2 face up on a clean, flat surface and add 400 μL of Working Protease Solution onto the tissue section. I. J. K. Carefully move the slide onto the ThermoBrite, close the lid and incubate for 10 min. Pour 200 mL of 1X PBS into a clear staining dish and insert an empty rack into it. At the end of 10 min (40 min total incubation time), decant the Working Protease Solution from the slides, insert them into the slide rack and rinse by moving up and down for 1 min. L. Retrieve slide 1 and add to slide rack in PBS. There should be 5 slides in the slide rack. M. Decant the 1X PBS, refill with 200 mL of fresh 1X PBS and rinse by moving slide rack up and down for 1 min. N. Transfer the slide rack into the clear staining dish containing 4% formaldehyde and incubate under a fume hood for 5 min at RT. O. Decant the clear staining dish containing 1X PBS and refill with 200 mL of fresh 1X PBS. P. Transfer the slide rack from the 4% formaldehyde solution to the clear staining dish containing 1X PBS, and incubate for 1 min with frequent agitation. Q. Decant the 1X PBS, refill with 200 mL of fresh 1X PBS and rinse by moving slide rack up and down for 1 min. R. S. Transfer the 4% formaldehyde solution to a 200 mL capacity container, keep for later use. Proceed to Step 6. Target Probe Set Hybridization on page 14 to continue the assay procedure. B Templates for Drawing the Hydrophobic Barrier NOTE: To ensure templates print to the correct size, make sure that you select none under the page scaling option in the print dialog box. Figure B.1 Tissue Slide Templates 30 QuantiGene® ViewRNA ISH Tissue Assay User Manual